Tripp Lite N252-024-HU-SHK Guide d'installation
- Taper
- Guide d'installation

1
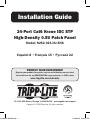
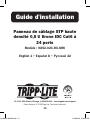
Installation Guide
24-Port Cat6 Krone IDC STP
High-Density 0.5U Patch Panel
Model: N252-024-HU-SHK
1111 W. 35th Street, Chicago, IL 60609 USA • www.tripplite.com/support
Copyright © 2018 Tripp Lite. All rights reserved.
PROTECT YOUR INVESTMENT!
Register your product for quicker service and ultimate peace of mind.
You could also win an ISOBAR6ULTRA surge protector—a $100 value!
www.tripplite.com/warranty
Español 8 • Français 15 • Русский 22
18-10-099-9338C8.indb 1 11/28/2018 6:32:37 PM

2
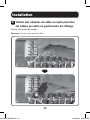
Installation
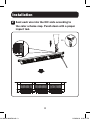
1
Prepare Cables.
S/FTP Cable
F/FTP Cable
50 mm
50 mm
Remove approximately
50 mm of cable sheath.
Roll the exposed braid back
along the cable sheath.
Remove approximately
50 mm of cable sheath.
Roll the exposed foil back
along the cable sheath.
Where a foil screen is present,
remove approximately 2 mm of
the exposed length.
Where a foil screen is present,
remove approximately 2 mm of
the exposed length.
Separate the
conductors.
Wrap the drain wire at least
twice around the foil. Separate
the conductors.
50 mm
50 mm
2 mm
2 mm
Drain
Wire
18-10-099-9338C8.indb 2 11/28/2018 6:32:38 PM

3
Installation
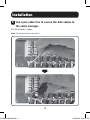
2
Seat each wire into the IDC slots according to
the color scheme map. Punch down with a proper
impact tool.
OR
18-10-099-9338C8.indb 3 11/28/2018 6:32:41 PM

4
Installation
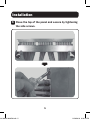
3
Use nylon cable ties to secure the bulk cables to
the cable manager.
Cut off all excess straps.
Note: Do not over-tighten the cables.
18-10-099-9338C8.indb 4 11/28/2018 6:32:42 PM

5
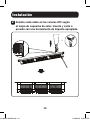
Installation
4
Close the top of the panel and secure by tightening
the side screws.
18-10-099-9338C8.indb 5 11/28/2018 6:32:43 PM

6
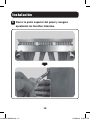
Installation
5
Attach the panel’s grounding lug to a rack or
cabinet.
18-10-099-9338C8.indb 6 11/28/2018 6:32:44 PM

7
Warranty and Product Registration
Lifetime Limited Warranty
Tripp Lite warrants its products to be free from defects in materials and workmanship for
life. Tripp Lite’s obligation under this warranty is limited to repairing or replacing (at its sole
option) any such defective products. To obtain service under this warranty, you must obtain
a Returned Material Authorization (RMA) number from Tripp Lite or an authorized Tripp Lite
service center. Products must be returned to Tripp Lite or an authorized Tripp Lite service
center with transportation charges prepaid and must be accompanied by a brief description
of the problem encountered and proof of date and place of purchase. This warranty does not
apply to equipment, which has been damaged by accident, negligence or misapplication or
has been altered or modified in any way.
EXCEPT AS PROVIDED HEREIN, Tripp Lite MAKES NO WARRANTIES, EXPRESS OR IMPLIED,
INCLUDING WARRANTIES OF MERCHANTABILITY AND FITNESS FOR A PARTICULAR PURPOSE.
Some states do not permit limitation or exclusion of implied warranties; therefore, the
aforesaid limitation(s) or exclusion(s) may not apply to the purchaser.
EXCEPT AS PROVIDED ABOVE, IN NO EVENT WILL Tripp Lite BE LIABLE FOR DIRECT, INDIRECT,
SPECIAL, INCIDENTAL OR CONSEQUENTIAL DAMAGES ARISING OUT OF THE USE OF THIS
PRODUCT, EVEN IF ADVISED OF THE POSSIBILITY OF SUCH DAMAGE. Specifically, Tripp Lite
is not liable for any costs, such as lost profits or revenue, loss of equipment, loss of use of
equipment, loss of software, loss of data, costs of substitutes, claims by third parties, or
otherwise.
Product Registration
Visit www.tripplite.com/warranty today to register your new Tripp Lite product. You’ll be
automatically entered into a drawing for a chance to win a FREE Tripp Lite product!*
* No purchase necessary. Void where prohibited. Some restrictions apply. See website for details.
Tripp Lite has a policy of continuous improvement. Specifications are subject to change
without notice.
1111 W. 35th Street, Chicago, IL 60609 USA • www.tripplite.com/support
18-10-099-9338C8.indb 7 11/28/2018 6:32:44 PM

8
Guía de Instalación
Panel de Conexiones de 0.5U de
24 Puertos Cat6 de Alta
Densidad Krone IDC STP
Modelo: N252-024-HU-SHK
1111 W. 35th Street, Chicago, IL 60609 EE UU • www.tripplite.com/support
Copyright © 2018 Tripp Lite. Todos los derechos reservados.
English 1 • Français 15 • Русский 22
18-10-099-9338C8.indb 8 11/28/2018 6:32:45 PM

9
Instalación
1
Prepare los Cables.
Cable S/FTP
Cable F/FTP
50 mm
50 mm
Retire aproximadamente
50 mm del revestimiento del cable.
Enrolle el trenzado expuesto
hacia atrás a lo largo del
revestimiento del cable.
Retire aproximadamente
50 mm del revestimiento del cable.
Enrolle el laminado
expuesto hacia atrás a lo largo
del revestimiento de cable.
Cuando haya una hoja laminada,
retire aproximadamente 2 mm de
la longitud expuesta.
Cuando haya una hoja laminada,
retire aproximadamente 2 mm de
la longitud expuesta.
Separe los
conductores.
Enrolle el hilo de descarga al
menos dos veces todo alrededor
de la hoja laminada. Separe los
conductores.
50 mm
50 mm
2 mm
2 mm
Hilo de
Descarga
18-10-099-9338C8.indb 9 11/28/2018 6:32:46 PM

10
Instalación
2
Asiente cada cable en las ranuras IDC según
el mapa de esquema de color. Inserte y corte a
presión con una herramienta de impacto apropiada.
O
18-10-099-9338C8.indb 10 11/28/2018 6:32:49 PM

11
Instalación
3
Utilice amarres de nylon para cable para asegurar
los mazos de cables al administrador de cables.
Corte todos los sobrantes de los amarres.
Nota: No apriete excesivamente los cables.
18-10-099-9338C8.indb 11 11/28/2018 6:32:50 PM

12
Instalación
4
Cierre la parte superior del panel y asegure
apretando los tornillos laterales.
18-10-099-9338C8.indb 12 11/28/2018 6:32:51 PM

13
Instalación
5
Conecte la terminal de tierra del panel a un rack o
gabinete.
18-10-099-9338C8.indb 13 11/28/2018 6:32:52 PM

14
Garantía
Garantía Limitada de por Vida
Tripp Lite garantiza de por vida que sus productos no tienen defectos de materiales ni de
mano de obra. La obligación de Tripp Lite bajo esta garantía está limitada a la reparación o
reemplazo (A su entera discreción) de cualquier producto defectuoso. Para obtener servicio
bajo esta garantía, debe obtener un número de Autorización de Devolución de Mercancía
(RMA) de Tripp Lite o de un centro de servicio autorizado de Tripp Lite. Los productos deben
ser regresados a Tripp Lite o a un centro de servicio autorizado de Tripp Lite con los cargos
de transporte prepagados y deben acompañarse con una breve descripción del problema
y un comprobante de la fecha y el lugar de compra. Esta garantía no se aplica a equipos
que hayan sido dañados por accidente, negligencia o mal uso, o hayan sido alterados o
modificados de alguna manera.
EXCEPTO COMO SE INDICA EN EL PRESENTE, TRIPP LITE NO HACE GARANTÍAS EXPRESAS
O IMPLÍCITAS, INCLUIDAS GARANTÍAS DE COMERCIABILIDAD Y ADECUACIÓN PARA UN
PROPÓSITO PARTICULAR. Algunos estados no permiten la limitación o exclusión de garantías
implícitas; por lo tanto, las limitaciones o exclusiones antes mencionadas pueden no
aplicarse al comprador.
EXCEPTO COMO SE INDICA ANTERIORMENTE, EN NINGÚN CASO TRIPP LITE SERÁ
RESPONSABLE POR DAÑOS DIRECTOS, INDIRECTOS, ESPECIALES, INCIDENTALES O
CONSECUENTES QUE SURJAN DEL USO DE ESTE PRODUCTO, INCLUSO SI SE ADVIERTE
SOBRE LA POSIBILIDAD DE TAL DAÑO. Específicamente, Tripp Lite no es responsable por
ningún costo, como pérdida de ganancias o ingresos, pérdida de equipos, pérdida del uso de
equipos, pérdida de software, pérdida de datos, costos de sustituciones, reclamaciones de
terceros o de cualquier otra forma.
1111 W. 35th Street, Chicago, IL 60609 EE UU • www.tripplite.com/support
18-10-099-9338C8.indb 14 11/28/2018 6:32:52 PM

15
Guide d'installation
Panneau de câblage STP haute
densité 0,5 U Krone IDC Cat6 à
24 ports
Modèle : N252-024-HU-SHK
1111 W. 35th Street, Chicago, IL 60609 USA • www.tripplite.com/support
Droits d'auteur © 2018 Tripp Lite. Tous droits réservés.
English 1 • Español 8 • Русский 22
18-10-099-9338C8.indb 15 11/28/2018 6:32:52 PM

16
Installation
1
Préparer les câbles.
Câble S/FTP
Câble F/FTP
50 mm
50 mm
Retirer environ
50 mm de la gaine de câble.
Rouler la tresse exposée le
long de la gaine de câble.
Retirer environ
50 mm de la gaine de câble.
Rouler la feuille exposée le
long de la gaine de câble.
Là où une toile métallique est
présente, retirer environ 2 mm de
la longueur exposée.
Là où une toile métallique est
présente, retirer environ 2 mm de
la longueur exposée.
Séparer les
conducteurs.
Enrouler le fil de masse au
moins deux fois autour de la
feuille. Séparer les conducteurs.
50 mm
50 mm
2 mm
2 mm
Fil de
masse
18-10-099-9338C8.indb 16 11/28/2018 6:32:52 PM

17
Installation
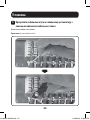
2
Placer chaque fil dans les fentes IDC en respectant
le schéma de câblage de couleurs. Perforer avec un
outil d'impact approprié.
OU
18-10-099-9338C8.indb 17 11/28/2018 6:32:56 PM

18
Installation
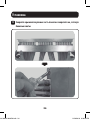
3
Utiliser des attaches de câble en nylon pour fixer
les câbles au mètre au gestionnaire du câblage.
Couper tout excès de sangles.
Remarque : Ne pas trop serrer les câbles.
18-10-099-9338C8.indb 18 11/28/2018 6:32:56 PM

19
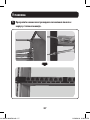
Installation
4
Fermer le dessus du panneau, puis le retenir en
place en serrant les vis latérales.
18-10-099-9338C8.indb 19 11/28/2018 6:32:56 PM

20
Installation
5
Fixer la patte de mise à la masse du panneau au
bâti ou à l'armoire.
18-10-099-9338C8.indb 20 11/28/2018 6:32:56 PM
La page est en cours de chargement...
La page est en cours de chargement...
La page est en cours de chargement...
La page est en cours de chargement...
La page est en cours de chargement...
La page est en cours de chargement...
La page est en cours de chargement...
La page est en cours de chargement...
-
 1
1
-
 2
2
-
 3
3
-
 4
4
-
 5
5
-
 6
6
-
 7
7
-
 8
8
-
 9
9
-
 10
10
-
 11
11
-
 12
12
-
 13
13
-
 14
14
-
 15
15
-
 16
16
-
 17
17
-
 18
18
-
 19
19
-
 20
20
-
 21
21
-
 22
22
-
 23
23
-
 24
24
-
 25
25
-
 26
26
-
 27
27
-
 28
28


Tripp Lite N252-024-HU-SHK Guide d'installation
- Taper
- Guide d'installation
dans d''autres langues
Documents connexes
-
Tripp Lite N252-048-SH-K Guide d'installation
-
-
-
-
-
-
-
-
-
Tripp Lite B110-SP-CAT Guide de démarrage rapide