Yapalong YAPALONG-5000 Full Duplex Radio Manuel utilisateur
- Taper
- Manuel utilisateur

YOU ARE RECEIVING THE FOLLOWING:
7895 Tranmere Dr., Unit 13
Mississauga, Ontario L5S 1V9
Canada
Email : [email protected]
Phone : 1-(905)-405-0300
Follow:
YAPALONG-5000
Please activate your warranty
@ yapalong.com/pages/warranty
User’s Manual
8-User (AM)
4-User (EU)
Full-Duplex Radio
Compatible with Yapalong-4000
V1

SPECIFICATIONS
Radio Frequency
Group Size
Wireless Network
Digital Modulation
No. of channels
Range
Overall Latency
Size
Weight
Power Rating
Power Source
Power Duration
Operating Temp Range
Sensitivity Adjustment
Safety
IP Rating
Unlicensed ISM band
900 MHz (AM)
800 MHz (EU)
8 talkers (AM)
4 talkers (EU)
Unlimited listeners
Auto channel selection no-master
TDMA/peer-to-peer
Encrypted communication
FSK/GFSK
3
Up to 1,100 meters line-of-sight
25 ms
129mm x 66mm x 21mm
138 grams
500 mW
Lithium polymer, 3.7 V, 1700 mAh
Over 8 hours after being fully
charged
-20 °C ~ 50 °C
5-level
Lead free, RoHS compliance
IP67
1102
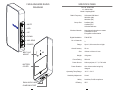
MUTE
LED
UP
DOWN
MIC SENS
POWER
BELT CLIP
MOUNT
BATTERY
COVER
CHARGING PORT
DUAL AUDIO JACK
YAPALONG5000 RADIO
DIAGRAM FCC ID: UJW-5000
IC: 6695A-5000
Model: Yapalong5000

SAFETY WARNING!
INDUSTRY CANADA COMPLIANCE STATEMENT
This device contains licence-exempt transmitter(s)/receiver(s) that comply with
Innovation, Science and Economic Development Canada’s licence-exempt RSS(s).
Operation is subject to the following two conditions:
1. This device may not cause interference.
2. This device must accept any interference, including interference that may cause
undesired operation of the device
L’émetteur/récepteur exempt de licence contenu dans le présent appareil est conforme
aux CNR d’Innovation, Sciences et Développement économique Canada applicables
aux appareils radio exempts de licence. L’exploitation est autorisée aux deux
conditions suivantes :
1. L’appareil ne doit pas produire de brouillage;
2. L’appareil doit accepter tout brouillage radioélectrique subi, même si le brouillage
est susceptible d’en compromettre le fonctionnement.
FCC INFORMATION TO USERS
This equipment has been tested and found to comply with the limits for Class B digital
devices, pursuant to Part 15 of the FCC Rules. These limits are designed to provide
reasonable protection against harmful interference in a residential installation. This
equipment generates, uses, and can radiate radio frequency energy and, if not installed
and used in accordance with the instruction manual, may cause harmful interference to
radio communications.
However, there is no guarantee that interference will not occur in a particular
installation. If this equipment does cause harmful interference to radio or television
reception, which can determined by turning the equipment off and on, the user is
encouraged to try to correct the interference by one or more of the following measures:
-Reorient or relocate the receiving antenna;
-Increase the separation between the equipment and receiver;
-Connect the equipment into an outlet on a circuit different from that to which the
receiver is connected.
Consult the dealer or an experienced radio/TV technician for help.
WARNING: Changes or modifications not expressly approved by Nautic Devices Inc.
could void the user’s authority to operate the equipment.
FOR CLASS B – UNINTENTIONAL RADIATORS
This device complies with Part 15 of the FCC Rules. Operation is subject to the
following two conditions: (1) this device may not cause harmful interference and (2) this
device must accept any interference received, including interference that may cause
undesired operations.
Don’t hold Yapalong too close to your head when in use.
0310
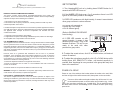
GET STARTED
1. Turn Yapalong5000 unit on by holding down POWER button for 2
seconds until RED LED turns on.
2. If the AMBER LED blinks every 2 or 5 seconds or there is no LED
light at all, the battery needs to be charged.
3. If RED LED remains on with high intensity, it means it cannot detect
other group unit due to various reasons:
Ɣ no group unit powered on;
Ɣ group unit out of range;
Ɣ unit in different group
(Refer to BINDING PROCEDURE
to do binding).
4. If RED LED remains on with
normal intensity, it means it has
detected group unit(s). Plug in the
headset as shown. The unit is now
ready to be used with other
powered-on group units.
5. To adjust the sound volume, click UP or DOWN button, until desired
volume is reached.
6. To adjust the microphone sensitivity, click UP or DOWN button while
holding down MIC SENSITIVITY button, until desired sensitivity is
reached. Now Yapalongs let every member in the group talk freely and
listen at the same time.
POWER UP A GROUP
Power on one of the radios at the location where the radios to be used. Wait
until the red light of the radio becomes solid, then power on the rest radios.
Power on all the radios at the place where they will be used. It is not
recommended to power on all the radios at one location (e.g., locker
room), then use them at another (e.g., football field). This is needed because
the radios auto scan the surroundings for the cleanest channel upon being
powered on.

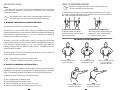
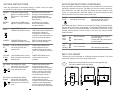
No close body blocking
No RF absorption
No close body blocking
Partial RF absorption
Partial close body blocking
due to low position
Partial RF absorption
Total close body blocking
Partial RF absorption
Total close body blocking
Partial RF absorption
09
HOW TO MAXIMIZE RANGE
CLOSE BODY BLOCKING
1. placing bodies in between
antennas causes communication
signs being blocked
ANTENNA TOUCHING BODY
2. Human body is mainly water so it
absorbs RF wave. Water absorbs
RF (radio frequency) wave.
WEARING POSITION ANALYSES:
BINDING PROCEDURE
Note:
Binding needs to be done under minimum radio interference environment,
which means no cellphone, no computer, no Bluetooth, and no electrical
control panel nearby.
After binding, there is NO need to do binding again next time for
the same group, until new radio(s) being added to the group.
A. BINDING PROCEDURE FOR REGULAR UNITS
1. Power down all units with good batteries installed.
2. Power up 1st unit until RED LED is solid on. Hold down UP and DOWN
buttons simultaneously for 3 seconds until GREEN and AMBER LEDs begin to
flash alternately. Release buttons for 5 or more seconds, both LEDs stop
blinking and all 3 LEDs remain solid on.
3. Power up 2nd unit until RED LED is solid on. Hold down UP and DOWN
buttons simultaneously for 3 seconds until GREEN and AMBER LEDs begin to
flash alternately. Release buttons for 5 or more seconds, both LEDs stop
blinking and only RED and GREEN remain solid on. If AMBER is also on,
restart Binding from Step1.
4. Repeat Step3 for the rest units until the binding for all the units is done. If in
doubt, repeat the entire procedure.
Power off all the units to exit binding mode.
The radios in binding mode cannot communicate.
B. ORDER FOR BINDING LISTENER UNITS
LISTENER units can be added to existing Yapalong group as listen-only units.
Regardless of the previous grouping state, the entire group has to be bound
again. The binding procedure is the same as the one for REGULAR units.
In addition we need to follow the order below to bind:
1. Set 1st REGULAR into Binding mode.
2. Set 2nd REGULAR into Binding mode.
3. Set all LISTENERs into Binding mode one by one.
4. Set the rest REGULARs into Binding mode one by one.
04
When worn, always keep the top of the radio upwards and
the front outwards for the best range.
To obtain maximum range is to eliminate blocking obstacles at line of sight.
The range is greatly reduced when the obstacle is very close to the antenna.
We need to avoid the following scenarios:

1. Get a slotted screwdriver. Insert the tip
of the screwdriver into the slot of the
battery cover. With a little twist, pry the
battery cover open.
2. Pull gently on the battery connector and take the
old battery out.
4. Put the battery cover back.
Make sure the bump on the
battery cover is close to the
bottom of the radio.
3. Get the new battery and
insert the battery connector as
orientation indicated
BATTERY REPLACEMENT
0508
2 MODES FOR EU MODEL
EU Model supports 2 modes: License-Free mode and Licensed mode.
License-Free Mode
Each time the EU radio is turned on, it is automatically in License-Free
mode. When in License-Free mode, the GREEN LED flashes every 2
seconds while the RED LED is solid on.
Licensed Mode
Here is the procedure to enter Licensed mode:
1/ Turn off all the radios in the group.
2/ Turn on any one radio. After the GREEN LED starts to flash, press
and hold the POWER button and the MIC button together for 2
seconds. The GREEN LED will be off.
3/ Do the same for the rest of the radios ONE BY ONE, not at the same
time. Now all the radios in the group are in Licensed Mode.
Frequency Allocation of EU Model
The central frequency of License-Free Mode is
869.525 MHz
The central frequencies of Licensed Mode are (in MHz)
865.651 866.401 867.151 867.901
868.651 869.401 870.151
Temporary license may be required depending on the region of Europe
that the radios are used. When in Licensed mode, the radio itself
chooses a clear frequency by its Auto-Scan function.
We apologize for the inconvenience. We try our best to comply with the
EU regulations.

Note: MIC SENS (microphone sensitivity) sets the threshold of sound volume
that the microphone can pick up. The higher it is, the more sound is picked up.
MIC SENS does not affect the talker but affects the other listeners of the
group. It is good practice to lower the setting in a noisy environment so that
other users will not hear so much environment noise.
KEYPAD INSTRUCTIONS (CONTINUED)
KEYPAD INSTRUCTIONS
Note: Any adjustment to the default settings is volatile. Once you restart
your radio, the radio returns to the default setting.
Hold down POWER button
approx. 2 seconds until RED
LED turns on. Then release
button.
RED LED is on with normal
intensity if the unit detects other
unit(s) of the same group;
otherwise RED LED is on with
high intensity.
POWER
ON
Hold down POWER button
approx. 2 seconds until RED
All LEDs are off in power
down mode except battery
charging indicator.
POWER
OFF
Click MUTE button and
GREEN LED flashes 3 times.
Continuous slow blinking of RED
LED indicates the microphone is
being muted. When the
microphone is muted, other
Yapalong units cannot hear you
but you can hear the others.
MUTE
Click MUTE button and
GREEN LED flashes 3 times.
RED LED slow blinking stops.
Back to normal operation.
UNMUTE
Click UP button to move up
one level at a time until
desired level.
GREEN LED flashes once
unless maximum level is
reached. There are 6 volume
levels. The default level is level
4.
VOLUME
UP
Click DOWN button to move
down one level at a time until
desired level.
GREEN LED flashes once
unless minimum level is
reached.
VOLUME
DOWN
Hold down MIC SENS
button then click UP button
to move up one level at a
time until desired level
GREEN LED flashes twice
unless maximum level is
reached. Increase microphone
sensitivity if you want to speak
softly in a quiet environment.
There are 5 sensitivity levels.
The default level is level 4.
MIC SENS
UP
Hold down MIC SENS
button then click DOWN
button to move down one
level at a time until desired
level.
GREEN LED flashes twice
unless minimum level is
reached. Decrease microphone
sensitivity when background
noise is loud. Speak closer to
the microphone to compensate.
MIC SENS
DOWN
06 07
+
+
Normal intensity
High intensity
Has detected other unit(s) of
the same group.
Cannot detect any other unit of
the same group.
Every 5 seconds
Every 2 seconds
Initial warning of low battery
Final warning of low battery
Press POWER button 1-3
seconds to resume the
FORCE
SYNC
Note: When the radio is moved out of then back into range, its communication
with the group will resume automatically, as indicated by RED LED of normal
intensity. If does not resume immediately, as indicated by RED LED of high
intensity, please perform FORCE SYNC. If still does not resume, please
restart the radio.
RED LED of high intensity is
turned into normal intensity
once the radio is in sync.
BELT CLIP MOUNT
AMBER
LED
Blinking
RED
LED
Solid
The belt clip can be mounted at 3 different positions as shown. The screw
used is M3 machine screw, 4mm long, Philips head.
When worn, always keep the top of the radio upwards and
the front outwards for the best range.
-
 1
1
-
 2
2
-
 3
3
-
 4
4
-
 5
5
-
 6
6


