
Italian
o
IT
En
g
lis
h
EN
F
rança
i
s
FR
Р
усский R
U
119RW49
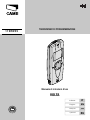
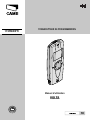
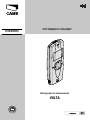
Manuale di istruzioni d'uso
VOLTA
TRANSCEIVER DI PROGRAMMAZIONE

2
4
6
3
1
5
Pag.
2
2 - Codice manuale:
119RW49IT
119 RW49IT ver.
1
1 07/2013 © CAME cancelli automatici s.p.a. - I dati e le informazioni indicate in questo manuale sono da ritenersi suscettibili di modifica in qualsiasi momento e senza obbligo di preavviso.
ATTENZIONE!
importanti istruzioni per la sicurezza delle persone:
LEGGERE ATTENTAMENTE!
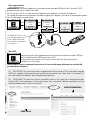
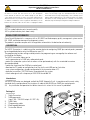
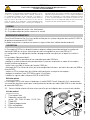
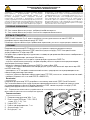
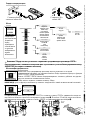
DESCRIZIONE
Il Transceiver VOLTA è un dispositivo rice-trasmittente radio per la configurazione di quadri comando CAME plus;
alimentato a batterie ricaricabili o da porta USB via PC.
Le impostazioni e le regolazioni delle funzioni per la programmazione sono gestite da un software e visualizzate
sul display.
Con il transceiver Volta è possibile:
- impostare via radio i parametri di un quadro comando CAME plus;
- proteggere l'impianto di automazione affinché su questo si possa intervenire solo con il transceiver associato
(attivazione password);
- aggiornare via cavo il firmware del quadro CAME plus;
- scaricare da PC i file di aggiornamento o di configurazione/utenti, via porta mini USB oppure con chiave USB;
- archiviare su PC le configurazioni di impianti già configurati con il transceiver;
- duplicare i trasmettitori (serie TOP/TAM) associati all'impianto;
- verificare i segnali radio con frequenza 433,92 e 868,35 MHz.
LEGENDA
Questo simbolo indica parti da leggere con attenzione.
Questo simbolo indica parti riguardanti la sicurezza.
Destinazione d'uso
Il transceiver VOLTA è stato progettato e costruito da CAME Cancelli Automatici S.p.A. in conformità alle vigenti
norme di sicurezza per la configurazione delle funzioni via radio a 868,35 MHz su quadri comando CAME plus.
Ogni installazione e uso difformi da quanto indicato nel seguente manuale sono da considerarsi vietate.
• Leggere tutte le precauzioni di sicurezza presenti in questo
manuale prima di utilizzare il dispositivo per garantirne un uso sicuro
e corretto • Le descrizioni contenute in questo manuale si basano
sulle impostazioni predefinite del vostro dispositivo • Le immagini e le
anteprime delle pagine utilizzate in questo manuale possono variare
nell’aspetto dal prodotto reale • Tenere le batterie lontane dalla portata
dei bambini. Se ingerite contattare immediatamente un medico • In
caso di rimozione delle batterie, assicurarsi che il dispositivo sia
scollegato dall'alimentazione • In fase di installazione delle batterie in
dotazione, o in caso di sostituzione delle stesse, è necessario prestare
la massima attenzione affinché vengano correttamente inserite nel
proprio alloggiamento rispettando la polarità (+ e -). La sostituzione
va fatta usando sempre batterie ricaricabili, poichè batterie non
adatte potrebbero rompersi o perdere liquido, causando esplosioni
e danni • Se il liquido della batteria fuoriesce, pulire bene l'alloggio
delle batterie prima di inserire quelle nuove • Durante la ricarica delle
batterie non connettere il transceiver VOLTA al quadro comando.
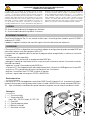
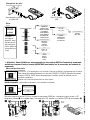
Packing list
1. n. 1 Transceiver Volta
2. n. 1 Alimentatore USB
(input: 100 - 240 V AC output: 5 V DC 1 Ah)
3. n. 1 Cavo USB
4. n. 1 Cavo di programmazione
5. n. 3 Batterie ricaricabili
6. n. 1 Manuale di istruzioni
RIFERIMENTI NORMATIVI
Came Cancelli Automatici S.p.A. è una azienda certificata per i sistemi di gestione aziendale: qualità ISO 9001 e
ambientale ISO 14001.
Il prodotto in oggetto è conforme alle normative vigenti citate nella dichiarazione di conformità.

6027
162
+
-
+
-
+
-
Pag.
3
3 - Codice manuale:
119RW49IT
119 RW49IT ver.
1
1 07/2013 © CAME cancelli automatici s.p.a. - I dati e le informazioni indicate in questo manuale sono da ritenersi suscettibili di modifica in qualsiasi momento e senza obbligo di preavviso
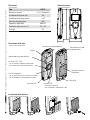
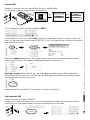
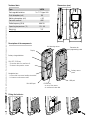
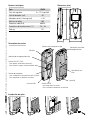
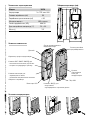
Dimensioni (mm)
Dati tecnici
Tipo VOLTA
Batterie ricaricabili 3 x 1,2 V tipo AAA
Assorbimento di picco (mA) 90
Assorbimento da acceso (mA) < 30
Materiale del contenitore ABS
Frequenza radio (MHz) 868,35
Temperatura di esercizio (°C) -20 ÷ 55
Peso (gr) 157
Descrizione delle parti
Tasto ENTER:
- per entrare nei menu;
- per confermare e memorizzare i dati.
Tasto ON / OFF / ESC:
- per accendere e spegnere il dispositivo;
- per tornare alla schermata precedente.
Tasti di navigazione:
- per spostarsi da una voce di menu ad un'altra;
- per incrementare o decrementare un valore.
Indicatore di carica delle batterie
Display
Sensore per autoapprendimento
Porta mini USB
Porta USB
Connettore per cavo di
programmazione
Sportello di accesso
alle batterie
Inserimento delle batterie

AC
PC
VOLTA
1.0/2013
5” 10”
Pag.
4
4 - Codice manuale:
119RW49IT
119 RW49IT ver.
1
1 07/2013 © CAME cancelli automatici s.p.a. - I dati e le informazioni indicate in questo manuale sono da ritenersi suscettibili di modifica in qualsiasi momento e senza obbligo di preavviso.
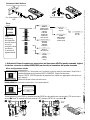
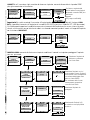
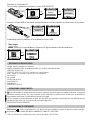
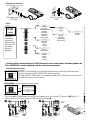
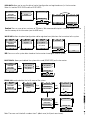
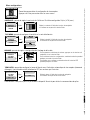
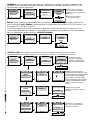
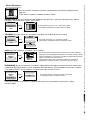
Menu configurazione scheda
ATTENZIONE: se il transceiver non è associato a nessun impianto, premendo il tasto Enter si
accede direttamente alla funzione NUOVA CONNESS. (Nuova Connessione).
Il menu CONFIG. SCHEDA permette di programmare, modificare, aggiungere o eliminare uno
o più impianti.
Premere Enter per entrare nei sotto-menu.
CONFIG.SCHEDA
MENU
Attenzione! Prima di eseguire una connessione dal transceiver VOLTA al quadro comando, togliere
la tensione e inserire la scheda 002VOLTA02 (non fornita) sul connettore del quadro comando.
Tenere premuto il tasto PROG sul quadro comando CAME plus da configurare fino quando il LED rosso rimane
acceso . Entro 10 secondi dall'accensione del LED, premere ENTER sul transceiver .
NUOVA CONNESS.: consente di connettersi a un nuovo impianto.
NUOVA CONNESS.
ZF3
CONFIG.SCHEDA
MENU
Enter
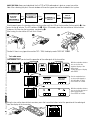
Caricamento delle batterie
Con alimentatore e cavo
USB
-------
Menu
IMP
OS
TAZI
O
NI
S
ELEZION
A
CONTRASTO
TIPO MENU
OROLOGIO
TEMPO STBY
CONNETTI
MODIFICA CONN.
NUOVA CONNESS.
LEGGI DATI
SCRIVI DATI
ELIMINA DATI
STORICO ERR.
COPIA TOP/TAM
CONFIGURAZIONE SCHEDA
TEST RADIO
IMPOSTAZIONI
AGGIORNAMENTI
USB
LINGUA
LIN
GU
A
ITALIANO
INGLESE
FRANCESE
RUSSO
USB
DEVICE:PC
HOST:CHIAVETTA
C
ONNETTI A:
ZF3:XXX
ZL42:XXX
...:...
M
ODIFICA CONN
.
ELIMINA
MODIFICA NOME
ATTIVA PASSW.
ELIMINA PASSW.
S
ELEZION
A
ON-LINE
OFF-LINE
A ogni
accensione
del dispositivo,
prima di entrare
nel menu
principale, viene
visualizzata
la versione di
aggiornamento.
Con PC e cavo USB

Pag.
5
5 - Codice manuale:
119RW49IT
119 RW49IT ver.
1
1 07/2013 © CAME cancelli automatici s.p.a. - I dati e le informazioni indicate in questo manuale sono da ritenersi suscettibili di modifica in qualsiasi momento e senza obbligo di preavviso
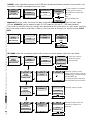
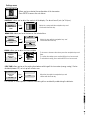
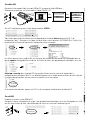
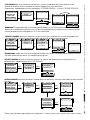
CONNETTI: se il transceiver è già associato ad almeno un impianto, consente di connettersi al quadro CAME
plus già memorizzato nel transceiver.
MODIFICA CONN.: consente di eliminare un impianto, modificare il nome di un impianto o proteggere l'impianto
con una password.
Per l'elenco completo delle
funzioni vedere il menu funzioni
del quadro comando CAME plus
selezionato.
Legenda
ZF3:[campo modificabile]
Selezionare l'impianto da
eliminare e confermare
con il tasto Enter.
SELEZIONA
NUOVA CONNESS.
MODIFICA CONN.
CONNETTI
CONNETTI A:
ZF3:XXX
ZF3:XXX
FUNZIONI
SELEZIONA
NUOVA CONNESS.
MODIFICA CONN.
CONNETTI
MODIFICA CONN.
MODIFICA NOME
ELIMINA
CONNETTI A:
ZF3:XXX
ATTIVA PASSW.
CORSA
TEMPI
Selezionare l'impianto da
proteggere.
Selezionando Confermi? (SI),
la scheda non sarà più protetta
da blocco.
MODIFICA CONN.
MODIFICA NOME
ELIMINA
CONNETTI A:
ZF3:XXX
ATTIVA PASSW.
.....:.....
MODIFICA CONN.
MODIFICA NOME
CONNETTI A:
ZF3:XXX
ATTIVA PASSW.
ELIMINA PASSW.
.....:.....
ATTIVA PASSW.
ZF3:XXX
CONFERMI? (NO)
ELIMINA PASSW.
ZF3:XXX
CONFERMI? (NO)
INFO
TEST COMANDI
CONNETTI A:
CONFERMI? (NO)
ZF3:XXX
E
n
t
e
r
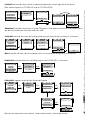
Importante! Una volta associato il transceiver all'impianto ed eseguito il salvataggio dei dati (funzione: LEGGI
DATI), è possibile intervenire sull'impianto sia in modalità ON-LINE (in loco) sia in modalità OFF-LINE (da remoto).
L'installatore potrà apportare le modifiche necessarie ai parametri dell'impianto anche se non si trova sul posto,
salvarle sul transceiver, per poi inviarle via radio in un secondo momento quando si troverà sul luogo dell'impianto,
con la funzione: SCRIVI DATI.
CONNETTI A:
ZF3:XXX
ZF3:XXX
FUNZIONI
CORSA
TEMPI
....:.... ....:....
Selezionare l'impianto a cui si
vuole cambiare il nome. Scrivere il
nome usando i tasti di navigazione.
La conferma della lettera viene
data con il tasto ENTER.
Per confermare tutto il nome,
tenere premuto per qualche
secondo il tasto Enter.
MODIFICA CONN.
MODIFICA NOME
ELIMINA
ATTIVA PASSW.
MODIFICA NOME
XXX___
CONFERMI? (SI)
CONFERMI? (SI)
CONFERMI? (SI)
INFO
TEST COMANDI
E
n
t
e
r
E
n
t
e
r
E
n
t
e
r
E
n
t
e
r
E
n
t
e
r
E
n
t
e
r
E
n
t
e
r
E
n
t
e
r
E
n
t
e
r
E
n
t
e
r
-------
-------
CONNETTI A:
ZF3:XXX
V: 1.0
CONNETTI A:
ZL42:XXX
ZF3:XXX
SELEZIONA
OFF-LINE
ON-LINE
SELEZIONA
NUOVA CONNESS.
MODIFICA CONN.
CONNETTI
E
n
t
e
r
E
n
t
e
r
E
n
t
e
r

Pag.
6
6 - Codice manuale:
119RW49IT
119 RW49IT ver.
1
1 07/2013 © CAME cancelli automatici s.p.a. - I dati e le informazioni indicate in questo manuale sono da ritenersi suscettibili di modifica in qualsiasi momento e senza obbligo di preavviso.
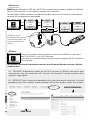
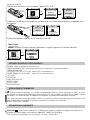
STORICO ERR.: legge o cancella gli ultimi 8 errori dell'impianto.
STORICO ERR.
SELEZIONA
ELIMINA DATI
SCRIVI DATI Enter
CONNETTI A:
ZF3:YYY
ZF3:XXX
LETTURA ERR.
LETTURA ERR.
CANCELLA ERR.
Enter Enter
LETTURA ERR.
2: ..............
3: ..............
1: ..............
4: ..............
Nota: gli errori sono elencati con numeri da 1 (errore meno recente) a 8 (errore più recente).
8: ..............
LETTURA ERR.
LETTURA ERR.
CANCELLA ERR.
Enter
CANCELLA ERR.
CONFERMI? (NO)
ELIMINA DATI: consente di eliminare i dati degli impianti salvati (LEGGI DATI) sul transceiver.
ELIMINA DATI
SELEZIONA
SCRIVI DATI
LEGGI DATI Enter
ELIMINA DATI
ZF3_XXX.usr
ZF3_XXX.dat
ZF3_YYY.dat
ELIMINA DATI
ZF3_XXX.usr
ZF3_XXX.dat
CONFERMI? (NO)
Enter
CONFERMI? (SI)
CONFERMI? (SI)
SCRIVI DATI: consente di caricare i dati (configurazione e/o utenti registrati) dal transceiver su un impianto.
LEGGI DATI: consente di salvare i dati di un impianto (configurazione e utenti registrati) nel transceiver.
Nota: confermare prima la LETTURA DATI e poi la LETTURA UTENTE.
SELEZIONA
NUOVA CONNESS.
MODIFICA CONN.
LETTURA DATI
CONFERMI? (NO)
LETTURA DATI
100%
CONNETTI A:
ZF3:YYY
ZF3:XXX
LETTURA DATI
CONFERMI? (NO)
LETTURA DATI
100%
SELEZIONA
ZF3_XXX.usr
ZF3_XXX.dat
ZF3_YYY.dat
SCRIVI DATI
SELEZIONA
LEGGI DATI
NUOVA CONNESS.
LETTURA UTENTE
CONFERMI? (NO)
CONFERMI? (SI)
CONFERMI? (SI)
CONFERMI? (SI)
Attenzione! È possibile salvare fino a un max di 128 impianti. Si consiglia di archiviare nel PC gli impianti salvati
per liberare la memoria del transceiver (vedi menu USB).
E
n
t
e
r
E
n
t
e
rE
n
t
e
r
E
n
t
e
r
E
n
t
e
r
E
n
t
e
rE
n
t
e
r
Nota: È possibile utilizzare i dati di un impianto salvati sul transceiver per configurare un altro impianto.
CONNETTI A:
.....:.....
ZF3:XXX
LEGGI DATI

433M
433M
433M
433M 868M
M
M
433M
433M
Pag.
7
7 - Codice manuale:
119RW49IT
119 RW49IT ver.
1
1 07/2013 © CAME cancelli automatici s.p.a. - I dati e le informazioni indicate in questo manuale sono da ritenersi suscettibili di modifica in qualsiasi momento e senza obbligo di preavviso
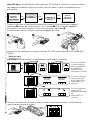
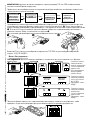
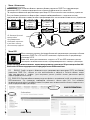
COPIA TOP/TAM: consente di duplicare il primo codice radio TOP o TAM di un impianto su un nuovo trasmettitore.
Nota: dopo aver selezionato l'impianto, nella finestra successiva apparirà il tipo di trasmettitore presente in
quell'impianto.
Premere assieme i due tasti del nuovo trasmettitore fino a quando il LED del trasmettitore lampeggerà
velocemente , premere poi il tasto da attivare. Il LED si accende . Entro 10 secondi, appoggiare il
trasmettitore sul transceiver e premere il tasto Enter del transceiver, vedi disegno .
A memorizzazione avvenuta il LED del trasmettitore lampeggerà per 3 volte.
COPIA TOP/TAM
SELEZIONA
STORICO ERR.
ELIMINA DATI Enter
SELEZIONA
ZF3:YYY
ZF3:XXX
COPIA TOP/TAM
RADIO TOP ATTIVA TELEC.
RADIO TOP
Enter Enter
CONFERMA ENT.
Attenzione! Se non è presente nessun tipo di trasmettitore TOP/TAM, viene visualizzata la scritta CODICE NON
TROVATO.
Menu test radio
TEST RADIO: consente di verificare il funzionamento del segnale radio del trasmettitore.
Affiancare il trasmettitore al transceiver, premere il tasto del trasmettitore per verificare il funzionamento del
segnale radio dal display del transceiver.
Con i tasti di navigazione
è possibile scegliere la
grafica di visualizzazione
del segnale radio.
Confermare il tipo di
visualizzazione con ENTER.
TEST RADIO
MENU
Enter
Con i tasti di navigazione
scegliere la frequenza
(433,92, 868,35 MHz).
Premere ENTER per
confermare.
Con i tasti di navigazione
scegliere il tipo di
visualizzazione del segnale
radio.
Premere ENTER per
confermare.
RADIO TAM

4
1
Pag.
8
8 - Codice manuale:
119RW49IT
119 RW49IT ver.
1
1 07/2013 © CAME cancelli automatici s.p.a. - I dati e le informazioni indicate in questo manuale sono da ritenersi suscettibili di modifica in qualsiasi momento e senza obbligo di preavviso.
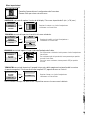
10:10:30
01/01/2000
Per incrementare o diminuire i valori premere i tasti di navigazione e
il tasto Enter.
Per confermare tutte le impostazioni, tenere premuto per qualche
secondo il tasto Enter.
Per uscire senza confermare, tenere premuto ESC per qualche
secondo.
OROLOGIO: consente di regolare l'impostazione dell'orologio e della data.
TEMPO STBY: consente di impostare il tempo di attesa prima dello spegnimento automatico del transceiver
(risparmio energetico). Può essere disattivato (scegliere OFF) oppure durare max 5 minuti.
IMPOSTAZIONI
OROLOGIO
TIPO MENU
CONTRASTO Enter
TEMPO STBY
IMPOSTAZIONI
OROLOGIO
TIPO MENU Enter
TEMPO STBY
5 min. Regolare il tempo con i tasti di navigazione e
confermare con il tasto Enter.
Questa funzione serve per non dimenticare il dispositivo acceso e far consumare le batterie.
TIPO MENU: consente di impostare la tonalità sulla voce selezionata.
IMPOSTAZIONI
OROLOGIO
TIPO MENU
CONTRASTO Enter
TIPO MENU
Regolare la tonalità con i tasti di navigazione e
confermare con il tasto Enter.
Menu impostazioni
CONTRASTO: consente di regolare il contrasto del display. Può essere impostato da 0 (min.) a 16 (max.).
Permette di personalizzare la configurazione del transceiver.
Premere Enter per entrare nei sotto-menu.
IMPOSTAZIONI
MENU
IMPOSTAZIONI
OROLOGIO
TIPO MENU
CONTRASTO Enter
CONTRASTO
16
Regolare il contrasto con i tasti di navigazione e
confermare con il tasto Enter.

1
Pag.
9
9 - Codice manuale:
119RW49IT
119 RW49IT ver.
1
1 07/2013 © CAME cancelli automatici s.p.a. - I dati e le informazioni indicate in questo manuale sono da ritenersi suscettibili di modifica in qualsiasi momento e senza obbligo di preavviso
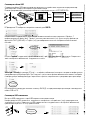
IMPORTANTE! Per scaricare gli eventuali aggiornamenti del transceiver VOLTA e dei quadri comando
CAME plus, accedere al sito www.came.com, entrare nell'area riservata con "nome utente" e "password" (se
non si possiedono tali credenziali, basta semplicemente registrarsi).
IMPORTANTE! Da quest'area riservata è possibile scaricare i file (script) per la configurazione della
chiavetta USB. Questa operazione va fatta solo la prima volta, e permette il backup automatico di tutti gli
impianti precedentemente salvati nel transceiver.
Menu aggiornamenti
ZF3
v. 1.0
AGGIORNAMENTI: consente di aggiornare i firmware dei quadri comando CAME plus e del Transceiver VOLTA,
precedentemente caricati (vedere menu USB).
Per il Transceiver VOLTA: una volta terminato l'aggiornamento, spegnere e riaccendere il dispositivo.
Per i quadri comando: prima di selezionare il quadro da aggiornare, collegare il transceiver al connettore del quadro
con il cavo di programmazione fornito.
Enter
AGGIORNAMENTI
Enter
AGGIORNAMENTI
MENU
CONFERMI? (NO)
PROGRAMMA
ZF3
v. 1.0
AGGIORNAMENTI
SELEZIONA
Enter
ZF3
100%
PROGRAMMA
ZF3
OK
Attenzione! Il filo rosso del
cavo di programmazione deve
essere collegato dalla parte
del connettore contrassegnato
con il numero 1.
Menu USB
Permette di gestire i file di aggiornamento del transceiver e dei quadri comando CAME plus
dal PC o dalla chiavetta USB nel transceiver VOLTA.
Inoltre permette di scaricare nel PC o nella chiavetta USB i dati relativi agli impianti
configurati con il transceiver.
USB
MENU
Tale operazione si può fare collegando il transceiver al PC con cavo USB oppure utilizzando una chiavetta USB
precedentemente confi gurata.
CONFERMI? (SI)
CAME ITALIA
CAME INTERNATIONAL

PC
PC
Pag.
10
10 - Codice manuale:
119RW49IT
119 RW49IT ver.
1
1 07/2013 © CAME cancelli automatici s.p.a. - I dati e le informazioni indicate in questo manuale sono da ritenersi suscettibili di modifica in qualsiasi momento e senza obbligo di preavviso.
Con la chiavetta USB
Inserire la chiavetta in una porta USB del PC.
Configurare la chiavetta salvando gli script (.scp) scaricati precedentemente dal sito. Salvare nella chiavetta
anche tutti gli altri file di aggiornamento scaricati dal sito semplicemente trascinandoli.
Con cavo USB
Collegare il transceiver Volta a una porta USB del PC con il cavo USB fornito.
Dal transceiver, selezionare e confermare la voce DEVICE:PC.
Dal PC, selezionare e aprire l'unità disco rimovibile "VOLTA".
All'interno del disco VOLTA, nella cartella data, sono salvati 3 file per ogni impianto: 1 di configurazione (.dat), 1
utenti (.usr) (per questi due file vedi funzione LEGGI DATI) e 1 file (.txt) che permette di visualizzare e stampare le
impostazioni di un impianto.
Nella cartella update vengono salvati i file di aggiornamento (.upd) relativi ai firmware dei quadri comando.
Salvare in questa cartella i file di aggiornamento precedentemente scaricati dal sito.
Volta.lgw e xxx.cfg (nell'esempio ZF3.cfg) sono file di aggiornamento della lingua e della configurazione
del transceiver Volta. Se sono stati scaricati dal sito nuovi file di aggiornamento della lingua e configurazione
sovrascrivere quelli presenti nel transceiver.
A operazione conclusa, premere ESC sul transceiver e scollegare il cavo dal PC.
USB
DEVICE:PC
USB
HOST:CHIAVETTA CONNESSO
MENU
Enter
DEVICE:PC
USB
Enter

Pag.
11
11 - Codice manuale:
119RW49IT
119 RW49IT ver.
1
1 07/2013 © CAME cancelli automatici s.p.a. - I dati e le informazioni indicate in questo manuale sono da ritenersi suscettibili di modifica in qualsiasi momento e senza obbligo di preavviso
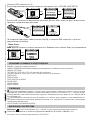
Rimuovere la chiavetta dal PC.
Dal transceiver, selezionare e confermare la voce HOST:CHIAVETTA.
Inserire la chiavetta USB nel transceiver e automaticamente i dati della chiavetta verranno salvati sul transceiver.
A operazione conclusa, premere ESC e rimuovere la chiavetta USB.
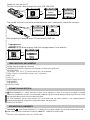
MESSAGGI DI ERRORE E AVVISI
Encoder: motore o encoder non funzionanti
ERRORE COMUNICAZIONE: errore di connessione tra transceiver e quadro comando
ERRORE NESSUNA CONF.
TEST FOTO, STOP, CX, CY, C7 e C8: contatti (N.C.) non funzionanti.
APRE, CHIUDE, P-P e AP.PARZ: contatti (N.O.) non funzionanti.
LISTA VUOTA
LISTA PIENA
SCHEDA GIÀ IN LISTA
PSW CORRETTA
PSW ERRATA
CODICE NON TROVATO
DISMISSIONE E SMALTIMENTO
Prima di procedere è sempre opportuno verificare le normative specifiche vigenti nel luogo d’installazione. I componenti
dell’imballo (cartone, plastiche, etc.) sono assimilabili ai rifiuti solidi urbani e possono essere smaltiti senza alcuna difficoltà,
semplicemente effettuando la raccolta differenziata per il riciclaggio.
Altri componenti (schede elettroniche, batterie, etc.) possono invece contenere sostanze inquinanti. Vanno quindi rimossi e
consegnati a ditte autorizzate al recupero e allo smaltimento degli stessi.
NON DISPERDERE NELL’AMBIENTE!
DICHIARAZIONE DI CONFORMITÀ
Dichiarazione - Came Cancelli Automatici S.p.A. dichiara che questo prodotto è conforme ai requisiti essenziali e alle altre
disposizioni pertinenti stabilite dalla direttiva 2006/95/CE, 1999/5/CE e 2014/30/UE.
Codice di riferimento per richiedere una copia conforme all’originale: DDC RA H012.
USB
HOST:CHIAVETTA
Enter
USB
DEVICE:PC NON CONNESSO
USB
Enter
ATTESA....
USB
HOST:CHIAVETTA
CONNESSO
LINGUA
MENU LINGUA
ITALIANO
ENGLISH
FRANCAIS
РУССКИЙ
Menu lingua
LINGUA: impostare la lingua desiderata. Selezionare la lingua e premere Enter per confermare.
HOST:CHIAVETTA
MENU
Enter
Volta.upd
USB

Italiano
Italiano - Codice manuale:
119EW09IT
119EW09IT
ver.
1
1 07/2013 © CAME cancelli automatici s.p.a.
I dati e le informazioni indicate in questo manuale sono da ritenersi suscettibili di modifica in qualsiasi momento e senza obbligo di preavviso da parte di CAME Cancelli Automatici S.p.a.
CAME Cancelli Automatici S.p.a.
CAME Cancelli Automatici S.p.a.
Via Martiri Della Libertà, 15
31030
Dosson Di Casier
Dosson Di Casier (Tv)
(+39) 0422 4940
(+39) 0422 4941
Assistenza Tecnica/Numero Verde 800 295830
Assistenza Tecnica/Numero Verde 800 295830
www. came.com
www. came.com
IT • Per ogni ulteriore informazione su azienda, prodotti e assistenza nella vostra lingua:
EN • For any further information on company, products and assistance in your language:
FR • Pour toute autre information sur la société, les produits et l’assistance dans votre langue :
DE • Weitere Infos über Unternehmen, Produkte und Kundendienst bei:
ES • Por cualquier información sobre la empresa, los productos y asistencia en su idioma:
NL • Voor meer informatie over het bedrijf, de producten en hulp in uw eigen taal:
PT • Para toda e qualquer informação acerca da empresa, de produtos e assistência técnica, em sua língua:
PL •
Wszystkie inne informacje dotyczące fi rmy, produktów oraz usług i pomocy technicznej w Waszym języku znajdują się na stronie:
RU •
Для получения дополнительной информации о компании, продукции и сервисной поддержке на вашем языке:
HU • A vállalatra, termékeire és a műszaki szervizre vonatkozó minden további információért az Ön nyelvén:
HR • Za sve dodatne informacije o poduzeću, proizvodima i tehničkoj podršci:
UK • Для отримання будь-якої іншої інформації про компанію, продукцію та технічну підтримку:

PROGRAMMING TRANSCEIVER
EN
User manual
VOLTA
119RW49EN

2
4
6
3
1
5
Page
2
2
- Manual code:
119RW49EN
119RW49EN ver.
1
1 07/2013 © CAME cancelli automatici s.p.a. - The data and information provided in this manual are subject to change at any time without prior notice.
CAUTION!
important personal safety instructions:
READ CAREFULLY!
DESCRIPTION
The VOLTA Transceiver is a radio transmitter-receiver device for configuring CAME plus control panels, powered
by rechargeable batteries or by the USB port on your PC.
The programming function settings and adjustments for programming are managed by the software and
visualised on the display.
The VOLTA transceiver allows you to:
- set the parameters of a CAME plus radio control panel;
- protect the automation system so that actions can be performed only with the associated transceiver
(password enabled);
- update the firmware of the CAME plus control panel;
- download via PC update or configuration/user files via the mini USB port or flash drive;
- save system configurations already configured with the transceiver onto a PC;
- duplicate transmitters (TOP/TAM series) associated with the system;
- check radio signals with a frequency of 433.92 MHz and 868.35
KEY
This symbol indicates parts to read carefully.
This symbol indicates parts about safety.
Intended use
The VOLTA transceiver was designed and built by CAME Automatic S.p.A. in compliance with current safety
standards for the configuration of the functions via radio at 868.35 MHz on CAME plus control panels.
Any installation and operation that differs from what is set out in this manual is prohibited.
• Read all of the safety instructions in this manual before using
the device to ensure safe and correct use • The descriptions
in this manual are based on the default settings of your device
• The images and previews of pages used in this manual may be
different from those of your device • Keep batteries out of the reach
of children. If swallowed, contact a physician immediately • If the
batteries are removed, make sure the device is unplugged • When
installing the supplied batteries, or in the case of replacement of the
same, it is necessary to pay close attention that they be correctly
inserted into their seat respecting polarity (+ and -). Always replace
batteries with rechargeable ones, since batteries that are not suitable
may rupture or leak, causing explosions or damage. • If the battery
fluid leaks, wipe the battery housing before fitting new batteries.
Packing list
1. 1 Volta Transceiver
2. 1 USB power pack
(input: 100 - 240 V AC output: 5 V DC 1 Ah)
3. 1 USB Cable
4. 1 Programming cable
5. 3 Rechargeable batteries
6. 1 Instruction Manual
REGULATORY REFERENCES
Came Cancelli Automatici is a company with an ISO 9001-certified company quality management system and an
ISO 14001-certified environmental management system.
The product in question complies with the regulations referred to in the declaration of conformity.

6027
162
+
-
+
-
+
-
Page
3
3
- Manual code:
119RW49EN
119RW49EN ver.
1
1 07/2013 © CAME cancelli automatici s.p.a. - The data and information provided in this manual are subject to change at any time without prior notice.
Dimensions (mm)Technical data
Type VOLTA
Rechargeable batteries 3 x 1.2 V type AAA
Peak absorption (mA) 90
Working absorption (mA) < 30
Container material ABS
Radio frequency (MHz) 868.35
Operating temperature (°C) -20 - 55
Weight (g) 157
Description of the components
ENTER key:
- to access the menus;
- to confirm and store data.
ON / OFF / ESC key:
- To turn the device on and turn off;
- To return to the previous screen.
Navigation keys:
- to move from one menu heading to another;
- to increase or decrease a value.
Battery charge indicator
Display
Self-learning sensor
Mini USB port
USB port
Connector for
programming cable
Battery access
panel
Fitting the batteries

AC
PC
VOLTA
1.0/2013
5” 10”
Page
4
4
- Manual code:
119RW49EN
119RW49EN ver.
1
1 07/2013 © CAME cancelli automatici s.p.a. - The data and information provided in this manual are subject to change at any time without prior notice.
Card configuration menu
CAUTION: If the transceiver is not associated with any plant, pressing the Enter key leads
directly to the function NEW CONNECTION. (New Connection).
The menu CONFIG. CARD allows you to program, modify, add, or delete one or more systems.
Press ENTER to access the sub-menus.
CONFIG.CARD
MENU
Warning! Before connecting from a VOLTA transceiver to the control panel, disconnect power and
fit the 002VOLTA02 card (not supplied) onto the control panel connector.
Press and hold the PROG button on the CAME plus control panel until the red LED remains lit . Within 10
seconds after the LED lights up, press ENTER on the transceiver .
NEW CONNEC.: lets you connect to a new system.
NEW CONNECTION
ZF3
CONFIG.CARD
MENU
Enter
Charging the batteries
With power pack and
USB cable
-------
Menu
S
ETTIN
GS
S
ELEC
T
CONTRAST
MENU TYPE
CLOCK
STBY TIME
CONNECT
EDIT CONN.
NEW CONNECTION
READ DATA
WRITE DATA
DELETE DATA
ERROR LOG
TOP COPY/TAM
CARD CONFIGURATION
TEST RADIO
SETTINGS
UPDATES
USB
LANGUAGE
LAN
GU
A
G
E
ITALIAN
ENGLISH
FRENCH
RUSSIAN
USB
DEVICE:PC
HOST:USB STICK
CONNECT TO:
ZF3:XXX
ZL42:XXX
...:...
EDIT CON
N
.
DELETE
EDIT NAME
ACTIVATE PASSW.
DELETE PASSW.
S
ELEC
T
ON-LINE
OFF-LINE
Each time
the device is
switched on,
before entering
the main menu,
the update
version is
displayed.
With PC and USB
cable

Page
5
5
- Manual code:
119RW49EN
119RW49EN ver.
1
1 07/2013 © CAME cancelli automatici s.p.a. - The data and information provided in this manual are subject to change at any time without prior notice.
CONNECT: makes it possible to connect to the CAME plus control panel previously stored in the transceiver if the
transceiver is already associated to at least one system
EDIT CONN.: allows the use to delete a plant, edit the name of a plant or protect a plant with a password.
For the complete list of features
see the functions menu on
the CAME plus control panel
selected.
Key
ZF3:[modifiable field]
Select the system to
delete and confirm
pressing Enter.
SELECT
NEW CONNECTION
EDIT CONN.
CONNECT
CONNECT TO:
ZF3:XXX
ZF3:XXX
FUNCTIONS
SELECT
NEW CONNECTION
EDIT CONN.
CONNECT
EDIT CONN.
EDIT NAME
DELETE
CONNECT TO:
ZF3:XXX
ACTIVATE PASSW.
RUN
TIMES
Select the system to protect.
Selecting Confirm? (YES), the
card will no longer be lock
protected.
EDIT CONN.
EDIT NAME
DELETE
CONNECT TO:
ZF3:XXX
ACTIVATE PASSW.
.....:.....
EDIT CONN.
EDIT NAME
CONNECT TO:
ZF3:XXX
ACTIVATE PASSW.
DELETE PASSW.
.....:.....
ACTIVATE PASSW.
ZF3:XXX
CONFIRM? (NO)
DELETE PASSW.
ZF3:XXX
CONFIRM? (NO)
INFO
COMMAND TEST
CONNECT TO:
CONFIRM? (NO)
ZF3:XXX
E
n
t
e
r
Important! Once the system transceiver has been associated to the system, and the data has been stored
(function: READ DATA), you can operate on both ON-LINE mode (on-site) and OFF-LINE mode (remotely).
The installer can make the necessary changes to the parameters of the system even if it is not in place, save them
on the transceiver, and then send them via radio at a later time when on the plant site, with the function: WRITE
DATA.
CONNECT TO:
ZF3:XXX
ZF3:XXX
FUNCTIONS
RUN
TIMES
....:.... ....:....
Select the system for name
editing. Enter the name using the
navigation keys. Confirm the letter
with the ENTER key.
To confirm the entire name press
and hold Enter for a few seconds.
EDIT CONN.
EDIT NAME
DELETE
ACTIVATE PASSW.
EDIT NAME
XXX___
CONFIRM? (YES)
CONFIRM? (YES)
CONFIRM? (YES)
INFO
TEST COMMANDS
E
n
t
e
r
E
n
t
e
r
E
n
t
e
r
E
n
t
e
r
E
n
t
e
r
E
n
t
e
r
E
n
t
e
r
E
n
t
e
r
E
n
t
e
r
E
n
t
e
r
-------
-------
CONNECT TO:
ZF3:XXX
V: 1.0
CONNECT TO:
ZL42:XXX
ZF3:XXX
SELECT
OFF-LINE
ON-LINE
SELECT
NEW CONNECTION
EDIT CONN.
CONNECT
E
n
t
e
r
E
n
t
e
r
E
n
t
e
r

Page
6
6
- Manual code:
119RW49EN
119RW49EN ver.
1
1 07/2013 © CAME cancelli automatici s.p.a. - The data and information provided in this manual are subject to change at any time without prior notice.
ERROR LOG: reads or deletes the last 8 errors of the system.
ERROR LOG
SELECT
DELETE DATA
WRITE DATA Enter
CONNECT TO:
ZF3:YYY
ZF3:XXX
READ ERROR
READ ERROR
DELETE ERROR
Enter Enter
READ ERROR
2: ..............
3: ..............
1: ..............
4: ..............
Note: The errors are listed with numbers from 1 (oldest error) to 8 (most recent error).
8: ..............
READ ERROR
READ ERROR
DELETE ERROR
Enter
DELETE ERROR
CONFIRM? (NO)
DELETE DATA: allows you to delete the system data saved (READ DATA) on the transceiver.
DELETE DATA
SELECT
WRITE DATA
READ DATA Enter
DELETE DATA
ZF3_XXX.usr
ZF3_XXX.dat
ZF3_YYY.dat
DELETE DATA
ZF3_XXX.usr
ZF3_XXX.dat
CONFIRM? (NO)
Enter
CONFIRM? (YES)
CONFIRM? (YES)
WRITE DATA: allows to upload (configuration and/or registered user) data from the transceiver to the system.
READ DATA allows you to save the data of a plant (configuration and registered users) in the transceiver.
Note: first confirm READ DATA and then READ USER.
SELECT
NEW CONNECTION
EDIT CONN.
READ DATA
CONFIRM? (NO)
READ DATA
100%
CONNECT TO:
ZF3:YYY
ZF3:XXX
READ DATA
CONFIRM? (NO)
READ DATA
100%
SELECT
ZF3_XXX.usr
ZF3_XXX.dat
ZF3_YYY.dat
WRITE DATA
SELECT
READ DATA
NEW CONNECTION
READ USER
CONFIRM? (NO)
CONFIRM? (YES)
CONFIRM? (YES)
CONFIRM? (YES)
Caution! You can save up to a maximum of 128 plants. We recommend that plants saved be stored in a PC to
free the memory of the transceiver (see the USB menu).
E
n
t
e
r
E
n
t
e
r
E
n
t
e
r
E
n
t
e
r
E
n
t
e
r
E
n
t
e
r
N.B. You can use the system data stored on the transceiver to configure another system.
CONNECT TO:
.....:.....
ZF3:XXX
READ DATA
E
n
t
e
r

433M
433M
433M
433M 868M
M
M
433M
433M
Page
7
7
- Manual code:
119RW49EN
119RW49EN ver.
1
1 07/2013 © CAME cancelli automatici s.p.a. - The data and information provided in this manual are subject to change at any time without prior notice.
COPY TOP/TAM: allows you to duplicate the first TOP or TAM radio code of a plant on a new transmitter.
Note: After selecting the plant, the next window will show the type of transmitter included in that system.
Simultaneously press the two keys of the new transmitter until the LED on the transmitter flashes quickly , then
press the key to activate. The LED switches ON . Within 10 seconds, place the transmitter on the transceiver
and press the Enter key the transceiver, see drawing .
After saving, the transmitter LED will flash 3 times.
COPY TOP/CAM
SELECT
ERROR LOG
DELETE DATA Enter
SELECT
ZF3:YYY
ZF3:XXX
COPY TOP/CAM
RADIO TOP ACTIVATE REM.C.
RADIO TOP
Enter Enter
CONFIRM ENT.
Caution! If there is any type of transmitter TOP / TAM, the display reads CODE NOT FOUND.
Test radio menu
TEST RADIO: allows you to check the operation of the radio signal of the transmitter.
Bring the transmitter close to the transceiver, press the transmitter button to test the operation of the radio signal
from the display of the transceiver.
With the navigation buttons
you can choose the
graphical display of the
radio signal.
Confirm the type of display
with ENTER.
TEST RADIO
MENU
Enter
Use the navigation keys
to choose the frequency
(433.92, 868.35 MHz).
Press ENTER to confirm.
With the navigation buttons
you can choose the type of
radio signal display.
Press ENTER to confirm.
RADIO TAM

4
1
Page
8
8
- Manual code:
119RW49EN
119RW49EN ver.
1
1 07/2013 © CAME cancelli automatici s.p.a. - The data and information provided in this manual are subject to change at any time without prior notice.
10:10:30
01/01/2000
To increase or decrease the values press the navigation keys and
Enter.
To confirm the settings press and hold Enter for a few seconds.
To exit without saving, press and hold ESC for a few seconds.
CLOCK: allows you to adjust the time and date.
STBY TIME: allows you to set the waiting time before switching off the transceiver (energy saving). Can be
disabled (choose OFF) or last up to 5 minutes max.
SETTINGS
CLOCK
MENU TYPE
CONTRAST Enter
STBY TIME
SETTINGS
CLOCK
MENU TYPE Enter
STBY TIME
5 min.
Adjust the time with the navigation keys and
confirm with the Enter key.
This function is used to prevent the device from being left on accidentally and draining the batteries.
MENU TYPE: allows you to set the tone on the selected item.
SETTINGS
CLOCK
MENU TYPE
CONTRAST Enter
MENU TYPE
Adjust the tone with the navigation keys and
confirm with the Enter key.
Settings menu
CONTRAST: allows you to adjust the contrast of the display. Can be set from 0 (min.) to 16 (max).
Allows you to customize the configuration of the transceiver.
Press ENTER to access the sub-menus.
SETTINGS
MENU
SETTINGS
CLOCK
MENU TYPE
CONTRAST Enter
CONTRAST
16
Adjust the contrast with the navigation keys and
confirm with the Enter key.
La page est en cours de chargement...
La page est en cours de chargement...
La page est en cours de chargement...
La page est en cours de chargement...
La page est en cours de chargement...
La page est en cours de chargement...
La page est en cours de chargement...
La page est en cours de chargement...
La page est en cours de chargement...
La page est en cours de chargement...
La page est en cours de chargement...
La page est en cours de chargement...
La page est en cours de chargement...
La page est en cours de chargement...
La page est en cours de chargement...
La page est en cours de chargement...
La page est en cours de chargement...
La page est en cours de chargement...
La page est en cours de chargement...
La page est en cours de chargement...
La page est en cours de chargement...
La page est en cours de chargement...
La page est en cours de chargement...
La page est en cours de chargement...
La page est en cours de chargement...
La page est en cours de chargement...
La page est en cours de chargement...
La page est en cours de chargement...
-
 1
1
-
 2
2
-
 3
3
-
 4
4
-
 5
5
-
 6
6
-
 7
7
-
 8
8
-
 9
9
-
 10
10
-
 11
11
-
 12
12
-
 13
13
-
 14
14
-
 15
15
-
 16
16
-
 17
17
-
 18
18
-
 19
19
-
 20
20
-
 21
21
-
 22
22
-
 23
23
-
 24
24
-
 25
25
-
 26
26
-
 27
27
-
 28
28
-
 29
29
-
 30
30
-
 31
31
-
 32
32
-
 33
33
-
 34
34
-
 35
35
-
 36
36
-
 37
37
-
 38
38
-
 39
39
-
 40
40
-
 41
41
-
 42
42
-
 43
43
-
 44
44
-
 45
45
-
 46
46
-
 47
47
-
 48
48


dans d''autres langues
- italiano: CAME 002VOLTA01 Guida d'installazione
Documents connexes
-
CAME 002VOLTA01 Guide d'installation
-
-
-
-
-
-
-
-
-
CAME ZLX24SA-ZLX24SR Guide d'installation