
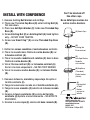
1. Remove Existing Nut Washer and old Cap.
2. Place new Threaded Cap Base (B) onto Existing Bolt (A)
flat side down.
3. Place new Anti Spin Washer (C) inside new Threaded Cap
Base (B).
4. Screw Existing Nut (D) on Existing Bolt (A) Hand tighten
only – DO NOT OVER TIGHTEN.
5. Screw new Smart Cap
™
(E) on new Threaded Cap Base
(B).
1. Retirer les ecrous rondelles et cache boulons existants.
2. Placer la nouvelle base filetée du cache-boulon (B) sur
le boulon existant (A).
3. Placer la nouvelle rondelle anti-rotation (C) dans la base
filetée de cache-boulon (B).
4. Visser l’écrou existant (D) sur le boulon existant.(A)
Serrer à la main uniquement – NE PAS TROP SERRER.
5. Visser le nouveau cache-boulon (E) sur la base filetée
(B).
1. Remueva la tuerca, arandela y capa vieja. No quite el
tornillo existente (B).
2. Ponga la nueva base roscada en el tornillo existente (A).
3. Ponga la nueva arandela (C) adentro de la base roscada
(B).
4. Enrosca la tuerca existente (D) encima del tornillo
existente (A) Apriete a mano solamente – NO APRIETE
EN EXCESO.
5. Enrosca la nueva capa (E) encima del base roscada (B).
INSTALL WITH CONFIDENCE
Can’t be knocked off
like other caps.
Ne se défait pas comme les
autres cache-boulons.
(E) Smart Cap
™
(D)
Existing Nut
Écrou existant
(C)
Anti-Spin Washer
Rondelle
anti-rotation
(B) Cap Base
(Threaded)
Cache-boulon
(filetée)
(A)
Existing Bolt
& Toilet
Boulon
existant et
toilette
30800 Rancho Viejo Rd.,
San Juan Capistrano, CA 92675
www.fluidmaster.com
800.631.2011
M-F 5:30 am - 5:00 pm (PST)
-
 1
1

Autres documents
-
American Standard 281AA104.020 Mode d'emploi
-
Chamberlain 8808CB-P Mode d'emploi
-
Kohler K-3591-96 Manuel utilisateur
-
Kohler K-4491-47 Guide d'installation
-
-
American Standard 2851A104.222 Mode d'emploi
-
-
-
 Penguin Toilets 524 Mode d'emploi
