La page est en cours de chargement...

EN
Warranty Information
To obtain a copy of the warranty for this product:
US: amazon.com/AmazonBasics/Warranty
UK: amazon.co.uk/basics-warranty
US: +1-866-216-1072 / UK: +44 (0) 800-279-7234
Feedback and Help
Love it? Hate it? Let us know with a customer review.
US: amazon.com/review/review-your-purchases#
UK: amazon.co.uk/review/review-your-purchases#
US: amazon.com/gp/help/customer/contact-us
UK: amazon.co.uk/gp/help/customer/contact-us
DEFR
Informations Sur La Garantie
Pour obtenir une copie de la garantie portant sur ce produit :
FR : amazon.fr/basics-garantie
CA : amazon.ca/AmazonBasics/Warranty
FR : +33 (0) 800-947-715 / CA : +1-877-586-3230
Vos Avis et Aide
FR : amazon.fr/review/review-your-purchases#
CA : amazon.com/review/review-your-purchases#
FR : amazon.fr/gp/help/customer/contact-us
CA : amazon.ca/gp/help/customer/contact-us
DE
Caution
This product contains small items that could be a choking hazard if swallowed. Keep
these items away from young children.
• Make Sure these instructions are read and completely understood before
attempting installation. If you are unsure of any part of this installation, please
contact a professional installer for assistance.
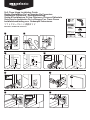
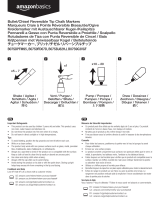
Step B: Install the new hinge into the bottom slot before removing and installing the
top hinge. Make sure to use the replacement screws included in your pack.
Tighten until secured.
Step A: Open your cabinet door and remove the bottom hinge using a Philips head
screwdriver.
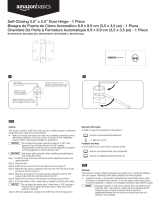
Step 1: Use a ruler or tape measure to mark a horizontal line for distance “X”. This will
be the center location for the hinge body.
Step 2: Locate and mark the holes for the hinge screws.
Step 4: Use a 1-3/8"(35mm) Forstner bit to drill ½" deep hole where you marked for
the hinge body. DO NOT drill through your door.
Step 5: Install the hinge using the screws provided in your pack. Tighten until secured.
Repeat steps 1-5 for the additional hinge.
Step 6: Position your cabinet door in the desire location. Mark your desired mounting
location with a pencil and drill using a 3/32"(2.38mm)drill bit. Repeat this
step for the remaining hinge.
Step 7: Install your hinges to the cabinet using the longer screw provided in your
package.
Step 3: Use a 3/32"(2.38mm) drill bit to drill 1/2"(12.7mm)deep holes where you
marked for screw holes. DO NOT drill through your door.
Industry Standard for the distance marked “X” is 3.5" (89mm).
Attention
Ce produit contient de petites pièces susceptibles de constituer un risque d’étouffement
en cas d’ingestion. Maintenez ces pièces hors de la portée des jeunes enfants.
• Veillez à ce que ces consignes soient lues et bien comprises avant de procéder à
l'installation. En cas de doute concernant toute étape de l’installation, veuillez
prendre contact avec un installateur professionnel afin de recevoir de l’aide.
Schritt A: Öffnen Sie Ihre Schranktür und entfernen Sie das untere Scharnier mithilfe
eines Kreuzschlitzschraubendrehers.
Schritt B: Montieren Sie das neue Scharnier im unteren Einschub, bevor Sie das
obere Scharnier entfernen und montieren. Achten Sie darauf, die
mitgelieferten Ersatzschrauben zu verwenden.Ziehen Sie die Schrauben fest.
Schritt 1: Verwenden Sie ein Lineal oder Maßband, um die horizontale Linie für den
Abstand „X“ zu markieren. Dies wird der Mittelpunkt für den Scharnierkörper.
Schritt 3: Verwenden Sie einen 3/32"(2.38mm) Bohrer, um 12,7 mm tiefe Löcher
zu bohren, wo Sie die Schraublöcher markiert haben. Bohren Sie NICHT
durch Ihre Tür.
Schritt 4: Verwenden Sie einen 1-3/8” (35mm) Forstnerbohrer, um ein Loch mit
12,7 mm Tiefe zu bohren, wo Sie es für den Scharnier-Körper markiert
haben. Bohren Sie NICHT durch Ihre Tür.
Schritt 5: Montieren Sie das Scharnier mithilfe der mitgelieferten Schrauben. Ziehen
Sie die Schrauben fest. Wiederholen Sie die Schritte 1 – 5 für weitere
Scharniere.
Schritt 2: Lokalisieren und markieren Sie die Löcher für die Scharnier-Schrauben.
Der Branchenstandard für den markierten Abstand „X“ beträgt 89 mm.
HINWEIS
NOTICE
Vorsicht
Dieses Produkt enthält Kleinteile, die beim Verschlucken eine Erstickungsgefahr
darstellen können. Halten Sie diese Teile von Kleinkindern fern.
• Stellen Sie sicher, dass Sie diese Anweisungen gelesen und vollständig
verstanden haben, bevor Sie mit der Montage beginnen. Wenn Sie sich über
Teile dieser Montage im Unklaren sind, bitten Sie eine Fachkraft um Hilfe.
Product Specifications:
Replacing Your Cabinet Hinges:
Installing New Cabinet hinges:
• Applicable to office, bedroom and kitchen furniture made from wood or plastic
material.
• Adjustable spring hinge with soft close dampening mechanism.
• Certified to the EN and US corrosion resistance standard.
• Made from cold rolled plate steel.
• Max loading capacity 45 LBS.
Étape B : Installez la nouvelle charnière à l’emplacement du bas avant de retirer et
d’installer la charnière du haut. Veillez à bien utiliser les vis de rechange
incluses dans votre emballage. Serrez jusqu’à ce qu’elle soit solidement fixée.
Étape A : Ouvrez la porte de votre meuble et retirez la charnière du bas à l’aide d’un
tournevis Philips.
Étape 1 : À l’aide d’une règle ou d’un mètre-ruban, tracez une ligne horizontale à la
distance « X ». Celle-ci marquera le centre de l’emplacement pour la
charnière. Remarque : La norme industrielle pour la distance « X » est 89 mm.
Étape 2 : Localisez et marquez les trous pour les vis de la charnière.
Étape 4 : À l’aide d’un foret Forstner de 1-3/8" (35mm), percez un trou de 12,7 mm
de profondeur à l’endroit où vous avez marqué le centre de l’emplacement
pour la charnière. NE TRANSPERCEZ PAS la porte.
Étape 5 : Installez la charnière à l’aide des vis fournies dans votre emballage. Serrez
jusqu’à ce qu’elle soit solidement fixée. Répétez les étapes 1-5 pour l’autre
charnière.
Étape 6 : Positionnez la porte de votre meuble dans la position désirée. À l’aide d’un
crayon, marquez l’emplacement souhaité pour le montage et percez un
trou à l’aide d’un foret de 3/32"(2.38mm). Répétez cette étape pour
l’autre charnière.
Étape 7 : Installez vos charnières sur le meuble à l’aide de la vis plus longue fournie
dans votre emballage.
Étape 3 : À l’aide d’un foret de 3/32"(2.38mm), percez des trous de 12,7 mm de
profondeur aux endroits où vous avez marqué les trous pour les vis.
NE TRANSPERCEZ PAS la porte.
Industry Standard for the distance marked “X” is 3.5" (89mm).
Caractéristiques du produit :
Ersetzen Ihrer Schrank-Scharniere:
Montage neuer Schrankscharniere:
Remplacer vos charnières de meubles :
Installer les nouvelles charnières de meubles :
• Convient aux meubles de bureau, de chambre et de cuisine en bois ou en plastique.
• Charnière à ressort réglable avec mécanisme d'amortissement à fermeture en
douceur.
• Conforme aux normes anglaise et américaine de résistance à la corrosion.
• Fabriqué en tôle d’acier profilé à froid.
• Capacité de chargement maximale : 20 kg.
• Geeignet für Büro-, Schlafzimmer- und Küchenmöbel aus Holz oder Kunststoff.
• Einstellbares Federscharnier mit sanft schließendem Dämpfungsmechanismus.
• Zertifiziert nach EN- und US-Standards für Korrosionsbeständigkeit.
• Aus kaltgewalztem Stahl.
• Max. Nutzlast: 20 kg.
Produktspezifikationen:
REMARQU
La page est en cours de chargement...
La page est en cours de chargement...
-
 1
1
-
 2
2
-
 3
3
-
 4
4


AmazonBasics B01N5RJL3B Manuel utilisateur
- Taper
- Manuel utilisateur
- Ce manuel convient également à
dans d''autres langues
- italiano: AmazonBasics B01N5RJL3B Manuale utente
- English: AmazonBasics B01N5RJL3B User manual
- español: AmazonBasics B01N5RJL3B Manual de usuario
- Deutsch: AmazonBasics B01N5RJL3B Benutzerhandbuch
- Nederlands: AmazonBasics B01N5RJL3B Handleiding
- 日本語: AmazonBasics B01N5RJL3B ユーザーマニュアル
Documents connexes
-
 AmazonBasics B01N7UFZIN Manuel utilisateur
-
AmazonBasics B01N5RJL3B Guide d'installation
-
 AmazonBasics B07PXDZ77G Manuel utilisateur
-
 AmazonBasics B07PD6BYQT Manuel utilisateur
-
 AmazonBasics B07PJV5MVG Manuel utilisateur
-
 AmazonBasics B07S9FD67D Manuel utilisateur
-
Amazon Basics B07GF4ZR17 Manuel utilisateur
-
Amazon Basics B01N5RJW49 Manuel utilisateur
-
-
 AmazonBasics B07GF54KV8 Manuel utilisateur


