Broil King 874214/874217 Le manuel du propriétaire
- Catégorie
- Barbecues
- Taper
- Le manuel du propriétaire

PLEASE RECORD YOUR MODEL
NUMBER, SERIAL NUMBER AND DATE
OF PURCHASE HERE.
This information can be found on the black and silver OMC caution
sticker on the back or side of your gas grill.
Model Number
-
Serial Number
-
Date of Purchase / /
dd mm yyyy
OWNER’S MANUAL
FOR USE WITH NATURAL GAS
ANSI Z21.58-2018 / CSA 1.6-2018
CONTENTS
SAFETY ............................................................................ 2
INSTALLATION ................................................................ 2
NATURAL GAS ................................................................ 3
GAS SUPPLY HOSE ........................................................ 3
VENTURI TUBES ............................................................. 4
LEAK TESTING ................................................................ 5
LIGHTING ......................................................................... 6
OPERATION ..................................................................... 7
COOKING TECHNIQUES .................................................... 7
MAINTENANCE ................................................................ 10
TROUBLESHOOTING ...................................................... 11
WARRANTY ..................................................................... 12
GUIDE DU PROPRIÉTAIRE DE BARBECUE AU
GAZ
.... 13
MANUAL DEL USUARIO DE PARRILLA A GAS
............. 25
NOTE TO INSTALLER: THESE INSTRUCTIONS MUST BE
LEFT WITH THE CONSUMER.
DANGER
IF YOU SMELL GAS:
1. SHUT OFF GAS TO THE APPLIANCE
2. EXTINGUISH ANY OPEN FLAME
3. OPEN LID
4. IF ODOR CONTINUES, KEEP AWAY FROM
THE APPLIANCE AND IMMEDIATELY
CALL YOUR GAS SUPPLIER OR YOUR
FIRE DEPARTMENT
WARNING
1. DO NOT STORE OR USE GASOLINE OR
OTHER FLAMMABLE LIQUIDS OR
VAPORS IN THEVICINITY OF
THIS APPLIANCE
READ ALL INSTRUCTIONS CAREFULLY BEFORE OPERATING YOUR GAS
GRILL.
RETAIN THESE INSTRUCTIONS FOR FUTURE
REFERENCE.
FOR ASSEMBLY INSTRUCTION, PLEASE SEE YOUR ASSEMBLY MANUAL
OR VISIT www.omcbbq.com TO VIEW OUR ASSEMBLY
VIDEOS.
1-800-265-2150
info@omcbbq.com
20094-40NG REV F 09/20

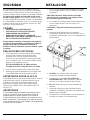
SAFETY INSTALLATION
2
Your new OMC gas grill is a safe, convenient appliance
when assembled and used properly. As with all gas-fired
products, however, certain safeguards must be observed.
Failure to follow these safeguards may result in
serious injury or damage. If you have questions
concerning assembly or operation, consult your dealer, gas
appliance specialist, Gas Company or our direct customer
service line at 1-800-265-2150. / info@omcbbq.com
CAUTION
• FOR OUTDOOR USE ONLY.
• THIS APPLIANCE MUST NOT BE OPERATED
UNATTENDED.
• SPECIAL CARE MUST BE TAKEN TO KEEP SMALL
CHILDREN AWAY FROM HEATED SURFACES.
Use caution when handling or transporting this
product. Metal edges can be hazardous. Use
appropriate gloves when lifting or handling. Before
lifting, remove side shelves, grids and grates.
ELECTRICAL CAUTION
1. If any accessory is used on this appliance that
requires an external electrical power source, the
accessory when installed must be electrically grounded
in accordance with local codes. In the absence of local
codes, the following standards apply:
(U.S.A.) ANSI/NFPA No. 70-Latest Edition and
(Canada) CSA C22.1 Canadian Electrical Code
2. Do not cut or remove the grounding prong from the
plug.
3. Keep the electrical supply cord and fuel supply hose
away from any heated surface.
PROPOSITION 65 WARNING
Handling the brass material on this product exposes you to
lead, a chemical known to the state of California to cause
cancer, birth defects or other reproductive harm. WASH
YOUR HANDS AFTER HANDLING THIS PRODUCT.
WARNING
Fuels used in gas or oil-fired appliances, and the
products of combustion of such fuels, contain chemicals
known to the State of California to cause cancer, birth
defects or other reproductive harm. “This warning is issued
pursuant to California Health and Safety Code Sec.
25249.6”
1.
In
the
U.S.A.,
this appliance
must
be installed in
accordance with the local code and the relevant
national code:
ANSI Z223.1/NFPA 54 - Latest Edition National Fuel
Gas Code and Latest Local Codes where Applicable
2. In Canada, this appliance must be installed in
accordance with the local code and the relevant CSA
standards:
CSA-B149.1 Natural Gas and Propane installation
Code
3. The appliance must be located away from combustible
surfaces by at least 76cm / 30” from each side, and
76cm / 30” from the rear.
4. Do not operate this appliance under any overhead
roof construction or foliage.
5. This appliance is for OUTDOOR USE ONLY, DO
NOT operate in garage, shed, balcony or other such
enclosed areas.
6. DO NOT restrict the flow of air to the appliance.
7. Keep the area surrounding the appliance free
of combustible materials, gasoline, and all flammable
liquids and vapors.
8. This appliance is not intended to be installed in, or
on, recreational vehicles and/or boats.

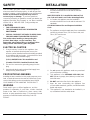
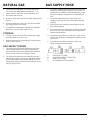
NATURAL GAS GAS SUPPLY HOSE
3
1. This barbecue is designed for use with natural gas.
Do not use with liquid propane (bottled gas). The
valves, orifices, and hoses are for natural gas only.
2. Do not use with charcoal.
3. A shut off valve must be used on the gas supply piping
system.
4. When the appliance is not in use, turn off the natural
gas supply at the shut off valve.
5. The appliance is designed to operate at a regulated
pressure of 7 inches water column (W.C.).
STORAGE
1. The gas must be turned off at the natural gas supply
when the barbecue is not in use.
2. When the barbecue is stored indoors, the gas supply
must be disconnected.
GAS SUPPLY TESTING
1. The outdoor gas grill and its individual shutoff valve
must be disconnected from the gas supply piping
system during any pressure testing of that system at
test pressures in excess of 1/2 psig (3.5kPa).
2. The outdoor gas grill must be isolated from the gas
supply piping system by closing its individual manual
shut off valve during any pressure testing of the gas
supply piping system at test pressures equal to or less
than 1/2 psig (3.5kPa).
1. On models supplied with an extension hose, the hose
assembly is specifically designed for your model. No
modifications or additions should be attempted. Hose
and hose couplings comply with CGA Standard CAN
1.83.
2. On models equipped with the "quick disconnect"
coupling, close "shut off valve" before disconnecting
coupling.
3. "Quick disconnect" coupling must be kept clean and
free of dirt and debris.
4. Protect the hose from dripping grease and do not allow
the hose to touch any hot surface, including the base
casting of the barbecue.
5. Inspect the hose at least once per year. If the hose is
cracked, cut, abraded or damaged, the appliance must
not be used.
6. For replacement of hose assembly, contact your
dealer or approved service centre.
A. GAS SUPPLY PIPING
B. QUICK DISCONNECT COUPLING
C. ADAPTER FITTING
D. EXTENSION HOSE ASSEMBLY

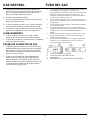
VENTURI TUBES
4
Always keep venturi tubes clean. Blockages in the venturi
tubes caused by spiders, insects and nests can cause a
flashback fire. In fact, although the gas grill may still light,
the backed up gas can ignite and cause a fire around the
venturi tubes at the control panel or the side burner.
If a flashback fire occurs, turn off gas at the source
immediately
Inspect and clean the venturi tubes (main burner, side
burner, rear burner) if any of the following symptoms
occur:
1. You smell gas.
2. Your gas grill does not reach temperature.
3. Your gas grill heats unevenly.
4. The burners make popping noises.
INSPECTING & CLEANING VENTURI
TUBES
1. Turn off gas by closing the propane cylinder valve
2. When gas grill is cool, remove the burner fasteners
and the top portion of the collector box. Proceed to lift
the burners from the gas grill housing.
3. Clean the venturi tubes with a pipe cleaner or
venturi cleaning tool (Accessory #77310 or #18270).
4. Lower the burner into position in the gas grill
housing, making sure that the venturi tubes are correctly
aligned and fitted on the orifices.
5. Secure burners with burner fasteners.
Snap top portion
of collector box back in place

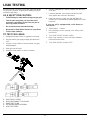
LEAK TESTING
5
All factory-made connections have been rigorously tested
for gas leaks. However, shipping and handling may have
loosened a gas fitting.
AS A SAFETY PRECAUTION:
• Test all fittings for leaks before using your gas grill.
• Test for leaks every time you disconnect and
reconnect a gas fitting, at least once per year or
after any period of nonuse.
• Do not smoke at any time while testing.
• Never test for leaks with a lit match or open flame.
• Test for leaks outdoors.
TO TEST FOR LEAKS:
1. Extinguish any open flame or cigarettes in the area.
2. Be sure that the gas supply and gas grill valves are
“OFF.”
3. Prepare a soap solution of one part water, one part
liquid detergent.
4. Open gas shut off valve
5. Brush the soap solution on each connection.
A. GAS SUPPLY PIPING
B. QUICK DISCONNECT COUPLING
C. ADAPTER FITTING
D. EXTENSION HOSE ASSEMBLY
E. LEAK TEST HERE
6. A leak is identified by a flow of bubbles from the area
of the leak.
7. If a leak is detected, close the gas cylinder “shut-off”
valve, tighten the connection and retest.
8. If the leak persists, contact your gas grill dealer for
assistance. Do not attempt to operate appliance if a leak
is present.
If your gas grill is equipped with a side burner or
rear burner:
1. Follow steps 1 - 5 above
2. Place fingertip over the opening in the orifice at the
end of hose.
3. Turn “SIDE”/”REAR” control to “HIGH.”
4. Brush soap solution on each connection between
orifice and control valve.
5. Turn “SIDE”/”REAR” control to “OFF”.

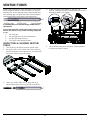
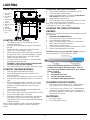
LIGHTING
6
BASIC GAS GRILL COMPONENTS
A. Main burner
controls
B. Side burner
control
C. Rear burner
control
D. Ignitor
E. Manual lighting
hole
F. Handle
G.
Side burner
H. Gas supply
hose
LIGHTING INSTRUCTIONS
1. The appliance must be assembled as per the
assembly instructions.
2. Check that your gas supply is properly connected to
the grill.
3. Ensure there are no gas leaks in the gas supply
system. See: “Leak Testing.” (Page 5)
4. Ensure that the venturi tubes are properly located over
the gas valve orifices. See Venturi diagram. (Page 4)
5. Ensure that both Main Burner and Side Burner
ignition wires are connected.
6. Carefully review all instructions on the information
plate attached to the gas grill.
7. WARNING: Always open lid before lighting and do
not lean over gas grill while lighting.
8. Set control knobs to “OFF” and turn on the gas supply.
LIGHTING THE MAIN BURNER:
a. Open gas grill lid and leave open until lit.
b. Check that the battery has been installed in the
electronic ignition.
c. Push and turn one main burner control knob to “HIGH.”
d. Push and hold down the ignitor button or use match to
light.
e. Burner should ignite within 5 seconds; turn off gas
source immediately if ignition does not occur in this
timeframe.
T
o light burner with a match proceed
below to step f.
f. Insert lit match through lighting hole located at the
bottom right of the cook box.
g. Push and turn right main burner control knob to “HIGH.”
h. Burner should ignite within 5 seconds.
i. After the first burner is lit, push and turn the adjacent
main burner control knob to “HIGH” then repeat for
other burners; these burners should light automatically
without the ignitor.
Note: In windy conditions, ignite each burner individually.
Use the match holder to lower a lit match to light each
burner.
LIGHTING THE SIDE BURNER:
a. Push and turn side burner control knob to “HIGH.”
b. Push and hold the ignitor button.
c. Burner should ignite within 5 seconds. To light burner
with a match proceed below to step d.
d. Apply lit match to burner ports.
e. Push in the side burner control knob and turn to “HIGH.”
f. Burner should ignite within 5 seconds.
Note: Pots on the side burner must not exceed 9” (23 cm)
in diameter or 15 lbs. (7 kg) in weight.
LIGHTING THE REAR ROTISSERIE
BURNER:
Warning: do not operate the main burner simultaneously with
the rear burner.
b. REMOVE THE WARMING RACK.
c. Push and turn rear burner control knob to “HIGH.”
d. Push and hold the ignitor button.
e. Burner should ignite within 5 seconds. To light burner
with a match proceed below to step f.
f. Apply lit match to burner ports.
g. Push in the rear burner control knob and turn to “HIGH.”
h. Burner should ignite within 5 seconds.
CAUTION: Check your gas grill after lighting. All burner
ports should show a 2.5cm / 1” flame on “HIGH.”
If any of the following symptoms occur there is
probably a blockage in the venturi tubes. Shut off
gas at once and clean the venturi tubes. See “Venturi
Tubes.” (Page 4)
1. You smell gas.
2. A flashback fire occurs.
3. Your gas grill heats unevenly.
4. The burners make popping noises.
IF BURNER DOES NOT IGNITE:
1. Push and turn control knob to “OFF.” Wait 5 minutes
then try again with control knob set at “MEDIUM.”
2. If any burner will not light, see “Troubleshooting”
on page 10. If problem persists, do not attempt to
operate the appliance; contact OMC, your dealer or an
approved service center.
SHUTDOWN:
1. Turn off gas supply.
2. Turn control knobs to “OFF.”

OPERATION COOKING TECHNIQUES
7
Burn-off. Before cooking on your gas barbecue for the first
time, burn off the barbecue to rid it of any odours or foreign
matter as follows:
Remove cooking grids and warming rack and wash in mild
soap and water. Ignite the burner. Close the lid and
operate the barbecue for 20 minutes with the control knobs
set at "MEDIUM/HIGH". Turn the gas off at the source.
Turn the control knobs to "Off". Let the appliance cool
down, replace the grids. You are now ready to use the
appliance.
Preheating. When grilling, preheat the barbecue on
Medium/High with the lid closed for ten minutes. Reduce
heat as appropriate for what you are grilling. Scrub grids
with a wire grill brush and brush or spray the grids with
vegetable or olive oil to prevent food from sticking.
Lid Position. The position of the lid during cooking is a
matter of personal preference, but the barbecue cooks
faster, uses less gas, and controls the temperature best
with the lid closed. A closed lid also imparts a smokier
flavor to meat cooked directly on the grid, and is essential
for smoke and convection cooking.
Vapourization Systems. Your gas grill is designed for use
with the Flav-R-Wave™ vapourization system (included).
Do not use lava rock, ceramic briquets or any other
vapourization system other than the one that came with the
barbecue.
COOKING TEMPERATURES
High Setting will produce temperatures at the cooking grid
of approximately 600 - 650°F (320 - 340° C). Use this
setting only for fast warm-up and for burning food residue
from the cooking grids after the cookout is over. This
setting is also ideal for quickly searing steaks before
reducing temperature. Rarely, if ever, do you use the HIGH
setting for extended cooking.
Medium/High Setting will produce temperatures at the
cooking grid of approximately 550°F (290 ° C). Use this
setting for warm-up and for grilling steaks and chops,
Medium Setting will produce temperatures inside the
barbecue of approximately 450° F (230°C) with the lid
down. Use this setting for most grilling of chicken, burgers,
vegetables and for roasting, and baking.
Low Setting will produce temperatures inside the barbecue
of approximately 310- 350° F (155-175° C). Use this
setting for all smoke cooking, large cuts of meat, delicate
fish, and for dough and pastry such as pizza and
quesadillas.
These temperatures are approximate only and vary
with the outside temperature and the amount of wind
present.
DIRECT GRILLING
The direct grilling method involves cooking the food on
grids directly over the flame. Direct grilling is the most
popular method for most single serving items such as
steaks, chops, fish, burgers, kebabs and vegetables.
1. Prepare food in advance to avoid delay and timing
problems. If using marinade or spices, they should be
applied before placing meat on the cooking grid. If
basting with sauces, they should be applied the last 2-4
minutes of grilling to avoid burning.
2. Organize the area around the barbecue to include
forks, tongs, oven mitts, sauces and seasonings, to
allow you to stay in the vicinity of the barbecue while
cooking.
3. Bring meat to room temperature just prior to grilling.
Trim excess fat from meat to minimize the "flare-ups"
that are caused by dripping grease.
4. Pre-heat the barbecue to the desired temperature with
the cover closed.
5. Coat the grids with vegetable or olive oil to prevent
food from sticking to the grids.
6. Hold the salt when cooking meats on the barbecue.
The meat will stay juicier if the salt is added after
cooking.
7. To prevent steaks from "drying out", use tongs rather
than a fork and start on "MEDIUM/HIGH" to sear the
meat and seal the juices in. Reduce the heat and
extend cooking times when grilling thicker cuts of meat.
8. Learn to test when the meat is done by time and feel.
The meat firms up as it cooks. When the meat is soft it
is rare. When it is firm, it is well done.
9. Follow the perfect steak grilling guide for most meat,
fish, poultry and vegetables.

COOKING TECHNIQUES
8
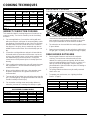
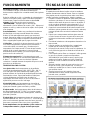
DIRECT GRILLING GUIDE
1” THICK
HEAT
SETTING
TIME PER
SIDE
TOTAL
MINUTES
CHICKEN
MED / WELL
MED / LOW
4 / 4 / 4 / 4
16
CHICKEN WINGS
MED / WELL
MED / LOW
5 / 5 / 5 / 5
20
HAMBURGER
MEDIUM
MED / LOW
3 / 3 / 3 / 3
12
HAMBURGERS
3/4” FROZEN
MEDIUM MED / LOW
3 / 3 / 3 / 3 12
FISH FILLET
MEDIUM
MEDIUM
2 / 2 / 2 / 2
8 – 10
LOBSTER TAILS
SPLIT
MEDIUM MEDIUM 4 / 4 / 4 / 4 16 - 20
USE SAME TECHNIQUE AS THE PERFECT STEAK GRILLING GUIDE
(PAGE 7)
INDIRECT CONVECTION COOKING
This method is ideal for cooking large cuts of meat such as
roasts or poultry. The food is cooked by hot air circulating
around it.
1. For most applications of convection cooking with and
without a rotisserie, a drip pan is recommended to catch
the drippings. Place drip pan on top of the Flav-R-Wave,
beneath center of food. Put half to one inch of water in
the drip pan. Fruit juice, wine or marinade may also be
added to enhance the flavor. Do not let the drip pan run
dry.
2. Convection cooking without a rotisserie is best with the
lid closed and the heat reduced. All burners can be set
to low or the outside burners can be set to medium and
the middle burner(s) can be turned off. Turning the
center burner off will prevent juices in the drip pan from
burning.
3. Prior to placing the meat on the gas grill, baste the meat
with vegetable oil. This will enhance browning on the
outside of the meat.
4. When cooking without a drip pan, close attention must
be paid to avoid the risk of a grease fire and is not
recommended.
5. Turn gas grill off and allow it to cool before removing drip
pan. The fat drippings are highly flammable and must be
handled carefully to avoid injury.
6. For convection cooking roasts and poultry without a
rotisserie, put meat in a roasting rack directly on grids.
INDIRECT CONVECTION AND
ROTISSERIE COOKING GUIDE
BEEF ROAST
3 - 6 Lb.
MED / LOW
2 – 4 HRS
BEEF ROAST
6 - 10 Lb.
MED / LOW
3 – 5 HRS
PORK ROAST
2 - 5 Lb.
MED / LOW
2 – 4 HRS
PORK ROAST
6 - 10 Lb.
MED / LOW
3 – 5 HRS
TURKEY OR CHICKEN
2 - 5 Lb.
MED / LOW
2 – 4 HRS
TURKEY OR CHICKEN
5 - 10 Lb.
MED / LOW
3 – 5 HRS
WHEN USING ROTISSERIE BURNER, SET HEAT AT MED / HIGH
ROTISSERIE COOKING
Follow the steps for Indirect Convection Cooking. (See left)
1. The rotisserie can accommodate up to 7 kg (15lb) of
meat with the limiting factor of rotating clearance. For
best results the meat should be centered on the center
line of spit to eliminate an out-of-balance condition.
2. The rotisserie can be used with the cooking grids in place
if space allows.
3. Fasten the meat securely on the spit prior to placing it on
the gas grill. For poultry, tie the wings and legs in tightly.
REAR BURNER ROTISSERIE
1. Certain models feature a rear burner for rotisserie
cooking. The rear burner rotisserie method is the
ultimate for cooking roasts and poultry. With the heat
source located behind the food, there is no chance of a
flare up caused by fat drippings. A dish or drip pan
placed below the spit will collect the juices for basting or
for preparing a sauce.
2. The spring loaded rear burner may be easily removed
when not in use.
3. To operate your rear burner, see “Lighting the Rear
Burner.” (Page 6)
MEAT TEMPERATURE GUIDE
RARE
MED
WELL
BEEF / LAMB / VEAL
130°F / 55°C
146°F / 63°C
160°F / 70°C
PORK
150°F / 65°C
170°F / 77°C
POULTRY
170°F / 77°C
HAMBURGER
160°F / 70°C
FOR BEST RESULTS, USE A MEAT THERMOMETER

COOKING TECHNIQUES
9
SPIT BALANCE
1. Loosen the rod handle to allow the balance to turn
freely.
2. Set the rotisserie rod in the slots of the gas grill casting.
Let the heaviest side of the meat rotate to the bottom.
3. Adjust the balance to the top of the rod, opposite the
heaviest side of the meat.
4. Tighten the rod handle. Periodically, check to see if the
meat turns smoothly while cooking. Adjust the balancer
as necessary. CAUTION: Use oven mitt when
adjusting balancer.
HOW TO USE A PROBE THERMOMETER
1. The accurate way to determine when a large piece of
meat is done is to use a probe thermometer. Insert the
thermometer at an angle so the sturdy pointed metal tip
rests in the center of the thickest part of the meat. Be
careful that it doesn’t touch the spit or the bone, and
that the point is not resting in fat (you will notice
much less resistance when probing in fat).
2. When the thermometer displays the desired temperature
the meat is done. Add your sauces during the last few
minutes of cooking time and let the meat stand about 15
minutes to firm up. Carve and serve.
• Poultry: insert the tip of the thermometer in the thickest
part of the thigh close to the body.
• Ham or roasts: insert the tip of the thermometer in the
center of the heaviest section of the meat.
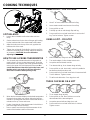
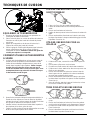
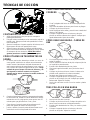
USING A SPIT – LEG OF LAMB
1. Have 3” of bone sawed from small end of leg.
2. Leave meat around bone intact to form a flap.
3. Put a spit fork on rod.
4. Fold flap up and run rod through flap and leg.
5. Put second fork on rod and insert forks in each end of
leg. Test for balance. Tighten screws.
USING A SPIT – POULTRY
1. With breast down, bring neck skin up over cavity.
2. Turn under edges of skin; skewer to back skin.
3. Loop twine around skewer and tie.
4. Turn breast side up; tie or skewer wings to body.
5. Put a spit fork on rod. Insert rod in neck skin parallel to
backbone and exit just above tail.
6. Put second fork on rod and insert forks in breast and tail.
Test for balance. Tighten screws.
7. Tie tail to rod with twine. Cross legs; tie to tail.
THREE CHICKENS ON A SPIT
1. Tie or skewer wings to body.
2. Put a spit fork on rod. Place chickens on rod as
demonstrated in the above diagram.
3. Loop twine around tails and legs; tie to rod.
4. Put second fork on rod and insert forks in chicken.
Tighten screws.

MAINTENANCE
10
REGULAR MAINTENANCE
To ensure optimal performance and safety, the following
components should be inspected and cleaned as required before
use of your gas grill.
COOKING GRIDS - CAST IRON, CAST STAINLESS & HEAVY
ROD STAINLESS
BROIL KING® Deep V cast iron and cast stainless cooking grids
provide unsurpassed heat retention and grilling performance.
BROIL KING® Heavy Rod stainless grids provide maximum
durability and good heat retention and good grilling performance.
BROIL KING® cast iron grids are coated with a porcelain enamel
finish to protect the grids and reduce the tendency of food sticking
to grids. Regular use and care improves performance and longevity
of the grids.
For optimum performance:
• Before first use and after long periods of storage, wash grids
using a light detergent and water and then rinse and dry with
paper towel; never air dry grids or use a dishwasher
• Immediately after washing, season cooking grids by coating
grids with an organic cold pressed cooking oil with a high
smoke point, light the grill and operate on Med/Low for 30
minutes. Recommended cooking oils:
o Avocado Oil – smoke point (260C/500F)
o Rice Bran Oil – smoke point (255C/490F)
o Canola Oil – smoke point (204C/400F)
• Before and after each use, brush grids with a good quality grill
brush (Item #’s 65225, 64014, 64034) and lightly coat with a
high smoke point cooking oil. This will continue the seasoning
process
• Use medium heat settings to preheat and grill to avoid
burning off the protective seasoned coating
• Avoid applying sugar based marinades or salt to meat before
grilling, apply sugar based marinades at end of grilling and salt
after grilling
• Use oil based marinades, avoid water based marinades
• Lightly coat food with cooking oil of your choice before grilling
• Turn and rotate your grids periodically
• Ensure the surface of the grid is always coated with a light
layer of oil. This helps prevent rust and deterioration and
improves the grids non-stick performance
• If rust does occur, Burn-Off the grid, brush with a high quality
grill brush and re-season
During long periods of inactivity, grids should be seasoned, then
stored in a dry place. The grids may be wrapped in protective
plastic food wrap. After periods of storage, Burn-Off grids, wash,
dry with paper towel and re-season with high smoke point cooking
oil.
WARNING:
If you brush the grids with a stainless steel bristle grill brush.
• If the grill is hot, use caution and oven mitts to protect
your hands.
• Inspect the grids carefully after brushing to ensure there
are no broken stainless steel bristles left on the grid.
GREASE TRAY
The grease tray is in the pull out drawer located under the control
panel. Clean regularly.
FLAV-R-WAVE™
The Flav-R-Wave™ is designed to generate smoke and vapor from
the food drippings in order to provide that authentic barbecue flavor
while protecting the burner. If residue accumulates on the Flav-R-
Wave™, remove the cooking grids and scrape the residue off the
Flav-R-Wave™ with the grid lifter. (Part # 60745)
GENERAL CLEANING
Perform a Burn-Off (see below).
When gas grill is cool, remove grids, scrape the Flav-R-Wave™
clean with grid lifter then remove the Flav-R-Wave™.
Clean the interior of the gas grill as necessary by scraping the sides
and bottom of the cook box with the grid lifter and vacuum residue.
Rust is a natural oxidation process and may appear on internal
stainless steel parts. Rust will not affect performance of your grill.
BURN-OFF
Ignite the burners as per “Lighting” (page 6).
Operate gas grill on HIGH with lid closed for 10 minutes maximum.
Turn the gas source off then turn control knobs to OFF.
ANNUAL MAINTENANCE
The following components should be inspected and cleaned at
least once a year or after any period of storage over 30 days to
ensure optimal performance, safety and efficiency.
BURNER
Remove burner and inspect for cracks and deterioration. Clean
venturi tubes using a pipe cleaner or venturi brush to eliminate any
blockages. See “Venturi Tubes.” (Page 4) While the burner is
removed, remove the grease shields, clean the interior of cook box
by scraping the sides and bottom of the cook box and vacuuming.
HOSE
Inspect and replace if necessary.
EXTERIOR ALUMINUM COMPONENTS
If white oxidation spots appear, wash the outside of the aluminum
cook box with a mild soap and water solution. Rinse the surfaces
thoroughly then wipe them with a cloth dipped in cooking oil to
restore the luster. For repair of paint scratches and scuffs, use a
good quality HIGH temperature (600°F) spray paint for touch-up.
STAINLESS STEEL & PORCELAIN COMPONENTS
Wash with soap and water. Use stainless steel cleaner or “Bar
Keepers Friend” to polish and remove stains or rust marks if they
occur. Weathering and extreme heat can cause a stainless steel lid
to turn a tan color. This is discoloration and is not considered a
manufacturing defect.
RESIN COMPONENTS AND SIDE SHELVES
Wash with soap and water.
REPLACEMENT PARTS
If a problem is found with the regulator, hose, burner, or control
valves, do not attempt repair. See your dealer, approved service
center, or contact the factory for repairs or replacement parts. To
ensure optimum performance, use only original BROIL KING
®
replacement parts.
LEAK TEST
When reconnecting a gas cylinder on propane models, be sure to
check for leaks. See “Leak Testing.” (Page 5)

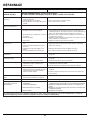
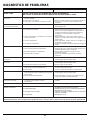
TROUBLESHOOTING
11
PROBLEM
POSSIBLE CAUSE
CORRECTIVE ACTION
SMELL OF GAS
SHUT OFF GAS SUPPLY AT ONCE.
DO NOT USE THE APPLIANCE UNTIL LEAK IS SEALED.
Leak detected at any connection.
1. Quick disconnect coupling not seated fully.
2. Gas leak in connection.
3. Gas leak in hose or control valves
1. Remove and reconnect coupling
2. Tighten connection and "Leak Test".
3. See authorized service centre
Flames Beneath Control Panel
(Flashback Fire)
1. Venturi blocked.
1. Remove burner and clean venturi. See “Venturi Tubes”
(page 4)
Burner Not Lighting
1. Gas shut off valve closed.
2. Ignitor issue.
3. Venturi blocked or misaligned with valve orifice.
4. Orifice(s) blocked.
5. Hose is twisted.
1. Open gas shut off valve.
2. Try manually lighting burner with a match. See “Lighting”
(page 6). If burner lights successfully, it is an ignitor issue.
See “Ignitor not Working” below
3. Remove burner, clean venturi and realign with valve
orifice. See page 4 for assistance.
4. Remove burner, clean orifices with a pin or fine wire. Do
not drill orifices.
5. Straighten hose. Keep away from bottom casting.
Ignitor Not Working
1. Ignitor battery is dead
2. Ignitor wire(s) not connected
3. Electrode misaligned on burner
4. Ignitor malfunction
1. Replace battery
2. Ensure main burner and side burner electrode wires are all
connected
3. Realign electrode and clear any surrounding debris from
area
4. Use “Match Lighting” procedure. (Page 6)
Decreasing Heat, “Popping
Sound”
1. Venturi blocked.
2. Remove burner, clean venturi. See “Venturi Tubes”
(Page 4) for assistance.
Hot spots on Cooking Surface
1. Venturi blocked
2. Debris buildup on Flav-R-Wave
1. Remove burner, clean venturi. See “Venturi Tubes”
(page 4) for assistance.
2. Scrape off Flav-R-Wave and vacuum
“Flare-ups” or Grease Fires
1. Excessive grease buildup on vaporizer or in gas grill
cook box
2. Excessive heat.
1. Thoroughly scrape off Flav-R-Wave and inside of cookbox
then vacuum out debris
2. Turn burner controls to a lower setting
Yellow Flame
1. Some yellow flame is normal. If it is excessive, the
venturi may be blocked.
2. Burner ports blocked.
1. Remove burner, clean venturi. See “Venturi Tubes”
(page 4) for assistance.
2. Remove burner & clean with soft bristle brush (e.g.
toothbrush).
Inside of Lid Appears to be
Peeling
1. This is a build-up of grease. The inside of lid is not
painted and cannot peel.
1. Clean with stiff bristle brush or scraper.
Cooking Grids Rusting
1. Porcelain enamel has been chipped
1. See “Maintenance” (page 10) for help
Control panel or oven lights not
working
1. Unit not connected to power.
2. Faulty transformer.
3. Loose or corroded connections.
4. Bulb blown
1. Connect GFI power cord to appliance. Plug to working
power outlet.
2. Check transformer output is 12Vac. Replace if required.
3. Clean connections and ensure all connectors are pushed
together firmly.
4. Replace bulbs.
If troubleshooting fails to solve any of these or any other issues, please visit www.omcbbq.com for more information including troubleshooting
videos, tricks and tips or call customer service at 1-800-265-2150

WARRANTY
12
The OMC Warranty is effective from date of purchase and is
limited to the repair or replacement of parts at no charge
which prove to be defective under normal domestic use.
In United States and Canada replacement is FOB Factory.
In all other countries replacement is FOB OMC Distributor
(Consult your Dealer for name of OMC Distributor).
All other costs are the responsibility of the owner.
This warranty is extended only to the original purchaser as
indicated on the warranty registration and applies only to
products sold at retail and only when used exclusively by the
purchaser in country where purchased. (Different types of gas
used in different countries require appropriate valves, orifices
and regulators.)
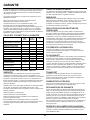
WHAT IS COVERED
IMPERIAL
REGAL
BARON
CROWN
SIGNET
MONARCH
GEM
STAINLESS STEEL LID & PORCELAIN
STEEL LID COMPONENTS
Lifetime Lifetime 10 Years
CAST ALUMINUM COOK BOX &
COMPONENTS
Lifetime Lifetime 10 Years
STAINLESS STEEL
COOK BOX
Lifetime Lifetime
STAINLESS STEEL
COOKING GRIDS
15 Years 5 Years
CAST IRON GRIDS
COOKING GRIDS
2 Years 2 Years
STAINLESS STEEL
FLAV-R-WAVE™
15 Years 3 Years 2 Years
DUAL-TUBE™ BURNERS
15 Years
10 Years
STAINLESS STEEL MAIN BURNERS
5 Years
SIDE BURNER
15 Years
2 Years
2 Years
REAR BURNER
15 Years
10 Years
INFRA-RED SIDE BURNER
(EXCLUDING SCREEN)
15 Years 5 Years
STAINLESS STEEL COMPONENTS
15 Years
5 Years
REMAINING PARTS & PAINT
15 Years
2 Years
2 Years
WHAT IS NOT COVERED
Any failures or operating difficulties due to accident, abuse,
misuse, alteration, misapplication, vandalism, improper
installation or improper maintenance or service, or failure to
perform normal and routine maintenance, including but not
limited to damage caused by insects within the burner tubes,
as set out in the owner’s manual.
Deterioration or damage due to severe weather conditions
such as hail, hurricanes, earthquakes or tornadoes,
discoloration due to exposure to chemicals either directly or in
the atmosphere.
Shipping or transportation costs.
Removal or re-installation costs.
Labor costs for installation and repair.
Cost of service calls.
Liability for indirect, or consequential damages.
Gas grills deemed to be used as a communal amenity or gas
grills not directly used and maintained by the purchaser
REPLACEMENT PARTS
“Genuine OMC Gas Grill Parts” must always be used for
replacement. Use of any other parts will automatically nullify
the above warranty.
BURNERS
The life of OMC burners (made of stainless steel) depends
almost entirely on proper use, cleaning and maintenance. This
warranty does not cover failure due to improper use and
maintenance. For proper burner maintenance instructions see
page 10.
PORCELAIN-COATED COOKING GRIDS
All OMC cast iron cooking grids are coated with a durable
porcelain enamel to assist in cleaning and reduce the
tendency of food sticking to the grid. Porcelain is essentially a
glass coating. Some chipping may occur if mishandled. This
will not affect the use or performance of the grids. The grids
are not warranted against chipping or rusting due to
mishandling. Consult “Maintenance” (page 10) for proper
cooking grid care and cleaning instructions.
VAPORIZATION SYSTEMS
OMC Gas Grills are designed for use with Flav-R-Wave™
vaporization systems. Use of any other product will nullify
the warranty.
FLAV-R-WAVE™
The Flav-R-Wave™ is warranted against defects in materials
or rust through for a period of 3 years on Monarch, Signet,
Baron, 5 years on Sovereign, Regal and Imperial and 2
years on all other models from date of purchase. Surface
rust will not affect the performance of the Flav-R-Wave™
and is not covered by the warranty. See “Maintenance”
(page 10) for proper Flav-R-Wave care instructions.
FREIGHT
Courtesy shipping is provided for warranty orders during the
six (6) months after the original date of purchase. After this
period, a freight charge will be applied to all warranty orders.
REGISTER YOUR GRILL
You can register your grill’s warranty online at
www.omcbbq.com or by calling 1-800-265-2150.
WARRANTY CLAIMS
All warranty is handled directly by OMC. Parts must be
returned to OMC Warranty Department, shipping charges
prepaid, accompanied by Model Number, Serial Number,
and if your grill is not registered, proof of purchase (copy of
sales slip or invoice). If inspection confirms the defect,
OMC will repair or replace such part in accordance with the
terms of the warranty.
On receipt of letter or fax (not by phone) OMC may at its
option not require part or parts to be returned.
NON AMERICAN/CANADIAN RESIDENTS
The above warranty is administered by the OMC distributor in
your country. Contact your dealer for the name of your OMC
distributor.

VEUILLEZ INSCRIRE LE NUMÉRO DE MODÈLE,
LE NUMÉRO DE SÉRIE ET LA DATE D’ACHAT
ICI.
Ces renseignements se trouvent sur une étiquette d’avertissement noire et
argent d’OMC à l’arrière ou sur le côté de votre gril à gaz.
Numéro de
modèle
-
Numéro de série
-
Date d’achat / /
jj mm aaaa
MANUEL DE L’UTILISATEUR
UTILISATION AVEC GAZ NATUREL
ANSI Z21.58-2018 / CSA 1.6-2018
TABLE DES MATIÈRES
MESURES DE SÉCURITÉ ................................................. 14
INSTALLATION.................................................................. 14
GAZ NATUREL .................................................................. 15
ALIMENTATION DU GAZ .................................................. 15
TUBES VENTURI ............................................................... 16
CONTRÔLE DES FUITES ................................................. 17
ALLUMAGE ........................................................................ 18
FONCTIONNEMENT .......................................................... 19
TECHNIQUES DE CUISSON ................................................. 19
ENTRETIEN ........................................................................ 22
DÉPANNAGE ..................................................................... 23
GARANTIE ......................................................................... 24
REMARQUE À L'INSTALLATEUR: CES INSTRUCTIONS
DOIT ÊTRE GAUCHE AVEC LE CONSOMMATEUR.
DANGER
S’IL Y A UNE ODEUR DE GAZ:
1. FERMER L’ALIMENTATION EN GAZ DE
L’APPAREIL
2. ÉTEINDRE TOUTE FLAMME NUE
3. OUVRIR LE COUVERCLE
4. SI L’ODEUR PERSISTE, ÉLOIGNEZ-VOUS
DE L’APPAREIL ET APPELEZ
IMMÉDIATEMENT VOTRE FOURNISSEUR
DE GAZ OU LES POMPIERS
AVERTISSEMENT
1. NE PAS ENTREPOSER NI UTILISER DE
L’ESSENCE OU AUTRES VAPEURS OU
LIQUIDES INFLAMMABLES À PROXIMITÉ
DE CET APPAREIL.
LIRE ATTENTIVEMENT CES DIRECTIVES AVANT D’UTILISER VOTRE GRIL
.
CONSERVER CES DIRECTIVES POUR RÉFÉRENCE ULTÉRIEURE
.
POUR LES INSTRUCTIONS D’ASSEMBLAGE, CONSULTER VOTRE MANUEL D’ASSEMBLAGE
OU VISITER www.omcbbq.com POUR VISIONNER NOS VIDÉOS SUR L’ASSEMBLAGE
.
1-800-265-2150
FR

MESURES DE SÉCURITÉ INSTALLATION
14
Votre nouveau barbecue au gaz OMC est un appareil
sécuritaire et pratique lorsqu’il est assemblé et utilisé
correctement. Toutefois, comme tout appareil fonctionnant au
gaz, certaines mesures de sécurité s’imposent. Le non
respect de ces mesures de sécurité peut causer de
sérieux dommages ou des blessures graves. Si vous avez
des questions en ce qui concerne l’assemblage ou le
fonctionnement de l’appareil, consultez votre marchand,
technicien d’appareils à gaz, compagnie de gaz ou notre
service à la clientèle au 1-800-265-2150 / info@omcbbq.com
ATTENTION
• UTILISER À L’EXTÉRIEUR SEULEMENT.
• NE PAS FAIRE FONCTIONNER CET APPAREIL SANS
SURVEILLANCE.
• PRENDRE LES PRÉCAUTIONS NÉCESSAIRES POUR
ÉLOIGNER LES ENFANTS DES SURFACES
CHAUDES.
Soyez prudent lorsque vous déplacez l’appareil. Les
bords de métal peuvent être coupants. Utilisez les gants
appropriés pour soulever ou déplacer le barbecue. Avant
de soulever le gril, retirer les tablettes latérales et les
grilles de cuisson.
PRÉCAUTIONS À PRENDRE AVEC
L’ÉLECTRICITÉ
1. Si vous utilisez un accessoire qui nécessite une source
de courant électrique avec ce gril, l’accessoire doit être
mis à la terre lorsqu’il est installé, selon les normes
locales en vigueur. En l’absence de normes locales, les
normes suivantes s’appliquent:
(É.-U.) ANSI/NFPA No. 70 - Dernière édition
(Canada) CSA C22.1 Code Canadien de l’électricité
2. Ne jamais couper ou enlever la broche de masse de la
fiche électrique.
3. Éloigner le fil électrique et le boyau d’alimentation en gaz
de toute surface chauffée.
AVERTISSEMENT LIÉ À LA
PROPOSITION 65
La manipulation du matériel en laiton de ce produit vous
expose au plomb, un produit chimique identifié par l’État de la
Californie comme cause le cancer, de malformations
congénitales et d’autres troubles de l’appareil reproducteur.
LAVEZ-VOUS LES MAINS APRÈS AVOIR MANIPULÉ CE
PRODUIT.
AVERTISSEMENT
Les combustibles utilisés dans les appareils à l’huile ou
au gaz et leurs produits de combustion contiennent des
produits chimiques identifiés par l’État de la Californie comme
cause le cancer, d’anomalies congénitales et autres
anomalies du système reproducteur. “Cet avertissement est
émis en vertu du California Health and Safety Code Sec.
25249.6”
1.
Aux États-Unis, cet appareil doit être installé selon les
normes locales et la norme nationale applicable
:
ANSI Z223.1/NFPA 54 - Dernière édition du National Fuel
Gas Code et plus récentes normes locales, s’il y a lieu.
2. Au Canada, cet appareil doit être installé selon les
normes locales et les normes applicables de la CSA:
CSA-B149.1 Code d’installation d’appareils fonctionnant
au gaz naturel ou au propane.
3. Les côtés et l’arrière de l’appareil doivent être éloignés
d’un minimum de 76cm / 30po de toute surface
combustible.
4. Ne pas utiliser cet appareil sous une toiture ou un
feuillage.
5. Cet appareil est conçu pour être UTILISÉ À
L’EXTÉRIEUR SEULEMENT. NE PAS UTILISER dans
un garage, un cabanon, sur un balcon ou tout endroit
clos.
6. NE PAS limiter la circulation d’air à l’appareil.
7. Garder les environs de l’appareil libres de matières
combustibles, d’essence et de tout liquide et vapeur
inflammables.
8. Cet appareil n’est pas conçu pour être installé sur ou
dans un véhicule récréatif ou un bateau.

GAZ NATUREL ALIMENTATION DU GAZ
15
1. Cet gril est destiné pour être utilisé avec du gaz naturel.
Ne pas utiliser avec du gaz propane (réservoir de gaz).
Les soupapes, orifices et les tuyaux sont pour gaz naturel
seulement.
2. Ne pas utiliser avec du charbon.
3. Une soupape d'arrêt doit être utilisée sur la canalisation
d'alimentation du gaz.
4. Quand l'appareil n'est pas utilisé, fermer l'alimentation du
gaz à la soupape.
5. L'appareil est fait pour opérer à une pression de 7
pouces sur colonne d'eau.
ENTREPOSAGE
1. Le gaz doit être fermé à l'alimentation du gaz naturel
quand le gril n'est pas utilise.
2. Quand le gril est entreposé dehors l'alimentation du gaz
doit être débranchée.
VERIFICATION DU GAZ A LA SOURCE
1. Cet appareil doit être débranché de la canalisation de
l'alimentation du gaz au débranchement rapide durant
une vérification à pression de ce système de plus de 1/2
psig (3.5 kPa).
2. Fermer le gril quand l'alimentation du gaz est verifiée à
une basse pression. Cet appareil devra être isolé de la
canlisation de l'alimentation du gaz en fermant la
soupape durant toute vérification de l'alimentation à une
pression égale ou moins de 1/2 psig (3.5 kPa).
1. Sur les modèles founis d'un tuyau prolongateur,
l'assemblage des tuyaux est destiné particulièrement
pour votre modèle. Ne pas essayer de modifier ou
d'ajouter à l'alimentation. Les tuyaux et les
accouplements des tayaux sont conformes au Standard
CGA CAN 1-83.
2. Pour les modèles équipés avec l'accouplement à
débranchement rapide, fermer la soupape avant de
débrancher l'accouplement.
3. L'accouplement à débranchement rapide doit rester propre et
être entretenu pour qu'il n'y ait pas de débris ou de saletés.
4. S'assurer qu'il n'y ait pas de graisse dégoutant du tuyau, et
ne pas laisser le tuyau toucher aucune surface chaude y
inclus le boîtier du gril.
5. Inspecter le tuyau en au moins une fois par année. Si le
tuyau a des fissures, des coupures, est usé ou endommagé,
l'appareil ne doit pas être utilisé.
6. Pour une réparation ou remplacement de l'assemblage des
tuyau, prendre contact avec votre marchand ou avec un
centre de service autorisé.
A. ALIMENTATION DU GAZ.
B. ACCOUPLEMENT À DÉBRANCHEMENT RAPIDE.
C. ADAPTEUR DU TUYAU.
D. TUYAU PROLONGATEUR.

TUBES VENTURI
16
Toujours garder les tubes venturi propres. Les obstructions
des tubes de venturi causées par les araignées, les insectes
et les nids peuvent s’enflammer. Même si le barbecue
s’allume, le gaz accumulé peut s’enflammer au niveau des
tubes venturi, du panneau de commande ou du brûleur
latéral.
S’il y a un retour de flamme, fermer immédiatement la
source de gaz.
Inspecter et nettoyer les tubes venturi (brûleur principal,
brûleur latéral et brûleur arrière) si vous remarquez le
suivant:
1. Une odeur de gaz.
2. Votre barbecue n’atteint pas la température désirée.
3. La température du barbecue n’est pas uniforme.
4. Les brûleurs émettent des crépitements.
INSPECTION ET NETTOYAGE DES
TUBES VENTURI
1. Fermer l’alimentation en gaz à l’aide du robinet de la
bonbonne.
2. Lorsque le barbecue est refroidi, enlever les attaches de
retenue des brûleurs et la partie supérieure du coffrage.
Soulever les brûleurs du fond du boîtier.
3. Nettoyer les tubes venturi avec une tige ou accessoire
de nettoyage à venturi (accessoire #77310 ou #18270).
4. Replacer le brûleur dans sa position originale dans le
boîtier en veillant à ce que les tubes venturi soient bien
alignés avec les orifices.
5. Replacer les attaches de retenue des brûleurs.
Remettre le couvercle du coffrage en place.

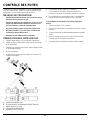
CONTRÔLE DES FUITES
17
Toutes les connexions fabriquées en usine ont été testées
pour des fuites de gaz. Toutefois, lors de l’expédition et la
manutention, un raccord pourrait s’être desserré.
MESURES DE PRÉCAUTION:
• Vérifier l’étanchéité de toutes les connexions avant
d’utiliser votre barbecue au gaz.
• Vérifier les fuites de gaz chaque fois qu'un raccord
de gaz est débranché et rebranché, au moins une
fois par année ou à période d'entreposage.
• Ne jamais fumer lorsque vous testez l’étanchéité.
• Ne jamais vérifier s’il y a des fuites à l’aide d’une
allumette ou d’une flamme nue.
• Effectuer le test d’étanchéité à l’extérieur.
VÉRIFICATION DES FUITES DE GAZ:
1. Éteindre toute flamme nue ou cigarette à proximité.
2. Vérifier à ce que l'alimentation en gaz et les vannes de
la gril est fermée.
3. Préparer une solution savonneuse: parties égales d’eau
et de détergent liquide.
4. Ouvrir la soupape.
5. A l'aide d'un pinceau, brosser chaque raccord avec la
solution savonneuse.
A. ALIMENTATION DU GAZ
B. A COUPLEMENT À DÉBRANCHEMENT RAPIDE
C. ADAPTEUR DU TUYAU
D. TUYAU PROLONGATEUR
E. VÉRIFIER LES FUITES ICI
6. Si la solution fait des bulles, il y a une fuite.
7. Si vous détectez une fuite, fermer le robinet de la
bonbonne, resserrez la connexion et testez à nouveau.
8. Si la fuite persiste, communiquez avec votre détaillant.
Ne pas faire fonctionner l’appareil s’il y a une fuite.
Si votre barbecue est équipé d’un brûleur latéral ou
arrière:
1. Suivre les étapes 1 à 4 ci-dessus.
2. Placer le bout du doigt sur l’ouverture de l’orifice au bout
du tuyau.
3. Tourner le bouton de contrôle du brûleur latéral à la position
“HIGH”.
4. Brosser chaque raccord entre l’orifice et le bouton de
contrôle avec une solution savonneuse.
5. Fermer le bouton de contrôle du brûleur arrière ou latéral.

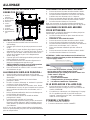
ALLUMAGE
18
COMPOSANTES DE BASE D’UN
BARBECUE AU GAZ
A. Brûleur
principal
B. Brûleur latéral
C. Brûleur arrière
D. Allumeur
E. Orifice
d'allumage
manuel
F. Poignée
G. Brûleur latéral
H. Alimentation du
gaz
INSTRUCTIONS D’ALLUMAGE
1. L’appareil doit être assemblé selon les instructions
d’assemblage.
2. S'assurer que le fournir de gaz soit proprement connecté
au gril.
3. S'assurer qu'il n'y a pas de fuites de gaz dans le système
d'alimentation de gaz. Voir "Contrôle des Fuites" (Page 17)
4. Veiller à ce que les tubes venturi sont bien situés sur les
orifices des soupapes de gaz. Voir le diagramme de
venturi. (Page 16)
5. S’assurer que les fils d’allumage du brûleur principal et du
brûleur latéral sont connectés.
6. Lire attentivement toutes les instructions figurant sur la
plaque de renseignements apposée au gril.
7. AVERTISSEMENT: Toujours ouvrir le boîtier pendant
l’allumage et ne pas se pencher au-dessus.
8. Placer les boutons de contrôle à “OFF” et ouvrir le robinet
de la bonbonne de gaz.
ALLUMAGE DU BRÛLEUR PRINCIPAL:
a. Ouvrir le boîtier et fermer seulement une fois allumé.
b. Vérifier que la pile est installée dans le système d’allumage
électronique.
c. Pousser et tourner le bouton de l’un des brûleurs
principaux à “HIGH”.
d. Pousser le bouton d’allumage et maintenir la pression
ou allumez à l’aide d’une allumette.
e. Le brûleur devrait s’allumer en 5 secondes, sinon, fermez
immédiatement la source de gaz si le barbecue ne s’allume
pas. Pour allumer le brûleur avec une allumette, voir f. ci-
dessous.
f. Insérer l’allumette enflammée dans le trou d’allumage sur
le côté inférieur droit du boîtier.
g. Pousser et tourner le bouton de contrôle du brûleur
principal droit à “HIGH”.
h. Le brûleur devrait s’allumer en 5 secondes.
i. Après l’allumage du premier brûleur, pousser et tourner le
bouton de contrôle adjacent à “HIGH” et répéter pour les
autres brûleurs qui devraient s’allumer automatiquement,
sans l’allumeur.
Avis: En cas de vent, allumer chaque brûleur individuellement.
Utiliser un porte-allumette pour placer une allumette enflammée
près de chaque brûleur.
ALLUMAGE DU BRÛLEUR LATÉRAL:
a. Pousser et tourner le bouton du brûleur latéral à “HIGH”.
b. Pousser le bouton d’allumage et maintenez la pression.
c. Le brûleur devrait s’allumer en 5 secondes. Pour allumer
le brûleur avec une allumette, voir d. ci-dessous.
d. Placer une allumette allumée près des orifices du brûleur.
e. Pousser et tourner le bouton du brûleur latéral à “HIGH”.
f. Le brûleur devrait s’allumer en 5 secondes.
Note: Les casseroles sur le brûleur latéral ne devraient pas
dépasser 23cm (9 po) de diamètre ou peser plus de 7kg (15 lb).
ALLUMAGE DU BRÛLEUR ARRIÈRE
POUR RÔTISSERIE:
Avertissement : ne pas faire fonctionner le brûleur principal en
même temps que le brûleur arrière.
a. Le brûleur arrière doit être en place avant de tourner le
bouton de contrôle.
b. ENLEVER LA GRILLE DE RÉCHAUD.
c. Pousser et tourner le bouton du brûleur arrière à “HIGH”
d. Pousser le bouton d’allumage et maintenir la pression.
e. Le brûleur devrait s’allumer en 5 secondes. Pour allumez le
brûleur avec une allumette, voir f. ci-dessous.
f. Placer une allumette enflammée près des orifices du
brûleur.
g. Pousser et tourner le bouton du brûleur arrière à “HIGH”
h. Le brûleur devrait s’allumer en 5 secondes.
ATTENTION – Vérifier votre barbecue une fois allumé. Les
orifices du brûleur devraient produire des flammes de 2.5cm
/ 1 po au réglage “HIGH”.
Si vous notez les problèmes suivants, il est possible
que les tubes venturi soient bloqués. Fermer
immédiatement le gaz et nettoyer les tubes venturi. Voir
“Tubes venturi”. (Page 16)
1. Une odeur de gaz.
2. Il y a un retour de flamme.
3. La température du gril n’est pas uniforme.
4. Les brûleurs émettent des crépitements.
SI LE BRÛLEUR NE S’ALLUME PAS:
1. Pousser et tourner le bouton de contrôle à “ARRÊT”.
Attendre 5 minutes et essayer encore, avec le bouton de
contrôle à “MEDIUM”.
2. Si un brûleur ne s’allume pas, voir “Dépannage” à la page
23. Si le problème persiste, ne pas faire fonctionner
l’appareil. Communiquez avec OMC, votre détaillant ou un
centre de service approuvé.
ÉTEINDRE L’APPAREIL:
1. Fermer le robinet de la bonbonne.
2. Tourner les boutons de contrôle à “ARRÊT”.

FONCTIONNEMENT TECHNIQUES DE CUISSON
19
Première utilisation: Avant de cuisiner avec votre barbecue
pour la première fois, allumez-le pour brûler toute odeur ou
corps étranger, comme suit:
Enlever toutes les grilles de cuisson et celle du réchauffement
et les nettoyer avec de l’eau et un savon doux. Allumer les
brûleurs, fermer le couvercle et laisser en marche pendant 20
minutes avec les boutons des valves ouvertes au réglage
‘moyen/élevé’. Éteindre le feu. Remettre les boutons des
valves à la position ‘d’arrêt (OFF)’. Laisser refroidir l’appareil
et remettre toutes les grilles à leur emplacement original.
Vous étés maintenant prêt à utiliser le gril.
Préchauffage : Préchauffer le barbecue à MEDIUM/HIGH
pendant 10 minutes, le couvercle fermé. Réduire la
température selon ce que vous allez griller. Brosser
fermement les grilles de cuisson avec une brosse en métal.
Ensuite, enduire ou vaporiser les grilles d’huile d’olive ou
végétale pour éviter que les aliments ne collent aux grilles.
Position du couvercle : La position du couvercle pendant
la cuisson est une question de préférence personnelle mais
le barbecue cuit plus rapidement, utilise moins de propane et
contrôle mieux la température lorsque le couvercle est
fermé. Un couvercle fermé donne aussi un goût plus fumé
aux viandes cuites directement sur les grilles et est aussi
indispensable pour la fumaison ou la cuisson à convection.
Système de vaporisation : Votre barbecue est conçu pour
fonctionner avec le système de vaporisation Flav-R-Wave™
compris. Ne pas utiliser de pierres de lave, de briquettes en
céramique ou tout autre système de vaporisation autre que
celui fourni avec votre barbecue.
TEMPÉRATURES DE CUISSON
Réglage élevé : La température à la surface des grilles est
d’environ 600 – 650°F (320 – 340°C). Utiliser cette
température pour chauffer rapidement le barbecue ou brûler
les résidus d’aliments des grilles à la fin de la cuisson. Cette
température est aussi idéale pour saisir des steaks avant de
réduire la température. L’option de caisson “HI” n’est que très
rarement utilisée et ne convient pas à de longues périodes de
cuisson.
Moyen/élevé : Produit une température à la surface des
grilles d’environ 550°F (290 C) avec le couvercle fermé.
Utiliser pour réchauffer le barbecue et pour cuire des steaks
et côtelettes.
Moyen : Produit une température d’environ 450° F (230°C)
à l’intérieur du barbecue avec le couvercle fermé. Utiliser
pour griller la volaille, les hamburgers, les légumes, pour
rôtir et la cuisson au four.
Bas : Produit une température d’environ 310- 350° F (155-
175° C) à l’intérieur du barbecue avec le couvercle fermé.
Utiliser pour la fumaison, de grosses coupes de viande, des
poisons délicats et pour la pâte et la pâtisserie, telles des
quesadillas.
Ces temperatures sont approximatives et variant selon
la température ambiante et la force du vent.
CUISSON DIRECTE
La cuisson directe est une méthode qui cuit les aliments sur
les grilles au-dessus d’un brûleur allumé. Il s’agit de la
méthode la plus populaire de cuire les portions individuelles
tels steaks, côtelettes, poisson, hamburgers, brochettes et
légumes.
1. Préparer la nourriture d’avance pour éviter les délais
dans la coordination du repas. Si vous utilisez une
marinade ou des épices, appliquer avant de placer la
viande sur la grille de cuisson. Si vous badigeonnez,
faites-le de 2 à 4 minutes avant la fin de la cuisson pour
éviter la carbonisation.
2. Fourchettes, pinces, gants, sauces et assaisonnements
devraient se trouver à proximité afin de ne pas devoir
quitter le barbecue pendant la cuisson.
3. La viande doit être à la température de la pièce
avant la cuisson. Ôter le surplus de graisse de la viande
pour minimiser les flambées causées par la graisse qui
s’égoutte.
4. Préchauffer le barbecue à la température désirée avec
le couvercle fermé.
5. Enduire les grilles d’huile d’olive ou végétale pour
prévenir que les aliments n’adhèrent aux grilles.
6. Ne pas saler la viande pendant la cuisson au barbecue.
La viande demeure plus juteuse si on ajoute le sel après
la cuisson.
7. Pour éviter des steaks “secs” utiliser des pinces
plutôt qu’une fourchette et débuter la cuisson à
“MEDIUM/HIGH“ pour saisir la viande et sceller la
saveur. Réduire la chaleur et allonger la durée de
cuisson pour griller des tranches de viande plus
épaisses.
8. Apprenez à vérifier si la viande est à point selon le
temps de cuisson et son apparence. La viande s’affermit
en cuisant. Un steak mou est saignant, un steak ferme
est bien cuit.
9. Suivez le guide de grillade du steak parfait pour la
plupart des viandes, poissons, volailles et légumes.

TECHNIQUES DE CUISSON
20
GUIDE DE CUISSON DIRECTE
ÉPAISSEUR
1 po
TEMPÉRATURE
DURÉE
PAR CÔTÉ
TOTALE DE
MINUTES
POULET
MOYEN /
BIEN CUIT
MOYEN / BAS 4 / 4 / 4 / 4 16
AILES DE
POULET
MOYEN /
BIEN CUIT
MOYEN / BAS 5 / 5 / 5 / 5 20
HAMBURGER
MOYEN
MOYEN / BAS
3 / 3 / 3 / 3
12
HAMBURGERS
3/4” GELÉS
MOYEN MOYEN / BAS 3 / 3 / 3 / 3 12
FILET DE
POISSON
MOYEN MOYEN 2 / 2 / 2 / 2 8 – 10
QUEUE DE
HOMARD
MOYEN MOYEN 4 / 4 / 4 / 4 16 - 20
UTILISEZ LA TECHNIQUE DE CUISSON DU BIFTECK PARFAIT (PAGE 19)
CUISSON INDIRECTE À LA CONVECTION
Cette méthode est idéale pour cuire de grosses coupes de
viandes comme des rôtis ou des volailles. La viande est
cuite par l’air chaud qui circule autour des aliments.
1. Pour la plupart des cuissons à convection avec ou sans
tournebroche, on recommande l’utilisation d’une
lèchefrite pour capter les jus de cuisson. Placer la
lèchefrite sur le Flav- R-Wave, sous le centre de la
viande. Verser un demi à un pouce d’eau dans la
lèchefrite. Pour plus de saveur, ajouter du jus de fruit, du
vin ou une marinade. Ne pas laisser le liquide s’évaporer
complètement de la lèchefrite.
2. On recommande de fermer le couvercle et de cuire à
basse température pour la cuisson par convection sans
tournebroche. Tous les brûleurs peuvent être à “LOW”
ou les brûleurs extérieurs à “MEDIUM” et le(s) brûleur(s)
du centre à “OFF”. En fermant les brûleurs du centre, on
évite que le liquide dans la lèchefrite ne brûle.
3. Avant de placer la viande sur le gril, badigeonnez d’huile
végétale pour dorer la viande.
4. La cuisson indirecte sans lèchefrite est déconseillée. Si
vous le faites, faites bien attention car les jus de cuisson
pourraient causer un feu de graisse.
5. Éteindre le gril et laisser refroidir avant d’enlever la
lèchefrite. Les jus de cuisson sont hautement
inflammables et doivent être manipulés avec soin pour
éviter les blessures.
6. Pour une cuisson à convection de rôtis et de volaille
sans tournebroche, placer la viande sur une rôtissoire
directement sur les grilles de cuisson.
GUIDE POUR LA CUISSON À
CONVECTION ET AU TOURNEBROCHE
RÔTI DE BOEUF
3 - 6 Lb.
MOYEN/BAS
2 – 4 HRS
RÔTI DE BOEUF
6 - 10 Lb.
MOYEN/BAS
3 – 5 HRS
RÔTI DE PORC
2 - 5 Lb.
MOYEN/BAS
2 – 4 HRS
RÔTI DE PORC
6 - 10 Lb.
MOYEN/BAS
3 – 5 HRS
DINDE OU POULET
2 - 5 Lb.
MOYEN/BAS
2 – 4 HRS
DINDE OU POULET
5 - 10 Lb.
MOYEN/BAS
3 – 5 HRS
QUAND VOUS UTILISEZ LE BRÛLEUR ARRIÈRE, RÉGLER À
MOYEN / HAUTE
CUISSON AU TOURNEBROCHE
Suivre les étapes de la cuisson indirecte à convection.
1. Le tournebroche peut accommoder jusqu’à 15 lb (7 kg)
de viande, limité seulement par l’espace de rotation.
Pour de meilleurs résultats, installer la viande au centre
de la broche afin qu’elle soit bien équilibrée.
2. Si l’espace le permet, le tournebroche peut être utilisé
avec les grilles de cuisson en place.
3. Bien attacher la viande sur la broche avant de l’installer
sur le barbecue. Pour la volaille, attacher fermement les
ailes et les cuisses.
CUISSON AU TOURNEBROCHE AVEC
BRÛLEUR ARRIÈRE
1. Certains modèles sont équipés d’un brûleur arrière pour
la cuisson au tournebroche. Cette méthode offre des
résultats supérieurs pour la cuisson de rôtis et de
volaille. Puisque la source de chaleur est située à
l’arrière, il n’y aura pas de flambée causée par
l’égouttement des jus de cuisson. Un plat ou une
lèchefrite placée sous la broche permettra de recueillir
les jus pour l’arrosage ou la préparation d’une sauce.
2. Le brûleur arrière à ressort peut être facilement enlevé
lorsqu’il n’est pas utilisé.
3. Pour le fonctionnement du brûleur arrière, voir “Allumage
du brûleur arrière”.
(Page 18)
GUIDE DE TEMPÉRATURE
POUR VIANDES ET VOLAILLES
SAIGNANT
MOYEN
BIEN CUIT
BOEUF/AGNEAU/VEAU
130°F / 55°C
146°F / 63°C
160°F / 70°C
PORC
150°F / 65°C
170°F / 77°C
VOLAILLE
170°F / 77°C
HAMBURGER
160°F / 70°C
POUR DE MEILLEURS RÉSULTATS, UTILISER UN THERMOMÈTRE À
VIANDE
La page est en cours de chargement...
La page est en cours de chargement...
La page est en cours de chargement...
La page est en cours de chargement...
La page est en cours de chargement...
La page est en cours de chargement...
La page est en cours de chargement...
La page est en cours de chargement...
La page est en cours de chargement...
La page est en cours de chargement...
La page est en cours de chargement...
La page est en cours de chargement...
La page est en cours de chargement...
La page est en cours de chargement...
La page est en cours de chargement...
La page est en cours de chargement...
-
 1
1
-
 2
2
-
 3
3
-
 4
4
-
 5
5
-
 6
6
-
 7
7
-
 8
8
-
 9
9
-
 10
10
-
 11
11
-
 12
12
-
 13
13
-
 14
14
-
 15
15
-
 16
16
-
 17
17
-
 18
18
-
 19
19
-
 20
20
-
 21
21
-
 22
22
-
 23
23
-
 24
24
-
 25
25
-
 26
26
-
 27
27
-
 28
28
-
 29
29
-
 30
30
-
 31
31
-
 32
32
-
 33
33
-
 34
34
-
 35
35
-
 36
36


Broil King 874214/874217 Le manuel du propriétaire
- Catégorie
- Barbecues
- Taper
- Le manuel du propriétaire
