La page est en cours de chargement...

If fixture is provided with ground wire. Connect fixture
ground wire to outlet box ground wire with wire connector
after following the above steps. Never connect ground
wire to black or white power supply wires.
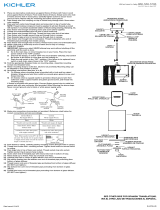
4) Make wire connections. Reference
chart below for correct connections and wire accordingly.
PRECAUCIÓN – RIESGO DE DESCARGA ELÉCTRICA – Desco-necte la
electricidad en el panel principal del interruptor au-tomático o caja
principal de fusibles antes de comenzar y durante la instalación.
ADVERTENCIA:
Este accesorio está destinado a la instalación de acuerdo con el National
Electrical Code (NEC) y todas las especificaciones del código local. Si no
está familiarizado con los requisitos del código, la instalación se
recomienda un electricista certificado.
GREEN GROUND
SCREW
CUPPED
WASHER
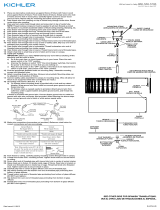
Thread hexnut onto threaded pipe so that 5 threads are
exposed above hexnut. Thread that end of threaded pipe into
mounting strap and tighten hexnut against mounting strap.
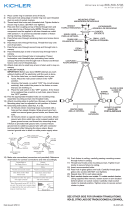
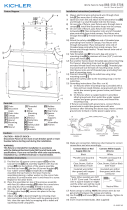
Grounding instructions: (See Illus. A or B).
On fixtures where mounting strap is provided with a hole
and two raised dimples. Wrap ground wire from outlet
box around green ground screw, and thread into hole.
B) On fixtures where a cupped washer is provided. Attach
ground wire from outlet box under cupped washer and
green ground screw, and thread into mounting strap.
OUTLET BOX
GROUND
FIXTURE
GROUND
DIMPLES
WIRE CONNECTOR
(NOT PROVIDED)
OUTLET BOX
GROUND
GREEN GROUND
SCREW
FIXTURE
GROUND
Connect Black or
Red Supply Wire to:
Connect
White Supply Wire to:
Black White
*Parallel cord (round & smooth) *Parallel cord (square & ridged)
Clear, Brown, Gold or Black
without tracer
Clear, Brown, Gold or Black
with tracer
Insulated wire (other than green)
with copper conductor
Insulated wire (other than green)
with silver conductor
*Note: When parallel wires (SPT I & SPT II)
are used. The neutral wire is square shaped
or ridged and the other wire will be round in
shape or smooth (see illus.) Neutral Wire
IS-45922-US
Enrosque la restante tuerca hexagonal en el tubo roscado y
apriétela para asegurar el artefacto a la pared.
Enrosque la perilla de sujeción del capuchón en el tubo
roscado. Apriete para cubrir la tuerca hexagonal.
Coloque el vidrio sobre el portalámparas.
Enrosque el anillo del portalámparas en el portalámparas.
(NO apriete demasiado).
Conectar el alambre de
suministro negro o rojo al
Conectar el alambre de
suministro blanco al
Negro Blanco
*Cordon paralelo (redondo y liso) *Cordon paralelo (cuadrado y estriado)
Claro, marrón, amarillio o negro
sin hebra identificadora
Claro, marrón, amarillio o negro
con hebra identificadora
Alambre aislado (diferente del verde)
con conductor de cobre
Alambre aislado (diferente del
verde) con conductor de plata
*Nota: Cuando se utiliza alambre paralelo
(SPT I y SPT II). El alambre neutro es de forma
cuadrada o estriada y el otro alambre será de
forma redonda o lisa. (Vea la ilustracíón). Hilo Neutral
ARANDELA
CONCAVA
AB
TIERRA DE LA
CAJA DE SALIDA
TORNILLO DE TIERRA,
VERDE
DEPRESIONES
TIERRA
ARTEFACTO
CONECTOR DE ALAMBRE
(NO SE PROVEE)
TIERRA DE LA
CAJA DE SALIDA
TORNILLO DE TIERRA,
VERDE
TIERRA
ARTEFACTO
We’re here to help 866-558-5706
Hrs: M-F 9am to 5pm EST
SOCKET RING
ANILO del CASQUILLO
GLASS
VIDRIO
MOUNTING STRAP
ABRAZADERA de MONTAJE
CANOPY
ESCUDETE
SOCKET
CAQUILLO
HEXNUT
TUERCA HEXAGONAL
LOCK-UP FINIAL
REMATE de BLOQUEO
TUBO ROSCADO
MOUNTING STRAP SCREW
TORNILLO de la ABRAZADERA
de MONTAJE
A)
CAUTION – RISK OF SHOCK – Disconnect Power at the main
circuit breaker panel or main fuse box before starting and during
the installation.
WARNING:
This fixture is intended for installation in accordance with the
National Electrical Code (NEC) and all local code specifications. If
you are not familiar with code requirements, installation by a
certified electrician is recommended.
1) Attach mounting strap to outlet box.
B
A
2)
3)
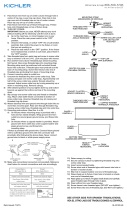
5) Push fixture to wall, carefully passing threaded pipe through hole in canopy.
Thread the remaining hexnut onto the threaded pipe. Tighten hexnut to
secure fixture to wall.
Screw lock-up finial knob onto threaded pipe. Tighten to cover the hexnut.
Set glass down over socket.
Thread socket ring onto socket. (DO NOT over tighten)
6)
7)
8)
9)
5) Empuje el artefacto a la pared, pasando cuidadosamente el
tubo roscado a través del agujero en el escudete.
6)
7)
8)
9)
Si la lámpara viene con alambre a tierra. Conecter alambre a tierra
de la lámpara al alambre a tierra de la caja tomacorriente con un
conector de alambres. Espués de seguir los pasos anteriores.
Nunca conectar el alambra a tierra a los alambres eléctros negro
o blanco.
Haga les conexiones de los alambres. La tabla de referencia indica
las conexiones correctas y los alambres correspondientes.
4)
dos hoyue los realzados. Enrollar el alambre a tierra de la caja
Sujete la plancha para montar a la caja de conexión.
Atornille la tuerca hexagonal en el tubo roscado de manera que 5 hilos de
rosca estén expuestos arriba de la tuerca hexagonal. Atornille el extremo
del tubo roscado en la plancha para montaje y apriete la tuerca hexagonal
contra la plancha para montaje.
Instrucciones de conexión a tierra solamente para los Estados Unidos.
(Vea la ilustracion A o B).
A) En las lámparas que tienen el fleje de montaje con un agujero y
tomacorriente alrededor del tornillo verde y pasarlo por el aquiero.
B) En las lámparas con una arandela acopada. Fijar el alambre a tierra
de la caja tomacorriente del ajo de la arandela acoada y tornillo
verde, y paser por el fleje de montaje.
1)
2)
3)
THREADED PIPE

Push fixture to wall, carefully passing threaded pipe through
hole in canopy.
Thread the remaining hexnut onto the threaded pipe. Tighten
hexnut to secure fixture to wall.
Screw lock-up finial knob onto threaded pipe.
Tighten to cover the hexnut.
Set glass down over socket.
Thread socket ring onto socket. (DO NOT over tighten)
Rapprocher le luminaire du mur en passant soigneusement le tube fileté
par le trou du couvercle.
Visser l’écrou hexagonal restant sur le tube fileté. Serrer l’écrou
hexagonal pour fixer le luminaire au mur.
Visser l’ornement de verrouillage sur le tube fileté. Serrer pour couvrir
l’écrou hexagonal.
Installer le verre sur la douille.
Serrer l’anneau de la douille sur la douille. (NE PAS serrer avec excès).
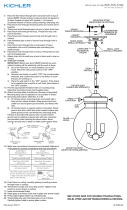
Connect Black or
Red Supply Wire to:
Connect
White Supply Wire to:
Black White
*Parallel cord (round & smooth) *Parallel cord (square & ridged)
Clear, Brown, Gold or Black
without tracer
Clear, Brown, Gold or Black
with tracer
Insulated wire (other than green)
with copper conductor
Insulated wire (other than green)
with silver conductor
*Note: When parallel wires (SPT I & SPT II)
are used. The neutral wire is square shaped
or ridged and the other wire will be round in
shape or smooth (see illus.) Neutral Wire
IS-45922-CB
INSTRUCTIONS
For Assembling and Installing Fixtures in Canada
Pour L’assemblage et L’installation Au Canada
Connecter le fil noir ou
rouge de la boite Connecter le fil blanc de la boîte
A Noir A Blanc
*Au cordon parallèle (rond et lisse) *Au cordon parallele (à angles droits el strié)
Au bransparent, doré, marron, ou
noir sans fil distinctif
Au transparent, doré, marron, ou
noir avec un til distinctif
Fil isolé (sauf fil vert) avec
conducteur en cuivre
Fil isolé (sauf fil vert) avec
conducteur en argent
*Remarque: Avec emploi d’un fil paralléle
(SPT I et SPT II). Le fil neutre est á angles
droits ou strié et l’autre fil doit étre rond ou
lisse (Voir le schéma). Fil Neutre
We’re here to help 866-558-5706
Hrs: M-F 9am to 5pm EST
SOCKET RING
ANNEAU de DOUILLE
GLASS
VERRE
SOCKET
DOUILLE
CANOPY
COUVERCLE
LOCK-UP FINIAL
BOULE de ORNAMENT
HEXNUT
ECROU HEXAGONAL
MOUNTING STRAP
ETRIER de MONTAGE
MOUNTING STRAP SCREW
VIS de L’ETRIER de MONTAGE
THREADED PIPE
TIGE FILETEE
1) Visser le collier de fixaiton à la boîte de jonction
2) Visser l’écrou hexagonal sur le tube fileté de façon a laisser
cinq fils a découvert au-dessus de l’ecrou. Enfiler cette
extrémite du tube filete dans le collier de faxation et serrer
l’ecrou contre le colllier de fixation.
3) Connecter les fils. Se reporter au tableau ci-dessous pour
faire les connexions.
4)
5)
8)
7)
6)
4)
5)
6)
7)
8)
ATTENTION – RISQUE DE DÉCHARGES ÉLECTRIQUES –
Couper le courant au niveau du panneau du disjoncteur du
circuit principal ou de la boîte à fusibles principale avant de
procéder à l’installation.
ATTENTION:
Ce luminaire doit être installé conformément aux codes
d’électricité nationaux (NEC) et satisfaire toutes les
spécifications des codes locaux. Si vous ne connaissez pas
les exigences de ces codes, il est recommandé de confier
l’installation à un électricien certifié.
CAUTION – RISK OF SHOCK – Disconnect Power at the main
circuit breaker panel or main fuse box before starting and
during the installation.
WARNING:
This fixture is intended for installation in accordance with the
National Electrical Code (NEC) and all local code
specifications. If you are not familiar with code requirements,
installation by a certified electrician is recommended.
1) Attach mounting strap to outlet box.
2) Thread hexnut onto threaded pipe so that 5 threads are
exposed above hexnut. Thread that end of threaded pipe into
mounting strap and tighten hexnut against mounting strap.
3) Make wire connections Reference chart below for correct
connections and wire accordingly.
/