Jade Bath HDB-5-FST-01 Guide d'installation
- Taper
- Guide d'installation

Installation Instructions
Instructions d'installation
MANSFIELD
Free Standing Bath tub
Bain Autoportant

If you have questions, give us a call: 1-866-333-0555
Pour toute questions,
veuillez communiquer sans-frais au 1-866-333-0555
Customer service / Service à la clientèle Cleaning and maintenance / Nettoyage et maintenance
ATTENTION:
Ne pas utiliser une lame en métal, une brosse métallique,de produits
abrasifs, papier sablé ou tous autres produits qui pourraient égratigner ou
endommager la surface du bain.
5
FOR DAILY MAINTENANCE / POUR UN NETTOYAGE QUOTIDIEN
Various types of bacteria may build up in the tub over time. Regular disinfectants
provide eective defense against bacterias.
Avec le temps, dierent types de bactéries se cumulent dans le bain. L’application
d’un produit désinfectant de façon régulière, est un moyen ecace de combattre
les bactéries.
Use a moist cloth and gentle liquid detergent.
Utiliser un chion humide et détergent liquide doux.
FOR ACRYLIC SURFACES / POUR LES SURFACES EN ACRYLIQUE
Occasional use of a special acrylic surface cleaner will add luster and protect
the nish.
L’utilisation à l’occasion de produits de nettoyage de surface pour l’acrylique
permet de maintenir le lustre et protéger le ni du bain.
PAINT STAINS / TACHES DE PEINTURE
Use either turpentine or a paint thinner to remove any paint stains.
Utiliser de la térébenthine ou un autre dissolvant pour enlever les taches de peinture.
(vérier qu’il n’altère pas l’acrylique)
WARNING:
Do not use a metal blade or a metal brush, abrasive cleaners, scrapers,
or any items, products that could scratch, dull the surface.
REPAIR WITH COMPOUND / REPARATION AVEC DU COMPOSE
Use a plastic or wood spatula covered with a damp cloth.
Utiliser une spatule en plastique ou en bois couvert d’un chion.
IMPORTANT:
The use of a professional company is highly recommended for any repair.
Il est strictement recommandé de faire appel à des professionels pour les
réparations de surface.

Installation / Installation
NOTE:
Use a soft surface to avoid
scratching the tub .
Utiliser une surface non rugueuse
pour ne pas égratigner le bain.
Installation / Installation
3
This product is heavy and requires
two people to install .
Ce produit est lourd et nécessite 2 personnes
pour l’installation.
WARNING: / ATTENTION:
Tools required / Outils requis:
WRENCH / CLE LEVEL / NIVEAU
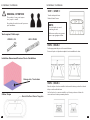
Installation Dimensioned Drawing / Dessin d’installation
Drainage hole / Trou du drain
Cutline / Coupe
Drain & Overow / Drain et Trop-plein
2
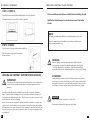
STEP 1: / ETAPE 1:
Turn the tub upside down.
Mettre le bain à l’envers.
STEP 2: / ETAPE 2:
Fix the appropriate tail piece to the waste & drainer .
Connecter la pièce de plomberie adaptée à votre installation de drain.
STEP 3: / ETAPE 3:
Once the tail piece has been installed on the waste & drainer, position the tub and
tail piece in-line with the drain.
Une fois la pièce de connexion installée sous le bain, positionner le bain et le
connecteur avec le drain provenant plancher.

1
IMPORTANT:
The unit must be installed perfectly leveled and must never touch the oor.
Le bain doit être parfaitement à niveau er ne devrait jamais toucher le
plancher.
Installation / Installation
STEP 4: / ETAPE 4:
Carefully lower the tub with the installed tail piece into the drain hole.
Délicatement baisser le bain dans le drain de plancher.
STEP 5: / ETAPE 5:
Use level ruler to keep level while adjusting tub legs.
Utiliser les pattes d’ajustement pour mettre
le bain au niveau
LEVELING AND SUPPORT / SUPPORT ET MISE A NIVEAU
Level the unit by adjusting the adjustable legs to the oor under the aluminium
frame. The tub should be standing on it’s legs on the oor and have a clearance of
2 cm between the bathtub and the oor. Once the unit is in position, ensure it is level
in both directions for proper drainage.
Mettre le bain à niveau en ajustant les pattes ajustables au plancher. Les pattes sont
situées sous le cadre de métal en dessous du bain. Le bain doit se tenir sur ses pattes
et il devrait y avoir un espace d’environ ¼” entre le bain et le plancher. Une fois le bain
en position, s’assurer qu’il est bien à niveau des deux côtés et que le drainage se fait
correctement.
Before the installation / Avant d’installer
NOTE:
We highly recommend installation by a certied plumber as per code.
Nous recommandons que l'installation de plomberie soit faite par un
professionnel suivant le code.
Before installing, ensure that the surface that will hold the tub
can support the weight of the tub lled with water (about 500Kgs
/ 1000Lbs). Always protect the surface of the tub until installation
is complete. Make sure the area around the tub is clear to avoid damage.
WARNING:
ATTENTION:
Avant d’installer, assurez-vous que le plancher qui va recevoir le bain
pourra supporter un poids de 500Kg (1000Lbs). Pendant toute la durée
des travaux, assurez-vous que le bain est protégé an d’éviter qu'il soit
endommagé. Assurez-vous que l'espace au tour du bain est dégagé.
Please read these instructions carefully before installing the tub.
Veuillez lire attentivement ces inindications avant d’installer
le bain.
DANGER:
Do not use any electrical device close to the tub.
Ne pas utiliser d’appareil électrique proche du bain.
4
-
 1
1
-
 2
2
-
 3
3
-
 4
4


Jade Bath HDB-5-FST-01 Guide d'installation
- Taper
- Guide d'installation
dans d''autres langues
Autres documents
-
MAAX 106994-000-002 Fontana Guide d'installation
-
MAAX 106151-000-002-103 Manuel utilisateur
-
American Standard 2691004.020 Guide d'installation
-
MAAX 105680-000-001 Murmur 5555 Guide d'installation
-
MAAX 410024-000-001 ModulR 6032 drop-in Guide d'installation
-
MAAX 101269-000-001 Optik 6636 Guide d'installation
-
MAAX 105454-000-001-802 Guide d'installation