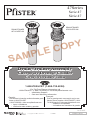
Pfister T47-7GLK Specification and Owner Manual
- Taper
- Specification and Owner Manual

47Series
Serie 47
Série 47
Français :
Pour les renseignment concernant le service san
frais de Pfaucet, appelez 1-800-PFAUCET (1-800-
732 8238) appel ou visite www.psterfaucets.com
• Assistance à l’installation
• Informations sur l’entretien et la garantie
Español:
Para obtener información mediante llamadas gratis,
llame al 1-800-PFAUCET
(1-800-732-8238) o visite www.psterfaucet.com
• Apoyo a instaladores
• Información sobre cuidado y garantías
1-800-PFAUCET (1-800-732-8238)
For Toll-Free Pfaucet information call
1-800-PFAUCET (1-800-732-8238) or visit www.psterfaucets.com
• Installation Support
• Care and Warranty Information
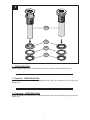
Drain/Strainer Assembly
Cuerpo De Drenaje/Colador
Corps De Drainage/Tamis
DRAIN/STRAINER
WITH OVERFLOW
DRAIN/STRAINER
LESS OVERFLOW
Jul 5, 2017
31342-0400
12209-03
Copyright © 2017, Pfister Inc.
SAMPLE COPY

1
1 PREPARATION
Remove Rubber Washer (1A), Friction Washer (1B) and Locknut (1C) from Drain Body (1D).
1 Español: PREPARACIÓN
Retire la arandela de caucho (1A), la arandela de fricción (1B) y la contratuerca (1C) del cuerpo de
drenaje (1D).
1 Français : PRÉPARATION
Retirer la rondelle en caoutchouc(1A), rondelle de friction (1B) et l’écrou de blocage (1C) du corps de
bonde (1D).
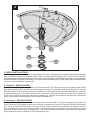
2
1A
1A
1B
1B
1C
1C
2D
2D

2
2 BODY INSTALLATION
The Drain Body (2A) can be installed with or without Rubber Seal (2B). If Drain Body (2A) is installed without Rubber Seal (2B),
apply a small bead of plumber’s putty underneath the Flange (2C) and around Drain Opening (2D). Use PTFE plumber’s tape to
all threaded ttings according to manufacturer’s instructions. Insert Drain Body (2A) into Drain Opening (2D). From underneath,
insert Rubber Washer (2E) and Friction Washer (2F) over the bottom of Drain Body (2A). Thread Locknut (2G) until Rubber Washer
(2E) seats securely inside Drain Opening (2D).
2 Español: INSTALACIÓN
El cuerpo de drenaje (2A) puede instalarse con o sin sello de hule (2B). Si el cuerpo de drenaje (2A) se instala sin sello de hule
(2B), aplique pequeño cordón de masilla de plomería debajo de la brida (2C) y alrededor del agujero de drenaje (2D). Coloque
cinta para plomería PTFE alrededor de todos los conectadores con rosca siguiendo las instrucciones del fabricante. Introduzca
el cuerpo de drenaje (2A) en el agujero de drenaje (2D). Desde abajo, introduzca la arandela de caucho (2E) y la arandela de
fricción (2D) a través de la parte inferior del cuerpo de drenaje (2A). Enrosque la contratuerca (2G) hasta que la arandela de
caucho (2E) se asiente rmemente dentro de la el agujero de drenaje (2D).
2 Français : INSTALLATION
Le corps de drainage (2A) peut être posée avec ou sans joint en caoutchouc (2B). Si le corps de drainage (2A) est posée sans
joint en caoutchouc (2B), appliquer un petit cordon de mastic de plombier sous la bride (2C) et autour de l’orice d’écoulement
(2D). Coller du ruban PTFE de plombier sur tous les raccords letés conformément aux instructions du fabricant. Insérer le
corps de drainage (2A) dans l’ori ce d’écoulement (2D). Insérer depuis le dessous la rondelle en caoutchouc (2E) et la rondelle
de friction (2F) dans le bas de corps de drainage (2A). Visser l’écrou de blocage (2G) jusqu’à ce que la rondelle de caoutchouc
(2E) se mette bien en place à l’intérieur de l’ori ce d’écoulement (2D).
3
2A
2E
2B
2D
2F
2C
2G

19701 DaVinci
Lake Forest, CA 92610
Phone: 1-800-Pfaucet
www.psterfaucets.com
English Español Français
*
Letter Designates Finish La Letra Indica el Terminado La Lettre Designe La Fini
C Polished Chrome Cromo Pulido Chrome Poli
B Black Negra Noire
BG PVD Brushed Gold PVD Oro Cepillado PVD Or Balayé
D PVD Polished Nickel PVD Niquel Pulido PVD Nickel Poli
K PVD Brushed Nickel PVD Niquel Cepillado PVD Nickel Brosse
U Rustic Bronze Bronce Rústico Bronze Rustique
Y Tuscan Bronze Bronce Toscano Bronze Le Toscan
DRAIN/STRAINER
WITH OVERFLOW
DRAIN/STRAINER
LESS OVERFLOW
T47-9GS*
T47-7GL*
SAMPLE COPY
-
 1
1
-
 2
2
-
 3
3
-
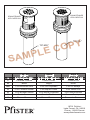 4
4


Pfister T47-7GLK Specification and Owner Manual
- Taper
- Specification and Owner Manual
dans d''autres langues
- English: Pfister T47-7GLK
- español: Pfister T47-7GLK

