PELHAM & WHITE PWS101-D Guide d'installation
- Taper
- Guide d'installation

Product Features
• High quality 16-Gauge 304 stainless steel alloy
• Sound deadening rubber pads and undercoating
• 10mm/0.4” radius corners for easy cleaning
• Includes stainless steel wire grid
• Includes stainless steel strainer drain
Unpack and inspect your sink upon delivery to avoid costly contractor delays
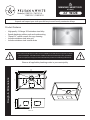
Rough-In Dimensions
Observe all applicable plumbing codes in your municipality
This sink is intended only for under-counter installations of solid-surface composite or natural
stone countertops. It should never be installed in laminated countertops. Thus, specialized
tools are required. It is highly recommended that this product be installed by professionals.
Section A-A
10”
9.6”
4.7”
16”
18”
1” 28”
30”
3.5”
4.5”
MINIMUM CABINET SIZE:
AT LEAST
33” WIDE
Model(s): PWS101 / PWS101-A
PWS101-C / PWS101-D

Pelham & White reserves the right to make specication and pricing changes without notice or obligation, and to change or discontinue models and nishes.
548 South Columbus Avenue • Mount Vernon, New York 10550
1-855-561-5222 • www.pelhamandwhite.com All rights reserved. Copyright Pelham & White 2023.
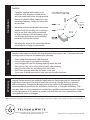
Installation
Installer:
• Template supplied with product is for
reference only. Be sure to double check
with the actual sink before cutting opening.
Be sure to properly allow clearance for the
mounting hardware, faucet, and other sink
accessories.
• Mounting anchors and brackets have been
supplied with this product, but it is always
best to use your own preferred methods
of sink securement and attachment, given
the different applications and countertop
materials that may be involved.
• Mounting the faucet to the countertop before
installing sink is highly recommended.
Silicone
Adhesiv
e
And
Care
Stainless steel sinks are durable, but they do benet from proper care. If you want your sink
to always look it’s best we recommend the following:
• Clean using a non-abrasive, mild detergent.
• Use only a sponge or soft cloth for cleaning.
• Avoid using steel wool for cleaning anything within the sink.
• Remove any cast iron or steel pans promptly after cleaning.
• Keep the sink clean, dry and empty when not in use.
• Don’t leave sponges and other wet items in the sink.
• If you want to avoid water spots, wipe your sink dry after each use.
Warranty
Limited lifetime warranty on residential applications or limited one year for commercial
applications extended to the original purchaser or owner covering defects in material
and workmanship. Excluded is damage done to the surface by disregarding the care
recommendations provided in the installation instructions, or improper installation. This
warranty does not cover products not installed by a qualied professional installer. Warranty
covers replacement of the defective product only and does not cover installation or other
consequential costs or damages.

Product Features
• Lead-free solid brass construction
• NSF Certied cartridge
• 2 Function sprayer
• Lever style handle
• Integrated supply lines with 3/8” compression
connections
• Max ow rate: 1.5 GPM @ 60 PSI
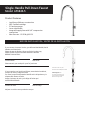
If you contact Customer Service, you will need the Model#, Serial
Number and Date Code.
Please locate the Product ID tag and Serial number tag.
Please record the serial number and date code here
BEFORE YOU INSTALL:
Si se comunica con Servicio al Cliente, necesitará el modelo #,
número de serie y código de fecha.
Por favor, busque la etiqueta de identicación del producto y la
etiqueta del número de serie.
Anote el número de serie y el código de fecha aquí
ANTES DE INSTALAR:
Serial Number
número de serie
Please attach your receipt for proof of purchase.
Adjunte su recibo como prueba de compra.
Date Code
Fecha Código
BEFORE INSTALLATION / ANTES DE LA INSTALACIÓN
Single-Handle Pull-Down Faucet
Model: AF6846-5
Serial number is under cover plate.
El numero de serie esta debajo de la cubierta.
Product ID tag can be found
on the hot supply line.
Las estiquetas de identicacion del
grifo se encontratan en la tuberia de
alimentacion de agua caliente.

HELPFUL TOOLS (NOT INCLUDED) / HERRAMIENTAS ÚTILES (NO SE INCLUYEN)
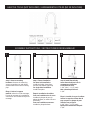
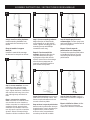
ASSEMBLY INSTRUCTIONS / INSTRUCCIONES DE ENSAMBLAJE
Step 1: Remove mounting
hardware: Remove the mounting
screws, mounting nut, and rubber
& metal washer from the mounting
pipe
Étape 1: Retirer le support
matériel: retirez les vis de montage,
l’écrou de montage et la rondelle en
caoutchouc et en métal du tuyau de
montage
Step 2: Faucet installation
For three-hole installation:
Install deck plate, base plate,
and silicone sealant (optional)
For single-hole installation:
Install base plate
Étape 2: Installation du robinet
Pour une installation à trois trous:
Installez la plaque de pont, la
plaque de base, et mastic silicone
(facultatif)
Pour une installation monotrou:
Installer la plaque de base
Step 3: Install faucet body
Insert faucet body into hole in
countertop or deck plate
Pre-drilled hole size:
1-3/8” (min) – 1-1/2” (max)
Max countertop thickness:
1-3/8”
Étape 3: Installer le corps du robinet
Insérez le corps du robinet dans le
trou comptoir ou plaque de pont
Taille du trou pré-percé:
1-3/8” (min) – 1-1/2” (max)
Épaisseur maximale du comptoir:
1-3/8”
123

ASSEMBLY INSTRUCTIONS / INSTRUCCIONES DE ENSAMBLAJE
Step 4: Install mounting hardware:
Install mounting hardware from
underneath the countertop to the
faucet
Étape 4: Installer le support
Matériel:
Installer le matériel de montage
de dessous le comptoir au robinet
Step 7: Connect waterlines: Connect
waterlines to hot and cold copper
lines. Connect waterlines to angle
stops. Tighten both ends of waterlines
with a wrench until snug. Turn on hot
and cold angle stops and check for
leaks
Étape 7: Connecter les conduites
d’eau: Connectez les conduites d’eau
aux conduites de cuivre chaudes et
froides. Raccordez les conduites d’eau
aux butées d’angle. Serrez les deux
extrémités des conduites d’eau avec
une clé jusqu’à ce qu’elles soient bien
ajustées. Activez les butées d’angle
chaudes et froides et vériez les fuites
Step 5: Secure mounting hardware:
Adjust direction of faucet body
so that handle is on right side of
faucet. Tighten mounting nut and
mounting screws with Phillips
screwdriver until snug
Étape 5: Fixez le matériel de
montage: Ajustez la direction du
corps du robinet de sorte que
la poignée soit du côté droit du
robinet. Serrez l’écrou de montage
et les vis de montage avec un
tournevis cruciforme jusqu’à ce
qu’ils soient bien ajustés
Step 8: Flush spray hose: Remove spray
head from hose. Hold tip of hose. Turn
faucet on and let the water run for 60
seconds to ush any debris
Étape 8: Rincer le tuyau de pulvérisation:
Retirez la tête de pulvérisation du tuyau
de pulvérisation. Tenez le bout du tuyau
de pulvérisation. Ouvrez le robinet
et laissez couler l’eau pendant 60
secondes pour éliminer les débris
Step 6: Attach spray hose and
counterweight: Connect spray hose
and install weight on lowest vertical
point on spray hose
Étape 6: Fixez le tuyau de
pulvérisation et le contrepoids:
connectez le tuyau de pulvérisation
et installez le poids sur le point
vertical le plus bas du tuyau de
pulvérisation
Step 9: Check for leaks:
Check for
leaks at the connections. Retighten if
necessary
Étape 9: Vériez les fuites:
Vériez
s’il y a des fuites au niveau des
connexions. Resserrer si nécessaire
4
7
5
8
6
9

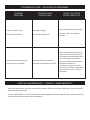
Leak from under handle.
Goteo debajo de la llave.
Damaged cartridge.
El cartucho está dañado.
Remove handle. Replace cartridge.
Retire la manija. Reemplace el
cartucho.
TROUBLESHOOTING / SOLUCIÓN DE PROBLEMAS
PROBLEM
PROBLEMA
POSSIBLE CAUSE
CAUSA POSIBLE
CORRECTIVE ACTION
ACCIÓN CORRECTIVA
Inconsistent water ow pattern.
El ujo de agua es irregular.
Cartridge needs to be replaced.
Se necesita reemplazar el cartucho.
Remove handle assembly, trim cap
and locking nut. Take out existing
cartridge and discard. Replace with
new cartridge and reassemble.
Retire el ensamble de la manija, la
tapa para el reborde y la
contratuerca. Saque el cartucho
existente y deséchelo. Reemplácelo
por un nuevo cartucho y vuelva a
ensamblar.
CARE AND MAINTENANCE / CUIDADO Y MANTENIMIENTO
• Clean periodically with a soft cloth. Avoid abrasive cleaners, steel wool, and harsh chemicals as these will dull the
nish and void your warranty.
• Limpie periódicamente con un paño suave. Evite utilizar limpiadores abrasivos, lana de acero y químicos agresivos,
ya que pueden dañar el acabado y anular la garantía.

WARRANTY / GARANTÍA
The manufacturer warrants this faucet to be free from defects in workmanship and material present at time of shipment
from the factory for a limited lifetime from the date of purchase. This warranty applies only to the original purchaser.
The manufacturer agrees to correct such defects at no charge or, at our option, replace the faucet with a comparable or
superior model. You may be required to present a copy of your sales receipt as proof of purchase. All cost of removal
and reinstallation are the expressed responsibility of the purchaser. Any damage to the faucet by accident, misuse or
improper installation, or by axing accessories not produced by the manufacturer, are the purchaser’s responsibility.
The manufacturer assumes no responsibility whatsoever for faucet installation during the warranty period. There is
no further expressed warranty. The manufacturer disclaims any and all implied warranties. The manufacturer shall not
be liable for incidental, consequential or special damages arising at or in connection with product use or performance
except as may otherwise be accorded by law. This warranty gives you specic legal rights, and you may also have other
rights which vary from state to state, province to province. This warranty supersedes all prior warranties.
El fabricante garantiza que este grifo no presenta defectos en la mano de obra ni en los materiales presentes en el
momento del transporte desde la fábrica durante un período limitado de por vida a partir de la fecha de compra. Esta
garantía es válida sólo para el comprador original. El fabricante acepta reparar dichos defectos sin cargo o, según
nuestro criterio, reemplazar el grifo por un modelo comparable o superior. Es posible que se le exija presentar una copia
del recibo de venta como comprobante de compra. Todos los costos de extracción y reinstalación son de responsabilidad
explícita del comprador. Cualquier daño al grifo producido por accidente, uso indebido o instalación incorrecta, o a causa
del uso de elementos accesorios que no son del fabricante, será responsabilidad del comprador. El fabricante no asume
ningún tipo de responsabilidad por la instalación del grifo durante el período de garantía. No existe otro tipo de garantía
explícita. El fabricante rechaza cualquiera y todas las garantías implícitas. El fabricante no se hará responsable por
daños accidentales, resultantes o especiales que surjan en relación con el uso o el funcionamiento del producto, excepto
que la ley indique lo contrario. Esta garantía le otorga derechos legales especícos, pero podría tener también otros
derechos que varían de estado/provincia a estado/provincia. Esta garantía sustituye cualquier garantía previa.

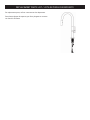
REPLACEMENT PARTS LIST / LISTA DE PIEZAS DE REPUESTO
For replacement parts, call our customer service department.
Para obtener piezas de repuesto, por favor póngase en contacto
con Servicio al Cliente.
-
 1
1
-
 2
2
-
 3
3
-
 4
4
-
 5
5
-
 6
6
-
 7
7
-
 8
8


