ZyXEL P-2612HNU-F1 Guide de démarrage rapide
- Catégorie
- Les routeurs
- Taper
- Guide de démarrage rapide
Ce manuel convient également à

www.zyxel.com
P-2612HNU-Fx
802.11n ADSL2+ VoIP IAD
Firmware V3.10
Edition 1, 9/2010
DEFAULT LOGIN DETAILS
IP Address http://192.168.1.1
User Login User Name: user
Password: 1234
Administrator
Login
User Name: admin
Password: 1234
2010 ZyXEL Communications Corporation
C

ENGLISH
2
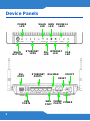
Device Panels
WLAN
POWER
DSL
INTERNET
PHONE1,2WANWLAN
ETHERNET
USB
BUTTON
LED
LEDS
LED
LED
LED LEDS
LED
LED
ON/OFF
RESET
POWER
ETHERNET
PORTS
PHONE
PORTS
DSL/WAN
WAN
PORT
DSL
PORT
USB
PORTS

3
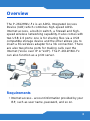
Overview
The P-2612HNU-Fx is an ADSL Integrated Access
Device (IAD) which combines high-speed ADSL
Internet access, a built-in switch, a firewall and high-
speed wireless networking capability. It also comes with
two USB 2.0 ports: one is for sharing files via a USB
compatible storage device and the other allows you to
insert a 3G wireless adapter for a 3G connection. There
are also two phone ports for making calls over the
Internet (Voice over IP or VoIP). The P-2612HNU-Fx
can also function as a print server.
Requirements
• Internet access - account information provided by your
ISP, such as user name, password, and so on.

4
• VoIP account - You need the account information
provided by your VoIP service provider (the company
that lets you make phone calls over the Internet).
• 3G account - if you want to access the Internet through
a 3G network. The P-2612HNU-Fx uses this 3G
connection as your WAN or a backup when the DSL/
Ethernet WAN connection fails.
• Internet Explorer 6.0 and later versions, with
JavaScript enabled, or Mozilla Firefox 3 and later
versions or Safari 2.0 and later versions.
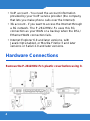
Hardware Connections
Remove the P-2612HNU-Fx’s plastic cover before using it.

5
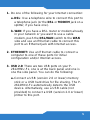
1. Do one of the following for your Internet connection:
a. DSL: Use a telephone wire to connect this port to
a telephone jack (or the DSL or MODEM jack on a
splitter, if you have one).
b. WAN: If you have a DSL router or modem already
in your network or you want to use a cable
modem, push the DSL/WAN switch to the WAN
side and use an Ethernet cable to connect this
port to an Ethernet jack with Internet access.
2. ETHERNET: Use an Ethernet cable to connect a
computer to one of these ports for initial
configuration and/or Internet access.
3. USB 2.0: There are two USB ports on your P-
2612HNU-Fx, one is at the back panel and one is
one the side panel. You can do the following:
a. Connect a USB (version 2.0 or lower) memory
stick or a USB hard drive for file sharing. The P-
2612HNU-Fx automatically detects the USB
device. Alternatively, use a USB cable (not
provided) to connect a USB (version 2.0 or lower)
printer to this port.

6
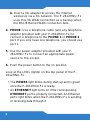
b. Insert a 3G adapter to access the Internet
wirelessly via a 3G network. The P-2612HNU-Fx
uses this 3G WAN connection as a backup when
the DSL/Ethernet WAN connection fails.
4. PHONE: Use a telephone cable (and any telephone
adaptor provided with your P-2612HNU-Fx) to
connect a telephone to the PHONE 1 or PHONE 2
port. If you only have one telephone, you should use
port 1.
5. Use the power adaptor provided with your P-
2612HNU-Fx to connect an appropriate power
source to this socket.
6. Push the power button to the on position.
Look at the LEDs (lights) on the top panel of the P-
2612HNU-Fx.
• The POWER light blinks during start-up and is green
once the P-2612HNU-Fx is ready.
•An ETHERNET light turns on if the corresponding
ETHERNET port is properly connected. An Ethernet
port’s light blinks when the P-2612HNU-Fx is sending
or receiving data through it.

7
•The WLAN/WPS light stays green when the wireless
LAN is ready. It blinks when the P-2612HNU-Fx is
sending/receiving data through the wireless LAN.
•The DSL light stays on if a physical DSL connection
exists and blinks when attempting to synchronize DSL
signal.
•The WAN light stays on if this port is properly
connected and blinks when sending or receiving data
through Ethernet WAN interface.
•The INTERNET light is solid green when Internet
access is available and blinks when sending or
receiving data.
•The PHONE lights stay on when your SIP account is
registered and they blink if the receiver is off the hook
or there is an incoming call.
•The USB light turns on when there is a USB device
(printer or memory stick) or a 3G adapter connected to
the P-2612HNU-Fx and blinks when transmitting data.
Set Up a Wireless Network
To set up a wireless network you need at least one
wireless network card/adapter.

8
• If you have a desktop computer, use either a wireless
USB adapter or a wireless PCI adapter.
• If you have a laptop, use either a wireless USB
adapter or a wireless CardBus card. These are built
into many laptops.
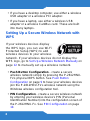
Setting Up a Secure Wireless Network with
WPS
If your wireless devices display
the WPS logo, you can use Wi-Fi
Protected Setup (WPS) to add
wireless devices to your wireless
network. If your wireless devices do not display the
WPS logo, go to Set Up a Wireless Network Manually on
page 12 to manually set up a wireless network.
• Push Button Configuration - create a secure
wireless network simply by pressing the P-2612HNU-
Fx’s physical WPS button. See Push Button
Configuration on page 9 to have your wireless devices
join the P-2612HNU-Fx’s wireless network using the
Windows wireless configuration tool.
• PIN Configuration - create a secure wireless network
by entering your wireless device’s PIN (Personal
Identification Number) into the configuration screen of
the P-2612HNU-Fx. See PIN Configuration on page
10.

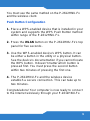
9
You must use the same method on the P-2612HNU-Fx
and the wireless client.
Push Button Configuration
1. Place a WPS-enabled device that is installed in your
system and supports the WPS Push Button method
within range of the P-2612HNU-Fx.
2. Press the WLAN button on the P-2612HNU-Fx’s top
panel for five seconds.
3. Use the WPS-enabled device’s WPS button. It can
be either a button in the utility or a physical button.
See the device’s documentation if you cannot locate
the WPS button. It doesn’t matter which button is
pressed first. You must press the second button
within two minutes of pressing the first one.
4. The P-2612HNU-Fx and the wireless device
establish a secure connection. This can take up to
two minutes.
Congratulations! Your computer is now ready to connect
to the Internet wirelessly through your P-2612HNU-Fx.

10
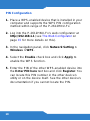
PIN Configuration
1. Place a WPS-enabled device that is installed in your
computer and supports the WPS PIN configuration
method within range of the P-2612HNU-Fx.
2. Log into the P-2612HNU-Fx’s web configurator at
http://192.168.1.1 (see The Web Configurator on
page 15 for more details on this).
3. In the navigation panel, click Network Setting >
Wireless > WPS.
4. Select the Enable check box and click Apply to
enable the WPS function.
5. Enter the PIN of the other WPS-enabled device into
the Enter PIN here text box and click Register. You
can locate this PIN number in the other device’s
utility or on the device itself. See the other device’s
documentation if you cannot locate the PIN.

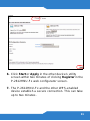
11
6. Click Start or Apply in the other device’s utility
screen within two minutes of clicking Register in the
P-2612HNU-Fx web configurator screen.
7. The P-2612HNU-Fx and the other WPS-enabled
device establish a secure connection. This can take
up to two minutes.

12
8. Congratulations! Your computer is now ready to
connect to the Internet wirelessly through your P-
2612HNU-Fx.
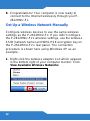
Set Up a Wireless Network Manually
Configure wireless devices to use the same wireless
settings as the P-2612HNU-Fx. If you didn’t configure
the P-2612HNU-Fx’s wireless settings, use the wireless
SSID (network name) and WPA-PSK encryption key on
the P-2612HNU-Fx’s rear panel. The connection
procedure is shown here using Windows XP as an
example.
1. Right-click the wireless adapter icon which appears
in the bottom right of your computer monitor. Click
View Available Wireless Networks.

13
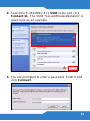
2. Select the P-2612HNU-Fx’s SSID name and click
Connect (A). The SSID “SecureWirelessNetwork” is
given here as an example.
3. You are prompted to enter a password. Enter it and
click Connect.
A

14
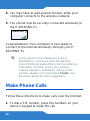
4. You may have to wait several minutes while your
computer connects to the wireless network.
5. You should now be securely connected wirelessly to
the P-2612HNU-Fx.
Congratulations! Your computer is now ready to
connect to the Internet wirelessly through your P-
2612HNU-Fx.
If you cannot connect wirelessly to the P-
2612HNU-Fx, check you have selected the
correct SSID and entered the correct security key.
If that does not work, ensure your wireless
network adapter is enabled by clicking on the
wireless adapter icon and clicking Enable. See
the User’s Guide for more suggestions.
Make Phone Calls
Follow these directions to make calls over the Internet.
1. To dial a SIP number, press the numbers on your
phone’s keypad to make the call.

15
2. To call regular telephone numbers, use your VoIP
service provider’s dialing plan.
3. For call forward service, contact your service
provider to know if they support this feature.
4. To receive a call through the P-2612HNU-Fx, the
other party must have your SIP number and a SIP
account of their own.
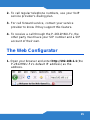
The Web Configurator
1. Open your browser and enter http://192.168.1.1 (the
P-2612HNU-Fx's default IP address) as the
address.

16
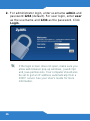
2. For administrator login, enter username admin and
password 1234 (default). For user login, enter user
as the username and 1234 as the password. Click
Login.
If the login screen does not open, make sure you
allow web browser pop-up windows, JavaScript
and Java permissions. Your computer should also
be set to get an IP address automatically from a
DHCP server. See your User’s Guide for more
information.

17
This device has been designed for the WLAN 2.4 GHz and 5 GHz
networks throughout the EC region and Switzerland, with restrictions
in France.
Ce produit est conçu pour les bandes de fréquences 2,4 Ghz et/ou 5
Ghz conformément à la législation Européenne. En France
métropolitaine, suivant les décisions n°03-908 et 03-909 de l’ARCEP,
la puissance d’émission ne devra pas dépasser 10 mW (10 dB) dans
le cadre d’une installation WiFi en extérieur pour les fréquences
comprises entre 2454 MHz et 2483,5 MhZ.
Viewing a Product’s Certifications
1. Go to www.zyxel.com.
2. Select your product from the drop-down list
box on the ZyXEL home page to go to that
product's page.
3. Select the certification you wish to view from
this page.

18
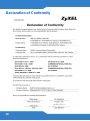
Declaration of Conformity

19
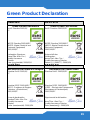
Green Product Declaration
ENGLISH DEUTSCH
Green Product Declaration
RoHS Directive 2002/95/
EC
Green Product Declaration
RoHS Directive 2002/95/EC
WEEE Directive 2002/96/EC
(WEEE: Waste Electrical and
Electronic Equipment)
2003/108/EC
WEEE Directive 2002/96/EC
(WEEE: Waste Electrical and
Electronic Equipment)
2003/108/EC
Declaration Signature:
Name/Title: Alan Cho /
Quality Assurance
Director
Date (yyyy/mm/dd): 2009/3/24
Unterschrift des
Erklärenden:
Name/Titel: Alan Cho /
Quality Assurance Director
Datum (JJJJ/MM/TT): 2009/3/24
ESPAÑOL FRANÇAIS
Declaración de Producto Ecológico
Directiva RoHS 2002/95/
EC
Déclaration de Produit Green
Directive RoHS 2002/95/EC
Directiva REEE 2002/96/EC
(REEE : Residuos de Equipos
Eléctricos y Electrónicos)
2003/108/EC
Directive DEEE 2002/96/EC
(DEEE : Déchets des Equipements
Electriques et Electroniques)
2003/108/EC
Firma de declaración:
Nombre/Título: Alan Cho
/ Quality Assurance
Director
Fecha (aaaa/mm/dd): 2009/3/24
Signature de la déclaration
:
Nom/Titre : Alan Cho /
Quality Assurance Director
Date (aaaa/mm/jj) : 2009/3/24

20
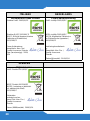
ITALIANO NEDERLANDS
Dichiarazione Green Product
Direttiva RoHS 2002/95/CE
Productmilieuverklaring
RoHS-richtlijn 2002/95/EC
Direttiva RAEE 2002/96/CE
(RAEE: Rifiuti di Apparecchiature
Elettriche ed Elettroniche)
2003/108/CE
AEEA-richtlijn 2002/96/EC
(AEEA: Afgedankte Elektrische
en Elektronische Apparaten)
2003/108/EC
Firma dichiarazione:
Nome/titolo: Alan Cho /
Quality Assurance Director
Data (aaaa/mm/gg): 2009/
3/24
Verklaringshandtekenin
g:
Naam/titel: Alan Cho /
Quality Assurance
Director
Datum(jjjj/mm/dd): 2009/3/24
SVENSKA
Miljödeklaration
RoHS Direktiv 2002/95/EC
WEEE Direktiv 2002/96/EC
(WEEE: hantering av elektriskt
och elektroniskt avfall)
2003/108/EC
Deklaration
undertecknad av:
Namn/Titel: Alan Cho /
Quality Assurance
Director
Datum (åååå/mm/dd): 2009/3/24
-
 1
1
-
 2
2
-
 3
3
-
 4
4
-
 5
5
-
 6
6
-
 7
7
-
 8
8
-
 9
9
-
 10
10
-
 11
11
-
 12
12
-
 13
13
-
 14
14
-
 15
15
-
 16
16
-
 17
17
-
 18
18
-
 19
19
-
 20
20


ZyXEL P-2612HNU-F1 Guide de démarrage rapide
- Catégorie
- Les routeurs
- Taper
- Guide de démarrage rapide
- Ce manuel convient également à
dans d''autres langues
- English: ZyXEL P-2612HNU-F1 Quick start guide
Documents connexes
-
ZyXEL P-661HNU-F3 Guide de démarrage rapide
-
ZyXEL Communications P-660HNU-F1 Guide de démarrage rapide
-
ZyXEL NBG-419N Guide de démarrage rapide
-
-
-
ZyXEL WAP3205 Le manuel du propriétaire
-
-
 ZyXEL Communications DI-106 Guide de démarrage rapide
