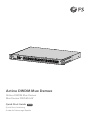
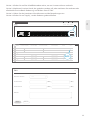
FS COM Active DWDM Mux Demux Mode d'emploi
- Taper
- Mode d'emploi

V1.0
Mux Demux DWDM Actif
Aktiver DWDM Mux Demux
Active DWDM Mux Demux
Quick Start Guide
Quick-Start Anleitung
Guide de Démarrage Rapide

1
EN
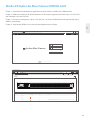
Introduction
Multiplexing up to 40 channels over one ber pair, it increases the bandwidth, capacity and
maximizes the usefulness of ber. A visual conrmation via LEDs shows that each channel and line
are set up correctly.
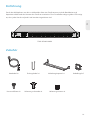
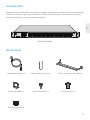
FMU-AD402160M3
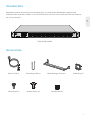
Accessories
Power Cord x2 Grounding Cable x1 Cable Manager Frame x1 Cable Ring x7
Plastic Rivet x2 Bracket Screw x4 Bracket Nut x4
C21 C39C37C35C33C31
C29C27
C25C23 C41 C51
C49C47
C43 C45 C55C53 C57
C59
MON
LINE
PWR1 PWR2 RUN 1310OSC C34C32C30C28C26
C24
C22 C42C40C38C36 C52C50C48C46C44 C56C54 C58 C60
FMU-AD402160M3
132179
TX RX
TX
RX
TX TX
RX RX TX TX
RX RX TX TX
RX RX TX TX
RX RX TX TX
RX RX TX TX
RX RX TX TX
RX RX TX TX
RX RX TX TX
RX RX TX TX
RX RX
TX TX
RX RX TX TX
RX RX TX TX
RX RX TX TX
RX RX TX TX
RX RX TX TX
RX RX TX TX
RX RX TX TX
RX RX TX TX
RX RX TX TX
RX RX

2
EN
C21 C39C37C35C33C31
C29C27
C25C23 C41 C51
C49C47
C43 C45 C55C53 C57
C59
MON
LINE
PWR1 PWR2 RUN 1310OSC C34C32C30C28C26
C24
C22 C42C40C38C36 C52C50C48C46C44 C56C54 C58 C60
FMU-AD402160M3
132179
TX RX
TX
RX
TX TX
RX RX TX TX
RX RX TX TX
RX RX TX TX
RX RX TX TX
RX RX TX TX
RX RX TX TX
RX RX TX TX
RX RX TX TX
RX RX TX TX
RX RX
TX TX
RX RX TX TX
RX RX TX TX
RX RX TX TX
RX RX TX TX
RX RX TX TX
RX RX TX TX
RX RX TX TX
RX RX TX TX
RX RX TX TX
RX RX
LINE
OSC
PWR1
PWR2 LINE
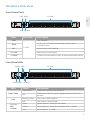
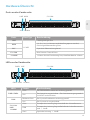
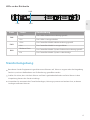
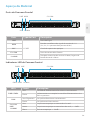
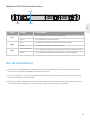
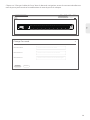
Hardware Overview
Front Panel Ports
Front Panel LEDs
1310nm
MON C21-C60
C21-C60
RUN 1310nm
Ports Port Type Description
LINE
MON
OSC
C21-C60
1310NM
LC/UPC
Line side port.
1% (2%, 3%, 5% can be customized) service signal
monitoring Port.
Optical supervisory channel.
Mux Demux channel ports.
1310nm service expansion port, channel bandwidth ±50nm.
LEDs Status Description
PWR1/PWR2
RUN
C21-C60/
LINE/
1310NM
The power module works properly.
The power is o/ The power supply module is NOT in the
position.
The system works properly.
The system is powered o.
Optical power is within the threshold.
Optical power is out of the threshold, and > -28dB.
Optical power < -28dB.
Solid Green
O
Blinking Green
O
Green
Yellow
Grey

3
EN
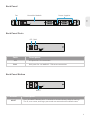
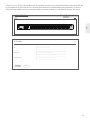
Back Panel
Back Panel Ports
Back Panel Button
Console
SFP1
SFP2
ETH1
ETH2
RESET
PWR
PWR
100VAC-240VAC/50-60HZ/2A Max
PWR
100VAC-240VAC/50-60HZ/2A Max
PWR
FAN
RUN
Controller ModuleFan Power Supplies
Ports Description
SFP
RJ45
SFP ports for 1G connection.
RJ45 ports for 10/100BASE-T Ethernet connection.
Console
SFP1
SFP2
ETH1
ETH2
RESET
PWR
RUN
SFP RJ45
Button Description
RESET Press the RESET button for 3-5 seconds to restore factory default settings.
The IP, user name, and login password are restored to the default state.
Console
SFP1
SFP2
ETH1
ETH2
RESET
PWR
RUN
RESET

4
EN
Site Environment
Keep the equipments indoors. If it is in rainy season or in humid environment, dehumidication
measures must be taken.
Ensure there is no water on the storage floor and no leakage to the packing box of the equipment.
Avoid automatic re ghting facilities, heating system and other places where leakage may occur.
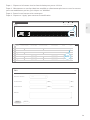
Back Panel LEDs
Ports Status Description
FAN
PWR
Solid Green
O
Solid Green
O
Blinking Green
O
The fan works properly.
The fan is powered o.
The controller module works properly.
The controller module is powered o.
The controller module system works properly.
RUN The controller module system is damaged.
Console
SFP1
SFP2
ETH1
ETH2
RESET
PWR
PWR
100VAC-240VAC/50-60HZ/2A Max
PWR
100VAC-240VAC/50-60HZ/2A Max
PWR
FAN
RUN
RUN
PWR
FAN

5
EN
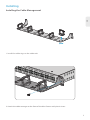
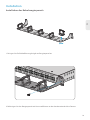
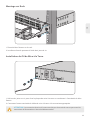
1. Install ve cable rings on the cable rack.
2. Attach the cable manager to the front of the Mux Demux with plastic rivets.
Installing
Installing the Cable Management

6
EN
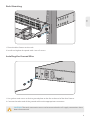
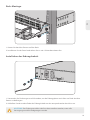
1. Place the Mux Demux on the rack.
1. Use gaskets and screws to x the ground plate to the fan at the end of the Mux Demux.
2. Connect the other end of the ground cable to the appropriate connection.
2. Install and tighten the panel with 4 sets of screws.
Rack Mounting
Installing the Ground Wire
CAUTION: The earth connection must not be removed unless all supply connections have
been disconnected

7
EN
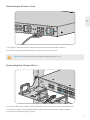
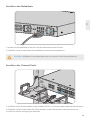
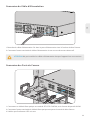
1. Plug the AC power cord into the power port on the back of the Mux Demux.
1. Connect a ber optic cable to the DWDM SFP/SFP+ transceiver, or other WDM devices.
2. Connect the other end of the ber optic cable to the channel ports of Mux Demux.
3. Check if the indicators light is green.
2. Connect the other end of the power cord to an AC power source.
Connecting the Power Cord
Connecting the Channel Ports
WARNING: Do not install power cables while the power is on.

8
EN
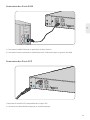
Connecting the SFP Ports
1. Plug the compatible SFP transceiver into the SFP port.
2. Connect a ber optic cable to the ber transceiver.
1. Connect the ethernet cable to the RJ45 port on the Mux Demux.
2. Connect the other end of ethernet cable to the computer for WEB management.
Connecting the RJ45 Ports

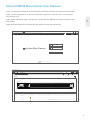
Active DWDM Mux Demux User Manual
Step1: Connect the computer to the RJ45 port of the Mux Demux using the network cable.
Step2: Set the computer IP to the same network segment as 192.168.126.1, for example,
192.168.126.XXX.
Step3: Open a browser, type 192.168.126.1 and enter the default username and password,
root/public.
Step4: WEB management and monitor the trac of each channel online.
EN
9
Active Mux Demux
Monitor Online
192.168.100.127/#/logln?redlrect=%2Fnetwork-element
User Name
Password
Login
Reset
Copyright © 2021 by FS.COM All Rights Reserved.
Avtive Mux Demux Monitoring interface Admin
Normal
Version: V1.01.001_20210528_T
State Statistics
ID
Normal
Alarm
No Signal
LED Status Totals Details
1 0
0
42 Line,1310,C21,C22,C23,C24,C25,C26,C27,C28,C29,C30,C31,C32,C33,C34,C35,C36,C37,C38,C39,C40,C41,C42,C43,C44,C45,C46,C47
C48,C49,C50,C51,C52,C53,C54,C55,C56,C57,C58,C59,C60
2
3
Alarm No Signal
IP Cong English Logout
Monitor Online
192.168.100.127/#/system/network-element
Refresh
C21 C39C37C35C33C31
C29C27
C25C23 C41 C51
C49C47
C43 C45 C55C53 C57
C59
MON
LINE
PWR1 PWR2 RUN 1310OSC C34C32C30C28C26
C24
C22 C42C40C38C36 C52C50C48C46C44 C56C54 C58 C60
FMU-AD402160M3
132179
TX RX
TX
RX
TX TX
RX RX TX TX
RX RX TX TX
RX RX TX TX
RX RX TX TX
RX RX TX TX
RX RX TX TX
RX RX TX TX
RX RX TX TX
RX RX TX TX
RX RX
TX TX
RX RX TX TX
RX RX TX TX
RX RX TX TX
RX RX TX TX
RX RX TX TX
RX RX TX TX
RX RX TX TX
RX RX TX TX
RX RX TX TX
RX RX

Click "Change Password" in the navigation bar, enter the new username and the new password to
complete the account password modication.
C21 C39C37C35C33C31
C29C27
C25C23 C41 C51
C49C47
C43 C45 C55C53 C57
C59
MON
LINE
PWR1 PWR2 RUN 1310OSC C34C32C30C28C26
C24
C22 C42C40C38C36 C52C50C48C46C44 C56C54 C58 C60
FMU-AD402160M3
132179
TX RX
TX
RX
TX TX
RX RX TX TX
RX RX TX TX
RX RX TX TX
RX RX TX TX
RX RX TX TX
RX RX TX TX
RX RX TX TX
RX RX TX TX
RX RX TX TX
RX RX
TX TX
RX RX TX TX
RX RX TX TX
RX RX TX TX
RX RX TX TX
RX RX TX TX
RX RX TX TX
RX RX TX TX
RX RX TX TX
RX RX TX TX
RX RX
Active Mux Demux Monitoring Interface Admin
Normal Alarm No Signal
IP Cong English Logout
Refresh
Change Password
*New User Name Please enter a new user name
Please enter a new user Password
Please enter a new user Password agian
*New Password
*New Password
CancelConrm
Change Password ×
10
EN

Click "IP Cong" in the navigation bar, enter the correct format of IP, gateway and subnet mask in
turn to complete the modication of the above parameters. After the IP is modied, enter the new
IP address to enter the client management interface.
11
EN
C21 C39C37C35C33C31
C29C27
C25C23 C41 C51
C49C47
C43 C45 C55C53 C57
C59
MON
LINE
PWR1 PWR2 RUN 1310OSC C34C32C30C28C26
C24
C22 C42C40C38C36 C52C50C48C46C44 C56C54 C58 C60
FMU-AD402160M3
132179
TX RX
TX
RX
TX TX
RX RX TX TX
RX RX TX TX
RX RX TX TX
RX RX TX TX
RX RX TX TX
RX RX TX TX
RX RX TX TX
RX RX TX TX
RX RX TX TX
RX RX
TX TX
RX RX TX TX
RX RX TX TX
RX RX TX TX
RX RX TX TX
RX RX TX TX
RX RX TX TX
RX RX TX TX
RX RX TX TX
RX RX TX TX
RX RX
Active Mux Demux Monitoring Interface Admin
Normal Alarm No Signal
IP Cong English Logout
Refresh
IP Cong
*IP Please enter an IP
Please enter a gateway
Please enter a subnet mask
*Gateway
*Subnet mask
CancelConrm
IP Cong ×

12
EN
Step3: Enter the correct threshold and remarks.
Step4: Click "Apply" to complete the modication.
*Channel selection Line
*Tx Threshold dBm)-
dBm)-
dBm)
dBm)*Rx Threshold
Remarks
CancelApply
Edit ×
Step1: Click the button on the upper right to switch to the List view.
Step2: Check one channel that needs to be modied, or check multiple or all channels for batch
modication, and click "Edit".
C21 C39C37C35C33C31
C29C27
C25C23 C41 C51
C49C47
C43 C45 C55C53 C57
C59
MON
LINE
PWR1 PWR2 RUN 1310OSC C34C32C30C28C26
C24
C22 C42C40C38C36 C52C50C48C46C44 C56C54 C58 C60
FMU-AD402160M3
132179
TX RX
TX
RX
TX TX
RX RX TX TX
RX RX TX TX
RX RX TX TX
RX RX TX TX
RX RX TX TX
RX RX TX TX
RX RX TX TX
RX RX TX TX
RX RX TX TX
RX RX
TX TX
RX RX TX TX
RX RX TX TX
RX RX TX TX
RX RX TX TX
RX RX TX TX
RX RX TX TX
RX RX TX TX
RX RX TX TX
RX RX TX TX
RX RX
Avtive Mux Demux Monitoring interface admin
Normal Alarm No Signal
IP Cong English Logout
Refresh
Refresh
Channel
Line
1310
C21
C22
C23
C24
C25
TX Current Power(dBm) TX Threshold(dBm)
-23.00n-20.00
-23.00n-20.00
-23.00n-20.00
-23.00n-20.00
-23.00n-20.00
-23.00n-20.00
-23.00n-20.00
-23.00n-20.00 42 Edit
Edit
Edit
Edit
Edit
Edit
Edit
41
1
2
3
4
5
-23.00n-20.00
-23.00n-20.00
-23.00n-20.00
-23.00n-20.00
-23.00n-20.00
-23.00n-20.00
RX Threshold(dBm) Remarks ActionRX Current Power(dBm)
Edit Normal Alarm No Signal
Edit

Online Resources
Download https://www.fs.com/download.html
Help Center https://www.fs.com/service/help_center.html
Contact Us https://www.fs.com/contact_us.html
Product Warranty
free return within 30 Days from the day you receive your goods. This excludes any custom made
FS ensures our customers that any damage or faulty items due to our workmanship, we will oer a
items or tailored solutions.
Warranty: Active Mux Demux enjoy 3 years limited warranty against defect in materials or
workmanship. For more details about warranty, please check at :
https://www.fs.com/policies/warranty.html
Return: If you want to return item(s), information on how to return can be found at :
https://www.fs.com/policies/day_return_policy.html
3
13
EN

Einführung
Durch das Multiplexen von bis zu 40 Kanälen über ein Glasfaserpaar wird die Bandbreite und
Kapazität erhöht und der Nutzen der Glasfaser maximiert. Eine visuelle Bestätigung über LEDs zeigt
an, dass jeder Kanal und jede Linie korrekt eingerichtet sind.
FMU-AD402160M3
Zubehör
Netzkabel x2 Erdungskabel x1 Kabelrangierpanel x1 Kabelbügel x7
Kunststoniete x2 Halterungsschraube x4 Halterungsmutter x4
C21 C39C37C35C33C31
C29C27
C25C23 C41 C51
C49C47
C43 C45 C55C53 C57
C59
MON
LINE
PWR1 PWR2 RUN 1310OSC C34C32C30C28C26
C24
C22 C42C40C38C36 C52C50C48C46C44 C56C54 C58 C60
FMU-AD402160M3
132179
TX RX
TX
RX
TX TX
RX RX TX TX
RX RX TX TX
RX RX TX TX
RX RX TX TX
RX RX TX TX
RX RX TX TX
RX RX TX TX
RX RX TX TX
RX RX TX TX
RX RX
TX TX
RX RX TX TX
RX RX TX TX
RX RX TX TX
RX RX TX TX
RX RX TX TX
RX RX TX TX
RX RX TX TX
RX RX TX TX
RX RX TX TX
RX RX
14
DE

C21 C39C37C35C33C31
C29C27
C25C23 C41 C51
C49C47
C43 C45 C55C53 C57
C59
MON
LINE
PWR1 PWR2 RUN 1310OSC C34C32C30C28C26
C24
C22 C42C40C38C36 C52C50C48C46C44 C56C54 C58 C60
FMU-AD402160M3
132179
TX RX
TX
RX
TX TX
RX RX TX TX
RX RX TX TX
RX RX TX TX
RX RX TX TX
RX RX TX TX
RX RX TX TX
RX RX TX TX
RX RX TX TX
RX RX TX TX
RX RX
TX TX
RX RX TX TX
RX RX TX TX
RX RX TX TX
RX RX TX TX
RX RX TX TX
RX RX TX TX
RX RX TX TX
RX RX TX TX
RX RX TX TX
RX RX
LINE
OSC
PWR1
PWR2 LINE
15
Hardware-Übersicht
Ports an der Vorderseite
LEDs an der Vorderseite
DE
1310nm
MON C21-C60
C21-C60
RUN 1310nm
Ports Port-Typ Beschreibung
LINE
MON
OSC
C21-C60
1310NM
LC/UPC
Leitungsseitiger Port.
1% (2%, 3%, 5% können individuell angepasst werden)
Dienstsignalüberwachung Port.
Optischer Überwachungskanal.
Mux Demux Channel-Ports.
1310nm Service Erweiterung Port, Kanalbandbreite ±50nm.
LEDs Status Beschreibung
PWR1/PWR2
RUN
C21-C60/
LINE/
1310NM
Das Netzmodul funktioniert ordnungsgemäß.
Der Strom ist ausgeschaltet. / Das Stromversorgungsmodul
ist NICHT in der Position.
Das System funktioniert ordnungsgemäß.
Das System ist ausgeschaltet.
Die optische Leistung liegt innerhalb des Schwellenwerts.
Die optische Leistung liegt außerhalb des Schwellenwertes
und -28dB.
Optische Leistung -28dB.
Grün
Aus
Blinkend Grün
Aus
Grün
Gelb
Grau

16
DE
Rückseite
Ports and der Rückseite
Tasten an der Rückseite
Console
SFP1
SFP2
ETH1
ETH2
RESET
PWR
PWR
100VAC-240VAC/50-60HZ/2A Max
PWR
100VAC-240VAC/50-60HZ/2A Max
PWR
FAN
RUN
Controller-ModulLüfter Stromversorgung
Ports Beschreibung
SFP
RJ45
SFP-Ports für 1G-Verbindungen.
RJ45-Ports für 10/100BASE-T-Ethernet-Anschluss.
Console
SFP1
SFP2
ETH1
ETH2
RESET
PWR
RUN
SFP RJ45
Taste Beschreibung
RESET
Drücken Sie die RESET-Taste für 3-5 Sekunden, um die Werkseinstellungen
wiederherzustellen.Die IP, der Benutzername und das Anmeldekennwort
werden auf den Standardzustand zurückgesetzt.
Console
SFP1
SFP2
ETH1
ETH2
RESET
PWR
RUN
RESET

17
DE
Standortumgebung
Stellen Sie sicher, dass sich kein Wasser auf dem Lagerboden bendet und kein Wasser in den
Verpackungskarton des Geräts eindringt.
Vermeiden Sie automatische Feuerlöschanlagen, Heizungssysteme und andere Orte, an denen
Leckagen auftreten können.
Bewahren Sie das Equipment in geschlossenen Räumen auf. Wenn es regnet oder die Umgebung
feucht ist, müssen Maßnahmen zur Entfeuchtung getroen werden.
LEDs an der Rückseite
Ports Status Beschreibung
FAN
PWR
Grün
Aus
Grün
Aus
Blinkend Grün
Ein
Der Lüfter funktioniert ordnungsgemäß.
Der Lüfter ist ausgeschaltet.
Das Controller-Modul arbeitet ordnungsgemäß.
Das Controller-Modul ist ausgeschaltet.
Das Controller-Modul-System funktioniert ordnungsgemäß.
RUN Das Controller-Modul-System ist beschädigt.
Console
SFP1
SFP2
ETH1
ETH2
RESET
PWR
PWR
100VAC-240VAC/50-60HZ/2A Max
PWR
100VAC-240VAC/50-60HZ/2A Max
PWR
FAN
RUN
RUN
PWR
FAN

18
DE
1. Bringen Sie fünf Kabelfünrungsbügel am Rangierpanel an.
2. Befestigen Sie das Rangierpanel mit Kunststonieten an der Vorderseite des Mux Demux.
Installation
Installation des Kabelrangierpanels

DE
19
1. Setzen Sie den Mux Demux auf das Rack.
1. Verwenden Sie Dichtungen und Schrauben, um die Erdungsplatte am Lüfter am Ende des Mux
Demux zu befestigen.
2. Schließen Sie das andere Ende des Erdungskabels an den entsprechenden Anschluss an.
2. Installieren Sie das Panel und ziehen Sie es mit 4 Schraubensätzen fest.
Rack-Montage
Installation des Erdungskabels
ACHTUNG: Der Erdungsanschluss darf erst dann entfernt werden, wenn alle
Versorgungsanschlüsse abgezogen wurden.
La page est en cours de chargement...
La page est en cours de chargement...
La page est en cours de chargement...
La page est en cours de chargement...
La page est en cours de chargement...
La page est en cours de chargement...
La page est en cours de chargement...
La page est en cours de chargement...
La page est en cours de chargement...
La page est en cours de chargement...
La page est en cours de chargement...
La page est en cours de chargement...
La page est en cours de chargement...
La page est en cours de chargement...
La page est en cours de chargement...
La page est en cours de chargement...
La page est en cours de chargement...
La page est en cours de chargement...
La page est en cours de chargement...
La page est en cours de chargement...
La page est en cours de chargement...
La page est en cours de chargement...
-
 1
1
-
 2
2
-
 3
3
-
 4
4
-
 5
5
-
 6
6
-
 7
7
-
 8
8
-
 9
9
-
 10
10
-
 11
11
-
 12
12
-
 13
13
-
 14
14
-
 15
15
-
 16
16
-
 17
17
-
 18
18
-
 19
19
-
 20
20
-
 21
21
-
 22
22
-
 23
23
-
 24
24
-
 25
25
-
 26
26
-
 27
27
-
 28
28
-
 29
29
-
 30
30
-
 31
31
-
 32
32
-
 33
33
-
 34
34
-
 35
35
-
 36
36
-
 37
37
-
 38
38
-
 39
39
-
 40
40
-
 41
41
-
 42
42


FS COM Active DWDM Mux Demux Mode d'emploi
- Taper
- Mode d'emploi
Autres documents
-
FS C21 Mode d'emploi
-
 YORKVILLE NX25P-2 Manuel utilisateur
-
 YORKVILLE YX15P Manuel utilisateur
-
 YORKVILLE NX25P Manuel utilisateur
-
Yorkville Sound YS1082 Manuel utilisateur
-
 YORKVILLE LS800P Manuel utilisateur
-
 YORKVILLE YSM8 Manuel utilisateur
-
 YORKVILLE NX720S Manuel utilisateur
-
 YORKVILLE LP-LED2X Manuel utilisateur
-


