
INSTALLATION
LEXA - RLX17
Doc. # DR173-1 / 15-11-2022 www.rubi.ca - 1.888.988.RUBI (7824)
03 04
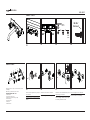
PIÈCES / PARTS
ÉTAPES / STEPS
Vérifiez que toutes les pièces de votre robinet sont dans
l'emballage.
Make sure you have all the parts in hand.
LISTE DES PIÈCES / PARTS LIST
01 Robinet / Faucet
02 Support de bec / Spout support
03 Assemblage de cartouche / Cartridge assembly
04 Rosaces / Flanges
05 Poignées / Handles
06 Bec / Spout
06 Aérateur / Aerator
02
01
06
Insérez les rosaces sur les cartouches.
Insert the flanges on the cartridges.
05
Vissez la noix de support de bec jusqu'au
bout des filets.
Screw the spout support until the end of the
threads.
1
2
3
4
5
6
7
HOT COLD
Ø 1 1/2’’
Ø 38mm
4 ’’
102 mm
4 ’’
102 mm
Mur fini /
Finish wall
Mur fini /
Finish wall
07
Tournez les rosaces simultanément pour un
ajustement égal au mur fini.
Turn both flanges simultaneously to adjust
the assembly flush with the wall.
08
Placez les poignées sur les cartouches.
Place the handles on the cartridges.

INSTALLATION
LEXA - RLX17
Doc. # DR173-1 / 15-11-2022 www.rubi.ca - 1.888.988.RUBI (7824)
ENTRETIEN
Pour nettoyer votre robinet, un savon doux, de l’eau
chaude et un linge doux suffiront pour faire disparaître
saletés, taches et traces d’accumulation de savon.
Rincez après le nettoyage et asséchez avec un linge
doux et sec pour retrouver le lustre original de votre
robinet.
La garantie sera nulle et non avenue dans les
cas d’utilisation de produits nettoyants inadaptés
(particulièrement ceux contenant des agents abrasifs,
cires, alcools, ammoniaques, javellisants, acides, des
solvants ou autres produits chimiques corrosifs), qu’ils
soient utilisés par l’acheteur ou par un tiers pour
l’acheteur/propriétaire.
MAINTENANCE
A mild detergent, warm water and a soft cloth will
remove normal dirt and soap accumulations on your
faucet. Rinse thoroughly after cleaning and wipe with
a soft dry cloth to restore original luster of your faucet.
Do not use harsh abrasives cleaners to clean your
shower head.
The warranty will be void in case of use of unsuitable
cleaning products (especially those containing abrasive
cleansers, waxes, alcohols, ammoniated, bleach,
acids, solvents or other harsh chemicals), whether they
are used by the purchaser or a third party for the buyer/
owner.
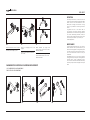
01
11
Retirez l'aérateur puis purgez votre
robinet. Laissez couler 15 à 20 secondes.
Réinstallez l'aérateur.
Remove the aerator then purge the faucet.
Let the water flow for 15 to 20 seconds.
Reinstall the aerator.
02
09
Glissez la rosace du bec et le bec en place.
Slide the spout and flange in place.
03
10
Serrez les vis de réglage du bec et des
poignées.
Secure the spout and the handles with
the set srews.
COUPE L'ALIMENTATION EN EAU AVANT LA MAINTENANCE /
TURN OFF WATER SUPPLY BEFORE MAINTENANCE
04
CHANGEMENT DE CARTOUCHE / CARTRIDGE REPLACEMENT
-
 1
1
-
 2
2


dans d''autres langues
- English: Rubi RLX17 Installation guide
Documents connexes
-
Rubi RQT17 Guide d'installation
-
-
-
-
-
-
-
-
-
Autres documents
-
MAAX 105509-000-001 Jazz (Drop-In) Guide d'installation
-
American Standard 2064.451.002 Guide d'installation
-
Delta T3567LF-WL Guide d'installation
-
Moen T940W Le manuel du propriétaire
-
-
-
Project Source 21-K822-PSD Guide d'installation
-
Delta T3597LF-PNWL Manuel utilisateur