
1WAC Lighting retains the right to modify the design of our products at any time as part of the company's continuous improvement program. JAN 2024 G0
waclighting.com
Phone (800) 526.2588
Fax (800) 526.2585
Headquarters, East Manufacturing Facility
44 Harbor Park Drive
Port Washington, NY 11050
South East Manufacturing Facility
1600 Distribution Ct
Lithia Springs, GA 30122
Central Manufacturing Facility
1700 South J Elmer Freeway, Ste 100
Cedar Hill, TX 75104
West Manufacturing Facility
1750 S Archibald Ave
Ontario, CA 91761
INSTALLATION INSTRUCTION
H / L / J / J2 Track Cable Suspension & Feed Canopy
SKC96, SKCF96, J2-SKCF96
SAFETY INSTRUCTION
IMPORTANT: NEVER attempt any work without shutting o the electricity.
• Read all of these instructions before installing the track system.
• Turn o power at main switch before installing or modifying the
system.
• Do not install within 6 inches of any curtain or combustible materials.
• Do not install less than 5 feet above a oor.
• Do not install in damp or wet locations.
• Do not install concealed, or extended through building walls.
• Do not attempt to energize anything other than a track light xture.
• Do not load to more than 20 amps per circuit.
• Do not exceed 4 feet between mounting points.
• These components are suitable for WAC’s H/L/J/J2 track systems only.
• Do not connect a track to more than one branch circuit.
• Check with a qualied electrician before wiring.
• All of the installations shall be in accordance with NEC and all local
codes.
INSTRUCTION DE SÉCURITÉ
IMPORTANT : NE JAMAIS tenter de travailler sans couper l’électricité.
• Lisez toutes ces instructions avant d’installer le système de rail.
• Coupez l’alimentation au niveau de l’interrupteur principal avant d’in-
staller ou de modier le système.
• Ne pas installer à moins de 6 pouces de tout rideau ou de matériaux
combustibles.
• Ne pas installer à moins de 5 pieds au-dessus d’un plancher.
• Ne pas installer dans des endroits humides ou mouillés.
• Ne pas installer de manière dissimulée ou étendue à travers les murs du
bâtiment.
• N’essayez pas d’alimenter autre chose qu’un luminaire sur rail.
• Ne chargez pas à plus de 20 ampères par circuit.
• Ne dépassez pas 4 pieds entre les points de montage.
• Ces composants conviennent uniquement aux systèmes de rails H/L/J/
J2 de WAC.
• Ne connectez pas une piste à plus d’un circuit de dérivation.
• Vériez auprès d’un électricien qualié avant le câblage.
• Toutes les installations doivent être conformes au NEC et à tous les
codes locaux.
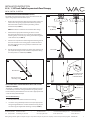
SAMPLE CONFIGURATION:
SUSPENSION MOUNTING GUIDELINES:
For track cable suspensions systems, do not exceed 4 feet between each mounting point, and do not exceed 6 inches (for track 4 feet or less in
length) or 12 inches (for track that is greater than 4 feet) from each end of the single track section. Always use two or more mounting supports
for each track length.
• Track cable suspensions shall be capable of being mounted to at ceiling structures.
• Track cable suspensions may be height adjusted in eld.
• Track cable suspensions shall be available in 96 inch standard lengths.
• Space the suspension supports evenly along the track. Recommended: (2) per 4 feet of track, (3) per 8 feet of track, and (4) per 12 feet
of track, additional suspension supports may be added for heavier loads.
It is the user’s responsibility to ensure the electrical and mechanical compatibility of the track system and the ttings.
SKCF96 or J2-SKCF96
Feed Canopy with Suspension
Junction Box (By Others)
Track Connector
SKC96
Cable Suspension
Track Connector
SKC96
SKC96

2WAC Lighting retains the right to modify the design of our products at any time as part of the company's continuous improvement program. JAN 2024 G0
waclighting.com
Phone (800) 526.2588
Fax (800) 526.2585
Headquarters, East Manufacturing Facility
44 Harbor Park Drive
Port Washington, NY 11050
South East Manufacturing Facility
1600 Distribution Ct
Lithia Springs, GA 30122
Central Manufacturing Facility
1700 South J Elmer Freeway, Ste 100
Cedar Hill, TX 75104
West Manufacturing Facility
1750 S Archibald Ave
Ontario, CA 91761
INSTALLATION INSTRUCTION
H / L / J / J2 Track Cable Suspension & Feed Canopy
SKC96, SKCF96, J2-SKCF96
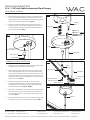
FIG. 1
FIG. 4FIG. 3
INSTALLING CABLE SUSPENSION MOUNT (SKC96):
The SKC96 cable suspension mount is to be direct mounted to the
upper ceiling support structure of the space.
1. Remove the top half of the cable supension mount anchor and
install to the ceiling using appropriate hardware (by others).
Attach the lower half of the anchor by threading it to the
mounted half. (See FIG. 1).
NOTE: The SKC96 is intended to be installed to at ceilings.
2. Determine the appropriate mounting locations on track.
Use existing mounting holes on track and add supplemental
mounting holes, as neccesary, by drilling 1/4” holes through the
center of the track (See FIG. 2).
3. Lift the track and push the screw through the mounting hole of
the track to fasten it to the cable gripper and wave washer of
the cable suspension base, using a Philips or at blade screw-
driver (See FIG. 3).
4. Use the spring mechanism at the top of the cable gripper to ad-
just suspension height, and discard excess suspension cabling
once the position is conrmed (See FIG. 4)
INSTALLING CABLE SUSPENSION MOUNT WITH FEED CANOPY
(SKCF96/J2-SKCF96):
The SKCF96 / J2-SKCF96 cable suspension mount with feed canopy
is to be directly installed to ceiling mounted 4” octagonal junction
boxes. Power may be fed down to track live end or appropriate track
connector with power feed input.
Junction Box Mounting
1. Ensure power is OFF before installation and wiring.
2. Locate the ceiling mounted junction box and pull appropriate
wiring through. Mount the crossbar of the feed canopy to junc-
tion box using the supplied #8 mounting screws (See FIG. 5).
FIG. 2
FIG. 5
1/4” Drill Bit
Cable Suspension
Mounting Screw
Wave Washer
Spring Mechanism
to Allow Aircraft
Cable Movement
Mounting
Screw
Threaded
Mounting Rod
Junction Box
(By Others)
Crossbar
Gypsum Board
Screw
(By Others)

3WAC Lighting retains the right to modify the design of our products at any time as part of the company's continuous improvement program. JAN 2024 G0
waclighting.com
Phone (800) 526.2588
Fax (800) 526.2585
Headquarters, East Manufacturing Facility
44 Harbor Park Drive
Port Washington, NY 11050
South East Manufacturing Facility
1600 Distribution Ct
Lithia Springs, GA 30122
Central Manufacturing Facility
1700 South J Elmer Freeway, Ste 100
Cedar Hill, TX 75104
West Manufacturing Facility
1750 S Archibald Ave
Ontario, CA 91761
INSTALLATION INSTRUCTION
H / L / J / J2 Track Cable Suspension & Feed Canopy
SKC96, SKCF96, J2-SKCF96
FIG. 6
FIG. 8
FIG. 9
Cable Suspension
Mounting Screw
Wave Washer
Cable Clamp
Fitting
Feed Cable
Track Connector
Cable
Gripper
Wire Tie
3. Bring the feed canopy to the junction box, and make electrical
connections between building and canopy feed wires using
supplied wire nuts. Secure connections and store wiring inside
the junction box and canopy space (See FIG. 6).
4. Ensure the canopy threaded mounting rod of the canopy, is
supported by the crossbar. Lift the canopy to the junction box
and thread the canopy cable coupler to the threaded mount-
ing rod until secure (See FIG 7 ).
Feed Wiring to Live End or Feed Connector
1. Remove the cover and knockout on the top side of the live end
or appropriate track connector with feed input.
2. Attach the canopy feed cable to the track connector using the
cable clamp tting. Make electrical connections between the
canopy and track feed connector in accordance with Local and
National Electrical Codes. Secure connections and store wiring
inside the track feed connector. Reattach the cover of the track
feed connector (See FIG. 8).
3. Determine the appropriate mounting locations on track.
Use existing mounting holes on track and add supplemental
mounting holes, as neccesary, by drilling 1/4” holes through
the center of the track (See FIG. 2 - PAGE 2).
4. Lift the track and push the screw through the mounting hole of
the track to fasten it to the cable gripper and wave washer of
the cable suspension base, using a Philips or at blade screw-
driver (See FIG. 8).
5. Connect the track section and connector. Secure the feed cable
and cable suspension, as needed, using wire ties (See FIG. 9).
Canopy
Feed Cable
Building
Wires
Wire Nuts
FIG. 7
Cable Coupler
Threaded
Mounting Rod
Aircraft Cable
HOT (Black)
HOT2 (Red - J2 Only)
NEUTRAL (White)
GROUND (Green)
-
 1
1
-
 2
2
-
 3
3


WAC Lighting SKC96 Mode d'emploi
- Taper
- Mode d'emploi
dans d''autres langues
Documents connexes
-
WAC Lighting WS-240836 Mode d'emploi
-
-
-
-
-
-
-
-
-