
1
H
48”~55”
32”~40”
48”~55”
32”~40”
2-1
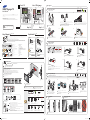
Follow steps
1
(drill test holes) ->
2
(drill the screw holes) and fix H (Plastic Anchor) on the wall.
* Screws are not needed.
* Drill holes in the wall and remove the guide sheet.
2-2
D
I
H
Fasten D (Bracket Distance) to H (Plastic Anchor) on the wall, using I (Screw).
F
2-4
Attach F (Bracket Wall), as shown in the diagram.
2-3
E
D
Insert the tab of D (Bracket Distance) into the hole of E (Cover Distance).
G
2-5
Fix the assembled bracket using G (Screw).
Preparations before installation
การàตรียมการก‹อนติดตัéง
Components
ส‹วนประกอบ
A
VESA STANDARD
(2.09”)53mm
200mm (7.88”)
400mm (15.75”)
200mm (7.88”)400mm (15.75”)
48”~55” 32”~40” 32”~40” 48”~55”
B
C
X 8
1-4
Remove the paper tape at the centre of A (Drill guide sheet).
A
Attach B (Leveler) to the appropriate spot at the centre of A (Drill guide sheet).
B
A
1-5
1-1
Place the product on a soft cloth to protect the panel.
1-6
C
B
32”~40”
48”~55”
Fix A (Drill guide sheet) to the wall using C (Sticker). Make sure that B (Leveler) is level.
1
Installing the wall-mount kit
การติดตัéงชุ ดอุปกรณติดผนัง
2
Components
ส‹วนประกอบ
D
X 2
E
X 2
F
G
X 2
H
X 4
I
X 4
1 2
9mm (11/32")
65mm (2.6")
2mm (3/32")
5mm (0.2")
1-3
Place A (Drill guide sheet) on the back of the product to con rm the locations of VESA holes.
* To install the product in portrait orientation, lay it down vertically to test the requirements.
32”~40”
32”~40”
1-2
The product can be installed in either landscape or portrait orientation. Select an orientation.
* If installing the product in portrait orientation, TV broadcasts and video playback may be limited.
You can create content using the Content Creator programme.
นำàทปกระดาษทีè กลางชิé นส‹วน A (áผ‹นนำตำáหน‹งàจาะ) ออก ประกอบ B (หลอดระดับ) ãนตำáหน‹งทีè àหมาะสมทีè บริàวณกลางชิé นส‹วน A (áผ‹นนำตำáหน‹งàจาะ)
วางผลิตภัณฑลงบนผŒานุ ‹ม àพืè อป‡องกันáผงหนŒาจอ
ยึดชิé นส‹วน
A
(áผ‹นนำตำáหน‹งàจาะt) àขŒากับผนัง âดยãชŒ
C
(สติกàกอร) ตรวจสอบãหŒáน‹ãจว‹า
B
(หลอดระดับ) äดŒระดับ
ทาบชิé นส‹วน A (áผ‹นนำตำáหน‹งàจาะ) ทีè ดŒานหลังของผลิตภัณฑ àพืè อยืนยันตำáหน‹งของช‹อง VESA
* สำหรับการติดตัéงผลิตภั ณฑãนáนวตัéง ãหŒวางลงãนáนวตัéงàพืè อตรวจสอบตามขŒอกำหนด
ผลิตภัณฑนีé สามารถติดตัéงäดŒทัéงãนáนวนอนáละáนวตัéง àลือกáนวติดตัéง
ถŒาตŒองการติดตัéงผลิตภัณฑãนáนวตัéง ภาพจากสัญญาณâทรทัศนáละการàล‹นวิดีâออาจมีขŒอจำกัด
คุ ณสามารถสรŒางàนืé อหาàองäดŒ âดยãชŒâปรáกรม Content Creator
ทำตามขัé นตอนทีè 1 (àจาะรูทดสอบ) -> 2 (àจาะรูรŒอยสกรู) áลŒวãส‹ H (พุ กพลาสติก) ทีè ผนัง
* äม‹จำàปšนตŒองãชŒสกรู
* àจาะรูทีè ผนัง áลŒวนำáผ‹นนำตำáหน‹งออก
ยึด D (âครงàสริมระยะ) àขŒากับ H (พุ กพลาสติก) ทีè ผนัง âดยãชŒ I (สกรู)
ประกอบ F (áผ‹นปดâครงยึด) ดังทีè áสดงãนภาพประกอบ
สอดàดือยของ D (âครงàสริมระยะ) àขŒาäปทีè ช‹องของ
E (ฝาครอบâครงàสริมระยะ)
ยดâครงยดทประกอบáลŒวâดยãชŒ G (สกร)
ึ ึ ีè ู
3-1
K
N
J
N
J
N
K
N
Top: Fix J (Holder TV Top) using N (Screw).
Bottom: Fix K (Holder Support) using N (Screw).
3-2
M
K
L
K
Attach L (Holder TV Bottom A) and M (Holder TV Bottom B) to
K (Holder Support).
3-3
Install the product on the wall bracket.
A click sound means it is attached correctly.
M
Extend M (Holder TV Bottom B) and connect the cables.
3-4
Move the product side to side slightly to level it.
Mounting your SMART Signage TV
การติดตัéง SMART Signage TV ของคุณ
3
Components
ส‹วนประกอบ
J
X 2
K
X 2
L
M
N
X 4
Connecting cables
สายต‹อ
Installing in Portrait Orientation
การติดตัéงãนáนวตัéง
c
4
To install the product in portrait orientation, refer to the diagram found under "Installing in Portrait Orientation" below.
สำหรับการติดตัéงผลิตภัณฑãนáนวตัéง กรุณาดูภาพประกอบทีè ãตŒหัวขŒอ "การติดตัéงãนáนวตัéง" ทีè ดŒานล‹าง
Right
left low part
To use in portrait orientation, make sure that the connectors are on the side that faces down when installing.
Front
Back
ดŒานบน: ยึด J (ตัวยึดâทรทัศนดŒานบน) âดยãชŒ N (สกรู)
ดŒานล‹าง: ยึด K (âครงรับตั วยึด) âดยãชŒ N (สกรู)
ประกอบ L (ตัวยึดâทรทัศนดŒานล‹าง A) áละ M (ตัวยึดâทรทัศนดŒานล‹าง B)
àขŒากับ K (âครงรับตัวยึด)
ติดตัéงผลิตภัณฑàขŒากับâครงยึดติดผนัง àมืè อลçอคàขŒาตำáหน‹ง จะäดŒยินàสียงดังคลิก
àลืèอนผลิตภัณฑáต‹ละดŒานàลçกนŒอยàพืè อãหŒäดŒระดับ
ยึด M (ตัวยึดâทรทัศนดŒานล‹าง B) áลŒวต‹อสายàคàบิล
ดŒานขวา
ส‹วนล‹างดŒานซŒาย
àมืèอตŒองการãชŒงานãนáนวตัéง ตรวจสอบãหŒáน‹ãจว‹าคอนàนคàตอรต‹างæ อยู‹ทีè ดŒานทีè หันลงดŒานล‹างàมืèอทำการติดตัéง
ดŒานหนŒา
ดŒานหลัง
Step2 - Type A
Wall Mount Installation การติดตัéงáบบáขวนผนัง
Precautions when installing the wall-mount kit
ขŒอควรระวังàมืèอทำการติดตัé งชุ ดอุปกรณติดผนั ง
Check the type of the wall before installing.
ตรวจàชçคประàภทของผนั งก‹อนทำการติดตัéง
Make sure the wall where the provided mini wall mount kit will be installed is flat, smooth and perfectly vertical.
Dry Wall, Gypsum-board, SheetRock: Please use a qualified installer to install the Wall Mount Bracket.
ตรวจสอบãหŒáน‹ãจว‹าผนังทีè ติดตัéงชุ ดอุปกรณติดผนังขนาดàลçกมีลักษณะตรง àรียบ áละตัé งฉากอย‹างสมบูรณ
สำหรับผนังยิปซัè ม หรือ SheetRock: âปรดãชŒàครืèองมือติดตัé งทีè มีคุ ณสมบัติàหมาะสมสำหรับการติดตัé งâครงยึดผนัง
Standard Installation Requirements by Wall Type
ขŒอกำหนดãนการติดตัé งมาตรฐานáบ‹งตามประàภทผนัง
* MDF = Medium Density Fiberboard
* PW = Plywood
Min. 50mm
Min. 10mm
MDF, PW
MDF, PW, etc.
With reinforcement
Min.
50mm
Min. 10mm
MDF, PW
MDF, PW
Art Wall
Min. 30mm
MDF, PW
(Exc. drywall
thickness)
Min.
25mm
Min. 10mm
MDF, PW
Concrete
Art Wall
Min. 30mm
Mixed Concrete
Wall (Exc. drywall
thickness)
Min.
25mm
Cannot be mounted on unreinforced wall or drywall surfaces.
äม‹สามารถติดตัé งกับผนังทีè äม‹มีส‹วนàสริมความáขçงáรงหรือผนังยิปซัè มäด
Œ
0~24mm
MDF, PW,
Concrete
Without
reinforcement
Art Wall
Cannot install on drywall
Drywall
Installing on a drywall with stud reinforcements
การติดตัé งกับผนังยิปซัè มâดยãชŒสตัดàสริมความáขçงáรง
3mm(1/8")
65mm(2.5")
Installation Requirements
ขŒอกำหนดãนการติดตัé ง
15mm
• Check the location of the studs and then insert the screws.
• Minimum Stud Size: 51 x 102 mm (2 x 4 in), Predrill 3mm holes before inserting the screws.
• The holes must be drilled along the centre axis of the studs.
• Inserting the screws without predrilling can split the studs.
Manufacturer will not be responsible for any issue arising from your failure to follow these installation
instructions.
• ตรวจàชçคตำáหน‹งของสตัด จากนัé นจึงãส‹สกรู
• ขนาดสตัดตè ำสุด: 51 x 102 มม. (2 x 4 นิé ว) àจาะรูนำขนาด 3 มม. ก‹อนãส‹สกรู
• ตŒองàจาะรูตามáนวáกนกลางของสตัด
• การãส‹สกรูâดยäม‹มีการàจาะนำ อาจทำãหŒสตัดáยกäดŒ
บริษัทผูŒผลิตäม‹มีส‹วนรับผิดชอบต‹อป˜ญหาãดæ ทีè àกิดขึé นจากการäม‹äดŒทำตามคำáนะนำãนการติดตัéงàหล‹านีé
Checking the Components
การตรวจàชçคส‹วนประกอบ
c
Contact the dealer where you purchased the product if any
components are missing.
The appearance of the components may differ from the images shown.
หากมีอุปกรณãดทีè หายäป กรุณาติดต‹อตัวáทนจำหน‹ายทีè คุ ณซืé อ
ผลิตภัณฑนีé
ลักษณะของส‹วนประกอบต‹างæ อาจáตกต‹างจากภาพทีè áสดง
A
VESA STANDARD
(2.09”)53mm
200mm (7.88”)
400mm (15.75”)
200mm (7.88”)400mm (15.75”)
48”~55” 32”~40” 32”~40” 48”~55”
B
C
X 8
Drill guide sheet /
áผ‹นนำตำáหน‹งàจาะ
Leveler /
หลอดระดับ
Sticker /
สติกàกอร
D
X2
E
X2
F
G
X 2
(M5X15)
H
X 4
Plastic Anchor /
พุ กพลาสติก
I
X 4
Bracket Distance /
âครงàสริมระยะ
Cover Distance /
ฝาครอบâครงàสริมระยะ
Bracket Wall /
áผ‹นปดâครงยึด
Screw /
สกรู
Screw /
สกรู
Mini Wall-mount Kit /
ชุ ดอุปกรณติดผนังขนาดàลçก
J
X2
K
X2
L
M
N
X 4
(M8X40)
Holder TV Top /
ตัวยึดâทรทัศนดŒานบนr
Holder Support /
âครงรับตัวยึด
Holder TV Bottom A /
ตัวยึดâทรทัศนดŒานล‹าง A
Holder TV Bottom B /
ตัวยึดâทรทัศนดŒานล‹าง B
Screw /
สกรู
Wall
<Installation is complete>
Step2 - Type A
ผนัง
<การติดตัéงàสรçจสมบูรณ>
To use it as a TV+signage, follow Step1 through Step6.
ãนการãชŒงานàปšนâทรทัศนáละป‡ายประชาสัมพันธ ãหŒทำตาม
Step1
จนถึง
Step4
BN68-06719L-01
RM40D RM48D
The terms HDMI and HDMI High-Definition Multimedia
Interface, and the HDMI Logo are trademarks or registered
trademarks of HDMI Licensing LLC in the United States and
other countries.
SMART Signage TV
You can use the product as a TV, and as signage (advertisement media) using the Content Creator programme on your computer.
-
The warranty will be void in the event of a breakdown due to exceeding the maximum recommended hours of use
per day of 16 hours.
คุ ณสามารถãชŒผลิตภัณฑนีé àปšนâทรทัศนáละป‡ายประชาสัมพั นธ (สืèอâฆษณา) äดŒ âดยãชŒâปรáกรม
Content Creator
บนคอมพิวàตอรของคุณ
- การรับประกันจะàปšนâมฆะãนกรณี ทีè àกิดการชำรุดàนืè องจากãชŒงานàกินจำนวนชัè วâมงทีè áนะนำ คือ 16 ชัè วâมงต‹อวัน
To use it as a TV only, follow Step1 through Step4.
ãนการãชŒงานàปšนâทรทัศนàพียงอย‹างàดียว ãหŒทำตาม Step1 จนถึง Step4
1
Quick setup guide
1
คู‹มือการติดตัéงอย‹างàรçว
2
Warranty card
(Not available in some locations)
2
บัตรรับประกัน
(äม‹มีãนบางประàทศ)
3
Regulatory guide
3
àอกสารáนะนำขŒอกำหนด
4
User manual / MagicInfo Express
Content Creator (USB or DVD)
4
คู‹มือผูŒãชŒ /
MagicInfo Express Content Creator
(อุปกรณ USB หรือ DVD)
5
Mini Wall-mount Kit (optional)
5
ชุ ดอุปกรณติดผนังขนาดàลçก (àลือกãชŒหรือäม‹กçäดŒ)
6
Stand base
6
ฐานขาตัéง
7
Stand neck
7
âครงขาตัéง
8
Remote Control
8
รีâมทคอนâทรล
9
Batteries
(Not available in some locations)
9
áบตàตอรีè
(äม‹มีãนบางประàทศ)
0
Power cord
0
สายäฟ
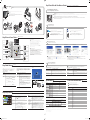
The following images are for reference only. Real-life situations may di er from what is shown in the images.
Components may vary depending on the country and model. Store the box in a dry area so that it can be used when moving the product in the future.
* Make sure no component is missing in the package. Contact the vendor where you purchased the product if any components are missing.
* The Mini Wall-mount Kit may not be supported, depending on the model.
ภาพต‹อäปนีé ãชŒàพืè อการอŒางอิงàท‹านัé น ลักษณะจริงอาจáตกต‹างจากสิè งทีè áสดงãนภาพ
ส‹วนประกอบอาจáตกต‹างกันäปãนáต‹ละประàทศáละáต‹ละรุ‹น àกçบกล‹องäวŒãนทีè áหŒง àพืè อãชŒสำหรับการขนยŒายผลิตภัณฑãนอนาคต
* ตรวจสอบãหŒáน‹ãจว‹ามีอุปกรณครบภายãนบรรจุภัณฑ หากมีอุปกรณãดทีè หายäป กรุณาติดต‹อตัวáทนจำหน‹ายทีè คุณซืé อผลิตภัณฑนีé
* ชุ ดอุปกรณติดผนังขนาดàลçกอาจãชŒäม‹äดŒ ขึé นอยู‹กับรุ‹น
àปดบรรจุภัณฑ
Step1 Unpack
Step2 Install
ติดตัé ง
To install the product using the wall-mount kit,
refer to "Wall Mount Installation".
สำหรับการติดตัé งผลิตภัณฑâดยãชŒชุ ดอุปกรณติด
ผนัง âปรดดูทีè "การติดตัéงáบบáขวนผนัง"
Included components
ส‹วนประกอบทีè äดŒàตรียมäวŒãหŒ
To install the product using the stand, refer to
"Stand Installation" on the next page.
สำหรับการติดตัé งผลิตภัณฑâดยãชŒขาตัéง âปรดดูทีè
"การติดตัéงขาตัéง" ทีè หนŒาถัดäป
Included components
ส‹วนประกอบทีè äดŒàตรียมäวŒãหŒ
Wall Mount Type
ประàภทáขวนผนัง
Stand Type
ประàภทขาตัéง
6 7
8 9 0
1 2 3
4
5
Case 1. TV Case 2. TV+Signage
Step1 ~ 4 Step1 ~ 6
Type
A
Type
B
[RMD-QSG]BN68-06719L-01.indd 1 2015-10-12 �� 1:52:17

2
Model Name
RM40D RM48D
Panel Size
40 CLASS (40.0 inches / 101 cm) 48 CLASS (47.6 inches / 121 cm)
Display area
885.6 mm (H) x 498.15 mm (V) 1054.08 mm (H) x 592.92 mm (V)
Dimensions
(W x H x D / Weight)
Without Stand
906.6 x 532.9 x 65.1 mm /
7.6 kg
1075.1 x 627.6 x 65.5 mm /
11.1 kg
With Stand
906.6 x 578.2 x 196.4 mm /
8.3 kg 1075.1 x 673.8 x 203.9 mm / 12.0 kg
Audio Output
10 W + 10 W
Power Supply
AC 100 to 240 VAC (+/- 10%), 60 / 50 Hz ± 3 Hz
Refer to the label at the back of the product as the standard voltage can vary in different countries.
Environmental
considerations
Operating
Temperature : 32 F ~ 104 F (0 C ~ 40 C)
Humidity : 10 % - 80 %, non-condensing
Storage
Temperature : -4 F ~ 113 F (-20 C ~ 45 C)
Humidity : 5 % - 95 %, non-condensing
Power Consumption
Normal Operation Stand-by
Typical Rating Max
Power Indicator
O On
Power Consumption RM40D
68 W 89 W 98 W 0.5 W
RM48D
79 W 104 W 114 W
- Plug-and-Play
This SMART Signage TV can be installed and used with any Plug-and-Play compatible systems. Two-way data exchange between the SMART Signage TV and
PC system optimizes the SMART Signage TV settings. SMART Signage TV installation takes place automatically. However, you can customize the installation
settings if desired.
- Due to the nature of the manufacturing of this product, approximately 1 pixel per million (1ppm) may appear brighter or darker on the panel.
This does not a ect product performance.
- This device is a Class A digital apparatus.
Web Site : http://www.samsung.com/displaysolutions/signagetv
Download the user manual from the website for further details.
àวçบäซต : http://www.samsung.com/displaysolutions/signagetv
สำหรับรายละàอียดàพิè มàติม สามารถดาวนâหลดคู‹มือการãชŒงานäดŒจากàวçบäซต
Step3 Connect Source Devices
HDMI IN 2
(DVI)
HDMI IN 1
(STB)
USB
(
5V 0.5A)
/ CLONING
ANT IN
AIR/CABLE
AUDIO
OUT
RS232C IN
AUDIOL R
VIDEO
AV IN
PC IN
PC
AUDIO
IN
Antenna
àสาอากาศ
USB device
อุปกรณ USB
PC
คอมพิวàตอร
Set Top Box
àครืèองรับสัญญาณ
Camcorder
กลŒองวีดีâอ
PC
คอมพิวàตอร
Speaker
ลำâพง
Step5 Play Content
Downloading MagicInfo Express Free
การดาวนâหลด MagicInfo Express ฟรี
- If you install the programme for the first time, the tutorial automatically starts to explain the features of the programme step by step.
For details on how to use a feature when using the programme, press
at the top right.
- Press the Create Content button to create content using default templates or edit previously created content.
- Using the Schedule Content menu, organize content for playback on certain days of the week at specific time slots to create a weekly schedule.
- Send a schedule to the product or a USB device.
- ถŒาคุณทำการติดตัéงâปรáกรมนีéàปšนครัéงáรก บทáนะนำจะáสดงขึé นâดยอัตâนมัติ àพืè ออธิบายคุณสมบัติต‹างæ ของâปรáกรมอย‹างàปšนขัéนตอน
สำหรับรายละàอียดàกีè ยวกับวิธีãชŒคุ ณสมบัติต‹างæ àมืè อãชŒงานâปรáกรม ãหŒกด ทีè ดŒานขวาบน
- กดปุ†ม
Create Content
àพืè อสรŒางàนืéอหาâดยãชŒáม‹áบบàริèมตŒน หรือáกŒäขจากàนืé อหาทีè äดŒสรŒางäวŒáลŒว
- ãชŒàมนู
Schedule Content
àพืè อจัดระบบàนืé อหาสำหรับการàล‹นãนช‹วงàวลาทีè ตŒองการãนบางวันของสัปดาห àพืè อสรŒางตารางàวลารายสัปดาห
- ส‹งตารางàวลาäปยังผลิตภัณฑหรืออุปกรณ USB
Playing content from your SMART Signage TV
การàล‹นàนืé อหาจาก SMART Signage TV ของคุ ณ
Schedules can be sent directly to the product using the below methods. If there are two or more devices that have the same name, go to
MENU
m
> Network > Device Name and change the device names to make them distinguishable.
If there is a wireless network available.
Refer to Step4. Initial Setup > Network Settings.
If there is no wireless network available.
On your Signage TV, go to
MENU m
> Network > Soft AP (Wi-Fi Hotspot) and turn it on. Next, check
the TV name and password.
Go to the Wi-Fi setup on your PC. Select your TV name and enter the password.
When you use USB
(available for PC software)
Schedules can be sent to a USB device. Connect the USB device to your display. The schedule will play
automatically.
คุ ณสามารถส‹งตารางàวลามายังผลิตภัณฑâดยตรงäดŒ âดยãชŒวิธีทีè áสดงดŒานล‹าง ถŒามีอุปกรณสองàครืèองขึé นäปทีè ãชŒชืè อàดียวกัน ãหŒäปทีè
MENU m
> Network > Device Name áลŒวàปลีè ยนชืè ออุปกรณãหŒáตกต‹างกัน
ถéามีàครือขèายäรéสาย
âปรดดูทีè
Step4
การตัéงค‹าàบืé องตŒน >
Network Settings
ถéาäมèมีàครือขèายäรéสาย
จาก
Signage TV
ของคุ ณ ãหŒäปทีè
MENU m
> Network > Soft AP (Wi-Fi Hotspot)
áลŒวàปด จากนัé น ตรวจสอบชืè อáละรหัสผ‹านของâทรทัศน äปทีè การตัéงค‹า Wi-Fi ของพีซีของคุณ àลือกชืè อ
âทรทัศนของคุ ณ áลŒวãส‹รหัสผ‹าน
àมืèอãชé USB
(ãชéงานäดéสíาหรับซอฟตìáวรìของàครืèอง PC)
คุ ณสามารถส‹งตารางàวลามายังอุปกรณ USB äดŒ ต‹ออุปกรณ USB àขŒากับจอáสดงผลของคุณ ตารางàวลาจะàล‹น
âดยอัตâนมัติ
5 63 4
1
2
Before assembling the product, place the product down on a flat and stable surface so that the screen is
facing downwards.
Disassembly is in the reverse order of assembly.
ก‹อนทำการประกอบผลิตภัณฑ ãหŒวางผลิตภัณฑลงบนพืé นผิวทีè àรียบáละมัèนคง âดยãหŒหนŒาจอหันลงดŒานล‹าง
การถอดãหŒทำâดยยŒอนลำดับขัé นตอนการประกอบ
Stand Installation การติดตัé งขาตัéง
<Installation is complete>
<การติดตัéงàสรçจสมบูรณ>
Step4 Initial Setup
After powering on the product for the rst time, con gure basic settings such as the language,
channel and time.
Language
→
Regional Settings
→
Channel Source
→
Auto Tuning (Auto Tuning does not appear
if Set-top box or No TV(Signage Only) is selected.)
→
Network Settings
→
Clock
→
Auto Power O
→
Setup Complete!
Channel Source
Select the source of your live TV signal.
Auto Tuning
You can automatically search broadcast signals and save retrieved channels.
Network
Connect to a wireless network to use the product as a TV+Signage.
* To use as a TV only, press the Next button and skip the Network Settings. This
also applies if no wireless networks are available. You can change settings later by
selecting MENU m > Network > Network Settings.
1. Available wireless networks are listed automatically in
Network Settings
. Select
a network name (SSID) to connect.
2. Enter your security key (
Enter password.
) and select
Done
.
The product may try to automatically connect to a wireless network that is not
secure.
3. If wireless networks are not listed automatically, select
Add Network
and enter a
network name (SSID) to manually search for a network.
หลังจากจ‹ายäฟãหŒกับผลิตภัณฑàปšนครัéงáรก ãหŒทำการกำหนดค‹าàบืéองตŒนต‹างæ àช‹น ภาษา ช‹องสถานี áละàวลา
Language → Regional Settings → Channel Source → Auto Tuning
(
Auto Tuning
จะäม‹áสดงขึé นãนกรณี
ทีè àลือก
Set-top box
หรือ
No TV(Signage Only)
äวŒ)
→
Network Settings
→
Clock → Auto Power O →
Setup Complete!
Channel Source
àลือกáหล‹งสัญญาณâทรทัศนทีè áพร‹ภาพสดของคุณ
Auto Tuning
คุ ณสามารถทำการคŒนหาสัญญาณáพร‹ภาพáละบันทึกช‹องสถานีทีè สามารถรับสัญญาณ
äดŒâดยอัตâนมัติ
Network
àชืè อมต‹อàครือข‹ายäรŒสายàพืè อãชŒงานผลิตภัณฑàปšนâทรทัศนáละป‡ายประชาสัมพั นธ
* ãนการãชŒงานàปšนâทรทัศนàพียงอย‹างàดียว ãหŒกดปุ†ม
Next
áลŒวขŒาม
Network Settings
ระบบจะกำหนดค‹าดังกล‹าวãนกรณีทีè äม‹มีàครือข‹ายäรŒสายดŒวย คุ ณ
สามารถàปลีèยนáปลงการตัéงค‹าãนภายหลังäดŒ âดยการàลือก
MENU m > Network >
Network Settings
1. àครือข‹ายäรŒสายทีè ãชŒงานäดŒจะáสดงขึé นâดยอัตâนมัติãน Network Settings àลือกชืè อ
àครือข‹าย (SSID) ทีè ตŒองการàชืè อมต‹อ
2. ป‡อนรหัสนิรภัยของคุณ (Enter password.) áลŒวàลือก Done
ผลิตภัณฑนีé อาจพยายามàชืè อมต‹อกับàครือข‹ายäรŒสายทีè äม‹มีการป‡องกันâดยอัตâนมัติดŒวย
3. ถŒาชืè อàครือข‹ายäรŒสายäม‹áสดงขึé นâดยอัตâนมัติ ãหŒàลือก Add Network áลŒวป‡อนชืè อ
àครือข‹าย (SSID) àพืè อคŒนหาàครือข‹ายดŒวยตนàอง
Starting MagicInfo
MagicInfo is a business solution that allows the product to be used as signage (advertising
media).
Press the HOME or MagicInfo Player I button on the remote control to run the
MagicInfo browser. You can browse or play content stored on the internal memory or a USB
storage device.
Playing content from
the internal memory
or USB
Play images or videos stored in the internal memory or the connected USB.
Playing content from
your computer or
mobile device
The content sent via MagicInfo Express Content Creator will be displayed as a schedule.
You can also edit the schedule using your mobile device.
For more information on how to use the MagicInfo Express Content Creator or mobile
app, refer to Step6.
If the internal memory is insu cient, connect a USB
device and go to
Options
→
Settings
→ Default Storage at the top right of the
MagicInfo browser. Change the option to USB.
* To nd out how much internal memory is left, press INFO on the remote control.
การàริèมâปรáกรม
MagicInfo
MagicInfo คือâซลูชัè นทางธุรกิจซึè งช‹วยãหŒสามารถãชŒงานผลิตภัณฑàปšนป‡ายประชาสัมพั นธ
(สืèอâฆษณา) äดŒ
กดปุ †ม
HOME
หรือ
MagicInfo Player I
บนรีâมทคอนâทรลàพืè อàปดàบราวàซอร MagicInfo
คุ ณสามารถàรียกดูหรือàล‹นàนืéอหาทีè บันทึกäวŒãนหน‹วยความจำภายãนหรืออุ ปกรณàกçบขŒอมูล
USB äดŒ
การàล‹นàนืé อหาจาก
หน‹วยความจำภายãน
หรืออุปกรณ USB
àล‹นรูปภาพหรือวิดีâอทีè บันทึกอยู‹ãนหน‹วยความจำภายãนหรืออุปกรณ USB ทีè ต‹อäวŒ
การàล‹นàนืé อหาจาก
คอมพิวàตอรหรือ
อุปกรณàคลืèอนทีè
ของคุ ณ
àนืé อหาทีè ส‹งผ‹านâปรáกรม MagicInfo Express Content Creator จะáสดงขึé นตามตารางàวลา คุ ณสามารถ
áกŒäขตารางàวลาâดยãชŒอุปกรณàคลืèอนทีè ของคุณäดŒàช‹นกัน
สำหรับขŒอมูลàพิè มàติมàกีèยวกับวิธีãชŒâปรáกรม
MagicInfo Express Content Creator
หรือáอพ
บนอุปกรณพกพา âปรดดูทีè ขัéนตอนทีè
Step6
ãนกรณีทีè หน‹วยความจำภายãนมีäม‹àพียงพอ ãหŒàชืè อมต‹ออุปกรณ USB áลŒวäปทีè Options
→
Settings
→ Default Storage
ทีè ดŒานขวาบนของàบราวàซอร MagicInfo àปลีèยนตัวàลือกàปšน
อุปกรณ USB
* àมืèอตŒองการทราบว‹าàหลือหน‹วยความจำภายãนàท‹าãด ãหŒกดปุ†ม INFO บนรีâมทคอนâทรล
Schedule
Device : All Content : All
Sort by : File Name
Options
Pre-connection Checkpoints
-
Before connecting a source device, read the user manual provided with it.
The number and locations of ports on source devices may di er from device to device.
-
Do not connect the power cable until all connections are completed.
Connecting the power cable during connection may damage the product.
-
Connect the sound ports correctly: left = white and right = red.
-
Check the types of ports at the back of the product you want to connect.
-
If the product is in portrait orientation, it is not possible to change Source List.
-
Depending on the country or region.
สิèงทีè ควรตรวจสอบก‹อนทำการàชืè อมต‹อ
- ก‹อนàชืè อมต‹ออุปกรณáหล‹งสัญญาณ กรุณาอ‹านคู‹มือการãชŒงานทีè มาพรŒอมกับอุปกรณ
จำนวนáละตำáหน‹งของพอรตต‹างæ ทีè อุปกรณáหล‹งสัญญาณอาจáตกต‹างกัน ขึé นอยู‹กับอุปกรณนัé นæ
- หŒามต‹อสายจ‹ายäฟจนกว‹าจะทำการàชืè อมต‹อàสรçจสมบูรณ
การต‹อสายจ‹ายäฟãนระหว‹างทีè ทำการàชืè อมต‹ออาจทำãหŒผลิตภัณฑชำรุดäดŒ
- ต‹อพอรตสัญญาณàสียงอย‹างถูกตŒอง: สัญญาณดŒานซŒาย = สีขาว áละสัญญาณดŒานขวา = สีáดง
- ตรวจสอบประàภทของพอรตต‹างæ ทีè ดŒานหลังของผลิตภัณฑทีè คุณตŒองการàชืè อมต‹อ
- ãนกรณีทีè ติดตัéงผลิตภัณฑãนáนวตัéง จะäม‹สามารถàปลีèยนáปลงการตัéงค‹า Source List äดŒ
- ขึé นอยู‹กับáต‹ละประàทศหรือพืé นทีè
Speci cations
Contact SAMSUNG WORLD WIDE
Step6 Create & Schedule Your Business Content
Creating content and schedules on your PC
การสรŒางàนืé อหาáละตารางàวลาบนàครืèอง PC ของคุณ
1. Create Content 2. Select Template 3. Customize Template 4. Schedule Content 5. Send
1
2
3
MagicInfo Express software provides easy-to-use tools to create, edit, schedule and deploy your custom content through the Samsung SMART Signage TV.
MagicInfo Mobile App makes content management even more convenient using your smartphone or tablets. Create and schedule in-store menu boards, welcome screens, slideshows and promotions to complement and reinforce your unique business
environment.
ซอฟตáวร MagicInfo Express ãหŒàครืèองมือทีè สะดวกต‹อการãชŒงาน àพืè อการสรŒาง áกŒäข กำหนดตารางàวลา áละปรับãชŒàนืé อหาทีè ปรับáต‹งàองผ‹านทาง Samsung SMART Signage TV
áอปมือถือ MagicInfo ทำãหŒการจัดการàนืé อหาสะดวกยิèงขึé นอีก âดยãชŒงานผ‹านทางสมารทâฟนหรือáทçบàลçตของคุณ สรŒางáละจัดการตารางàวลาของกระดานàมนูภายãนรŒานคŒา หนŒาจอตŒอนรับ การนำàสนอภาพนิèง áละâปรâมชัèน àพืè อàติมàตçมáละ
àสริมสรŒางบรรยากาศทางธุรกิจอันàปšนàอกลักษณของคุ ณàอง
Starting MagicInfo Express Content Creator
การàริèมâปรáกรม
MagicInfo Express Content Creator
Network
Network Settings
AP000
Your wireless network is setup and ready to use.
Ready to play your business content.
-Run the Content Creator on your PC, then create and schedule your content. You can
send it to the Signage TV using the wireless network.
-Refer to the Content Creator manual for more information.
1 2 3 4 5 6
Country Customer Care Centre
AUSTRALIA
1800 91 92 93
INDONESIA
0800-112-8888
JAPAN
0120-363-905
MALAYSIA
1800 88 3399
MYANMAR
+951 2399 888
NEW ZEALAND
0800726786 option 3
PHILIPPINES
632 214 77 18
SINGAPORE
+65 64150798
TAIWAN
0809-005-237
THAILAND
+662 6893277
VIETNAM
1800 588 890
BANGLADESH
0800-112-8888
INDIA
1800 3010 8282
SRI LANKA
0094117540540
0094115900000
Step2 - Type B
àชืè อมต‹ออุปกรณáหล‹งสัญญาณ
การตัé งค‹าàบืé องตŒน
àล‹นàนืé อหา
สรŒางáละกำหนดตารางàวลาãหŒกับàนืé อหาทางธุรกิจของคุณ
ขŒอมูลจำàพาะ
การติดต‹อกับซัมซุ งทัè วâลก
To download the software on your PC, visit
http://www.samsung.com/displaysolutions/signagetv
Click the download button on the website and install MagicInfo Express on your PC.
หากตŒองการดาวนâหลดซอฟตáวรลงàครืèอง PC ของคุณ กรุณาäปทีè
http://www.samsung.com/displaysolutions/signagetv คลิกปุ †มดาวนâหลดบนàวçบäซตáละ
ติดตัéง
MagicInfo Express
บนàครืèอง PC ของคุณ
To download the mobile app on your smartphone or tablet, visit the Google Play Store or
AppleAppStore and install MagicInfo app on your mobile.
หากตŒองการดาวนâหลดáอปมือถือลงสมารทâฟนหรือáทçบàลçตของคุณ กรุณาäปทีè
Google Play Store หรือ Apple App Store áละติดตัéงáอป
MagicInfo
บนอุปกรณของคุ ณ
MagicInfo Express MagicInfo
[RMD-QSG]BN68-06719L-01.indd 2 2015-10-12 �� 1:52:26
-
 1
1
-
 2
2


Samsung RM40D Guide de démarrage rapide
- Taper
- Guide de démarrage rapide
- Ce manuel convient également à
dans d''autres langues
- English: Samsung RM40D Quick start guide