sunjoe SPX3000 Le manuel du propriétaire
- Catégorie
- Outils de jardin
- Taper
- Le manuel du propriétaire

Original instructions.
© 2023 Snow Joe, LLC. All rights reserved. SAVE THESE INSTRUCTIONS
1
EN
A Division of Snow Joe, LLC Model SPX3000 Form No. SJ-SPX3000-880E-MR15
R
OPERATOR’S MANUAL
14.5A ELECTRIC PRESSURE WASHER
IMPORTANT!
Safety Instructions
All Operators Must Read These
Instructions Before Use
mWARNING! This indicates a hazardous situation, which,
if not avoided, could result in death or serious injury.
mCAUTION! This indicates a hazardous situation, which,
if not avoided, could result in minor or moderate injury.
mDANGER! This indicates a hazardous situation, which,
if not followed, will result in death or serious injury.
General Safety
mWARNING! This appliance is not intended for use
by children or by unassisted, unsupervised persons whose
physical, sensory or mental capabilities prevent them from
using it safely. Children should be supervised to ensure that
they do not play with the appliance.
Before starting up your machine, please check it carefully for
any defects. If you nd any, do not start up your machine.
Contact your authorized Snow Joe® + Sun Joe® dealer or
call the Snow Joe® + Sun Joe® customer service center at
1-866-SNOWJOE (1-866-766-9563).
mWARNING! When using the pressure washer, basic
safety precautions should always be followed to reduce the
risk of re, electric shock, and personal injury. These include:
• Know your product – Know how to stop the machine and
bleed pressure quickly. Thoroughly familiarize yourself with
the controls.
• Keep bystanders away – All visitors and pets should be
kept a safe distance away from the work area.
• Use the right product – Do not use this machine for any
job except that for which it is intended.
• Dress properly – Do not wear loose clothing or jewelry.
They can get caught in moving parts. Protective rubber
gloves and non-slip footwear are recommended when
working outdoors.
• mCAUTION! – Exercise caution to avoid slipping or falling.
Wear protective footwear that will protect your feet and
improve your footing on slippery surfaces.
• Stay alert – Watch what you are doing. Use common
sense. Do not operate the pressure washer when you are
tired, or under the inuence of alcohol or drugs.
• Do not overreach – Keep proper footing and balance at
all times.
• Avoid unintentional starting – Do not carry a plugged-
in machine with your nger on the trigger. Make sure the
switch is o before plugging in the machine.
• Do not abuse the cord – Never carry the machine by the
cord or yank the cord to disconnect it from the receptacle.
Keep the cord away from heat, oil, and sharp edges.
• Use safety glasses – Also use safety footwear, snug-tting
clothing, protective gloves, hearing and head protection.
• Check the water temperature – This pressure washer is not
meant to pump hot water. NEVER connect it to a hot water
supply as it will signicantly reduce the life of the pump.
• Store indoors – NEVER store the pressure washer
outdoors or where it could freeze. The pump could be
seriously damaged.
• Ground Fault Circuit Interrupter (GFCI) – Protection
should be provided on the circuits or outlets to be used
for this pressure washer. Receptacles are available having
built-in GFCI protection and may be used for this measure
of safety.
• Inspect electrical cables – The insulation of the power cord
should be perfectly intact. If the power cord is damaged or
shows any signs of wear or tear, do not use the pressure
washer. Contact your authorized Snow Joe
®
+ Sun Joe
®
dealer or call the Snow Joe
®
+ Sun Joe
®
customer service
center at 1-866-SNOWJOE (1-866-766-9563).
mWARNING! Do not use this appliance without reading
this instruction manual.
mWARNING! This appliance has been designed for
use with cleaning agents that are recommended by the
manufacturer. The use of other cleaning agents or chemicals
may adversely aect the safety of the appliance.
mWARNING! Do not use the appliance within range of
persons unless they are wearing protective clothing.
mWARNING! High-pressure jets can be dangerous if
subject to misuse. The jet must not be directed at persons,
pets, live electrical equipment, or the appliance itself.
• Do not direct the jet at yourself or others in order to clean
clothes or footwear.
• Risk of explosion – Do not spray ammable liquids.

2
• Disconnect the tool – Disconnect from the electrical
power supply before performing any maintenance task.
• Keep children away – This high-pressure electric
power washer must not be used by children or
untrained personnel.
• To ensure appliance safety, use only original replacement
parts from the manufacturer or those approved by
the manufacturer.
mWARNING! Water that has owed through backow
preventers is considered to be non-potable.
mWARNING! During cleaning, maintenance or when
replacing parts, the machine must be disconnected from its
power source by removing the plug from the socket outlet.
mWARNING! High-pressure hoses, ttings, and
couplings are important for the safe operation of the appliance.
Use only hoses, ttings, and couplings recommended by
the manufacturer.
• Check for damaged parts – Do not use the appliance if
the supply cord or other important parts of the appliance
are damaged (e.g. safety devices, high-pressure hoses,
trigger gun).
mWARNING! If an extension cord is used, the plug and
socket must be of watertight construction.
mWARNING! Inadequate extension cords can
be dangerous.
• This high-pressure electric power washer must not be used
at temperatures below 32ºF (0°C).
mWARNING! Power cords on drums should always be
completely unwound to prevent the cord from overheating.
• Power cord connections should be kept dry and o
the ground.
• If the power cord is damaged, do not use the appliance.
Contact your authorized Snow Joe® + Sun Joe® dealer or
call the Snow Joe® + Sun Joe® customer service center at
1-866-SNOWJOE (1-866-766-9563).
• Keep the machine on a stable, at surface during operation,
handling, transportation, and storage. Sudden overturn of
the machine can cause bodily injury.
• In the event of an accident or breakdown, switch o the
machine immediately. (If contact with detergent occurs,
rinse with an abundance of clean water.)
Electrical Safety
ATTENTION: If there are problems with the electrical
MAINS, short voltage drops may appear when starting the
equipment. This can, in turn, inuence other equipment
(e.g. cause a lamp to blink). If the MAINS-IMPEDANCE Zmax
< 0.335 OHM, such disturbances are not expected. (If you
require assistance, contact your local supply authority for
further information.)
mWARNING! Electrical Shock Hazard – Before
starting up your machine, please check it carefully for any
defects. If you nd any, do not start up your machine and
contact your distributor.
The following should be observed when connecting the
high-pressure electric power washer to the electric supply:
• The electric supply connection should be performed by a
qualied person.
• The electric supply to this appliance should include either
a residual current device that will interrupt the supply if the
leakage current to the earth exceeds 30 mA for 30 ms or a
device that will interrupt the earth circuit (GFCI).
IMPORTANT: Only use water without any impurities.
If there is a risk of running sand into the inlet water (i.e. from
your own well), an additional lter should be installed.
Safety Devices
The unloader valve can reduce pressure if it exceeds preset
values. The spray gun features a locking device. When the lock
is activated, the spray gun cannot be operated.
1. Thermal sensor – A thermal sensor protects the motor
against overloading. The machine will restart after a few
minutes when the thermal sensor has cooled.
2. Double insulation – In a double-insulated appliance, two
systems of insulation are provided instead of grounding.
No grounding means is provided on a double-insulated
appliance, nor should a means for grounding be added
to the appliance. Servicing a double-insulated appliance
requires extreme care and knowledge of the system, and
should be performed only by qualied service personnel at
an authorized Snow Joe® + Sun Joe® dealer. Replacement
parts for a double-insulated appliance must be identical
to the parts they replace. A double-insulated appliance
is marked with the words “Double Insulation” or “Double
Insulated.” The symbol (square within a square) may
also be marked on the appliance.
3. Ground fault circuit interrupter (GFCI) protection – A
GFCI should be provided on the circuit(s) or outlet(s) to be
used for the pressure washer. Receptacles are available
having built-in GFCI protection and may be used for this
measure of safety.
4. It is not recommended to use an extension cord with this
pressure washer. The unit comes standard with a 35 ft
GFCI power cable. Using an extension cord may cause
a drop in line voltage resulting in loss of power
and overheating.
5. To reduce the risk of electric shock, this appliance has
a polarized plug (i.e. one blade is wider than the other).
The appliance plug will t into a polarized outlet only
one way.
If the appliance plug does not t fully into the outlet,
reverse the plug. If the plug still does not t, make sure
that you are using the correct polarized wall outlet. If the

3
plug still does not t, contact a qualied electrician to
install the proper wall outlet. Do not modify the appliance
plug, power cord receptacle, or power cord plug in
any way.
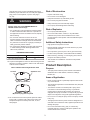
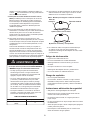
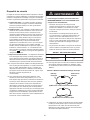
6. To prevent the appliance cord from disconnecting from the
extension cord during operation, make a knot with the two
cords as shown in Table 1.
7. Do not abuse the cord. Never pull the pressure washer
by the cord or yank the cord to disconnect it from the
receptacle. Keep the cord away from heat, oil, and
sharp edges.
Risk of Electrocution
• Inspect cord before using.
• Do not use if cord is damaged.
• Keep all connections dry and o the ground.
• Do not touch plug with wet hands.
• Keep cord away from heat and sharp edges.
• Do not spray electrical apparatus and wiring.
Risk of Explosion
• Do not spray ammable liquids.
• Do not use acids, bases, solvents, or any ammable
material in this product. These substances can cause
physical injuries to the operator and irreversible damage to
the machine.
Additional Safety Instructions
• High-pressure: keep clear of nozzle.
• Injection hazard: equipment can cause serious injury if the
spray penetrates the skin.
• Do not point the gun at anyone or at any part of the body.
• In case of skin penetration, seek medical aid immediately.
• Before servicing, cleaning, or removing any parts, shut o
the power and relieve pressure.
• This machine is not suitable for connection to the potable
water mains.
Product Description
Purpose
• This high-pressure electric power washer is intended for
residential use to clean vehicles, machines, buildings,
facades, etc.
Areas of Application
• Never use the machine in potentially explosive areas under
any circumstances!
• The operating temperature must be between 32ºF (0ºC) and
104ºF (40ºC).
• The machine consists of an assembly with a pump, which
is encased in a shock-absorbing housing. To provide the
operator with an optimal working position, the machine is
equipped with a spray wand and a non-slip handle grip, whose
shape and conguration comply with applicable regulations.
• Do not cover or modify the spray wand or the spray nozzles
in any way.
• The high-pressure electric power washer is designed to be
used with cold or lukewarm water; higher temperatures can
damage the pump.
• Do not use water that is dirty, gritty, or contains any
chemical products, as these could impair operation and
shorten the life of the machine.
m WARNING m
Electric shock may cause SEVERE INJURY or
DEATH. Heed these warnings:
• Do not allow any part of the electric pressure washer
to make contact with water while it is in operation. If
the appliance becomes wet while turned o, wipe dry
before starting.
• Do not use an extension cord over 25 ft. The
pressure washer comes equipped with a 35 ft power
cable. Combined cord length must not exceed 60 ft.
Any extension cord must be 14-gauge (or heavier) to
safely power the pressure washer.
• Do not touch the appliance or its plug with wet hands
or while standing in water. Wearing rubber boots
oers some protection.
EXTENSION CORD CHART
Cord Length:
Min. Wire Gauge (A.W.G.):
25 ft (7.6 m)
14
(B) Connect plug and receptacle
Cord set Appliance cord
(A) Tie cord as shown
Table 1. Method of Securing Extension Cord

4
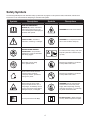
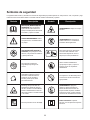
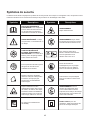
Safety Symbols
The following table depicts and describes safety symbols that may appear on this product. Read, understand, and follow all
instructions on the machine before attempting to assemble and operate.
Symbols Descriptions Symbols Descriptions
READ THE OPERATOR’S
MANUAL(S) – Read, understand,
and follow all instructions in the
user manual(s) before attempting to
assemble and operate.
WARNING! Electrical shock hazard.
SAFETY ALERT – Indicates a
precaution, a warning, or a danger.
WARNING! Do not expose the unit to
rain or wet conditions. Keep dry.
WEAR EYE AND HEARING
PROTECTION – For protection
against injury, wear ear defenders
and safety goggles.
To reduce the risk of injury, user must
keep all bystanders at least 49 ft (15
m) away.
Wear safety gloves during
use to protect hands.
Machine not suitable for connection
to the potable water mains.
Store indoors. Never store the
pressure washer outdoors.
If the pump freezes, permanent
damage may result.
Machine not suitable for connection
to the potable water mains.
Always keep the power cable
away from heat sources, oils, or
sharp edges. Immediately remove
plug from the mains if the cable is
damaged, frayed, or entangled.
WARNING! Turn the machine OFF
and disconnect it from the power
supply before inspecting, cleaning,
changing accessories, or conducting
any other maintenance task.
Sound power level is 96 dB(A). Double Insulation – When servicing,
use only identical replacement parts.

5
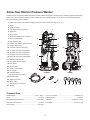
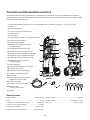
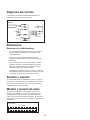
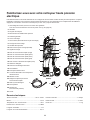
Know Your Electric Pressure Washer
Read the owner’s manual and safety instructions carefully before operating the electric pressure washer. Compare the illustration
below to the electric pressure washer in order to familiarize yourself with the location of the various controls and adjustments.
Save this manual for future reference.
Technical Data
Rated Voltage .......................................................120V ~ 60 Hz
Motor ............................................................................14.5 amp
Max Water Inlet Temperature ................................... 104ºF/40ºC
Max Water Inlet Pressure .............................................. 0.7 MPa
Hose Length ............................................................... 20 ft (6 m)
Power Cord Length ............................................... 35 ft (10.7 m)
Rated Pressure ............................................................ 1450 PSI
Rated Flow ................................................1.24 GPM (4.7 l/min)
Net Weight ......................................................... 24.3 lbs (11 kg)
1. Safety lock (Locate lock in center of trigger. Pull up and snap in place. See Fig. 20, pg. 10)
2. Trigger
3. Transport handle
4. High-pressure hose connection
5. Trigger gun
6. Spray wand
7. Water inlet (garden hose connection)
8. Spray wand protector
9. High-pressure hose
10. Garden hose adapter (female coupler)
11. Needle clean-out tool
12. 0º Quick-Connect nozzle (red)
13. 15º Quick-Connect nozzle (yellow)
14. 25º Quick-Connect nozzle (green)
15. 40º Quick-Connect nozzle (gray)
16. Soap Quick-Connect nozzle (black)
17. Detergent selection dial
18. Removable detergent tanks
19. Hose holder
20. On/O switch
21. Power cord with GFCI
22. Cord holder
23. Onboard storage
for Quick-Connect nozzles
24. Detergent tube
25. Trigger gun holder
26. Water outlet
(high-pressure connection)
27. Wheels
15º
25º
0º
SOAP
40º
25
27
24
23
17
18
19 22
10
11
4
5
6
7
9
8
20
21
1 2 3
1412
26
13 15 16
(REAR)(FRONT)

6
Unpacking
Carton Contents
• Electric pressure washer
• Handle
• Trigger gun
• Spray wand
• Five (5) Quick-Connect nozzles (0º, 15º, 25º, 40º and Soap)
• Two (2) removable detergent tanks
• Four (4) large screws
• Two (2) small screws
• Spray wand protector
• Trigger gun holder
• Hose holder
• Needle clean-out tool
• High-pressure hose
• Garden hose adapter (female coupler) with two sealing rings
• Manual with registration card
1. Carefully remove the pressure washer and check to see
that all of the above items are supplied.
2. Inspect the product carefully to make sure no breakage or
damage occurred during shipping. If you nd damaged or
missing parts, DO NOT return the unit to the store. Please
call the Snow Joe® + Sun Joe® customer service center at
1-866-SNOWJOE (1-866-766-9563).
NOTE: Do not discard the shipping carton and packaging
material until you are ready to use your new electric
pressure washer. The packaging is made of recyclable
materials. Properly dispose of these materials in
accordance with local regulations.
IMPORTANT! The equipment and packaging material are
not toys. Do not let children play with plastic bags, foils,
or small parts. These items can be swallowed and pose a
suocation risk!
mWARNING! Do not connect to power supply until
assembly is complete. Failure to comply could result in
accidental starting and possible serious personal injury.
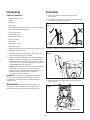
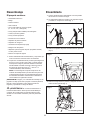
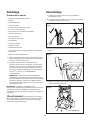
Assembly
1. Position the washer as CLOSE as possible to the
water supply.
2. The washer must be used on a secure and stable surface
in a standing, upright position (Fig. 1).
3. Slide the trigger gun holder into position (Fig. 2).
4. Slide the handle into position and secure it with 4 large
screws (Fig. 3).
Fig. 1
Fig. 2
Fig. 3
4 large screws

7
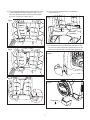
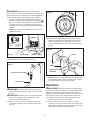
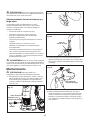
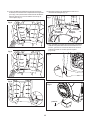
5. Insert the detergent bottles (top end rst) under the ridge
of their designated storage compartment (Figs. 4 & 5).
Then snap the bottom of the bottles into the V-shaped
grooves to secure them in place (Fig. 6).
6. Connect the PVC detergent tube to the detergent
connection (Fig. 7).
7. To assemble the spray wand protector, rst snap the tab
into the slot located at the bottom left side of the unit, and
then secure it in place with one small screw. (Figs. 8 & 9).
Fig. 4
Fig. 5
Fig. 6
Fig. 7
Detergent
connection
Detergent tank
Detergent tube
Fig. 8
Fig. 9
small screw

8
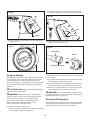
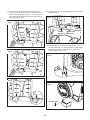
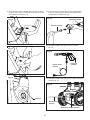
8. To assemble the hose holder, slide the holder into position
(Figs. 10 & 11) and secure it to the unit with the remaining
small screw (Fig. 12).
9. Fit the spray wand into the trigger gun and rotate the
collar until the two parts are completely locked (Fig. 13).
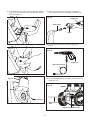
10. Connect the high-pressure hose to the trigger gun
(Fig. 14).
11. Connect the high-pressure hose to the water outlet on the
washer (Fig. 15).
Fig. 10
Fig. 11
OFF
ON
O
Fig. 12
Small screw
Fig. 13 Trigger gun
Spray wand
High-pressure hose
Trigger gun
Fig. 14
Fig. 15
High-pressure water outlet
(REAR)
High-pressure
hose
Collar

9
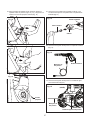
mWARNING! Keep hose away from sharp objects.
Bursting hoses may cause injury. Examine hoses regularly and
replace if damaged. Do not attempt to mend a damaged hose.
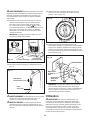
12. Connect the garden hose adapter (female coupler) to
the water inlet of the pressure washer, then thread your
garden hose (male end) into the garden hose adapter
(Fig. 16). The garden hose must have an internal diameter
of at least 13 mm (1/2 in.) and must be reinforced. The
water supply must be at least equal to the washer delivery
capacity.
NOTE: The machine is not suitable for connection to the
potable water main.
13. Attach garden hose to water supply (Fig. 17).
mWARNING! The intake water temperature must not
exceed 104ºF/40ºC. The water supply must not exceed
0.7 MPa.
mCAUTION! The washer must only be used with clean
water; use of unltered water containing corrosive
chemicals will damage the washer.
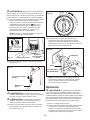
14. Make sure the motor switch is pushed to the OFF (0)
position before plugging the unit into the power outlet
(Fig. 18).
15. Check that the electrical supply voltage and frequency
(Volt/Hz) correspond to those specied on the pressure
washer rating plate. If the power supply is correct, you
may now plug the pressure washer into the power outlet
(Fig. 19).
NOTE: The GFCI may need to be reset when rst plugged
into the electric outlet. Press the "Reset" button until the
power light indicator on the GFCI illuminates.
Operation
mIMPORTANT! This pressure washer is equipped with
a micro-switch sensitive to water ow. This Total Stop System
(TSS) senses water ow in the pump. When the trigger is
released, water stops owing through the pump. The TSS then
automatically turns the motor o to protect the pump from
overheating, thus saving energy and prolonging pump life.
1. Turn the water supply tap on completely.
2. Make sure the safety lock is down and in its original
position (Fig. 20), then press the trigger for a few seconds
until water ow is steady. This will allow air to escape and
discharge any residual pressure in the hose.
Fig. 16 Water inlet
(female coupler)
(FRONT)
Garden hose
This end to the
water inlet on
the unit
Garden hose
(male end)
Fig. 17
Connect to water supply
Garden hose
OFF
I
ON
0
OFF
ON
Fig. 18
RESET
TEST
Fig. 19
GFCI
Power light
indicator
Reset

10
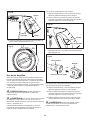
3. Turn the switch to the ON (I) position to start the pressure
washer (Fig. 21).
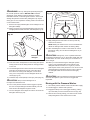
Using the Nozzles
Before beginning any cleaning task, determine the best nozzle
for the job. Each of the nozzles has a dierent spray pattern.
The nozzle patterns are 40˚ (for gentle cleaning), 25˚ (for
all-purpose cleaning), 15˚ (for tough jobs), 0˚ (for spot cleaning
or hard-to-reach areas) and the Soap nozzle (for detergent
application).
mCAUTION! NEVER change nozzles without locking the
safety lock on the trigger handle.
mWARNING! High-pressure jets can be dangerous if
subject to misuse. The jet must not be directed at persons,
pets, live electrical equipment, or the appliance itself.
This electric pressure washer is equipped with ve (5)
Quick-Connect nozzles that easily snap onto the
Quick-Connect collar of the spray wand.
To connect a nozzle to the spray wand:
1. Turn o the pressure washer and shut o the water supply.
Pull the trigger to release water pressure.
2. Engage the safety lock on the trigger handle by pushing
up on the safety lock until it clicks into the slot (Fig. 22).
3. Snap the desired nozzle onto the Quick-Connect collar
until it clicks into place (Fig. 23).
To disconnect a nozzle from the spray wand once the cleaning
job is complete:
4. Turn o the pressure washer and shut o the water supply.
Pull the trigger to release water pressure.
5. Engage the safety lock on the trigger handle by pushing
up on the safety lock until it clicks into the slot (Fig. 22).
6. Remove the nozzle by placing your hand over the nozzle
while pulling back on the Quick-Connect collar.
mWARNING! Do not make changes to the nozzle while
the trigger is engaged. Doing so could result in damage to the
pressure washer or injury to the user.
Working with Detergents
When cleaning with the pressure washer, some cleaning tasks
can be solved with water alone, but for most tasks cleaning
with detergent allows for more eective dirt removal.
Fig. 20
Safety lock
Slot
Trigger
OFF
ON
I
0
ON
Fig. 21
Fig. 22
Safety lock
Slot
Fig. 23
Nozzle
“Click”
Quick-Connect collar
Spray wand

11
mWARNING! Use only detergents specically designed
for use with pressure washers. DO NOT USE household
detergents, acids, alkaline solutions, bleaches, solvents,
ammable material, or industrial grade solutions. These could
damage the pressure washer. Many detergents may require
mixing prior to use. Prepare the cleaning solution as instructed
on the solution bottle.
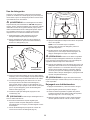
1. Remove the cap(s) and detergent suction tube(s) from the
detergent bottle(s).
2. Gently pull each of the onboard detergent tanks out of its
storage position and ll each tank with detergent (Fig. 24).
3. Insert the suction tube(s) back into the tank(s) and cap the
tank(s) closed. Push the tank(s) back into storage position
on the unit.
4. Use the detergent dial to select which of the two detergent
tanks the unit will draw from and to control the rate of
ow. When not working with detergent, such as when
using a non-soap nozzle, turn the detergent dial to the
center (O) (Fig. 25).
5. Install the Soap nozzle (black) on the spray wand (Fig. 23).
mCAUTION! Always test the detergent in an
inconspicuous area before use.
6. Turn on the pressure washer. Pull the trigger to operate
the unit. The liquid detergent will automatically mix with
water and be discharged through the nozzle.
7. Turn the detergent dial to adjust the suction volume of the
detergent solution (Fig. 25).
8. Apply detergent from the bottom to the top of the dry
surface to be cleaned.
NOTE: Wetting the surface rst is not recommended as it
dilutes the detergent and reduces its cleaning ability.
9. Allow the detergent to remain on the surface for a short
time before rinsing. Do not allow the detergent to dry on
the surface.
mCAUTION! Damage may occur to painted surfaces if
the detergent is allowed to dry on the surface. Wash and rinse
a small section at a time. Avoid working on hot surfaces or in
direct sunlight.
10. When you have nished using the detergent injection
system, remove the detergent suction tube from the
detergent bottle and insert it into 1.3 gal (5 L) of fresh
water. Siphon water at low pressure for one minute so that
all the detergent is ushed through the system. Remove
the detergent bottle and rinse it until it is thoroughly
cleaned.
mCAUTION! Failure to follow these cleaning instructions
will cause the injection system to become clogged and
inoperable.
Rinsing with the Pressure Washer
1. Turn o the pressure washer and shut o the water supply.
2. Pull the trigger to release water pressure.
3. Engage the safety lock on the trigger handle by pushing
up on the safety lock until it clicks into the slot (Fig. 22).
4. Remove the nozzle by placing your hand over the nozzle
while pulling back on the Quick-Connect collar.
Fig. 24
Detergent tank Pressure washer
detergent
Fig. 25
Detergent selection dial

12
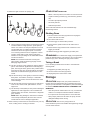
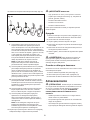
5. Select the right nozzle for the job (Fig. 26):
i) The 0º intense-jet nozzle (red) is an extremely powerful
nozzle that delivers a high-pressure, pencil-point jet
stream. It is used to cut heavy dirt deposits in a small,
concentrated area. It is ideal for dissolving stubborn
substances, like tar and grease spots on concrete,
or for removing caked mud from equipment. Use this
nozzle to clean hard-to-reach areas including the
facades of 2-story buildings or the undersides of lawn
mowers and tractors.
NOTE: Care should be used when choosing the
right nozzle to avoid permanently gouging wood or
damaging fragile surfaces.
ii) Use the 15º fan-tip nozzle (yellow) for intense cleaning
jobs on hard surfaces. Applications include stripping
paint, removing oil stains, grease, heavy mildew stains,
and rust from steel. This nozzle should only be used in
areas that can withstand the high-pressure from this
nozzle.
iii) Use the 25º fan-tip nozzle (green) to clean home siding,
brick patios, wood decks, driveways, or sidewalks.
When using this nozzle, test a small area rst to avoid
surface damage.
iv) Use the 40º wide-spray tip nozzle (gray) to clean items
such as cars, trucks, boats, patio furniture, or lawn
equipment.
v) Use the Soap nozzle (black) for low-pressure detergent
application to clean equipment, remove mildew and
oxidation stains from houses, clean bricks or degrease
grimy surfaces.
NOTE: When using detergent, make sure to install the
correct Soap nozzle (black). All of the other colored
nozzles will not work for detergent application.
6. Start at the top of the area to be rinsed and work your way
down, making sure to overlap your strokes.
mIMPORTANT! NEVER USE:
• Bleach, chlorine products, and other corrosive chemicals
• Liquids containing solvents (e.g. paint thinners, gasoline,
oils)
• Tri-sodium phosphate products
• Ammonia products
• Acid-based products
These chemicals will harm the unit and will damage
the cleaning surface.
Shutting Down
1. Turn the switch to the OFF (0) position and unplug the
power cord from the outlet.
2. Turn o the water source.
3. Hold the trigger to release water pressure.
4. Disconnect the garden hose from the water inlet on
the unit.
5. Disconnect the high-pressure hose connection on the
trigger gun handle.
6. Release the trigger and engage the gun safety lock.
mWARNING! Turn o the water supply and squeeze the
trigger to depressurize the unit. Failure to do so could result in
personal injury due to discharge of high-pressure water.
Taking a Break
If you are taking a break of ve minutes or more between
cleaning tasks:
1. Engage the gun safety lock (Fig. 22).
2. Turn the switch to the OFF (0) position.
3. Unplug the power cord from the outlet.
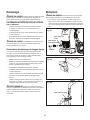
Storage
mCAUTION! Always store your pressure washer in a
location where the temperature will not fall below 32ºF (0ºC).
The pump in this machine is susceptible to permanent damage
if it freezes. FREEZE DAMAGE IS NOT COVERED BY THE
WARRANTY.
• Store the pressure washer indoors in a dry, covered area
where it is not subject to adverse weather conditions.
• It is important to store this product in a frost-free area.
• Always empty water from all hoses, the pump, and the
detergent bottle(s) before storing.
mCAUTION! The use of a pump protector is
recommended to prevent cold weather damage during storage
over the winter months.
15º
SOAP
25º 40º
0º
Fig. 26

13
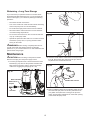
Winterizing + Long-Term Storage
If you must store your pressure washer in a location where
the temperature falls below 32ºF (0ºC), you can minimize the
chance of damage to your machine by utilizing the following
procedure:
• Disconnect all water connections.
• Turn on the machine for a few seconds until the remaining
water in the pump exits. Turn o immediately.
• Do not allow the high-pressure hose to become kinked.
• Store the machine and accessories in a room that does
not reach freezing temperatures.
• Do not store near a furnace or other sources of heat that
may dry out the pump seals.
• Operate the pressure washer with non-corrosive/non-toxic
anti-freeze, a pump saver, or a pump protector before
storing for the winter.
mWARNING! Before reusing, completely ush the unit
out with clear water. Anti-freeze products can damage
paintwork, so you must ensure there is no anti-freeze left in the
system before using it again.
Maintenance
mCAUTION! Before working on the pressure washer,
disconnect the plug from the power supply socket.
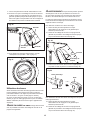
1. To ensure good performance, check and clean the water
inlet lter (Fig. 27). Remove the pre-lter and water inlet
lter and rinse with warm water to prevent any foreign
matter from clogging the pump (Figs. 28 – 29).
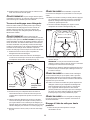
2. Clean the nozzle with the needle clean-out tool provided
(Fig. 30). Remove the spray wand from the gun; remove
any dirt from the nozzle hole and rinse.
3. Remove additional debris by back ushing water through
the nozzle and spray wand. To do this, place the end of
your garden hose (with water running) to the tip of the
nozzle, pushing water and debris out of the back opening
of the nozzle and spray wand.
Fig. 27
(FRONT)
Waterinletlter
Garden hose
adapter
Pre-lter
Fig. 28
Pre-lter
Fig. 29
Inletlter
15º
Fig. 30
Needle clean-out tool

14
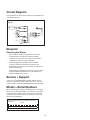
Circuit Diagram
A circuit diagram for the pressure washer is provided below for
your reference (Fig. 31).
Disposal
Recycling the Washer
• Do not dispose of electrical appliances as unsorted
municipal waste. Use separate collection facilities.
• Contact your local government agency for information
regarding the collection systems available.
• If electrical appliances are disposed of in landlls
or dumps, hazardous substances can leak into the
groundwater and get into the food chain, damaging your
health and well-being.
• When replacing old appliances with new ones, the retailer
is legally obligated to take back your old appliance for
disposal at least free of charge.
Service + Support
If your Sun Joe® SPX3000 electric pressure washer requires
service or maintenance, please call the Snow Joe® + Sun Joe®
customer service center at 1-866-SNOWJOE (1-866-766-9563).
Model + Serial Numbers
When contacting the company, reordering parts, or arranging
service from an authorized dealer, you will need to provide the
model and serial numbers, which can be found on the decal
located on the housing of the unit. Copy these numbers into
the space provided below.
!
Micro-switch
Motor
Capacitor
On/off switch
Power cord
Fig. 31
Record the following numbers from the housing or handle of your
new product:
S P X 3 0 0 0
Model #:
Serial #:

15
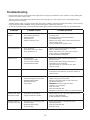
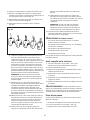
Troubleshooting
• Disconnect the unit from the electrical power supply before carrying out maintenance on the machine or when checking that
its parts are in proper working order.
• The hose must be connected and the water turned on before operating your unit. Failure to do so will damage the pump
motor and void your warranty.
• Total Stop System (TSS) – The motor will shut OFF and remain in standby mode during periods of inactivity, or as soon as the
unit is pressurized. THIS IS NORMAL. Simply squeeze the trigger to restart the pump motor.
• To avoid unnecessary hassles, consult the following table before contacting customer service with any mechanical issues.
Problems Possible Cause Possible Solution
Machine refuses
to start
• Power failure/machine not plugged
into a working receptacle.
• Defective socket.
• Fuse has blown.
• Defective extension cord.
• Check to make sure machine is plugged into
a working outlet.
• Check the power cord and reset the GFCI.
Try a dierent outlet.
• Replace fuse. Switch o any other machines that are
using the same circuit.
• Try the unit without an extension cord.
Fluctuating pressure • Pump sucking air.
• Valves dirty, worn out, or stuck.
• Pump seals worn out.
• Check the hoses and connections are airtight.
• Clean or replace valves/seals.
• Please call the Snow Joe® + Sun Joe® customer
service center at 1-866-SNOWJOE
(1-866-766-9563) for assistance.
Machine stops • Fuse has blown.
• Incorrect mains voltage.
• Thermal sensor activated.
• Nozzle partially blocked.
• Replace fuse. Switch o other machines using
the same circuit.
• Check that the mains voltage corresponds to
specication on the model tag.
• Leave the washer for 5 minutes to cool down.
• Clean the nozzle.
Fuse blows • Fuse too small. • Install a fuse with a higher amp rating than the amp
consumption of the machine. Try the unit without an
extension cord.
Machine pulsating • Air in inlet hose.
• Inadequate supply of mains water.
• Nozzle partially blocked.
• Water lter blocked.
• Hose kinked.
• Allow machine to run by holding the trigger until
regular working pressure resumes.
• Check that the water supply corresponds to the
specications required.
• WARNING! Avoid using long, thin hoses
(minimum 1/2 in. diameter).
• Clean the nozzle.
• Clean the water inlet lter.
• Straighten out the hose to remove any kinks/blockages.
Machine often starts
and stops by itself
• Pump/spray gun is leaking.
• Trigger mechanism is broken.
• Please call Snow Joe® + Sun Joe® customer service
center at 1-866-SNOWJOE
(1-866-766-9563) for assistance.
Machine starts, but
no water comes out
• Pump/hoses or accessories frozen.
• No water supply.
• Water inlet lter blocked.
• Nozzle blocked.
• Wait for pump/hoses or accessories to thaw.
• Connect inlet water.
• Clean the water inlet lter.
• Clean the nozzle.

16
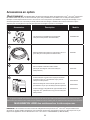
Optional Accessories
mWARNING! ALWAYS use only authorized Snow Joe® + Sun Joe® replacement parts and accessories. NEVER use
replacement parts or accessories that are not intended for use with this electric pressure washer. Contact Snow Joe® + Sun Joe®
if you are unsure whether it is safe to use a particular replacement part or accessory with your pressure washer. The use of any
other attachment or accessory can be dangerous and could cause injury or mechanical damage.
Accessories Item Model
1
Spray Tip Set
(Compatible with most SPX Series Pressure Washers) SPX3000-TPS
2
25 ft Medium-Duty
High Pressure Extension Hose
(For SPX Pressure Washer Series)
SPX-25H
3
Solid Brass Universal Quick Connector
(Garden Hose to Pressure Washer Adapter) SPX-UQC
4 Sun Joe® House + Deck All-Purpose Pressure Washer
Rated Concentrated Cleaner
Sun Joe® Premium Snow Foam Pressure Washer
Rated Car Wash + Cleaner
Sun Joe® All-Purpose Heavy Duty Pressure Washer
Rated Cleaner + Degreaser
SPX-HDC1G
SPX-FCS1G
SPX-APC1G
11
55
ºº
SOSO
AA
PP
22
55
ºº
44
00
ºº
00
ºº
NOTE: Accessories are subject to change without any obligation on the part of Snow Joe® + Sun Joe® to provide notice of such
changes. Accessories can be ordered online at sunjoe.com or via phone by contacting the Snow Joe® + Sun Joe® customer
service center at 1-866-SNOWJOE (1-866-766-9563).
Sun Joe’s complete line of premium pressure washer accessories and attachments
make it easy to get your dirty work done, and also help you get the most out of your model!
SHOP ONLINE now at sunjoe.com

R4_01282020
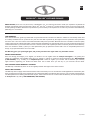
SNOW JOE® + SUN JOE® CUSTOMER PROMISE
OUR WARRANTY:
Snow Joe warrants new, genuine, powered and non-powered Products to be free from defects in material or workmanship when used
for ordinary household use for a period of two years from the date of purchase by the original, end-user purchaser when purchased
from Snow Joe or from one of Snow Joe’s authorized sellers with proof of purchase. Because Snow Joe is unable to control the quality
of its Products sold by unauthorized sellers, unless otherwise prohibited by law, this Warranty does not cover Products purchased from
unauthorized sellers. If your Product does not work or there’s an issue with a specic part that is covered by the terms of this Warranty,
Snow Joe will elect to either (1) send you a free replacement part, (2) replace the Product with a new or comparable product at no
charge, or (3) repair the Product. How cool is that!
This Warranty gives you specific legal rights, and you may also have other rights which vary from State to State.
PRODUCT REGISTRATION:
Snow Joe strongly encourages you to register your Product. You can register online at snowjoe.com/register, or by printing and
mailing in a registration card available online from our website, or calling our Customer Service Department at 1-866-SNOWJOE
(1-866-766-9563), or by e-mailing us at [email protected]. Failure to register your Product will not diminish your warranty
rights. However, registering your Product will allow Snow Joe to better serve you with any of your customer service needs.
WHO CAN SEEK LIMITED WARRANTY COVERAGE:
This Warranty is extended by Snow Joe to the original purchaser and original owner of the Product.
WHAT IS NOT COVERED?
This Warranty does not apply if the Product has been used commercially or for non-household or rental applications. This Warranty also
does not apply if the Product was purchased from an unauthorized seller. This Warranty also does not cover cosmetic changes that do
not aect performance. Wearing parts like belts, augers, chains and tines are not covered under this Warranty, and can be purchased
at snowjoe.com or by calling 1-866-SNOWJOE (1-866-766-9563).
ABOVE ALL ELSE, Snow Joe, LLC (“Snow Joe”) is dedicated to you, our customer. We strive to make your experience as pleasant as
possible. Unfortunately, there are times when a Snow Joe®, Sun Joe®, or Aqua Joe® product (“Product”) does not work or breaks under
normal operating conditions. We think it’s important that you know what you can expect from us. That’s why we have a Limited Warranty
(“Warranty”) for our Products.
17
EN


ES
Instrucciones originales.
©2023 Snow Joe, LLC. Derechos reservados. GUARDE ESTAS INSTRUCCIONES
19
Una división de Snow Joe, LLC Modelo SPX3000 Forma No. SJ-SPX3000-880S-MR15
R
MANUAL DEL OPERADOR
14.5 A HIDROLAVADORA ELÉCTRICA
¡IMPORTANTE!
Instrucciones de seguridad
Todos los operadores deberán leer
estas instrucciones antes del uso
m ¡ADVERTENCIA! Esto indica una situación peligrosa,
la cual, de no ser evitada, puede resultar en lesiones severas o
la muerte.
m ¡PRECAUCIÓN! Esto indica una situación peligrosa,
la cual, de no ser evitada, puede resultar en lesiones menores
o moderadas.
m ¡PELIGRO! Esto indica una situación peligrosa, la
cual, de no ser evitada, causará lesiones severas o la muerte.
Seguridad general
m ¡ADVERTENCIA! Este artefacto no está destinado
para su uso por niños o aquellas personas sin asistencia o
supervisión cuyas habilidades físicas, sensoriales o mentales
les impiden usarlo de forma segura. Los niños deben
estar bajo supervisión para asegurar que no jueguen con
el artefacto.
Antes de encender su máquina, por favor verifíquela
cuidadosamente para ver que no tenga defectos. Si
encuentra algún defecto, no la encienda. Contacte a su
concesionario autorizado de Snow Joe® + Sun Joe® o llame
a la central de servicio al cliente de Snow Joe® + Sun Joe® al
1-866-SNOWJOE (1-866-766-9563).
m ¡ADVERTENCIA! Al usar la hidrolavadora
eléctrica se deberán tomar precauciones básicas de
seguridad para reducir riesgos de incendio, choque eléctrico
o lesiones personales.
• Conozca su producto: sepa cómo detener la máquina y
purgar rápidamente la presión. Familiarícese a fondo con
los controles.
• Mantenga alejados a los transeúntes: todos los
visitantes, incluidas las mascotas, deberán estar a una
distancia segura del área de trabajo.
• Use el producto adecuado: no emplee esta máquina para
ningún otro trabajo excepto para el cual está destinada.
• Use ropa adecuada: no use prendas holgadas ni joyería,
ya que pueden llegar a engancharse en las partes móviles.
Se recomienda el uso de guantes de goma protectores
y calzado protector antideslizante cuando se trabaje
en exteriores.
• m ¡PRECAUCIÓN! Tenga cuidado y evite resbalar o caer.
Utilice calzado protector que proteja sus pies y mejore su
posición de pie en supercies resbaladizas.
• Manténgase alerta: fíjese en lo que está haciendo.
Utilice su sentido común. No opere la hidrolavadora si
usted está cansado o bajo la inuencia del alcohol, drogas
o medicamentos.
• No adopte una postura inclinada: mantenga el equilibrio y
posición adecuados durante todo el tiempo.
• Evitelosencendidosaccidentales:no lleve la máquina
enchufada con su dedo en el gatillo. Asegúrese de que el
interruptor esté apagado antes de enchufar la máquina.
• No abuse del cable: nunca lleve la máquina por el
cable ni tire bruscamente de éste para desenchufarla del
tomacorriente. Mantenga el cable alejado del calor, aceite y
bordes losos.
• Use gafas protectoras: use también calzado protector,
ropa que se ajuste a su cuerpo, guantes protectores y
protección auditiva y para la cabeza.
• Veriquelatemperaturadelagua:esta hidrolavadora
no está hecha para bombear agua caliente. NUNCA la
conecte a una fuente de agua caliente ya que reducirá
signicativamente el ciclo de vida de la bomba.
• Guárdela en un lugar bajo techo: NUNCA almacene la
hidrolavadora en exteriores o donde pueda congelarse.
La bomba podría dañarse seriamente.
• Interruptor de circuito de falla de conexión a tierra
(GFCI): se deberá proveer protección en los circuitos
o tomacorrientes a ser usados por esta hidrolavadora.
Los tomacorrientes están disponibles con protección
incorporada GFCI y pueden ser utilizados para esta
medida de seguridad.
• Inspeccioneloscableseléctricos:el aislamiento del
cable de alimentación debe estar perfectamente intacto.
Si el cable de alimentación está dañado o hay señales de
desgaste o deterioro, no use la hidrolavadora. Contacte a
su concesionario autorizado de Snow Joe® + Sun Joe® o
llame a la central de servicio al cliente de Snow Joe® +
Sun Joe® al 1-866-SNOWJOE (1-866-766-9563).
m ¡ADVERTENCIA! No use este artefacto sin antes leer
este manual de instrucciones.

20
m ¡ADVERTENCIA! Este artefacto ha sido diseñado
para su uso con agentes de limpieza recomendados por el
fabricante. El uso de otros agentes de limpieza o químicos
puede afectar de forma negativa la seguridad del artefacto.
m ¡ADVERTENCIA! No use el artefacto cerca de
personas, a menos que estén usando ropa protectora.
m ¡ADVERTENCIA! Los chorros de alta presión pueden
ser peligrosos si están sujetos a un mal uso. El chorro no
deberá estar dirigido a personas, mascotas, equipos eléctricos
activos, o al artefacto en sí.
• No dirija el chorro hacia usted o demás personas para
limpiar ropa o calzado.
• Riesgo de explosión: no rocíe líquidos inamables.
• Desconecte la herramienta: desconéctela de la
fuente de alimentación antes de llevar a cabo
cualquier mantenimiento.
• Mantenga alejados a los niños: esta hidrolavadora
eléctrica no debe ser usada por niños o personas
no capacitadas.
• Para garantizar la seguridad del artefacto, use solo piezas
de repuesto del fabricante o aprobadas por éste.
m ¡ADVERTENCIA! El agua que ha uido a través de
válvulas contra-reujo se considera como no potable.
m ¡ADVERTENCIA! La máquina deberá estar
desconectada de su fuente de alimentación, es decir
desenchufada del tomacorriente, durante la limpieza,
mantenimiento o reemplazo de las partes.
m ¡ADVERTENCIA! Las mangueras, juntas y
acoplamientos para presiones altas son importantes para
la seguridad del artefacto. Use solo mangueras, juntas y
acoplamientos recomendados por el fabricante.
• Veriquelaspartesdañadas:no use el artefacto si hay
daños en el cable de alimentación o en partes importantes;
p. ej., dispositivos de seguridad, mangueras para presión
alta o pistola rociadora.
m ¡ADVERTENCIA! Si se usa un cable de extensión, el
enchufe y tomacorriente deberán ser a prueba de agua.
m ¡ADVERTENCIA! Los cables de extensión
inadecuados pueden ser peligrosos.
• Esta hidrolavadora eléctrica no debe ser usada a
temperaturas menores de 32 ºF (0 °C).
m ¡ADVERTENCIA! El cable sobre los tanques debe
estar siempre desenrollado por completo para evitar el
sobrecalentamiento.
• Las conexiones de cables de alimentación deben
permanecer secas y por encima del nivel del suelo.
• Si el cable de alimentación está dañado, no utilice el
artefacto. Contacte a su concesionario autorizado de
Snow Joe® + Sun Joe® o llame a la central de servicio al
cliente de Snow Joe® + Sun Joe® al 1-866-SNOWJOE
(1-866-766-9563).
• Mantenga la máquina en una supercie estable y
plana durante la operación, manipulación, transporte y
almacenamiento. Un volcado repentino de la máquina
puede causar lesiones corporales.
• En caso de accidente o desperfecto, desconecte la
hidrolavadora inmediatamente del tomacorriente. Si
usted hace contacto con el detergente, enjuáguese con
abundante agua limpia.
Seguridad eléctrica
ATENCIÓN: si hay problemas con la RED ELÉCTRICA,
pueden ocurrir caídas breves de voltaje al encender el equipo.
Esto a su vez puede afectar otros equipos (como por ejemplo,
el parpadeo de una lámpara). Si la IMPEDANCIA DE LA RED
(Zmax) es menor que 0.335 ohmios, estas uctuaciones no
son esperadas. Si necesita ayuda, puede contactar a su
empresa local de suministro eléctrico para más información.
m ¡ADVERTENCIA! Peligrodechoqueeléctrico:
antes de encender su máquina, por favor inspecciónela
cuidadosamente para ver que no tenga defectos. Si encuentra
algún defecto, no la encienda y contacte a su proveedor.
Se deberá cumplir lo siguiente al conectar la hidrolavadora a la
red eléctrica:
• La conexión al suministro eléctrico deberá haber sido
hecha por una persona calicada.
• La alimentación a este artefacto deberá incluir ya sea un
dispositivo de corriente residual (RCD) que interrumpirá el
suministro si la corriente de fuga a tierra excede los 30 mA
por 30 ms, o un interruptor de circuito a tierra (GFCI).
IMPORTANTE: solo use agua sin impurezas. Si hay un
peligro de arena uida en el agua de entrada (p. ej., de su
propio pozo), se deberá instalar un ltro adicional.
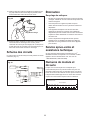
Dispositivos de seguridad
La válvula del descargador puede reducir la presión si ésta
excede los valores predeterminados. La pistola rociadora
incluye un dispositivo de trabado. Cuando este dispositivo
de trabado es activado, la pistola rociadora no puede
ser operada.
1. Sensor térmico: un sensor térmico protege al motor
contra sobrecargas. La máquina se reiniciará luego de
unos cuantos minutos, cuando el sensor térmico se
haya enfriado.
2. Doble aislamiento: en un artefacto de doble aislamiento,
se proporcionan dos sistemas de aislamiento en lugar de
una conexión a tierra. Un artefacto de doble aislamiento
no posee conexión a tierra, y no debe agregársele
ninguna. La reparación de un artefacto de doble
aislamiento requiere sumo cuidado y conocimiento del
sistema, y solo debe ser llevada a cabo por personal
técnico calicado en un centro de servicio autorizado por
Snow Joe® + Sun Joe®. Las partes de reemplazo de un
artefacto de doble aislamiento deben ser idénticas a las
partes originales. Un artefacto de doble aislamiento está
marcado con las frases “Double Insulation” (“doblemente
La page charge ...
La page charge ...
La page charge ...
La page charge ...
La page charge ...
La page charge ...
La page charge ...
La page charge ...
La page charge ...
La page charge ...
La page charge ...
La page charge ...
La page charge ...
La page charge ...
La page charge ...
La page charge ...
La page charge ...
La page charge ...
La page charge ...
La page charge ...
La page charge ...
La page charge ...
La page charge ...
La page charge ...
La page charge ...
La page charge ...
La page charge ...
La page charge ...
La page charge ...
La page charge ...
La page charge ...
La page charge ...
La page charge ...
La page charge ...
La page charge ...
La page charge ...
-
 1
1
-
 2
2
-
 3
3
-
 4
4
-
 5
5
-
 6
6
-
 7
7
-
 8
8
-
 9
9
-
 10
10
-
 11
11
-
 12
12
-
 13
13
-
 14
14
-
 15
15
-
 16
16
-
 17
17
-
 18
18
-
 19
19
-
 20
20
-
 21
21
-
 22
22
-
 23
23
-
 24
24
-
 25
25
-
 26
26
-
 27
27
-
 28
28
-
 29
29
-
 30
30
-
 31
31
-
 32
32
-
 33
33
-
 34
34
-
 35
35
-
 36
36
-
 37
37
-
 38
38
-
 39
39
-
 40
40
-
 41
41
-
 42
42
-
 43
43
-
 44
44
-
 45
45
-
 46
46
-
 47
47
-
 48
48
-
 49
49
-
 50
50
-
 51
51
-
 52
52
-
 53
53
-
 54
54
-
 55
55
-
 56
56


sunjoe SPX3000 Le manuel du propriétaire
- Catégorie
- Outils de jardin
- Taper
- Le manuel du propriétaire
dans d''autres langues
- English: sunjoe SPX3000 Owner's manual
- español: sunjoe SPX3000 El manual del propietario