
December 2004
Ref. : 3306607
Document subject to modification
Réalisation :
Espace Graphique

y
www.krups.com

2
FBC 2/3/4
Español
35
Características del aparato p 39
Características p 39
Antes de la primera utilización p 40
Ajuste del reloj p 41
Utilizando el Panel de Control p 41
Sistema de calentamiento p 42
Función BAKE/
Horno
p 42
Función CONV. BAKE/
Horno de convección
p 43
Función BROIL/
Asar
p 43
Función Tostar p 44
Función DEFROST/
descongelación
p 45
Función Expert Controlled Cooking p 46
Limpieza y mantenimiento p 49
Expert Heat reflector p 49
English
3
Features p 7
Advantages p 7
Before using for the first time p 8
Setting the clock p 9
Using the control panel p 9
Heating performance p 10
Bake function p 10
Convection Bake function p 11
Broil/Grill function p 11
Toast function p 12
Defrost function p 12
Expert Controlled Cooking function p 13
Cleaning and care p 16
Expert Heat reflector p 17
Français
19
Caractéristiques de l’appareil p 23
Avantages p 23
Avant la première utilisation p 24
Réglage de l’horloge p 25
Utilisation du tableau de commandes p 25
Puissance de chauffage p 26
Fonction BAKE
(CUISSON)
p 26
Fonction CONV. BAKE /
cuisson à convection
p 27
Fonction BROIL /
grillage
p 27
Fonction TOAST /
grille-pain
p 28
Fonction DEFROST /
décongélation
p 29
Fonction Expert Controlled Cooking p 30
Nettoyage et entretien p 33
Expert Heat reflector p 34

3
English
IMPORTANT SAFEGUARDS
When using electrical appliances, there are certain basic rules that should always be adhered to,
especially the following:
• Read all the instructions for use and follow them carefully.
• This appliance is not intended for use by children or other persons without assistance or
supervision if their physical , sensory or mental capabilities prevent them from using it safely.
• Young children must be supervised to ensure that they do not play with the appliance.
• Do not leave the appliance within the reach of children.
• Never leave the appliance operating unattended; remain nearby when it is in use.
• Do not use the appliance for any purpose other than that for which it was designed.
• Do not touch the metal or hot parts of the appliance while in use; use the knobs and the handle.
Use oven gloves if necessary.
• To avoid electric shock, never immerse the electric cord, the plug or the appliance in water or in any
other liquid.
• To disconnect the appliance, press stop and then pull the plug from the wall outlet.
• Disconnect the appliance when not in use and before cleaning it. Wait for it to cool before cleaning
or putting it away.
• Never use the appliance if:
- the power cord is damaged,
- the appliance has fallen to the floor and shows visible signs of damage or does not function
correctly.
In either case, the appliance must be sent to the nearest KRUPS approved service center to
eliminate any risk.
• Do not allow the power cord to hang down or to touch the hot parts of the appliance.
• Do not place the appliance on or close to a source of heat (hot plate, oven etc.).
• Do not cover the appliance while in operation.
• In order to avoid any risk of fire, do not operate the appliance under a wall cupboard, a shelf or
near inflammable materials such as: blinds, curtains, drapes etc.
• Do not place objects on the appliance while in operation.
Should any part of the appliance catch fire, do not attempt to extinguish it with water.
Smother external flames with a damp cloth. Never attempt to open the oven door if the oven should
catch fire.
• Do not store flammable materials in the vicinity of the appliance.
• Never place large items of food or metal utensils in the appliance as they may catch fire or cause a
short circuit.
• Take extreme care if you use containers made of materials other than metal or glass compatible
with the oven.
• Disconnect the appliance if it does not work correctly, after each use, before changing its position
and before cleaning.
• Do not use metal pads or abrasive cleaning products. These could shed metal particles, which might
touch the electrical parts of the appliance and cause a short circuit.
• Do not use the appliance outdoors.
• While in operation, do not store any accessories in the appliance other than those recommended
by KRUPS.
• Do not place any of the following materials in the oven: paper, cardboard or plastic.
• Do not use it as a source of heat or for drying.
• The appliance must only be used in an upright position, never lying down, tilted or upside down.
• Do not insert anything in the ventilation slots and do not obstruct them.

4
English
• Empty the crumb tray regularly. Do not cover the crumb tray with aluminum foil, as this will cause
the appliance to overheat.
• This appliance is designed solely for household use; any professional or inappropriate use or use
not in accordance with these instructions renders the warranty null and void.
• Use extreme caution when removing tray or disposing of hot grease.
• Any work other than cleaning and care must be entrusted to the nearest KRUPS authorized
service center.
There are no user repairable parts. In order to avoid any risk fire or electrocution, repairs may only
be carried out by the qualified personnel of a KRUPS approved service center.
SAVE THESE INSTRUCTIONS
CAUTION
• Check that the supply voltage matches that indicated on the appliance.
• Given the diversity of applicable standards, if this appliance is to be used in a country other than
that in which it was purchased, you should have it checked by an approved service center.
• Use a solid work surface away from any water splashes.
• Do not carry or move the appliance during use.
• Do not pull on the supply cord to unplug the appliance.
SPECIAL CORD INSTRUCTIONS
A. A short power-supply cord is provided to reduce the risk of becoming entangled in or tripping
over a longer cord. Extension cords are available and may be used if care is exercised in their
use.
B. If an extension cord is used,
(1) the marked electrical rating of the extension cord should be at least as great as the electrical-
rating of the appliance,
(2) the cord should be arranged so that it will not drape over the counter top or table top
where it can be pulled on by children or tripped over unintentionally.
C. This appliance has a polarized plug (one blade is wider than the other). To reduce the risk of
electric shock, this plug is intended to fit into a polarized outlet only one way. If the plug does
not fit, contact a qualified electrician. Do not attempt to modify the plug in any way.
In the interest of improving products, Krups reserves the right to change specifications without
prior notice.

5
English
LIMITED WARRANTY
This Krups product is warranted for 1 year from the date of purchase against defects
in material and workmanship. During this period, the Krups product that, upon
inspection by Krups, is proved defective, will be repaired or replaced, at Krups option,
without charge to the customer. If a replacement product is sent, it will carry the
remaining warranty of the original product. This warranty does not apply to any
defect arising from a buyer's or user's misuse of the product, negligence, failure to
follow Krups' instructions, use on current or voltage other than that stamped on the
product, wear and tear, alteration or repair not authorized by Krups, or use for
commercial purposes.
THE WARRANTIES SET FORTH HEREIN ARE EXCLUSIVE AND NO OTHER WARRANTIES,
EXPRESS OR IMPLIED, INCLUDING BUT NOT LIMITED TO ANY WARRANTY OF
MERCHANTABILITY OR FITNESS FOR A PARTICULAR PURPOSE OR USE, ARE MADE BY
KRUPS OR ARE AUTHORIZED TO BE MADE WITH RESPECT TO THE PRODUCT.
Some states do not allow limitation on how long an implied warranty lasts or do not
allow the exclusion of incidental or consequential damages, so the above limitations may
not apply to you. This warranty gives you specific legal rights, and you may also have
other rights which vary from state to state.
If you believe your product is defective, bring the product (or send it, postage prepaid)
along with a copy of the proof of purchase to the nearest authorized Krups Service
Center.
(Please contact your respective country’s customer service department, indicated
below for the address of the nearest authorized Krups Service Center.)
If you send the product, please include a letter explaining the nature of the claimed
defect.
If you have additional questions, please call our Consumer Service Department at :
United States : 1-800-526-5377 ; Canada : 1-800-418-3325 ;
Mon - Fri 8:30 a.m. - 7:00 pm (EST). Mon – Fri 8:30 a.m. – 4:30 p.m. (EST)
www
.krupsUSA.com www.Krups.ca
Please note hours are subject to change.
Before calling the Consumer Service Department, please have the type number of
your Krups appliance available. This will assist in answering your questions. The type
number is generally found on the bottom of the machine. It would be helpful if you
had the appliance available at the time of your call.
General correspondance can be addressed to:
Krups USA Groupe SEB Canada Inc
196 Boston Avenue 455 Finchdene Square
Medford, MA 02155 Scarborough, Ontario MIX 1 B 7
Only letters can be accepted at this address. Shipments and packages
that do not have a return authorization number will be refused.
ENVIRONMENTAL PROTECTION
The packaging of your product is made of recyclable materials. Do not throw it in your usual
trash can; take it to a nearby separated waste collection center.
The approved after-sales service centers will accept your used appliance in order to dispose
of it in an environmentally friendly manner or you can take it to a specialized collection
center provided for this purpose.

6
* Depending on model, selon modèle, según modelo
y
2
1
3
6
9
*
10
*
11
*
7
8
5
4
*
12
*
a
b
c
d
e
f
h
i
j
k
*
g

English
7
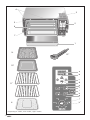
Features
1 Door handle
2 Control panel
a) Display
b) Temperature setting
c) Cooking time setting
d) “+” or “-” adjustment button
e) BAKE function, cooking
f) BROIL function, grilling
g) CONVECTION BAKE cooking
h) DEFROST function
i) TOAST function, toasting
j) START/STOP button
k) Expert Controlled Cooking*
selector switch: (thin pizza, thick pizza, cookies, brownies, bagels, pastry)
3 Ventilation slots
4 Non stick side-walls*
5 Quartz top elements
6 Crumb tray / Expert Heat Reflector
7 Quartz bottom elements
8 Shelf supports
9 Non-stick broil pan*
10 Non-stick bake sheet*
11 2 reversible shelves*
12 Bread tongs*
Advantages:
• Large capacity allows toasting of up to 6 slices of bread, and provides space to heat more of
your favorite foods.
• Versatility to bake, reheat, toast, broil and defrost.
• Convection Bake cooking function uses a fan to distribute hot air throughout the oven for fast
results.
• Patented “Expert Quartz Cycling Technology” cooks faster, and toasts better than other ovens.
• 4 shelf positions allow you to vary the distance of the food from the top or bottom heating
elements to customize your results.
• Electronic thermostat can be precisely adjusted from 100°F to 450°F (in 25°F increments).
• Electronic browning control for toast to your taste.
• Six pre-programmed recipes*.
• Stainless steel crumb tray reflects heat during cooking and pulls out for easy cleaning.
• User-friendly electronic display with digital clock and easy-to-use soft touch controls.
*
Depending on model

8
English
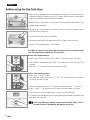
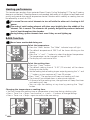
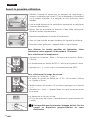
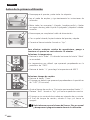
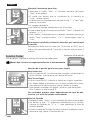
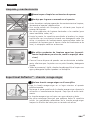
Before using for the first time
• Unpack the appliance and remove packaging including the self-
adhesive display sticker on the LCD screen and product information
tags from door handle (not on all models).
• Read all the instructions for use and the important safeguards and
follow them carefully.
• Remove all accessories and wash them in warm, soapy water.
Rinse and dry carefully.
• Unroll the power cord completely.
• Wipe the outside of the appliance with a damp cloth and dry.
• Plug in the toaster oven. It will beep.
In order to remove any possible residues from manufacturing,
run the appliance empty for 15 minutes.
Select the temperature:
• Press the “Bake” button. The “Bake” indicator lamp will light.
• The default temperature of 350°F will be shown blinking on the
display.
• Press on “+” to select a temperature of 450°F.
Select the cooking time:
• Press the “Timer” button.
• The default cooking time of “0:30” (30 minutes) will be shown
blinking on the display.
• Set the cooking time to 15 minutes by pressing the “-” button.
• Press “Start”. The appliance will beep and the oven will start.
• The time will be counted down in one-minute intervals.
• At the end of the cooking time, the appliance will beep five times and
the oven will turn off.
You may observe smoke escaping from the oven. This is
normal and will gradually disappear with use.

9
English
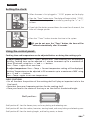
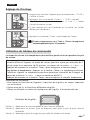
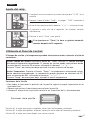
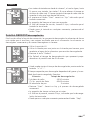
Setting the clock:
• When the oven is first plugged in “12:00” appears on the display.
• Press the “Timer” button twice. The display will begin to blink “12:00”.
• Adjust the time in steps of one minute by pressing the “+” or “-”
buttons.
• If you hold the button pressed down for more than 6 seconds, the
time will change quicker.
• Press the “Timer” button to enter the time in the system.
If you do not press the “Timer” button, the time will be
entered automatically after 30 seconds.
Using the control panel:
Cooking time and temperature can be adjusted before or during the cooking cycle.
To adjust cooking times: Press « Timer » button once. Time remaining will be displayed,
blinking. Cooking time can be adjusted in 1 minute increments up to a maximum of
1 hour 30 minutes, using the « + » and « - » buttons.
Press « Timer » again to set new time.
To adjust temperature: Press « Temp ». Current temperature setting will be displayed,
blinking. Temperature can be adjusted in 25 increments up to a maximum of 450° using
the « + » and « - » buttons.
Press « Temp » again to set new temperature.
SHELF POSITIONS:
• For all functions the position of the cooking shelf will play an important role in the
final result.
• Note that there are 4 separate positions for the cooking shelf.
• Place your food in the center of the tray or on the shelf at the desired height.
Shelf position #1: best for frozen pizza, and many baking and reheating uses.
Shelf position #2: best for cookies, brownies, toasting bread, and many baking and reheating uses.
Shelf position #3: best for toasting bagels, and broiling meats, or bacon.
Shelf position :

10
English
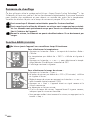
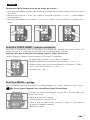
Heating performance
This toaster oven employs Krups patented Expert Quartz Cycling Technology™. The top 3 heating
elements and bottom 3 heating elements are powered alternately at full power to heat food more
quickly and provide ultra precise temperature control. Monitor results carefully as cooking time can
be reduced by as much as 30%.
It is normal for one set of elements to turn off while the other set is heating at full
power.
The ends of each heating element will glow more brightly than the middle of the
element. This is normal. The elements are specially designed to produce a balanced
level of heat throughout the chamber.
During baking, quartz elements heat even if they are not lighting up.
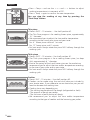
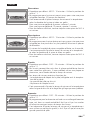
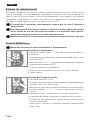
BAKE function
Never leave unattended during use.
Select the temperature:
• Press the “Bake” button. The “Bake” indicator lamp will light.
• The default temperature of 350°F will be shown blinking on the
display.
• Press the “+” and “-” buttons to select the desired temperature.
The temperature can be changed in steps of 25°F.
• The display will continue to blink.
Select the cooking time:
• Press the “Timer” button.
• The default cooking time of “0:30” (30 minutes) will be shown
blinking on the display.
• Set the cooking time according to your recipe by pressing the “+” and
“-” buttons, up to a maximum of 1 hour 30 minutes.
• Press “Start”. The appliance will beep and cooking will start.
• The time will be counted down in one-minute intervals.
• At the end of the cooking time, the appliance will beep five times
and cooking will stop.
• You can stop the cooking at any time by pressing the “Stop”
button.
Changing the temperature or cooking time:
• You can change the cooking time or temperature at any time during a baking cycle.
• Press « Timer » or « Temp » and use the « + » and « - » buttons to change settings.
• Press « Timer » or « Temp » again to confirm the new setting.

11
English
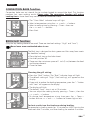
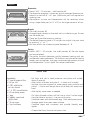
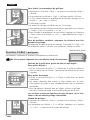
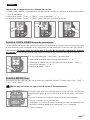
CONVECTION BAKE function
Convection bake uses an internal fan to circulate heated air around the food. This function
produces fast, even cooking results. Please note: The convection function will reduce
cooking times. Some foods may not be ideal for convection bake.
• The “Conv. Bake” indicator lamp will light.
• Select a temperature using the « + » and « - » buttons.
• Select a cooking time by pressing « Timer » then use
the « + » and « - » buttons.
• Press Start.
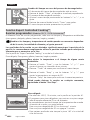
BROIL/Grill function
(Only the top heating elements are used. There are two broil settings: “High” and “Low”).
Never leave oven unattended when in use.
The Broil tray is designed to drain grease and fats away from meats
for healthier cooking.
• Place the broil tray on the bake sheet.
• Use shelf position #3.
• There must be a minimum space of 1 inch (2 cm) between the food
and the top element.
• Close the door.
Choosing the grill setting:
• Press the “Broil” button. The “Broil” indicator lamp will light.
• The default setting of “High” (fast broiling), will appear on the
display.
• If you wish to reduce the broiling temperature, press the “-” button
and “Low” will appear on the display.
• The display will blink.
• The default “broil” time is set at 10 minutes.
• You can adjust the cooking time by pressing « Timer », then the
« + » and « - » buttons.
• To change broil temperature at any time press the « Temp »
button and use « + » and « - » buttons to choose high or low.
For best results turn the food once during broiling.
For example try broiling meats for 10 minutes on HIGH, turning the
food over after 7 minutes, and then broiling for another 3 minutes.

12
English
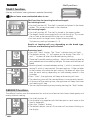
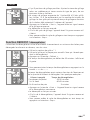
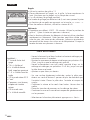
TOAST function
(the top and bottom heating elements operate alternately).
Never leave oven unattended when in use.
Shelf position for toasting bread and bagels:
For toasting bread:
• Use shelf position #2. The shelf is inverted and placed in the lower
guides. This centers the bread in the chamber.
For toasting bagels:
• Use shelf position #3. The shelf is placed in the upper guides.
• The bagels should be arranged with cut side facing up. This causes
the cut side to be toasted while the crust is warmed.
• For best results on bagels use a higher browning setting.
Try browning settings between 6 – 9.
Results of toasting will vary depending on the bread type,
freshness and browning level selected.
Browning level:
• Press the “Toast” button. The “Toast” indicator lamp will light.
• The default setting, “4” will appear on the display. Press the “+”
and “-” buttons to select the desired toasting setting.
• There are 9 possible toasting settings. Adjust the browning level to
your preference and considering the type, thickness and freshness of
bread.
• Browning levels increase between setting 1, which is warmed, and
setting 9, which is very toasted. The toast settings 1-9 do not refer
to the number of minutes for each setting. The oven will adjust the
time for each setting depending on heat already present in the
chamber.
• Press “Start”; the appliance will beep and toasting will start.
• The remaining time will be counted down in one-second intervals.
• At the end of the cooking time, the appliance will beep five times
and cooking will stop.
• You can stop the toasting at any time by pressing the “Stop” button.
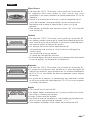
DEFROST function
The defrost function uses the convection fan and minimal heat to thaw frozen foods gently and
evenly without cooking.
• Use shelf position #1.
• Use the broil tray together with the bake pan to catch water as the
food is defrosted.
• Press the “Defrost” button.
• The default defrost time of 45 minutes will be shown blinking on
the display.
Shelf position :

13
English
• You can adjust the defrosting time required by pressing the “+”
and “- ” buttons.
The time needed to defrost is dependant on the thickness and the
quantity of the frozen food. Examples:
Frozen food item Defrost time
2 chicken cutlets 45-50 minutes
1
1
/2 lbs. steak tips 60-65 minutes
4-6 slice of bread 5 minutes
• Press “Start”. The appliance will beep and defrosting will begin.
• The time will be counted down in one-minute intervals.
• At the end of the defrosting time, the appliance will beep five
times and defrosting will stop.
• You can stop defrosting at any time by pressing the “Stop” button.
Changing the time during defrosting:
• The defrosting time is counting down.
• Press the “Timer” button; the time display will start to blink.
• Set the new defrosting time as desired by pressing the “+” and
“-” buttons.
• Press the “Timer” button again to enter the time in the system.
• The display will show the new remaining defrosting time.
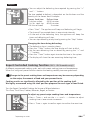
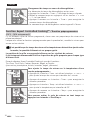
Expert Controlled Cooking function (FBC3 - FBC4 models only)*
6 different programmed cooking cycles, each with preset cooking times and temperatures.
When first using each preset function monitor the cooking carefully to ensure good result.
Changes to the preset cooking times and temperatures may be necessary depending
on the recipe, the amount of food and your personal taste.
Cooking results are significantly affected by the position of the cooking shelf.
We highly recommend using the shelf position proposed for each type of food listed.
Turn the Expert Controlled Cooking dial to one of 6 food selections:
Thin Pizza, Thick Pizza, Cookies, Brownies, Bagels, or Pastries.
To adjust any preset recipe cooking times and temperatures:
• Press « Timer », and use the « + » and « - » buttons to adjust
cooking time in one-minute increments.
• Press « Timer » again to confirm again to confirm the new time.
*Depending on model

14
English
• Press « Temp » and use the « + » and « -» buttons to adjust
cooking temperature in increments of 25°.
• Press « Temp » again to confirm the new temperature.
You can stop the cooking at any time by pressing the
“Start/Stop” button.
Thin pizza
• Preset: 450°F - 10 minutes – Use shelf position #1.
• The Thin Pizza program is for cooking frozen pizza, approximately
10 ‘’ diameter.
• We recommend you to adjust the time and/or temperature
according to the size of your pizza and your taste.
For 8 ‘’ frozen pizza substract 1 minute.
For 12’’ frozen pizza, add 1 minute.
• For best results always rotate the pizza 180º halfway through the
cooking cycle.
Thick pizza
• Preset: 450°F - 15 minutes – Use shelf position #1.
• The Thick pizza program is for a cooking frozen pizza, (or deep
dish) approximately 8 ‘’ diameter.
• Due to the variety of fresh and frozen pizza on the market we
recommend you to adjust the time and/or temperature according
to the size of your pizza and to your taste.
• For best results always rotate the pizza 180º halfway through the
cooking cycle.
Cookies
• Preset: 300° - 10 minutes – Use shelf position #2.
• Cookies can be made using the non-stick bake pan included in
your toaster oven. If you choose to use an aluminium pan you will
need to decrease the cooking time.
• Cooking times vary depending on:
- The starting temperature of the dough (refrigerated or fresh).
- The amount of dough per cookie.
- The thickness of each portion of dough.
• We recommend you to adjust the time and/or temperature
according to the type of cookies and the browning you prefer.
1

Brownies
• Preset: 300° - 30 minutes – shelf position #2.
• The brownies program is based on typical packaged brownie mix,
baked in a nonstick 8” x 8” pan. Aluminium pans will require less
cooking time.
• Adjustments to time and temperature will be necessary when
using a larger bake pan (ie. 9’’ x 9’’) or for larger amounts of mix.
Bagels
• Use shelf position #3.
• Arrange bagels directly on the shelf with cut side facing up. Do not
use the bake pan.
• There are 9 possible browning settings.
• The default browning level is 4, but you can adjust it to your taste
by pressing “+” or “-“.
• For best results use a browning level between 6 – 9.
Pastry
• Preset: 450°F - 20 minutes. Use shelf position #1 (for the Apple
tart recipe below).
• The pastry function alternates quickly between heating with top
and bottom heating elements. The function can be used for baking
breads, pies and pastries, with your customized adjustments to time
and temperature. Try this Apple Tart recipe listed below.
APPLE TART
- Put flour and salt in food processor and pulse until mixed,
about 2 seconds.
- Add chunks of butter and pulse 3 – 4 times until crumbly.
- Sprinkle minimum amount of water evenly over mixture and
pulse 2 – 4 times until dough forms a ball and pulls away from
bowl.
- Add slightly more water as needed.
- On lightly floured surface, roll ball into a circle 2 inches larger
than pie plate or tart pan. Line pan with pastry.
- Combine cream with well beaten egg. Pour evenly over pastry.
- Arrange apple slices over cream mixture.
- Combine sugar and cinnamon and sprinkle liberally over
apples.
- Choose the Pastry function and press start.
15
English
Ingredients:
•
1 cup all purpose flour
•
1
/4 tsp. salt
•
5 TBS. cold butter,
cut into chunks
•
2 - 4 TBS. ice cold water
•
1
/2 cup heavy cream
•
1 egg
•
2 apples, cored and
thinly sliced
•
1
/4 cup sugar
•
1 tsp. cinnamon

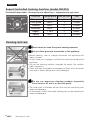
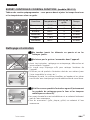
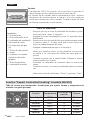
Expert Controlled Cooking Function (model FBC412)
Preselected recipe table - You may have to adjust time + temperature to your taste.
Cleaning and care
Never touch or clean the quartz heating elements.
Do not allow grease to accumulate in the appliance.
• Before cleaning, care or storage disconnect the appliance and
leave it to cool.
• A quick wipe with a sponge is sufficient to clean the outside of the
appliance.
• Do not use cleaning products intended for metals (for stainless
steel, copper etc.).
• Clean the door, enameled or lacquered surfaces and translucent
parts with a damp sponge and a mild detergent.
Do not use aggressive cleaning products (especially
oven cleaners or metal or abrasive pads).
• The inside walls of the oven are non-stick and will clean easily with
water and detergent.
• All accessories* (shelf, bake sheet, broiling pan) can be cleaned with
water and detergent.
16
English
*Depending on model
Function Temperature Shelf position Time
Thin pizza 450°F 1 10 min
Thick pizza 450°F 1 15 min
Cookies 300°F 2 10 min
Brownies 300°F 2 30 min
Bagels 1 to 9 3 varies
Pastry 450°F 1 20 min

*Depending on model
17
English
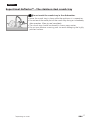
Expert Heat Reflector
Tm
- The stainless steel crumb tray
Do not wash the crumb tray in the dishwasher.
• Leave the crumb tray in place while the appliance is in operation.
• Do not touch the metal part of the crumb tray during or immediately
after operation. Allow to cool completely.
• The crumb tray should be cleaned in warm soapy water.
• Do not use abrasive scouring pads to avoid damaging the highly
polished surface.

18

19
Français
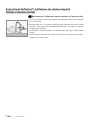
PRECAUTIONS IMPORTANTES
Lors d'utilisation d'appareils électriques, un certain nombre de règles élémentaires doivent être
respectées, en particulier les suivantes :
• Lisez entièrement le mode d'emploi et suivez-le attentivement.
• L'appareil ne doit pas être utilisé sans assistance et supervision par de jeunes enfants ou d'autre
personnes si leurs capacités physiques, sensorielles ou mentales les empêchent d'utiliser l'appareil
en toute sécurité.
• Les jeunes enfants doivent être surveillés de façon à ce qu'ils ne jouent pas avec l'appareil.
• Ne laissez pas l’appareil à la portée des enfants.
• Ne laissez jamais l'appareil fonctionner sans surveillance; restez à proximité de l'appareil pendant
son utilisation.
• N’utilisez pas l'appareil pour tout autre usage que celui pour lequel il a été conçu.
• Ne touchez pas les parties métalliques ou chaudes de l'appareil en cours d'utilisation; utilisez les
boutons et la poignée. Utilisez des gants de cuisine si nécessaire.
• Afin d'éviter les chocs électriques, ne plongez pas le fil électrique, la prise de courant ou l'appareil
dans l'eau ou tout autre liquide.
• Pour mettre l’appareil hors tension, appuyez sur « Stop » et débranchez la prise du mur.
• Débranchez l'appareil quand il n’est pas utilisé et avant de le nettoyer. Attendez qu'il refroidisse
pour le nettoyer ou avant de le ranger.
• N’utilisez pas l'appareil si :
- celui-ci a un cordon défectueux,
- l’appareil est tombé et présente des détériorations visibles ou des anomalies de fonctionnement.
Dans chacun de ces cas, l'appareil doit être envoyé au centre de service KRUPS agréé le plus près, afin
d'éviter tout danger.
• Ne laissez pas le cordon pendre ou toucher les parties chaudes de l'appareil.
• Ne placez pas l'appareil sur ou à proximité d'une source de chaleur (plaque de cuisson, four,...).
• Ne couvrez pas l'appareil pendant son fonctionnement.
• Afin d’éviter les risques d’incendie, ne faites pas fonctionner l'appareil sous un meuble mural, une
étagère, ou à proximité de matériaux inflammables tels que : stores, rideaux, tentures...
• Ne stockez pas d’objets sur l’appareil pendant son fonctionnement.
S'il arrivait que certaines parties de l’appareil s'enflamment, ne tentez jamais d’éteindre les flammes
avec de l'eau.
Etouffez les flammes externes au produit avec un linge humide. Ne tentez jamais d’ouvrir la porte
du four en cas d’incendie à l’intérieur de l’appareil.
• Ne rangez pas de produits inflammables à proximité ou sous le meuble où est placé l'appareil.
• Ne mettez pas d’aliments de trop grande taille ni d’ustensiles en métal dans l’appareil car ils
pourraient s’enflammer ou créer un court circuit.
• Prenez d’extrêmes précautions si vous utilisez des plats faits d’autres matériaux que le métal ou le
verre compatible au four.
• Débranchez l'appareil si une anomalie de fonctionnement se produit, après chaque utilisation,
avant de le changer de place et avant de le nettoyer.
• N’utilisez pas de tampons métalliques ni de nettoyants abrasifs. Des particules métalliques
pourraient se détacher et toucher des parties électriques de l’appareil ce qui pourrait provoquer
un court-circuit.
• N'utilisez pas l'appareil à l’extérieur.
• Lorsqu’il n’est pas en fonctionnement, ne stockez pas dans l’appareil des accessoires autres que
ceux recommandés par le fabricant KRUPS.
• Ne placez aucun des matériaux suivants dans le four : papier, carton ou plastique.
• Ne l'utilisez pas comme source de chaleur ou pour sécher.
• L'appareil doit être exclusivement en position debout, jamais couché ni incliné ou à l'envers.
• N’introduisez rien dans les fentes de ventilation et ne les obstruez pas.
La page est en cours de chargement...
La page est en cours de chargement...
La page est en cours de chargement...
La page est en cours de chargement...
La page est en cours de chargement...
La page est en cours de chargement...
La page est en cours de chargement...
La page est en cours de chargement...
La page est en cours de chargement...
La page est en cours de chargement...
La page est en cours de chargement...
La page est en cours de chargement...
La page est en cours de chargement...
La page est en cours de chargement...
La page est en cours de chargement...
La page est en cours de chargement...
La page est en cours de chargement...
La page est en cours de chargement...
La page est en cours de chargement...
La page est en cours de chargement...
La page est en cours de chargement...
La page est en cours de chargement...
La page est en cours de chargement...
La page est en cours de chargement...
La page est en cours de chargement...
La page est en cours de chargement...
La page est en cours de chargement...
La page est en cours de chargement...
La page est en cours de chargement...
La page est en cours de chargement...
-
 1
1
-
 2
2
-
 3
3
-
 4
4
-
 5
5
-
 6
6
-
 7
7
-
 8
8
-
 9
9
-
 10
10
-
 11
11
-
 12
12
-
 13
13
-
 14
14
-
 15
15
-
 16
16
-
 17
17
-
 18
18
-
 19
19
-
 20
20
-
 21
21
-
 22
22
-
 23
23
-
 24
24
-
 25
25
-
 26
26
-
 27
27
-
 28
28
-
 29
29
-
 30
30
-
 31
31
-
 32
32
-
 33
33
-
 34
34
-
 35
35
-
 36
36
-
 37
37
-
 38
38
-
 39
39
-
 40
40
-
 41
41
-
 42
42
-
 43
43
-
 44
44
-
 45
45
-
 46
46
-
 47
47
-
 48
48
-
 49
49
-
 50
50


Krups FBC213 Manuel utilisateur
- Catégorie
- Grille-pain
- Taper
- Manuel utilisateur
dans d''autres langues
- English: Krups FBC213 User manual
- español: Krups FBC213 Manual de usuario