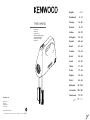
Kenwood HMP30.A0WH Le manuel du propriétaire
- Taper
- Le manuel du propriétaire

English 2 - 7
Nederlands 8 - 13
Français 14 - 20
Deutsch 21 - 27
Italiano 28 - 33
Português 34 - 39
Español 40 - 46
Dansk 47 - 52
Svenska 53 - 58
Norsk 59 - 64
Suomi 65 - 70
Türkçe 71 - 76
Česky 77 - 82
Magyar 83 - 88
Polski 89 - 96
Ελληνικά 97 - 104
Slovenčina 105 - 110
Українська 111 - 117
ÝY
opq - oov
Kenwood Ltd
New Lane
Havant
Hampshire
PO9 2NH
kenwoodworld.com
© Copyright 2022 Kenwood Limited. All rights reserved 141354/3
instructions
istruzioni
instrucciones
Bedienungsanleitungen
gebruiksaanwijzing
Instrukcja obsługi
instruções
TYPE: HMP30

Safety
ORead these instructions carefully and
retain for future reference.
ORemove all packaging and any labels.
OIf the plug or cord is damaged it must,
for safety reasons, be replaced by
Kenwood or an authorised Kenwood
repairer in order to avoid a hazard.
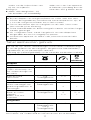
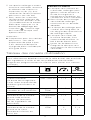
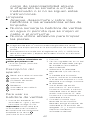
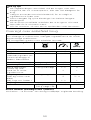
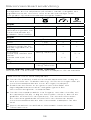
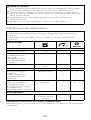
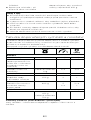
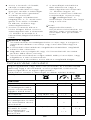
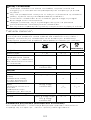
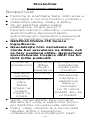
ODO NOT process hot ingredients.
ODo not operate your appliance for
longer than the times specified below
without a rest period. Processing
continuously for longer periods can
damage your appliance.
Function/
Attachment
Maximum
Operation
Time
Rest Period
Between
Operations
Beaters 6 mins Unplug the
appliance
and allow to
cool down for
15 minutes
Kneaders
Heavy cake
mixes
Bread
doughs
3 mins
O Never put the handmixer body in water
or let the cord or plug get wet.
O Keep fingers, hair, clothing and utensils
away from moving parts.
O Never let the cord touch hot surfaces
or hang down where a child could grab
it.
O Never use a damaged handmixer. Get
it checked or repaired: see ‘Service and
Customer Care’.
English
2
1
4
5
2
3
6
{R
O ¨F\Y¨(-1.7½¨719ɨ*'Y07Y¨./7ÉÅ
{D¨7½¨.+-19¨.F(19
O ¤³-Y,W7½¨)-1Pɤ9-$+7½
¨-R¨,0FY¤É¨+7H--S
O ¨(D˨Ab7N¨#(F¨.{Hɤ°É¨½¨.7\Dª
(1D¨ÌU¨AG¨¢¨.F9
O ¨EÝË{9¨-R&B7uU¤ÉFVD17Ì
Y79ÉW°*S+D/GV
O zDY¨*79¨1DÉ9Y79-*078
J¨07³¤É¦b{Vݨ(YT¨D9
ÉÝ79¨(.{¢
O zDY¤9-+7½1F(.Dª
S¨+F¨¢ª¨F7¢-8¨$*9¨AÉX(F·¨$WÝ
FY
؛ٺ؊ؠٴرتؗٯا؟٦ٴ؛٪ڃػ٦ؘؕ؛ٟ٧ٓ؟٪ؙؖؕغپ
O
ٴ؊ٹؘصٳ٣٦ؔ١٧ػ٦ؔٙ٧؞؛٦ؕتٹٚ7صيؕد٪
ٴ؊Kenwood؛ًغؔٵؘٱ٦ؔرؙ؟غؔؗاٺ7عؘٟؕ٦ؔ
.Kenwood ٥ؙٞ٭٪ر٫؟ٓ٪؛٪رخط٢ص٪
ڗڝٔڣڠښګڀـّڥڠ٬ڴ٬ًکٝڜيگڠ٧٥ٕٱٔڸ
O
*ّ٠ي٫ڜيْي٫ٕڑًَٞڡٱڜيڢڪ٦ڦًڤ٦ـّ١ټګڡڜي
ِ٫ٕڑڜًْڤګڙڡڜيڣڠ٧ڰ٭ڡڜيّٝڜًډڠّڰ٪ي٫ڡٰٕي
*٬ًکٝڜيڏڝٔگڐٍُٱٕڰ٧ڔښګڀـّڱڥڠ٬
*٫ڱٽ١ٕڜيؽًڥ٘ـّڥ٤ًًْٰڤګڙڠگڠ٧٥ٕٱٔڸ
O
¨(79
/؛ٛٻَٵ٦ؔ
ٝث٧٫٦ؔ
ٷكٞپؔرث٦ؔ
٥ٻٗؿ؟٦ؔ٭٪ط٦
٭ٻؘ؛تؔص٦ؔؔص؟ٚ
٥ٻٗؿ؟٦ؔؔص٪
ضؕٳا٦ؔٹ٧كٚؔ
شؕٻ؟٦ؔشرك٪٭ْ
ٱٺ؈ص؞ؔٴٹؘصٳ٣٦ؔ
osؚر٫٦ذصؙٻ٦
؛ٟٻٞذ
ٝؒؕٞذq ًؕ٧خ
ؕ٣ٓ٣٦ؔ
؛ٯٻدأ٦ؔ
طؙد٦ؔ٭ٻاْ
ٝؒؕٞذt ؛ٞؕٛد٦ؔ
لصٓ؞ٴ؊؇ؕ٫٦ؔٹٚٸٴرٻ٦ؔوڃد٦ؔص٫ٖشسثٺ
O
oov

3
O Never use an unauthorised
attachment.
O Always switch off the appliance
and disconnect from the power
supply, if it is left unattended,
before assembling, disassembling or
cleaning.
O Appliances can be used by persons
with reduced physical, sensory
or mental capabilities or lack of
experience and knowledge if they
have been given supervision or
instruction concerning use of the
appliance in a safe way and if they
understand the hazards involved.
O Misuse of your appliance can result in
injury.
O The rated power is based on
the chopper attachment. Other
attachments may draw less power.
O This appliance shall not be used by
children. Keep the appliance and its
cord out of reach of children.
O Children should be supervised to
ensure that they do not play with the
appliance.
OOnly use the appliance for its
intended domestic use. Kenwood
will not accept any liability if the
appliance is subject to improper
use, or failure to comply with these
instructions.
Cleaning
O Always switch off, unplug and
remove the beaters or kneaders
before cleaning.

4
O Never put the handmixer body in
water or let the cord or plug get wet.
O Never use abrasives to clean parts.
Before plugging in
O Make sure your electricity supply is the same as the one shown
on the rear of your handmixer.
O This appliance conforms to EC Regulation 1935/2004 on
materials and articles intended to come into contact with food.
Before using your handmixer
for the first time
O Wash the parts (see
‘cleaning’).
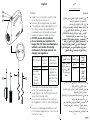
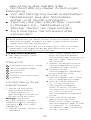
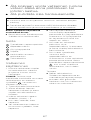
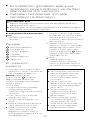
Key
1 Tool release button
2 Speed selector
3 (P) Pulse button
4 Beaters
5 Kneader with collar
6 Kneader
To Use Your
Handmixer
1 Insert the beaters or kneaders
– turn and push until a positive
click is felt.
Important: check that the
kneader with the metal collar
is correctly fitted into the
socket (refer to illustration).
2 Plug in.
3 With the ingredients in a bowl
of an appropriate size, place
the beaters/kneaders into the
bowl.
4 Select the required speed
from 1 (slowest) to 5.
O As the mixture thickens,
increase the speed.
O If the machine starts to slow
or labour, increase the speed.
O Use the pulse ‘P’ button
to operate the motor at
maximum speed. Note: the ‘P’
pulse button will only operate
if a speed is selected first.
5 When the mixture has reached
the desired consistency, return
the speed selector to the off
‘O’ position and then lift the
beaters/kneaders out of the
bowl.
6 To remove the tools, make
sure the speed selector is in
the off ‘O’ position and unplug
the handmixer. Press the tool
release button 1. Hold onto
the tool shafts when ejecting
the tools.
Important:
O kneaders only - when making
bread dough we recommend
that the dough load does not
exceed 450g flour.
Hints and Tips
O When creaming for cake
mixtures, use butter
or margarine at room
temperature or soften
before use.
O To avoid overloading your
mixing bowl, select one of
an appropriate size.
O Large quantities and thick
mixtures may require a
longer mixing time.
O When whipping cream,
use of a high-sided bowl is
recommended to minimise
splashing.
O Switch it off as soon as
you have got the right
consistency.

5
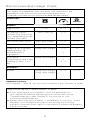
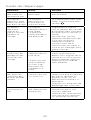
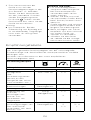
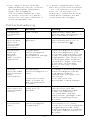
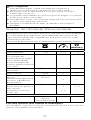
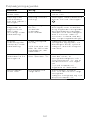
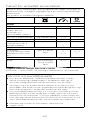
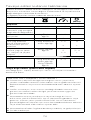
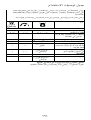
Recommended Usage Chart
Please note that these are recommendations only and the speed
you select may depend upon the bowl size, quantities, the
ingredients you are mixing and personal preference.
Gradually increase to the recommended speeds below.
Food type
(Mins)
Beaters
Egg whites 1 - 10 4 – 5 1 - 3
Whipping Cream
(Processing times may
vary, depending on fat
content of cream)
200 - 500 ml 1 – 5 2 - 3
All-in-one cake mixes 1kg Total weight 1 – 5 1 – 2
Batter 1 litre 5 1
Rubbing fat into flour
Adding water to
combine pastry
ingredients
250g Flour weight
1 – 2
2
4
1
Fruit cake
Creaming fat and sugar
Folding in flour, fruit,
etc.
900g Total weight
5
1 – 2
3 - 4
1
Kneaders
Bread
450g Flour weight
750g Total weight
4 – 5 2 – 3
Optional attachment (not
supplied in pack)
Mini chopper - refer to ‘Service and Customer Care” section to order.
Service and Customer Care
O If you experience any problems with the operation of
your appliance, before requesting assistance refer to the
‘Troubleshooting Guide’ section in the manual or visit
www.kenwoodworld.com.
O Please note that your product is covered by a warranty, which
complies with all legal provisions concerning any existing
warranty and consumer rights in the country where the product
was purchased.

6
Recipe
White bread dough
10ml/2 tsp dried yeast
(the type that requires
reconstituting)
5ml/1 tsp sugar
250ml warm water
450g bread flour
5ml/1 tsp salt
15g lard
1 Place the dried yeast, with the
sugar and water, in a mixing
bowl and leave to froth. The
correct water temperature
should be 43°C and can be
achieved by mixing one third
boiling water with two thirds
cold water.
2 Add the remaining ingredients.
Fit the kneaders to the
handmixer, then combine
the ingredients together on
a low speed until the flour is
incorporated. Then increase
the speed and knead for
approximately 2-3 minutes,
until the dough is smooth and
elastic. Cover with oiled cling
film and leave the dough to
rise in a warm place for 45-60
minutes.
3 Re-knead the dough on
maximum speed for 30-45
seconds, keeping the kneaders
in the mix.
4 Shape the dough into a loaf,
or rolls, and place on greased
baking trays. Cover with
oiled cling film and leave
somewhere warm until it has
doubled in size.
5 Bake in a preheated oven at
230°C/450°F/Gas mark 8 for
20-25 minutes (for a loaf) or
10-15 minutes (for rolls). When
ready, the dough should
sound hollow when tapped on
the base.
O If your Kenwood product malfunctions or you find any defects,
please send it or bring it to an authorised KENWOOD Service
Centre. To find up to date details of your nearest authorised
KENWOOD Service centre visit www.kenwoodworld.com or the
website specific to your Country.
O Designed and engineered by Kenwood in the UK.
O Made in China.
IMPORTANT INFORMATION FOR CORRECT DISPOSAL OF THE
PRODUCT IN ACCORDANCE WITH THE EUROPEAN DIRECTIVE
ON WASTE ELECTRICAL AND ELECTRONIC EQUIPMENT
(WEEE)
At the end of its working life, the product must not be disposed of
as urban waste.
It must be taken to a special local authority differentiated waste
collection centre or to a dealer providing this service.

7
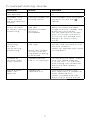
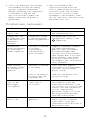
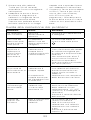
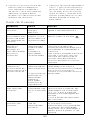
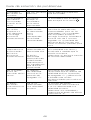
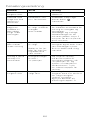
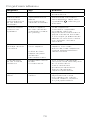
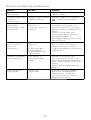
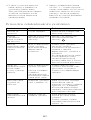
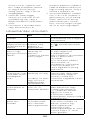
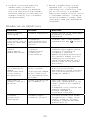
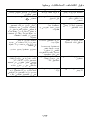
Troubleshooting Guide
Problem Cause Solution
Handmixer does
not operate.
No power. Check appliance is plugged
in.
Kneader with
collar cannot
be inserted into
socket.
Fitting kneader to
wrong socket
The kneader with the collar
will only fit into the
socket.
Handmixer
starts to slow
or labour during
processing.
Speed selected
too low.
Recommended
quantity
exceeded.
Increase speed.
Refer to recommended
usage chart for speeds and
quantities to process.
Do not operate for longer
than 3 minutes without a
15 minute rest period with
doughs or heavy cake
mixes.
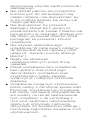
Excessive
splashing
or flour
spray during
processing.
Speed selected
too high.
Bowl too shallow
or too small for
ingredients being
processed.
Select a lower speed
initially and increase as the
mixture thickens.
Select an appropriate sized
mixing bowl.
Unable to
remove tools
from sockets.
Speed selector
not in 'O' position.
To remove the tools, make
sure the speed selector
is in the OFF “O” position
and unplug the handmixer.
Press the tool release
button.
Pulse button
does not
operate
Speed not
selected first.
The Pulse function will
only operate if a speed has
been selected first.
Select a speed and then
press the ‘P‘ pulse button.

8
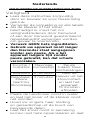
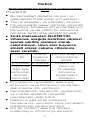
Veiligheid
OLees deze instructies zorgvuldig
door en bewaar ze voor toekomstig
gebruik.
O
Verwijder de verpakking en alle labels.
OAls de stekker of het snoer
beschadigd is, moet het om
veiligheidsredenen door Kenwood
of een door Kenwood geautoriseerd
reparatiebedrijf vervangen worden,
om gevaar te voorkomen.
OVerwerk GEEN hete ingrediënten.
OGebruik uw apparaat nooit langer
dan hieronder staat aangegeven
zonder een pauze. Als u het
apparaat langere tijd zonder
pauze gebruikt, kan dat schade
veroorzaken.
Functie /
hulpstuk Maximale
inschakeltijd
Pauze
tussen twee
inschakelingen
Kloppers 6 minuten Haal de
stekker uit het
stopcontact
en laat het
apparaat
15 minuten
afkoelen
Deeghaken
Zware
taartmix
Brooddeeg
3 minuten
O Plaats de handmixer nooit in water
en laat het snoer of de stekker nooit
nat worden.
O Houd uw vingers, haar, kleding
en gereedschap uit de buurt van
bewegende delen.
O Laat het snoer nooit in aanraking
komen met hete oppervlakken en laat
Vouw de voorpagina a.u.b. uit voordat u begint te lezen. Op deze
manier zijn de afbeeldingen zichtbaar
Nederlands

9
het niet naar beneden hangen waar
een kind erbij kan.
O Gebruik nooit een beschadigde
handmixer. Laat het nakijken of
repareren: zie Onderhoud en
klantenservice.
O Gebruik nooit een ongeautoriseerd
hulpstuk.
O Zet de machine altijd uit en trek
de stekker uit het stopcontact als
de machine onbeheerd is, ge(de)
monteerd of gereinigd wordt.
ODit apparaat kan worden gebruikt
door personen met verminderde
lichamelijke, sensorische of
geestelijke capaciteiten of gebrek
aan ervaring en kennis mits ze onder
toezicht staan of instructie hebben
gekregen over het veilige gebruik van
het apparaat, en de betrokken risico’s
begrijpen.
OMisbruik van dit apparaat kan
persoonlijk letsel veroorzaken.
O Het nominale vermogen is gebaseerd
op het hak-accessoire. Andere
accessoires trekken mogelijk minder
stroom.
ODit apparaat mag niet door kinderen
worden gebruikt. Houd het apparaat
en het snoer buiten het bereik van
kinderen.
O Op kinderen moet toezicht gehouden
worden om er zeker van te zijn dat
ze niet met het apparaat spelen.
OGebruik het apparaat alleen voor
het huishoudelijke gebruik waarvoor
het is bedoeld. Kenwood kan niet
aansprakelijk worden gesteld in het
geval dat het apparaat niet correct is

10
Voor u de handmixer de eerste
keer gebruikt
O De onderdelen afwassen (zie
Reiniging).
Legenda
1 Ontgrendelingsknop
2 Snelheidsschakelaar
3 (P) Pulseerstand
4 Kloppers
5 Deeghaak met kraagje
6 Deeghaak
Het gebruik van uw
handmixer
1 Steek de kloppers of
deeghaken in de mixer – draai
en duw tot u een klik voelt.
Belangrijk: controleer dat de
deeghaak met het metalen
kraagje correct in de
opening geplaatst is (zie
afbeelding).
2 Steek de stekker in het
stopcontact.
3 Plaats de ingrediënten in een
geschikte maat kom en houd
de kloppers/deeghaken in de
kom.
4 Kies de gewenste snelheid van
1 (langzaam) tot 5.
O Verhoog de snelheid als het
mengsel dikker wordt.
O Als het apparaat langzamer
begint te draaien of te hard
moet werken, verhoogt u de
snelheid.
O Gebruik de pulseerknop
‘P’ om de motor op de
maximumsnelheid te
gebruiken. Let op: de
pulseerknop ‘P’ werkt alleen
als een snelheid ingesteld is.
5 Wanneer het mengsel de
gewenste consistentie
heeft bereikt, zet u de
snelheidsschakelaar in de UIT-
stand ‘O’ en tilt u de kloppers/
deeghaken uit de kom.
6 Om hulpstukken te
verwijderen, zorgt u dat de
snelheidsschakelaar in de
UIT-stand (‘O’) staat en de
stekker van de mixer uit het
stopcontact is getrokken. Druk
op de ontgrendelingsknop
voor hulpstukken 1. Houd de
gebruikt, of waar deze instructies niet
worden opgevolgd.
Reiniging
O Schakel het apparaat altijd uit, haal
de stekker uit het stopcontact en
verwijder de kloppers of deeghaken
voordat u het apparaat schoonmaakt.
O Plaats de handmixer nooit in water
en laat het snoer of de stekker nooit
nat worden.
O Gebruik geen schuurmiddelen om de
onderdelen te reinigen.
Voor u de stekker in het stopcontact steekt
O Zorg dat het voltage gelijk is aan wat aan de onderkant van uw
handmixer wordt aangegeven.
O Dit apparaat voldoet aan EG Verordening 1935/2004
inzake materialen en voorwerpen die bestemd zijn om met
levensmiddelen in contact te komen.

11
Tips
O Bij het kloppen van margarine/boter en suiker voor een taart,
kunnen de ingrediënten het beste op kamertemperatuur zijn, of
u kunt de margarine of boter eerst zacht maken.
O Om te voorkomen dat uw mengkom te vol raakt, kiest u een
kom met de juiste afmeting.
O Grote hoeveelheden en dikke mengsels moeten misschien langer
worden gemengd.
O Als u slagroom slaat, wordt het gebruik van een diepe kom
aangeraden om zo min mogelijk te spatten.
O Schakel het apparaat uit zodra u de juiste consistentie hebt
bereikt.
Tabel aanbevolen gebruik
Let op: dit zijn slechts aanbevelingen. De te kiezen snelheid hangt
af van de grootte van de mengkom, de gebruikte hoeveelheden/
ingrediënten en uw persoonlijke voorkeur.
Verhoog de snelheid geleidelijk tot de hieronder aanbevolen snelheid.
Type voedsel
(in
minuten)
Kloppers
Eiwitten 1 - 10 4 – 5 1 - 3
Slagroom
(Tijd is afhankelijk van
het vetpercentage van
de room)
200 - 500 ml 1 – 5 2 - 3
Kant-en-klare
taartmixen
1 kg
Totaalgewicht
1 – 5 1 – 2
Beslag 1 liter 5 1
Vet in bloem wrijven.
Water toevoegen om
gebaksingrediënten te
vermengen
250 g
Bloemgewicht
1 – 2
2
4
1
Vruchtencake
Boter en suiker
kloppen
Bloem, fruit, enz.
invouwen
900 g
Totaalgewicht
5
1 – 2
3 - 4
1
Deeghaken
Brood
450 g
Bloemgewicht
750 g
Totaalgewicht
4 – 5 2 – 3
Extra hulpstuk (niet meegeleverd)
Mini-hakker: zie ‘Onderhoud en klantenservice’ om te bestellen
stelen van de hulpstukken vast
bij het verwijderen.
Belangrijk:
O alleen voor deeghaken - bij
het bereiden van brooddeeg
raden we u aan het apparaat
te belasten met deeg dat niet
meer dan 450 g bloem bevat.

12
Onderhoud en klantenservice
O Als u problemen ondervindt met de werking van de machine,
raadpleegt u de informatie onder ‘Problemen oplossen’ in deze
handleiding of gaat u naar www.kenwoodworld.com.
O Dit product is gedekt door een garantie die voldoet
aan alle wettelijke regels voor bestaande garanties en
consumentenrechten die gelden in het land waar het product is
gekocht.
O Als uw Kenwood product niet goed functioneert of als
u defecten opmerkt, kunt u het naar een erkend Service
Center van KENWOOD sturen of brengen. Voor informatie
over het KENWOOD Service Center in uw buurt gaat u naar
www.kenwoodworld.com of naar de specifieke website in uw
land.
O Ontworpen en ontwikkeld door Kenwood in het VK.
O Vervaardigd in China.
BELANGRIJKE INFORMATIE VOOR DE JUISTE VERWIJDERING
VAN HET PRODUCT VOLGENS DE EUROPESE RICHTLIJN
BETREFFENDE AFGEDANKTE ELEKTRISCHE EN
ELEKTRONISCHE APPARATUUR (AEEA)
Aan het einde van de levensduur van het product mag het niet
samen met het gewone huishoudelijke afval worden verwerkt. Het
moet naar een speciaal centrum voor gescheiden afvalinzameling
van de gemeente worden gebracht, of naar een verkooppunt dat
deze service verschaft.
Recept
Witbrooddeeg
10 ml gedroogde gist (die
gereconstitueerd moet
worden)
5 ml suiker
250 ml warm water
450 g broodmeel
5 ml zout
15 g reuzel
1 Doe de gedroogde gist
met de suiker en het water
in een mengkom en laat
het opschuimen. De juiste
watertemperatuur is 43°C
en dit wordt bereikt door
eenderde kokend water met
tweederde koud water te
vermengen.
2 Voeg de resterende
ingrediënten aan de kom
toe. Steek de deeghaken in
de handmixer en meng de
ingrediënten op lage snelheid,
totdat het meel is opgenomen.
Verhoog de snelheid en kneed
het deeg ca. 2 tot 3 minuten,
totdat het glad en elastisch is.
Bedek de kom met ingevette
krimpfolie en laat het deeg
gedurende 45 tot 60 minuten
in een warme ruimte rijzen.
3 Kneed het deeg
opnieuw gedurende
30 tot 45 seconden op
maximumsnelheid, waarbij
u de deeghaken in het deeg
houdt.

13
4 Vorm het deeg tot een brood
of broodjes en leg het deeg
op een ingevette bakplaat.
Bedek het deeg met ingevette
krimpfolie en leg het op
een warme plek, totdat het
deeg tweemaal zo groot is
geworden.
5 Bak het brood in een
voorverwarmde oven op
230°C gedurende 20 tot 25
minuten (voor een brood)
of 10 tot 15 minuten (voor
broodjes). Het brood is klaar
als het hol klinkt wanneer u op
de onderkant tikt.
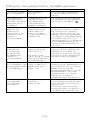
Problemen oplossen
Probleem Oorzaak Oplossing
Handmixer
werkt niet.
Geen stroom. Controleer of de stekker in
het stopcontact zit.
Deeghaak met
kraagje kan niet
in de opening
geplaatst
worden.
Deeghaak wordt
in de verkeerde
opening geplaatst.
De deeghaak met het
kraagje past alleen in de
opening.
Handmixer
draait langzaam
of moeizaam
tijdens gebruik.
Gekozen snelheid
is te laag.
Aanbevolen
hoeveelheid is
overschreden.
Hogere snelheid instellen.
Zie tabel aanbevolen
gebruik voor snelheden
en hoeveelheden die
verwerkt kunnen worden.
Niet langer dan 3 minuten
laten draaien voor deeg
of zware cakemixen en
vervolgens een kwartiertje
laten afkoelen.
Veel spatten
of bloem vliegt
rond tijdens
gebruik.
Gekozen snelheid
is te hoog.
Kom is te laag of
te klein voor de
ingrediënten.
Start met een lagere
snelheid en verhoog deze
wanneer het mengsel
dikker wordt.
Gebruik mengkom met
juiste omvang.
Kan hulpstukken
niet uit de
openingen
verwijderen.
Snelheidsschakelaar
staat niet in
‘O’-stand.
Om hulpstukken te
verwijderen moet de
snelheidsschakelaar in de
UIT-stand (‘O’) staan en de
stekker van de handmixer
uit het stopcontact
gehaald worden. Druk op
de ontgrendelingsknop
voor de hulpstukken.
Pulseerstand
werkt niet.
Snelheid niet
gekozen.
De pulseerstand werkt
alleen als een snelheid
ingesteld is. Kies een
snelheid en druk dan op ‘P’,
de pulseerknop.

14
Sécurité
OLisez et conservez soigneusement
ces instructions pour pouvoir vous y
référer ultérieurement.
ORetirez tous les éléments d’emballage
et les étiquettes.
OSi le cordon ou la prise sont
endommagés, il faut les faire
remplacer, pour des raisons de
sécurité, par Kenwood ou un
réparateur agréé par Kenwood pour
éviter tout accident.
OVeuillez NE PAS MIXER des
ingrédients chauds.
ON’utilisez pas votre appareil
pendant plus de temps que celui
spécifié ci-dessous sans période
d’arrêt. Si vous l’utilisez pendant de
plus longues périodes, vous risquez
d’endommager l’appareil.
Fonction/
accessoire Temps
d’utilisation
maximal
Temps
d’arrêt
entre les
utilisations
Fouets 6 minutes
Débranchez
l’appareil
et laissez
refroidir
pendant
15 minutes
Crochets
pétrisseurs
Pâtes à
gâteau
épaisses
Pâtes à
pain
3 minutes
O
Ne plongez jamais le corps du batteur
dans l’eau et ne mouillez jamais le
cordon d’alimentation ou la prise.
Avant de lire, veuillez déplier la première page contenant les
illustrations
Français

15
O Gardez les doigts, les cheveux, les
vêtements et les ustensiles loin des
éléments mobiles.
O Ne laissez jamais le cordon au contact
de surfaces chaudes ou pendre de telle
façon qu’un enfant puisse s’en saisir.
O N’utilisez jamais un batteur électrique
endommagé. Faites-le vérifier ou
réparer : voir « Service après-vente ».
O N’utilisez jamais un accessoire non
recommandé.
O Éteignez toujours l’appareil et
débranchez-le de l’alimentation s’il est
laissé sans surveillance, avant d’installer
ou de retirer les accessoires ou de le
nettoyer.
OLes appareils peuvent être utilisés
par des personnes dont les capacités
physiques, sensorielles ou mentales
sont diminuées, ou qui ne disposent
pas des connaissances ou de
l’expérience nécessaires, si elles ont été
formées et encadrées pour l’utilisation
des appareils, et si elles ont conscience
des risques encourus.
OToute mauvaise utilisation de votre
appareil peut être source de blessures.
O La puissance nominale est basée sur
les données du hachoir. es autres
accessoires peuvent demander moins
d’énergie.
OCet appareil ne doit pas être utilisé par
des enfants. Veuillez garder l’appareil
et le cordon hors de portée des
enfants.
O Les enfants doivent être surveillés afin
qu’ils ne puissent pas jouer avec cet
appareil.

16
ON’employez l’appareil qu’à la fin
domestique prévue. Kenwood décline
toute responsabilité dans les cas où
l’appareil est utilisé incorrectement
ou que les présentes instructions ne
sont pas respectées.
Nettoyage
O Veillez à toujours éteindre et
débrancher l’appareil et à retirer les
fouets ou crochets pétrisseurs avant
le nettoyage.
O Ne plongez jamais le corps du
batteur dans l’eau et ne mouillez
jamais le cordon d’alimentation ou la
prise.
O N’utilisez jamais d’abrasifs pour
nettoyer les éléments.
Avant de brancher l’appareil
O Assurez-vous que votre alimentation électrique correspond à
celle qui est indiquée au dos de votre batteur électrique.
O Cet appareil est conforme au règlement 1935/2004 de la CE sur
les matériaux et les articles destinés au contact alimentaire.
Avant la première utilisation de
votre batteur électrique
O Nettoyez les éléments (voir
« Nettoyage »).
Légende
1 Bouton de déblocage des
ustensiles
2 Sélecteur de vitesse
3 (P) Bouton Pulse
4 Fouets
5 Crochet pétrisseur avec
collier
6 Crochet pétrisseur
Utilisation de votre
batteur électrique
1 Insérez les fouets ou les
crochet pétrisseurs – tournez
et poussez jusqu’à ce qu’un
clic soit ressenti.
Important : vérifiez que le
crochet pétrisseur avec le collier
métallique est bien enclenché
sur l’orifice du bloc moteur
(voir l’illustration).
2 Branchez l’appareil.
3 Après avoir placé les
ingrédients dans un bol de
taille adaptée, mettez les
fouets / crochet pétrisseurs
dans le bol.
4 Sélectionnez la vitesse
souhaitée, de 1 (la plus lente) à
5.
O Au fur et à mesure que
la préparation épaissit,
augmentez la vitesse.
O Si vous entendez votre
appareil forcer ou ralentir,
augmentez la vitesse.
O Utilisez le bouton Pulse
(P) pour faire tourner le
moteur à la vitesse maximale.
Remarque : le bouton Pulse
(P) ne fonctionnera que si une
vitesse a déjà été sélectionnée.

17
5 Lorsque le mélange a atteint
la texture souhaitée, remettre
le sélecteur de vitesse sur
la position Arrêt (O), puis
soulevez les fouets/crochets
pétrisseurs hors du bol.
6 Pour retirer les ustensiles,
vérifiez que le sélecteur de
vitesse est en position Arrêt
(O) et débranchez le batteur
électrique. Appuyez sur le
bouton de déblocage des
ustensiles 1. Tenez la tige
de l’ustensile lorsque vous
éjectez celui-ci.
Important :
O uniquement pour les crochets
pétrisseurs - lors de la
préparation de pâte à pain,
il est recommandé que la
charge de pâte n’excède pas
450 g de farine.
Conseils et astuces
O Lorsque vous montez en
crème des mélanges pour
gâteau, utilisez du beurre
ou de la margarine à
température ambiante, ou
ramollissez avant utilisation.
O Pour éviter de surcharger
votre bol de mélange,
choisissez-en un de taille
adaptée.
O Le temps de mélange peut
s’avérer plus long dans le
cas de grandes quantités et
de mélanges épais.
O Lorsque vous faites de
la crème fouettée, il est
recommandé d’utiliser un
bol à bords élevés pour
limiter les éclaboussures.
O Éteignez-le dès que vous
avez obtenu la consistance
souhaitée.
Tableau des conseils d’utilisation
Les présentes ne sont que des recommandations. La vitesse que
vous sélectionnez dépendra aussi de la taille du bol, des quantités,
des ingrédients à mixer et de vos préférences personnelles.
Augmentez progressivement la vitesse, pour passer aux vitesses
suivantes.
Type d’aliments
(en min)
Fouets
Blancs d’oeuf 1 - 10 4 – 5 1 - 3
Crème à fouetter
(la durée de mixage peut
varier selon la quantité de
matières grasses dans la
crème)
200 - 500 ml 1 – 5 2 - 3
Tous les mélanges à gâteau
travaillés en une seule fois
1 kg poids
total
1 – 5 1 – 2
Pâte 1 litre 5 1
Incorporer de la matière
grasse à de la farine.
Ajouter de l’eau pour
lier les ingrédients de
pâtisseries.
250 g
poids
farine
1 – 2
2
4
1
Cake aux fruits
Incorporer de la matière
grasse et le sucre.
Incorporer la farine, les
fruits, etc.
900 g poids
total 5
1 – 2
3 - 4
1

18
Crochets pétrisseurs
Pain
450 g
poids
farine
750 g
poids
total
4 – 5 2 – 3
Accessoire facultatif (non fourni)
Hachoir compact : voir le paragraphe « Service après-vente » pour
commander.
Service après-vente
O Si vous rencontrez des problèmes lors de l’utilisation de votre
appareil, reportez-vous à la section « Guide de dépannage » de
ce manuel ou consultez la page www.kenwoodworld.com avant
de contacter le service après-vente.
O N’oubliez pas que votre appareil est couvert par une garantie,
qui respecte toutes les dispositions légales concernant les
garanties existantes et les droits du consommateur dans le pays
où vous avez acheté le produit.
O Si votre appareil Kenwood fonctionne mal ou si vous trouvez un
quelconque défaut, veuillez l’envoyer ou l’apporter à un centre
de réparation KENWOOD autorisé. Pour trouver des détails
actualisés sur votre centre de réparation KENWOOD le plus
proche, veuillez consultez www.kenwoodworld.com ou le site
internet spécifique à votre pays.
O Conçu et développé par Kenwood au Royaume-Uni.
O Fabriqué en Chine.
AVERTISSEMENTS POUR L’ÉLIMINATION CORRECTE DU
PRODUIT CONFORMÉMENT AUX TERMES DE LA DIRECTIVE
EUROPÉENNE RELATIVE AUX DÉCHETS D’ÉQUIPEMENTS
ÉLECTRIQUES ET ÉLECTRONIQUES (DEEE).
Au terme de son utilisation, le produit ne doit pas être éliminé avec
les déchets urbains.
Le produit doit être remis à l’un des centres de collecte sélective
prévus par l’administration communale ou auprès des revendeurs
assurant ce service.

19
Recette
Pâte à pain blanc
10 ml / 2 cuillères à café
de levure sèche (levure à
reconstituer)
5 ml /1 cuillère à café de sucre
250 ml d’eau tiède
450 g de farine à pain
5 ml / 1 cuillère à café de sel
15 g de lard
1 Disposez la levure sèche,
avec le sucre et l’eau, dans un
récipient à mélanger et laisser
lever. La bonne température
de l’eau est établie à 43° C et
pour l’obtenir, mélangez un
tiers d’eau bouillante à deux
tiers d’eau froide.
2 Ajoutez les ingrédients
restants. Installez les crochets
pétrisseurs sur le batteur
électrique, puis mélangez
les ingrédients à vitesse
lente jusqu’à incorporation
complète de la farine. Puis
augmentez la vitesse et battez
pendant 2 à 3 minutes, jusqu’à
ce que la pâte devienne
souple et élastique. Recouvrez
à l’aide d’un papier film
alimentaire huilé, et laissez
la pâte lever dans un endroit
chaud 45 à 60 minutes.
3 Remixez la pâte à la
vitesse maximale pendant
30 à 45 secondes, en
maintenant les crochets
pétrisseurs dans le mélange.
4 Façonnez la pâte en une
miche ou en petits pains et
disposez sur des plaques de
cuisson graissées. Couvrez
d’un papier film huilée et
laissez dans un endroit chaud
jusqu’à ce que la pâte ait
doublé de volume.
5 Faites cuire dans un
four préchauffé à 230°C,
bouton 8 au gaz pendant 20 à
25 minutes (pour une miche)
ou 10 à 15 minutes (pour des
petits pains). Lorsque le pain
est cuit, si vous tapotez sur
le fond du pain, vous devez
entendre un son creux.

20
Guide de dépannage
Problème Cause Solution
Le batteur
électrique ne
fonctionne pas
Pas d’alimentation
électrique
Vérifiez que l’appareil est
bien branché
Le crochet
pétrisseur avec
collier ne rentre
pas dans l’orifice
Le crochet
pétrisseur est
inséré dans le
mauvais orifice
Le crochet pétrisseur avec
collier ne rentre que dans
l’orifice .
Le batteur
électrique
ralentit ou
peine à tourner
pendant le
mixage
La vitesse
sélectionnée est
trop faible.
La quantité
recommandée a
été dépassée.
Augmentez la vitesse.
Voir le tableau des conseils
d’utilisation pour connaître
les quantités et vitesses à
utiliser.
Ne faites pas tourner
l’appareil pendant plus de
3 minutes et laissez
l’appareil refroidir 15
minutes avant de le
relancer pour les pâtes à
cuire et les mélanges pour
gâteaux lourds.
Projections
excessives de
liquides ou de
farine lors du
mixage
La vitesse
sélectionnée est
trop forte.
Le bol n’est pas
assez profond
ou il est trop
petit pour les
ingrédients à
mixer.
Sélectionnez une vitesse
moins importante au
départ, puis augmentez la
vitesse au fur et à mesure
que le mélange s’épaissit.
Sélectionnez un bol de
taille adaptée.
Impossible
de retirer les
ustensiles des
orifices du bloc
moteur
Le sélecteur de
vitesse n’est pas
sur Arrêt (O).
Pour retirer les ustensiles,
veillez à ce que le sélecteur
de vitesse soit bien en
position Arrêt (O), et
débranchez le batteur à
électrique.
Appuyez sur le bouton de
déblocage des ustensiles.
Le bouton Pulse
ne fonctionne
pas
La vitesse n’a pas
été sélectionnée
auparavant
La fonction Pulse ne
fonctionne que si une
vitesse a déjà été
sélectionnée. Sélectionnez
une vitesse puis appuyez
sur le bouton Pulse (P)
La page charge ...
La page charge ...
La page charge ...
La page charge ...
La page charge ...
La page charge ...
La page charge ...
La page charge ...
La page charge ...
La page charge ...
La page charge ...
La page charge ...
La page charge ...
La page charge ...
La page charge ...
La page charge ...
La page charge ...
La page charge ...
La page charge ...
La page charge ...
La page charge ...
La page charge ...
La page charge ...
La page charge ...
La page charge ...
La page charge ...
La page charge ...
La page charge ...
La page charge ...
La page charge ...
La page charge ...
La page charge ...
La page charge ...
La page charge ...
La page charge ...
La page charge ...
La page charge ...
La page charge ...
La page charge ...
La page charge ...
La page charge ...
La page charge ...
La page charge ...
La page charge ...
La page charge ...
La page charge ...
La page charge ...
La page charge ...
La page charge ...
La page charge ...
La page charge ...
La page charge ...
La page charge ...
La page charge ...
La page charge ...
La page charge ...
La page charge ...
La page charge ...
La page charge ...
La page charge ...
La page charge ...
La page charge ...
La page charge ...
La page charge ...
La page charge ...
La page charge ...
La page charge ...
La page charge ...
La page charge ...
La page charge ...
La page charge ...
La page charge ...
La page charge ...
La page charge ...
La page charge ...
La page charge ...
La page charge ...
La page charge ...
La page charge ...
La page charge ...
La page charge ...
La page charge ...
La page charge ...
La page charge ...
La page charge ...
La page charge ...
La page charge ...
La page charge ...
La page charge ...
La page charge ...
La page charge ...
La page charge ...
La page charge ...
La page charge ...
La page charge ...
La page charge ...
La page charge ...
La page charge ...
La page charge ...
La page charge ...
La page charge ...
La page charge ...
-
 1
1
-
 2
2
-
 3
3
-
 4
4
-
 5
5
-
 6
6
-
 7
7
-
 8
8
-
 9
9
-
 10
10
-
 11
11
-
 12
12
-
 13
13
-
 14
14
-
 15
15
-
 16
16
-
 17
17
-
 18
18
-
 19
19
-
 20
20
-
 21
21
-
 22
22
-
 23
23
-
 24
24
-
 25
25
-
 26
26
-
 27
27
-
 28
28
-
 29
29
-
 30
30
-
 31
31
-
 32
32
-
 33
33
-
 34
34
-
 35
35
-
 36
36
-
 37
37
-
 38
38
-
 39
39
-
 40
40
-
 41
41
-
 42
42
-
 43
43
-
 44
44
-
 45
45
-
 46
46
-
 47
47
-
 48
48
-
 49
49
-
 50
50
-
 51
51
-
 52
52
-
 53
53
-
 54
54
-
 55
55
-
 56
56
-
 57
57
-
 58
58
-
 59
59
-
 60
60
-
 61
61
-
 62
62
-
 63
63
-
 64
64
-
 65
65
-
 66
66
-
 67
67
-
 68
68
-
 69
69
-
 70
70
-
 71
71
-
 72
72
-
 73
73
-
 74
74
-
 75
75
-
 76
76
-
 77
77
-
 78
78
-
 79
79
-
 80
80
-
 81
81
-
 82
82
-
 83
83
-
 84
84
-
 85
85
-
 86
86
-
 87
87
-
 88
88
-
 89
89
-
 90
90
-
 91
91
-
 92
92
-
 93
93
-
 94
94
-
 95
95
-
 96
96
-
 97
97
-
 98
98
-
 99
99
-
 100
100
-
 101
101
-
 102
102
-
 103
103
-
 104
104
-
 105
105
-
 106
106
-
 107
107
-
 108
108
-
 109
109
-
 110
110
-
 111
111
-
 112
112
-
 113
113
-
 114
114
-
 115
115
-
 116
116
-
 117
117
-
 118
118
-
 119
119
-
 120
120
-
 121
121
-
 122
122


Kenwood HMP30.A0WH Le manuel du propriétaire
- Taper
- Le manuel du propriétaire
dans d''autres langues
- italiano: Kenwood HMP30.A0WH Manuale del proprietario
- Deutsch: Kenwood HMP30.A0WH Bedienungsanleitung
- slovenčina: Kenwood HMP30.A0WH Návod na obsluhu
- dansk: Kenwood HMP30.A0WH Brugervejledning
- polski: Kenwood HMP30.A0WH Instrukcja obsługi