Smappee EV Wall Home Guide d'installation
- Taper
- Guide d'installation

Quick Install
Guide
EV Wall HOME
Three Phase Edition
Quick Install Guide
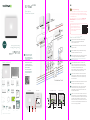
What’s in the box?
Safety warning
Carrying out electrical work within the home or workplace
can be dangerous and must be conducted according to
the appropriate national safety standards and executed by
a certified electrician.
For safety purposes, it is also necessary to power o
the installation before proceeding with the physical
installation.
For further safety instructions
and more detailed information,
please consult the full manual at
smappee.com/smappee-manuals
or via the QR code:
How to install EV Wall HOME
1 Prepare the installation. Foresee a power supply
& communication cable between the EV Wall
and the distribution panel.
2 Fix the mounting plate to the wall with the provided
plugs and screws.
3 Attach the EV Wall housing to the EV Wall mounting
plate with the provided small screws.
4 Connect the power supply cable, communication cable
and charging cable (if applicable) to the EV Wall.
See diagrams overleaf. In case of 3-phase delta (3*230 V), please
consult the full manual online.
5 Connect the EV Wall modules as indicated in the
diagram shown overleaf. The Connect, the EV Wall
splitter, the CT Hub and Current Transformers (CTs)
are installed inside the distribution panel.
These components communicate with the charging
station via the CAT 5/6 communication cable.
6 Connect the A and B cables and the communication
cable to the cover’s PCB. Then attach the front cover
to the EV Wall to close it. Switch on the power using
the circuit breaker.
7 Download the Smappee App and follow the instructions
to configure your Smappee charging station.
8 Once Smappee Connect shows a green pulsing light,
validate the installation by verifying that the real-
time bubbles show correctly measured values in the
Smappee App/Dashboard.
9 Create a user account for the customer and share the
location with this new username. Write the username,
password and email address in the Quick Starter Guide
(included in the box together with this Quick Install
Guide) and hand it to your customer. This user account
can be used for the Smappee App and Dashboard and
to set smart charging schedules.
EN
EV Wall
Optional: 8 m cable with cable holder
EV Wall mounting plate
DIN mounting
plate
Wall mounting
plate
EV Wall
splitter
Connect
CT Hub CT 50A
×4
Solid Core
3-phase CT
RJ10 cable
40 cm
RJ10 cable
150 cm
Bus termination
plug
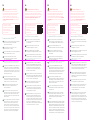
EV Wall HOME
Three phase
Connection diagram
Distribution Panel
CAT 5/6
communication
cable
Power
supply
cable
A
B B
LED Board
Front side Back side
Please don’t litter. Responsible publisher: Stefan Grosjean © Smappee nv - Evolis 104 -8530 Harelbeke, Belgium.
QIG – EV Wall Three phase Installers – 70-0174 – 2023/01
Manual
Connect the CT to measure
solar to the correct phase.
Adjust the configuration in
the Smappee App when this
is not the L1 phase.
When the solar installation
is 3-phased, you need to
purchase and install the EV
Wall solar add-on.
In case of 3-phase delta
(3*230 V), consult the full
manual via the QR code:
Installer
Screw &
plug
×3
Small
screw
×3
QR code
sticker
Smart Charge
Card
Quick Starter
Guide
Charging
cable
Fixed cable version Socket version
RCD
Contactor
Charge
Controller
Power
Box
CP
N
L1
L2
L3
PE
N
L1
L2
L3
PE
N
L1
L2
L3
RCD
Contactor
Charge
Controller
Power
Box Lock
Power
supply cable

Sikkerhedsadvarsel
Udførelse af elektrisk arbejde i hjemmet eller på
arbejdspladsen kan være farligt, og skal udføres
i overensstemmelse med de relevante nationale
sikkerhedsstandarder, og udføres af en autoriseret
elektriker. Af sikkerhedsmæssige årsager er det
også nødvendigt at slukke for installationen før man
fortsætter med den fysiske installation.
For yderligere sikkerheds-
instruktioner og mere yderligere
oplysninger, se venligst den fulde
manual på
smappee.com/smappee-manuals
eller via QR-koden:
Sådan installeres EV Wall HOME
1 Forberedelse af installationen Træk et strømforsy-
nings- og kommunikationskabel mellem EV-væggen
og eltavlen.
2 Fastgør monteringspladen til væggen med de
medfølgende stik og skruer.
3 Fastgør EV Wall-kassen til EV Wall-monteringspladen
med de medfølgende små skruer.
4 Tilslut strømforsyningskablet, kommunikationskablet
og ladekablet (hvis relevant) til din EV Wall.
I tilfælde af 3-fase delta (3*230 V), se venligst
det fulde manual online.
5 Tilslut EV Wall-modulerne som vist i diagrammet på
næste side. Forbindelsen, EV Wall splitter, CT Hub og
Current Transformers (CT'er) er installeret inden i
eltavlen. Disse komponenter kommunikerer med lade-
stationen via CAT 5/6 kommunikationskablet.
6 Tilslut A- og B-kablerne og kommunikationskablet
til dækslets PCB. Tilslut derefter forsidedækslet til
din EV Wall for at lukke den. Tænd for strømmen ved
hjælp af afbryderen.
7 Download Smappee-appen og følg instruktionerne
for at konfigurere din Smappee-ladestation.
8 Når Smappee Connect viser et grønt pulserende lys,
skal du validere installationen ved at verificere,
at realtidsboblerne viser korrekt målte værdier
i Smappee App/Dashboard.
9 Opret en brugerkonto til kunden og del placeringen
med det nye brugernavn. Skriv brugernavn, ad-
gangskode og e-mailadresse i Quick Starter Guide
(medfølger i kassen sammen med denne Quick Install
Guide) og giv den til din kunde. Denne brugerkonto
kan bruges i Smappee-appen og dashboardet, og til at
indstille smart opladningstidsplaner.
Sicherheitshinweis
Die Ausführung von Elektroarbeiten im Haus oder am
Arbeitsplatz kann gefährlich sein und muss gemäß den
entsprechenden nationalen Sicherheitsnormen und von
einem zertifizierten Elektriker durchgeführt werden. Aus
Sicherheitsgründen ist es außerdem notwendig, die Anlage
auszuschalten, bevor man mit der physischen Installation
fortfährt.
Weitere Sicherheitshinweise und
detailliertere Informationen finden
Sie in der vollständigen
Bedienungsanleitung unter
smappee.com/smappee-manuals
oder über den QR-Code:
So wird die EV Wall HOME installiert
1 Bereiten Sie die Installation vor. Planen Sie ein
Stromversorgungs- und Kommunikationskabel
zwischen der EV Wall und dem Verteilerkasten ein.
2 Befestigen Sie die Montageplatte mit den
mitgelieferten Dübeln und Schrauben an der Wand.
3 Befestigen Sie das EV Wall-Gehäuse mit den
mitgelieferten kleinen Schrauben an der EV Wall-
Montageplatte.
4 Schließen Sie das Stromversorgungskabel, das
Kommunikations-Kabel und das Ladekabel (falls
vorhanden) an der EV Wall an.
Siehe umseitige Diagramme. Im Falle eines 3-Phasen-Delta-Netzwerks
(3*230 V) lesen Sie bitte das ausführliche Handbuch online.
5 Schließen Sie die EV Wall-Module wie auf dem
umseitigen Diagramm gezeigt an. Der Connect, der
EV Wall Splitter, der CT Hub und die Stromwandler
(CTs) werden innerhalb des Verteilerkastens installiert.
Diese Komponenten kommunizieren über das CAT-
5/6-Kommunikationskabel mit der Ladestation.
6 Schließen Sie die A- und B-Kabel und das
Kommunikationskabel an die FBG der Abdeckung an.
Dann befestigen Sie die Frontabdeckung an der EV
Wall und schließen Sie sie. Schalten Sie den Strom
über den Schutzschalter ein.
7 Laden Sie die Smappee App herunter und folgen
Sie den Anleitungen, um Ihre Smappee Ladestation
zu konfigurieren.
8 Sobald Smappee Connect ein grünes pulsierendes
Licht anzeigt, validieren Sie die Installation, indem
Sie überprüfen, ob die Echtzeitblasen in der Smappee
App/im Dashboard korrekt gemessene Werte
anzeigen.
9
Erstellen Sie ein Benutzerkonto für den Kunden und geben
Sie den Standort mit diesem neuen Benutzernamen frei.
Notieren Sie den Benutzernamen, das Passwort und die
E-Mail-Adresse auf dem Dokument Quick Starter Guide
(welches mit dem Quick Install Guide in der Verpackung
enthalten ist) und geben Sie das Ihrem Kunden. Dieses
Benutzerkonto kann in der Smappee App und im Dashboard
verwendet werden, um smarte Ladepläne einzurichten.
Veiligheidswaarschuwing
Elektrische werkzaamheden in huis of op het werk kunnen
gevaarlijk zijn en moeten worden uitgevoerd volgens de
geldende nationale veiligheidsnormen en door een erkende
elektricien. Om veiligheidsredenen is het ook nodig de
stroom van de installatie uit te schakelen voordat u
verder gaat met de fysieke installatie.
Voor verdere veiligheidsinstructies
en meer gedetailleerde informatie
kunt u de volledige handleiding
raadplegen op
smappee.com/smappee-manuals
of via de QR-code:
Hoe EV Wall HOME te installeren
1 Bereid de installatie voor. Voorzie een voedings-
en communicatiekabel tussen de EV Wall en het
distributiepaneel.
2 Bevestig de montageplaat aan de muur met
de bijgeleverde pluggen en schroeven.
3 Bevestig de EV Wall behuizing op de EV Wall
montageplaat met de bijgeleverde kleine schroeven.
4 Sluit de stroomtoevoerkabel, communicatiekabel en
laadkabel (indien van toepassing) aan op de EV Wall.
Zie schema's op de ommezijde. In geval van driefasige delta (3*230 V),
gelieve de volledige handleiding online.
5 Sluit de EV Wall modules aan zoals aangegeven in
het schema aan de ommezijde. De Connect, de EV
Wall splitter, de CT Hub en de stroomklemmen (CT's)
zijn geïnstalleerd in het distributiepaneel. Deze
componenten communiceren met de laadpaal via
de CAT 5/6 communicatiekabel.
6 Sluit de A- en B-kabels en de communicatiekabel aan
op de printplaat van de afdekking. Bevestig vervolgens
de voorklep op de EV Wall om deze te sluiten. Schakel
de stroom in met de stroomonderbreker.
7 Download de Smappee App en volg de instructies
om uw Smappee laadpaal te configureren.
8 Zodra Smappee Connect een groen pulserend licht
toont, valideert u de installatie door te controleren
of de real-time bol correct gemeten waarden tonen
in de Smappee App / Dashboard.
9 Maak een gebruikersaccount aan voor de klant en
deel de locatie met deze nieuwe gebruikersnaam.
Schrijf de gebruikersnaam, het wachtwoord en het
e-mailadres in de Quick Starter Guide (die samen met
deze Quick Install Guide in de doos zit) en overhandig
deze aan uw klant. Deze gebruikersaccount kan
worden gebruikt in de Smappee App en Dashboard en
om slimme autolaadschema's in te stellen.
Avertissement de sécurité
Les travaux électriques à domicile ou sur le lieu de
travail peuvent être dangereux et doivent être eectués
conformément aux normes de sécurité nationales
appropriées et exécutés par un électricien certifié.
Pour des raisons de sécurité, il est également nécessaire
de mettre l’installation hors tension avant de procéder
au montage.
Pour d’autres consignes de
sécurité et des informations
plus détaillées, veuillez consulter
le manuel complet sur :
smappee.com/smappee-manuals
ou via le code QR :
Comment installer EV Wall HOME
1 Préparez l'installation. Prévoyez un câble d'alimentation
et de communication entre la borne EV Wall
et le panneau de distribution.
2 Fixez la plaque de montage au mur à l'aide
des chevilles et des vis fournies.
3 Fixez le boîtier EV Wall à la plaque de montage EV Wall
Smart à l'aide des petites vis fournies.
4 Connectez le câble d'alimentation, le câble
de communication et le câble de chargement
(le cas échéant) à l'EV Wall.
Voir les schémas au verso. Dans le cas d'une alimentation triphasée
en triangle (3*230 V), veuillez consulter le manuel complet en ligne.
5 Connectez les modules EV Wall comme indiqué sur le
schéma au verso. Le Connect, le répartiteur EV Wall,
le CT Hub et les pinces de courant (CT) sont installés à
l'intérieur du panneau de distribution. Ces composants
communiquent avec la borne de recharge via le câble
de communication CAT 5/6.
6 Connectez les câbles A et B et le câble de
communication au PCB du couvercle. Fixez ensuite
le couvercle avant à l'EV Wall pour la fermer. Mettez
l'appareil sous tension à l'aide du disjoncteur.
7 Téléchargez l'application Smappee App et suivez
les instructions pour configurer votre borne
de recharge Smappee.
8 Une fois qu'une lumière verte clignote au niveau
de Smappee Connect, validez l'installation en vérifiant
que les bulles en temps réel montrent des valeurs
correctement mesurées dans l'application Smappee
App / Dashboard.
9 Créez un compte utilisateur pour le client et partagez
l'emplacement avec ce nouveau nom d'utilisateur.
Inscrivez le nom d'utilisateur, le mot de passe et
l'adresse email dans le Quick Starter Guide (inclus
dans la boîte avec ce Quick Install Guide) et remettez-
le à votre client. Ce compte utilisateur peut être utilisé
dans l'application et le tableau de bord Smappee et
pour définir des horaires de recharge intelligente.
DADENLFR
-
 1
1
-
 2
2

