Haier HRF-225 Manuel utilisateur
- Catégorie
- Réfrigérateurs combinés
- Taper
- Manuel utilisateur
Ce manuel convient également à

HRF-225
HRF-255
Domestic RefrigeratorDomestic Refrigerator
Domestic RefrigeratorDomestic Refrigerator
Domestic Refrigerator
HaushaltskühlschrankHaushaltskühlschrank
HaushaltskühlschrankHaushaltskühlschrank
Haushaltskühlschrank
Réfriérqteur-ménqgerRéfriérqteur-ménqger
Réfriérqteur-ménqgerRéfriérqteur-ménqger
Réfriérqteur-ménqger
Huishoudelijke KoelkastHuishoudelijke Koelkast
Huishoudelijke KoelkastHuishoudelijke Koelkast
Huishoudelijke Koelkast
Gelador eletrodomésticoGelador eletrodoméstico
Gelador eletrodomésticoGelador eletrodoméstico
Gelador eletrodoméstico
Nevera ElectrodomésticaNevera Electrodoméstica
Nevera ElectrodomésticaNevera Electrodoméstica
Nevera Electrodoméstica
FrigoriferoFrigorifero
FrigoriferoFrigorifero
Frigorifero
Operation InstructionsOperation Instructions
Operation InstructionsOperation Instructions
Operation Instructions
GebrauchsanweisungGebrauchsanweisung
GebrauchsanweisungGebrauchsanweisung
Gebrauchsanweisung
L’instruction d’emploiL’instruction d’emploi
L’instruction d’emploiL’instruction d’emploi
L’instruction d’emploi
BebruikershandleidingBebruikershandleiding
BebruikershandleidingBebruikershandleiding
Bebruikershandleiding
Instrução de UsoInstrução de Uso
Instrução de UsoInstrução de Uso
Instrução de Uso
Instrcciones de UsoInstrcciones de Uso
Instrcciones de UsoInstrcciones de Uso
Instrcciones de Uso
Istruzioni per I’usoIstruzioni per I’uso
Istruzioni per I’usoIstruzioni per I’uso
Istruzioni per I’uso

Contents
Cautions---------------------------------------------------------------------1~2
Refrigerator diagram--------------------------------------------------------3
Location-------------------------------------------------------------------------4
Preparation-----------------------------------------------------------------5~7
Operation-----------------------------------------------------------------------8
Refrigerator storage---------------------------------------------------------9
Cautions-----------------------------------------------------------------------10
Suggestions-------------------------------------------------------------------11
Freezer storage--------------------------------------------------------------12
Cautions-----------------------------------------------------------------------13
Defrosting,Cleaning and Cesstion--------------------------------14~17
Questions and Answers----------------------------------------------18~20
Inhaltsverzeichnis
Sicherheitshinweise---------------------------------------------------21~22
Bauteile------------------------------------------------------------------------23
Aufstellen---------------------------------------------------------------------24
Vorbereitung------------------------------------------------------------25~27
Inbetriebnahme-------------------------------------------------------------28
Kühlteil------------------------------------------------------------------------29
Kühlen-------------------------------------------------------------------------30
Hinweise zum Kühlen------------------------------------------------------31
Gefrierteil---------------------------------------------------------------------32
Einfrieren---------------------------------------------------------------------33
Abtauen,Reinigen,Außer Betrieb----------------------------------34~37
Störungen----------------------------------------------------------------38~40
Catalogue
Conseils de sécurité---------------------------------------------------41~42
Nom des composants------------------------------------------------------43
Emplacement----------------------------------------------------------------44
Préparation-------------------------------------------------------------45~47
Mise en service--------------------------------------------------------------48
Réfrigérateur-----------------------------------------------------------------49
Remarques pour la mise en conservation----------------------------50
Informations supplémentaires concernant le réfigérateur-----51
Congélateur ------------------------------------------------------------------52
Remarques générales pour congeler les aliments-----------------53
Dégivrage,Nettoyage,Mise hors service ------------------------54~57
Réponses aux problèmes -------------------------------------------58~60
Inhoudsopgave
Voorbereiden in gebruikname-------------------------------------61~62
Schema Koelkast------------------------------------------------------------63
Plaatsing----------------------------------------------------------------------64
Voorbereiding----------------------------------------------------------65~67
Werking-----------------------------------------------------------------------68
Koelgedeelte-----------------------------------------------------------------69
Waarschuwingen-----------------------------------------------------------70
Suggesties--------------------------------------------------------------------71
Vriesgedeelte----------------------------------------------------------------72
Waarschuwingen------------------------------------------------------------73
Ontdooien, schoonmaken en uitschakelen---------------------74~77
Problemen en oplossingen -----------------------------------------78~80

SumárioSumário
SumárioSumário
Sumário
Cauções--------------------------------------------------------------------81~82
Diagrama ----------------------------------------------------------------------83
Colocação-----------------------------------------------------------------------84
Preparação----------------------------------------------------------------85~87
Operação---------------------------------------------------------------------88
Conservação na arca frigorífica------------------------------------------89
Cauções------------------------------------------------------------------------90
Sugestões--------------------------------------------------------------------91
Conservação na arca congelador----------------------------------------92
Cauções----------------------------------------------------------------------93
Degelo, limpeza e cessação----------------------------------------94~97
Dúvidas e respostas-------------------------------------------------98~100
IndiceIndice
IndiceIndice
Indice
Advertencias---------------------------------------------------------101~102
El diagrama de la nevera-------------------------------------------------103
Colocación--------------------------------------------------------------------104
Preparativos previos de usar la nevera--------------------105~107
Empezar el usar------------------------------------------------------------108
La cámara de refrigeración----------------------------------------------109
Advertencias----------------------------------------------------------------110
Sugestión---------------------------------------------------------------------111
Conservar en la cámara de congelación------------------------------112
Advertencias-------------------------------------------------------------113
Descongelar, limpiar y terminar de usar la nevera---------114~117
Aclaraciones sobre dudas----------------------------------------118~120
IndiceIndice
IndiceIndice
Indice
Punti per sicurezza------------------------------------------------121~122
Disegno----------------------------------------------------------------------123
Mettere-----------------------------------------------------------------------124
Preparazione--------------------------------------------------------125~127
Utilizzazione---------------------------------------------------------------128
Riserva refrigerante------------------------------------------------------129
Punti per sicurezza-------------------------------------------------------130
Suggestione-----------------------------------------------------------------131
Riserva congelamento---------------------------------------------------132
Punti per sicurezza-------------------------------------------------------133
Sbrinamento,sciacquata,sospensione------------------------134~137
Spiegazione ---------------------------------------------------------138~140

Disposal of the old appliance
Before disposing an old appliance, please make sure it’s inoperative and safe. Unplug
the appliance and remove or destroy all of the springs, latches, or bolt-locks in order to
avoid the risk of child entrapment.
It must be noted that the refrigeration system contains insulating gases and refrigerants,
which require specialized waste disposal. The valuable materials contained in a refrig-
erator can be recycled. Contact your local waste disposal center for proper disposal of
an old appliance and contact your local authority or your dealer if you have any ques-
tion. Please ensure that the pipe work of your refrigerator dose not get damaged prior to
being picked up by the relevant waste disposal center, and contribute to environmental
awareness by insisting on an appropriate, any-pollution method of disposal.
Disposal of the packaging of your new appliance
All the packaging materials employed in the package of your new appliance may be
disposed without any danger to the environment.
The cardboard box may be broken or cut into smaller pieces and given to a waste paper
disposal service. The wrapping foil is made of polyethylene and the polyethylene pads
and stuffing contain no fluorochloric hydrocarbon.
All these valuable materials may be taken to a waste collecting center and used again
after adequate recycling.
Consult your local authorities for the name and address of the waste materials collect-
ing centers and waste paper disposal services nearest to your house.
Safety Instructions and Warnings
Before starting the appliance, read the information given in the User’s Guide carefully.
The User’s Guide contains very important observations relating to the assembly,
operation and maintenance of the appliance.
Keep the User’s Guide in a safe place and remember to hand it over to the subsequent
owner, if you ever sell the appliance.
The manufacturer does not accept responsibility for any damages that may arise due to
non-observation of the following instruction.
CautionsCautions
CautionsCautions
Cautions
*Damaged appliances are not to be put into operation. In case of doubt ,consult your
supplier.
*Connection and installation of the appliance are not to be carried out in strict compliance
with the relative instructions set forth in the Use’s Guide.
*For the purpose of safety ,the appliance must be properly grounded in accordance with
specifications.
*The plug should be accessible after the appliance positioned.
*Power cable should inly be replaced by factory authorized service shop.
*Always remember to unplug the appliance before cleaning.To disconnect the appliance,
pull at the plug itself not the cord.
*Keep alcoholic beverages in airtight bottles or containers and always store in an upright
position. In addition, do not store any explosive substances inside the appliance-Danger
of explosion!
*Do not damage any parts of the appliance that carry refrigerant by piercing or perforating
the refrigerant’s grooves with sharp or pointed items,crushing or twisting any tubes, or
scraping the coatings off the surfaces. If the refrigerant spurts out and gets into eyes, it
may result in serious eye injuries.
*Do not obstruct or cover the ventilation grille of the appliance.
*Do not allow children to play with the appliance. In no case should children be allowed to
sit on the drawers or hang onto the door.
*Warning: Keep ventilation openings in the appliance enclosure or in the structure for
building in ,clear of obstruction.
*Warning: Do not use mechanical devices or other means to accelerate the defrosting
process, other than those recommended by the manufacturer.
*Warning: Do not damage the refrigerant circuit.
*Warning: Do not use electrical appliances inside the food storage of the appliance.
*If the supply cord is damaged, it must be replaced by the manufacture or its service
agent or a similarly qualified person in order to avoid a hazard.
Specifications
*This appliance is designed for food refrigeration, ice making and frozen food storage.
*It is intended strictly for household use. If using it for industrial or commercial purpose ,
be sure to observe the relevant norms and regulations.
*The refrigerating circuit is leak-proof.
CautionsCautions
CautionsCautions
Cautions
1
2

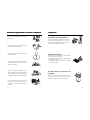
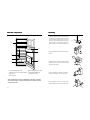
Refrigerator DiagramRefrigerator Diagram
Refrigerator DiagramRefrigerator Diagram
Refrigerator Diagram
3
4
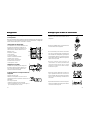
LocationLocation
LocationLocation
Location
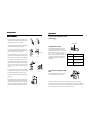
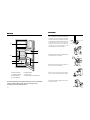
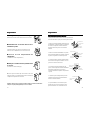
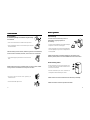
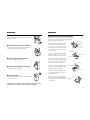
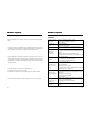
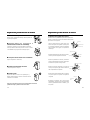
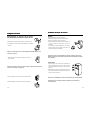
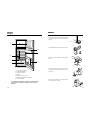
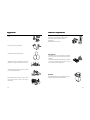
*The refrigerator should be placed on a flat and solid
surface. If the refrigerator is placed on a plinth, flat,
strong and fire-resistant materials must be used.
The front black foot of the refrigerator can be
adjusted clockwise or anti-clockwise to lift or lower
the refrigerator if it is placed on an uneven surface.
*Prevent the refrigeratorfrom heat sources or direct
sunlight.
*The area for built-in refrigerator should be well
ventilated with a space over 6cm around the
refrigerator.
*Never place the refrigerator near to a water source
and immediately clean and dry any water splashes
and stains with soft cloth.
*Never place the refrigerator in an area with an
ambient temperature below zero. Never operate
the refrigerator in an open area.
>6cm
>6cm
>6cm
clockwise
Adjustable Foot
anti-clockwise
Spanner
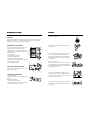
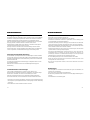
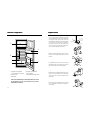
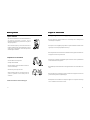
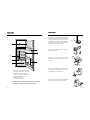
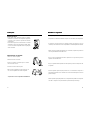
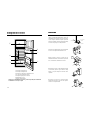
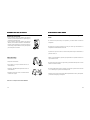
⑥
①
②
③
④
⑤
⑦
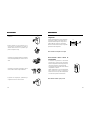
①Freezer food shelf ②Refrigerator food shelf
③Fresh food container cover ④Fresh food container
⑤Egg holder cover ⑥Thermostat and lamp
⑦Bottle holder
This diagram may very slightly with the layout of theThis diagram may very slightly with the layout of the
This diagram may very slightly with the layout of theThis diagram may very slightly with the layout of the
This diagram may very slightly with the layout of the
refrigerator you have just purchased due to technicalrefrigerator you have just purchased due to technical
refrigerator you have just purchased due to technicalrefrigerator you have just purchased due to technical
refrigerator you have just purchased due to technical
improvements.improvements.
improvements.improvements.
improvements.

PreparationPreparation
PreparationPreparation
Preparation
1.1.
1.1.
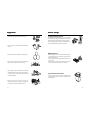
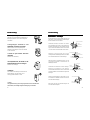
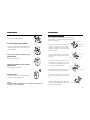
1.Unpacking
Remove all packing materials. The door protective film and the
table protective film should also be removed.
2.2.
2.2.
2.Check attachments and materials
Checking should be conducted with reference to the Packing
List. Contact the local distributor if discrepancies are found.
3.3.
3.3.
3.Ensure proper location of the refrigerator.
(Refer to the section of "Location")
4.4.
4.4.
4.Clean the refrigerator before using.
(Refer to the section of "Cleaning")
5.5.
5.5.
5.Standby status
Connect the power source a minimum of 30 minutes after the
refrigerator has been sited and cleaned.
5
6
Caution:
After unpacking, write down the model and delivery number of the refrigerator on
the Warranty for future inquiries.
PreparationPreparation
PreparationPreparation
Preparation
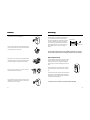
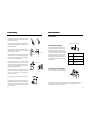
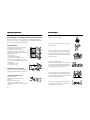
Left/Right Door OpeningLeft/Right Door Opening
Left/Right Door OpeningLeft/Right Door Opening
Left/Right Door Opening
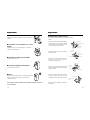
The door of the refrigerator can be opened both from the left or
right as required. The following are the steps required to
position the door to open to the right.
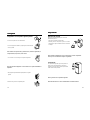
1.Firmly hold the refrigerator door and remove the
screws from the right lower hinge. Remove the door
and place aside. Remove the lower pivot pin and
install it in the left lower hinge hole.
2.Remove the middle hinge and the washer on the
middle connection and then the freezer door. Put the
door aside.
3.Remove the pivot pin from the upper right hinge and
install it on the left, then remove the screws on the
left of the middle connection.
4.Place the freezer door on the left side of the housing.
Remove the middle pivot pin from and then insert it
from the other side of the middle hinge. Fix the middle
hinge on the left side of the housing.
5.Mount the refrigerator door with the top left hole on
the down pivot pin of the middle hinge.
6.After installation, open and close the door several
times and fix tighten the hinge screws when the door
operates normally.
Lower hinge
Lower pivot pin
Lower pivot pin hole
Pivot pin hole
Middle pivot pin
Washer
Middle hinge
Hole stoppers
Middle pivot pin
Washer
Middle hinge
Lower hinge
Lower pivot pin

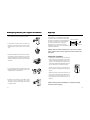
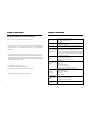
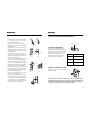
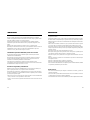
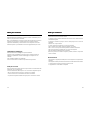
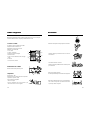
1 Connect the refrigerator to the
power supply.
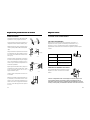
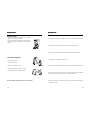
2 Temperature control
The refrigerator shall be placed in an area
with an ambient temperature of over 16℃.
Temperature in refrigerator can be controlled
by the thermostat ①. There are 7 options, 1,
2, 3, 4, 5, 6 and 7, for selection. With the
value increasing, the temperature goes down
accordingly. Information in the diagram can
be taken as the reference for selection of
temperatures.
3 Loading the refrigerator with
food
Load the refrigerator with food two or three
hours after the refrigerator is turned on.
OperationOperation
OperationOperation
Operation
recommended
positions
Ambient temperature≥32℃
Ambient temperature16~30℃
Ambient temperature≤16℃
Prevailing ambient
temperature
Caution: Some time will be required for the refrigerator to reach the set level when
temperature adjustments are made. The length of this period is determined by difference
in the existing and set temperatures, the ambient temperature, the frequency with which
the door is opened and closed and the amount of food in storage.
PreparationPreparation
PreparationPreparation
Preparation
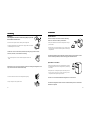
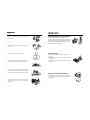
Built-in installationBuilt-in installation
Built-in installationBuilt-in installation
Built-in installation
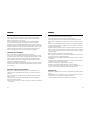
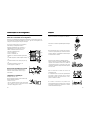
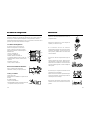
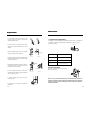
1. Ensure that the doors of the kitchen unit and the
refrigerator are of the same opening direction. (Take
the right-opening door as an example)
2. Fix the joint sockets to the freezer and refrigerator
doors with the provided screws (Figure 1).
3. Move the refrigerator into the kitchen unit,
ensuring the left side panel of the refrigerator as
close as possible to the wall. (Figure 2)
4. Insert the connecting pad into the joint socket
and then fix the connecting pad on the door of the
kitchen unit with a margin of 20-22mm. (Figure 3)
5. Properly place the refrigerator with a 3-4mm
space between the left side to the wall, ensuring
that the doors of the refrigerator and the kitchen
unit can be easily opened and closed, and the
connecting pad is correctly settled in the joint
socket.
6. Fix the upper and lower stiffeners to the upper
connection and base panel. The screw holes shall
be plugged with the plastic stoppers. (Figure 4)
7. Fill the left gap of the kitchen unit with the gasket.
(Figure 5)
8. Remove the screws and the hole stoppers on the
left of the middle connection, and fix the connecting
pivot to the refrigerator with one end in the hole
which was plugged by the stopper and the other
end to the inside wall of the kitchen unit. (Figure 6)
Joint socket
(Figure 1)
20~22mm
C
Connecting pad
(Figure 3)
(Figure 2)
Plastic stopper
door gasket
(Figure 4)
(Figure 5)
(Figure 6)
thermostat T
1 - 3
3 - 5
5 - 7
7 8

*Hot food must be cooled to room temperature before
storing in the refrigerator.
*Dry any water droplets on the food before placing it in
the refrigerator.
*It is recommended that food be sealed in suitable
storage bags before placing it in the refrigerator.
This will prevent moisture in the food from evaporating
and prevent vegetables and fruit from withering or
altering in flavor.
*Storage of Sorted Food
Food to be stored should be sorted according to
consumer requirements. Food consumed daily should
be placed in the most convenient area, this will minimize
opening periods for the door.
*Do not store excess quantities or weights of food
Food should be stored with spaces in between for better
storage results. Never overload shelves, as they may
collapse under excessive loads.
*Do not place food too close to the internal walls. The
stored food placed close to internal walls is easily frozen
onto the walls.
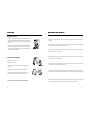
Refrigerator storageRefrigerator storage
Refrigerator storageRefrigerator storage
Refrigerator storage
The refrigerator is for short-term food storage or for daily con-
sumption.
Although the temperature in most areas in the refrigeration compartment can be regu-
lated between 0℃and 10℃, extended periods of food storage is not recommended.
Refrigerator should only be used for short-term storage.
Refrigeration compartment
As cold air circulates inside the refrigerator, tem-
perature differences exist inside the storage
compartments. Area ⑥ is the coldest. Different
foods should be placed in different areas according
to their properties.
1. Eggs and butter
2. Canned food and seasonings
3. Beverages and bottled food
4. Pickled food or canned pickled food
5. Wheaten food, canned food, milk and beancurd
6. Cooked food and sausages
7. Fruit, vegetables and salad
Lamp and its replacement
Lamp: 220-240V, 10W
Lamp holder: E14 (lamps exceeding 10W must not
be used)
When replacing the lamp,
* Unplug to disconnect the power.
* Turn the lamp anti-clockwise to remove and then
clockwise for installation of a new lamp.
CautionsCautions
CautionsCautions
Cautions
9 10
Relocation of the food shelves
Carefully remove and replace the food shelves for
desired height and space.
⑤
③
①
②
⑥
④
⑦

*Storage period will be extended if vegetables are
placed with their roots towards the cold source.
*Leaves of carrots or turnips should be removed before
storage.
*Eggs should be stored vertically in the egg holder.
*Frozen food can be placed in the cold compartment
before serving, as this will conserve energy.
*Onions, garlic, ginger, water chestnuts and other root
vegetables should not be stored in the refrigerator,
as these foods are suitable for long-term storage at
normal temperatures.
*Ripe squash, melon, pawpaw, bananas and
pineapples should not be stored in the refrigerator.
Freezing will accelerate the ripening process.
SuggestionsSuggestions
SuggestionsSuggestions
Suggestions
Long-term storage of food
As the freezer storage temperature is very low, fresh food
can be stored in the freezer compartment for a long time.
Food requiring long-term storage can be stored in the
frozen food compartment. Attention should be paid to the
storage information printed on the food packing.
Freezer storageFreezer storage
Freezer storageFreezer storage
Freezer storage
11
12
Making water-Ice
*Pour water into the water ice mould up to three-quarters
of the mould volume, and then place the mould in the
freezing compartment.
*Do not a use knife or other metal tools to take the ice out
of the mould.
*The ice can be easily removed by hand after the mould
has been placed in warm water for a short time.
Do not load excessive food
Quantity of fresh food to be loaded is subjected to the
capacity of the refrigerator. (refer to the requirements on
the nameplate)

CautionsCautions
CautionsCautions
Cautions
*Hot food should not be stored in the refrigerator until it
has cooled down to room temperature.
*Food cut into small portions will freeze faster and be
easier to defrost and cook. The recommended weight
for each portion is less than 2.5kg.
*The outside of any food packing should dried before
storage in the freezer, and any packing materials should
be odor-free, airtight, non-poisonous and nontoxic.
*Food should be stored in accordance with any
information printed on the packing.
*Only remove the required amount of food from the
refrigerator. Defrosted food cannot be re-stored in the
freezer unless it is first cooked.
Defrosting the refrigerator
The refrigerator is designed for automatic defrost-
ing. Frost formed on the back wall will melt and
flow via the drainpipe to the evaporating container
over the compressor on the back of the refrigera-
tor, where the heat generated by the compressor
will evaporate the water. It is normal for frost and
water droplets to form on the back wall of the
freezer.
Caution: Always keep the drain over the vegetable and fruit tray clear to ensure
the normal flow of defrosted water. Use the pin provided to clear any blockages.
DefrostingDefrosting
DefrostingDefrosting
Defrosting
Water Outlet
Cleaning Rod
13
14
Defrosting the freezer
* Manual defrosting is required for the freezer. After a
period of operation, a layer of frost will form on the
evaporator in the freezer compartment. Additional
electricity will be consumed if this layer becomes too
thick.
* The defrosting process must be carried out when a
thick layer of frost has been formed on the evapora-
tor.
* Disconnect the power. Remove all the food and then
the drawers from the refrigerator before defrosting. A
bowl of hot water can be placed on the evaporator to
accelerate the defrosting process.
Caution: Never use a metal tool or electrical heater for defrosting.

Cleaning
The refrigerator should be cleaned regularly to prevent
the formation of bad odors.
*Disconnect the power before cleaning the refrigerator.
*Clean the refrigerator using soft towel or sponge with warm water
(mild detergent can be used).
Caution: Do not use a hard brush, steel brush, detergent, gasoline or other
solvents, hot water, acid or alkali for cleaning.
Caution:Do not use excessive amounts of water for cleaning the refrigerator. Use
a dry cloth to clean the switch and the lamp.
*Clean the back and sides of the refrigerator regularly.
*Always keep the door gasket clean.
CleaningCleaning
CleaningCleaning
Cleaning
* Dry water drop on the surface of the refrigerator with a soft
cloth.
Power failure
Even in summer, food can be stored in the refrig-
erator for a few hours after a power failure.
*Don't put additional food into the refrigerator during a
power failure.
*If prior notice of a power failure is given, make some
ice and put it in a container in the top of the cold storage
compartment.
Caution:Temperature in the refrigerator will rise during a power failure or in the
event of technical problems, and the storage period will be reduced.
Operation cessation
*If the power failure lasts for an extended period, unplug
the refrigerator and clean the refrigerator as previously
described.
*Keep the door of refrigerator open when the power is
turned off to prevent any food remaining in the
compartment from producing bad odors.
Caution: It is recommended that the refrigerator is not turned off.
Caution:The refrigerator should never be restarted until a period of at least five
minutes has elapsed.
CessationCessation
CessationCessation
Cessation
15 16

17
18
Caution:never place the refrigerator horizontally.
Moving the refrigerator
*Unplug the refrigerator.
*Remove all the food.
*Secure the shelves and the fresh food container with
the tape.
*Tightly close and tape the door of the refrigerator.
*Do not tilt the refrigerator more than 45 degrees, thus
problems may be resulted to the cooling system.
During Vacations
*Remove any food from refrigerator is the vacation is short.
Turn the temperature selection knob to the proper position,
and make sure that the door of the refrigerator is properly
closed.
*If the vacation is long, take out the food from the refrigerator
and disconnect the power. Wait until the frost inside melts,
clean and dry the compartment. Leave the door open to
prevent formation of bad odor.
CessationCessation
CessationCessation
Cessation
Following circumstances are not problems:
*A slight sound might be produced by the evaporator and the pipes due to temperature
changes.
*The compressor will operate for comparatively longer periods if excessive quantity of
food is stored or the ambient temperature is high.
*A slight sound might be produced by the thermostat, start capacitor or heat protector
when the appliance is first started.
*Wipe with soft cloth the water drops, which might appear on the external surface and the
middle connection of the appliance.
*The two sides of the external surface and the middle connection of the appliance will be
warm due to heat radiation of the appliance.
*A slight sound may be heard when the appliance is first started due to the operation of the
compressor and motor. The sound will be lower and lower gradually a short period later.
*The temperature of the refrigerator and the compressor will rise and the compressor will
run for comparatively longer periods when the refrigerator is first started.
Questions and AnswersQuestions and Answers
Questions and AnswersQuestions and Answers
Questions and Answers

19
20
Please determine the cause of the problem before making
any repairs.
Questions and AnswersQuestions and Answers
Questions and AnswersQuestions and Answers
Questions and Answers
Operation failure of
the refrigerator
Failure of lamp
Excessive noise.
Failure of set
temperature
Strange odor
Long operation period
of the compressor
Thick frost formation
on back wall
Water drops form on
middle front and door
decal
Accumulated of spilt
water in the refri-
gerator compartment
*Disconnection of power supply (plug, socket and fuse);
*Thermostat is set to the position of "0";
*Voltage is low.
*The bulb is bad;
*Power supply is connected.
*Contact between the refrigerator and a wall or other article;
*Uneven placement.
*The thermostat is not properly set.
*The door is not properly closed; or the door is opened for long
period.
*The refrigerator is in direct sunlight, or close to a heat source;
*The area is poorly ventilated, or the two sides of the refrigerator
are blocked or badly contaminated.
*Failure to seal food properly;
*Rotting food inside refrigerator;
*Failure of regular cleaning of the refrigerator.
*Initial operation
*Large quantity of food loaded
*Hot weather
*Frequent opening of the refrigerator door
*Not properly closed door
*Improper setting of the thermostat (see the section of
"Operation")
*Thermostat not properly set (see section "Operation")
*Door is not closed.
*Frequent opening of the refrigerator door
*Hot weather
*Excessive moisture
*High ambient temperature or heavy moisture. Wipe clean with
a soft cloth.
*Thermostat is set too high.
*Water outlet is blocked. Clean the outlet with the cleaning rod.
Following circumstances are not problems:
*A slight continuous sound will be heard when the liquid refrigerant circulates.
*Electricity consumption specified in the technical parameters is the standard issued by
state authorities. This is determined under the following operating conditions for the
refrigerator: ambient temperature: 25 degrees Centigrade; temperature in the cold storage
compartment: 5 degrees Centigrade; Door: closed; continuous operation: 24 hours.
*When the ambient temperature and humidity are high (exceeding 32 degrees Centigrade
and 75%, respectively), a thick layer of ice will form on the back wall of the cold storage
compartment. In such circumstances, it is recommended that automatic mode is selected,
food with a high moisture content is sealed before storage, any food in the compartment
is loosely packed and the door is not opened unnecessarily.
*Excessive vibration will be resulted in the following circumstances:
a) The refrigerator is not well positioned and adjusted.
b) The refrigerator is placed on a wood floor or near to wooden furniture.
*Liquid refrigerant in the refrigerator will make a sound similar to that of flowing water.
Questions and AnswersQuestions and Answers
Questions and AnswersQuestions and Answers
Questions and Answers

SicherheitshinweiseSicherheitshinweise
SicherheitshinweiseSicherheitshinweise
Sicherheitshinweise
*Beschädigtes Gerät nicht in Betrieb nehmen, im Zweifel beim Lieferanten rückfragen.
*Der Stecker soll nach dem Einbau erreichbar sein.
*Wechseln der beschä digten Anschußkabel nur durch Fachleuten.
*Die elektrische Sicherheit des Gerätes ist nur gewährleistet, wenn das Erdungssystem
der Hausinstallation vorschriftsmäßig installiert ist.
*Im Fehlerfall, bei Wartung und bei der Reinigung Gerät vom Netz trennen. Netzstecker
ziehen oder Sicherung ausschalten. Am Netzstecker ziehen, nicht am Anschlußkabel.
*Reparaturen an Elektrogeräten durchgeführt werden. Durch unsachgemäße Reparaturen
können erhebliche Gefahren für den Benutzer entstehen.
*Hochprozentigen Alkohol nur dicht verschlossen und stehend lagern, außerdem keine
explosiven Stoffe im Gerät lagern-Explosionsgefahr.
*Die Teile des Kältemittelkreislaufes nicht beschädigen,z.B. durch Aufstechen der
Kältemittelkanäle des Verdampfers mit scharfem Gegenständen, Abknicken von
Rohrleitungen, Abkratzen von Oberflächenbeschichtungen usw. Herausspritzendes
Kältemittel kann sich entzünden oder zu Augenverletzungen führen.
*Be- und Entlüftungsöffnungen für das Gerät nicht abdecken oder zustellen.
*Kinder nicht mit dem Gerät spielen lassen. Auf keinen Fall sollten sich kinder z.B.auf
Auszügesetzen oder an die Tür hängen.
*Bei Gerät mit nachgerüstetem Schloß, Schlüssel außer Reichweite von Kindern
aufbewahren.
Bestimmungen
*Das Getät eignet sich zum Kühlen von Lebensmitteln,zum Lagern von Tiefkühlkost, zum
Einfrieren und zur Eisbereitung.
*Das Gerät ist für die Verwendung im Haushalt bestimmt.
*Bei Einsatz im gewerblichen Berich sind die für das Gewerbe gültigen Bestimmungen zu
beachten.
*Der Kältekreislauf ist auf Dichtheit geprüft.
SicherheitshinweiseSicherheitshinweise
SicherheitshinweiseSicherheitshinweise
Sicherheitshinweise
Entsorgung des Altgerätes
Ausgediente Geräte sofort unbrauchbar machen. Netzstecker ziehen und Anschlußkabel
durchtrennen. Schnapp-oder Riegelschlösser entfernen oder zerstören-Sie verhindern
damit,daß spielende Kinder sich selbst einsperren und in Lebensgefahr kommen.
Kühl- und Gefriergeräte enthalten Isolationsgase und Kältemittel, die eine fachgemäßen
Entsorgung erfordern. Außerdem enthalten sie wertvolle stoffe, die einer
Wiederverwertung zugeführt werden sollen. Nehmen sie deshalb zum Entsorgen Ihre
zuständige Kommunale Entsorgungsstelle in Anspruch.
Bei Fragen wenden Sie sich bitte an Ihre Gemeindeverwaltung oder Ihren Händler.
Achten Sie bitte darauf , daß die Rohrleitungen Ihres Kältegerätes bis zum Abtransport
zu einer sachgemäßen, unweltfreundlichen Entsorgung nicht beschädigt werden.
Entsorgung der Neugeräte-Verpackung
Alle verwendeten Verpackungsmaterialien sind umweltverträglich und wiederverwertbar.
Sie können die Verpackung in kleine Teile zerreißen und ins Wertstoffzentrum schicken.
Alle wertbaren Materialien können ins Wertstoffzentrum geschickt und durch Behandeln
wiederverwendet werden.
Anschriften von Wertstoffzentrum für die Entsorgung von Altgeräten erfahren Sie über
Ihre Gemeindeverwaltung.
Bitte helfen Sie auf diese Weise mit für eine umweltverträgliche Entsorgung bzw.
Wiederwertung.
Sicherheitshinweise und Warnungen
Lesen Sie bitte vor Inbetriebnahme des Gerätes die in der Gebrauchs-und
Montageanweisung aufgeführten Informationen sorgfältig durch. Sie enthalten wichtige
Hinweise für die Installation, den Gebrauch und die Wartung des Gerätes.
Gebrauchs-und Montageanweisung ggf. für Nachbesitzer sorgfältig aufbewahren.
Der Hersteller haftet nicht, wenn die nachstehenden Hinweise nicht beachtet werden.
*Verwenden Sie zum Reinigen oder Abtauen auf Keinen Fall ein Dampfreinigungsgerät.
Der Dampf kann an spannungsführende Teile des Gerätes gelangen und einen Stromschlag
verursachen.
*Keine elektrischen Geräte innerhalb des Gerätes verwenden.
21
22

Die Firma arbeitet ständig an der Weiterentwicklung aller Typen und Modelle. Bitte
haben Sie deshalb Verständnis dafür, daß wir uns Änderungen in Form ,
Ausstattung und Technik vorbehalten müssen.
BauteileBauteile
BauteileBauteile
Bauteile
23
24
AufstellenAufstellen
AufstellenAufstellen
Aufstellen
* Der Boden am Standort soll waagrecht und eben
sein. Unebenheiten durch ebene, feste Unterlagen
ausgleichen. Die Schaumstoffe zur Verpackung
nicht dazu verwenden. Die Stellfüße des Gerätes
mit beigefügtem Schraubenschlüssel oder 22mm
Schraubenschlüssel bis zur Waargerechten
einstellen. Beim Drehen der Stellfüße im
Uhrzeigersinn das Gerät erhöhen und im
Gegenuhrzeigersinn die Höhe verringern.
*Standorte im Bereich direkter Sonnenbestrahlung
und Heizquelle sind zu vermeiden.
*Beim Einbau in die Küchenzeile einen Raum von
mind. 6 cm um das Gerät behalten.
*Gerät nicht auf feuchten Standort aufstellen.
Wasser und Schmutz mit weichem Tuch reinigen.
*Gerät nicht in eiskalter Umgebung oder im Freien
und Regen einsetzen.
⑥
①
②
③
④
⑤
⑦
①Absteller/Gefrierteil ②Absteller/Kühlteil
③Gemüseschaledeckel ④Gemüseschale
⑤Eierablageblende ⑥Temperaturregler und Beleuchtung
⑦Flaschenhalterung
>6cm
>6cm
>6cm
Uhrzeigersinn
einstellbare
Stellfüße
Gegenuhrzeigersinn
Schraubenschlüssel

VorbereitungVorbereitung
VorbereitungVorbereitung
Vorbereitung
1.Alle Verpackungen entfernen
Untersatz aus Schaumstoffen bzw. Klebbänder zur
Befestigung entfernen, um das Gerät waagerecht
aufzustellen.
2.Beigefügte Zubehöre und
Materialien sortieren und prüfen
Artikel im Karton nach der Verpackungsliste
überprüfen. Bei Diskrepanz wenden Sie sich bitte
an den Lieferanten.
3.Gerät an passenden Standort
aufstellen
(Näheres unter "Aufstellen")
4.Es empfiehlt sich, das Gerät vor der
Inbetriebnahme innen zu reinigen.
(Näheres unter "Reinigen")
5.Stillegen
Das Gerät nach dem Reinigen für mindestens 30
Minuten stillegen, dann einschalten, um es
ordnungsgemäß in Betrieb zu setzen.
25
26
Achtung!
Die Typenbezeichnung und die Ausgangsnummer auf den Garantieschein
hinschreiben, um zukünftige mögliche Erkundigung zu erleichtern.
VorbereitungVorbereitung
VorbereitungVorbereitung
Vorbereitung
Wechsel des TWechsel des T
Wechsel des TWechsel des T
Wechsel des Tü
ranschlagsranschlags
ranschlagsranschlags
ranschlags
Die Gerätetür lässt sich je nach Bedarf von links und
rechts öffnen. Unten beschriebene Schritte befolgen
und die Gerätetür von rechts öffnen.
1.Gerätetür festhalten, Schrauben vom unteren
Scharnierwinkel unten rechts an der Gerätetür des
Kühlteils abschrauben und die Gerätetür beiseite
legen; unteren Scharnierbolzen heraus- und ins linke
Loch des unteren Scharnierwinkels einschrauben.
2.Mittleren Scharnierwinkel und dessen
Unterlegscheibe am Mittelträger abbauen, Gerätetür
des Gefrierteils abnehmen und beiseite legen.
3.Oberen rechten Scharnierbolzen heraus- und auf
Gegenseite einschrauben. Schrauben links am
Mittelträger entfernen.
4.Gerätetür des Gefrierteils von links anbringen.
Mittleren Scharnierbolzen vom mittleren
Scharnierwinkel herausziehen und von anderer Seite
einstecken. Mittleren Scharnierwinkel auf Gegenseite
befestigen.
5.Unteren Scharnierbolzen ins obere linke Loch an
der Gerätetür des Kühlteils einstecken und unteren
Scharnierwinkel befestigen.
6.Auf festen Sitz aller Schraubverbindungen und
Scharnierwinkel überprüfen.
Unterer Scharnierwinkel
Unterer
Scharnierbolzen
Scharnierbolzenloch
Scharnierbolzenlöcher
Mittlerer
Scharnierbolzen
Unterlegscheibe
Mittlerer
Scharnierwinkel
Lochstöpsel
Mittlerer
Scharnierbolzen
Unterlegscheibe
Mittlerer
Scharnierwinkel
Unterer Scharnierwinkel
Unterer
Scharnierbolzen

1.Einschalten
InbetriebnahmeInbetriebnahme
InbetriebnahmeInbetriebnahme
Inbetriebnahme
2.Temperatureinstellung
Bei einer Umgebungstemperatur über 16°C
wird die Temperatur durch Temperaturein-
stellknopf ① eingestellt. Auf Stellung "0" ist
der Kühlschrank ausgeschalten. Die Zahlen
"1,2,3,4,5,6,7" bezeichnen keine konkreten
Temperaturen. Je kleiner die Zahl ist, desto
höher die Temperatur; je größer die Zahl,
desto niedriger die Temperatur. Wählen Sie
eine Regler-Stellung nach Ihren Temperatur-
vorstellungen.
3.Lagerung der Lebensmittel
Den Kühlschrank für 2-3 Stunden leerlaufen
lassen. Lebensmittel erst dann hineinstellen,
Achtung: Beachten Sie, daß sich bei Veränderungen des Temperaturreglers der neue
Wert nur langsam einstellt, er ist abhängig von der Umgebungstemperatur, der
Häufigkeit des Türöffnens und der lagerung.
VorbereitungVorbereitung
VorbereitungVorbereitung
Vorbereitung
Einbau in die KEinbau in die K
Einbau in die KEinbau in die K
Einbau in die Kü
chenzeilechenzeile
chenzeilechenzeile
chenzeile
1. Die Öffnungsrichtung der Gerätetür muß mit der
der Kabinettür übereinstimmen. (Beispiel: Gerätetür
mit linkem Türanschlag.).
2. Kupplungssitz nach Abbildung (1) mit beigefügten
Schrauben an die Gerätetüren des Kühlteils bzw. des
Gefrierteils befestigen.
3. Gerät vollständig in die Kabine schieben. Die linke
Wand des Gerätes möglichst die linke Innenwand
der Kabine nähen. (Abb. 2)
4. Kupplungsplatte in den Kupplungssitz einrasten und
mit Schrauben an die Kabinetür befestigen. Eine
Distanz von ca. 20-22 mm von der Kupplungsplatte
bis zur Kante der Kabinetür halten.
5. Gerät mit einer Distanz von 3-4 mm bis zur linken
Wand aufstellen. Die Türen des Gerätes und der
Kabine sollen sich einwandfrei öffnen und schließen
lassen. Die Kupplungsplatte soll richtig an den
Kupplungssitz angebracht werden.
6. Befestigungsprofile mit Schrauben jeweils an die
obere und untere Kante der Kabine befestigen.
Löcher mit beigefügten Plastikstöpseln
verschliessen. (Abb. 4)
7. Dichtungen links an die Kabine anbringen. (Abb.
5)
8. Befestigungsschrauben und Stöpseln links am
Mittelträger abnehmen. Ein Ende des Verbindungs-
bolzens ans Gerät (ehemalige Position für Stöpseln)
und das andere an die Innenwand der Kabine
befestigen.(Abb. 6)
Kupplungssitz
(Abb. 1)
20~22mm
C
Kupplungsplatte
(Abb. 3)
(Abb. 2)
Kunststoffstöpsel
Dichtung
(Abb. 4)
(Abb. 5)
(Abb. 6)
Stellung
Umgebungstemperatur≥32℃
Umgebungstemperatur16~30℃
Umgebungstemperatur≤16℃
Verwendung
Temperatureinstellknopf
1 - 3
3 - 5
5 - 7
27
28

*Heiße Speisen und Getränke vor dem Einlegen in den
Kühlraum auf Zimmertemperatur abkühlen.
*Vor dem Lagern Lebensmittel waschen und Wasser
abwischen.
*Vor dem Einlegen Lebensmittel mit Verpackung
verschließen, um Wasserverdampf und
Geruchsübertragung zu vermeiden.
*Die Waren portionsgerecht für Ihren Haushalt sortieren
und abpacken. Das am Kürzesten zu verwendende
Lebensmittel in vorderen Teil der Abstellroste einlegen,
um unnötiges langes Öffnen der Gerätetür zu
vermeiden.
*Den Kühlschrank nicht mit Lebensmitteln überfüllen.
Einen Abstand unter den Lebensmitteln und zwischen
den Lebensmitteln und der Innenwand des Gerätes
beim Lagern beachten.
*Lebensmittel nicht zu eng an der Innenwand lagern, um
Einfrieren an der Rückwand zu vermeiden.
KühlenKühlen
KühlenKühlen
Kühlen
29
30
KühlteilKühlteil
KühlteilKühlteil
Kühlteil
Für kurzfristiges Lagern der Lebensmittel das Kühlteil
verwenden
Die durchschnittliche Temperatur von 0°C-10°C im Kühlteil ist für langfristiges Lagern
der Lebensmittel nicht kalt genug und kann nur für kurzfristiges Lagern der Lebensmittel
verwendet werden.
Einordnungsbeispiel:
Lebensmittel sollten nach den unterschiedlichen
Temperaturbereichen im Kühlraum eingeordnet
werden. Die Temperatur im Bereich ⑥ ist am
niedrigsten.
1. Eier, Butter
2. Konserven und Gewürze
3. Getränke, Flaschenlebensmittel
4. Eingesalzte Produkte und Konserven
5. Mehlwaren, Konserven, Milch und Toufu
6. Fertiges Fleisch, Wurst
7. Obst, Gemüse, Salate
Innenbeleuchtung und Auswechseln
der Glühlampe
Glühlampendaten: 220-240V~/10W
Fassung: E 14 (auf keinen Fall eine Lampe mit
mehr als 10 W einsetzen)
Auswechseln der Glühlampe:
* Netzstecker ziehen bzw. Sicherung ausschalten
oder herausschrauben;
* Kaputte Glühlampe in gegenuhr zeigersinn drehen
und neue Glühlampe auswechseln.
Abstellfach einstellen
Das Abstellfach können je nach Kühlguthöhe frei
versetzt werden. Zum Herausnehmen oder
Einsetzen das Fach mit beiden Händern fest halten.
⑤
③
①
②
⑥
④
⑦

31
32
*Gemüse in Wachstumsrichtung aufbewahren, um die
Lagerdauer zu verlängern.
*Beim Lagern von Rettich die Blätter wegschneiden, um
dadurch die Absorbtion von Nährstoffen zu vermeiden.
*Eier in der Eierablage stehen lassen, um Lagerdauer zu
verlängern.
*Gefriergut im Kühlschrank abtauen - Energie einsparen.
*Nicht unbedingt zu kühlende Artikel: Zwiebel, Paprika,
Knoblauch, Ingwer, Wassernuß.
*Nicht zum Kühlen geeignete Artikel: Flaschenkürbis,
Melone, Banane, Ananas. Beim Kühlen wird der
Stoffwechseln gefördert. Unreifes Obst im Kühlschrank
lagern.
Hinweise zum KühlenHinweise zum Kühlen
Hinweise zum KühlenHinweise zum Kühlen
Hinweise zum Kühlen
Für langfristiges Lagern der Lebensmittel
das Gefrierteil verwenden
Eine niedrige Temperatur im Gefrierteil ist für langfristiges
Lagern der Lebensmittel erforderlich. Die angegebene
Lagerdauer auf der Verpackung nicht überschreiten.
Eiswürfelbereitung
* Zur Eiswürfelbereitung mitgelieferte Schale zu Dreiviertel
mit Wasser füllen und ins Gefrierteil stellen.
*Beim Herausziehen Messer oder andere
Metallwerkzeuge nicht verwenden.
* Die Eiswürfel lassen sich leicht aus der Schale lösen,
wenn sie kurze Zeit in lauwarmes Wasser gehalten wird.
Gefrierleistung nicht überschreiten
Keine größeren Mengen frischer Lebensmittel auf einmal
hineinlegen als die unter Gefrierleistung angegebene
Menge. (Näheres unter "Typenschild")
GefrierteilGefrierteil
GefrierteilGefrierteil
Gefrierteil

EinfrierenEinfrieren
EinfrierenEinfrieren
Einfrieren
*Heiße Speisen und Getränke vor dem Hineinlegen in
den Gefrierraum auf Zimmertemperatur abkühlen
lassen.
*Die Waren portionsgerecht für Ihren Haushalt abpacken
- jede Portion bis zu 2,5kg. Die Portionen frieren
schneller durch und die Qualität bleibt beim Abtauen
und Zubereiten so am besten erhalten.
*Vor dem Einfrieren die Waren verpacken. Die
Packungen sollen trocken sein, um ein Zusammen-
frieren zu vermeiden. Für das Verpacken nur gefrierge-
eignetes Verpackungsmaterial verwenden; es muß
widerstandsfähig, geschmacksneutral, luft- und
flüssigkeitsundurchlässig sein, um Geschmacksüber-
tragungen und Qualitätsminderung zu vermeiden.
*Die Verpackungen immer mit Datum und Inhalt
beschriften und die angegebene Lagerdauer des
Gefriergutes nicht überschreiten, so werden
Qualitätseinbußen vermieden.
*Zum Abtauen grundsätzlich nur so viel dem Gefrierraum
entnehmen, wie unmittelbar benötigt wird. Einmal
aufgetaute Lebensmittel dürfen auf keinen Fall wieder
eingefroren werden, außer sie werden zu einem
Fertiggericht weiter verarbeitet.
Abtauen des Kühlteils
Das Kühlteil taut automatisch ab. Das Tauwasser
wird in den Verdunstungsbehälter unten an der
Kühlraumrückwand gesammelt und durch die
Wärme vom Betrieb des Kompressors verdunstet.
Reifschicht und Wassertropfen an der Rückwand
sind normal beim automatischen Abtauen.
Achtung: Das Tauwasser muß durch die Abflußöffnung oberhalb der Gemüse-
schalen unbehindert abfließen können. Gegenenfalls die Abflußöffnung mit einem
spitzen Gegenstand durchstoßen.
Abtauen
Abflußöffnung
Abtauen des Gefrierteils
* Die Reifschicht im Gefrierraum muß mit Kunststoffschaber
manuell entfernt werden. Nach längerer Betriebszeit kann
sich an den Kälteerzeugern eine Reif- bzw. Eisschicht
bilden. Eine zu dick gewordene Reif- bzw. Eisschicht
erhöht den Energieverbrauch.
* Der Gefrierraum muß abgetaut und gereinigt werden,
wenn sich Reifschicht auf dem Verdampfer bildet.
* Zum Abtauen den Netzstecker herausziehen und
Gefriergut aus Gefrierraum nehmen, in Decken
einschlagen und an einem kühlem Ort aufbewahren.
Schubfach entnehmen. Nach dem Abtauen das Gefriergut
wieder zurückbringen. Zum Beschleunigen des
Abtauvorgangs einen Topf mit warmem Wasser auf den
Verdampfer stellen.
Achtung: Zum Abtauen keine Metallwerkzeuge und auf keinen Fall elektrische
Heizgeräte verwenden.
spitzer
Gegenstand
33
34
La page charge ...
La page charge ...
La page charge ...
La page charge ...
La page charge ...
La page charge ...
La page charge ...
La page charge ...
La page charge ...
La page charge ...
La page charge ...
La page charge ...
La page charge ...
La page charge ...
La page charge ...
La page charge ...
La page charge ...
La page charge ...
La page charge ...
La page charge ...
La page charge ...
La page charge ...
La page charge ...
La page charge ...
La page charge ...
La page charge ...
La page charge ...
La page charge ...
La page charge ...
La page charge ...
La page charge ...
La page charge ...
La page charge ...
La page charge ...
La page charge ...
La page charge ...
La page charge ...
La page charge ...
La page charge ...
La page charge ...
La page charge ...
La page charge ...
La page charge ...
La page charge ...
La page charge ...
La page charge ...
La page charge ...
La page charge ...
La page charge ...
La page charge ...
La page charge ...
La page charge ...
La page charge ...
-
 1
1
-
 2
2
-
 3
3
-
 4
4
-
 5
5
-
 6
6
-
 7
7
-
 8
8
-
 9
9
-
 10
10
-
 11
11
-
 12
12
-
 13
13
-
 14
14
-
 15
15
-
 16
16
-
 17
17
-
 18
18
-
 19
19
-
 20
20
-
 21
21
-
 22
22
-
 23
23
-
 24
24
-
 25
25
-
 26
26
-
 27
27
-
 28
28
-
 29
29
-
 30
30
-
 31
31
-
 32
32
-
 33
33
-
 34
34
-
 35
35
-
 36
36
-
 37
37
-
 38
38
-
 39
39
-
 40
40
-
 41
41
-
 42
42
-
 43
43
-
 44
44
-
 45
45
-
 46
46
-
 47
47
-
 48
48
-
 49
49
-
 50
50
-
 51
51
-
 52
52
-
 53
53
-
 54
54
-
 55
55
-
 56
56
-
 57
57
-
 58
58
-
 59
59
-
 60
60
-
 61
61
-
 62
62
-
 63
63
-
 64
64
-
 65
65
-
 66
66
-
 67
67
-
 68
68
-
 69
69
-
 70
70
-
 71
71
-
 72
72
-
 73
73


Haier HRF-225 Manuel utilisateur
- Catégorie
- Réfrigérateurs combinés
- Taper
- Manuel utilisateur
- Ce manuel convient également à
dans d''autres langues
- italiano: Haier HRF-225 Manuale utente
- español: Haier HRF-225 Manual de usuario
- Deutsch: Haier HRF-225 Benutzerhandbuch
- Nederlands: Haier HRF-225 Handleiding
- português: Haier HRF-225 Manual do usuário

