HP C3125 Le manuel du propriétaire
- Catégorie
- Imprimer
- Taper
- Le manuel du propriétaire

HP Photosmart C3100 series
Tout-en-un HP Photosmart série C3100
3
2
1
*Q8150-90168*
Q8150-90168
*Q8150-90168*
** On CD.
**
** En CD.
** Sur CD-ROM.
*
* Purchased separately.
* Se adquieren por separado.
* Acheté séparément.
EN
EN
EN
EN
FR
FR
FR
FR
ES
ES
ES
ES
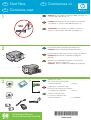
AVERTISSEMENT : Pour garantir une installation correcte du
logiciel, ne connectez pas le câble USB avant l’étape 12.
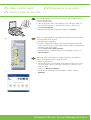
Abaissez le bac d’alimentation du papier et ouvrez la porte
d’accès aux cartouches d’impression.
IMPORTANT : Retirez tout matériel d’emballage du périphérique.
Vérifiez le contenu du coffret.
Le contenu du coffret peut varier.
Commencez ici
Comience aquí
ATENCIÓN: Para asegurarse de que el software se ha instalado
correctamente, no conecte el cable USB hasta el paso 12.
Baje la bandeja de papel y la puerta de los cartuchos de impresión.
IMPORTANTE: Extraiga todo el material de embalaje del
dispositivo.
Compruebe el contenido de la caja.
El contenido de la caja puede ser distinto.
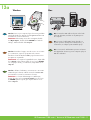
Start Here
Lower both the paper tray and the print cartridge door.
IMPORTANT: Remove all packing material from the device.
Verify the box contents.
The contents of your box may differ.
WARNING: To ensure that the software is installed correctly, do not
connect the USB cable until step 12.
USB
a.
b.
Windows
Macintosh
Basics Guide
HP Photosmart C3100 All-in-One series

2 • HP Photosmart C3100 series / Tout-en-un HP Photosmart série C3100
7
4
6
5
EN
EN
EN
EN
ES
ES
ES
FR
FR
FR
ES
FR
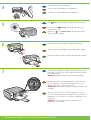
Appuyez sur (bouton Marche/Arrêt ). Attendez 30 secondes
que le périphérique démarre.
Ouvrez la porte d’accès aux cartouches d’impression. Assurez-
vous que le chariot d’impression se déplace bien vers la droite du
périphérique. Si ce n’est pas le cas, éteignez le périphérique, puis
rallumez-le.
IMPORTANT : Pour insérer les cartouches d’impression, le
périphérique doit être allumé.
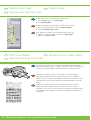
Connectez le cordon d’alimentation et l’adaptateur.
Déployez la rallonge du bac et chargez du papier blanc ordinaire.
Presione el botón
( Encender ). Espere 30 segundos a que se
encienda el dispositivo.
Abra la puerta de los cartuchos de impresión. Asegúrese de que
el carro de impresión se mueve hacia la derecha. Si no es así,
apague el dispositivo y vuélvalo a encender.
IMPORTANTE: Para insertar los cartuchos, el dispositivo debe estar
encendido.
Conecte el cable de alimentación y el adaptador.
Saque el extensor de la bandeja y cargue papel blanco normal.
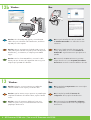
Press
( On button). Wait 30 seconds for the device to start up.
Open the print cartridge door. Make sure the print carriage moves
to the right. If it does not move to the right, turn the device off, then
turn it back on again.
IMPORTANT: The device must be turned on to insert cartridges.
Connect the power cord and adapter.
Pull out the tray extender, and then load plain white paper.
625mA
a.
b.

HP Photosmart C3100 series / Tout-en-un HP Photosmart série C3100 • 3
9
8
EN
EN
ES
FR
ES
FR
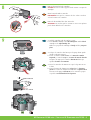
Retirez le ruban adhésif des deux cartouches.
ATTENTION : Ne touchez pas les contacts en cuivre et ne replacez
pas le ruban adhésif sur les cartouches.
a. Tenez les cartouches de manière à ce que le logo HP soit vers
le haut.
b. Insérez la cartouche d’impression couleur dans le logement
gauche et la cartouche d’impression noire dans le logement droit .
Assurez-vous d’appuyer fermement sur les cartouches jusqu’à
ce qu’elles s’enclenchent dans leur logement .
Quite la cinta de ambos cartuchos.
PRECAUCIÓN: No toque los contactos de color cobre ni vuelva a
colocar la cinta en los cartuchos.
a. Coloque los cartuchos de forma que el logotipo de HP quede
situado en la parte superior.
b. Inserte el cartucho de tres colores en la ranura de cartucho
izquierda y el cartucho negro en la ranura de cartucho derecha .
Asegúrese de empujar los cartuchos firmemente hasta que
queden colocados correctamente .
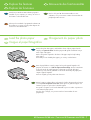
Remove the tape from both cartridges.
CAUTION: Do not touch the copper-colored contacts or re-tape the
cartridges.
a. Hold the cartridges with the HP logo on top.
b. Insert tri-color cartridge in the left cartridge slot and the black
cartridge in the right cartridge slot .
Make sure you push the cartridges in firmly until they snap into
place .

4 • HP Photosmart C3100 series / Tout-en-un HP Photosmart série C3100
10
11
Mac: Windows:
EN
EN EN
FR
FR FR
ES
ES ES
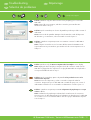
Fermez la porte d’accès aux cartouches d’impression.
IMPORTANT : Assurez-vous d’avoir chargé du papier dans le bac
et attentez quelques minutes, le temps que la page d’alignement
des cartouches s’imprime. L’alignement est terminé lorsque la page
est imprimée.
Munissez-vous du CD-ROM vert pour Windows. Munissez-vous du CD pour Mac.
Cierre la puerta de los cartuchos de impresión.
IMPORTANTE: Compruebe si ha cargado papel en la bandeja y
espere unos minutos mientras se imprime la página de alineación
del cartucho. La alineación habrá finalizado una vez imprimida la
página.
Seleccione el CD de Windows verde . Seleccione el CD de Mac.
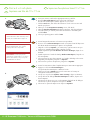
Close the print cartridge door.
IMPORTANT: Make sure you have loaded paper in the tray, then
wait a few minutes while the cartridge alignment page is printed.
Alignment is complete after the page is printed.
Select the green Windows CD. Select the Mac CD.

HP Photosmart C3100 series / Tout-en-un HP Photosmart série C3100 • 5
12a
Mac: Windows:
EN EN
ES
ES
FR
FR
Windows : Allumez l’ordinateur, connectez-vous si nécessaire
et attendez que le bureau s’affiche. Insérez le CD-ROM vert
pour Windows et suivez les instructions à l’écran.
IMPORTANT : Si l’écran de démarrage ne s’affiche pas,
cliquez deux fois sur l’icône Poste de travail , puis sur l’icône
du CD-ROM ayant le logo HP, puis cliquez deux fois sur le
fichier setup.exe .
Mac : Connectez le câble USB au port situé à l’arrière
de l’appareil HP Tout-en-un, puis à n’importe quel port
USB de l’ordinateur.
Windows: Encienda el equipo, inicie la sesión si es necesario
y, a continuación, espere a que aparezca el escritorio.
Introduzca el CD de Windows verde y siga las instrucciones
que aparecen en pantalla.
IMPORTANTE: Si no aparece la pantalla de inicio, haga doble
clic en Mi PC , vuelva a hacer doble clic en el icono CD-ROM
con el logotipo de HP y, a continuación, haga doble clic en
setup.exe .
Mac: Conecte el cable USB al puerto ubicado en
la parte posterior del dispositivo HP All-in-One y, a
continuación, a cualquier puerto USB del equipo.
Mac: Connect the USB cable to the port on the back
of the HP All-in-One, and then to any USB port on
the computer.
Windows: Turn on your computer, login if necessary, and then
wait for the desktop to appear. Insert the green Windows CD
and follow the onscreen instructions.
IMPORTANT: If the startup screen does not appear, double-
click My Computer , double-click the CD-ROM icon with the
HP logo, and then double-click setup.exe .
625mA

6 • HP Photosmart C3100 series / Tout-en-un HP Photosmart série C3100
12b
Mac: Windows:
13
Mac: Windows:
EN EN
EN EN
ES ES
ES ES
FR FR
FR FR
Windows : Une fois l’invite USB affichée, connectez le câble
USB au port situé à l’arrière de l’appareil HP Tout-en-un, puis à
n’importe quel port USB de l’ordinateur.
Mac : Insérez le CD-ROM HP Tout-en-un pour Mac.
Cliquez deux fois sur l’icône Programme d’installation
HP Tout-en-un . Suivez les instructions affichées à l’écran.
Windows : Suivez les instructions affichées à l’écran pour
installer le logiciel. Vous pouvez maintenant découvrir votre
périphérique HP Tout-en-un.
Mac : Renseignez l’écran Assistant de configuration .
Vous pouvez maintenant découvrir votre périphérique
HP Tout-en-un.
Windows: Una vez que aparezca el indicador USB, conecte el
cable USB al puerto ubicado en la parte posterior del dispositivo
HP All-in-One y, a continuación, a cualquier puerto USB del
equipo.
Mac: Inserte el CD de Mac del dispositivo HP All-
in-One. Haga doble clic en el icono Instalador de
HP All-in-One . Siga las instrucciones que aparecen en
pantalla.
Windows: Siga las instrucciones que aparecen en pantalla para
completar la instalación del software. Ahora, explore el HP All-
in-One.
Mac: Complete la pantalla del Asistente de
configuración . Ahora, explore el HP All-in-One.
Mac: Insert the HP All-in-One Mac CD. Double-click
the HP All-in-One Installer icon. Follow the onscreen
instructions.
Windows: Once the USB prompt appears, connect the USB
cable to the port on the back of the HP All-in-One, and then to
any USB port on the computer.
Mac: Complete the Setup Assistant screen. Now explore
your HP All-in-One.
Windows: Follow the onscreen instructions to complete the
software installation. Now explore your HP All-in-One.
62
5m
A

HP Photosmart C3100 series / Tout-en-un HP Photosmart série C3100 • 7
EN
EN
EN
EN
ES
ES
ES
ES
FR
FR
FR
FR
Chargement du papier photo
Découverte des fonctionnalités
Une fois le logiciel HP Photosmart installé sur votre
ordinateur, vous pouvez tester certaines fonctionnalités du
périphérique HP Tout-en-un.
Retirez le papier ordinaire blanc et chargez les feuilles de papier photo fournies
en exemple face à imprimer vers le bas . Faites glisser le guide de largeur vers
l’intérieur jusqu’à ce qu’il touche le bord du papier.
Des guides sont gravés sur le bac d’alimentation pour vous aider à positionner
correctement le papier photo.
Une fois celui-ci chargé, vous pouvez tester les fonctionnalités de votre
périphérique.
Cargue el papel fotográfico
Explore las funciones
Ahora que ha instalado el programa de software HP
Photosmart en su equipo, puede probar algunas de
las funciones del HP All-in-One.
Retire el papel blanco normal y cargue las hojas de papel fotográfico del
paquete de muestra con el lado de impresión hacia abajo . Deslice hacia dentro
la guía de ancho de papel hasta que se detenga en el borde del papel.
Oriéntese por las marcas grabadas en la base de la bandeja de papel para
cargar el papel fotográfico.
Una vez cargado, puede probar otras funciones.
Load the photo paper
Explore the features
Now that your HP Photosmart software program is
installed on your computer, you can try out a few of
the features on the HP All-in-One.
Remove the plain white paper, and load the sheets of photo paper from the
sample pack print side down . Slide the paper-width guide inward until it stops
at the edge of the paper.
Refer to the guides engraved in the base of the paper tray for help loading
photo paper.
Now that you have loaded photo paper, you can try out the features.

8 • HP Photosmart C3100 series / Tout-en-un HP Photosmart série C3100
EN
EN
ES
ES
FR
FR
a. Insérez la carte mémoire dans l’emplacement pour carte mémoire approprié.
b. Appuyez sur le bouton Photosmart Express .
Le logiciel HP Photosmart Express s’affiche à l’écran.
c. Cliquez sur le bouton Imprimer et suivez les instructions à l’écran pour
sauvegarder et transférer vos photos.
d. Lorsque vous voyez l’écran Synthèse action sur image , cliquez sur Terminer.
e. Lorsque la boîte de dialogue HP Photosmart Express s’affiche, cliquez sur le
bouton Imprimer.
f. Sélectionnez les photos que vous voulez imprimer dans la boîte de dialogue
Sélectionner les photos à imprimer et cliquez sur Suivant .
g. Choisissez les options d’impression et cliquez sur Imprimer .
Impression d’une photo au format 10 x 15 cm
AVERTISSEMENT : N’insérez pas plusieurs
cartes mémoire en même temps. Si vous insérez
plusieurs cartes mémoire, vous pouvez perdre
irrémédiablement des données.
a. Inserte la tarjeta de memoria en la ranura correspondiente.
b.
Presione el botón Photosmart Express situado en la parte frontal del dispositivo.
El software HP Photosmart Express aparece en la pantalla.
c. Haga clic en el botón Imprimir y, a continuación, siga las instrucciones que
aparecen en pantalla para guardar y transferir las fotos.
d. Cuando aparezca la pantalla Resumen de acciones de imagen , haga clic en
Finalizar.
e. Cuando aparezca el cuadro de diálogo HP Photosmart Express , haga clic en
el botón Imprimir.
f. Seleccione las fotos que desee imprimir en el cuadro de diálogo Seleccionar
fotografías para imprimir y haga clic en Siguiente .
g. Seleccione las opciones de impresión y haga clic en Imprimir .
Imprima una foto de 10 x 15 cm
ATENCIÓN: No inserte más de una tarjeta de
memoria simultáneamente. De lo contrario,
pueden perderse datos irrecuperables.
a. Insert your memory card into the appropriate memory card slot.
b. Press the Photosmart Express button on the front of the device.
The HP Photosmart Express software appears on your screen
c. Click the Print button, then follow the instructions on the screen to save and
transfer your photos.
d. When you see the Image Action Summary screen, click Finish.
e. When the HP Photosmart Express dialog box appears, click the Print button.
f. Select the photos you want to print in the Select Photos to Print dialog box
and click Next .
g. Select your printing options and click Print .
Print a 4 x 6 inch photo
WARNING: Do not insert more than one memory
card at a time. If more than one memory card is
inserted, unrecoverable data loss might occur.
a.
b.
c.

HP Photosmart C3100 series / Tout-en-un HP Photosmart série C3100 • 9
EN
EN
ES
ES
FR
FR
Maintenant, plutôt que d’imprimer une image à partir de la carte mémoire,
essayez de réimprimer une photo à partir de la vitre.
a. Retirez la carte mémoire. .
b. Placez la photo face vers le bas dans l’angle avant droit de la vitre. Assurez-
vous que le bord le plus long de la photo est aligné sur l’avant de la vitre.
Fermez le capot.
c. Appuyez sur Numériser/réimprimer .
d. Lorsque la boîte de dialogue Photosmart Express s’affiche, cliquez sur
Réimprimer .
Réimpression d’une photo
Ahora, en lugar de imprimir una fotografía desde la tarjeta de memoria, intente
volver a imprimirla desde el cristal.
a. Extraiga la tarjeta fotográfica .
b. Coloque la fotografía hacia abajo sobre la esquina delantera derecha del
cristal. Asegúrese de que el lado más largo de la fotografía se adapta al lado
frontal del cristal. Cierre la tapa.
c. Presione Iniciar escaneo/Volver a imprimir .
d. Cuando aparezca el cuadro de diálogo Photosmart Express, haga clic en
Volver a imprimir .
Vuelva a imprimir una foto
Now instead of printing a picture from your memory card, try making a reprint
of a photo from the glass.
a. Remove the photo card .
b. Place the photo face down on the right front corner of the glass. Make sure
the long edge of the photo is along the front of the glass. Close the lid.
c. Press Start Scan/Reprints .
d. When the Photosmart Express dialog box appears, click Reprint .
Make a photo reprint
a.
b.
c.

10 • HP Photosmart C3100 series / Tout-en-un HP Photosmart série C3100
EN
EN
EN
EN
ES
ES
ES
ES
FR
FR
FR
FR
Copie couleur
Impression d’un index photos
L’index photos permet de sélectionner très facilement des photos et de les
imprimer directement à partir d’une carte mémoire, sans avoir à utiliser
l’ordinateur. Si vous avez une carte mémoire provenant de votre appareil photo,
insérez-la à nouveau et appuyez sur le bouton Index photos pour imprimer un
index photos.
Enfin, effectuez une simple copie de la photo à partir de la vitre.
a. Appuyez sur le bouton Type pour sélectionner Papier photo .
b. Appuyez sur Copier, couleur .
Imprima una copia de color
Imprima una hoja de prueba
Una hoja de constituye un sistema sencillo para seleccionar fotografías e
imprimirlas directamente desde una tarjeta de memoria sin necesidad de
utilizar un equipo. Si dispone de la tarjeta de memoria de una cámara, vuelva
a introducirla y presione el botón Hoja de prueba para imprimir una hoja de
prueba.
Finalmente, imprima una copia simple de la foto desde el cristal.
a. Presione el botón Tipo para seleccionar Papel fotográfico .
b. Presione Comenzar copia en color .
Make a color copy
Print a proofsheet
A proofsheet is a simple way to select photos and make prints directly from a
memory card without using your computer. If you have a memory card from your
camera, insert it again and press the Proofsheet button to print a proofsheet.
Finally, make a simple copy of the photo from the glass.
a. Press the Type button to select Photo Paper .
b. Press Start Copy Color .

HP Photosmart C3100 series / Tout-en-un HP Photosmart série C3100 • 11
www.hp.com/support
EN
EN
EN
ES
ES
ES
FR
FR
FR
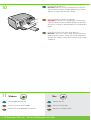
Dépannage
Problème : (Windows uniquement) L’écran vous invitant à connecter le câble USB ne
s’affiche pas.
Action : Cliquez sur Annuler sur tous les écrans affichés. Retirez le CD-ROM vert du
logiciel HP Tout-en-un pour Windows, puis introduisez-le de nouveau. Reportez-vous à
l’étape 11.
Problème : (Windows uniquement) L’écran La configuration du périphérique ne s’est pas
achevée s’affiche.
Action : Débranchez le périphérique et rebranchez-le. Vérifiez toutes les connexions.
Assurez-vous que le câble USB est branché à l’ordinateur. Ne branchez pas le câble USB
sur un clavier ni sur un concentrateur USB non doté de sa propre alimentation. Reportez-
vous à l’étape 11.
Solución de problemas
Problema: (Sólo en Windows) No ha visto la pantalla que indica que debe conectar el
cable USB.
Acción: Cierre todas las pantallas. Extraiga el CD de Windows verde del dispositivo
HP All-in-One y, a continuación, vuelva a insertarlo. Consulte el paso 11.
Problema: (Sólo en Windows) Aparece la pantalla Se ha producido un error en la
instalación del dispositivo .
Acción: Desconecte el dispositivo y vuelva a conectarlo. Compruebe todas las
conexiones. Asegúrese de que el cable USB está conectado al equipo. No conecte el
cable USB a un teclado ni a un concentrador sin alimentación. Consulte el paso 11.
Problem: (Windows only) You did not see the screen prompting you to connect the
USB cable.
Action: Cancel all screens. Remove, and then re-insert the green HP All-in-One
Windows CD. Refer to Step 11.
Problem: (Windows only) The Device Setup Has Failed To Complete screen displays.
Action: Unplug the device and plug it in again. Check all connections. Make sure the
USB cable is plugged into the computer. Do not plug the USB cable into a keyboard or
a non-powered USB hub. Refer to step 11.
Troubleshooting

Copyright 2006 Hewlett-Packard Development Company, L.P.
Printed in ()
Printed in ()
Printed in ()
EN
EN
ES
ES
FR
FR
Problème : (Windows) L’écran Microsoft Ajout de matériel s’affiche.
Action : Cliquez sur Annuler sur tous les écrans affichés. Débranchez le câble USB, puis
introduisez le CD-ROM vert du logiciel HP Tout-en-un pour Windows. Reportez-vous aux
étapes 11 et 12.
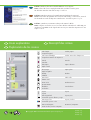
Descriptif des icônes
Vérifier papier
Vérifier cartouches d’impression
Annuler
Papier ordinaire
Papier photo
Qualité
Taille réelle
Redimensionner
Sans bordures
Copies
Copier, Noir
Copier, Couleur
Numériser/réimprimer
Problema: (Windows) Aparece la pantalla Agregar hardware de Microsoft.
Acción: Cierre todas las pantallas. Desconecte el cable USB y, a continuación, inserte el
CD de Windows verde del dispositivo HP All-in-One. Consulte los pasos 11 y 12.
Explicación de los iconos
Comprobar papel
Comprobar cartuchos de impresión
Cancelar
Papel normal
Papel fotográfico
Calidad
Tamaño real
Ajustar tamaño
Sin bordes
Copias
Comenzar copia en blanco y negro
Comenzar copia en color
Iniciar escaneo/Volver a imprimir
Problem: (Windows) The Microsoft Add Hardware screen appears.
Action: Cancel all screens. Unplug the USB cable, and then insert the green
HP All-in-One Windows CD. Refer to Steps 11 and 12.
Icons explanation
Check Paper
Check Print Cartridges
Cancel
Plain Paper
Photo Paper
Quality
Actual Size
Resize to Fit
Borderless
Copies
Start Copy Black
Start Copy Color
Start Scan/Reprints
-
 1
1
-
 2
2
-
 3
3
-
 4
4
-
 5
5
-
 6
6
-
 7
7
-
 8
8
-
 9
9
-
 10
10
-
 11
11
-
 12
12


HP C3125 Le manuel du propriétaire
- Catégorie
- Imprimer
- Taper
- Le manuel du propriétaire
dans d''autres langues
- English: HP C3125 Owner's manual
- español: HP C3125 El manual del propietario
Documents connexes
-
HP Photosmart C4340 All-in-One Printer series Le manuel du propriétaire
-
-
HP PHOTOSMART C3100 Le manuel du propriétaire
-
HP Photosmart C3100 series Manuel utilisateur
-
HP PHOTOSMART C5200 ALL-IN-ONE PRINTER Le manuel du propriétaire
-
HP Photosmart C4280 Le manuel du propriétaire
-
-
-
-