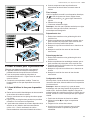
Bosch HDS8045U Manuel utilisateur
- Catégorie
- Fours
- Taper
- Manuel utilisateur
Ce manuel convient également à


en-us
2
Table of contents
1 IMPORTANT SAFETY INSTRUCTIONS.................... 3
1.1 Safety definitions....................................................... 4
1.2 General information................................................... 4
1.3 Intended use ............................................................. 4
1.4 Restriction on user group .......................................... 4
1.5 Safe use.................................................................... 4
1.6 Child safety ............................................................... 7
1.7 Gas safety................................................................. 8
1.8 Cleaning function ...................................................... 8
1.9 Proper installation and maintenance ......................... 8
1.10 Conversion to Liquified Petroleum gas.................... 9
1.11 High altitude installation ........................................ 10
1.12 State of California Proposition 65 Warnings .......... 10
2 Preventing material damage .................................. 11
2.1 Preventing oven cavity damage .............................. 11
2.2 Preventing cooktop damage.................................... 11
3 Environmental protection and energy-saving ...... 11
3.1 Disposal of packaging............................................. 11
3.2 Saving energy when using the oven........................ 11
3.3 Saving energy when using the cooktop................... 12
4 Familiarizing yourself with your appliance ........... 13
4.1 Appliance................................................................ 13
5 Accessories............................................................. 17
5.1 Other accessories................................................... 17
5.2 Fitting the telescopic rail set .................................... 17
5.3 Inserting racks......................................................... 17
5.4 Griddle .................................................................... 18
5.5 Installing the griddle ................................................ 18
6 Before using for the first time ................................ 18
6.1 Before using the oven for the first time.................... 19
6.2 Before using the cooktop for the first time ............... 19
7 Cooktop operation .................................................. 20
7.1 About the appliance ................................................ 20
7.2 To operate .............................................................. 20
7.3 In case of power failure........................................... 20
7.4 Flame failure safety system..................................... 20
7.5 Normal operation - electronic ignition ...................... 20
7.6 Before first use........................................................ 20
7.7 Getting the most out of your appliance.................... 20
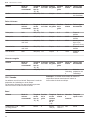
7.8 Settings recommendations...................................... 21
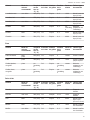
7.9 Standard burner cooking table ................................ 21
7.10 Notes regarding cookware .................................... 23
8 Oven operation........................................................ 24
8.1 Switching on the oven............................................. 24
8.2 Time-setting options................................................ 24
8.3 Core temperature meat probe ................................. 25
8.4 Sabbath mode......................................................... 26
8.5 Panel lock ................................................................ 26
8.6 Getting the most out of your appliance ..................... 26
9 Cleaning and maintenance...................................... 30
9.1 Cleaning and maintenance-cooktop ......................... 30
9.2 Cleaning and maintenance - oven ............................ 31
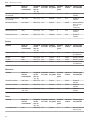
10 Cooking charts ....................................................... 36
10.1 Baked goods/entrees ............................................. 36
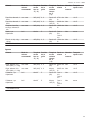
10.2 Meats ..................................................................... 38
11 Troubleshooting..................................................... 42
12 Disposal .................................................................. 43
12.1 Disposal of your old appliance................................ 43
13 Customer Service................................................... 43
13.1 Model number (E-Nr.) and production number
(FD)........................................................................ 43
13.2 Rating plate location............................................... 43
14 STATEMENT OF LIMITED PRODUCT
WARRANTY ............................................................ 44
14.1 What this warranty covers & Who it applies to........ 44
14.2 How long the warranty lasts ................................... 44
14.3 Repair/replace as your exclusive remedy ............... 44
14.4 Out of warranty product.......................................... 45
14.5 Warranty exclusions............................................... 45
14.6 Obtaining warranty service..................................... 45
14.7 Product information ................................................ 45

en-us
3
Read all instructions carefully before use. These precautions will reduce the risk of electrical shock, fire and injury to
persons. When using kitchen appliances, basic safety precautions must be followed including those in the following
pages.
IMPORTANT SAFETY INSTRUCTIONS
READ AND SAVE THESE INSTRUCTIONS

en-us
4
1.1 Safety definitions
Here you can find explanations of the safety signal words
used in this manual.
WARNING
This indicates that death or serious injuries may occur as
a result of non-observance of this warning.
CAUTION
This indicates that minor or moderate injuries may occur
as a result of non-observance of this warning.
NOTICE:
This indicates that damage to the appliance or property
may occur as a result of non-compliance with this
advisory.
Note:This alerts you to important information and/or tips.
1.2 General information
¡Read this manual carefully.
¡Do not connect the appliance if it has been damaged in
transit.
1.3 Intended use
Only use this appliance:
¡To prepare meals and drinks.
¡Under supervision. Never leave the appliance
unattended when cooking for short periods.
¡For normal household use and in enclosed spaces in a
residential environment.
Do not use the appliance:
¡On boats or in vehicles.
¡as a room heater.
¡This appliance is not intended for operation with an
external time switch or external remote control.
Call Customer Service if you want to convert your
appliance to a different type of gas.
1.4 Restriction on user group
This appliance is not intended for use by persons
(including children) with reduced physical, sensory or
mental capabilities, or lack of experience and knowledge,
unless they have been given supervision or instruction
concerning use of the appliance by a person responsible
for their safety.
When children become old enough to use the appliance, it
is the responsibility of the parents or legal guardians to
ensure that they are instructed in safe practices by
qualified persons.
Children should be supervised to ensure that they do not
play with the appliance.
Do not let children play with the appliance.
1.5 Safe use
WARNING
When properly cared for, your new appliance has been
designed to be safe and reliable.
▶Read all instructions carefully before use. These
precautions will reduce the risk of burns, electric shock,
fire, and injury to persons.
▶When using kitchen appliances, basic safety
precautions must be followed, including those in the
following pages.
WARNING
Overheated materials can cause fire or burns.
▶Do not allow aluminum foil, plastic, paper or cloth to
come in contact with a hot surface element, burner or
grate.
▶Do not allow pans to boil dry.
Set the burner control so that the flame does not extend
beyond the bottom of the pan.
Take care that drafts like those from fans or forced air
vents do not push the flames so that they extend beyond
the edges of the pan.
Unattended cooking on a cooktop with fat or oil can be
dangerous and may result in a fire.
▶Do not leave the cooktop unattended when in use.
If materials inside an oven or warming drawer should
ignite, keep door closed.
▶Turn off the appliance and disconnect the circuit at the
circuit breaker box.
A fire could occur during cooking.
▶Always have a working smoke detector near the
kitchen.
▶Have an appropriate fire extinguisher available, nearby,
highly visible and easily accessible near the appliance.
IMPORTANT SAFETY INSTRUCTIONS
READ AND SAVE THESE INSTRUCTIONS

en-us
5
NEVER cover any slots, holes or passages in the oven
bottom or cover an entire rack with materials such as
aluminum foil.
▶Doing so blocks air flow through the oven and may
cause carbon monoxide poisoning.
▶Aluminum foil linings may also trap heat, causing a fire
hazard.
If the cooktop is near a window, forced air vent or fan, be
certain that flammable materials such as window
coverings do not blow over or near the burners or heating
elements. They could catch on fire.
Cooking fires can spread if extinguished incorrectly.
▶Never use water on cooking fires.
WARNING
TO REDUCE THE RISK OF A RANGE TOP GREASE
FIRE
▶Never Leave Surface Units Unattended at High
Settings - Boilovers cause smoking and greasy
spillovers that may ignite. Heat oils slowly on low or
medium settings.
▶Always turn hood ON when cooking at high heat or
when flambeing food (i.e. Crepes Suzette, Cherries
Jubilee, Peppercorn Beef Flambe’).
▶Clean ventilating fans frequently. Grease should not be
allowed to accumulate on fan or filter.
▶Use proper pan size. Always use cookware appropriate
for the size of the surface element.
Flames can be drawn into the ventilation system.
▶Whenever possible, do not operate the ventilation
system during a cooktop fire. However, do not reach
through fire to turn it off.
Cookware Handles Should be Turned Inward and Not
Extend Over Adjacent Surface Units.
▶To reduce the risk of burns, ignition of flammable
materials, and spillage due to unintentional contact with
the cookware, the handle of a cookware should be
positioned so that it is turned inward, and does not
extend over adjacent surface units.
Wear Proper Apparel. Loose-fitting or hanging garments,
such as ties, scarves, jewelry, or dangling sleeves, should
never be worn while using the appliance.
▶Tie long hair so that it does not hang loose.
▶Secure all loose garments, etc. before beginning.
CAUTION
The cooking process has to be supervised. A short term
cooking process has to be supervised continuously.
WARNING
To avoid risk of fire do not store items on the cooking
surfaces.
In the event that personal clothing or hair catches fire,
drop and roll immediately to extinguish flames.
Do Not Use Water on Grease Fires.
▶Smother fire or flame or use dry chemical or foam-type
extinguisher.
Adjust burner flame size so that it does not extend beyond
the edge of the cookware. Proper relationship of cookware
to burner flame reduces safety risks.
CAUTION
The oven vents are important for air circulation. Covering
the oven vents will cause the oven to overheat. Refer to
the appliance overview for the location of the oven vents.
→
Page13
▶Do not obstruct the front oven vent or rear vent trim.
WARNING
Use Only Dry Potholders - Moist or damp potholders on
hot surfaces may result in burns from steam.
▶Do not let potholders touch hot heating elements.
▶Do not use a towel or other bulky cloth.
Hot oil is capable of causing extreme burns and injury.
▶Use high heat settings on the cooktop only when
necessary.
▶To avoid bubbling and splattering, heat oil slowly on no
more than a low-medium setting.
▶Never move a pan of hot oil, especially a deep fat fryer.
Wait until it is cool.
Spills of hot food may cause burns.
▶Hold the handle of the pan when stirring or turning food.
This helps prevent spills and movement of the pan.
DO NOT TOUCH SURFACE UNITS OR AREAS NEAR
UNITS. Surface units may be hot even though they are
dark in color. Areas near surface units may become hot
enough to cause burns.
▶During and after use, do not touch, or let clothing,
potholders, or other flammable materials contact
surface units or areas near units until they have had
sufficient time to cool. Among these areas are the
cooktop and areas facing the cooktop.
DO NOT TOUCH HEATING ELEMENTS OR INTERIOR
SURFACES OF OVEN - Heating elements may be hot
even though they are dark in color. Interior surfaces of an
oven become hot enough to cause burns.
▶During and after use, do not touch, or let clothing,
potholders, or other flammable materials contact
heating elements or interior surfaces of oven until they
IMPORTANT SAFETY INSTRUCTIONS
READ AND SAVE THESE INSTRUCTIONS

en-us
6
have had sufficient time to cool. Other surfaces of the
appliance may become hot enough to cause burns.
Among these surfaces are oven vent openings,
surfaces near these openings and oven doors.
Exercise caution when opening the appliance.
▶Standing to the side, open the door (or drawer) slowly
and slightly to let hot air and/or steam escape.
▶Keep your face clear of the opening and make sure
there are no children or pets near the unit.
▶After the release of hot air and/or steam, proceed with
your cooking.
▶Keep doors shut unless necessary for cooking or
cleaning purposes.
▶Do not leave open doors unattended.
Do not clean the appliance while it is still hot. Some
cleaners produce noxious fumes when applied to a hot
surface. Wet clothes and sponges can cause burns from
steam.
After a spill or boilover, turn off the burner and allow the
cooktop to cool.
▶Clean around the burner and burner ports.
▶After cleaning, check for proper operation.
Inspect your cookware for damage or excessive wear
before using it.
CAUTION
Use caution when cooking foods with high alcohol content
(e.g. rum, brandy, bourbon) in the oven. Alcohol
evaporates at high temperatures. There is a risk of
burning as the alcohol vapors may catch fire in the oven.
▶Use only small quantities of alcohol in foods, and open
the oven door carefully.
The oven racks and the oven cavity surfaces become very
hot during cooking.
▶Place oven racks in the desired positions before turning
oven on.
▶Always use oven mitts when the oven is warm.
▶If a rack must be moved while the oven is hot, do not let
oven mitts contact hot heating elements.
▶Use caution when removing oven racks from the lowest
rack position to avoid contact with the hot oven door.
WARNING
Avoid reaching or leaning over the appliance.
▶Be aware that certain clothing and hair sprays may
contain flammable chemicals that could be ignited if
brought in to contact with hot surface units or heating
elements and may cause severe burns.
Do not place any objects on the projecting control panel in
front of the burners. The area becomes very hot during
cooking.
The oven interior and the meat probe become very hot.
▶Use oven mitts to plug and unplug the meat probe.
WARNING
Storage in or on Appliance - The use of corrosive
chemicals in heating or cleaning will damage the
appliance and could result in injury.
▶Flammable materials, corrosive chemicals, vapors or
non-food products should not be stored or used in an
oven or on or near surface units.
▶The appliance is specifically designed for use when
heating or cooking food.
This appliance is intended for normal family household
use only.
▶It is not approved for outdoor use.
▶See the Statement of Limited Product Warranty. If you
have any questions, contact the manufacturer.
WARNING
Using this appliance other than for its intended use can
cause fire or injury to persons.
▶Use this appliance only for its intended use as
described in this manual.
▶NEVER use your appliances as a space heater for
warming or heating the room. Doing so may result in
overheating the appliance.
▶Never use the appliance for storage.
WARNING - TO REDUCE THE RISK OF INJURY TO
PERSONS IN THE EVENT OF A RANGE TOP GREASE
FIRE, OBSERVE THE FOLLOWING.
▶SMOTHER FLAMES with a close-fitting lid, cookie
sheet, or metal tray, then turn off the burner. BE
CAREFUL TO PREVENT BURNS. If the flames do not
go out immediately, EVACUATE AND CALL THE FIRE
DEPARTMENT.
▶NEVER PICK UP A FLAMING PAN – You may be
burned.
▶DO NOT USE WATER, including wet dishcloths or
towels – a violent steam explosion will result.
▶Use an extinguisher ONLY if:
- You know you have a Class ABC extinguisher, and
you already know how to operate it.
- The fire is small and contained in the area where it
started.
- The fire department is being called.
- You can fight the fire with your back to an exit.
IMPORTANT SAFETY INSTRUCTIONS
READ AND SAVE THESE INSTRUCTIONS

en-us
7
Do not heat or warm unopened food containers. Build-up
of pressure may cause the container to burst and cause
injury.
Failure to operate knobs properly may result in personal
injury and damage to the appliance.
Glazed Cooking Utensils - Only certain types of glass,
glass/ceramic, ceramic, earthenware, or other glazed
utensils are suitable for cooktop or range-top service
without breaking due to the sudden change in
temperature.
Cooking or roasting bags might explode.
▶Follow the manufacturer’s directions when using
cooking or roasting bags.
CAUTION
To avoid possible injury or damage to the appliance,
ensure oven rack is installed exactly per installation
instructions and not backwards or upside down.
Do not place anything on the oven cavity bottom. Do not
cover it with aluminum foil. A build-up of heat could
damage the appliance or cause injury.
WARNING
Moisture intrusion may cause an electric shock.
▶Do not use any steam cleaners or high-pressure
cleaners to clean the appliance.
If the appliance or the power cord is damaged, this is
dangerous.
▶Do not turn the power on if the appliance or the power
cord is damaged. Doing so may cause injury.
▶Never operate a damaged appliance.
▶If the appliance or the power cord is damaged,
immediately unplug the power cord or switch off the
breaker in the circuit breaker box and turn off the gas
supply.
▶Call Customer Service. →
Page43
▶Repairs to the appliance must only be performed by an
authorized service provider.
WARNING
Scratched glass in the appliance door may develop into a
crack.
▶Do not use any harsh or abrasive cleaners or sharp
metal scrapers to clean the glass on the oven door, as
they may scratch the surface.
Use of a wrong meat probe can damage the insulation.
Use only the meat probe intended for this appliance.
IMPORTANT SAFETY NOTICE: The California Safe
Drinking Water and Toxic Enforcement Act requires the
Governor of California to publish a list of substances
known to the state to cause cancer, birth defects or other
reproductive harm, and requires businesses to warn
customers of potential exposure to such substances. The
burning of gas cooking fuel and the elimination of soil
during self-cleaning can generate some by-products which
are on the list. To minimize exposure to these substances,
always operate this unit according to the instructions
contained in this booklet and provide good ventilation.
1.6 Child safety
This appliance is not intended for use by persons
(including children) with reduced physical, sensory or
mental capabilities, or lack of experience and knowledge,
unless they have been given supervision or instruction
concerning use of the appliance by a person responsible
for their safety.
When children become old enough to use the appliance, it
is the responsibility of the parents or legal guardians to
ensure that they are instructed in safe practices by
qualified persons.
WARNING
Do not allow children to use this appliance unless closely
supervised by an adult.
▶Children and pets should not be left alone or
unattended in the area where the appliance is in use.
They should never be allowed to play in its vicinity,
whether or not the appliance is in use.
Do not allow anyone to climb, stand, lean, sit, or hang on
any part of an appliance, especially a door, warming
drawer, or storage drawer.
▶This can damage the appliance, and the unit may tip
over, potentially causing severe injury.
Do not let children play with the appliance.
CAUTION
Do not store items of interest to children in cabinets above
a range or on the backguard of a range. Children climbing
on the range to reach items could be seriously injured.
Do Not Leave Children Alone.
▶Children should not be left alone or unattended in the
area where the appliance is in use.
▶They should never be allowed to sit or stand on any
part of the appliance.
▶Always check inside the oven before turning it on.
IMPORTANT SAFETY INSTRUCTIONS
READ AND SAVE THESE INSTRUCTIONS

en-us
8
WARNING
To avoid the risk of suffocation:
▶Do not allow children to play with packaging material.
▶Store small parts safely as they can be a choke hazard.
1.7 Gas safety
WARNING
To prevent carbon monoxide build-up, do not block
appliance air vents.
WARNING
Have the installer show you where the gas shut-off valve
is located.
If a burner goes out and gas escapes, open windows and
doors. Wait until gas dissipates before using the
appliance.
If you smell gas, your installer has not done a proper job
of checking for leaks. If the connections are not perfectly
tight, you can have a small leak and, therefore, a faint
smell. Finding a gas leak is not a “do-it-yourself”
procedure. Some leaks can only be found with the burner
control in the ON position and this must be done by a
qualified service technician. Read the WARNING about
gas smell.
WARNING
Keep the igniter ports clean for proper lighting
performance of the burners. It is necessary to clean these
when there is a boilover or when the burner does not light
even though the electronic igniters click.
For proper burner performance, keep igniters clean and
dry.
CAUTION
All igniters spark when any single burner is turned on.
▶Do not touch any of the burners when the cooktop is in
use.
WARNING
To prevent flare-ups all grates must be properly positioned
on the cooktop whenever the cooktop is in use. Each of
the feet must be placed into the corresponding dimples in
the cooktop.
▶Do not use a grate if the rubber feet are missing or
damaged.
WARNING
Do not clean or touch any of the burners when an extra
low burner (if equipped) is in use. When the extra low
burner automatically reignites the ignitor at the burner will
spark.
WARNING
To prevent flare-ups do not use the cooktop without all
burner caps and all burner grates properly positioned.
WARNING
Use this appliance only for its intended use as described
in this manual.
▶NEVER use this appliance as a space heater to heat or
warm the room. Doing so may result in carbon
monoxide poisoning and overheating the appliance.
▶Never use the appliance for storage.
WARNING
The burning of gas cooking fuel can create small amounts
of carbon monoxide, benzene, formaldehyde and soot. To
minimize exposure to these substances the burners
should be adjusted by a certified installer or agency to
ensure proper combustion.
▶Ensure proper ventilation with an open window or use a
ventilation fan or hood when cooking with gas.
▶Always operate the unit according to the instructions in
this manual.
1.8 Cleaning function
Follow these safety instructions when using the cleaning
function.
WARNING
The outside of the appliance gets very hot when the
cleaning function is in progress.
▶Never touch the appliance door.
▶Allow the appliance to cool down.
▶Keep children at a safe distance.
WARNING
Do not use a protective coating to line the oven and do not
use commercial oven cleaner.
Clean only parts listed in this manual.
1.9 Proper installation and maintenance
WARNING
TIP OVER HAZARD! A child or adult can tip the range
over and be killed.
▶Install the anti-tip device to the structure and/or the
range.
IMPORTANT SAFETY INSTRUCTIONS
READ AND SAVE THESE INSTRUCTIONS

en-us
9
▶Verify the anti-tip device has been properly installed
and engaged.
▶Engage the range to the anti-tip device. Ensure the
anti-tip device is re-engaged when the range is moved.
▶Re-engage the anti-tip device if the range is moved. Do
not operate the range without the anti-tip device in
place and engaged.
▶See installation instructions for details.
▶Failure to follow the instructions in this manual can
result in death or serious burns to children and adults.
▶Check for proper installation and use of the anti-tip
bracket. Carefully tip the range forward pulling from the
back to ensure that the anti-tip bracket engages the
range leg and prevents tip-over. The range should not
move more than 1" (2.5cm).
WARNING
In the event of a malfunction, it might become necessary
to turn off the power supply.
▶Have the installer show you the circuit breaker or fuse.
Mark it for easy reference.
To avoid electrical shock hazard, before servicing the
appliance, turn power off at the service panel and lock the
panel to prevent the power from being switched on
accidentally.
Proper Installation - Improper installation or grounding can
cause electric shock.
▶This appliance must be properly installed and grounded
by a qualified technician.
▶Connect only to properly grounded outlet.
▶Refer to installation instructions for details.
User Servicing - Do not repair or replace any part of the
appliance unless specifically recommended in this
manual.
▶All other servicing should be referred to an authorized
service provider.
Light socket is live when door is open if main power
supply is not turned off.
▶Turn off main power supply at the service panel before
changing the light bulbs.
WARNING
Make sure the appliance and lights are cool and power to
the appliance has been turned off before replacing the
light bulb(s). Failure to do so could result in electrical
shock or burns.
▶The lenses must be in place when using the appliance.
▶The lenses serve to protect the light bulb from breaking.
▶The lenses are made of glass. Handle carefully to avoid
breaking. Broken glass can cause an injury.
Failure to follow these instructions when removing the
oven door may lead to personal injury or product damage.
▶Make sure oven is cool and power to the oven has
been turned off before removing the door. Failure to do
so could result in electrical shock or burns.
▶The oven door is heavy and parts of it are fragile. Use
both hands to remove the oven door.
▶The door front is glass. Handle it carefully to avoid
breakage.
▶Grasp only the side of the oven door. Do not grasp the
handle. It may swing in your hand and cause damage
or injury. Failure to grasp the oven door firmly and
properly could result in personal injury or product
damage.
▶To avoid injury from hinge bracket snapping closed, be
sure both levers are securely in place before removing
the door.
▶Do not force the door open or closed. The hinge could
be damaged and cause damage or injury.
▶Do not lay the removed door on sharp or pointed
objects as this could break the glass. Lay it on a flat,
smooth surface, positioned so that the door cannot fall
over.
WARNING
Grease and fat can ignite when heated.
▶Keep the oven free from grease build up.
CAUTION
In the event of an error the display flashes and beeps
continuously.
▶Disconnect appliance from the power supply and call
an authorized service provider.
WARNING
Malfunctions can cause injuries.
▶Do not operate this appliance if it is not working
properly, or if it has been damaged. Contact an
authorized service provider.
1.10 Conversion to Liquified Petroleum
gas
WARNING
Personal injury or death from electrical shock may occur,
if the range is not installed by a qualified installer or
electrician. Any additions, changes, or conversions
IMPORTANT SAFETY INSTRUCTIONS
READ AND SAVE THESE INSTRUCTIONS

en-us
10
required in order for this appliance to satisfactorily meet
the application needs must be made by a qualified
technician.
Your gas range model is designed to allow for LP
conversion by a qualified service technician.
▶Before installing the kit, be sure to follow the LP
Installation Instructions carefully.
1.11 High altitude installation
This appliance has been tested for operation up to an
altitude of 10,000ft (3,048m) elevation above sea level.
If desired, for altitudes above 2,000ft (610m) elevation
above sea level, adjustments may be made. Burners
should be checked at the lowest setting, if the flame is not
stable the simmer should be increased until the flame is
stable. This can be done by adjusting the bypass screw in
the valve. If flame performance is satisfactory, adjustment
will not be required. It is required that a Certified
Professional make the high altitude adjustments during
installation. High altitude nozzle sets for natural gas and
propane gas are available for installations at
2,000-6,500ft (610-1,981m) or 6,501-10,000ft
(1,982-3,048m) if the adjustments using the bypass
screw don’t resolve performance issues.
1.12 State of California Proposition 65
Warnings
This product may contain a chemical known to the State
of California, which can cause cancer or reproductive
harm. Therefore, the packaging of your product may bear
the following label as required by California:
IMPORTANT SAFETY INSTRUCTIONS
READ AND SAVE THESE INSTRUCTIONS

Preventing material damage en-us
11
Preventing material damage
2 Preventing material damage
Preventing material damage
2.1 Preventing oven cavity damage
NOTICE:
The presence of objects on the oven cavity bottom will
cause heat to build up. The baking and roasting times will
no longer be correct and the enamel will be damaged.
▶Do not cover the oven cavity bottom with any sort of foil
or greaseproof paper.
▶Do not place accessories on the oven cavity bottom.
Do not allow aluminum foil in the oven cavity to come into
contact with the door glass, it could cause permanent
discoloration.
Never pour water into the oven cavity when it is still hot.
Never place cookware containing water on the oven cavity
bottom.
The prolonged presence of moisture in the oven cavity
leads to corrosion.
▶Allow the oven cavity to dry after use.
▶Do not keep moist food in the oven cavity for a long
time with the door closed.
▶Do not store food in the oven cavity.
Leaving the appliance to cool down with the door open will
damage the front of neighboring kitchen units over time.
▶Always allow the oven cavity to cool down with the door
closed after cooking at high temperatures. Only leave
the oven cavity to dry with the door open if a lot of
moisture was produced during operation.
▶Take care not to trap anything in the appliance door.
Fruit juice dripping from the baking tray leaves stains that
cannot be removed.
▶When baking very juicy fruit pies, do not pack too much
on the baking tray.
If the seal is very dirty, the appliance door will not close
properly when the appliance is in operation. This may
damage the front of adjacent kitchen units.
▶Keep the seal clean at all times.
▶Never operate the appliance if the seal is damaged or
missing.
Sitting or placing objects on the appliance door may
damage it.
▶Do not place or hang objects on the appliance door.
▶Do not place cookware or accessories on the appliance
door.
With certain models, accessories may scratch the door
glass when closing the appliance door.
▶Always push accessories fully into the oven cavity.
Carrying the appliance by the door handle could break it.
The door handle cannot support the weight of the
appliance.
▶Do not carry or hold the appliance by the door handle.
2.2 Preventing cooktop damage
NOTICE:
OPERATIONAL FAULT.
▶Always turn the control knob to the OFF position when
the appliance is not being used.
Overheating can damage the cookware.
▶Do not heat empty pots or pans.
A build-up of heat may damage the appliance.
▶Never cover the cooktop, for example with aluminum foil
or oven protectors.
▶Do not place roasters, frying pans or grill stones on
more than one burner at a time.
▶Only use the accessories specified.
Acidic liquids such as lemon juice or vinegar may damage
the surface finish of the appliance.
▶Remove spilled liquids immediately. Use caution while
the burners are still hot.
Heat may cause damage to adjacent appliances or
furniture. If the appliance is in operation for an extended
period, heat and moisture will be generated. Additional
ventilation is required.
▶Open the window or switch on an extractor hood that
discharges the extracted air and moisture outside the
building.
Environmental protection and energy-saving
3 Environmental protection and
energy-saving
Environmental protection and energy-saving
3.1 Disposal of packaging
The packaging materials are environmentally compatible
and can be recycled.
▶Sort the individual components by type and dispose of
them separately.
3.2 Saving energy when using the oven
If you follow these tips, your appliance consumes less
energy.
Only preheat the appliance if the recipe or the
recommended settings tell you to do so.
aNot preheating the appliance can reduce the energy
used.
Use dark-colored, black-coated or enameled baking pans.
aThese types of baking pans absorb the heat particularly
well.
Open the appliance door as little as possible during
operation.
aThis will maintain the temperature in the oven cavity
and eliminate the need for the appliance to reheat.
When baking multiple dishes, do so in succession or at
the same time.
aThe oven cavity is heated after baking the first dish.
This reduces the baking time for the second dish.
If the cooking time is relatively long, you can switch the
appliance off 10minutes before the cooking time ends.
aThere will be enough residual heat to finish cooking the
dish.

en-us Environmental protection and energy-saving
12
Remove any accessories that are not being used from the
oven cavity.
aAn extra pan without food affects the browning and
cooking.
Allow frozen food to defrost before cooking.
aThis will save the energy that would otherwise be
required to defrost it.
3.3 Saving energy when using the cooktop
If you follow these tips, your appliance consumes less
energy.
Select a cookware diameter that matches the burner.
Center the cookware on the burner.
Tip:Cookware manufacturers usually state the top
diameter of the cookware. The diameter of the cookware
base is usually smaller.
aThe energy is targeted at the cookware.
If you use cookware that is too small, energy is wasted.
If the cookware is too large, much energy is used to
heat up the cookware.
Close cookware with a fitting lid.
aCooking without a lid consumes more energy.
Only lift the lid when necessary.
aIf you lift the lid, a lot of energy can escape.
Use a glass lid.
aIf you use a glass lid, you can look inside the cookware
without lifting the lid.
Use cookware with a solid flat bottom.
aCurved cookware bases increase energy consumption.
Use a cookware size that matches the amount of food you
want to cook.
aCookware with little content consumes a lot of energy.
Cook with a small amount of water.
aMore water requires more energy to heat it up.
Select a lower power level as soon as possible. Select a
suitable power level to continue cooking.
aFor ongoing cooking a lower power level is sufficient.

Familiarizing yourself with your appliance en-us
13
Familiarizing yourself with your appliance
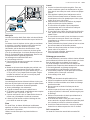
4 Familiarizing yourself with your appliance
Familiarizing yourself with your appliance
This Use and Care Manual covers several models. Your model may have some but not all of the features listed.
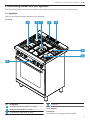
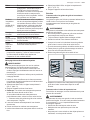
4.1 Appliance
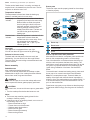
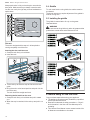
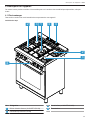
Here you can find an overview of the parts of your appliance.
30" Range
12
3
2
3 4 4
4
No. Designation
1
Dual-flame burner (18,000BTU / 5.3kW)
2
Small burner (5,000BTU / 1.5kW)
3
Large burner (10,000BTU / 2.9kW)
4
Oven vent
Oven features
Cooling fan
The cooling fan runs during all cooking modes.

en-us Familiarizing yourself with your appliance
14
The fan can be heard when it is running, and warm air
may be felt as it is released from the oven vent. The fan
may also run after the oven is off.
Temperature indicator
The temperature indicator bars show the heating-up
phases or residual heat in the oven cavity.
Heating-up
indicator
The temperature indicator shows the
progress of pre-heat in the oven cavity.
When all bars are filled, the optimal
time for placing the food in the oven
has been reached. In the broiling and
cleaning settings, the bars are all
already filled at the start. The bars are
not filled for the gentle top/bottom
heating type.
Residual heat
indicator
When the appliance is switched off, the
temperature indicator shows the
residual heat in the oven cavity. Once
the temperature has dropped to
approximately 140°F (60°C), the
indicator goes out.
Oven light
Your appliance is equipped with an oven light.
You can turn the oven light on and off by pressing .
Surfaces in the oven cavity
The back wall and side parts in the oven cavity are
selfcleaning. You can tell this from the rough surface.
The oven cavity floor and ceiling are enameled and have
smooth surfaces.
Burner assembly
Sealed burners
Your cooktop has sealed gas burners.
There are no burner parts under the cooktop to clean,
disassemble or adjust. Your cooktop has three different
burner sizes: small, large and dual-flame.
WARNING
To prevent flare-ups do not use the cooktop without all
burner caps and all burner grates properly positioned.
CAUTION
To prevent burns, do not touch burner caps or grates while
hot.
▶Turn the cooktop off and allow the burners to cool.
Notes
¡The burner caps must be properly placed for the
cooktop to function properly.
¡If the burner cap is not properly placed, one or more of
the following may occur:
–Burner flames are too high
–Flames shoot out of the burners
–Stainless steel discolorations
–Burners do not ignite
–Burner flames light unevenly
–Burner emits gas odor
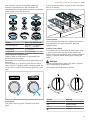
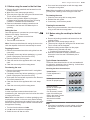
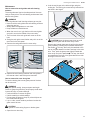
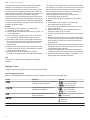
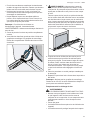
Burner parts
The burner caps must be properly placed for the cooktop
to function properly.
4
3
2
1
1
Burner cap
2
Burner base
3
Thermocouple
4
Igniter
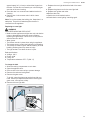
Burner cap and burner base placement
After electrical connection is complete, place each burner
base on the corresponding location on the cooktop.
One of the three bars on the burner base should line up
with the notch and prevent the base from rotating. The
small hole or cutout near the edge should also line up with
the igniter. Pay special attention to avoid damaging the
igniter during installation of the base. See Illustration
below.
Once each base is located and resting evenly, place each
burner cap on its correct burner base. See Illustration.
Note:Do not swap burner caps. These will affect the
stability of the flame and make the burner impossible or
difficult to light. The smallest burner cap marked "DUAL" is
to be used exclusively on the Dual-flame burner. Do not
put it on the small burner.
Place burner cap gently on top of base so that the prongs
of the burner base fit snugly into the groove of the burner
cap.

Familiarizing yourself with your appliance en-us
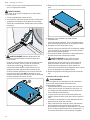
15
If the maintop is removed by a certified installer (for
example to check electrical or gas connection) the
panhead screws that were removed must be re-installed to
ensure proper functionality of burners.
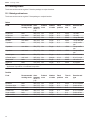
Burner Burner cap dimensions
Dual-flame burner Inner dual: 13/4" (45mm)
Ring: 515/16" (150 mm)
Small burner 23/16" (55mm)
Large burner 315/16" (100mm)
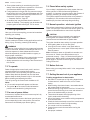
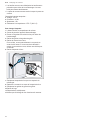
Checking burner cap placement
Check to make sure that there is no gap between the
burner cap and burner base.
See illustration for correct and incorrect placements of the
burner cap.
You may gently try to move the burner cap from side to
side to check if it is properly placed. If properly placed, the
cap will click from side to side as the prongs hit the groove
ridge.
Install grates
First position the outer grates, followed by the center
grate.
If you only have two grates, the order in which you position
them is not relevant.
Control panels
You can use the control panel to configure all functions of
your appliance and to obtain information about the
operating status.
Cooktop control panel
The cooktop has one control knob for each burner. Push
in and turn to the left to light and set the desired heat
setting. Once the flame appears, keep the knob pressed in
fully for 2-3 seconds before releasing and adjusting the
flame.
WARNING
Failure to operate knobs properly may result in personal
injury and damage to the appliance.
The cooktop has standard burner controls.
Symbol Meaning
off Cooking zone switched off
min Minimum power
max Maximum power
Inner flame switched on

en-us Familiarizing yourself with your appliance
16
Symbol Meaning
Inner and outer flame
switched on
Symbol Meaning
Recommended ignition
position
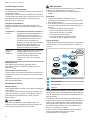
Oven control panel
F F
AM
PM
1
23
1
Display
2
Touch keys
3
Temperature indicator →
Page14
Buttons
Symbol Meaning
Panel lock or settings
Minus
Time functions
Plus
Oven light
Note:You only need to press lightly on the touch keys to
operate them.
Display
Symbol Meaning
Panel lock
Clock
Kitchen timer
End time
Duration
Sabbath mode
Symbol Meaning
Meat probe
h:min Time in hours and minutes
min:sec Time in minutes and seconds
AM/PM Time
Control knobs
WARNING
Failure to operate knobs properly may result in personal
injury and damage to the appliance.

Accessories en-us
17
Oven
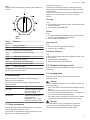
Set the required heating type using the rotary selector for
the oven.
Knob
position
Function
off Oven switched off
broil Switching on Broiling
conv broil Switching on Convection Broil
conv
roast
Switching on Convection Roast
pizza Switching on Pizza mode
proof Switching on Proofing
multi rack Switching on Multi Rack mode
conv bake Switching on Convection Bake
bake Switching on Bake
To operate: Turn to the required type of heating. Turn off
by turning the control knob to off.
Accessories
5 Accessories
Accessories
Only use original accessories. These are designed
especially for your appliance.
The accessories supplied may differ depending on the
appliance model.
Accessories Use
Wire rack Inserting cake pans, baking
dishes, cookware, meat
and frozen meals.
Meat probe Determining the degree of
cooking and the
temperature in food items
such as meat and poultry.
5.1 Other accessories
You can purchase other accessories from our Customer
Service, specialist retailers or online.
You will find a comprehensive range of products for your
appliance in our brochures and online:
www.bosch-home.com
Accessories are appliance-specific. When purchasing,
always check for compatibility with your appliance model
number (E-Nr).
You can find out which accessories are available for your
appliance in our online shop or from our Customer
Service.
Wok ring
Use
¡Only suitable for dual-flame burners. Use cookware with
a rounded bottom.
¡Order number: HEZ9GW23UC
Griddle
Use
¡The griddle plate allows meals that are usually cooked
in a pan to be prepared with reduced fat.
¡Order number: HEZ9GR41UC
Telescopic rail
Use
¡Pull wire rack out further without tipping.
¡Order number: 12029918
Side panel extension
Use
¡Side cover for appliances without adjacent kitchen units.
Order numbers:
¡stainless steel: HEZ9YZ04UC
¡black stainless steel: HEZ8YZ04UC
5.2 Fitting the telescopic rail set
Instructions on fitting the telescopic rail set are enclosed
with the set.
5.3 Inserting racks
The wire rack can be inserted into the oven cavity at
6different levels.
CAUTION
The oven racks and the oven cavity surfaces become very
hot during cooking.
▶Place oven racks in the desired positions before turning
oven on.
▶Always use oven mitts when the oven is warm.
▶If a rack must be moved while the oven is hot, do not let
oven mitts contact hot heating elements.
▶Use caution when removing oven racks from the lowest
rack position to avoid contact with the hot oven door.
CAUTION
To avoid possible injury or damage to the appliance,
ensure oven rack is installed exactly per installation
instructions and not backwards or upside down.

en-us Before using for the first time
18
Always push racks in fully so that they do not touch the
door panel. Make sure that you always insert the racks
into the oven cavity the right way, and not backwards or
upside down.
Flat rack
The rack is designed with a stop so it will stop before
coming completely out of the oven.
Inserting the wire rack into oven
1. Grasp the rack firmly on both sides.
2. Insert the rack.
3. Tilt the rack up to allow the stop to slide onto the rack
guide.
4. Bring the rack to a horizontal position and push it in the
rest of the way.
The rack should be straight and level.
Removing the flat rack from the oven
1. Grasp the rack firmly on both sides and pull it toward
you.
2. When the stop is reached, tilt the rack up and pull it out
fully.
5.4 Griddle
To cook most foods on the griddle, the surface must be
pre-heated.
The burner power may require adjustment if the griddle is
used for a long time.
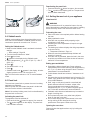
5.5 Installing the griddle
The griddle is customized to fit only on the grates
illustrated below.
WARNING
Place and remove the griddle only when all grates and the
griddle have cooled down and all burners are off.
Before using for the first time
6 Before using for the first time
Before using for the first time
Carry out these steps before using your appliance.
¡The appliance must be properly installed by a qualified
service provider before use.
¡Read and understand all safety precautions →
Page3
and information in the Use and Care Manual prior to
operating.
¡This Use and Care Manual covers several models. Not
all features are available on all models.

Before using for the first time en-us
19
6.1 Before using the oven for the first time
¡Remove all packing materials and literature from the
cooktop surface.
¡Wipe with a clean, damp sponge and dry.
¡There may be a slight odor during the first several uses.
This is normal and will disappear.
¡Optimum cooking results depend on the proper
cookware being selected and used. See “Choosing
Cookware - Cookware Recommendations”.
¡Read and understand all safety precautions and
information in the Use and Care Manual prior to
operating.
Setting the time
Once the appliance is connected to a power supply, :
flashes on the display. Set the time.
1. Use the and buttons to set the time.
2. Press the button.
aThe time has now been set.
Note:Once the period allowed for setting the time on the
clock has elapsed, the time will automatically be saved.
Prepping the oven
1. Remove the accessories and the rack guides from the
oven cavity.
2. Completely remove any leftover packaging, e.g. small
pieces of polystyrene, from the oven cavity.
3. Remove protection film from parts.
4. Clean the outside of the appliance with a soft, damp
cloth.
5. Clean the oven cavity with hot soapy water.
Pre-cleaning the oven
1. Remove the accessories and the hook-in rack guides
from the oven cavity.
2. Completely remove any leftover packaging, e.g. small
pieces of polystyrene, from the oven cavity.
3. Some parts are covered with a protective film. Remove
this scratch protection film.
4. Clean the outside of the appliance with a soft, damp
cloth.
5. Clean the oven cavity with hot soapy water.
Initial start up
In order to prevent excess smoke and odor from
manufacturing oils, heat up the oven for the first time when
it is empty and closed.
Note:Make sure that there is no leftover packaging, such
as polystyrene pellets, in the oven cavity. Before heating
the appliance, wipe the smooth surfaces in the oven cavity
with a soft, damp cloth. Keep the kitchen ventilated while
the appliance is heating.
1. Turn the function selector to bake.
2. Use to set the maximum temperature.
3. Switch the oven off after one hour.
4. Once oven has cooled wipe out with hot soapy water
and replace rack guides.
Note:When the appliance is heating up for the first time,
you may hear crackling noises coming from the oven.
Re-cleaning the oven
1. Clean the oven cavity with hot soapy water.
2. Reinstall the rack guides.
3. If necessary, clean the door panels.
Cleaning the accessories
▶Before using the accessories, clean them thoroughly
using a cloth and warm soapy water.
6.2 Before using the cooktop for the first
time
¡Remove all packing materials and literature from the
cooktop surface.
¡Wipe with a clean, damp sponge and dry.
¡There may be a slight odor during the first several uses.
This is normal and will disappear.
¡Optimum cooking results depend on the proper
cookware being selected and used.
→
"Cookware recommendations", Page23
¡Read and understand all safety precautions and
information in the Use and Care Manual prior to
operating.
Typical flame characteristics
The burner flame should be blue in color and stable with
no yellow tips, excessive noise or fluttering. It should burn
completely around the burner cap.
Checking the flame characteristics:
Yellow flames:
Further adjustment is
required.
Yellow tips on outer cones:
Normal for propane gas.
Soft blue flames:
Normal for natural gas.
Orange flames:
Can be normal if certain
types of humidifiers are
used in the home. Flames
should return to blue
without the humidifier
running.
Note
¡If the flame is completely or mostly yellow, verify that
the regulator is set for the correct fuel. Retest after
adjustment.

en-us Cooktop operation
20
¡Some yellow streaking is normal during the initial
startup. Allow the appliance to operate for 4–5minutes
and reevaluate before making adjustments.
¡Foreign particles in the gas line may cause an orange
flame during initial use. This should disappear with use.
Check the burner to make sure that port holes are not
obstructed. If the ports are clogged.
→
"Customer Service", Page43
¡An audible "pop" may be heard when the burner is
turned off manually. The "popping" may be louder with
propane gas than with natural gas. This is normal.
Cooktop operation
7 Cooktop operation
Cooktop operation
Here you will find out everything you need to know about
operating your cooktop.
7.1 About the appliance
Use the cooktop for surface cooking applications such as
boiling, frying, simmering, steaming and sautéing.
WARNING
The burning of gas cooking fuel can create small amounts
of carbon monoxide, benzene, formaldehyde and soot. To
minimize exposure to these substances the burners
should be adjusted by a certified installer or agency to
ensure proper combustion.
▶Ensure proper ventilation with an open window or use a
ventilation fan or hood when cooking with gas.
▶Always operate the unit according to the instructions in
this manual.
7.2 To operate
Select the appropriate control knob, push in and turn
counterclockwise to the desired flame setting.
With this motion, burner sparking and gas flow will be
initiated. Keep the knob pressed and once the flame
appears keep the knob pressed in fully for 2-3 seconds
before releasing and adjusting the flame.
Turn off by turning the control knob clockwise to off.
Notes
¡It is normal that sparks will appear at all burners.
¡The symbol on the control knobs indicates the
position recommended for igniting the burner.
7.3 In case of power failure
In the event of a power failure, the burners may be lit by
an alternate flame source.
Hold a lit flame source next to the burner gas exit ports,
turn corresponding knob to max position, and remove
flame source immediately upon burner lighting.
7.4 Flame failure safety system
Your cooktop is equipped with a safety system that cuts
off the gas flow in case the flame extinguishes by
accident, (i.e. because of a strong draft or high amount of
spillage), preventing an escape of unburned gas.
This system requires that the knob has to be pressed in
completely for 2-3seconds until the thermocouple is
heated up by the flame and keeps the gas flowing.
7.5 Normal operation - electronic ignition
The cooktop uses electronic igniters to light the burners.
There is no pilot light. Each burner has its own igniter. All
igniters are activated when a control knob is pushed.
CAUTION
To avoid possible injury or damage to the appliance,
ensure grates are installed exactly per installation
instructions and not backwards or upside down.
The igniter should be clean and dry for proper operation.
¡Avoid getting water or food on the igniter.
¡If the igniter is wet or soiled, it may spark without
igniting the burner, or even spark continuously when a
flame is present.
Note:If the burner does not light within 4 seconds, turn
the burner off. Check to see that the burner cap is
positioned correctly →
Page14
. Check that the igniter is
clean and dry. Wait at least 5minutes before igniting the
burner again. If a burner still fails to ignite, see “Before
Calling for Service”.
7.6 Before first use
Before using your new griddle, wash it in hot, soapy water,
rinse and dry.
7.7 Getting the most out of your appliance
Cooking suggestions for best results
¡Boil water in covered pot on High using largest burner
for best results. If water boils over, turn to a lower
setting.
¡When melting chocolate or butter, use smallest burner
with a water bath for best results.
¡When simmering, bring food to a boil first. Stir well to be
sure all the food is boiling, then cover and reduce the
flame to the desired setting to simmer.
¡There should be steam and slight quivering of the
liquid’s surface while simmering.
¡Use a lid to keep a more constant cooking temperature
and heat food faster.
¡Check the food occasionally to see if the control knob
should be turned to a lower or higher setting.
¡It is normal to stir food occasionally.
¡Center the pan over the burner before turning the
burner on.
¡Use proper cookware.
La page charge ...
La page charge ...
La page charge ...
La page charge ...
La page charge ...
La page charge ...
La page charge ...
La page charge ...
La page charge ...
La page charge ...
La page charge ...
La page charge ...
La page charge ...
La page charge ...
La page charge ...
La page charge ...
La page charge ...
La page charge ...
La page charge ...
La page charge ...
La page charge ...
La page charge ...
La page charge ...
La page charge ...
La page charge ...
La page charge ...
La page charge ...
La page charge ...
La page charge ...
La page charge ...
La page charge ...
La page charge ...
La page charge ...
La page charge ...
La page charge ...
La page charge ...
La page charge ...
La page charge ...
La page charge ...
La page charge ...
La page charge ...
La page charge ...
La page charge ...
La page charge ...
La page charge ...
La page charge ...
La page charge ...
La page charge ...
La page charge ...
La page charge ...
La page charge ...
La page charge ...
La page charge ...
La page charge ...
La page charge ...
La page charge ...
La page charge ...
La page charge ...
La page charge ...
La page charge ...
La page charge ...
La page charge ...
La page charge ...
La page charge ...
La page charge ...
La page charge ...
La page charge ...
La page charge ...
La page charge ...
La page charge ...
La page charge ...
La page charge ...
La page charge ...
La page charge ...
La page charge ...
La page charge ...
La page charge ...
La page charge ...
La page charge ...
La page charge ...
-
 1
1
-
 2
2
-
 3
3
-
 4
4
-
 5
5
-
 6
6
-
 7
7
-
 8
8
-
 9
9
-
 10
10
-
 11
11
-
 12
12
-
 13
13
-
 14
14
-
 15
15
-
 16
16
-
 17
17
-
 18
18
-
 19
19
-
 20
20
-
 21
21
-
 22
22
-
 23
23
-
 24
24
-
 25
25
-
 26
26
-
 27
27
-
 28
28
-
 29
29
-
 30
30
-
 31
31
-
 32
32
-
 33
33
-
 34
34
-
 35
35
-
 36
36
-
 37
37
-
 38
38
-
 39
39
-
 40
40
-
 41
41
-
 42
42
-
 43
43
-
 44
44
-
 45
45
-
 46
46
-
 47
47
-
 48
48
-
 49
49
-
 50
50
-
 51
51
-
 52
52
-
 53
53
-
 54
54
-
 55
55
-
 56
56
-
 57
57
-
 58
58
-
 59
59
-
 60
60
-
 61
61
-
 62
62
-
 63
63
-
 64
64
-
 65
65
-
 66
66
-
 67
67
-
 68
68
-
 69
69
-
 70
70
-
 71
71
-
 72
72
-
 73
73
-
 74
74
-
 75
75
-
 76
76
-
 77
77
-
 78
78
-
 79
79
-
 80
80
-
 81
81
-
 82
82
-
 83
83
-
 84
84
-
 85
85
-
 86
86
-
 87
87
-
 88
88
-
 89
89
-
 90
90
-
 91
91
-
 92
92
-
 93
93
-
 94
94
-
 95
95
-
 96
96
-
 97
97
-
 98
98
-
 99
99
-
 100
100


Bosch HDS8045U Manuel utilisateur
- Catégorie
- Fours
- Taper
- Manuel utilisateur
- Ce manuel convient également à
dans d''autres langues
- English: Bosch HDS8045U User manual