BLUE SKY OKCSST26 Le manuel du propriétaire
- Taper
- Le manuel du propriétaire

OWNER'S MANUAL
OUTDOOR KITCHEN
MANUEL DU PROPRIÉTAIRE
CUISINE EXTÉRIEURE
MANUAL DEL PROPIETARIO
COCINA PARA EXTERIORES
OKC3024GDR1DG, OKC3024GD2DG
OKC3024GD2SKDG, OKC3024GDR3DG

2 www.blueskyoutdoorliving.com
Fill in the following information and retain this manual for future reference:
MODEL(S):
DATE OF PURCHASE:
PLACE OF PURCHASE:
RECEIPT NO:
TIME WELL SPENT
We believe in the value and benefits of spending time outdoors. Our goal is to provide you
with a wide variety of outdoor related products that allow you to spend endless days outside,
generating loads of laughter and creating memories that will last a lifetime.
Blue Sky Outdoor Living oers high quality, on-trend,
outdoor living products that will bring an enhanced experience to any backyard, outdoor
gathering or adventure.
Connect with us @blueskyoutdoorliving
GETTING STARTED
All cabinets are inspected prior to leaving the factory and they have been carefully packaged to prevent any
damage during shipping and handling. On occasion, damage in handling between the factory and your home may
occur. Please inspect each cabinet carefully prior to assembly and installation. If damage is discovered, contact our
Customer Service team at 1-800-459-4409 for quick results to any issues that may arise.
Take time to review your installation project, what cabinets you have and how they will be arranged in your space.
If you have unpacked all your boxes, and checked for damage, please make sure not to mix components.
You can perform a dry fit of the cabinets by laying out the tops (keep their protective film on to prevent scratches) in
the selected location to ensure your layout will fit in the desired space.

3 www.blueskyoutdoorliving.com
PICKING A LOCATION
Make sure there is enough room for the cabinets you are installing.
Remember to leave about 3 feet for you to walk in front of and at the sides of your cabinet(s).
The install location should not have a slope of more than 15 degrees and should be made of a hard surface - stone,
concrete, wooden or composite decking.
It is not recommend for installation on a lawn or directly on the ground.
If you are installing the cabinets next to a BBQ grill or other burning appliance, check the recommended locations for
placement in your burning appliance directions. Do not place your outdoor cabinets right next to the burn chamber of
a BBQ grill.
FOR YOUR SAFETY
BEFORE STARTING THE INSTALLATION, READ THIS ENTIRE GUIDE TO FAMILIARIZE YOURSELF WITH THE
SAFETY AND LOCATION WARNINGS AND ASSEMBLY STEPS.
THE INSTALLATION OF ANY OF BLUE SKY OUTDOOR KITCHEN CABINETS NOT PERFORMED ACCORDING
TO THE INSTRUCTIONS PRESENTED IN THIS GUIDE COULD VOID THE WARRANTY OF THE PRODUCT.
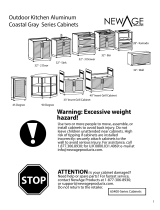
WARNING: EXCESSIVE WEIGHT HAZARD
Blue Sky Outdoor Kitchen Cabinets should be moved, assemble or installed with two or more people to avoid injury
from lifting.
Do not let children climb on the cabinets, hang on doors / drawers or leave children unattended near the cabinets. These
actions could cause tipping that could lead to serious or fatal injury. Securely attach cabinets to a wall or gang several cabinets
together using the fasteners included with each cabinet to avoid serious injury.
Note the listed weight capacities and do not overload cabinets. Overloading could cause cabinets to become unstable and
cause serious or fatal injury.
WARNING
Wear protective eye wear, gloves, and boots during assembly.
Always maintain a clean, organized work area.
Do not stand or sit on cabinet tops, cabinet may become unstable and result in property damage or serious injury. If sitting at
a cabinet with an extended top, do not use the top to pull yourself up from a chair.
Do not drag or move cabinets with leveling feet in place.
WARNING
Electric, plumbing, gas lines and other utilities are frequently installed or embedded behind walls where cabinets are being
installed. Before drilling holes or screwing cabinets to outside walls, be sure you will not make contact with any of these
utilities. Failure to follow these instructions may result in property damaged and serious or fatal injury. If you do not feel
confident in your ability to insure that you will not make contact with utilities behind a wall during installation, please contact a
licensed contractor to install the cabinets.

4 www.blueskyoutdoorliving.com
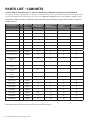
PARTS LIST - CABINETS
UNPACK PARTS, MAKING SURE ALL PIECES ARE PRESENT BEFORE ATTEMPTING TO ASSEMBLE.
If any part is missing or damaged, do not attempt to assemble the product. Contact Blue Sky Outdoor Living directly by
email at service@blueskyoutdoorliving.com or phone at 1-800-459-4409 (Monday–Friday, 8:00 am–4:30 pm, CST).
ASSEMBLY AND MOVING OF BLUE SKY OUTDOOR KITCHEN CABINETS SHOULD BE DONE BY TWO OR
MORE PEOPLE.
DESCRIPTION REF PART
NUMBERS
2 DOOR CABINET
OKC3024GD2DG 1 DRAWER
2 DOOR CABINET
OKC3024GDR1DG
3 DRAWER
CABINET
OKC3024GDR3DG
2 DOOR SINK
CABINET
OKC3024GDSKDG
Cabinet Body A 1 1 1 1
Cabinet Base B 1 1 1 1
Leveling Feet C126022 4 4 4 4
Shelf Bracket D126023 4 4 0 4
Adjustable Shelf E126024 1 1 0 0
Adjustable Sink Shelf ES 126025 0 0 0 1
Large Plastic Cap F126026 1 1 1 3
Medium Plastic Cap G126027 0 0 0 4
Small Plastic Cap H126028 8 8 8 8
Large Folding
Drawer I 0 0 2 0
Large Drawer Front J 0 0 2 0
Medium Folding
Drawer K 0 1 1 0
Medium Drawer
Front L 0 1 1 0
Large Drawer
Dividers ML 126029 0 0 4 0
Medium Drawer
Dividers MM 126030 0 2 2 0
Drawer Slides N 126031 0 2 6 0
Drawer Liner O126032 0 1 3 0
M8*50 Bolt P 126033 4 4 4 4
M8*50 Nut Q 126034 4 4 4 4
M6*12 Bolt R 126035 10 10 10 10
M5*10 Bolt S126036 0 12 36 0
M4*10 Bolt T126037 020 60 0
Parts listed with part numbers can be ordered for replacement parts.

5 www.blueskyoutdoorliving.com
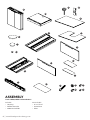
A
E
F
G
H
I
K
L
ML
MM
N
O
PQ S
RT
J
ES
B
C D
ASSEMBLY
TOOLS REQUIRED FOR ASSEMBLY
Included:
• Hex Keys
• Drill Bit Extender
• 4MM Hex Drill Bit
Not Included:
• 4' to 6' level
• Screwdriver
• Pliers

6 www.blueskyoutdoorliving.com
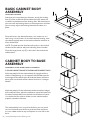
BASIC CABINET BODY
ASSEMBLY
LEVELING THE BASE
Now that you have picked your location, attach the leveling
feet (C) to the underside of the cabinet base (B). Move the
nut down to the bottom of the leveling feet. We recommend
you start with the leveling foot at it's lowest position and then
you can easily adjust the leveling foot when the base is in
place.
Place the base in the desired location, and make sure it is
level using a 4' to 6' level. On the front to back leveling, have
the cabinet slightly lower in the back to allow for moisture to
drain o the back.
NOTE: The hole location for electrical cords is in the back of
the base of the cabinet. Adjust the leveling feet if needed.
Place the large plastic cap (F) in the hole in the back of the
cabinet base.
CABINET BODY TO BASE
ASSEMBLY
(ASSEMBLY IS THE SAME FOR ALL CABINETS)
2 DOOR CABINET IMAGE IS SHOWN AS EXAMPLE ONLY
With two people, lift the cabinet body (A) upright with the
sticker inside pointing up. One person should hold onto the
front edge of the cabinet (do not lift by the doors) while the
other pulls out the back of the cabinet so that it is no longer
folded.
With two people, lift the cabinet by the back and front edges
of the cabinet frame, place the cabinet on top of the base that
has been leveled. Make sure the hole for the electrical cords
is in the back of the cabinet. Make sure the cabinet body is
properly seated on the base.
The cabinet body has a snug fit to the base, you may need
to use a flat head screw driver to guide one side into place
or use a rubber mallet to tap it into place so it sits flat on the
base.

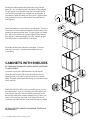
7 www.blueskyoutdoorliving.com
Attach the cabinet body to the base by using 6 of the
bolts (R) - 3 in the front and 3 in the back of the cabinet.
Finger tighten until all bolts have been threaded in the
nuts that have already been welded into the bottom of
the cabinet. When the bolts are all in place - tighten them
with provided hex key or drill bit with extender (do not
over tighten).
With two people, turn the cabinet upside down. There are
2 locations on each side of the bottom of the cabinet that
need to be secured to the base. Finger tighten all 4 bolts
(R). When the 4 bolts are in place-tighten them (do not
over tighten). With two people, turn the cabinet upright.
Check to make sure the cabinet is still level.
Assembly of the Base Cabinet is complete. Continue
with the instructions related to the cabinet you are
assembling.
CABINETS WITH SHELVES
(IF YOUR UNIT DOES NOT HAVE A SHELF CONTINUE
TO NEXT STEP)
It is easier to set your shelf location with the top o.
Place the self brackets (D) to the desired location by
slipping them in the slots in the corners of the cabinet
body. The open hook should be facing up towards the top
of the cabinet.
Slide the shelf (E or ES) in place to make sure it is in the
desired location. If you are installing the ES shelf for the
sink cabinet, the open slot should be positioned in the
back of the cabinet to accommodate pluming hoses and
drains. Then remove the shelf. It will make it easier to
install the top. Reinstall the shelf after the top is installed.
ATTACH THE TOP USING TOP MANUAL (TOP SOLD
SEPARATELY)

8 www.blueskyoutdoorliving.com
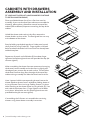
(IF YOUR UNIT DOES NOT HAVE DRAWERS CONTINUE
TO DETAIL AND FINISHING)
Place your folded drawer (I or K) on a flat clean area for
assembly. If you use the top of your cabinet to assemble the
drawer(s), please place a protective material on top of the
cabinet (like cardboard) to prevent scratching the top of the
cabinet.
Unfold the drawer sides so that it lays flat, remove the
drawer dividers and set aside. The food grade liner can stay
at the bottom of the drawer.
Start by folding up the back panel and 1 side panel, attach
the 2 panels by using 2 bolts (S). Finger tighten until both
bolts have been threaded in the nuts that have already been
welded into place.
Repeat on all panels until all 8 bolts (S) have been finger
tightened into place-tighten them with provided hex key (do
not over tighten).
When assembling the drawer front we recommend arranging
the drawer frame assembly so that the front is slightly over
the edge of your counter top or work surface. This will allow
the drawer handle to hang over the edge of the top of the
cabinet during assembly and allow the draw front to sit flat.
Have 1 person hold the corresponding drawer front to the
drawer (Medium drawer front L to Medium folding drawer K
or Large Drawer Front J to Large Folding Drawer I) in place
while attaching to the drawer frame by using 4 bolts (S), 2 on
each side of the drawer front. Finger tighten until all bolts
are in place. When bolts are all in place-tighten them with
provided hex key (do not over tighten).
If assembling the 3 Drawer unit assemble the remaining
drawers using above drawer assembly instructions.
CABINETS WITH DRAWERS
ASSEMBLY AND INSTALLATION
FRONT
BACK

9 www.blueskyoutdoorliving.com
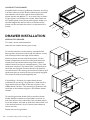
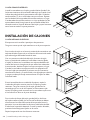
DRAWER SLIDE ASSEMBLY
CAUTION! DRAWER SLIDES ARE GREASED AND CAN LEAVE
RESIDUE.
Before attaching slides to the cabinet make sure the inside arm is
pushed and locked all the way back exposing the front through holes
as shown. Repeat for all slides before next step.
Assemble the top drawer slides by attaching 2 of the drawer slides
(N) on to the top slide location of the inside of the cabinet on each
side of the cabinet using 12 bolts (T)- 1 drawer slide and 6 bolts on
each side. Finger tighten until all bolts are in place. When bolts are
all in place-tighten them with provided hex key (do not over tighten).
If assembling a 3 Drawer unit continue attaching remaining slides to
the cabinet. Note the assembly location of remaining slides.
Assemble the middle drawer slides by attaching 2 of the drawer
slides (N) on to the 2nd highest slide location of the inside of the
cabinet on each side of the cabinet using 12 bolts (T) - 1 drawer slide
and 6 bolts on each side. Finger tighten until all bolts are in place.
When bolts are all in place-tighten them with provided hex key (do
not over tighten).
Assemble the bottom drawer slides by attaching the remaining 2
drawer slides (N) to the lowest slide location of the inside of the
cabinet on each side of the cabinet using 12 bolts (T) - 1 drawer slide
and 6 bolts on each side. Finger tighten until all bolts are in place.
When bolts are all in place-tighten them with provided hex key (do
not over tighten).

10 www.blueskyoutdoorliving.com
With your drawer slides attached to the cabinet extend the inside
arm of your drawer slides on both sides.
Separate the inside arm of your drawer slide by pressing up on
the plastic lever on the slide on the right and down on the lever
on the slide on the left. Keep the inner slides together as you
separate them.
Repeat drawer slide separation for remaining drawer slide.
MEDIUM TOP DRAWER
Assemble slides to the medium top drawer by attaching 2 of the
inside arms of the drawer slide that you removed to either side of
the outside of the drawer.
Attach with 8 bolts (T) - 4 on each side, as shown. Finger tighten
until all bolts are in place. When bolts are all in place-tighten
them (do not over tighten). Make sure the solid edge of the
drawer slide is at the front of the drawer and the end with the
cutout is at the back of the drawer.
LARGE MIDDLE DRAWER
Assemble slides to the Large Middle drawer by attaching 2 of
the inside arms of the drawer slide that you removed to the top
rail of either side of the outside of the drawer. Attach with 8 bolts
(T) - 4 on each side, as shown. Finger tighten until all bolts are
in place. When bolts are all in place-tighten them (do not over
tighten). Make sure the solid edge of the drawer slide is at the
front of the drawer and the end with the cutout is at the back of
the drawer.

11 www.blueskyoutdoorliving.com
LARGE BOTTOM DRAWER
Assemble slides to the Large Bottom drawer by attaching
2 of the inside arms of the drawer slide that you removed
to the bottom rail of either side of the outside of the
drawer. Attach with 8 bolts (T) - 4 on each side, as shown.
Finger tighten until all bolts are in place. When bolts are
all in place-tighten them (do not over tighten). Make sure
the solid edge of the drawer slide is at the front of the
drawer and the end with the cutout is at the back of the
drawer.
DRAWER INSTALLATION
MEDIUM TOP DRAWER
This step is easier with two people.
Note that the medium drawer goes on top.
To install the drawer into the cabinet, extend the ball
bearing slides that were install inside the cabinet, so they
stick out beyond the front edge of the cabinet.
With one person on each side of the drawer. Lift the
drawer into position so the inner slide (attached to the
drawer) lines up with the ball bearing slide inside the
cabinet. Make sure they are seated properly. Then slide
the drawer into place. You should hear a small click when
the slides are engaged. Close the drawer fully (the first
time will require a firm closing of the drawer) and then pull
the drawer open to make sure they are properly engaged.
The drawer should not pull completely out.
If assembling a 3 drawer unit repeat above drawer
instillation for remaining 2 large drawers. Note that the
large drawer with the slides on the top rail goes in the
middle drawer location. The remaining large drawer with
the slides on the bottom rail goes in the bottom drawer
location.
To install large drawer divider (ML) or medium drawer
divider (MM) the notches on the dividers must line up
with the tracks on the inside of the front and back panels.
Once the dividers are lined up slide them side to side until
in the desired location. Once in location press down to
secure into slot.
Repeat for remaining dividers.

12 www.blueskyoutdoorliving.com
Empty drawer before removing it from the cabinet. It is easier to
remove the drawer with two people. To remove the drawer, pull
the drawer open enough to fully extend the slides. Push up on the
black release lever on one side of the inner slide, while pushing
down on the black release lever on the other side of the drawer.
While holding the levers in these positions, pull the drawer outward,
towards you, until it is released from the drawer slide.
REFER TO DRAWER INSTALLATION TO RE-INSTALL
DRAWERS.
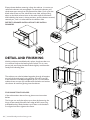
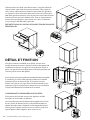
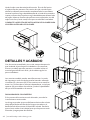
DETAIL AND FINISHING
With the cabinet assembled and in place, check to make sure
it is still level. Adjust the leveling feet if need. This is a two
person job, one to tip the cabinet back slightly and the other
to adjust the leveling feet.
The cabinets can also be bolted together through 4 locations
on each of the side panels using 4 bolts (P) and 4 nuts (Q).
If the cabinet are not bolted together or if it is a stand alone
cabinet there are caps (H) include to fill the holes and reduce
the chance of moisture getting into the cabinet.
FOR CABINETS WITH DOORS:
If the cabinet doors do not line up, please see instruction
below.
The hinges can easily be adjust up or down by loosening the
hinge screws attached to the front edge of the frame using
provided hex key. Slide the door up or down until the doors
are aligned and then tighten the screws.
X4
X4

13 www.blueskyoutdoorliving.com
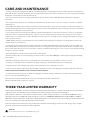
THREE YEAR LIMITED WARRANTY
This product is warranted to be free from defects in materials and workmanship for a period of three (3) years from the date of
original purchase. This limited warranty is available to the initial purchaser only and is not transferable.
If this product is defective, contact the local retailer where you purchased your product, or contact Blue Sky Outdoor Living
directly by email at service@blueskyoutdoorliving.com or phone at 1-800-459-4409 (Monday–Friday, 8:00 am–4:30 pm,
CST). If the product is defective, we will replace the defective part at no cost to you. Please do not ship your product back to the
store or to us unless we send you written instructions for return.
In the event it becomes necessary for your product to be returned, we will notify you how to proceed. A copy of your original
purchase receipt must accompany the returned product.
WARNING
Cancer and Reproductive Harm – www.P65Warnings.ca.gov
CARE AND MAINTENANCE
• To keep your cabinets looking clean and fresh, wash with fresh water, a mild detergent and a micro fiber cloth. Then rinse with clean
water and dry with a soft cloth, go with the grain on any brushed stainless-steel surfaces. If preferred, you can use products specifically
designed to clean stainless steel for the cabinet tops.
• Do not use abrasive cleaners or sponges / pads that are abrasive, these products will dull the finish and harm the longevity of
the product.
• Also, stainless-steel may show "tea" staining if not washed often in costal locations or in close proximity to a chlorine or saltwater
swimming pool.
• Check cabinets / drawers after hard rain. If water has penetrated the cabinet - wipe up moisture with a micro fiber cloth. Make sure
all side button plugs and electrical cord grommets are in place. If water entered a drawer, make sure they are securely closed and that
the cabinets are leveled per set up instructions.
• If your stainless-steel tops show signs of oxidization, take the following steps to rejuvenate its appearance. First, try cleaning with
fresh water and a non-abrasive cleaning sponge - make sure you are stainless-steel top in the direction of the grain. If you run into a
stubborn stain, use a stainless-steel cleanser (follow the cleanser's direction - follow the cleaner's warnings with regards to using on a
food preparation surface.)
• NOTE: Always rub / wipe / clean the stainless-steel tops with the grain. Wiping across the grain can ruin the finish and cause the
stainless-steel to lose its brilliance.
• For the glass fronts and aluminum front panels, wash with clean water and mild detergent with a micro fiber cloth. Rinse with clear
water and dry with a soft cloth. Do not use abrasive cleaners or scouring pad on any surface of the cabinet. Clean as needed or every
three months. If the cabinets are in close proximity to a chlorine or saltwater swimming pool or near a ocean, more frequently cleaning
is required - every 2 to 3 weeks.
• Water with high iron content can leave rusty residue on the cabinets.
• Extreme heat by a flame - be careful placing your cabinet in direct contact with a BBQ grill or other appliance that generated high
heat or flames.
• Salt that is left sitting on the products or gets splashed up on the cabinets in snowy weather can cause corrosion.
• Keeping your new outdoor kitchen cabinets clean will go a long way to extending their appearance and longevity.
• Trapped moisture under cutting boards, rubber mats, metal trays or cans could lead to corrosion.
• If the color of the cabinet bodies shows signs of fading, a thin layer of car wax can be applied per the wax manufacturers directions.
AVOID USING THESE CHEMICALS ON / AROUND THESE CABINETS:
• Products that include strong acids or alkaline can damage your cabinets: Vinegars, white wine, mustard, tomato-based products,
lemons, some carbonated beverages etc.
Chloride cleansers which includes bleach or any other cleaning materials that contain bleach.
Muriatic acid (often used to clean tile / concrete)

14 www.blueskyoutdoorliving.com
Remplissez les informations suivantes et conservez ce manuel d’utilisation pour référence future:
MODÈLE(S):
DATE D’ACHAT:
LIEU D’ACHAT:
NO DE REÇU:
DU TEMPS BIEN PASSÉ
Chez Blue Sky Outdoor Living, nous croyons à la valeur et aux avantages de passer du temps dans la
nature. Nos produits sont conçus pour la cour de votre domicile, la terrasse, le camping, la plage ou
lors de votre événement sportif préféré.
Vous pouvez compter sur Blue Sky Outdoor Living pour fournir des produits durables et faciles
à utiliser qui amélioreront votre arrière-cour, votre prochain rassemblement en plein air ou votre
prochaine aventure.
Connectez-vous avec nous @blueskyoutdoorliving
POUR COMMENCER
Toutes les armoires sont inspectées avant de quitter l’usine et soigneusement emballées afin d’éviter tout dommage
lors de l’expédition et de la manutention. Des dommages peuvent survenir lors de la manutention entre l’usine
et votre domicile. Veuillez inspecter soigneusement chaque armoire avant l’assemblage et l’installation. Si vous
constatez des dommages, communiquez avec notre équipe du service à la clientèle au 1800459-4409 pour
obtenir un soutien rapide.
Prenez le temps de passer en revue votre projet d’installation, d’inspecter vos armoires et de déterminer leur
disposition dans votre espace.
Après avoir déballé toutes vos boîtes et vérifié qu’il n’y a aucun dommage, assurez-vous de ne pas mélanger les
composants.
Vous pouvez eectuer une installation à sec des armoires en disposant les parties supérieures (conservez la pellicule
protectrice pour éviter les égratignures) à l’endroit choisi pour vous assurer que votre aménagement tiendra dans
l’espace prévu.

15 www.blueskyoutdoorliving.com
CHOISIR UN EMPLACEMENT
Assurez-vous d’avoir susamment d’espace pour les armoires que vous installez.
N’oubliez pas de laisser environ 1m (3pi) pour circuler en avant et sur les côtés de l’armoire.
L’endroit où vous l’installerez ne doit pas être incliné de plus de 15degrés et la surface doit être dure: revêtement
en pierre, en béton, en bois ou en composite.
Il n’est pas recommandé de faire l’installation sur l’herbe ou directement au sol.
Si vous installez les armoires à côté d’un BBQ ou d’un autre appareil de combustion, vérifiez les emplacements
recommandés dans le mode d’emploi de l’appareil de cuisson. Ne placez pas vos armoires extérieures juste à côté de
la zone de combustion d’un BBQ.
POUR VOTRE SÉCURITÉ
AVANT DE COMMENCER L’INSTALLATION, VEUILLEZ LIRE CE GUIDE AU COMPLET POUR CONNAÎTRE LES
CONSIGNES DE SÉCURITÉ ET D’EMPLACEMENT AINSI QUE LES ÉTAPES DE L’ASSEMBLAGE.
TOUTE ARMOIRE DE CUISINE EXTÉRIEURE BLUESKY DOIT ÊTRE INSTALLÉE SELON LES INSTRUCTIONS
PRÉSENTÉES DANS CE GUIDE, SANS QUOILA GARANTIE DU PRODUIT POURRAIT ÊTRE ANNULÉE.
WARNING: RISQUE DE POIDS EXCESSIF
Les armoires de cuisine extérieure BlueSky doivent être déplacées, assemblées ou installées par au moins deuxpersonnes
afin d’éviter de se blesser en les soulevant.
Empêchez les enfants de grimper sur les armoires, de s’accrocher aux portes ou aux tiroirs et ne les laissez pas à proximité
des armoires sans surveillance. Le non-respect de ces instructions pourrait causer un basculement risquant d’entraîner
des blessures graves ou mortelles. Fixez solidement les armoires au mur ou accrochez-les en utilisant les pièces de fixation
incluses avec chaque armoire pour éviter les blessures graves.
Prenez note des limites de poids indiquées et ne surchargez pas les armoires. Une surcharge pourrait engendrer une
instabilité des armoires et causer des blessures graves ou mortelles.
ATTENTION
Portez des lunettes de protection, des gants et des bottes pendant l’assemblage.
Maintenez votre aire de travail propre et ordonnée.
Ne vous tenez pas debout ou assis sur le dessus des armoires; elles risquent de bouger, causant ainsi des dommages
matériels ou de graves blessures. Si vous êtes assis devant une armoire dont la partie supérieure est allongée, ne vous
appuyez pas dessus pour vous lever.
Ne traînez pas ou ne déplacez pas les armoires avec des pattes de nivellement en place.
ATTENTION
Les branchements électriques, de plomberie, de gaz et autres sont souvent installés ou encastrés en arrière des murs sur
lesquels les armoires sont installées. Avant de percer des trous ou de visser les armoires sur les murs extérieurs, assurez-
vous de ne pas toucher à ces diérents branchements. Le non-respect de ces instructions pourrait entraîner des dommages
matériels et des blessures graves ou mortelles. Si vous n’avez pas confiance en votre capacité de ne pas toucher à ces
diérents branchements en arrière d’un mur pendant l’installation, veuillez recourir aux services d’un entrepreneur autorisé.

16 www.blueskyoutdoorliving.com
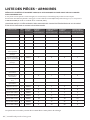
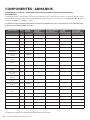
LISTE DES PIÈCES – ARMOIRES
DÉBALLEZ LES PIÈCES ET ASSUREZ-VOUS QU’IL N’EN MANQUE AUCUNE AVANT DE VOUS LANCER
DANS L’ASSEMBLAGE.
Si une pièce est manquante ou endommagée, ne commencez pas l’assemblage du produit. Communiquez
directement avec BlueSkyOutdoorLiving par courriel à l’adresse service@blueskyoutdoorliving.com, ou composez le
1800459-4409 (du lundi au vendredi de 8h à 16h30, HNC).
L’ASSEMBLAGE ET LE DÉPLACEMENT DES ARMOIRES DE CUISINE EXTÉRIEURES BLUESKY DOIVENT
ÊTRE EFFECTUÉS PAR AU MOINS DEUXPERSONNES.
DESCRIPTION RÉF NUMÉROS
DE PIÈCE ARMOIRE À
2PORTES
OKC3024GD2DG
1TIROIR ARMOIRE
À 2PORTES
OKC3024GDR1DG
ARMOIRE À
3TIROIRS
OKC3024GDR3DG
ARMOIRE SOUS
ÉVIER À 2PORTES
OKC3024GDSKDG
Caisson d’armoire A 1 1 1 1
Base d’armoire B 1 1 1 1
Pattes de nivellement C126022 4 4 4 4
Console pour tablette D126023 4 4 0 4
Tablette ajustable E126024 1 1 0 0
Tablette d’armoire
d’évier ajustable ES 126025 0 0 0 1
Grand capuchon en
plastique F126026 1 1 1 3
Capuchon de taille
moyenne en plastique G126027 0 0 0 4
Petit capuchon en
plastique H126028 8 8 8 8
Grand tiroir rabattable I 0 0 2 0
Devant du grand tiroir J 0 0 2 0
Tiroir rabattable
intermédiaire K 0 1 1 0
Devant du tiroir
intermédiaire L 0 1 1 0
Séparateurs du grand
tiroir ML 126029 0 0 4 0
Séparateurs du tiroir
intermédiaire MM 126030 0 2 2 0
Glissières du tiroir N 126031 0 2 6 0
Doublure du tiroir O 126032 0 1 3 0
BoulonM8x50mm P 126033 4 4 4 4
ÉcrouM8x50mm Q 126034 4 4 4 4
BoulonM6x12mm R 126035 10 10 10 10
BoulonM5x10mm S 126036 0 12 36 0
BoulonM4x10mm T 126037 020 60 0
Les pièces avec un numéro peuvent être commandées comme pièces de rechange.

17 www.blueskyoutdoorliving.com
A
E
F
G
H
I
K
L
ML
MM
N
O
PQ S
RT
J
ES
B
C D
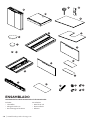
ASSEMBLAGE
OUTILS NÉCESSAIRES À L’ASSEMBLAGE
Inclus:
• Clés hexagonales
• Rallonge pour mèche
• Mèche hexagonale de 4mm
Non inclus:
• Niveau de 1,2m à 1,8m (4 à 6pi)
• Tournevis
• Pinces

18 www.blueskyoutdoorliving.com
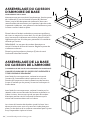
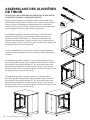
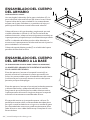
ASSEMBLAGE DU CAISSON
D’ARMOIRE DE BASE
NIVELLEMENT DE LA BASE
Maintenant que vous avez choisi l’emplacement, fixez les pattes
de nivellement (C) sous la base de l’armoire (B). Abaissez
l’écrou jusqu’au bas des pattes de nivellement. Nous vous
recommandons de commencer par la position la plus basse de
la patte de nivellement, vous pouvez ensuite facilement ajuster
le niveau une fois la base en place.
Placez la base à l’endroit souhaité et assurez-vous qu’elle est
de niveau au moyen d’un niveau de 1,2m à 1,8m (4 à 6pi). En
ce qui concerne le nivellement avant-arrière, placez l’armoire
légèrement plus bas à l’arrière pour permettre à l’humidité de
s’écouler par l’arrière.
REMARQUE: Le trou pour les cordons électriques se
trouve à l’arrière de la base de l’armoire. Réglez les pattes de
nivellement au besoin.
Placez le grand capuchon en plastique (F) dans le trou à
l’arrière de la base de l’armoire.
ASSEMBLAGE DE LA BASE
DU CAISSON DE L’ARMOIRE
(L’ASSEMBLAGE DE TOUTES LES ARMOIRES EST IDENTIQUE)
L’IMAGE DE L’ARMOIRE À 2PORTES EST PRÉSENTÉE À
TITRE D’EXEMPLE SEULEMENT
Avec l’aide d’une autre personne, soulevez le caisson de
l’armoire (A), l’autocollant intérieur pointant vers le haut.
Pendant qu’une personne tient le rebord avant de l’armoire
(ne pas la soulever par les portes), l’autre tire l’arrière pour la
mettre droite.
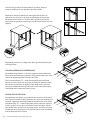
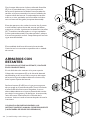
Avec l’aide d’une autre personne, soulevez l’armoire par les
rebords arrière et avant du cadre de l’armoire et placez-la sur
la base à niveau. Assurez-vous que le trou pour les cordons
électriques est bien situé à l’arrière de l’armoire et que le
caisson de l’armoire est bien calé sur la base.
Le caisson de l’armoire doit être bien ajusté à la base. Vous
devrez peut-être vous servir d’un tournevis à tête plate pour
placer un des côtés ou d’un maillet en caoutchouc pour l’ajuster
et qu’il repose bien à plat sur la base.

19 www.blueskyoutdoorliving.com
Fixez le caisson de l’armoire sur la base à l’aide de
6boulons (R) – 3à l’avant et 3à l’arrière de l’armoire.
Serrez à la main jusqu’à ce que tous les boulons soient
vissés dans les écrous préalablement soudés dans la
partie inférieure de l’armoire. Lorsque tous les boulons
sont en place, serrez-les à l’aide de la clé hexagonale
fournie ou d’une mèche avec rallonge (ne pas trop serrer).
Avec l’aide d’une autre personne, retournez l’armoire à
l’envers. Deuxemplacements de chaque côté du bas du
coret doivent être fixés à la base. Serrez les 4boulons à
la main (R). Lorsque les 4boulons sont en place, serrez-
les, mais pas trop. Retournez ensuite l’armoire à l’endroit.
Assurez-vous qu’elle est toujours de niveau.
L’assemblage de la base de l’armoire est maintenant
terminé. Poursuivez selon les instructions correspondant
à l’assemblage de votre armoire.
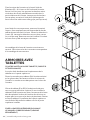
ARMOIRES AVEC
TABLETTES
(SI VOTRE UNITÉ N’A PAS DE TABLETTE, PASSEZ À
L’ÉTAPE SUIVANTE)
Il est plus facile de déterminer l’emplacement de la
tablette sans la partie supérieure.
Placer les consoles pour tablette (D) à l’endroit souhaité
en les glissant dans les fentes aux coins du caisson de
l’armoire. Le crochet ouvert doit pointer vers le haut de
l’armoire.
Glissez la tablette (E ou ES) à l’endroit souhaité pour
vous assurer qu’elle a bien sa place. Si vous installez la
tablette ES de l’armoire sous évier, l’ouverture de la fente
doit être placée à l’arrière de l’armoire afin de laisser un
espace pour les tuyaux et les drains de plomberie. Retirez
ensuite la tablette. L’installation de la partie supérieure
sera facilitée. Réinstallez la tablette une fois la partie
supérieure installée.
FIXEZ LA PARTIE SUPÉRIEURE EN SUIVANT
LE MANUEL CORRESPONDANT (VENDUE
SÉPARÉMENT)

20 www.blueskyoutdoorliving.com
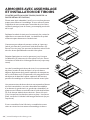
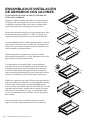
(SI VOTRE UNITÉ N’A PAS DE TIROIRS, PASSEZ À LA
PARTIE DÉTAILS ET FINITION)
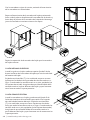
Placez votre tiroir rabattable (I ou K) sur une surface plane et
propre pour eectuer l’assemblage. Si vous utilisez la partie
supérieure de votre armoire pour assembler le ou les tiroirs,
veuillez la protéger (avec du carton, par exemple) pour éviter
de la rayer.
Déployez les côtés du tiroir pour les mettre à plat, retirez les
séparateurs et mettez-les de côté. La doublure de qualité
alimentaire peut demeurer au fond du tiroir.
Commencez par rabattre le panneau arrière et 1panneau
latéral, puis fixez les 2panneaux à l’aide de 2boulons (S).
Serrez à la main jusqu’à ce que tous les boulons soient vissés
dans les écrous préalablement soudés à leur place.
Répétez l’opération sur tous les panneaux jusqu’à ce que
les 8boulons (S) soient serrés à leur place à la main. Serrez
les boulons à l’aide de la clé hexagonale fournie (ne pas trop
serrer).
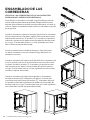
Lors de l’assemblage du devant du tiroir, il est recommandé
de placer le cadre du tiroir de façon à ce que le devant
dépasse légèrement de la partie supérieure du comptoir ou
de la surface de travail. Cela permettra à la poignée du tiroir
de dépasser du bord de la partie supérieure de l’armoire
pendant l’assemblage et au devant du tiroir de rester à plat.
Une personne tient le devant du tiroir correspondant (devant
du tiroir intermédiaire L ou tiroir rabattable intermédiaire
K ou devant du grand tiroir J ou grand tiroir rabattable I) en
place tout en le fixant au cadre du tiroir à l’aide de 4boulons
(S), 2de chaque côté du devant du tiroir. Serrez à la main
jusqu’à ce que tous les boulons soient en place. Une fois en
place, serrez-les à l’aide de la clé hexagonale fournie (ne pas
trop serrer).
Si vous assemblez l’unité à 3tiroirs, assemblez les autres
tiroirs en suivant les instructions d’assemblage ci-dessus.
ARMOIRES AVEC ASSEMBLAGE
ET INSTALLATION DE TIROIRS
FRONT
BACK
La page est en cours de chargement...
La page est en cours de chargement...
La page est en cours de chargement...
La page est en cours de chargement...
La page est en cours de chargement...
La page est en cours de chargement...
La page est en cours de chargement...
La page est en cours de chargement...
La page est en cours de chargement...
La page est en cours de chargement...
La page est en cours de chargement...
La page est en cours de chargement...
La page est en cours de chargement...
La page est en cours de chargement...
La page est en cours de chargement...
La page est en cours de chargement...
La page est en cours de chargement...
La page est en cours de chargement...
La page est en cours de chargement...
La page est en cours de chargement...
-
 1
1
-
 2
2
-
 3
3
-
 4
4
-
 5
5
-
 6
6
-
 7
7
-
 8
8
-
 9
9
-
 10
10
-
 11
11
-
 12
12
-
 13
13
-
 14
14
-
 15
15
-
 16
16
-
 17
17
-
 18
18
-
 19
19
-
 20
20
-
 21
21
-
 22
22
-
 23
23
-
 24
24
-
 25
25
-
 26
26
-
 27
27
-
 28
28
-
 29
29
-
 30
30
-
 31
31
-
 32
32
-
 33
33
-
 34
34
-
 35
35
-
 36
36
-
 37
37
-
 38
38
-
 39
39
-
 40
40


BLUE SKY OKCSST26 Le manuel du propriétaire
- Taper
- Le manuel du propriétaire
dans d''autres langues
- English: BLUE SKY OKCSST26 Owner's manual
- español: BLUE SKY OKCSST26 El manual del propietario
Autres documents
-
 NewAge Products 51203 Mode d'emploi
-
 NewAge Products 51604 Mode d'emploi
-
 NewAge Products 53255 Mode d'emploi
-
 NewAge Products 52380 Guide d'installation
-
 NewAge Products 54368 Guide d'installation
-
 NewAge Products 52298 Manuel utilisateur
-
 NewAge Products 35505 Guide d'installation
-
 NewAge Products 66456 Guide d'installation
-
NewAge Products 65271 Mode d'emploi
-
Linon Scarsdale Tall Cabinet Assembly Instructions


