Prescolite LTR-SCA LITEISTRY Sloped Ceiling Adapter Guide d'installation
- Taper
- Guide d'installation

•
Prescolite Toll Free Technical Support
1.888.PRS.4TEC
•Hours: 8am - 5pm ET
IMPORTANT SAFETY INFORMATION. READ AND FOLLOW ALL SAFETY INSTRUCTIONS. Follow label information
and instructions concerning Wet or Damp Locations, installation near combustible materials, insulation, building materials,
and proper lamping. Do not install i
n areas subject to combustible vapors or gases. Before wiring to power supply and
during servicing or relamping, turn off power at fuse or circuit breaker.
All servicing or relamping must be performed by
qualified service personnel. Product must be grounde
d to avoid potential electric shock or other potential hazard.
Product must be mounted in locations and at heights and in a manner consistent with its intended use, and in
compliance with the National Electrical Code and local codes. The use of accessory e
quipment not recommended by
the manufacturer or installed contrary to instructions may cause an unsafe condition. Do not block light emanating from
product in whole or part, as this may cause an unsafe condition. Do not allow items such as drapes, curtains
, screens or
the like to come into contact with the product or to block light from the product, as this
may cause an unsafe condition.
currentlighting.com/Prescolite
© 2021 HLI Solutions, Inc. All rights reserved. Information and specifications subject to change without
notice. All values are design or typical values when measured under laboratory conditions.
Page 1 of 12
93130762 | Rev A
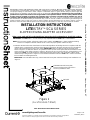
INSTALLATION INSTRUCTIONS
LITEISTRYTM SCA
SERIES
SLOPED CEILING ADAPTER ACCESSORY
Make sure to read and fully understand these instructions before attempting to install this product.
IMPORTANT: The LITEISTRY™ SCA accessory is only compatible with the LITEISTRY™ series fixtures.
NOTE: The accessory requires ceiling hole cutouts seen in Table 2 and LITEISTRY™ fixture installed to building
structure in compliance with the national electric code in the proper position outlined in step 1.
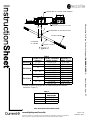
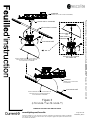
1. Determine the desired location of the fixture and mount the light fixture to building structure in compliance with the
national electric code where the center line of the fixture trim opening on the frame or frame void is in line with the
center of the desired fixture location in the ceiling. IMPORTANT: Make sure that the edge of the fixture frame
shown in “Figure 2” is within the distance “A” (provided in Table 1) of the center point of the desired fixture location
on the room side of the ceiling as shown in “Figure 2” based on the SCA accessory trim size, ceiling thickness, and
ceiling slope. NOTE: To avoid interference of the fixture with the sloped ceiling; note orientation of fixture frame
relative to slope ceiling shown in “Figure 2” for best fixture installation. Reference LITEISTRY™ fixture instructions
for more details on installing the fixture.
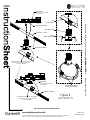
IMPORTANT: For LTR-3RD Frame only, remove frame trim insert plate and discard during frame installation. See
“
F
igu
re
1
”
KEEP THESE INSTALLATION INSTRUCTIONS
Figure 1
(For LTR-SCA3-** ONLY)
FIXTURE
LTR-3RD frame trim insert plate;
remove and discard for LTR-SCA3-**
accessory installation ONLY

currentlighting.com/Prescolite
© 2021 HLI Solutions, Inc. All rights reserved. Information and specifications subject to change without
notice. All values are design or typical values when measured under laboratory conditions.
Page 2 of 12
93130762 | Rev A
•
Prescolite Toll Free Technical Support
1.888.PRS.4TEC
•Hours: 8am - 5pm ET
KEEP THESE INSTALLATION INSTRUCTIONS
Figure 2
"A"
ROOM SIDE
OF CEILING
SLOPED CEILING
FIXTURE
(MOUNTED TO BUILDING STRUCTURE)
CEILING CUTOUT
DIMENSIONS
LTR-SCA3-
xx
Ø 10.0"
LTR-SCA4-
xx
Ø 10.5"
LTR-SCA6-
xx
Ø 11.5"
Table 2
CEILING CUTOUT
CENTERLINE OF FIXTURE TRIM OPENING
CENTERLINE OF CEILING CUTOUT
CEILING SLOPE
(degrees)
CEILING THICKNESS
RANGE (inches)
DIMENSION "A"
RANGE (inches)
LTR-SCA3-xx 5° - 35° 1/2" to 1-1/4" 5" to 6-3/4"
5° - 20° 1/2" to 2" 4-7/8" to 5-1/4"
1/2" to 1-3/4" 4-7/8" to 5-1/4"
1-3/4" to 2" 5" to 5-1/4"
1/2" to 5/8" 5" to 5-1/4"
5/8" to 1-3/4" 6-3/8" to 6-3/4" ^^
5° - 20° 1/2" to 2" 4-7/8" to 5-1/4"
1/2" to 1-3/4" 4-7/8" to 5-1/4"
1-3/4" to 2" 6-3/8" to 6-3/4" ^^
1/2" to 5/8" 5" to 5-1/4"
5/8" to 1-3/4" 6-3/8" to 6-3/4" ^^
LTR-SCA4-xx
LTR-SCA6-xx
Table 1
^^ Flip the (2) torsion spring brackets on frame for proper trim retention
(Reference "Figure 5")
25°
30° - 35°
30° - 35°
25°

currentlighting.com/Prescolite
© 2021 HLI Solutions, Inc. All rights reserved. Information and specifications subject to change without
notice. All values are design or typical values when measured under laboratory conditions.
Page 3 of 12
93130762 | Rev A
•
Prescolite Toll Free Technical Support
1.888.PRS.4TEC
•Hours: 8am - 5pm ET
Make sure to read and fully understand these instructions before attempting to install this product.
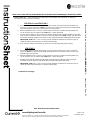
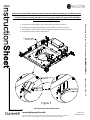
2. With the LITEISTRY™ fixture installed in the ceiling in the correct position and ceiling hole cut; follow the
instructions per SCA Accessory size below.
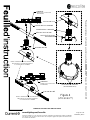
LTR-SCA4-** and LTR-SCA6-**
a. For LTR-4RD and LTR-6RD fixtures, squeeze torsion springs on trim and insert trim inside the SCA
accessory as shown in “Figure 3”. Note: It can help to use a paper clip to keep torsion springs together
while performing this step to aid in protecting SCA accessory finish.
b. With trim installed in SCA accessory, connect electrical connectors on frame and trim together and
secure electrical cover as outlined in the LITEISTRY™ fixture instructions.
c. Squeeze torsion springs on trim and insert into torsion spring brackets on frame installed in ceiling with
SCA accessory oriented as shown in “Figure 3” relative to sloped ceiling. Note: if paper clips were used
to hold torsion springs together for the previous step, remove them before installing trim into the frame.
IMPORTANT: LITEISTRY™ SCA accessory must be installed in orientation as shown in “Figure 3”
relative to sloped ceiling and fixture or it will not install properly.
d. Push Trim into ceiling to draw the trim up and SCA accessory flange firmly against ceiling.
LTR-SCA3-**
a. For LTR-3RD fixtures, squeeze wing springs on trim and insert inside SCA accessory as shown in
“Figure 4”. Note: Be careful not to let springs snap against inner SCA reflector surface as this could
damage SCA accessory finish.
b. With trim installed in SCA accessory, connect electrical connectors on frame and trim together and
secure electrical cover as outlined in the LITEISTRY™ fixture instructions.
c. Rotate 4 torsion springs upward along the sides of the trim and insert through ceiling opening in
orientation shown in “Figure 4” until springs draw SCA trim firmly against the ceiling.
IMPORTANT: LITEISTRY™ SCA accessory must be installed in orientation as shown in “Figure 4”
relative to sloped ceiling and fixture or it will not install properly.
(Continued on next page)
KEEP THESE INSTALLATION INSTRUCTIONS

currentlighting.com/Prescolite
© 2021 HLI Solutions, Inc. All rights reserved. Information and specifications subject to change without
notice. All values are design or typical values when measured under laboratory conditions.
Page 4 of 12
93130762 | Rev A
•
Prescolite Toll Free Technical Support
1.888.PRS.4TEC
•Hours: 8am - 5pm ET
KEEP THESE INSTALLATION INSTRUCTIONS
NOTE ORIENTATION OF SCA ACCESSORY
RELATIVE TO SLOPED CEILING AND
FIXTURE OPENING
(MOUNTED TO BUILDING
STRUCTURE)
FIXTURE
SLOPED CEILING
SLOPED CEILING
FIXTURE
(MOUNTED TO BUILDING STRUCTURE)
CEILING CUTOUT
NOTE ORIENTATION OF SCA ACCESSORY
RELATIVE TO SLOPED CEILING AND
FIXTURE OPENING
FIXTURE OPENING
Figure 3
(LTR-SCA4-** & LTR-SCA6-**)
FIXTURE TRIM
SCA
ACCESSORY
TRIM TORSION SPRINGS

currentlighting.com/Prescolite
© 2021 HLI Solutions, Inc. All rights reserved. Information and specifications subject to change without
notice. All values are design or typical values when measured under laboratory conditions.
Page 5 of 12
93130762 | Rev A
•
Prescolite Toll Free Technical Support
1.888.PRS.4TEC
•Hours: 8am - 5pm ET
KEEP THESE INSTALLATION INSTRUCTIONS
(MOUNTED TO BUILDING
STRUCTURE)
FIXTURE
FIXTURE OPENING
NOTE ORIENTATION OF SCA ACCESSORY
RELATIVE TO SLOPED CEILING AND
FIXTURE OPENING
CEILING CUTOUT
SLOPED CEILING
Figure 4
(LTR-SCA3-**)
TORSION SPRINGS
(SCA ACCESSORY)
SCA
ACCESSORY
FIXTURE TRIM
TRIM
WING SPRINGS
NOTE ORIENTATION OF SCA ACCESSORY
RELATIVE TO SLOPED CEILING AND
FIXTURE OPENING
(MOUNTED TO BUILDING
STRUCTURE)
FIXTURE
SLOPED CEILING

currentlighting.com/Prescolite
© 2021 HLI Solutions, Inc. All rights reserved. Information and specifications subject to change without
notice. All values are design or typical values when measured under laboratory conditions.
Page 6 of 12
93130762 | Rev A
•
Prescolite Toll Free Technical Support
1.888.PRS.4TEC
•Hours: 8am - 5pm ET
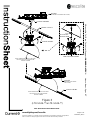
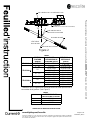
Figure 5
Make sure to read and fully understand these instructions before attempting to install this product.
^^ To flip the (2) torsion spring brackets on frame as may be required for proper SCA installation
see instructions and “Figure 5” below.
a. Remove the screw holding the torsion spring bracket as shown in “Figure 5”
b. Rotate torsion spring bracket 90 degrees and re-position as shown in “Figure 5”
c. Re-install the screw to hold the torsion spring bracket in place as shown in “Figure 5”
d. Repeat steps on other torsion spring bracket
KEEP THESE INSTALLATION INSTRUCTIONS
SCREW
TORSION SPRING
BRACKET
TORSION SPRING
BRACKETS (2)

•
Prescolite Toll Free Technical Support
1.888.PRS.4TEC
•Hours: 8am - 5pm ET
IMPORTANT SAFETY INFORMATION. READ AND FOLLOW ALL SAFETY INSTRUCTIONS. Follow label information
and instructions concerning Wet or Damp Locations, installation near combustible materials, insulation, building materials,
and proper lamping. Do not install i
n areas subject to combustible vapors or gases. Before wiring to power supply and
during servicing or relamping, turn off power at fuse or circuit breaker.
All servicing or relamping must be performed by
qualified service personnel. Product must be grounde
d to avoid potential electric shock or other potential hazard.
Product must be mounted in locations and at heights and in a manner consistent with its intended use, and in
compliance with the National Electrical Code and local codes.
The use of accessory e
quipment not recommended by
the manufacturer or installed contrary to instructions may cause an unsafe condition. Do not block light emanating from
product in whole or part, as this may cause an unsafe condition. Do not allow items such as drapes, curtains
, screens or
the like to come into contact with the product or to block light from the product, as this
may cause an unsafe condition.
currentlighting.com/Prescolite
© 2021 HLI Solutions, Inc. All rights reserved. Information and specifications subject to change without
notice. All values are design or typical values when measured under laboratory conditions.
Page 7 of 12
93130762 | Rev A
INSTRUCTIONS D'INSTALLATION
SÉRIE LITEISTRY
TM
SCA
ACCESSOIRE D'ADAPTATION POUR PLAFOND EN PENTE
Veiller à lire et à bien comprendre ces instructions avant d’essayer d’installer ce produit.
IMPORTANT : L’accessoire LITEISTRY™ SCA est uniquement compatible avec les luminaires de la série
LITEISTRY™.
REMARQUE : Cet accessoire nécessite la découpe dans le plafond de l’ouverture indiquée à la Table 2 et le
montage du luminaire LITEISTRY™ sur la structure du bâtiment en conformité avec le code de l’électricité en
vigueur, dans la position décrite à l’étape 1.
1. Déterminer l’emplacement souhaité et monter le luminaire sur la structure du bâtiment en conformité avec le code
de l’électricité en vigueur, de telle façon que l’axe central de l’ouverture pour garniture du luminaire une fois
attaché à la charpente soit aligné sur le centre de l’emplacement souhaité pour le luminaire dans le plafond.
IMPORTANT : S’assurer que le bord inférieur du bâti du luminaire illustré à la Figure 2 est dans les limites de la
distance « A » (voir Table 1) du point central de l’emplacement souhaité pour le luminaire sur le côté pièce du
plafond, comme illustré à la Figure 2, en fonction de la taille de garniture de l’accessoire SCA et de la pente du
plafond. REMARQUE : Afin d’éviter toute entrave entre le luminaire et le plafond en pente et assurer une
installation optimale, noter l’orientation du bâti de luminaire par rapport à la pente du plafond, comme illustré à la
Figure 2. Pour plus de détails sur l’installation du luminaire, se reporter aux instructions fournies avec le luminaire
LITEISTRY™.
IMPORTANT : Pour le bâti LTR-3RD uniquement, retirer la plaque d’insertion de garniture du bâti et la mettre au
rebut avant d’installer le luminaire. Voir Figure 1.
CONSERVER CES DIRECTIVES D'INSTALLATION!
Figure 1
LUMINAIRE
Plaque d’insertion de garniture de LTR-3RD:
retirer et mettre au rebut pour l’installation
de l’accessoire LTR-SCA3-** UNIQUEMENT

currentlighting.com/Prescolite
© 2021 HLI Solutions, Inc. Tous les droits sont réservés. Informations et spécifications sujettes à modification
sans préavis. Toutes les valeurs sont des valeurs de conception ou typiques lorsqu'elles sont mesurées dans
des conditions de laboratoire.
Page 8 of 12
93130762 | Rev A
•
Assistance technique de Prescolite au numéro sans frais
1.888.PRS.4TEC
•
Heures: 8 h 00 à 17 h 00 HNE
Figure 2
"A"
CÔTÉ PIÈCE
DU PLAFOND
PLAFOND INCLINÉ
LUMINAIRE
(MONTÉ SUR LA STRUCTURE DU BÂTIMENT)
DÉCOUPE DU PLAFOND
AXE CENTRAL DE L'OUVERTURE POUR
AXE CENTRAL DE LA
DÉCOUPE DU PLAFOND
DIMENSIONS DE
DÉCOUPE DU PLAFOND
LTR-SCA3-
xx
Ø 10.0"
LTR-SCA4-
xx
Ø 10.5"
LTR-SCA6-
xx
Ø 11.5"
Table 2
CONSERVER CES DIRECTIVES D'INSTALLATION!
PENTE DU
PLAFOND
(degrés)
PLAGE
D'ÉPAISSEUR DE
PLAFOND (pouce)
DIMENSION « A »
INTERVALLE
(pouce)
LTR-SCA3-xx 5° - 35° 1/2" to 1-1/4" 5" to 6-3/4"
5° - 20° 1/2" to 2" 4-7/8" to 5-1/4"
1/2" to 1-3/4" 4-7/8" to 5-1/4"
1-3/4" to 2" 5" to 5-1/4"
1/2" to 5/8" 5" to 5-1/4"
5/8" to 1-3/4" 6-3/8" to 6-3/4" ^^
5° - 20° 1/2" to 2" 4-7/8" to 5-1/4"
1/2" to 1-3/4" 4-7/8" to 5-1/4"
1-3/4" to 2" 6-3/8" to 6-3/4" ^^
1/2" to 5/8" 5" to 5-1/4"
5/8" to 1-3/4" 6-3/8" to 6-3/4" ^^
LTR-SCA4-xx
LTR-SCA6-xx
Table 1
^^ Retourner les (2) supports pour ressort de torsion sur le bâti pour assurer le
bon maintien de la garniture (Voir Figure 5)
25°
30° - 35°
30° - 35°
25°

currentlighting.com/Prescolite
© 2021 HLI Solutions, Inc. Tous les droits sont réservés. Informations et spécifications sujettes à modification
sans préavis. Toutes les valeurs sont des valeurs de conception ou typiques lorsqu'elles sont mesurées dans
des conditions de laboratoire.
Page 9 of 12
93130762 | Rev A
•
Assistance technique de Prescolite au numéro sans frais
1.888.PRS.4TEC
•
Heures: 8 h 00 à 17 h 00 HNE
Veiller à lire et à bien comprendre ces instructions avant d’essayer d’installer ce produit.
2. Une fois le luminaire LITEISTRY™ installé dans le plafond en position correcte et l’ouverture découpée dans le
plafond, suivre les instructions correspondant à la taille de l’accessoire SCA ci-dessous.
LTR-SCA4-** et LTR-SCA6-**
a. Pour les luminaires LTR-4RD et LTR-6RD, serrer les ressorts de torsion de la garniture et insérer la
garniture à l’intérieur de l’accessoire SCA comme illustré à la Figure 3. Remarque : Il peut être utile
d’utiliser un trombone pour maintenir les ressorts de torsion ensemble durant cette étape afin de
protéger la finition de l’accessoire SCA.
b. Une fois la garniture montée dans l’accessoire SCA, raccorder les connecteurs électriques du bâti et de
la garniture et attacher le couvercle du boîtier électrique conformément aux instructions du luminaire
LITEISTRY™.
c. Serrer les ressorts de torsion de la garniture et les insérer dans les supports pour ressorts de torsion sur
le luminaire installé dans le plafond, avec l’accessoire SCA orienté comme illustré à la Figure 3 par
rapport à la pente du plafond. Remarque : si des trombones ont été utilisés pour maintenir les ressorts
de torsion ensemble à l’étape précédente, penser à les enlever avant d’attacher la garniture au bâti.
IMPORTANT : L’accessoire SCA LITEISTRY™ doit être monté suivant l’orientation illustrée à la Figure 3
par rapport au plafond en pente et au luminaire pour pouvoir être installé correctement.
d. Pousser la garniture dans le plafond afin qu’elle soit tirée vers le haut et que la bride de l’accessoire SCA
appuie fermement contre le plafond.
LTR-SCA3-**
a. Pour les luminaires LTR-3RD, serrer les ailettes à ressort de la garniture et l’insérer à l’intérieur de
l’accessoire SCA comme illustré à la Figure 4. Remarque : Prendre garde de ne pas laisser les ailettes
se détendre contre la surface réfléchissante intérieure de l’accessoire SCA car cela pourrait
endommager la finition de l’accessoire.
b. Une fois la garniture montée dans l’accessoire SCA, raccorder les connecteurs électriques du bâti et de
la garniture et attacher le couvercle du boîtier électrique conformément aux instructions du luminaire
LITEISTRY™.
c. Tourner les 4 ressorts de torsion vers le haut sur les côtés de la garniture et les insérer dans l’ouverture
du plafond suivant l’orientation illustrée à la Figure 4, jusqu'à ce que les ressorts tirent la garniture du
SCA fermement contre le plafond.
IMPORTANT : L’accessoire SCA LITEISTRY™ doit être monté suivant l’orientation illustrée à la Figure 4
par rapport au plafond en pente et au luminaire pour pouvoir être installé correctement.
(Suite à la page suivante)
CONSERVER CES DIRECTIVES D'INSTALLATION!

currentlighting.com/Prescolite
© 2021 HLI Solutions, Inc. Tous les droits sont réservés. Informations et spécifications sujettes à modification
sans préavis. Toutes les valeurs sont des valeurs de conception ou typiques lorsqu'elles sont mesurées dans
des conditions de laboratoire.
Page 10 of 12
93130762 | Rev A
•
Assistance technique de Prescolite au numéro sans frais
1.888.PRS.4TEC
•
Heures: 8 h 00 à 17 h 00 HNE
CONSERVER CES DIRECTIVES D'INSTALLATION!
NOTER L’ORIENTATION DE L’ACCESSOIRE SCA
PAR RAPPORT AU PLAFOND EN PENTE ET
À L’OUVERTURE DU LUMINAIRE
PLAFOND INCLINÉ
PLAFOND INCLINÉ
LUMINAIRE
(MONTÉ SUR LA STRUCTURE DU BÂTIMENT)
DÉCOUPE DU PLAFOND
NOTER L’ORIENTATION DE L’ACCESSOIRE SCA
PAR RAPPORT AU PLAFOND EN PENTE ET
À L’OUVERTURE DU LUMINAIRE
OUVERTURE DU LUMINAIRE
Figure 3
(LTR-SCA4-** & LTR-SCA6-**)
GARNITURE DU
LUMINAIRE
ACCESSOIRE
SCA
RESSORTS DE TORSION
DE GARNITURE
LUMINAIRE
(MONTÉ SUR LA STRUCTURE
DU BÂTIMENT)

currentlighting.com/Prescolite
© 2021 HLI Solutions, Inc. Tous les droits sont réservés. Informations et spécifications sujettes à modification
sans préavis. Toutes les valeurs sont des valeurs de conception ou typiques lorsqu'elles sont mesurées dans
des conditions de laboratoire.
Page 11 of 12
93130762 | Rev A
•
Assistance technique de Prescolite au numéro sans frais
1.888.PRS.4TEC
•
Heures: 8 h 00 à 17 h 00 HNE
CONSERVER CES DIRECTIVES D'INSTALLATION!
(MONTÉ SUR LA STRUCTURE
DU BÂTIMENT)
LUMINAIRE
RESSORTS DE TORSION
(ACCESSOIRE SCA)
ACCESSOIRE SCA
GARNITURE DU LUMINAIRE
AILETTES À RESSORT
DE GARNITURE
NOTER L’ORIENTATION DE L’ACCESSOIRE SCA
PAR RAPPORT AU PLAFOND EN PENTE ET
À L’OUVERTURE DU LUMINAIRE
PLAFOND INCLINÉ
OUVERTURE DU LUMINAIRE
NOTER L’ORIENTATION DE L’ACCESSOIRE SCA
PAR RAPPORT AU PLAFOND EN PENTE ET
À L’OUVERTURE DU LUMINAIRE
DÉCOUPE DU PLAFOND
PLAFOND INCLINÉ
Figure 4
(LTR-SCA3-**)
(MONTÉ SUR LA STRUCTURE
DU BÂTIMENT)
LUMINAIRE

currentlighting.com/Prescolite
© 2021 HLI Solutions, Inc. Tous les droits sont réservés. Informations et spécifications sujettes à modification
sans préavis. Toutes les valeurs sont des valeurs de conception ou typiques lorsqu'elles sont mesurées dans
des conditions de laboratoire.
Page 12 of 12
93130762 | Rev A
•
Assistance technique de Prescolite au numéro sans frais
1.888.PRS.4TEC
•
Heures: 8 h 00 à 17 h 00 HNE
Veiller à lire et à bien comprendre ces instructions avant d’essayer d’installer ce produit.
^^ Pour retourner les (2) supports pour ressort de torsion sur le bâti comme il se doit pour
permettre la bonne installation du SCA, voir les instructions et la Figure 5 ci-dessous.
a. Retirer la vis de maintien du support pour ressort de torsion, comme illustré à la Figure 5
b. Tourner le support pour ressort de torsion de 90 degrés et le remettre en place comme illustré à la
Figure 5
c. Remonter la vis de fixation du support pour ressort de torsion comme illustré à la Figure 5
d. Répéter cette opération pour l’autre support pour ressort de torsion
CONSERVER CES DIRECTIVES D'INSTALLATION!
Figure 5
VIS
SUPPORT POUR
RESSORT DE
TORSION
SUPPORTS POUR
RESSORT DE TORSION (2)
-
 1
1
-
 2
2
-
 3
3
-
 4
4
-
 5
5
-
 6
6
-
 7
7
-
 8
8
-
 9
9
-
 10
10
-
 11
11
-
 12
12


Prescolite LTR-SCA LITEISTRY Sloped Ceiling Adapter Guide d'installation
- Taper
- Guide d'installation
dans d''autres langues
Documents connexes
Autres documents
-
Halo SLD606930WHR Mode d'emploi
-
Halo SMD6R6950WH Mode d'emploi
-
-
Halo RA406930WHR-CA Mode d'emploi
-
-
-
-
-
Eaton SLD606830WH Mode d'emploi
-