Panasonic TX50MX710E Mode d'emploi
- Catégorie
- Lecteurs multimédias numériques
- Taper
- Mode d'emploi
Ce manuel convient également à

OPERATING INSTRUCTIONS / BEDIENUNGSANLEITUNG / MODE
D’EMPLOI / MANUAL DE FUNCIONAMIENTO / ISTRUZIONI DI
FUNZIONAMENTO / BRUGSANVISNING/ KÄYTTÖOHJE /
DRIFTINSTRUKTIONER / BRUKSANVISNING HANDLEIDING /
INSTRUÇÕES DE UTILIZAÇÃO / UŽIVATELSKÁ PŘÍRUČKA /
INSTRUKCJE UŻYTKOWANIA / HASZNÁLATI UTASÍTÁS /
INSTRUCŢIUNI DE OPERARE / ΟΔΗΓΙΕΣ ΧΡΗΣΗΣ / ИНСТРУКЦИИ
ЗА ЕКСПЛОАТАЦИЯ / POUŽÍVATEĽSKÁ PRÍRUČKA
TX-43MX700E / TX-43MX710E / TX-50MX700E / TX-50MX710E
TX-55MX700E / TX-55MX710E / TX-65MX700E / TX-65MX710E
LED TV / Téléviseur LED / Televisor LED / TV a LED
Led-tv / Televisor LED / LED televizor /
Telewizor LED / LED TV / Τηλεόραση LED /
LED телевизор / LED televízor
• You can nd instructions for your TV’s features in the E-Manual. To access the E-Manual, enter Settings menu, select Manuals and press OK. For quick access press
Home/Menu button and then Info button.
• Im E-Manuel können Sie Anweisungen über die Eigenschaften Ihres TV-Gerätes nden. Um auf die E-Manuel zuzugreifen, rufen Sie das Einstellungenmenü auf, wählen
Sie Anleitungen und drücken Sie OK. Für einen schnellen Zugri drücken Sie die Home/Menu-Taste und dann die Info-Taste.
• Vous pouvez accéder aux instructions relatives aux fonctions de votre téléviseur à partir du E-Manuel. Pour accéder au E-Manual, accédez au menu Réglages, sélectionnez
Manuels et appuyez sur OK. Pour un accès rapide, appuyez sur le bouton Home/Menu, puis sur le bouton Info.
• Puede encontrar instrucciones sobre las funciones de su televisor en el E-Manual. Para acceder al E-Manual o manual electrónico, ingrese al menú de Settings
Conguración, seleccione Manuales y presione OK. Para un acceso rápido, presione el botón Home/Menu y luego el botón Info.
• Sarà possibile trovare istruzioni per le caratteristiche della TV nel E-Manual (Manuale elettronico). Per accedere al E-Manual, aprire il menu Impostazioni, selezionare
Manuali e premere OK. Per un accesso rapido premere il pulsante Home/Menu e il pulsante Info.
• Du kan nde en vejledning til TV‘ets funktioner i E-Manualen. For at bruge E-Manualen, skal du indtaste menuen Indstillinger, vælge Manualer og trykke på OK. For
hurtig adgang til E-Manual skal du trykke på Home/Menu-knappen og derefter Info-knappen.
• Löydät TV:n käyttöohjeet E-oppaasta. E-oppaan käyttämiseksi, avaa Asetukset-valikko, valitse Oppaat ja paina OK. Avataksesi E-oppaan nopeasti, paina Home/
Menu-painiketta ja sitten Info-painiketta.
• Du kan hitta instruktionerna för Tv:ns funktioner i E-manualen. För att komma till E-manualen, gå in i inställningsmenyn, välj Manualer (Handböcker) och tryck på OK.
För snabb åtkomst, tryck på Home/Menu-knappen och sedan Info-knappen.
• Du kan nne anvisninger for TV-funksjonen i den E-Manual (elektroniske håndboken). For å få tilgang til den E-Manual (elektroniske håndboken), gå inn i Instllinger-
menyen, velg Bruksanvininger (Håndbøker) og trykk OK. For rask tilgan, trykk på Home/Menu-knappen og deretter Info-knappen.
•U vindt de instructies voor de functies van uw tv in de E-handleiding. Voor toegang tot de E-handleiding gaat u naar het menu Instellingen. Selecteer Handleidingen
en druk op OK. Voor snelle toegang drukt u op de knop Home/Menu en daarna op de knop Info.
• Encontra instruções para as funções da sua TV no E-Manual. Para aceder ao E-Manual, entrar no menu Conguração, selecionar Manuais e premir em OK. Para
acesso rápido premir o botão Home/Menu e depois o botão Info.
• V E-Manual (elektronické příručce) najdete pokyny pro funkce vašeho televizoru. Chcete-li použít E-Manual (elektronickou příručku), vstupte do nabídky Nastavení, zvolte
Návod (Manuál) a stiskněte OK. Pro rychlý přístup do elektronické příručky, stiskněte tlačítko Home/Menu a poté tlačítko Info.
• E-Manual (Instrukcję obsługi) dotyczącą możliwości Twojego TV możesz znaleźć w E-poradniku. Aby skorzystać z E-instrukcji, wejdź do Home/Menu Ustawieńia,
wybierz Instrukcję obsługi i naciśnij OK. Aby uzyskać szybki dostęp, naciśnij przycisk Menu, a następnie przycisk Info.
• A TV-készülék funkcióira vonatkozó használati utasításokat az E-kézikönyv tartalmazza. Az E-kézikönyv eléréséhez lépjen be a Beállítások menübe, válassza a
Kézikönyvek opciót, és nyomja meg az OK gombot. A gyors eléréshez nyomja meg a Home/Menu gombot, majd az Info gombot.
• În E-Manual (Manualul electronic) puteţi găsi instrucţiuni privind funcţiile televizorului dumneavoastră. Pentru a accesa E-Manual (Manualul electronic), accesați meniul
Setări, selectați Manuale și apăsați OK. Pentru acces rapid, apăsați butonul Home/Menu și apoi butonul Info.
• Στο Ηλ. E-Manual (εγχειρίδιο) μπορείτε να βρείτε οδηγίες σχετικά με τις λειτουργίες της τηλεόρασής σας. Για να αποκτήσετε πρόσβαση στο Ηλ. E-Manual (εγχειρίδιο),
εισέλθετε στο μενού Ρυθμίσεις, επιλέξτε Εγχειρίδια και πιέστε OK. Για γρήγορη πρόσβαση, πιέστε το πλήκτρο Home/Menu και κατόπιν το πλήκτρο Info.
• Можете да откриете инструкции за функциите на Вашия телевизор в електронното E-Manual (ръководство). За да получите достъп до електронното E-Manual
(ръководство), влезте в меню Настройки, изберете Ръководства и натиснете OK. За бърз достъп натиснете бутона Home/Menu и след това бутона Информация.
• V E-Manual (elektronickej príručke) nájdete pokyny pre funkcie vášho televízora. Pre prístup k E-Manual (elektronickej príručke) prejdite do ponuky Nastavenia,
vyberte Príručky a stlačte OK. Pre rýchly prístup stlačte tlačidlo Home/Menu a potom tlačidlo Info.
e-MANUAL

English - 1 -
Table of Contents
Safety Information ................................................. 2
Markings on the Product....................................2
Maintenance..........................................................4
Display panel, Cabinet, Pedestal.......................4
Mains plug .........................................................4
Assembling / Removing the pedestal ....................4
When using the wall-hanging bracket ................... 5
Introduction ...........................................................5
Accessories Included ............................................ 5
Features ................................................................ 5
Antenna Connection..............................................6
Other Connections ................................................ 7
Turning On/Off the TV ........................................... 8
TV Control & Operation .........................................8
Remote Control ................................................... 10
Initial Setup Wizard ............................................. 11
Home Screen ......................................................14
Live TV Mode Menu Content ..............................14
Channels ........................................................14
TV Options.......................................................16
Settings ...............................................................18
Channels & Inputs ...........................................18
Display & Sound ..............................................20
Network & Internet ........................................... 22
Accounts & Sign-In ..........................................23
Privacy ............................................................. 23
Apps ................................................................23
System .............................................................24
Bluetooth Remotes & Accessories ..................25
Help & Feedback .............................................25
Channel List ........................................................25
Programme Guide ...............................................26
Connecting to the Internet ...................................26
Multi Media Player...............................................28
From USB Connection.....................................29
USB Auto Play Feature....................................30
CEC.....................................................................30
Google Cast ........................................................31
HBBTV System ...................................................31
Quick Standby Search ........................................31
Software Update .................................................31
Troubleshooting & Tips ....................................... 32
HDMI Signal Compatibility ..................................33
Supported File Formats for USB Mode ............... 34
Video Decoder .................................................34
Audio ...............................................................35
Subtitle.............................................................37
Supported DVI Resolutions .................................38
Specification ........................................................39
Notice .................................................................. 40
Licences .............................................................. 41
Disposal of Old Equipment and Batteries ...........41
Declaration of Conformity (DoC) ......................... 42

English - 2 -
Safety Information
CAUTION
RISK OF ELECTRIC SHOCK
DO NOT OPEN
CAUTION: TO REDUCE THE RISK OF ELECTRIC SHOCK DO
NOT REMOVE COVER (OR BACK).
NO USER-SERVICEABLE PARTS INSIDE. REFER
SERVICING TO QUALIFIED SERVICE PERSONNEL.
Note: Follow the on screen instructions for operating the
related features.
In extreme weather (storms, lightning) and long inactivity
periods (going on holiday) disconnect the TV set from the
mains.
The mains plug is used to disconnect TV set from the mains
and therefore it must remain readily operable. If the TV set is
not disconnected electrically from the mains, the device will
still draw power for all situations even if the TV is in standby
IMPORTANT - Please read these
instructions fully before installing or
operating
WARNING: This device is intended to be
used by persons (including children) who are
capable / experienced of operating such a device
unsupervised, unless they have been given
supervision or instruction concerning the use of
the device by a person responsible for their safety.
• Use this TV set at an altitude of less than 5000 metres
above the sea level, in dry locations and in regions
with moderate or tropical climates.
• The TV set is intended for household and similar
indoor use but may also be used in public places.
• For ventilation purposes, leave at least 5cm of free
space around the TV.
• The ventilation should not be impeded by covering
or blocking the ventilation openings with items, such
as newspapers, table-cloths, curtains, etc.
• The power cord/plug should be easily accessible. Do
not place the TV, furniture, etc. on the power cord.
you an electric shock. Handle the power cord by the
plug, do not unplug the TV by pulling the power cord.
Never touch the power cord/plug with wet hands as
this could cause a short circuit or electric shock.
Never make a knot in the power cord or tie it with
other cords. When damaged it must be replaced, this
• Do not expose the TV to dripping or splashing of
such as vases, cups, etc. on or over the TV (e.g. on
shelves above the TV).
• Do not expose the TV to direct sunlight or do not
or near the TV.
• Do not place any heat sources such as electric
heaters, radiators, etc. near the TV set.
•
•
out of the reach of babies, children and domestic
animals.
• Carefully attach the stand to the TV. If the stand is
prevent the TV from tilting. Do not over-tighten the
screws and mount the stand rubbers properly.
• Do not dispose of the batteries in fire or with
WARNING
• Batteries must not be exposed to excessive heat
• Excessive sound pressure from earphones or
headphones can cause hearing loss.
ABOVE ALL - NEVER let anyone, especially
children, push or hit the screen, push anything
into holes, slots or any other openings in the TV.
Caution Serious injury or death
risk
Risk of electric shock Dangerous voltage risk
Maintenance Important maintenance
component
Markings on the Product
The following symbols are used on the product as
a marker for restrictions and precautions and safety
such information for security reasons.
Class II Equipment: This appliance is
designed in such a way that it does not require
a safety connection to electrical earth.
Hazardous Live Terminal: The marked
terminal(s) is/are hazardous live under normal
operating conditions.
i
Caution, See Operating Instructions: The
marked area(s) contain(s) user replaceable
coin or button cell batteries.
CLASS 1
LASER PRODUCT
Class 1 Laser Product: This
product contains Class 1 laser
source that is safe under rea-
sonably foreseeable condi-
tions of operation.

English - 3 -
WARNING
Do not ingest the battery, Chemical Burn Hazard
This product or the accessories supplied with the pro-
duct may contain a coin/button cell battery. If the coin/
button cell battery is swallowed, it can cause severe
internal burns in just 2 hours and can lead to death.
Keep new and used batteries away from children.
If the battery compartment does not close securely,
stop using the product and keep it away from children.
If you think batteries might have been swallowed or
placed inside any part of the body, seek immediate
medical attention.
– – – – – – – – – – – –
Warning Stability Hazard
A television may fall, causing serious personal injury
or death. Many injuries, particuIarly to children, can be
avoided by taking simple precautions such as:
• ALWAYS use cabinets or stands or mounting me-
thods recommended by the manufacturer of the
television set.
• ALWAYS use furniture that can safely support the
television set.
• ALWAYS ensure the television set is not overhanging
the edge of the supporting furniture.
• ALWAYS educate children about the dangers of
climbing on furniture to reach the television set or
its controls.
• ALWAYS route cords and cables connected to your
television so they cannot be tripped over, pulled or
grabbed.
• NEVER place a television set in an unstable location.
• NEVER place the television set on tall furniture (for
example, cupboards or bookcases) without ancho-
ring both the furniture and the television set to a
suitable support.
• NEVER place the television set on cloth or other
materials that may be located between the television
set and supporting furniture.
• NEVER place items that might tempt children to
climb, such as toys and remote controls, on the top
of the television or furniture on which the television
is placed.
• The equipment is only suitable for mounting at
If the existing television set is going to be retained and
relocated, the same considerations as above should
be applied. – – – – – – – – – – – –
Apparatus connected to the protective earthing of the
building installation through the MAINS connection or
through other apparatus with a connection to protective
earthing – and to a television distribution system using
hazard. Connection to a television distribution system
has therefore to be provided through a device providing
electrical isolation below a certain frequency range
(galvanic isolator).
WALL MOUNTING WARNINGS
• Read the instructions before mounting your TV on
the wall.
• The wall mount kit is optional. You can obtain from
your local dealer, if not supplied with your TV.
• Do not install the TV on a ceiling or on an inclined
wall.
•
accessories.
•
the TV from falling. Do not over-tighten the screws.
WARNING
• Using other wall-hanging brackets, or installing
a wall-hanging bracket by yourself have the risk
of personal injury and product damage. In order
to maintain the unit’s performance and safety, be
absolutely sure to ask your dealer or a licensed
contractor to secure the wall-hanging brackets. Any
installer will void your warranty.
• Carefully read the instructions accompanying
optional accessories, and be absolutely sure to take
• Handle the TV carefully during installation since
subjecting it to impact or other forces may cause
product damage.
•
Always ensure that there are no electrical cables or
pipes in the wall before hanging bracket.
•
wall position when it is no longer in use.
Figures and illustrations in these operating
instructions are provided for reference only and
without notice.

English - 4 -
Assembling / Removing
the pedestal
Preparations
Take out the pedestal(s) and the TV from the packing
case and put the TV onto a work table with the screen
panel down on the clean and soft cloth (blanket, etc.)
•
• Do not hold the screen panel part.
• Make sure not to scratch or break the TV.
CAUTION: Please refrain from inserting pictured screws to the
TV body when not using the TV stand e.g. wall hanging. Inserting
screws without pedestal may cause a damage of the TV.
Assembling the pedestal
1. The stand of the TV consists of 4 pieces. Install
these pieces together.
x2
M4 x 12mm
x4
M6 x 20 mm
M6 x 20 mm
2. Place the stand(s) on the stand mounting
pattern(s) on the rear side of the TV.
Maintenance
socket.
Display panel, Cabinet, Pedestal
Regular care:
Gently wipe the surface of the display panel, cabinet,
or pedestal by using a soft cloth to remove dirt or
For stubborn dirt:
1. First clean the dust from the surface.
2. Dampen a soft cloth with clean water or diluted
neutral detergent (1 part detergent to 100 parts
water).
3.
let liquid enter the TV inside as it may lead to
product failure.)
4. Carefully wipe moisten and wipe away the
stubborn dirt.
5. Finally, wipe away all the moisture.
Caution
Do not use a hard cloth or rub the surface too hard,
otherwise this may cause scratches on the surface.
• Take care not to subject the surfaces to insect
repellent, solvent, thinner or other volatile substances.
This may degrade surface quality or cause peeling
of the paint.
• The surface of the display panel is specially treated
and may be easily damaged. Take care not to tap
hard objects.
• Do not allow the cabinet and pedestal to make
contact with a rubber or PVC substance for a long
time. This may degrade surface quality.
Mains plug
Wipe the mains plug with a dry cloth at regular
intervals.

English - 5 -
View from the side
c
VESA
Bracket
d
(d)
43” 50”, 55”, 65”
Depth of screw (c) min. 9 mm 12 mm
max. 10 mm 15 mm
Diameter M4 M6
Note: The screws for xing the TV onto the wall-hanging
bracket are not supplied with the TV.
Introduction
Thank you for choosing our product. You’ll soon be
enjoying your new TV. Please read these instructions
carefully. They contain important information which will
help you get the best from your TV and ensure safe
and correct installation and operation.
Accessories Included
• Remote Control
• Batteries: 2 x AAA
• Operating Instructions
• Power Cord
• Detachable stand
• Stand mounting screws (M4 x 12) + (M6 x 20)
Features
• 4K UHD Google TV
• AndroidTM operating system
• Google Cast
• Voice Search
• Fully integrated digital terrestrial/cable/satellite TV
(DVB-T-T2/C/S-S2)
• Ethernet (LAN) for Internet connectivity and service
• 802.11 a/b/g/n/ac built in WLAN Support
Ultra HD (UHD)
known as 4K) which provides resolution of 3840 x
2160 (4K:2K). It equals 4 times the resolution of Full
HD TV by doubling the pixel count of the Full HD TV
both horizontally and vertically. Ultra HD content is
supported via native and market applications, HDMI,
some of the Over-the-Top (OTT) services, USB inputs
and over DVB-T2 and DVB-S2 broadcasts.
3. Insert the screws (M4 x 12) provided and tighten
M6 x 20 mm
43” 50/55/65”
x6
M4 x 12 mm
x4
M4 x 12 mm
Removing the pedestal from the TV
Be sure to remove the pedestal in the following way
when using the wall-hanging bracket or repacking
the TV.
• Put the TV onto a work table with the screen panel
down on the clean and soft cloth. Leave the stand(s)
protruding over the edge of the surface.
•
• Remove the stand(s).
When using the wall-
hanging bracket
Please contact your local Panasonic dealer to
purchase the recommended wall-hanging bracket.
Holes for wall-hanging bracket installation;
Rear of the TV
a
b
43” 50” 55” 65”
a (mm) 100 200 200 400
b (mm) 100 200 200 200

English - 6 -
High Dynamic Range (HDR) / Hybrid Log-
Gamma (HLG)
Using this feature the TV can reproduce greater
dynamic range of luminosity by capturing and then
promises better picture quality thanks to brighter, more
realistic highlights, more realistic colour and other
intended to achieve, showing the hidden areas of
dark shadows and sunlight with full clarity, colour
and detail. HDR/HLG content is supported via native
and market applications, HDMI, USB inputs and
over DVB-S broadcasts. When the input source is
set to the related HDMI input press the Menu button
and set the HDMI EDID Version option in the TV
Options>Settings>Channels & Inputs>Inputs menu
as EDID 2.0, EDID 2.1 or Auto EDID in order to watch
HDR/HLG content, if the HDR/HLG content is received
through an HDMI input. The source device should also
be at least HDMI 2.0a compatible in this case.
Dolby Vision
Dolby Vision™ delivers a dramatic visual experience,
astonishing brightness, exceptional contrast, and vivid
colour, that brings entertainment to life. It achieves this
stunning image quality by combining HDR and wide
colour gamut imaging technologies. By increasing the
brightness of the original signal and using a higher dy-
namic colour and contrast range, Dolby Vision presents
amazing true-to-life images with stunning detail that
other post-processing technologies in the TV aren’t
able to produce. Dolby Vision is supported via native
and market applications, HDMI and USB inputs. When
the input source is set to the related HDMI input press
the Menu button and set the HDMI EDID Version
option in the TV Options>Settings>Channels &
Inputs>Inputs menu as EDID 2.0, EDID 2.1 or Auto
EDID in order to watch Dolby Vision content, if the
Dolby Vision content is received through an HDMI
input. The source device should also be at least HDMI
2.0a compatible in this case. In the Picture Mode
-
ble if Dolby Vision content is detected: Dolby Vision
Bright, Dolby Vision Dark and Dolby Vision Vivid.
All allow the user to experience the content in the way
lighting conditions. To change the Picture Mode setting
press the Menu button while watching the Dolby Vision
content and go to Picture menu. While watching Dolby
Vision Content via an application, except YouTube,
access the Picture menu and set the Picture Mode.
Antenna Connection
Connect the aerial or cable TV plug to the aerial input
(ANT) socket located on the left side of the TV or
satellite plug to the satellite input (LNB) socket located
on the rear side of the TV.
Left side of the TV
ANT
Rear side of the TV
LNB
If you want to connect a device to the TV, make
before making any connection. After the connection
is done, you can turn on the units and use them.

English - 7 -
Other Connections
any connection. After the connection is done, you can turn on the units and use them.
Connector Type Cables Device
HDMI
Connection
(back&side)
SPDIF SPDIF
(Optical Out)
Connection
(back)
HEADPHONE Headphone
Connection
(back)
USB
Connection
(side)
CI
Connection
(side)
CAM
module
LAN Ethernet
Connection
(back) LAN / Ethernet Cable
When using the wall mounting kit
(contact your dealer to purchase one,
if not supplied), we recommend that
you plug all your cables into the back
of the TV before mounting on the wall.
Insert or remove the CI module only
when the TV is SWITCHED OFF. You
should refer to the module instruction
manual for details of the settings. The
USB inputs on the TV support devices
up to 500mA. Connecting devices that
have current value above 500mA may
damage your TV. When connecting
equipment using a HDMI cable to your
TV, to guarantee sucient immunity
against parasitic frequency radiation
and trouble-free transmission of high
denition signals, such as 4K content,
you have to use a high speed shielded
(high grade) HDMI cable with ferrites.

English - 8 -
Connect power
IMPORTANT: The TV set is designed to operate on
220-240V AC, 50 Hz socket.
After unpacking, allow the TV set to reach the ambient
room temperature before you connect the set to the
mains.
Plug one end (the two-hole plug) of the supplied
detachable power cord into the power cord inlet on
the rear side of the TV as shown above. Then plug
the other end of the power cord into the mains socket
outlet.
Turn on the main switch “ ” located on the TV -
position “|”. The TV will switch into standby mode and
the standby LED will light up.
Note: The positions of the power cord inlet and main switch
may dier depending on the model.
To switch on the TV from standby
If the TV is in standby mode the standby LED lights
up. To switch on the TV from standby mode either:
• Press the Standby button on the remote control.
• Press the centre of the joystick on the TV in.
To switch the TV into standby
The TV cannot be switched into standby mode via
joystick. Press and hold the Standby button on the
remote control. dialogue will appear on the
screen. Highlight OK and press the OK button. The
TV will switch into standby mode.
” located on the TV -
position 2
To power down the TV completely, unplug the power
cord from the mains socket.
Quick standby mode
In order to switch the TV into quick standby mode
either;
• Press the Standby button on the remote.
Press again to go back to operating mode.
• Press and hold the centre of the joystick on the TV.
Press again to go back to operating mode.
Your TV continues to operate in the quick standby
mode state, as it regularly checks for updates. This is
not a malfunction, it meets the requirements for energy
consumption. In order to minimise energy consumption
switch your TV into standby mode as explained above.
Note: When the TV is switched into standby mode, the standby
LED can blink to indicate that features such as standby search
or timer is active. The LED can also blink when you switch on
the TV from standby mode.
TV Control & Operation
The joystick allows you to control the Volume /
Programme / Source and Quick Standby-On functions
of the TV.
Note: The position of the joystick may dier depending on
the model.
Note: The position of the power switch may dier depending
on the model.
To change volume: With the front side of the TV facing
you, push the joystick right to increase the volume and
push it left to decrease the volume.
To change channel in Live TV mode: Scroll through
the stored channels by pushing the joystick forwards
or pulling it towards yourself.
To change source in Live TV mode: Press the
centre of the joystick in, the TV options menu will
be displayed. Highlight Source option and press the
centre of the joystick in again, the Inputs list will appear
on the screen. Select the desired source by pushing
the joystick forwards or pulling it towards yourself and
press the centre of the joystick in.

English - 9 -
Press the centre
of the joystick in and hold it down for a few seconds,
the TV will turn into quick standby mode.
The TV cannot be
switched into standby mode via joystick.
To turn on the TV: Press the centre of the joystick in,
the TV will turn on.
Operation with the Remote Control
Press the Menu button on your remote control to
display Live TV settings menu when in Live TV mode.
Press the Home button to display or return to the Home
Screen of the Google TV. Use the directional buttons
to move the focus, proceed, adjust some settings and
press OK to make selections in order to make changes,
set your preferences, enter a sub-menu, launch an
application, etc. Press Back/Return to return to the
previous menu screen.
Input Selection
Once you have connected external systems to your
Source button on your remote control consecutively
or use the directional buttons and then press the OK
mode. Or enter the Inputs menu on the Dashboard,
select the desired source from the list and press OK.
Changing Channels and Volume
You can adjust the volume by using the Volume
+/- buttons and change the channel in Live TV mode
by using the Programme +/- buttons on the remote.

English - 10 -
Remote Control
27
28
Note: Other Panasonic devices cannot be operated with
this remote.
Standby Button
Press and hold the Standby button on the remote control.
dialogue will appear on the screen. Highlight OK
and press the OK button. The TV will switch into standby
standby mode or to switch on the TV when in quick standby
or standby mode.
Inserting the Batteries into the Remote
The remote may have a screw that secures the battery com-
partment cover onto the remote control (or this may be in a
separate bag). Remove the screw, if the cover is screwed on
previously. Then remove the battery compartment cover to
reveal the battery compartment. Insert two 1.5V - size AAA
batteries. Make sure the (+) and (-) signs match (observing
correct polarity). Do not mix old and new batteries. Replace
only with same or equivalent type. Place the cover back on.
Secure the cover again with the screw, if any.
To pair remote with the TV
remote will be performed before the initial setup starts. You
will need to pair your remote control with your TV at this point.
Press and hold the Home and Back/Return buttons on the
remote simultaneously until the LED on the remote starts to
blink, then release the buttons. That means the remote is in
pairing mode.
pairing process is successful, the LED on the remote will go
the pairing process fails the remote will enter sleep mode
after 30 seconds.
In order to pair your remote later on, you can go to Settings>
Bluetooth Remotes & Accessories menu, highlight the
Pair Accessory option and press OK to start a search for
accessories.
1. Standby: Quick Standby / Standby / On
2. Numeric buttons: Switches the channel in Live TV
mode, enters a number in the text box on the screen
3. Language: Switches among sound modes (analogue
TV), displays and changes audio language (digital TV,
where available)
4. Volume +/-: Increases/decreases the volume level
5. Microphone: Activates the microphone on the remote
if the remote is paired with the TV previously. Otherwise
pressing this button will start the search for accessories
where you can pair your remote with the TV
6. Home: Opens the Home Screen, is also used in pairing
process of the remote. Press and hold to open the
Dashboard
7. Guide: Displays the electronic programme guide for
Live TV channels
8. OK: Confirms selections, enters sub-menus, views
channel list (in Live TV mode)
9. Back/Return: Returns to previous menu screen, goes
one step back, closes open windows, closes teletext (in
Live TV-Teletext mode), is also used in pairing process
of the remote
10.
11. Prime Video: Launches the Amazon Prime Video
application
12. Menu: Displays the main settings menu (on other sources
than Google TV Home), displays available setting options
such as sound and picture
13. Rewind: Moves frames backwards in media such as
movies
14. Stop: Stops the media being played
15. No function
16. Coloured Buttons: Follow the on-screen instructions for
coloured button functions
17. Pause: Pauses the media being played
Play: Resumes playing the paused media
18. Text: Opens and closes teletext (where available in
Live TV mode)
19. Fast forward: Moves frames forward in media such
as movies
20. Source: Shows all available broadcast and content
sources
21. Google Play: Launches the Google Play Store
application
22. YouTube: Launches the YouTube application
23. Exit: Closes and exits from the main settings menus (on
other sources than Google TV Home), closes the Home
Screen and switches to last set source, exits from any
running application or menu or OSD banner
24. Directional buttons: Navigates menus, setting options,
moves the focus or cursor, etc. and displays the subpages
in Live TV-Teletext mode when pressed Right or Left.
Follow the on-screen instructions
Note: Directional buttons are positioned on the circle
around the OK button.
25. Settings: Opens the Dashboard
26. Programme +/-: Increases/decreases channel number
in Live TV mode
27. Mute:
28. Info: Displays information about on-screen content

English - 11 -
Initial Setup Wizard
Note: Follow the on-screen instructions to complete the initial
setup process. Use the directional buttons and the OK button
on the remote to select, set, conrm and proceed.
pairing screen will be displayed. After pairing your
remote with the TV as instructed, select your language
on the next screen and press OK. Follow the on-screen
instructions to setup your TV and install channels. The
installation wizard will guide you through the setup
process. You can perform initial setup anytime using
the Reset option in the Settings>System>About>Re-
set menu. You can access the Settings menu from
the Dashboard on the Home screen or from the TV
options menu in Live TV mode.
or be skipped depending on the selected options in
each step.
1. Pair the remote control
A search for the remote control will be performed
the on-screen instructions to pair your remote control
(depends on the model of the remote control) with your
TV. If the pairing process is successful, a green check
mark will be displayed on the screen.
If you don’t want to pair your remote with the TV at this
point, you can press the Back/Return button to skip.
2. Welcome Message and Language Selection
“Welcome” message will be displayed along with
the language selection options listed on the screen.
Select the desired language from the list and press
OK to continue.
3. Region/Country
In the next step select your region or country from the
list and press OK to continue.
4. TV setup selection
You can choose to proceed with the Google TV or basic
TV installation at this point. Select according to your
preference and press OK to continue.
5. Setup with the Google Home app
Depending on the country selection you can use the
Google Home app to transfer your Android phone’s
Google Account to your TV. Select adding new
device option in the app and scan the QR code when
instructed. Follow the on-screen instructions on your
TV and your phone to complete the process with the
Google Home app. Some of the following steps of the
initial setup on the TV will be skipped if the Google TV
setup is carried out using the Home app.
To continue the setup on your TV press the Down
directional button and then press OK on this screen.
6. Network Connection
If you did priorly connect your TV to the Internet via
Ethernet a message will be displayed stating that you
are connected. You can choose to continue with wired
connection or change the network. Highlight Change
network and press OK if you want to use wireless
connection instead of wired connection.
If the Internet connection has not been established via
Ethernet before, available wireless networks will be
searched and listed on the next screen. Select your
WLAN network from the list and press OK to connect.
Enter the password using the virtual keyboard if the
network is password protected. Select the Other
network option from the list, if the network that you
want to connect has hidden SSID (network name).
If you prefer not to connect to the Internet at this point
you can skip this step by selecting the Skip option.
You can connect to the Internet later using the Network
& Internet menu options in the Settings menu from
the Dashboard on the Home Screen or from the TV
options menu in Live TV mode.
Highlight OK and press OK to continue with the
wireless connection, when the energy saving tips
dialogue is displayed.
7. Network Privacy Policy
Network Privacy Policy screen will be displayed next.
Read the related explanations displayed on the screen.
You can use Up and Down directional buttons to scroll
through and read the entire text. Highlight Accept and
press OK
can change this setting later using Network Privacy
Policy option in the Settings>Network & Internet
menu.
8. Sign in to your Google account
If the network connection is successfully established,
you can sign in to your Google account on the next
screen. You need to be signed in to a Google account in
order to use Google services. This step will be skipped
if no internet connection has been established or if you
already signed in to your Google account using your
Android phone in the previous steps of the initial setup.
By signing in, you will be able to discover new
apps for videos, music and games on Google Play;
get personalised recommendations from apps like
YouTube; buy or rent the newest movies and shows on
Google Play Movies & TV; access your entertainment
and control your media. Highlight Sign In and press
OK to proceed. You can sign in to your Google account
by entering your e-mail address or phone number and
your password, or create a new account.
9. Terms of Service
Terms of Service screen will be displayed next. By
continuing, you will agree to the Google Terms of
Service, the Google Play Terms of Service, and the

English - 12 -
Google Privacy Policy. Highlight Accept and press OK
view Terms of Service, Play Terms of Service, and
Privacy Policy on this screen. To display the content
an internet connection is needed. A message will be
displayed mentioning the web site address on which
this information can also be viewed, in case internet
access is not available.
10. Google Services
Select each to learn more about each service, such as
-
ding to Google’s Privacy Policy. Highlight Accept and
press OK
services settings.
Use location
You can allow or disallow Google and third party apps
to use your TV’s location information. Highlight Use
location and press OK to view detailed information
setting later using Location status option in the Set-
tings>Privacy>Location menu.
Help improve Google TV
Automatically send diagnostic information to Google,
like crash reports and usage data from your device and
apps. Highlight Help improve Google TV and press
OK to view detailed information and turn this feature
Settings>Privacy>Usage & diagnostics menu.
Recommendations
Google TV uses your activity from other Google products
and services to improve your recommendations. Your
activity on Google TV will also be used to improve
your recommendations on other Google products. You
can view and control the data shared between Google
products at the address given in the text. You can also
hide personalised recommendations on Google TV by
enabling apps-only mode from the device settings.
Services and your privacy
Google Assistant sends services you talk to a unique
code. That way, services can remember things like
your preferences during conversations. You can view,
manage and reset the data sent to services on each
service’s page in the Explore section of the Assistant
mobile app. Learn more at g.co/assistant/idreset.
If you have signed in to your Google account in the
previous steps, you can also turn on personal results
for Assistant and allow Assistant to search across all
your TV apps by choosing the related options when
prompted.
11. Password
Depending on the country selection you made in the
password (PIN) at this point. Press OK to proceed.
The selected PIN cannot be 0000. This PIN will be
required in order to access some menus, content or
to release locked channels, sources, etc. You will have
to enter it if you are asked to enter a PIN for any menu
operation later.
12. Parental Controls
Depending on the country selection you made in the
earlier steps, the parental controls screen may be
displayed. Highlight the desired parental restriction
option and press OK to select and proceed. The TV
will get the maturity information from the broadcast and
if this maturity level is disabled, will prohibit access to
the broadcast. You can highlight and press OK, if
you don’t want to activate parental restrictions.
13. Select TV Mode
In the following step of the initial setup, you can set
the TV’s operation mode either as Home or as Store.
Store
environment. This option is intended only for store
use. It is recommended to select Home for home use.
14. Chromecast built-in always available
Select your chromecast availability preference. If set as
On your TV will be detected as a Google Cast device
and allow Google Assistant and other services to wake
your TV up to respond to Cast commands, even when
15. Tuner Mode
The next step is the selection of the tuner mode. Select
your tuner preference to install channels for Live TV
function. Antenna, Cable and Satellite options are
available. Highlight the option that corresponds to your
environment and press OK or Right directional button
to proceed. If you don’t want to perform a tuner scan
highlight Next and press OK.
When the channel scan with the selected tuner is
completed, the installation wizard will bring you back
to this step. In case you want to continue scanning
channels with another tuner, you can proceed as
explained below.
Antenna
If the Antenna option is selected, you can choose to
search for digital terrestrial and analogue broadcasts.
On the next screen highlight the option you prefer and
press OK to start the search.
While the search continues you can press the Back/
Return button to stop the search. Then highlight Skip
Scan and press OK or the Right directional button to
complete the setup. The channels that have already
been found will be stored in the channel list.
Note: If the country selected does not have analogue
broadcasts, analogue channels may not be searched.
Cable
If the Cable option is selected, you can choose to
search for digital cable and analogue broadcasts. If

English - 13 -
any, available operator options will be listed on the
Select Operator screen. Otherwise this step will be
skipped. You can select only one operator from the
list. Highlight the desired operator and press OK or
the Right directional button to proceed. On the next
screen highlight the option you prefer and press OK
to start the search. If one of the digital channel search
displayed next. Scan Mode, Frequency (KHz), and
Network ID options may need to be set. To perform
a full scan set the Scan Mode as Full or Advanced
if available. Depending on the selected operator and/
or the Scan Mode setting, some options may not be
available to be set.
Note: If the country selected does not have analogue
broadcasts, analogue channels may not be searched.
Once you are done with setting available options,
press the Right directional button to proceed. The TV
will start to search available broadcasts.
While the search continues you can press the Back/
Return button to stop the search. Then highlight Skip
Scan and press OK or the Right directional button to
complete the setup. The channels that have already
been found will be stored in the channel list.
Satellite
If the Satellite option is selected, the Antenna Type
screen will be displayed next. If you have a Direct
satellite system, you can proceed to the next step
quickly by selecting the Next option here. Highlight
More and press OK to set the antenna type manually.
Single, Tone Burst, DiSEqC and Unicable options
are available. Highlight the antenna type that
corresponds to your satellite system and press OK or
the Right directional button to proceed to the next step.
Next screen may be the Select Operator screen. You
can select only one operator from the list. Highlight
the desired operator and press OK or the Right
directional button to proceed. Some of the options in
the following steps may be preset and/or additional
steps may be added or some steps may be skipped
depending on the selected operator in this step. Check
the parameters in each step before proceeding and
adjust if necessary. You can highlight General and
press OK or Right directional button to proceed with
normal satellite installation.
LNB List screen will be displayed next. You may be
selected country, antenna type and operator in the
previous steps. Highlight the desired satellite option
and press OK or the Right directional button to set
the parameters. The Satellite Status of the first
satellite option will be set as On. In order to enable
channel scan on the satellite, this option should be
set as On
Following satellite parameters will be available. You
may not be able to change all settings depending on
the previous selections.
Satellite Status: Set the status option to On to
enable channel search on the selected satellite.
Highlight this option and press OK to change the
status.
Satellite Selection: Select the satellite on which you
want to perform a channel search.
Scan Mode: Set your scan mode preference.
Network and Full options will be available. If you
are going to perform a network scan, make sure that
you have adjusted the Frequency, Symbol Rate
(Ksym/s) and Polarisation parameters under the
Transponder option accurately.
Scan Type: You can perform a scan for free or
encrypted channels only. If the Only Free Channels
option is selected, encrypted channels will not be
installed. Select All to scan all channels.
Store Type: You can select to store TV channels
(referred to as ‘Digital Channels’ in the menu) or
radio channels only. Select All to store all channels.
Transponder: Adjust the Frequency, Symbol Rate
(Ksym/s) and Polarisation parameters for the
selected satellite if necessary.
Set the parameters for LNB.
For DiSEqC antenna type select the correct DiSEqC
port corresponding to your satellite system. Set other
parameters in accordance with your satellite system
if necessary.
Signal Quality: The signal quality status is displayed
as a percentage.
Signal Level: The signal level status is displayed
as a percentage.
Press the Back/Return button and select next satellite
changes, highlight Next on the LNB List screen and
press OK or the Right directional button to proceed.
If Load Preset List option is selected in the previous
step next steps will be skipped and the preset channel
list installation will start. If the correct satellite has not
been selected for SatcoDX installation, a warning
dialogue will be displayed on the screen. The satellite/s
that can be selected will be listed. Press OK to close
the dialogue and then set the satellite accordingly.
Channel Scan screen will be displayed next. Select
Skip Scan to proceed without performing a scan and
complete the initial setup. Select Scan and press OK
or the Right directional button to start the search.
While the search continues you can press the Back/
Return button to stop the search. Then highlight Skip
Scan and press OK or the Right directional button to
complete the setup. The channels that have already
been found will be stored in the channel list.

English - 14 -
When the initial setup is completed a message will be
displayed. Press OK
You will be asked to give your consent to the collection
of your data. Read the text on the screen for detailed
information. Highlight Accept and press OK to give
your consent and proceed. To skip without giving your
consent, select Next. You can change this setting later
using the Settings>Privacy>Usage & diagnostics
menu.
added. When the Google TV is ready, a message
stating that the TV is ready and the Start exploring
button will appear on the screen. Press OK again to
proceed.
Home Screen will be displayed. You can press the
Exit button on the remote or highlight the LiveTV app
and press OK to switch to Live TV mode and watch
TV channels.
Home Screen
installation should be performed instead of the basic TV
installation during the initial setup of your TV. You also
need to be signed in to your Google account and your
TV should be connected to the Internet. To perform
Google TV installation after the initial setup, you can
scroll down, highlight the Setup Google TV option and
press OK. Connect the TV to a home network with a
high-speed Internet connection. Refer to the Network
& Internet and Connecting to the Internet sections
for further information on how to connect your TV to
the Internet.
The Home menu is the centre of your TV. From the
Home menu, you can start any application, switch to a
TV channel, watch a movie, or switch to a connected
device. Press the Home button to display Home
Screen. You can also select the Google TV Home
option from the Inputs menu to switch to Home
Screen. To open the Inputs menu, press the Source
button on the remote or press the Menu button on the
remote when the TV is in Live TV mode, highlight the
Source option in the TV options menu, and press
OK. Depending on your TV setup and your country
selection in the initial setup, the Home menu may
Highlight the Live TV app and press OK or press the
Exit button on the remote to switch to Live TV mode.
If the source was set to an option other than Antenna,
Cable, Satellite or ATV previously, press the Source
button and set one of these options to watch live TV
channels. Highlight the Multi Media Player app and
press OK to browse the connected USB devices and
play/display the installed media content on the TV. The
audio can be played through the speakers of the TV
or through the speaker systems connected to the TV.
Google TV Home Screen
The Home Screen will be organised into several tabs.
Home, Apps, and Library tabs will be available. The
available options of these tabs are positioned in rows.
To navigate through the Home Screen options use the
directional buttons on the remote. Select a tab and then
a row, move the focus to the desired item in the row.
Press OK to make a selection or to enter a sub-menu.
On the upper left of the Home Screen, search tool
will be located. You can choose either to type a word
to start a search via the virtual keyboard or try voice
search option if your remote has a built-in microphone.
Move the focus to the search tool and press OK or
just press the Microphone button on the remote and
talk to proceed.
On the upper right of the Home Screen, the logo of the
active account will be seen, if you have priorly logged
into a Google account.
To display the Dashboard, press the Settings button or
press and hold the Home button on the remote or press
the Right directional button consecutively on the Home
screen. On the Dashboard there will be options for
Google TV accounts, screensaver and the Settings,
Inputs, Picture and options available.
To browse the Internet, you will need an internet
browser application. Make a search on the Home
Screen or in the Apps tab, find a browser and
download it.
Basic TV Home Screen
The available options of the Home Screen are posi-
tioned in rows. To navigate through the Home Screen
options use the directional buttons on the remote.
Select a row then move the focus to the desired item
in the row. Press OK button to make a selection or to
enter a sub-menu.
To display the Dashboard, press the Settings button
or press and hold the Home button on the remote or
highlight the Dashboard item on the Home screen and
press OK. On the Dashboard there will be options for
screensaver and the Settings, Inputs, Picture and
options available.
Live TV Mode Menu Content
the Menu button on the remote to see Live TV menu
options. To switch to Live TV mode you can either
press the Exit button or highlight the Live TV app on
the Home Screen and press OK.
Channels
Programme Guide: Open the electronic programme
guide. Refer to the Programme Guide section for
detailed information.

English - 15 -
Channel Export/Import: Export this TV’s satellite
channel list data to a connected USB storage device,
or import a previously exported data from a connected
USB storage device to this TV. The Channel Export
and Channel Import options will be available. Connect
a USB storage device (*) to the TV, highlight the option
you want to continue with and press OK. The Channel
Export/Import option will not be available if the input
source is not set to Satellite.
(*) The USB storage device must be formatted with the FAT32
le system.
Channel: Open the Channels menu. You can use the
options of this menu to search for broadcast channels.
Refer to the Channels section for more information.
Channel Management: You can edit the channels
and the channel list using the options of this menu.
Available options may change or the menu may
become inactive depending on the selected input
source, operator, and whether the channel installation
is completed.
Input Source - Antenna
Channel Skip: Set channels to be skipped when
switching the channels via the Programme +/- buttons
on the remote. Highlight the desired channel/s on the
list and press OK to select/unselect.
Channel Swap: Replace the positions of the two
selected channels in the channel list. Highlight the
desired channels on the list and press OK to select.
When the second channel is selected, the position of
this channel will be replaced with the position of the
Yellow but-
ton and enter the number of the channel you want to
select. Then highlight OK and press OK to go to that
channel. You may need to set the LCN option in the
Channels>Channel>Antenna menu to in order
to enable this feature.
Channel Move: Move a channel to the position of
another channel. Highlight the channel you want to
move and press OK to select. Then do the same for a
second channel. When the second channel is selected,
you can press the Blue
channel will be moved to the position of that channel.
Continue and press OK to proceed. You can press
the Yellow button and enter the number of the channel
you want to select. Then highlight OK and press OK
to go to that channel. You may need to set the LCN
option in the Channels>Channel>Antenna menu to
in order to enable this feature.
Channel Edit: Edit channels in the channel list. Edit
the name and channel number (*) of the selected
channel and display Network Name, Channel Type
and Frequency information related to that channel
if available. Depending on the channel other options
may also be editable. Press OK or the Yellow button
to edit the highlighted channel. You can press the Blue
button to delete the highlighted channel.
(*) The selected channel number should not be used for
another channel in the channel list. You may need to set the
LCN option to O in order to change the channel number.
Channel Delete: Highlight the desired channel/s on
the list and press OK or the Yellow button to select/
unselect. Then press the Blue button to delete the
appears, highlight Continue and press OK to proceed.
Clear Channel List: Delete all channels stored in the
-
tion. Highlight Continue and press OK to proceed.
Highlight Cancel and press OK to cancel.
Input Source - Cable
Channel Skip: Set channels to be skipped when
switching the channels via the Programme +/- buttons
on the remote. Highlight the desired channel/s on the
list and press OK to select/unselect.
Channel Swap: Replace the positions of the two
selected channels in the channel list. Highlight the
desired channels on the list and press OK to select.
When the second channel is selected, the position
of this channel will be replaced with the position of
Yellow
button and enter the number of the channel you want
to select. Then highlight OK and press OK to go to
that channel. You may need to set the LCN option in
the Channels>Channel>Cable menu to in order
to enable this feature.
Channel Move: Move a channel to the position of
another channel. Highlight the channel you want to
move and press OK to select. Then do the same for a
second channel. When the second channel is selected,
you can press the Blue
channel will be moved to the position of that channel.
Continue and press OK to proceed. You can press
the Yellow button and enter the number of the channel
you want to select. Then highlight OK and press OK
to go to that channel. You may need to set the LCN
option in the Channels>Channel>Cable menu to
in order to enable this feature.
Channel Edit: Edit channels in the channel list. Edit
the name and channel number (*) of the selected
channel and display Network Name, Channel Type,
Frequency, Modulation and Symbol Rate informa-
tion related to that channel. Depending on the channel
other options may also be editable. Press OK or the
Yellow button to edit the highlighted channel. You can
press the Blue button to delete the highlighted channel.
(*) The selected channel number should not be used for
another channel in the channel list. You may need to set the
LCN option to O in order to change the channel number.
Channel Delete: Highlight the desired channel/s on
the list and press OK or the Yellow button to select/

English - 16 -
unselect. Then press the Blue button to delete the
appears, highlight Continue and press OK to proceed.
Clear Channel List: Delete all channels stored in the
-
tion. Highlight Continue and press OK to proceed.
Highlight Cancel and press OK to cancel.
Input Source - Satellite
Channel Skip: Set channels to be skipped when
switching the channels via the Programme +/- buttons
on the remote. Highlight the desired channel/s on the
list and press OK to select/unselect.
Channel Swap: Replace the positions of the two
selected channels in the channel list. Highlight the
desired channels on the list and press OK to select.
When the second channel is selected, the position of
this channel will be replaced with the position of the
Yellow button
and enter the number of the channel you want to select.
Then highlight OK and press OK to go to that channel.
Channel Move: Move a channel to the position of
another channel. Highlight the channel you want to
move and press OK to select. Then do the same for a
second channel. When the second channel is selected,
you can press the Blue
channel will be moved to the position of that channel.
Continue and press OK to proceed. You can press
the Yellow button and enter the number of the channel
you want to select. Then highlight OK and press OK
to go to that channel.
Channel Edit: Edit channels in the channel list. Edit
the name and channel number (*) of the selected chan-
nel and display Network Name, Channel Number,
Channel Type and Frequency information related to
that channel if available. Depending on the channel
other options may also be editable. Press OK or the
Yellow button to edit the highlighted channel. You can
press the Blue button to delete the highlighted channel.
(*) The selected channel number should not be used for
another channel in the channel list.
Channel Delete: Highlight the desired channel/s on
the list and press OK or the Yellow button to select/
unselect. Then press the Blue button to delete the
appears, highlight Continue and press OK to proceed.
Clear Channel List: Delete all channels stored in the
-
tion. Highlight Continue and press OK to proceed.
Highlight Cancel and press OK to cancel.
Input Source - ATV
Channel Skip: Set channels to be skipped when
switching the channels via the Programme +/- buttons
on the remote. Highlight the desired channel/s on the
list and press OK to select/unselect.
Channel Swap: Replace the positions of the two
selected channels in the channel list. Highlight the
desired channels on the list and press OK to select.
When the second channel is selected, the position of
this channel will be replaced with the position of the
Yellow button
and enter the number of the channel you want to select.
Then highlight OK and press OK to go to that channel.
Channel Move: Move a channel to the position of
another channel. Highlight the channel you want to
move and press OK to select. Then do the same for a
second channel. When the second channel is selected,
you can press the Blue
channel will be moved to the position of that channel.
Continue and press OK to proceed. You can press
the Yellow button and enter the number of the channel
you want to select. Then highlight OK and press OK
to go to that channel.
Channel Edit: Edit channels in the channel list. Edit the
channel number (*), name, frequency, colour system
and sound system of the selected channel and display
the Network Name and Channel Type information
related to that channel if available. Press OK or the
Yellow button to edit the highlighted channel. You can
press the Blue button to delete the highlighted channel.
(*) The selected channel number should not be used for
another channel in the channel list.
Channel Delete: Highlight the desired channel/s on
the list and press OK or the Yellow button to select/
unselect. Then press the Blue button to delete the
appears, highlight Continue and press OK to proceed.
Analogue Channel Fine-tune: Select the channel you
want to adjust from the list and press OK. Then change
the frequency using the Left/Right directional buttons
Back/Return but-
appears, highlight OK and press OK to proceed.
Clear Channel List: Delete all channels stored in the
-
tion. Highlight Continue and press OK to proceed.
Highlight Cancel and press OK to cancel.
TV Options
Source: Display the list of input sources. Select the
desired one and press OK to switch to that source.
Picture: Open the Picture menu. Refer to the Display
& Sound section for detailed information.
Screen: Set the aspect ratio of the screen. Select one
Sound: Open the Sound menu. Refer to the Display
& Sound section for detailed information.
Power: Check the Power & Energy menu options in
the Settings>System for additional power settings.

English - 17 -
This menu has the same options as in the Power &
Energy>Power menu.
Sleep Timer:
your TV to enter sleep mode automatically. Set as
to disable.
OK to
or on the TV to turn the screen on again. Note that
you can not turn the screen on via the Volume +/-,
Mute and Standby buttons. These buttons will
function normally.
Auto Sleep:
want your TV to enter sleep mode automatically. 4
Hours, 6 Hours and 8 Hours options are available.
Set as Never to disable.
Parental Controls
(*) To enter this menu PIN should be entered rst. Use the
PIN that you have dened during the initial setup process. If
you have changed the PIN after the initial setup use that PIN.
If you didn’t set a PIN during the initial setup, you can use
the default PIN. The default PIN is 1234. Some options may
not be available or vary depending on the country selection
during the initial setup. The content of this menu may not
be displayed if the channel installation is not completed
and no channels are installed.
Channels Blocked: Select channel/s to be blocked
from the channel list. Highlight a channel and press
OK to select/unselect. To watch a blocked channel
Programme Restrictions: Block programmes
according to the age rating information that is being
-
trictions, set rating systems, age limits, and block
unrated programmes using the options of this menu.
Inputs Blocked: Prevent access to the selected
input source content. Highlight the desired input
option and press OK to select/unselect. To switch to
Change PIN:
the initial setup. Highlight this option and press OK.
PIN entry screen will be displayed. Enter the new
PIN
CI Card: Display available menu options of the CI card
in use. This item may not be available depending on
the input source setting.
Advanced Options
The options of this menu may change and/or appear
as greyed out depending on the selected input source.
Audio
Audio Language: Set your language preference
for audio. This item may not be available
depending on the input source setting.
Second Audio Language: Set one of the listed
language options as second audio language
preference.
Soundtracks: Set your sound track preference,
if any available.
Audio Type: Set your audio type preference.
Visually Impaired: Set the Audio Type option
to Audio Description to enable this option.
Digital TV channels can broadcast special audio
commentary describing on-screen action, body
language, expressions and movements for people
with visual disabilities.
Speaker: Turn this option on if you want to hear
the audio commentary through the TV speakers.
Headphone: Turn this option on if you want to
route the sound of the audio commentary to the
TV’s headphone output.
Volume: Adjust the volume level of the audio
commentary.
Pan and Fade: Turn this option on if you want to
hear the audio commentary more clearly, when
it is available through broadcast.
Audio for the Visually Impaired: Set your
audio preference for visually impaired. Options
will be available depending on the selected
broadcast.
Fader Control: Adjust the volume balance
between the main TV audio (Main) and audio
commentary (AD).
Subtitle
Analogue Subtitle: Set this option as , On
or Mute. If Mute option is selected, the analogue
subtitle will be displayed on the screen but the
speakers will be muted simultaneously.
Digital Subtitle: Set this option as or On.
Subtitle Tracks: Set your subtitle track preference,
if any available.
Digital Subtitle Language: Set one of the listed
preference.
Second Digital Subtitle Language: Set one
of the listed language options as second digital
subtitle language preference. If the selected
language in the Digital Subtitle Language option
is not available, the subtitles will be displayed in
this language.
Subtitle Type: Set this option as Normal or
Hearing Impaired. If the Hearing Impaired
option is selected, it provides subtitle services to
deaf and hard of hearing viewers with additional
descriptions.
Teletext

English - 18 -
Digital Teletext Language: Set the teletext
language for digital broadcasts.
Decoding Page Language: Set the decoding
page language for teletext display.
Blue Mute:
your preference. When turned on, blue background
will be displayed on the screen when no signal is
available.
Set the behaviour of
the TV, when no signal is detected from the currently
set input source.
to disable.
Default Channel: Set your default startup channel
preference. When the Select Mode is set as User
Select, the Show Channels option will become
available. Highlight and press OK to see channel
list. Highlight a channel and press OK to make a
selection. Selected channel will be displayed, every
time the TV is turned back on from any standby
mode. If the Select Mode is set as Last Status, the
last watched channel will be displayed.
HBBTV Settings
HBBTV Support: Turn the HBBTV function on
Do Not Track: Set your preference regarding the
tracking behaviour for HBBTV services.
Cookie Settings: Set your cookie setting
preference for HBBTV services.
Persistent Storage: Turn the Persistent Storage
stored with an expiry date in the persistent
memory of the TV.
Block Tracking Sites: Turn the Block Tracking
Device ID:
Reset Device ID: Reset the device ID for HBBTV
on dialogue will be displayed.
Press OK to proceed, Back to cancel.
BISS Key: “Click To Add Biss Key” message
will be displayed. Press OK to add a biss key.
Frequency, Symbol Rate (KSym/s), Polarisation,
Programme ID and CW Key parameters will be
available to be set. Once you are done with the
settings highlight Save Key and press OK to save
and add the biss key. This option will not be available
if the input source is not set as Satellite. Available
selected country
during the initial setup process.
System Information: Display detailed system
information on the current channel such as Signal
Level, Signal Quality, Frequency, etc.
Open Source Licences: Display Open Source
Software licence information.
Settings
You can access the Settings menu from the Dashboard
or from the TV options menu in Live TV mode. To
display the Dashboard, press the Settings button or
press and hold the Home button on the remote or press
the Right directional button consecutively on the Home
Screen. If Basic TV installation is performed during
the initial setup, highlight the Dashboard item on the
Home Screen and press OK.
You can use the Right and Left directional buttons,
OK, and Back/Return buttons to navigate through
the menu tree.
Channels & Inputs
The content of this menu may change depending on
the selected input source and whether the channel
installation is completed.
Channels
Analogue
Channel Scan: Start a scan for analogue channels.
You can press OK or the Back/Return button to
cancel the scan. Then press OK or the Back/Return
button again to exit. The channels that have already
been found will be stored in the channel list.
Update Scan: Search for updates. Previously
added channels will not be deleted, but any newly
found channels will be stored in the channel list.
You can press OK or the Back/Return button to
cancel the scan. Then press OK or the Back/Return
button again to exit.
Analogue Manual Scan: Start a channel scan
manually. First, enter the start frequency for the
scan. Then select the scanning direction and press
OK or the Right directional button to start scan. The
found channels will be stored in the channel list. You
can press the Back/Return button to cancel the
scan. Then press the Back/Return button again or
highlight Finish and press OK to exit.
Antenna
Channel Scan: Start a scan for digital terrestrial
channels. You can press OK or the Back/Return
button to cancel the scan. Then press OK or the
Back/Return button again to exit. The channels
that have already been found will be stored in the
channel list.
Update Scan: Search for updates. Previously
added channels will not be deleted, but any newly
found channels will be stored in the channel list.
You can press OK or the Back/Return button to
cancel the scan. Then press OK or the Back/Return
button again to exit.
Single RF Scan: Set the RF Channel option by
using the Right/Left directional buttons. Signal

English - 19 -
Level and Signal Quality of the selected channel
will be shown. Press OK to start scan on the
selected RF channel. The found channels will be
stored in the channel list. You can press the Back/
Return button to cancel the scan. Then press the
Back/Return button again or highlight Finish and
press OK to exit.
Manual Service Update: Start a service update
manually. You can press OK or the Back/Return
button to cancel the scan. Then press OK or the
Back/Return button again to exit.
LCN: Set your preference for LCN. LCN is the Logical
Channel Number system that organises available
broadcasts in accordance with a recognisable
channel number sequence (if available).
Channel Scan Type: Set your scan type preference.
Channel Store Type: Set your store type prefe-
rence.
Favourite Network Select: Select your favourite
network. This menu option will be active, if more
than one network is available.
Cable
Channel Scan: Start a scan for digital cable
channels. If available, operator options will be
listed. Select the desired one and press OK. Scan
Mode, Frequency and Network ID options may be
available. The options may vary depending on the
operator and the Scan Mode selections. Set the
Scan Mode as Full if you don’t know how to set up
other options. Highlight Scan and press OK or the
Right directional button to start the scan. You can
press the Back/Return button to cancel the scan.
The channels that have already been found will be
stored in the channel list.
Single RF Scan: Enter the Frequency value.
Signal Level and Signal Quality of the selected
Frequency will be shown. Highlight the Scan
option and press OK or the Right directional button
to start scan. The found channels will be stored in
the channel list.
LCN: Set your preference for LCN. LCN is the Logical
Channel Number system that organises available
broadcasts in accordance with a recognisable
channel number sequence (if available).
Channel Scan Type: Set your scan type preference.
Channel Store Type: Set your store type prefe-
rence.
Favourite Network Select: Select your favourite
network. This menu option will be active, if more
than one network is available. This option may not
be available depending on the selected country
during the initial setup process.
Satellite
Channel Installation Mode: Set this option as
Preferred Satellite or General Satellite. The
channel list will also change depending on the
selected option here. In order to watch the channels
on the satellite you want, this option should be
selected accordingly. Set to Preferred Satellite to
watch operator channels, if you have performed
an operator installation. Set to General Satellite
to watch other satellite channels, if you have
performed a normal installation.
Satellite Re-scan: Start a satellite scan beginning
with the antenna selection screen. When this
scanning option is preferred, some scanning
preferences you made during the initial setup
process may not be changed.
For the General Satellite channel installation mode
the SatcoDX Scan option may also be available
here. For standard installation select Normal
scan. For SatcoDX installation select SatcoDX
Scan
directory of an USB storage device and connect it
to your TV. Highlight this option and press OK or the
Right directional button. The Download SatcoDX
option will be highlighted, press OK or the Right
from the connected USB storage device and press
OK. Satellite selection screen will be displayed. The
On.
Highlight that satellite option and press OK. Set
the parameters corresponding to your system and
correct satellite and press the Back/Return button
to return to the satellite selection screen. Highlight
Next and press OK to proceed with the SatcoDX
channel list installation. If the selected satellite is not
correct for SatcoDX installation, a warning dialogue
will be displayed on the screen. The satellite/s that
can be selected will be listed. Press OK to close the
dialogue and press OK or the Back/Return button
to return to satellite selection screen. Then set the
satellite accordingly.
Satellite Add: Add satellite/s on which you want
to perform a channel scan. This menu option will
be active, if Channel Installation Mode is set to
General Satellite.
Satellite Update: Search for any updates by
repeating the previous scan with the same settings.
before the scan. Depending on the Channel
Installation Mode setting, this option may not be
available services. Highlight the satellite and press
OK to configure detailed satellite parameters.
Then press the Back/Return button to return to
the satellite selection screen. Highlight Next and
press OK to proceed.
La page est en cours de chargement...
La page est en cours de chargement...
La page est en cours de chargement...
La page est en cours de chargement...
La page est en cours de chargement...
La page est en cours de chargement...
La page est en cours de chargement...
La page est en cours de chargement...
La page est en cours de chargement...
La page est en cours de chargement...
La page est en cours de chargement...
La page est en cours de chargement...
La page est en cours de chargement...
La page est en cours de chargement...
La page est en cours de chargement...
La page est en cours de chargement...
La page est en cours de chargement...
La page est en cours de chargement...
La page est en cours de chargement...
La page est en cours de chargement...
La page est en cours de chargement...
La page est en cours de chargement...
La page est en cours de chargement...
La page est en cours de chargement...
La page est en cours de chargement...
La page est en cours de chargement...
La page est en cours de chargement...
La page est en cours de chargement...
La page est en cours de chargement...
La page est en cours de chargement...
La page est en cours de chargement...
La page est en cours de chargement...
La page est en cours de chargement...
La page est en cours de chargement...
La page est en cours de chargement...
La page est en cours de chargement...
La page est en cours de chargement...
La page est en cours de chargement...
La page est en cours de chargement...
La page est en cours de chargement...
La page est en cours de chargement...
La page est en cours de chargement...
La page est en cours de chargement...
La page est en cours de chargement...
La page est en cours de chargement...
La page est en cours de chargement...
La page est en cours de chargement...
La page est en cours de chargement...
La page est en cours de chargement...
La page est en cours de chargement...
La page est en cours de chargement...
La page est en cours de chargement...
La page est en cours de chargement...
La page est en cours de chargement...
La page est en cours de chargement...
La page est en cours de chargement...
La page est en cours de chargement...
La page est en cours de chargement...
La page est en cours de chargement...
La page est en cours de chargement...
La page est en cours de chargement...
La page est en cours de chargement...
La page est en cours de chargement...
La page est en cours de chargement...
La page est en cours de chargement...
La page est en cours de chargement...
La page est en cours de chargement...
La page est en cours de chargement...
La page est en cours de chargement...
La page est en cours de chargement...
La page est en cours de chargement...
La page est en cours de chargement...
La page est en cours de chargement...
La page est en cours de chargement...
La page est en cours de chargement...
La page est en cours de chargement...
La page est en cours de chargement...
La page est en cours de chargement...
La page est en cours de chargement...
La page est en cours de chargement...
La page est en cours de chargement...
La page est en cours de chargement...
La page est en cours de chargement...
La page est en cours de chargement...
La page est en cours de chargement...
La page est en cours de chargement...
La page est en cours de chargement...
La page est en cours de chargement...
La page est en cours de chargement...
La page est en cours de chargement...
La page est en cours de chargement...
La page est en cours de chargement...
La page est en cours de chargement...
La page est en cours de chargement...
La page est en cours de chargement...
La page est en cours de chargement...
La page est en cours de chargement...
La page est en cours de chargement...
La page est en cours de chargement...
La page est en cours de chargement...
La page est en cours de chargement...
La page est en cours de chargement...
La page est en cours de chargement...
La page est en cours de chargement...
La page est en cours de chargement...
La page est en cours de chargement...
La page est en cours de chargement...
La page est en cours de chargement...
La page est en cours de chargement...
La page est en cours de chargement...
La page est en cours de chargement...
La page est en cours de chargement...
La page est en cours de chargement...
La page est en cours de chargement...
La page est en cours de chargement...
La page est en cours de chargement...
La page est en cours de chargement...
La page est en cours de chargement...
La page est en cours de chargement...
La page est en cours de chargement...
La page est en cours de chargement...
La page est en cours de chargement...
La page est en cours de chargement...
La page est en cours de chargement...
La page est en cours de chargement...
La page est en cours de chargement...
La page est en cours de chargement...
La page est en cours de chargement...
La page est en cours de chargement...
La page est en cours de chargement...
La page est en cours de chargement...
La page est en cours de chargement...
La page est en cours de chargement...
La page est en cours de chargement...
La page est en cours de chargement...
La page est en cours de chargement...
La page est en cours de chargement...
La page est en cours de chargement...
La page est en cours de chargement...
La page est en cours de chargement...
La page est en cours de chargement...
La page est en cours de chargement...
La page est en cours de chargement...
La page est en cours de chargement...
La page est en cours de chargement...
La page est en cours de chargement...
La page est en cours de chargement...
La page est en cours de chargement...
La page est en cours de chargement...
La page est en cours de chargement...
La page est en cours de chargement...
La page est en cours de chargement...
La page est en cours de chargement...
La page est en cours de chargement...
La page est en cours de chargement...
La page est en cours de chargement...
La page est en cours de chargement...
La page est en cours de chargement...
La page est en cours de chargement...
La page est en cours de chargement...
La page est en cours de chargement...
La page est en cours de chargement...
La page est en cours de chargement...
La page est en cours de chargement...
La page est en cours de chargement...
La page est en cours de chargement...
La page est en cours de chargement...
La page est en cours de chargement...
La page est en cours de chargement...
La page est en cours de chargement...
La page est en cours de chargement...
La page est en cours de chargement...
La page est en cours de chargement...
La page est en cours de chargement...
La page est en cours de chargement...
La page est en cours de chargement...
La page est en cours de chargement...
La page est en cours de chargement...
La page est en cours de chargement...
La page est en cours de chargement...
La page est en cours de chargement...
La page est en cours de chargement...
La page est en cours de chargement...
La page est en cours de chargement...
La page est en cours de chargement...
La page est en cours de chargement...
La page est en cours de chargement...
La page est en cours de chargement...
La page est en cours de chargement...
La page est en cours de chargement...
La page est en cours de chargement...
La page est en cours de chargement...
La page est en cours de chargement...
La page est en cours de chargement...
La page est en cours de chargement...
La page est en cours de chargement...
La page est en cours de chargement...
La page est en cours de chargement...
La page est en cours de chargement...
La page est en cours de chargement...
La page est en cours de chargement...
La page est en cours de chargement...
La page est en cours de chargement...
La page est en cours de chargement...
La page est en cours de chargement...
La page est en cours de chargement...
La page est en cours de chargement...
La page est en cours de chargement...
La page est en cours de chargement...
La page est en cours de chargement...
La page est en cours de chargement...
La page est en cours de chargement...
La page est en cours de chargement...
La page est en cours de chargement...
La page est en cours de chargement...
La page est en cours de chargement...
La page est en cours de chargement...
La page est en cours de chargement...
La page est en cours de chargement...
La page est en cours de chargement...
La page est en cours de chargement...
La page est en cours de chargement...
La page est en cours de chargement...
La page est en cours de chargement...
La page est en cours de chargement...
La page est en cours de chargement...
La page est en cours de chargement...
La page est en cours de chargement...
La page est en cours de chargement...
La page est en cours de chargement...
La page est en cours de chargement...
La page est en cours de chargement...
La page est en cours de chargement...
La page est en cours de chargement...
La page est en cours de chargement...
La page est en cours de chargement...
La page est en cours de chargement...
La page est en cours de chargement...
La page est en cours de chargement...
La page est en cours de chargement...
La page est en cours de chargement...
La page est en cours de chargement...
La page est en cours de chargement...
La page est en cours de chargement...
La page est en cours de chargement...
La page est en cours de chargement...
La page est en cours de chargement...
La page est en cours de chargement...
La page est en cours de chargement...
La page est en cours de chargement...
La page est en cours de chargement...
La page est en cours de chargement...
La page est en cours de chargement...
La page est en cours de chargement...
La page est en cours de chargement...
La page est en cours de chargement...
La page est en cours de chargement...
La page est en cours de chargement...
La page est en cours de chargement...
La page est en cours de chargement...
La page est en cours de chargement...
La page est en cours de chargement...
La page est en cours de chargement...
La page est en cours de chargement...
La page est en cours de chargement...
La page est en cours de chargement...
La page est en cours de chargement...
La page est en cours de chargement...
La page est en cours de chargement...
La page est en cours de chargement...
La page est en cours de chargement...
La page est en cours de chargement...
La page est en cours de chargement...
La page est en cours de chargement...
La page est en cours de chargement...
La page est en cours de chargement...
La page est en cours de chargement...
La page est en cours de chargement...
La page est en cours de chargement...
La page est en cours de chargement...
La page est en cours de chargement...
La page est en cours de chargement...
La page est en cours de chargement...
La page est en cours de chargement...
La page est en cours de chargement...
La page est en cours de chargement...
La page est en cours de chargement...
La page est en cours de chargement...
La page est en cours de chargement...
La page est en cours de chargement...
La page est en cours de chargement...
La page est en cours de chargement...
La page est en cours de chargement...
La page est en cours de chargement...
La page est en cours de chargement...
La page est en cours de chargement...
La page est en cours de chargement...
La page est en cours de chargement...
La page est en cours de chargement...
La page est en cours de chargement...
La page est en cours de chargement...
La page est en cours de chargement...
La page est en cours de chargement...
La page est en cours de chargement...
La page est en cours de chargement...
La page est en cours de chargement...
La page est en cours de chargement...
La page est en cours de chargement...
La page est en cours de chargement...
La page est en cours de chargement...
La page est en cours de chargement...
La page est en cours de chargement...
La page est en cours de chargement...
La page est en cours de chargement...
La page est en cours de chargement...
La page est en cours de chargement...
La page est en cours de chargement...
La page est en cours de chargement...
La page est en cours de chargement...
La page est en cours de chargement...
La page est en cours de chargement...
La page est en cours de chargement...
La page est en cours de chargement...
La page est en cours de chargement...
La page est en cours de chargement...
La page est en cours de chargement...
La page est en cours de chargement...
La page est en cours de chargement...
La page est en cours de chargement...
La page est en cours de chargement...
La page est en cours de chargement...
La page est en cours de chargement...
La page est en cours de chargement...
La page est en cours de chargement...
La page est en cours de chargement...
La page est en cours de chargement...
La page est en cours de chargement...
La page est en cours de chargement...
La page est en cours de chargement...
La page est en cours de chargement...
La page est en cours de chargement...
La page est en cours de chargement...
La page est en cours de chargement...
La page est en cours de chargement...
La page est en cours de chargement...
La page est en cours de chargement...
La page est en cours de chargement...
La page est en cours de chargement...
La page est en cours de chargement...
La page est en cours de chargement...
La page est en cours de chargement...
La page est en cours de chargement...
La page est en cours de chargement...
La page est en cours de chargement...
La page est en cours de chargement...
La page est en cours de chargement...
La page est en cours de chargement...
La page est en cours de chargement...
La page est en cours de chargement...
La page est en cours de chargement...
La page est en cours de chargement...
La page est en cours de chargement...
La page est en cours de chargement...
La page est en cours de chargement...
La page est en cours de chargement...
La page est en cours de chargement...
La page est en cours de chargement...
La page est en cours de chargement...
La page est en cours de chargement...
La page est en cours de chargement...
La page est en cours de chargement...
La page est en cours de chargement...
La page est en cours de chargement...
La page est en cours de chargement...
La page est en cours de chargement...
La page est en cours de chargement...
La page est en cours de chargement...
La page est en cours de chargement...
La page est en cours de chargement...
La page est en cours de chargement...
La page est en cours de chargement...
La page est en cours de chargement...
La page est en cours de chargement...
La page est en cours de chargement...
La page est en cours de chargement...
La page est en cours de chargement...
La page est en cours de chargement...
La page est en cours de chargement...
La page est en cours de chargement...
La page est en cours de chargement...
La page est en cours de chargement...
La page est en cours de chargement...
La page est en cours de chargement...
La page est en cours de chargement...
La page est en cours de chargement...
La page est en cours de chargement...
La page est en cours de chargement...
La page est en cours de chargement...
La page est en cours de chargement...
La page est en cours de chargement...
La page est en cours de chargement...
La page est en cours de chargement...
La page est en cours de chargement...
La page est en cours de chargement...
La page est en cours de chargement...
La page est en cours de chargement...
La page est en cours de chargement...
La page est en cours de chargement...
La page est en cours de chargement...
La page est en cours de chargement...
La page est en cours de chargement...
La page est en cours de chargement...
La page est en cours de chargement...
La page est en cours de chargement...
La page est en cours de chargement...
La page est en cours de chargement...
La page est en cours de chargement...
La page est en cours de chargement...
La page est en cours de chargement...
La page est en cours de chargement...
La page est en cours de chargement...
La page est en cours de chargement...
La page est en cours de chargement...
La page est en cours de chargement...
La page est en cours de chargement...
La page est en cours de chargement...
La page est en cours de chargement...
La page est en cours de chargement...
La page est en cours de chargement...
La page est en cours de chargement...
La page est en cours de chargement...
La page est en cours de chargement...
La page est en cours de chargement...
La page est en cours de chargement...
La page est en cours de chargement...
La page est en cours de chargement...
La page est en cours de chargement...
La page est en cours de chargement...
La page est en cours de chargement...
La page est en cours de chargement...
La page est en cours de chargement...
La page est en cours de chargement...
La page est en cours de chargement...
La page est en cours de chargement...
La page est en cours de chargement...
La page est en cours de chargement...
La page est en cours de chargement...
La page est en cours de chargement...
La page est en cours de chargement...
La page est en cours de chargement...
La page est en cours de chargement...
La page est en cours de chargement...
La page est en cours de chargement...
La page est en cours de chargement...
La page est en cours de chargement...
La page est en cours de chargement...
La page est en cours de chargement...
La page est en cours de chargement...
La page est en cours de chargement...
La page est en cours de chargement...
La page est en cours de chargement...
La page est en cours de chargement...
La page est en cours de chargement...
La page est en cours de chargement...
La page est en cours de chargement...
La page est en cours de chargement...
La page est en cours de chargement...
La page est en cours de chargement...
La page est en cours de chargement...
La page est en cours de chargement...
La page est en cours de chargement...
La page est en cours de chargement...
La page est en cours de chargement...
La page est en cours de chargement...
La page est en cours de chargement...
La page est en cours de chargement...
La page est en cours de chargement...
La page est en cours de chargement...
La page est en cours de chargement...
La page est en cours de chargement...
La page est en cours de chargement...
La page est en cours de chargement...
La page est en cours de chargement...
La page est en cours de chargement...
La page est en cours de chargement...
La page est en cours de chargement...
La page est en cours de chargement...
La page est en cours de chargement...
La page est en cours de chargement...
La page est en cours de chargement...
La page est en cours de chargement...
La page est en cours de chargement...
La page est en cours de chargement...
La page est en cours de chargement...
La page est en cours de chargement...
La page est en cours de chargement...
La page est en cours de chargement...
La page est en cours de chargement...
La page est en cours de chargement...
La page est en cours de chargement...
La page est en cours de chargement...
La page est en cours de chargement...
La page est en cours de chargement...
La page est en cours de chargement...
La page est en cours de chargement...
La page est en cours de chargement...
La page est en cours de chargement...
La page est en cours de chargement...
La page est en cours de chargement...
La page est en cours de chargement...
La page est en cours de chargement...
La page est en cours de chargement...
La page est en cours de chargement...
La page est en cours de chargement...
La page est en cours de chargement...
La page est en cours de chargement...
La page est en cours de chargement...
La page est en cours de chargement...
La page est en cours de chargement...
La page est en cours de chargement...
La page est en cours de chargement...
La page est en cours de chargement...
La page est en cours de chargement...
La page est en cours de chargement...
La page est en cours de chargement...
La page est en cours de chargement...
La page est en cours de chargement...
La page est en cours de chargement...
La page est en cours de chargement...
La page est en cours de chargement...
La page est en cours de chargement...
La page est en cours de chargement...
La page est en cours de chargement...
La page est en cours de chargement...
La page est en cours de chargement...
La page est en cours de chargement...
La page est en cours de chargement...
La page est en cours de chargement...
La page est en cours de chargement...
La page est en cours de chargement...
La page est en cours de chargement...
La page est en cours de chargement...
La page est en cours de chargement...
La page est en cours de chargement...
La page est en cours de chargement...
La page est en cours de chargement...
La page est en cours de chargement...
La page est en cours de chargement...
La page est en cours de chargement...
La page est en cours de chargement...
La page est en cours de chargement...
La page est en cours de chargement...
La page est en cours de chargement...
La page est en cours de chargement...
La page est en cours de chargement...
La page est en cours de chargement...
La page est en cours de chargement...
La page est en cours de chargement...
La page est en cours de chargement...
La page est en cours de chargement...
La page est en cours de chargement...
La page est en cours de chargement...
La page est en cours de chargement...
La page est en cours de chargement...
La page est en cours de chargement...
La page est en cours de chargement...
La page est en cours de chargement...
La page est en cours de chargement...
La page est en cours de chargement...
La page est en cours de chargement...
La page est en cours de chargement...
La page est en cours de chargement...
La page est en cours de chargement...
La page est en cours de chargement...
La page est en cours de chargement...
La page est en cours de chargement...
La page est en cours de chargement...
La page est en cours de chargement...
La page est en cours de chargement...
La page est en cours de chargement...
La page est en cours de chargement...
La page est en cours de chargement...
La page est en cours de chargement...
La page est en cours de chargement...
La page est en cours de chargement...
La page est en cours de chargement...
La page est en cours de chargement...
La page est en cours de chargement...
La page est en cours de chargement...
La page est en cours de chargement...
La page est en cours de chargement...
La page est en cours de chargement...
La page est en cours de chargement...
La page est en cours de chargement...
La page est en cours de chargement...
La page est en cours de chargement...
La page est en cours de chargement...
La page est en cours de chargement...
La page est en cours de chargement...
La page est en cours de chargement...
La page est en cours de chargement...
La page est en cours de chargement...
La page est en cours de chargement...
La page est en cours de chargement...
La page est en cours de chargement...
La page est en cours de chargement...
La page est en cours de chargement...
La page est en cours de chargement...
La page est en cours de chargement...
La page est en cours de chargement...
La page est en cours de chargement...
La page est en cours de chargement...
La page est en cours de chargement...
La page est en cours de chargement...
La page est en cours de chargement...
La page est en cours de chargement...
La page est en cours de chargement...
La page est en cours de chargement...
La page est en cours de chargement...
La page est en cours de chargement...
La page est en cours de chargement...
La page est en cours de chargement...
La page est en cours de chargement...
La page est en cours de chargement...
La page est en cours de chargement...
La page est en cours de chargement...
La page est en cours de chargement...
La page est en cours de chargement...
La page est en cours de chargement...
La page est en cours de chargement...
La page est en cours de chargement...
La page est en cours de chargement...
La page est en cours de chargement...
La page est en cours de chargement...
La page est en cours de chargement...
La page est en cours de chargement...
La page est en cours de chargement...
La page est en cours de chargement...
La page est en cours de chargement...
La page est en cours de chargement...
La page est en cours de chargement...
La page est en cours de chargement...
La page est en cours de chargement...
La page est en cours de chargement...
La page est en cours de chargement...
La page est en cours de chargement...
La page est en cours de chargement...
La page est en cours de chargement...
La page est en cours de chargement...
La page est en cours de chargement...
La page est en cours de chargement...
La page est en cours de chargement...
La page est en cours de chargement...
La page est en cours de chargement...
La page est en cours de chargement...
La page est en cours de chargement...
La page est en cours de chargement...
La page est en cours de chargement...
La page est en cours de chargement...
La page est en cours de chargement...
La page est en cours de chargement...
La page est en cours de chargement...
La page est en cours de chargement...
La page est en cours de chargement...
La page est en cours de chargement...
La page est en cours de chargement...
La page est en cours de chargement...
La page est en cours de chargement...
La page est en cours de chargement...
La page est en cours de chargement...
La page est en cours de chargement...
La page est en cours de chargement...
La page est en cours de chargement...
La page est en cours de chargement...
La page est en cours de chargement...
La page est en cours de chargement...
La page est en cours de chargement...
La page est en cours de chargement...
La page est en cours de chargement...
La page est en cours de chargement...
La page est en cours de chargement...
La page est en cours de chargement...
La page est en cours de chargement...
La page est en cours de chargement...
La page est en cours de chargement...
La page est en cours de chargement...
La page est en cours de chargement...
La page est en cours de chargement...
La page est en cours de chargement...
La page est en cours de chargement...
La page est en cours de chargement...
La page est en cours de chargement...
La page est en cours de chargement...
La page est en cours de chargement...
La page est en cours de chargement...
La page est en cours de chargement...
La page est en cours de chargement...
La page est en cours de chargement...
La page est en cours de chargement...
La page est en cours de chargement...
La page est en cours de chargement...
La page est en cours de chargement...
La page est en cours de chargement...
La page est en cours de chargement...
La page est en cours de chargement...
La page est en cours de chargement...
La page est en cours de chargement...
La page est en cours de chargement...
La page est en cours de chargement...
La page est en cours de chargement...
La page est en cours de chargement...
La page est en cours de chargement...
La page est en cours de chargement...
La page est en cours de chargement...
La page est en cours de chargement...
La page est en cours de chargement...
La page est en cours de chargement...
La page est en cours de chargement...
La page est en cours de chargement...
La page est en cours de chargement...
La page est en cours de chargement...
La page est en cours de chargement...
La page est en cours de chargement...
La page est en cours de chargement...
La page est en cours de chargement...
La page est en cours de chargement...
La page est en cours de chargement...
La page est en cours de chargement...
La page est en cours de chargement...
La page est en cours de chargement...
La page est en cours de chargement...
La page est en cours de chargement...
La page est en cours de chargement...
La page est en cours de chargement...
La page est en cours de chargement...
La page est en cours de chargement...
La page est en cours de chargement...
La page est en cours de chargement...
La page est en cours de chargement...
La page est en cours de chargement...
La page est en cours de chargement...
La page est en cours de chargement...
La page est en cours de chargement...
La page est en cours de chargement...
La page est en cours de chargement...
La page est en cours de chargement...
La page est en cours de chargement...
La page est en cours de chargement...
La page est en cours de chargement...
La page est en cours de chargement...
La page est en cours de chargement...
La page est en cours de chargement...
La page est en cours de chargement...
La page est en cours de chargement...
La page est en cours de chargement...
La page est en cours de chargement...
La page est en cours de chargement...
La page est en cours de chargement...
La page est en cours de chargement...
La page est en cours de chargement...
La page est en cours de chargement...
La page est en cours de chargement...
La page est en cours de chargement...
La page est en cours de chargement...
La page est en cours de chargement...
La page est en cours de chargement...
La page est en cours de chargement...
La page est en cours de chargement...
La page est en cours de chargement...
La page est en cours de chargement...
La page est en cours de chargement...
La page est en cours de chargement...
La page est en cours de chargement...
La page est en cours de chargement...
La page est en cours de chargement...
La page est en cours de chargement...
La page est en cours de chargement...
La page est en cours de chargement...
La page est en cours de chargement...
La page est en cours de chargement...
La page est en cours de chargement...
-
 1
1
-
 2
2
-
 3
3
-
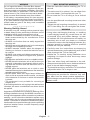 4
4
-
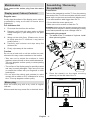 5
5
-
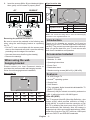 6
6
-
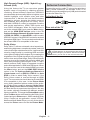 7
7
-
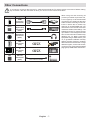 8
8
-
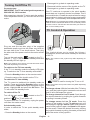 9
9
-
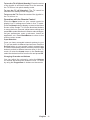 10
10
-
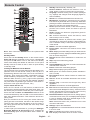 11
11
-
 12
12
-
 13
13
-
 14
14
-
 15
15
-
 16
16
-
 17
17
-
 18
18
-
 19
19
-
 20
20
-
 21
21
-
 22
22
-
 23
23
-
 24
24
-
 25
25
-
 26
26
-
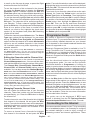 27
27
-
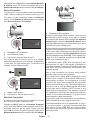 28
28
-
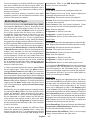 29
29
-
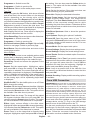 30
30
-
 31
31
-
 32
32
-
 33
33
-
 34
34
-
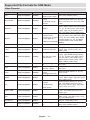 35
35
-
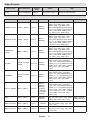 36
36
-
 37
37
-
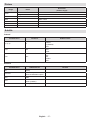 38
38
-
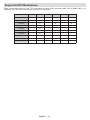 39
39
-
 40
40
-
 41
41
-
 42
42
-
 43
43
-
 44
44
-
 45
45
-
 46
46
-
 47
47
-
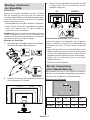 48
48
-
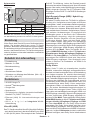 49
49
-
 50
50
-
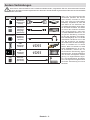 51
51
-
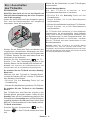 52
52
-
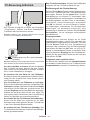 53
53
-
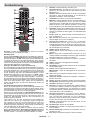 54
54
-
 55
55
-
 56
56
-
 57
57
-
 58
58
-
 59
59
-
 60
60
-
 61
61
-
 62
62
-
 63
63
-
 64
64
-
 65
65
-
 66
66
-
 67
67
-
 68
68
-
 69
69
-
 70
70
-
 71
71
-
 72
72
-
 73
73
-
 74
74
-
 75
75
-
 76
76
-
 77
77
-
 78
78
-
 79
79
-
 80
80
-
 81
81
-
 82
82
-
 83
83
-
 84
84
-
 85
85
-
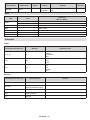 86
86
-
 87
87
-
 88
88
-
 89
89
-
 90
90
-
 91
91
-
 92
92
-
 93
93
-
 94
94
-
 95
95
-
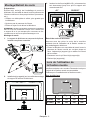 96
96
-
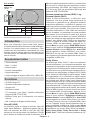 97
97
-
 98
98
-
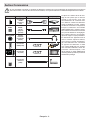 99
99
-
 100
100
-
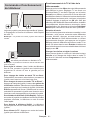 101
101
-
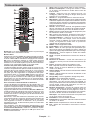 102
102
-
 103
103
-
 104
104
-
 105
105
-
 106
106
-
 107
107
-
 108
108
-
 109
109
-
 110
110
-
 111
111
-
 112
112
-
 113
113
-
 114
114
-
 115
115
-
 116
116
-
 117
117
-
 118
118
-
 119
119
-
 120
120
-
 121
121
-
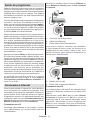 122
122
-
 123
123
-
 124
124
-
 125
125
-
 126
126
-
 127
127
-
 128
128
-
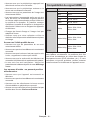 129
129
-
 130
130
-
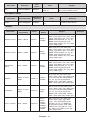 131
131
-
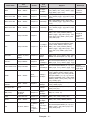 132
132
-
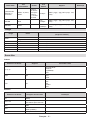 133
133
-
 134
134
-
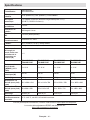 135
135
-
 136
136
-
 137
137
-
 138
138
-
 139
139
-
 140
140
-
 141
141
-
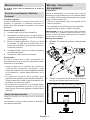 142
142
-
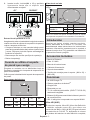 143
143
-
 144
144
-
 145
145
-
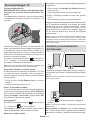 146
146
-
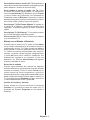 147
147
-
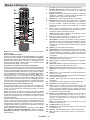 148
148
-
 149
149
-
 150
150
-
 151
151
-
 152
152
-
 153
153
-
 154
154
-
 155
155
-
 156
156
-
 157
157
-
 158
158
-
 159
159
-
 160
160
-
 161
161
-
 162
162
-
 163
163
-
 164
164
-
 165
165
-
 166
166
-
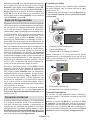 167
167
-
 168
168
-
 169
169
-
 170
170
-
 171
171
-
 172
172
-
 173
173
-
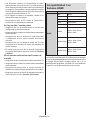 174
174
-
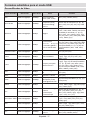 175
175
-
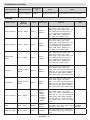 176
176
-
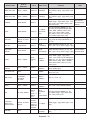 177
177
-
 178
178
-
 179
179
-
 180
180
-
 181
181
-
 182
182
-
 183
183
-
 184
184
-
 185
185
-
 186
186
-
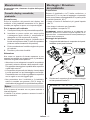 187
187
-
 188
188
-
 189
189
-
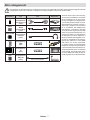 190
190
-
 191
191
-
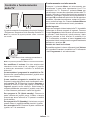 192
192
-
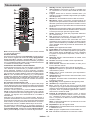 193
193
-
 194
194
-
 195
195
-
 196
196
-
 197
197
-
 198
198
-
 199
199
-
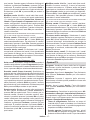 200
200
-
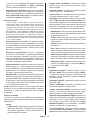 201
201
-
 202
202
-
 203
203
-
 204
204
-
 205
205
-
 206
206
-
 207
207
-
 208
208
-
 209
209
-
 210
210
-
 211
211
-
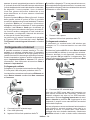 212
212
-
 213
213
-
 214
214
-
 215
215
-
 216
216
-
 217
217
-
 218
218
-
 219
219
-
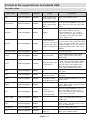 220
220
-
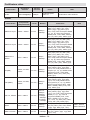 221
221
-
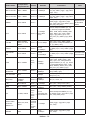 222
222
-
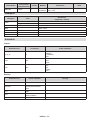 223
223
-
 224
224
-
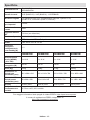 225
225
-
 226
226
-
 227
227
-
 228
228
-
 229
229
-
 230
230
-
 231
231
-
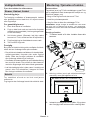 232
232
-
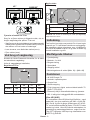 233
233
-
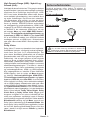 234
234
-
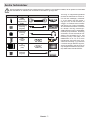 235
235
-
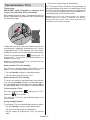 236
236
-
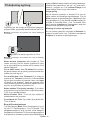 237
237
-
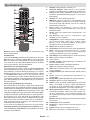 238
238
-
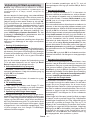 239
239
-
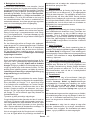 240
240
-
 241
241
-
 242
242
-
 243
243
-
 244
244
-
 245
245
-
 246
246
-
 247
247
-
 248
248
-
 249
249
-
 250
250
-
 251
251
-
 252
252
-
 253
253
-
 254
254
-
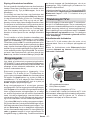 255
255
-
 256
256
-
 257
257
-
 258
258
-
 259
259
-
 260
260
-
 261
261
-
 262
262
-
 263
263
-
 264
264
-
 265
265
-
 266
266
-
 267
267
-
 268
268
-
 269
269
-
 270
270
-
 271
271
-
 272
272
-
 273
273
-
 274
274
-
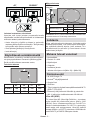 275
275
-
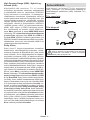 276
276
-
 277
277
-
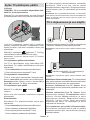 278
278
-
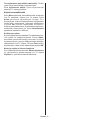 279
279
-
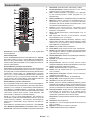 280
280
-
 281
281
-
 282
282
-
 283
283
-
 284
284
-
 285
285
-
 286
286
-
 287
287
-
 288
288
-
 289
289
-
 290
290
-
 291
291
-
 292
292
-
 293
293
-
 294
294
-
 295
295
-
 296
296
-
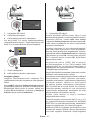 297
297
-
 298
298
-
 299
299
-
 300
300
-
 301
301
-
 302
302
-
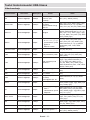 303
303
-
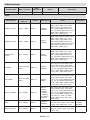 304
304
-
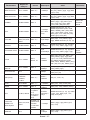 305
305
-
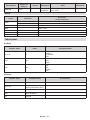 306
306
-
 307
307
-
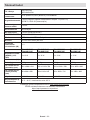 308
308
-
 309
309
-
 310
310
-
 311
311
-
 312
312
-
 313
313
-
 314
314
-
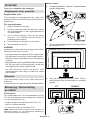 315
315
-
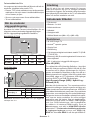 316
316
-
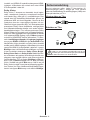 317
317
-
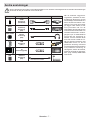 318
318
-
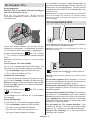 319
319
-
 320
320
-
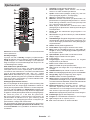 321
321
-
 322
322
-
 323
323
-
 324
324
-
 325
325
-
 326
326
-
 327
327
-
 328
328
-
 329
329
-
 330
330
-
 331
331
-
 332
332
-
 333
333
-
 334
334
-
 335
335
-
 336
336
-
 337
337
-
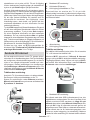 338
338
-
 339
339
-
 340
340
-
 341
341
-
 342
342
-
 343
343
-
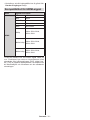 344
344
-
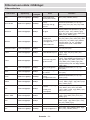 345
345
-
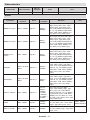 346
346
-
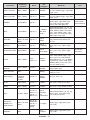 347
347
-
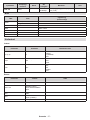 348
348
-
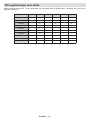 349
349
-
 350
350
-
 351
351
-
 352
352
-
 353
353
-
 354
354
-
 355
355
-
 356
356
-
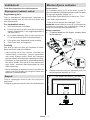 357
357
-
 358
358
-
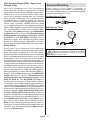 359
359
-
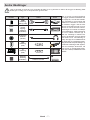 360
360
-
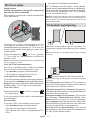 361
361
-
 362
362
-
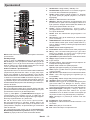 363
363
-
 364
364
-
 365
365
-
 366
366
-
 367
367
-
 368
368
-
 369
369
-
 370
370
-
 371
371
-
 372
372
-
 373
373
-
 374
374
-
 375
375
-
 376
376
-
 377
377
-
 378
378
-
 379
379
-
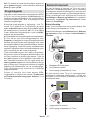 380
380
-
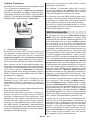 381
381
-
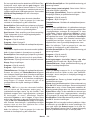 382
382
-
 383
383
-
 384
384
-
 385
385
-
 386
386
-
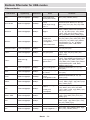 387
387
-
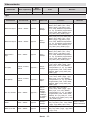 388
388
-
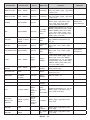 389
389
-
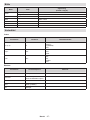 390
390
-
 391
391
-
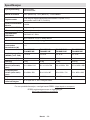 392
392
-
 393
393
-
 394
394
-
 395
395
-
 396
396
-
 397
397
-
 398
398
-
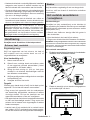 399
399
-
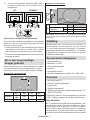 400
400
-
 401
401
-
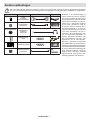 402
402
-
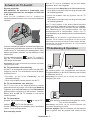 403
403
-
 404
404
-
 405
405
-
 406
406
-
 407
407
-
 408
408
-
 409
409
-
 410
410
-
 411
411
-
 412
412
-
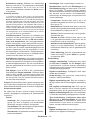 413
413
-
 414
414
-
 415
415
-
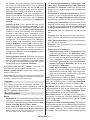 416
416
-
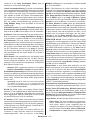 417
417
-
 418
418
-
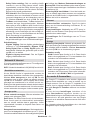 419
419
-
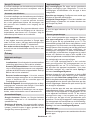 420
420
-
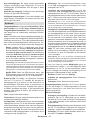 421
421
-
 422
422
-
 423
423
-
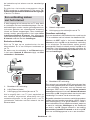 424
424
-
 425
425
-
 426
426
-
 427
427
-
 428
428
-
 429
429
-
 430
430
-
 431
431
-
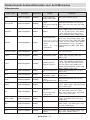 432
432
-
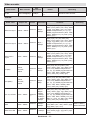 433
433
-
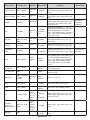 434
434
-
 435
435
-
 436
436
-
 437
437
-
 438
438
-
 439
439
-
 440
440
-
 441
441
-
 442
442
-
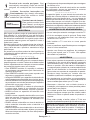 443
443
-
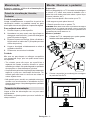 444
444
-
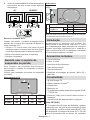 445
445
-
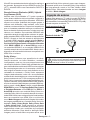 446
446
-
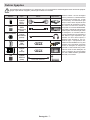 447
447
-
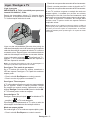 448
448
-
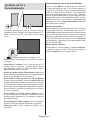 449
449
-
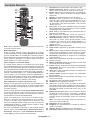 450
450
-
 451
451
-
 452
452
-
 453
453
-
 454
454
-
 455
455
-
 456
456
-
 457
457
-
 458
458
-
 459
459
-
 460
460
-
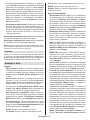 461
461
-
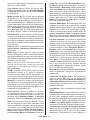 462
462
-
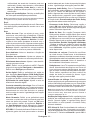 463
463
-
 464
464
-
 465
465
-
 466
466
-
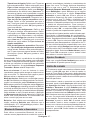 467
467
-
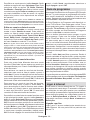 468
468
-
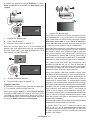 469
469
-
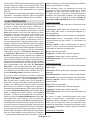 470
470
-
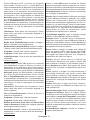 471
471
-
 472
472
-
 473
473
-
 474
474
-
 475
475
-
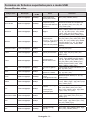 476
476
-
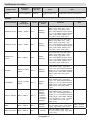 477
477
-
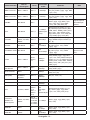 478
478
-
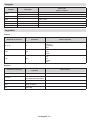 479
479
-
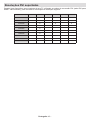 480
480
-
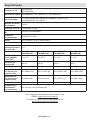 481
481
-
 482
482
-
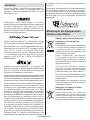 483
483
-
 484
484
-
 485
485
-
 486
486
-
 487
487
-
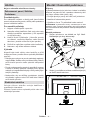 488
488
-
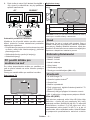 489
489
-
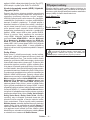 490
490
-
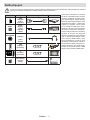 491
491
-
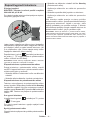 492
492
-
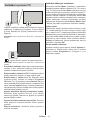 493
493
-
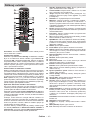 494
494
-
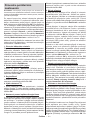 495
495
-
 496
496
-
 497
497
-
 498
498
-
 499
499
-
 500
500
-
 501
501
-
 502
502
-
 503
503
-
 504
504
-
 505
505
-
 506
506
-
 507
507
-
 508
508
-
 509
509
-
 510
510
-
 511
511
-
 512
512
-
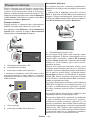 513
513
-
 514
514
-
 515
515
-
 516
516
-
 517
517
-
 518
518
-
 519
519
-
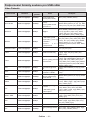 520
520
-
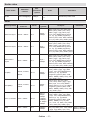 521
521
-
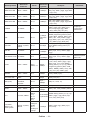 522
522
-
 523
523
-
 524
524
-
 525
525
-
 526
526
-
 527
527
-
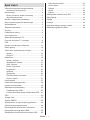 528
528
-
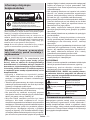 529
529
-
 530
530
-
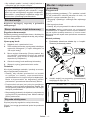 531
531
-
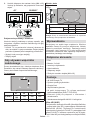 532
532
-
 533
533
-
 534
534
-
 535
535
-
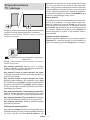 536
536
-
 537
537
-
 538
538
-
 539
539
-
 540
540
-
 541
541
-
 542
542
-
 543
543
-
 544
544
-
 545
545
-
 546
546
-
 547
547
-
 548
548
-
 549
549
-
 550
550
-
 551
551
-
 552
552
-
 553
553
-
 554
554
-
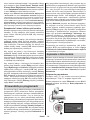 555
555
-
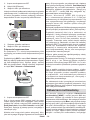 556
556
-
 557
557
-
 558
558
-
 559
559
-
 560
560
-
 561
561
-
 562
562
-
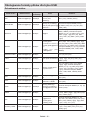 563
563
-
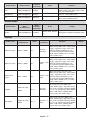 564
564
-
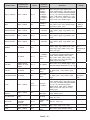 565
565
-
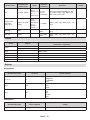 566
566
-
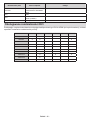 567
567
-
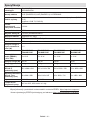 568
568
-
 569
569
-
 570
570
-
 571
571
-
 572
572
-
 573
573
-
 574
574
-
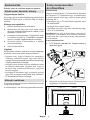 575
575
-
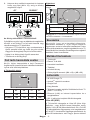 576
576
-
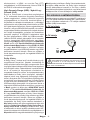 577
577
-
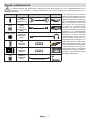 578
578
-
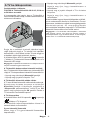 579
579
-
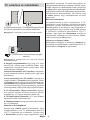 580
580
-
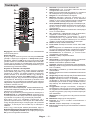 581
581
-
 582
582
-
 583
583
-
 584
584
-
 585
585
-
 586
586
-
 587
587
-
 588
588
-
 589
589
-
 590
590
-
 591
591
-
 592
592
-
 593
593
-
 594
594
-
 595
595
-
 596
596
-
 597
597
-
 598
598
-
 599
599
-
 600
600
-
 601
601
-
 602
602
-
 603
603
-
 604
604
-
 605
605
-
 606
606
-
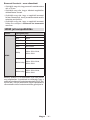 607
607
-
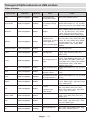 608
608
-
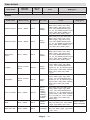 609
609
-
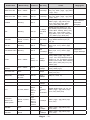 610
610
-
 611
611
-
 612
612
-
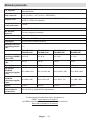 613
613
-
 614
614
-
 615
615
-
 616
616
-
 617
617
-
 618
618
-
 619
619
-
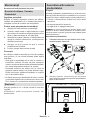 620
620
-
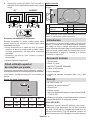 621
621
-
 622
622
-
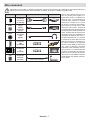 623
623
-
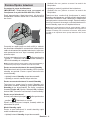 624
624
-
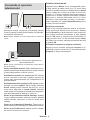 625
625
-
 626
626
-
 627
627
-
 628
628
-
 629
629
-
 630
630
-
 631
631
-
 632
632
-
 633
633
-
 634
634
-
 635
635
-
 636
636
-
 637
637
-
 638
638
-
 639
639
-
 640
640
-
 641
641
-
 642
642
-
 643
643
-
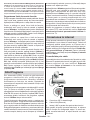 644
644
-
 645
645
-
 646
646
-
 647
647
-
 648
648
-
 649
649
-
 650
650
-
 651
651
-
 652
652
-
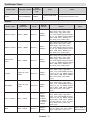 653
653
-
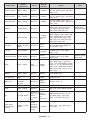 654
654
-
 655
655
-
 656
656
-
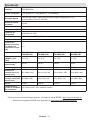 657
657
-
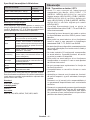 658
658
-
 659
659
-
 660
660
-
 661
661
-
 662
662
-
 663
663
-
 664
664
-
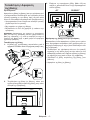 665
665
-
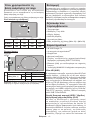 666
666
-
 667
667
-
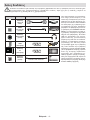 668
668
-
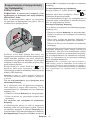 669
669
-
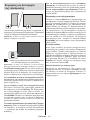 670
670
-
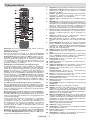 671
671
-
 672
672
-
 673
673
-
 674
674
-
 675
675
-
 676
676
-
 677
677
-
 678
678
-
 679
679
-
 680
680
-
 681
681
-
 682
682
-
 683
683
-
 684
684
-
 685
685
-
 686
686
-
 687
687
-
 688
688
-
 689
689
-
 690
690
-
 691
691
-
 692
692
-
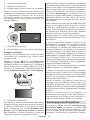 693
693
-
 694
694
-
 695
695
-
 696
696
-
 697
697
-
 698
698
-
 699
699
-
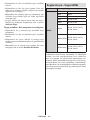 700
700
-
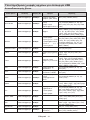 701
701
-
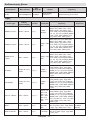 702
702
-
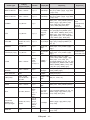 703
703
-
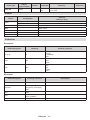 704
704
-
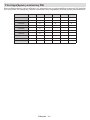 705
705
-
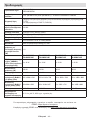 706
706
-
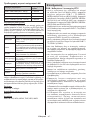 707
707
-
 708
708
-
 709
709
-
 710
710
-
 711
711
-
 712
712
-
 713
713
-
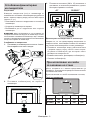 714
714
-
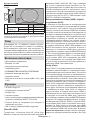 715
715
-
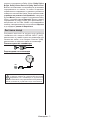 716
716
-
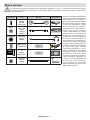 717
717
-
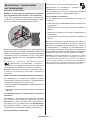 718
718
-
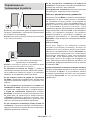 719
719
-
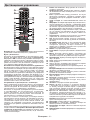 720
720
-
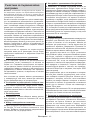 721
721
-
 722
722
-
 723
723
-
 724
724
-
 725
725
-
 726
726
-
 727
727
-
 728
728
-
 729
729
-
 730
730
-
 731
731
-
 732
732
-
 733
733
-
 734
734
-
 735
735
-
 736
736
-
 737
737
-
 738
738
-
 739
739
-
 740
740
-
 741
741
-
 742
742
-
 743
743
-
 744
744
-
 745
745
-
 746
746
-
 747
747
-
 748
748
-
 749
749
-
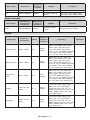 750
750
-
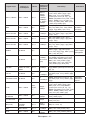 751
751
-
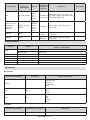 752
752
-
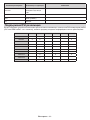 753
753
-
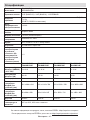 754
754
-
 755
755
-
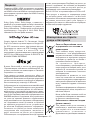 756
756
-
 757
757
-
 758
758
-
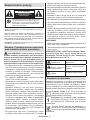 759
759
-
 760
760
-
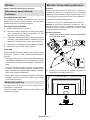 761
761
-
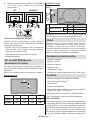 762
762
-
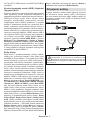 763
763
-
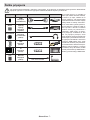 764
764
-
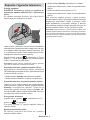 765
765
-
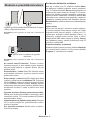 766
766
-
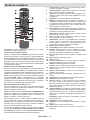 767
767
-
 768
768
-
 769
769
-
 770
770
-
 771
771
-
 772
772
-
 773
773
-
 774
774
-
 775
775
-
 776
776
-
 777
777
-
 778
778
-
 779
779
-
 780
780
-
 781
781
-
 782
782
-
 783
783
-
 784
784
-
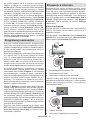 785
785
-
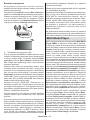 786
786
-
 787
787
-
 788
788
-
 789
789
-
 790
790
-
 791
791
-
 792
792
-
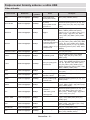 793
793
-
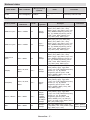 794
794
-
 795
795
-
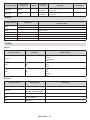 796
796
-
 797
797
-
 798
798
-
 799
799
-
 800
800
-
 801
801


Panasonic TX50MX710E Mode d'emploi
- Catégorie
- Lecteurs multimédias numériques
- Taper
- Mode d'emploi
- Ce manuel convient également à
dans d''autres langues
- italiano: Panasonic TX50MX710E Istruzioni per l'uso
- English: Panasonic TX50MX710E Operating instructions
- español: Panasonic TX50MX710E Instrucciones de operación
- Deutsch: Panasonic TX50MX710E Bedienungsanleitung
- Nederlands: Panasonic TX50MX710E Handleiding
- português: Panasonic TX50MX710E Instruções de operação
- slovenčina: Panasonic TX50MX710E Návod na používanie
- dansk: Panasonic TX50MX710E Betjeningsvejledning
- polski: Panasonic TX50MX710E Instrukcja obsługi
- čeština: Panasonic TX50MX710E Operativní instrukce
- svenska: Panasonic TX50MX710E Bruksanvisningar
- suomi: Panasonic TX50MX710E Käyttö ohjeet
- română: Panasonic TX50MX710E Instrucțiuni de utilizare