
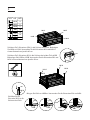
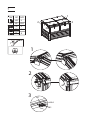
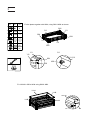
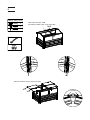
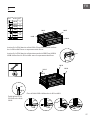
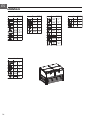
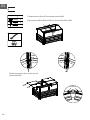
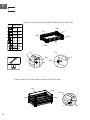
Highgrow Advanced
Hochbeet mit Gewächshausdach
Raised Garden Bed with Green House Roof
Potager surélevé avec couvercle de serre
Jardinera elevada con techo de invernadero
Fioriera rialzata con te o per serra
10034687 10034688 10034689


ARTIKEL
Arkelnummer 10034687 10034688 10034689
SICHERHEITSHINWEISE
• Einige Teile haben scharfe Metallkanten. Seien Sie beim Umgang mit den Metallkanten
vorsichtig. Tragen Sie während des Zusammenbaus Arbeitshandschuhe, Schuhe und eine
Schutzbrille.
• Legen Sie alle Teile auf einen weichen Teppich oder eine Decke, um Kratzer und Beschädigungen
zu vermeiden.
• Entfernen Sie vor dem Zusammenbau ca. 2 cm des Streifens von den Ecken der Metallbleche.
Entfernen Sie nach der Montage den ganzen Film. Achten Sie darauf, dass die Seite mit den
weißen Streifen nach außen zeigt.
• Wenn das Beet gereinigt werden muss, verwenden Sie einen milden Reiniger und spülen Sie es
mit kaltem, sauberen Wasser. Verwenden Sie keinen Acetonreiniger oder andere Scheuermittel
oder scharfen Reiniger, um die Panele zu reinigen.
Hersteller:
Chal-Tec GmbH, Wallstraße 16, 10179 Berlin, Deutschland.

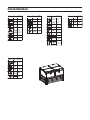
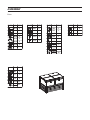
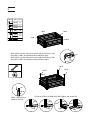
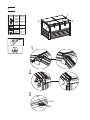
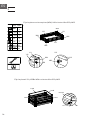
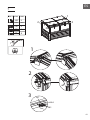
ZUSAMMENBAU
PART
NO
QTY
L01A 4
L01B 4
PART
NO
QTY
Z01
38
S01
22
M5X10
M01
M5
22
PART
NO
QTY
Y1
4
4
J 02
L06
4
L07
4
L08
8
PART
NO
QTY
16
Z02
L02A
2
L02B
2
L03A
2
L05A
1
2
J 03
4
J 08
4
J 09
2
Y2
Y4
4
4
J 07
W02
10
L04A
2
L04B
2
L33A
2
L33B
2
PART
NO
QTY
1100mm
800mm
W04
4
Y11
2
Y12
2
48
48
S02
M6X10
M02
M6
M4X12D
M4X8
TEIL
TEIL
TEIL TEIL TEILNR
NR
NR NR NRANZ
ANZ
ANZ ANZ ANZ

1
PART
NO
QTY
L06
1
L07
1
L08
2
2
1
Y4
L06
L08
L08
4*Z01
L07
Z02
4
Z01
J 08
Y4
J 08
2*Z02
J 08
L06
L08
L08
L07
1
J 09
Y4
1
J 09
J 09
M4X12D
M4X8
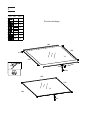
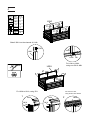
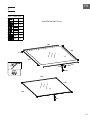
Window Assembly
TEIL NR ANZ
Fenstermontage

PART
NO
QTY
M02
Y11/Y12
S02
W04
Y12
Y11
1100mm
800mm
Y12
L33A&L33B
S02
W04
L33A
L33A
L33B
L33B
L33A
2
L33B
2
W04
4
Y11
2
Y12
2
48
48
S02
M6X10
M02
M6
Y11
Y11
Y12
Y12
W04
W04
W04
W04
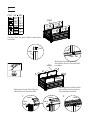
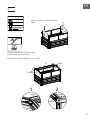
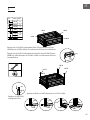
Fix the plates together with W04, using S02 & M02 as shown
Fix L33A & L33B to W04 using S02 & M02
TEIL NR ANZ
Befestigen Sie die Platten mit den Ecken (W04). Verwenden Sie die Schrauben
S02 und M02.
Befestigen Sie die Teile L33 und L33B an W04. Verwenden Sie die Schrauben
S02 und M02.
2

PART
NO
QTY
S01
14
M5X10
M01
M5
14
L01A 4
S01
L01A
Z01
L02B
Z01
L02B
L01A
L01A
L01A
L02A
L02B
L02A
L01A
M01
L02B
Z01
4
L02A
2
L02B
2
L02B
L02A
L02B
L02A
W02
M01
S01
W02
10
L01A
L01A
L01A
L01A
M4X12D
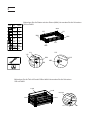
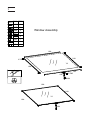
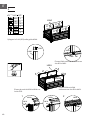
Slide 3*S01 into the channel of each L02A, fix L02A to L33A
using S01 & M01 at a distance about 40CM of each.
Slide 2*S01 into the channel of each L02B, fix L02B to L33B
using S01 & MO1 at a distance about 40CM of each.
Slide 1*S01 into the
channel of L01A
Fix L01A to L02A & L02B using S01 & M01 and screw Z01.
TEIL NR ANZ
Schieben Sie 3 Schrauben (S01) in die Schiene von L02A. Befestigen
Sie L02A an L33A. Verwenden Sie die Schrauben S01 und M01 in
einem Abstand von jeweils 40cm.
Schieben Sie 2 Schrauben S01 in die Schiene der beiden Teile L02B.
Befestigen Sie L02B an L33B. Verwenden Sie die Schrauben S01 und
M01 in einem Abstand von jeweils 40cm.
Bringen Sie L01A an L02B an. Verwenden Sie die Schrauben S01 und M01.
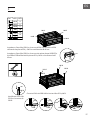
3
Schieben Sie die
Schraube (S01) in die
Schiene von L01A.

L04A
2
L04A
2*S01
L02A
L04A
S01
L01A
L03A
Z01
L03A
L01A
PART
NO
QTY
Z01
4
L03A
2
4
Y1
L03A
M01
M5
4
M01
2
1
1
1
1
1
L03A
2
L03A
2
Y1
S01
4
M5X10
L04A
L04A
Y1
Y1
Y1
M4X12D
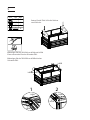
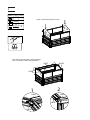
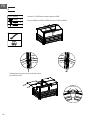
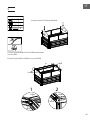
Slide 2*S01 into the channel of L04A
Fix L04A to L02A,
using one S01 & M01
Fix L03A to L01A, using Z01
Fix L03A to L04A,
using another S01 & M01
TEIL NR ANZ
Schieben Sie 2 Schrauben (S01) in die Schiene
von L04A.
Befestigen Sie L04A an L02A.
Verwenden Sie eine Schraube S01
und M01.
Befestigen Sie L03A an L04A.
Verwenden Sie eine weitere
Schraube S01 und M01.
Befestigen Sie die Teile L03A an
L01A mit einer Schraube Z01.
4

L01B
L03A
PART
NO
QTY
4
L01B
Z01
8
L05A
1
L01B
L05A
2
Y2
L01B
L05A
Y2
1
2
Y2
L01B
M4X12D
Insert Y2 into the channel of L01A
Fix L01B to L01A & L03A, using screw Z01.
Then, fix L05A to L01B using screw Z01.
TEIL
NR ANZ
Setzen Sie die Teile Y2 in die Schiene
von L01A ein.
Befestigen Sie das Teil L01A an L01A und L03A.
Dazu verwenden Sie eine Schraube Z01.
Befestigen Sie das Teil L05A an L01B mit einer
Schraube Z01.
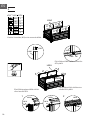
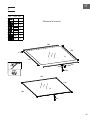
5

wi ndow
1
1
2
1 2
L04B
L04B
PART
NO
QTY
2
L04B
S01
4
M5X10
M01
M5
4
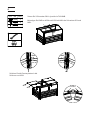
Slide 2*S01 into each L04B.
Fix L04B to L03A & L05A, using S01 & M01.
Slide the windows into the channel of L05A.
L04B
TEIL NR ANZ Setzen Sie 2 Schrauben S01 in jeweils ein Teil L04B.
Befestigen Sie L04B an L03A und L05A mit Hilfe der Schrauben S01 und
M01.
Schieben Sie die Fensterplatten in die
Schienen von L05A
Fenster
6

PART
NO
QTY
2
4
Z01
6
J 02
J 02
J 02
1
2
J 03
J 07
L03A
Z02
3
J 07
8
Z02
4
1
2
2
3
3
1
2
M4X12D
M4X8
TEIL NR
ANZ
7
TEIL
NR ANZ


ITEM
Item number
10034687 10034688 10034689
SAFETY INSTRUCTIONS
• Some components have sharp metal edges. Please be careful when handling metal components.
Please wear gloves, shoes and safety goggles during assembly.
• Lay all of the components on a soft carpet or blanket to avoid any scratches or damages.
• Remove approximately 2 inches of lm from all sheet edges before installing and remove all lm
immediately after the construction is completed. Please ensure that the side with the white lm
faces outwards.
• When your product needs cleaning, use a mild detergent solution and rinse with cold clean
water. Do not use acetone, abrasive cleaners or strong detergents to clean the panels.
Producer:
Chal-Tec GmbH, Wallstraße 16, 10179 Berlin, Deutschland.

ASSEMBLY
Parts
PART
NO
QTY
L01A 4
L01B 4
PART
NO
QTY
Z01
38
S01
22
M5X10
M01
M5
22
PART
NO
QTY
Y1
4
4
J 02
L06
4
L07
4
L08
8
PART
NO
QTY
16
Z02
L02A
2
L02B
2
L03A
2
L05A
1
2
J 03
4
J 08
4
J 09
2
Y2
Y4
4
4
J 07
W02
10
L04A
2
L04B
2
L33A
2
L33B
2
PART
NO
QTY
1100mm
800mm
W04
4
Y11
2
Y12
2
48
48
S02
M6X10
M02
M6
M4X12D
M4X8

1
PART
NO
QTY
L06
1
L07
1
L08
2
2
1
Y4
L06
L08
L08
4*Z01
L07
Z02
4
Z01
J 08
Y4
J 08
2*Z02
J 08
L06
L08
L08
L07
1
J 09
Y4
1
J 09
J 09
M4X12D
M4X8
Window Assembly

PART
NO
QTY
M02
Y11/Y12
S02
W04
Y12
Y11
1100mm
800mm
Y12
L33A&L33B
S02
W04
L33A
L33A
L33B
L33B
L33A
2
L33B
2
W04
4
Y11
2
Y12
2
48
48
S02
M6X10
M02
M6
Y11
Y11
Y12
Y12
W04
W04
W04
W04
Fix the plates together with W04, using S02 & M02 as shown
Fix L33A & L33B to W04 using S02 & M02
2

PART
NO
QTY
S01
14
M5X10
M01
M5
14
L01A 4
S01
L01A
Z01
L02B
Z01
L02B
L01A
L01A
L01A
L02A
L02B
L02A
L01A
M01
L02B
Z01
4
L02A
2
L02B
2
L02B
L02A
L02B
L02A
W02
M01
S01
W02
10
L01A
L01A
L01A
L01A
M4X12D
Slide 3*S01 into the channel of each L02A, fix L02A to L33A
using S01 & M01 at a distance about 40CM of each.
Slide 2*S01 into the channel of each L02B, fix L02B to L33B
using S01 & MO1 at a distance about 40CM of each.
Slide 1*S01 into the
channel of L01A
Fix L01A to L02A & L02B using S01 & M01 and screw Z01.
3

L04A
2
L04A
2*S01
L02A
L04A
S01
L01A
L03A
Z01
L03A
L01A
PART
NO
QTY
Z01
4
L03A
2
4
Y1
L03A
M01
M5
4
M01
2
1
1
1
1
1
L03A
2
L03A
2
Y1
S01
4
M5X10
L04A
L04A
Y1
Y1
Y1
M4X12D
Slide 2*S01 into the channel of L04A
Fix L04A to L02A,
using one S01 & M01
Fix L03A to L01A, using Z01
Fix L03A to L04A,
using another S01 & M01
4

L01B
L03A
PART
NO
QTY
4
L01B
Z01
8
L05A
1
L01B
L05A
2
Y2
L01B
L05A
Y2
1
2
Y2
L01B
M4X12D
Insert Y2 into the channel of L01A
Fix L01B to L01A & L03A, using screw Z01.
Then, fix L05A to L01B using screw Z01.
5

wi ndow
1
1
2
1 2
L04B
L04B
PART
NO
QTY
2
L04B
S01
4
M5X10
M01
M5
4
Slide 2*S01 into each L04B.
Fix L04B to L03A & L05A, using S01 & M01.
Slide the windows into the channel of L05A.
L04B
6
La page est en cours de chargement...
La page est en cours de chargement...
La page est en cours de chargement...
La page est en cours de chargement...
La page est en cours de chargement...
La page est en cours de chargement...
La page est en cours de chargement...
La page est en cours de chargement...
La page est en cours de chargement...
La page est en cours de chargement...
La page est en cours de chargement...
La page est en cours de chargement...
La page est en cours de chargement...
La page est en cours de chargement...
La page est en cours de chargement...
La page est en cours de chargement...
La page est en cours de chargement...
La page est en cours de chargement...
La page est en cours de chargement...
La page est en cours de chargement...
La page est en cours de chargement...
La page est en cours de chargement...
La page est en cours de chargement...
La page est en cours de chargement...
La page est en cours de chargement...
La page est en cours de chargement...
La page est en cours de chargement...
La page est en cours de chargement...
La page est en cours de chargement...
La page est en cours de chargement...
La page est en cours de chargement...
La page est en cours de chargement...
La page est en cours de chargement...
La page est en cours de chargement...
-
 1
1
-
 2
2
-
 3
3
-
 4
4
-
 5
5
-
 6
6
-
 7
7
-
 8
8
-
 9
9
-
 10
10
-
 11
11
-
 12
12
-
 13
13
-
 14
14
-
 15
15
-
 16
16
-
 17
17
-
 18
18
-
 19
19
-
 20
20
-
 21
21
-
 22
22
-
 23
23
-
 24
24
-
 25
25
-
 26
26
-
 27
27
-
 28
28
-
 29
29
-
 30
30
-
 31
31
-
 32
32
-
 33
33
-
 34
34
-
 35
35
-
 36
36
-
 37
37
-
 38
38
-
 39
39
-
 40
40
-
 41
41
-
 42
42
-
 43
43
-
 44
44
-
 45
45
-
 46
46
-
 47
47
-
 48
48
-
 49
49
-
 50
50
-
 51
51
-
 52
52
-
 53
53
-
 54
54


Blumfeldt 10034689 Le manuel du propriétaire
- Taper
- Le manuel du propriétaire
- Ce manuel convient également à
Autres documents
-
Horizon Fitness T51 Mode d'emploi
-
AFG 4.1AE Le manuel du propriétaire
-
-
Hitachi 27CX01B Manuel utilisateur
-
-
-
Sanyo PLV-HD2000 - 7000 Lumens Mode d'emploi
-
Sanyo PLC-XF42 Le manuel du propriétaire
-
Juwel Profiline 20377 Assembly Instructions
-