Maytag MCD2358WEW - 23.1 cu. Ft. Cabinet Depth User Instructions
- Catégorie
- Frigos
- Taper
- User Instructions
Ce manuel convient également à

THANK YOU for purchasing this high-quality product. If you should experience a problem not covered in TROUBLESHOOTING,
please visit our website at www.maytag.com for additional information. If you still need assistance, call us at 1-800-688-9900.
In Canada, visit our website at www.maytag.ca or call us at 1-800-807-6777.
You will need your model and serial number, located on the inside wall of the refrigerator compartment.
REFRIGERATOR SAFETY
Table of Contents / Índice / Table des matières
REFRIGERATOR SAFETY .......................1
REFRIGERATOR USE..............................2
REFRIGERATOR CARE...........................6
TROUBLESHOOTING..............................7
ACCESSORIES.........................................9
WATER FILTER CERTIFICATIONS.......10
PERFORMANCE DATA SHEETS..........11
WARRANTY ............................................15
SEGURIDAD DEL REFRIGERADOR.....16
USO DE SU REFRIGERADOR...............17
CUIDADO DE SU REFRIGERADOR .....21
SOLUCIÓN DE PROBLEMAS................22
ACCESORIOS.........................................24
HOJA DE DATOS
DEL RENDIMIENTO ...............................25
GARANTÍA...............................................29
SÉCURITÉ DU RÉFRIGÉRATEUR........ 31
UTILISATION DU RÉFRIGÉRATEUR... 32
ENTRETIEN DU RÉFRIGÉRATEUR ..... 37
DÉPANNAGE.......................................... 38
ACCESSOIRES ...................................... 40
FEUILLES DE DONNÉES
SUR LA PERFORMANCE...................... 41
GARANTIE.............................................. 45
REFRIGERATOR
USER INSTRUCTIONS
W10168311A
You can be killed or seriously injured if you don't immediately
You
can be killed or seriously injured if you don't
follow
All safety messages will tell you what the potential hazard is, tell you how to reduce the chance of injury, and tell you what can
happen if the instructions are not followed.
Your safety and the safety of others are very important.
We have provided many important safety messages in this manual and on your appliance. Always read and obey all safety
messages.
This is the safety alert symbol.
This symbol alerts you to potential hazards that can kill or hurt you and others.
All safety messages will follow the safety alert symbol and either the word “DANGER” or “WARNING.”
These words mean:
follow instructions.
instructions.
DANGER
WARNING

2
REFRIGERATOR USE
Using the Controls
Temperature Control Adjustment and Cooling On/Off
The refrigerator and freezer control buttons are located on the
dispenser panel.
To turn cooling off, press and hold the LOCK and FAST ICE/
COOL buttons at the same time for 3 seconds. Press and hold
LOCK and FAST ICE/COOL again to turn cooling on. Your
refrigerator and freezer will not cool when cooling is off.
IMPORTANT: To avoid unintentionally locking the dispenser
or changing other settings, be sure to press both buttons at
exactly the same time.
For your convenience, your refrigerator and freezer controls are
preset at the factory. When you first install your refrigerator, make
sure that the controls are still set to the “mid-settings.”
To view set points, press the TEMPERATURE button on your
dispenser panel. The factory recommended set points are
0°F (-18°C) for the freezer and 37°F (3°C) for the refrigerator.
IMPORTANT:
■ Wait 24 hours before you put food into the refrigerator. If you
add food before the refrigerator has cooled completely, your
food may spoil.
NOTE: Adjusting the set points to a higher (colder) than
recommended setting will not cool the compartments any
faster.
■ If the temperature is too warm or too cold in the refrigerator or
freezer, first check the air vents to be sure they are not
blocked before adjusting the controls.
■ The preset settings should be correct for normal household
usage. The controls are set correctly when milk or juice is as
cold as you like and when ice cream is firm.
Proper Disposal of Your Old Refrigerator
IMPORTANT: Child entrapment and suffocation are not problems
of the past. Junked or abandoned refrigerators are still dangerous
– even if they will sit for “just a few days.” If you are getting rid of
your old refrigerator, please follow these instructions to help
prevent accidents.
Before You Throw Away Your Old Refrigerator or Freezer:
■ Take off the doors.
■ Leave the shelves in place so that children may not easily
climb inside.
IMPORTANT SAFETY INSTRUCTIONS
WARNING:
To reduce the risk of fire, electric shock, or injury when using your refrigerator, follow these basic precautions:
SAVE THESE INSTRUCTIONS
■ Plug into a grounded 3 prong outlet.
■ Do not remove ground prong.
■ Do not use an adapter.
■ Do not use an extension cord.
■ Disconnect power before servicing.
■ Replace all parts and panels before operating.
■ Remove doors from your old refrigerator.
■ Use nonflammable cleaner.
■ Keep flammable materials and vapors, such as gasoline,
away from refrigerator.
■ Use two or more people to move and install refrigerator.
■ Disconnect power before installing ice maker (on ice maker
kit ready models only).
■ Use a sturdy glass when dispensing ice (on some models).
WARNING
Suffocation Hazard
Remove doors from your old refrigerator.
Failure to do so can result in death or brain damage.

3
■ Wait at least 24 hours between adjustments. Recheck the
temperatures before other adjustments are made.
■ The display screen on the dispenser control panel has a
backlight, which will turn off automatically when the control
buttons have not been used for 30 seconds or more. When
the backlight is off, the first press of a control button will only
reactivate the backlight, without changing any settings.
Within 30 seconds after the backlight has been reactivated,
additional presses of control buttons will change the
applicable settings.
Adjusting the Controls
To adjust the set points, press and hold the TEMPERATURE
button for 3 seconds. When adjust mode is activated, set points
and adjusting information will appear on the display screen.
NOTE: To view Celsius temperatures, press the FILTER button
when adjust mode is activated. To return the display setting to
Fahrenheit, press FILTER again.
Refrigerator Controls
When adjust mode is activated, the LOCK and FAST ICE/COOL
buttons adjust the refrigerator compartment temperature. The set
point range for the refrigerator is 33°F to 45°F (0°C to 7°C).
■ Press LOCK to lower the set point.
■ Press FAST ICE/COOL to raise the set point.
Freezer Controls
When adjust mode is activated, the ICE and LIGHT buttons
adjust the freezer compartment temperature. The set point range
for the freezer is -5°F to 5°F (-21°C to -15°C).
■ Press ICE to lower the set point.
■ Press LIGHT to raise the set point.
Press TEMPERATURE to exit adjust mode, or allow about
15 seconds of inactivity and adjust mode will turn off
automatically.
Additional Features
NOTE: The display screen on the dispenser control panel has a
backlight, which will turn off automatically when the control
buttons have not been used for 30 seconds or more. When the
backlight is off, the first press of a control button will only
reactivate the backlight, without changing any settings. Within
30 seconds after the backlight has been reactivated, additional
presses of control buttons will change the applicable settings.
Fast Cool and Fast Ice
The Fast Cool feature assists with periods of heavy ice usage, full
grocery loads, or temporarily warm room temperatures.
The Fast Ice feature assists with temporary periods of heavy ice
use by increasing ice production.
■ Press the FAST ICE/COOL button to turn on the Fast Cool
feature. When the feature turns on, the “Fast Cool” animation
will appear on the dispenser display.
The Fast Cool setting will remain on for 24 hours unless
manually turned off.
■ Press FAST ICE/COOL again to turn off Fast Cool and turn on
the Fast Ice feature. When the feature turns on, the “Fast Ice”
animation will appear on the dispenser display.
The Fast Ice setting will remain on for a minimum of
90 minutes unless manually turned off.
■ Press FAST ICE/COOL a third time to activate Fast Cool and
Fast Ice at the same time. When the features are activated,
both the “Fast Cool” and “Fast Ice” animations will appear on
the dispenser display.
■ Press FAST ICE/COOL a fourth time to turn both Fast Cool
and Fast Ice off.
When Fast Cool and/or Fast Ice are active, the temperature
display will not change. After 24 hours, the refrigerator returns to
the previous temperature set points.
NOTE: If increased ice production is desired at all times, change
the freezer control to a lower setting. Setting the freezer to a
colder temperature may make some foods, such as ice cream,
harder.
Temperature Display Always On
This feature keeps the temperature display on at all times.
■ Press and hold TEMPERATURE and LOCK at the same time
for 3 seconds to turn the feature on.
IMPORTANT: To avoid unintentionally locking the dispenser
or changing other settings, be sure to press both buttons at
exactly the same time.
■ Press and hold TEMPERATURE and LOCK at the same time
for 3 seconds again to turn the feature off.
Door Ajar Alarm
The Door Ajar Alarm feature sounds an alarm when the
refrigerator or freezer door is open for 5 minutes and the product
cooling is turned on. The alarm will repeat every 2 minutes. Close
both doors to turn it off. The feature then resets and will
reactivate when either door is left open again for 5 minutes.
CONDITION: TEMPERATURE
ADJUSTMENT:
REFRIGERATOR too cold REFRIGERATOR Setting
1° higher
REFRIGERATOR too warm REFRIGERATOR Setting
1° lower
FREEZER too cold FREEZER Setting
1° higher
FREEZER too warm/too little ice FREEZER Setting
1° lower

4
Disabling Sounds
■ To turn off all dispenser and control sounds, including the
Door Ajar Alarm, press and hold ICE and FAST ICE/COOL at
the same time for 3 seconds.
■ To turn all sounds back on, press and hold ICE and FAST ICE/
COOL at the same time for 3 seconds again.
Convertible Drawer Temperature Control
(on some models)
The control can be adjusted to properly chill meats or vegetables.
The air inside the pan is cooled to avoid “spot” freezing and can
be set to keep meats at the National Livestock and Meat Board
recommended storage temperatures of 28° to 32°F (-2° to 0°C).
The convertible drawer temperature control is preset to the
PRODUCE setting.
To store meat:
Set the control to one of the three MEAT settings to store meat at
its optimal storage temperature.
To store vegetables:
Set the control to PRODUCE to store vegetables at their optimal
storage temperatures.
NOTE: If food starts to freeze, move the control to the left (less
cold). Remember to wait 24 hours between adjustments.
Crisper Humidity Control
(on some models)
You can control the amount of humidity in the moisture-sealed
crisper. Adjust the control to any setting between LOW and
HIGH.
LOW (open) for best storage of fruits and vegetables with skins.
HIGH (closed) for best storage of fresh, leafy vegetables.
Door Chill Control
(on some models)
The door chill control is located on the left-hand side of the
refrigerator compartment.
■ Turn the control clockwise (right) to reduce the flow of cold air
to the door and make it less cold.
■ Turn the control counterclockwise (left) to increase the flow of
cold air to the door and make it colder.
Water and Ice Dispensers
(on some models)
Depending on your model, you may have one or more of the
following options: the ability to select either crushed or cubed
ice, a special light that turns on when you use the dispenser, or a
lock option to avoid unintentional dispensing.
NOTES:
■ The dispensing system will not operate when the freezer door
is open.
■ After connecting the refrigerator to a water source, flush the
water system. Use a sturdy container to depress and hold the
water dispenser lever for 5 seconds, then release it for
5 seconds. Repeat until water begins to flow. Once water
begins to flow, continue depressing and releasing the
dispenser lever (5 seconds on, 5 seconds off) for an
additional 5 minutes. This will flush air from the filter and
water dispensing system. Additional flushing may be required
in some households. As air is cleared from the system, water
may spurt out of the dispenser.
■ Allow 24 hours for the refrigerator to cool down and chill
water.
■ Allow 24 hours to produce the first batch of ice. Discard the
first three batches of ice produced.
■ The display screen on the dispenser control panel has a
backlight, which will turn off automatically when the control
buttons have not been used for 30 seconds or more. When
the backlight is off, the first press of a control button will only
reactivate the backlight, without changing any settings.
Within 30 seconds after the backlight has been reactivated,
additional presses of control buttons will change the
applicable settings.
The Water Dispenser
IMPORTANT: Dispense enough water every week to maintain a
fresh supply.
To Dispense Water:
1. Press a sturdy glass against the water dispenser lever.
2. Remove the glass to stop dispensing.
The Ice Dispenser
Ice dispenses from the ice maker storage bin in the freezer when
the dispenser lever is pressed. The dispensing system will not
operate when the freezer door is open. To turn off the ice maker,
see “Ice Maker and Storage Bin.”
Your ice maker can produce both crushed and cubed ice. Before
dispensing ice, select which type of ice you prefer by pressing
the ICE button.
The display screen indicates which type of ice is selected.
For crushed ice, cubes are crushed before being dispensed. This
may cause a slight delay when dispensing crushed ice. Noise
from the ice crusher is normal, and pieces of ice may vary in size.
When changing from crushed to cubed, a few ounces of crushed
ice will be dispensed along with the first cubes.
CRUSHED CUBED

5
To Dispense Ice:
1. Press the button to select the desired type of ice.
2. Press a sturdy glass against the ice dispenser lever. Hold the
glass close to the dispenser opening so ice does not fall
outside of the glass.
IMPORTANT: You do not need to apply a lot of pressure to
the lever in order to activate the ice dispenser. Pressing hard
will not make the ice dispense faster or in greater quantities.
3. Remove the glass to stop dispensing.
NOTE: Ice may continue to dispense for up to 10 seconds
after removing the glass from the lever. The dispenser may
continue to make noise for a few seconds after dispensing.
The Dispenser Light (on some models)
When you use the dispenser, the light will automatically turn on.
If you want the light to be on continuously, you may choose either
ON or DIM. The display screen indicates which mode is selected.
ON: Press LIGHT to turn the dispenser light on.
DIM: Press LIGHT a second time to select DIM mode. The
dispenser light will remain on, but at a lower intensity.
OFF: Press LIGHT a third time to turn the dispenser light off.
The dispenser lights are LEDs that cannot be changed. If it
appears that your dispenser lights are not working, see
“Troubleshooting” for more information.
The Dispenser Lock (on some models)
The dispenser can be turned off for easy cleaning or to avoid
unintentional dispensing by small children and pets.
NOTE: The lock feature does not shut off power to the
refrigerator, to the ice maker, or to the dispenser light. It simply
deactivates the dispenser controls and levers. To turn off the ice
maker, see “Ice Maker and Storage Bin.”
■ Press and hold LOCK for 3 seconds to lock the dispenser.
■ Press and hold LOCK a second time to unlock the dispenser.
The display screen indicates when the dispenser is locked.
Ice Maker and Storage Bin
Turning the Ice Maker On/Off
The On/Off switch is located on the top right-hand side of the
freezer compartment.
■ To turn on the ice maker, slide the control to the ON (left)
position.
■ To manually turn off the ice maker, slide the control to the
OFF (right) position.
NOTE: Your ice maker has an automatic shutoff. The ice maker
sensors will automatically stop ice production, but the control will
remain in the ON (left) position.
REMEMBER:
■ Allow 24 hours to produce the first batch of ice. Discard the
first three batches of ice produced.
■ The quality of your ice will be only as good as the quality of
the water supplied to your ice maker. Avoid connecting the
ice maker to a softened water supply. Water softener
chemicals (such as salt) can damage parts of the ice maker
and lead to poor quality ice. If a softened water supply cannot
be avoided, make sure the water softener is operating
properly and is well maintained.
■ Do not use anything sharp to break up the ice in the storage
bin. This can cause damage to the ice container and the
dispenser mechanism.
■ Do not store anything on top of or in the ice maker or storage
bin.
Removing and Replacing Ice Storage Bin
1. Hold the base of the storage bin with both hands and press
the release button to lift the storage bin up and out.
NOTE: It is not necessary to turn the ice maker control to the
OFF (right) position when removing the storage bin. The
sensor cover (“flipper door”) on the left wall of the freezer
stops the ice maker from producing ice if the door is open or
the storage bin is removed.
2. Replace the storage bin on the door and push down to make
sure it is securely in place.
ON DIM OFF
LOCKED UNLOCKED
Cut Hazard
Use a sturdy glass when dispensing ice.
Failure to do so can result in cuts.
WARNING

6
Water Filtration System
Water Filter Status Light (on some models)
The water filter status light will help you know when to change
your water filter. When the water filter status display changes
from “GOOD” to “ORDER,” this tells you that it is almost time to
change the water filter cartridge. Replace the water filter
cartridge when the water filter status display changes to
“REPLACE.” If water flow to your water dispenser or ice maker
decreases noticeably, change the filter sooner. The filter should
be replaced at least every 6 months depending on your water
quality and usage.
After changing the water filter, reset the status light by pressing
and holding the FILTER button for 3 seconds. The status light will
change from “REPLACE” to “GOOD” when the system is reset.
Changing the Water Filter
1. Press the eject button to release the filter from the base grille.
2. Pull the filter straight out.
3. Turn the cap counterclockwise to remove it from the filter.
IMPORTANT: Do not discard the cap. It is part of your
refrigerator. Keep the cap to use with the replacement filter.
4. Align the ridge on the cap with the arrow on the new filter and
turn the cap until it snaps into place.
NOTE: You can run the dispenser without a filter. Your water
will not be filtered. Simply insert the cap all of the way into the
base grille and rotate the cap until it is firmly in place.
5. Remove the covers from the O-rings. Be sure the O-rings are
still in place after the covers are removed.
6. Push the filter into the base grille. The eject button will pop
back out when the filter is fully engaged.
7. Flush the water system. See “Water and Ice Dispensers.”
REFRIGERATOR CARE
Cleaning
Both the refrigerator and freezer sections defrost automatically.
However, clean both sections about once a month to avoid
buildup of odors. Wipe up spills immediately.
IMPORTANT: Because air circulates between both sections, any
odors formed in one section will transfer to the other. You must
thoroughly clean both sections to eliminate odors. To avoid odor
transfer and drying out of food, wrap or cover foods tightly.
To Clean Your Refrigerator:
NOTE: Do not use abrasive or harsh cleaners such as window
sprays, scouring cleansers, flammable fluids, cleaning waxes,
concentrated detergents, bleaches or cleansers containing
petroleum products on plastic parts, interior and door liners or
gaskets. Do not use paper towels, scouring pads, or other harsh
cleaning tools.
1. Unplug refrigerator or disconnect power.
2. Hand wash, rinse, and dry removable parts and interior
surfaces thoroughly. Use a clean sponge or soft cloth and a
mild detergent in warm water.
3. Wash stainless steel and painted metal exteriors with a clean
sponge or soft cloth and a mild detergent in warm water.
4. On some models, wash glass door panels with a clean
sponge or soft cloth and a mild detergent in warm water.
NOTES:
■ Do not hit the glass with pots, pans, furniture, toys, or
other objects. Scratching, hitting, jarring or stressing the
glass may weaken its structure, causing an increased risk
of breakage at a later date.
■ Do not close the doors until all shelves, drawers and bins
are in place.
5. There is no need for routine condenser cleaning in normal
home operating environments. If the environment is
particularly greasy or dusty, or there is significant pet traffic in
the home, the condenser should be cleaned every 2 to
3 months to ensure maximum efficiency.
If you need to clean the condenser:
■ Remove the base grille.
■ Use a vacuum cleaner with a soft brush to clean the grille,
the open areas behind the grille and the front surface area
of the condenser.
■ Replace the base grille when finished.
6. Plug in refrigerator or reconnect power.
Do not use with water that is microbiologically unsafe or of
unknown quality without adequate disinfection before or
after the system.
WARNING
Explosion Hazard
Use nonflammable cleaner.
Failure to do so can result in death, explosion, or fire.

7
Changing the Light Bulbs
NOTE: Not all bulbs will fit your refrigerator. Be sure to replace
the bulb with one of the same size, shape and wattage.
Replacement bulbs are available from your dealer.
■ The dispenser lights are LEDs that cannot be changed.
■ All other lights require a 40-watt bulb.
1. Unplug refrigerator or disconnect power.
2. Remove light shield when applicable.
NOTE: To clean the light shield, wash it with warm water and
liquid detergent. Rinse and dry the shield well.
3. Remove light bulb and replace with one of the same size,
shape and wattage.
4. Replace light shield when applicable.
5. Plug in refrigerator or reconnect power.
TROUBLESHOOTING
First try the solutions suggested here or visit our website and reference FAQs (Frequently Asked Questions)
to possibly avoid the cost of a service call.
In the U.S.A., www.maytag.com In Canada, www.maytag.ca
Refrigerator Operation
The refrigerator will not operate
■ Power cord unplugged? Plug into a grounded 3 prong
outlet.
■ Is outlet working? Plug in a lamp to see if the outlet is
working.
■ Household fuse blown or circuit breaker tripped? Replace
the fuse or reset the circuit breaker. If the problem continues,
call an electrician.
■ Are controls on? Make sure the refrigerator controls are on.
See “Using the Controls.”
■ New installation? Allow 24 hours following installation for the
refrigerator to cool completely.
NOTE: Adjusting the temperature controls to coldest setting will
not cool either compartment more quickly.
The motor seems to run too much
Your new refrigerator may run longer than your old one due to its
high-efficiency compressor and fans. To maximize energy
efficiency, the compressor changes speed to provide just the
right amount of cooling as it is needed. Your refrigerator may run
as much as 100% of the time, but it will still use less energy than
an older refrigerator. You may notice that it runs more often when
the room is warm, a large amount of food is added to either
compartment, or the doors are opened often.
The refrigerator is noisy
Refrigerator noise has been reduced over the years. Due to this
reduction, you may hear intermittent noises from your new
refrigerator that you did not notice from your old model. Below
are listed some normal sounds with an explanation.
■ Buzzing - heard when the water valve opens to fill the ice
maker
■ Pulsating - fans/compressor adjusting to optimize
performance
■ Rattling - flow of refrigerant, water line, or from items placed
on top of the refrigerator
■ Sizzling/Gurgling - water dripping on the heater during
defrost cycle
■ Popping - contraction/expansion of inside walls, especially
during initial cool-down
■ Water running - may be heard when ice melts during the
defrost cycle and water runs into the drain pan
■ Creaking/Cracking - occurs as ice is being ejected from the
ice maker mold.
Electrical Shock Hazard
Plug into a grounded 3 prong outlet.
Do not remove ground prong.
Do not use an adapter.
Do not use an extension cord.
Failure to follow these instructions can result in death,
fire, or electrical shock.
WARNING

8
The doors will not close completely
Check the following:
■ Are food packages blocking the door open?
■ Are all bins and shelves pushed back into the correct
positions?
The doors are difficult to open
■ Are the gaskets dirty or sticky? Clean gaskets with mild
soap and warm water.
■ Has the door been opened and closed within the last few
seconds? Wait at least 30 seconds to reopen the doors.
Temperature and Moisture
Temperature is too warm
Check the following:
■ Are the air vents blocked in either compartment?
■ Are the door(s) opened often?
■ Has a large amount of food just been added to the
refrigerator or freezer?
■ Are the controls set correctly for the surrounding conditions?
There is interior moisture buildup
NOTE: Some moisture is normal.
■ Are the air vents blocked in the refrigerator?
■ Are the door(s) opened often?
■ Is the room humid?
■ Are the controls set correctly for the surrounding conditions?
■ Was an automatic self-defrost cycle completed?
Items in meat pan/crisper are freezing
The temperature inside the meat pan/crisper may become too
cold, especially when using some additional control panel
features. Adjust the meat pan control to the closed setting.
Ice and Water
The ice maker is not producing ice or not enough ice
■ Is the ice maker wire shutoff arm or switch (depending on
models) in the OFF position?
■ Is the water line shutoff valve to the refrigerator turned on?
■ Has the ice maker just been installed? Is the freezer
temperature cold enough to produce ice? Wait 24 hours
after ice maker hookup for ice production to begin. Allow
3 days after ice production begins to completely fill ice
container.
■ Does the ice maker mold have water in it or has no ice
been produced? Make sure your refrigerator has been
connected to a water supply and the supply shutoff valve is
turned on.
■ Has a large amount of ice just been removed? Allow
24 hours for ice maker to produce more ice.
■ Is there a water filter installed on the refrigerator? The
filter may be clogged or installed incorrectly.
■ Is an ice cube jammed in the ice maker ejector arm?
For models with an interior ice bin, remove the ice from the
ejector arm with a plastic utensil.
■ Is a reverse osmosis water filtration system connected to
your cold water supply? See “Water Supply Requirements”
in the Installation Instructions.
The ice cubes are hollow or small
This is an indication of low water pressure.
Check the following:
■ Is the water shutoff valve fully open?
■ Are there kinks in the water lines that could restrict water
flow?
■ If you are using a water filter, remove the filter and operate the
dispenser. If water flow increases, the filter is clogged or
incorrectly installed.
■ Is a reverse osmosis water filtration system connected to
your cold water supply? See “Water Supply Requirements”
in the Installation Instructions.
■ If you still have questions regarding your water pressure, call
a licensed, qualified plumber.
WARNING
Explosion Hazard
Use nonflammable cleaner.
Failure to do so can result in death, explosion, or fire.

9
Off-taste, odor or gray color in the ice
Check the following:
■ Are the plumbing connections new, causing discolored or
off-flavored ice?
■ Have the ice cubes been stored too long?
■ Does the freezer and ice bin need to be cleaned?
■ Has food in the freezer or refrigerator been wrapped
properly?
■ Does the water contain minerals (such as sulfur)? A filter
may need to be installed to remove the minerals.
■ Is there a water filter installed on the refrigerator? Gray or
dark discoloration in ice indicates that the water filtration
system needs additional flushing.
The ice dispenser will not operate properly
Check the following:
■ Is the freezer door closed completely?
■ Is the ice bin installed correctly?
■ Is there ice in the bin?
■ Has the ice frozen in the ice bin?
■ Is ice stuck in the delivery chute?
■ Has the wrong ice been added to the bin? Use only cubes
produced by the current ice maker.
■ Has the ice melted around the auger (metal spiral) in the
ice bin? Empty the ice container. Use warm water to melt the
ice if necessary.
■ Is the ice dispenser stalling while dispensing “crushed”
ice? Change the ice button from “crushed” to “cubed.” If
cubed ice dispenses correctly, depress the button for
“crushed” ice and begin dispensing again.
■ Has the dispenser lever been held in too long? Ice will stop
dispensing when the arm is held in too long. Wait 3 minutes
for dispenser motor to reset before using again.
The water dispenser will not operate properly
Check the following:
■ Is the freezer door closed completely?
■ Is the water shutoff valve not turned on, incorrectly installed
or clogged?
■ Is the water line connected at the source?
■ Is there a kink in the home water source line?
■ Has the water system not filled? The water system needs
to be filled the first time it is used.
■ Is the refrigerator connected to a cold water line with
water pressure of at least 30 psi (207 kPa)? The water
pressure to the home determines the flow from the dispenser.
■ Is there a water filter installed on the refrigerator? The
filter may be clogged or incorrectly installed.
■ Is a reverse osmosis water filtration system connected to
your cold water supply? See “Water Supply Requirements”
in the Installation Instructions.
Water is leaking from the dispenser
Check the following:
■ Is the glass not being held under the dispenser long enough?
■ Has the water system been flushed since installation or
changing filters?
The dispenser water is not cool enough
NOTE: Water from the dispenser is chilled to only 50°F (10°C).
■ Has the refrigerator been newly installed or a large
amount of water recently dispensed? Allow 24 hours for
the refrigerator to cool completely.
■ Has water not been recently dispensed? The first glass of
water may not be cool. Discard the first glass of water.
ACCESSORIES
To order stainless steel cleaner or replacement filters, call
1-800-688-9900 and ask for the appropriate part number listed
below or contact your authorized MAYTAG
®
Appliances dealer.
In Canada, call 1-800-807-6777.
Stainless Steel Cleaner and Polish:
Order Part #4396095
Standard Base Filter Cartridge:
Order Part #4396841 (T2RFWG2 and P2RFWG2)
Cut Hazard
Use a sturdy glass when dispensing ice.
Failure to do so can result in cuts.
WARNING

10
WATER FILTER CERTIFICATIONS

11
PERFORMANCE DATA SHEETS
Base Grille Water Filtration System
Model T2WG2L/T2RFWG2 Capacity 200 Gallons (757 Liters)
Model T2WG2/T2RFWG2 Capacity 200 Gallons (757 Liters)
This system has been tested according to NSF/ANSI Standards 42 and 53 for the reduction of the substances listed below. The
concentration of the indicated substances in water entering the system was reduced to a concentration less than or equal to the
permissible limit for water leaving the system, as specified in NSF/ANSI Standards 42 and 53.
Test Parameters: pH = 7.5 ± 0.5 unless otherwise noted. Flow = 0.85 gpm (3.2 Lpm). Pressure = 60 psig (413.7 kPa).
Temp. = 68°F to 71.6°F (20°C to 22°C). Rated service capacity = 200 gallons (757 liters).
■ It is essential that operational, maintenance, and filter
replacement requirements be carried out for the product to
perform as advertised.
■ Use replacement filter T2RFWG2, part #4396841.
2008 suggested retail price of $39.99 U.S.A./$54.95 Canada.
Prices are subject to change without notice.
Model T2WG2L: Style 1 – When the filter indicator reads 10%,
order a new filter. When the indicator reads 0%, it is
recommended that you replace the filter.
Style 2 – When the filter indicator changes from green to yellow,
order a new filter. When the indicator changes from yellow to red,
it is recommended that you replace the filter.
Style 3 – When the water filter status display changes from
“GOOD” to “ORDER,” order a new filter. When the filter indicator
reads “REPLACE,” it is recommended that you replace the filter.
Style 4 – Press FILTER to check the status of your water filter. If
the filter indicator light is yellow, order a new filter. If the filter
indicator light is red, it is recommended that you replace the filter.
Model T2WG2: Change the water filter cartridge every 6 months.
If the water flow to the water dispenser or ice maker decreases
noticeably before 6 months have passed, replace the water filter
cartridge more often.
■ These contaminants are not necessarily in your water supply.
While testing was performed under standard laboratory
conditions, actual performance may vary.
■ The product is for cold water use only.
■ Do not use with water that is microbiologically unsafe or of
unknown quality without adequate disinfection before or after the
system.
■ Refer to the “Warranty” section for the Manufacturer’s name,
address and telephone number.
■ Refer to the “Warranty” section for the Manufacturer’s limited
warranty.
Application Guidelines/Water Supply Parameters
System tested and certified by NSF International against NSF/ANSI
Standard 42 for the reduction of Chlorine Taste and Odor, Particulate
Class II*; and against NSF/ANSI Standard 53 for the reduction of Mercury,
Benzene, Toxaphene, O-dichlorobenzene, and Carbofuran.
Substance Reduction
Aesthetic Effects
NSF Reduction
Requirements
Average
Influent
Influent Challenge
Concentration
Maximum
Effluent
Average
Effluent
Minimum %
Reduction
Average %
Reduction
Chlorine Taste/Odor
Particulate Class II
*
50% reduction
85% reduction
2.0182 mg/L
1333333 #/mL
2.0 mg/L ± 10%
At least 10,000 particles/mL
0.06 mg/L
6600 #/mL**
0.0536 mg/L
2325 #/mL
97.03
99.51
97.34
99.83
Contaminant
Reduction
NSF Reduction
Requirements
Average
Influent
Influent Challenge
Concentration
Maximum
Effluent
Average
Effluent
Minimum %
Reduction
Average %
Reduction
Lead: @ pH 6.5***
Lead: @ pH 8.5***
0.010 mg/L
0.010 mg/L
0.1533 mg/L
0.1400 mg/L
0.15 mg/L ± 10%
0.15 mg/L ± 10%
0.0005 mg/L
0.0007 mg/L
0.0005 mg/L
0.0006 mg/L
99.67
99.50
99.67
99.57
Mercury: @ pH 6.5
Mercury: @ pH 8.5
0.002 mg/L
0.002 mg/L
0.0058 mg/L
0.0059 mg/L
0.006 mg/L ± 10%
0.006 mg/L ± 10%
0.0002 mg/L
0.0005 mg/L
0.0002 mg/L
0.0003 mg/L
96.54
91.57
96.54
94.92
Benzene 0.005 mg/L 0.0154 mg/L 0.015 mg/L ± 10% 0.0012 mg/L 0.0006 mg/L 92.22 96.34
O-Dichlorobenzene 0.6 mg/L 1.7571 mg/L 1.8 mg/L ± 10% 0.0250 mg/L 0.0066 mg/L 98.58 99.63
Toxaphene 0.003 mg/L 0.015 mg/L 0.015 mg/L ± 10% 0.001 mg/L 0.001 mg/L 93.33 93.33
Carbofuran 0.04 mg/L 0.0819 mg/L 0.08 mg/L ± 10% 0.0400 mg/L 0.0213 mg/L 51.13 74.00
Water Supply
Water Pressure
Water Temperature
Service Flow Rate
City or Well
30 - 120 psi (207 - 827 kPa)
33° - 100°F (0.6° - 37.8°C)
0.85 gpm (3.2 Lpm) @ 60 psi
*
**
***
Class II particle size: 1 um to <5 um
Test requirement is at least 100,000 particles/mL of AC Fine Test Dust.
Compliant for Lead reduction requirements under NSF/ANSI Standard 53 as tested by Pace Analytical Services, Inc.
® NSF is a registered trademark of NSF International.

12
Base Grille Water Filtration System
Model T1WG2L/T2RFWG2 Capacity 200 Gallons (757 Liters)
Model T1WG2/T2RFWG2 Capacity 200 Gallons (757 Liters)
This system has been tested according to NSF/ANSI Standards 42 and 53 for the reduction of the substances listed below. The
concentration of the indicated substances in water entering the system was reduced to a concentration less than or equal to the
permissible limit for water leaving the system, as specified in NSF/ANSI Standards 42 and 53.
Test Parameters: pH = 7.5 ± 0.5 unless otherwise noted. Flow = 0.5 gpm (1.9 Lpm). Pressure = 60 psig (413.7 kPa).
Temp. = 68°F to 71.6°F (20°C to 22°C). Rated service capacity = 200 gallons (757 liters).
■ It is essential that operational, maintenance, and filter
replacement requirements be carried out for the product to
perform as advertised.
■ Use replacement filter T2RFWG2, part #4396841.
2008 suggested retail price of $39.99 U.S.A./$54.95 Canada.
Prices are subject to change without notice.
Model T1WG2L: Style 1 – When the filter indicator reads 10%,
order a new filter. When the indicator reads 0%, it is
recommended that you replace the filter.
Style 2 – When the filter indicator changes from green to yellow,
order a new filter. When the indicator changes from yellow to red,
it is recommended that you replace the filter.
Style 3 – When the water filter status display changes from
“GOOD” to “ORDER,” order a new filter. When the filter indicator
reads “REPLACE,” it is recommended that you replace the filter.
Style 4 – Press FILTER to check the status of your water filter. If
the filter indicator light is yellow, order a new filter. If the filter
indicator light is red, it is recommended that you replace the filter.
Model T1WG2: Change the water filter cartridge every 6 months.
If the water flow to the water dispenser or ice maker decreases
noticeably before 6 months have passed, replace the water filter
cartridge more often.
■ These contaminants are not necessarily in your water supply.
While testing was performed under standard laboratory
conditions, actual performance may vary.
■ The product is for cold water use only.
■ Do not use with water that is microbiologically unsafe or of
unknown quality without adequate disinfection before or after the
system.
■ Refer to the “Warranty” section for the Manufacturer’s name,
address and telephone number.
■ Refer to the “Warranty” section for the Manufacturer’s limited
warranty.
Application Guidelines/Water Supply Parameters
System tested and certified by NSF International against NSF/ANSI
Standard 42 for the reduction of Chlorine Taste and Odor, Particulate
Class II*; and against NSF/ANSI Standard 53 for the reduction of Mercury,
Benzene, Toxaphene, O-dichlorobenzene, and Carbofuran.
Substance Reduction
Aesthetic Effects
NSF Reduction
Requirements
Average
Influent
Influent Challenge
Concentration
Maximum
Effluent
Average
Effluent
Minimum %
Reduction
Average %
Reduction
Chlorine Taste/Odor
Particulate Class II
*
50% reduction
85% reduction
2.0182 mg/L
1333333 #/mL
2.0 mg/L ± 10%
At least 10,000 particles/mL
0.06 mg/L
6600 #/mL
**
0.0536 mg/L
2325 #/mL
97.03
99.51
97.34
99.83
Contaminant
Reduction
NSF Reduction
Requirements
Average
Influent
Influent Challenge
Concentration
Maximum
Effluent
Average
Effluent
Minimum %
Reduction
Average %
Reduction
Lead: @ pH 6.5***
Lead: @ pH 8.5***
0.010 mg/L
0.010 mg/L
0.1533 mg/L
0.1400 mg/L
0.15 mg/L ± 10%
0.15 mg/L ± 10%
0.0005 mg/L
0.0007 mg/L
0.0005 mg/L
0.0006 mg/L
99.67
99.50
99.67
99.57
Mercury: @ pH 6.5
Mercury: @ pH 8.5
0.002 mg/L
0.002 mg/L
0.0058 mg/L
0.0059 mg/L
0.006 mg/L ± 10%
0.006 mg/L ± 10%
0.0002 mg/L
0.0005 mg/L
0.0002 mg/L
0.0003 mg/L
96.54
91.57
96.54
94.92
Benzene 0.005 mg/L 0.0154 mg/L 0.015 mg/L ± 10% 0.0012 mg/L 0.0006 mg/L 92.22 96.34
O-Dichlorobenzene 0.6 mg/L 1.7571 mg/L 1.8 mg/L ± 10% 0.0250 mg/L 0.0066 mg/L 98.58 99.63
Toxaphene 0.003 mg/L 0.015 mg/L 0.015 mg/L ± 10% 0.001 mg/L 0.001 mg/L 93.33 93.33
Carbofuran 0.04 mg/L 0.0819 mg/L 0.08 mg/L ± 10% 0.0400 mg/L 0.0213 mg/L 51.13 74.00
Water Supply
Water Pressure
Water Temperature
Service Flow Rate
City or Well
30 - 120 psi (207 - 827 kPa)
33° - 100°F (0.6° - 37.8°C)
0.5 gpm (1.9 Lpm) @ 60 psi
*
**
***
Class II particle size: 1 um to <5 um
Test requirement is at least 100,000 particles/mL of AC Fine Test Dust.
Compliant for Lead reduction requirements under NSF/ANSI Standard 53 as tested by Pace Analytical Services, Inc.
® NSF is a registered trademark of NSF International.

13
Base Grille Water Filtration System
Model P2WG2L/P2RFWG2 Capacity 200 Gallons (757 Liters)
Model P2WG2/P2RFWG2 Capacity 200 Gallons (757 Liters)
This system has been tested according to NSF/ANSI Standards 42 and 53 for the reduction of the substances listed below. The
concentration of the indicated substances in water entering the system was reduced to a concentration less than or equal to the
permissible limit for water leaving the system, as specified in NSF/ANSI Standards 42 and 53.
Test Parameters: pH = 7.5 ± 0.5 unless otherwise noted. Flow = 0.85 gpm (3.2 Lpm). Pressure = 60 psig (413.7 kPa).
Temp. = 68°F to 71.6°F (20°C to 22°C). Rated service capacity = 200 gallons (757 liters).
■ It is essential that operational, maintenance, and filter
replacement requirements be carried out for the product to
perform as advertised.
■ Use replacement filter P2RFWG2, part #4396841.
2008 suggested retail price of $39.99 U.S.A./$54.95 Canada.
Prices are subject to change without notice.
Model P2WG2L/P2WG2: Style 1 – When the filter indicator
reads 10%, order a new filter. When the indicator reads 0%, it is
recommended that you replace the filter.
Style 2 – When the filter indicator changes from green to yellow,
order a new filter. When the indicator changes from yellow to red,
it is recommended that you replace the filter.
Style 3 – When the water filter status display changes from
“GOOD” to “ORDER,” order a new filter. When the filter indicator
reads “REPLACE,” it is recommended that you replace the filter.
Style 4 – Press FILTER to check the status of your water filter. If
the filter indicator light is yellow, order a new filter. If the filter
indicator light is red, it is recommended that you replace the filter.
Change the water filter cartridge every 6 months. If the water
flow to the water dispenser or ice maker decreases noticeably
before 6 months have passed, replace the water filter cartridge
more often.
■ These contaminants are not necessarily in your water supply.
While testing was performed under standard laboratory
conditions, actual performance may vary.
■ The product is for cold water use only.
■ Do not use with water that is microbiologically unsafe or of
unknown quality without adequate disinfection before or after the
system.
■ Refer to the “Warranty” section for the Manufacturer’s name,
address and telephone number.
■ Refer to the “Warranty” section for the Manufacturer’s limited
warranty.
Application Guidelines/Water Supply Parameters
System tested and certified by NSF International against NSF/ANSI
Standard 42 for the reduction of Chlorine Taste and Odor, Particulate
Class I*; and against NSF/ANSI Standard 53 for the reduction of Lead,
Mercury, Benzene, Toxaphene, and O-dichlorobenzene.
Substance Reduction
Aesthetic Effects
NSF Reduction
Requirements
Average
Influent
Influent Challenge
Concentration
Maximum
Effluent
Average
Effluent
Minimum %
Reduction
Average %
Reduction
Chlorine Taste/Odor
Particulate Class I
*
50% reduction
85% reduction
1.909 mg/L
9700000 #/mL
2.0 mg/L ± 10%
At least 10,000 particles/mL
0.05 mg/L
2600 #/mL
**
<0.05 mg/L
62000 #/mL
>97.4
>97.6
>97.4
>99.4
Contaminant
Reduction
NSF Reduction
Requirements
Average
Influent
Influent Challenge
Concentration
Maximum
Effluent
Average
Effluent
Minimum %
Reduction
Average %
Reduction
Lead: @ pH 6.5
Lead: @ pH 8.5
0.010 mg/L
0.010 mg/L
143.33 ug/L
140 ug/L
0.15 mg/L ± 10%
0.15 mg/L ± 10%
1.0 ug/L
1.0 ug/L
1.0 ug/L
1.0 ug/L
>99.3
>99.3
>99.3
99.3
Mercury: @ pH 6.5
Mercury: @ pH 8.5
0.002 mg/L
0.002 mg/L
0.0058 mg/L
0.00646 mg/L
0.006 mg/L ± 10%
0.006 mg/L ± 10%
0.3 ug/L
1.4 ug/L
0.0002 mg/L
0.0004 mg/L
>96.5
76.3
96.5
88.1
Benzene 0.005 mg/L 0.015 mg/L 0.015 mg/L ± 10% 0.5 ug/L 0.0005 mg/L >96.5 >96.5
O-Dichlorobenzene 0.6 mg/L 1.83333 mg/L 1.8 mg/L ± 10% 4.8 ug/L 0.014 mg/L 99.7 99.9
Toxaphene 0.003 mg/L 0.016 mg/L 0.015 mg/L ± 10% 1 ug/L 0.001 mg/L >93.2 >93.2
Water Supply
Water Pressure
Water Temperature
Service Flow Rate
City or Well
30 - 120 psi (207 - 827 kPa)
33° - 100°F (0.6° - 37.8°C)
0.85 gpm (3.2 Lpm) @ 60 psi
*
**
Class I particle size: >0.5 um to <1 um
Test requirement is at least 100,000 particles/mL of AC Fine Test Dust.
® NSF is a registered trademark of NSF International.

14
Base Grille Water Filtration System
Model P1WG2L/P2RFWG2 Capacity 200 Gallons (757 Liters)
Model P1WG2/P2RFWG2 Capacity 200 Gallons (757 Liters)
This system has been tested according to NSF/ANSI Standards 42 and 53 for the reduction of the substances listed below. The
concentration of the indicated substances in water entering the system was reduced to a concentration less than or equal to the
permissible limit for water leaving the system, as specified in NSF/ANSI Standards 42 and 53.
Test Parameters: pH = 7.5 ± 0.5 unless otherwise noted. Flow = 0.5 gpm (1.9 Lpm). Pressure = 60 psig (413.7 kPa).
Temp. = 68°F to 71.6°F (20°C to 22°C). Rated service capacity = 200 gallons (757 liters).
■ It is essential that operational, maintenance, and filter
replacement requirements be carried out for the product to
perform as advertised.
■ Use replacement filter P2RFWG2, part #4396841.
2008 suggested retail price of $39.99 U.S.A./$54.95 Canada.
Prices are subject to change without notice.
Model P1WG2L/P1WG2: Style 1 – When the filter indicator
reads 10%, order a new filter. When the indicator reads 0%, it is
recommended that you replace the filter.
Style 2 – When the filter indicator changes from green to yellow,
order a new filter. When the indicator changes from yellow to red,
it is recommended that you replace the filter.
Style 3 – When the water filter status display changes from
“GOOD” to “ORDER,” order a new filter. When the filter indicator
reads “REPLACE,” it is recommended that you replace the filter.
Style 4 – Press FILTER to check the status of your water filter. If
the filter indicator light is yellow, order a new filter. If the filter
indicator light is red, it is recommended that you replace the filter.
Change the water filter cartridge every 6 months. If the water
flow to the water dispenser or ice maker decreases noticeably
before 6 months have passed, replace the water filter cartridge
more often.
■ These contaminants are not necessarily in your water supply.
While testing was performed under standard laboratory
conditions, actual performance may vary.
■ The product is for cold water use only.
■ Do not use with water that is microbiologically unsafe or of
unknown quality without adequate disinfection before or after the
system.
■ Refer to the “Warranty” section for the Manufacturer’s name,
address and telephone number.
■ Refer to the “Warranty” section for the Manufacturer’s limited
warranty.
Application Guidelines/Water Supply Parameters
System tested and certified by NSF International against NSF/ANSI
Standard 42 for the reduction of Chlorine Taste and Odor, Particulate
Class I*; and against NSF/ANSI Standard 53 for the reduction of Lead,
Mercury, Benzene, Toxaphene, and O-dichlorobenzene.
Substance Reduction
Aesthetic Effects
NSF Reduction
Requirements
Average
Influent
Influent Challenge
Concentration
Maximum
Effluent
Average
Effluent
Minimum %
Reduction
Average %
Reduction
Chlorine Taste/Odor
Particulate Class I
*
50% reduction
85% reduction
1.909 mg/L
5166666 #/mL
2.0 mg/L ± 10%
At least 10,000 particles/mL
0.05 mg/L
4200 #/mL
**
<0.05 mg/L
1900 #/mL
>97.4
>99.9
>97.4
>99.9
Contaminant
Reduction
NSF Reduction
Requirements
Average
Influent
Influent Challenge
Concentration
Maximum
Effluent
Average
Effluent
Minimum %
Reduction
Average %
Reduction
Lead: @ pH 6.5
Lead: @ pH 8.5
0.010 mg/L
0.010 mg/L
143.33 ug/L
150 ug/L
0.15 mg/L ± 10%
0.15 mg/L ± 10%
1.0 ug/L
1.0 ug/L
1.0 ug/L
1.0 ug/L
>99.3
>99.3
>99.3
99.3
Mercury: @ pH 6.5
Mercury: @ pH 8.5
0.002 mg/L
0.002 mg/L
0.0058 mg/L
0.00646 mg/L
0.006 mg/L ± 10%
0.006 mg/L ± 10%
0.3 ug/L
0.8 ug/L
0.0002 mg/L
0.0004 mg/L
94.8
88.5
96.4
94.9
Benzene 0.005 mg/L 0.015 mg/L 0.015 mg/L ± 10% 0.5 ug/L 0.0005 mg/L >96.7 >96.7
O-Dichlorobenzene 0.6 mg/L 1.83333 mg/L 1.8 mg/L ± 10% 160 ug/L 0.005 mg/L 91.1 96.5
Toxaphene 0.003 mg/L 0.016 mg/L 0.015 mg/L ± 10% 1 ug/L 0.001 mg/L >93.8 >93.8
Water Supply
Water Pressure
Water Temperature
Service Flow Rate
City or Well
30 - 120 psi (207 - 827 kPa)
33° - 100°F (0.6° - 37.8°C)
0.5 gpm (1.9 Lpm) @ 60 psi
*
**
Class I particle size: >0.5 um to <1 um
Test requirement is at least 100,000 particles/mL of AC Fine Test Dust.
® NSF is a registered trademark of NSF International.

15
MAYTAG
®
MAJOR APPLIANCE WARRANTY
LIMITED WARRANTY
For one year from the date of purchase, when this major appliance is operated and maintained according to instructions attached to or
furnished with the product, Maytag brand of Whirlpool Corporation or Whirlpool Canada LP (hereafter “Maytag”) will pay for factory
specified parts and repair labor to correct defects in materials or workmanship that existed when this major appliance was purchased.
Service must be provided by a Maytag designated service company. YOUR SOLE AND EXCLUSIVE REMEDY UNDER THIS LIMITED
WARRANTY SHALL BE PRODUCT REPAIR AS PROVIDED HEREIN. This limited warranty is valid only in the United States or Canada
and applies only when the major appliance is used in the country in which it was purchased. Proof of original purchase date is required
to obtain service under this limited warranty.
ITEMS EXCLUDED FROM WARRANTY
This limited warranty does not cover:
1. Replacement parts or repair labor if this major appliance is used for other than normal, single-family household use or when it is
used in a manner that is inconsistent to published user or operator instructions and/or installation instructions.
2. Service calls to correct the installation of your major appliance, to instruct you on how to use your major appliance, to replace or
repair house fuses, or to correct house wiring or plumbing.
3. Service calls to repair or replace appliance light bulbs, air filters or water filters. Consumable parts are excluded from warranty
coverage.
4. Damage resulting from accident, alteration, misuse, abuse, fire, flood, acts of God, improper installation, installation not in
accordance with electrical or plumbing codes, or use of products not approved by Maytag.
5. Cosmetic damage, including scratches, dents, chips or other damage to the finish of your major appliance, unless such damage
results from defects in materials or workmanship and is reported to Maytag within 30 days from the date of purchase.
6. Any food or medicine loss due to refrigerator or freezer product failures.
7. Pickup and delivery. This major appliance is intended to be repaired in your home.
8. Repairs to parts or systems resulting from unauthorized modifications made to the appliance.
9. Expenses for travel and transportation for product service if your major appliance is located in a remote area where service by an
authorized Maytag servicer is not available.
10. The removal and reinstallation of your major appliance if it is installed in an inaccessible location or is not installed in accordance
with Maytag's published installation instructions.
11. Replacement parts or repair labor on major appliances with original model/serial numbers that have been removed, altered or
cannot be easily determined.
12. Discoloration, rust, or oxidation of stainless steel surfaces.
DISCLAIMER OF IMPLIED WARRANTIES
IMPLIED WARRANTIES, INCLUDING ANY IMPLIED WARRANTY OF MERCHANTABILITY OR IMPLIED WARRANTY OF FITNESS FOR
A PARTICULAR PURPOSE, ARE LIMITED TO ONE YEAR OR THE SHORTEST PERIOD ALLOWED BY LAW. Some states and provinces
do not allow limitations on the duration of implied warranties of merchantability or fitness, so this limitation may not apply to you. This
warranty gives you specific legal rights, and you also may have other rights that vary from state to state or province to province.
LIMITATION OF REMEDIES; EXCLUSION OF INCIDENTAL AND CONSEQUENTIAL DAMAGES
YOUR SOLE AND EXCLUSIVE REMEDY UNDER THIS LIMITED WARRANTY SHALL BE PRODUCT REPAIR AS PROVIDED HEREIN.
MAYTAG SHALL NOT BE LIABLE FOR INCIDENTAL OR CONSEQUENTIAL DAMAGES. Some states and provinces do not allow the
exclusion or limitation of incidental or consequential damages, so these limitations and exclusions may not apply to you. This warranty
gives you specific legal rights, and you also may have other rights that vary from state to state or province to province.
If outside the 50 United States and Canada, contact your authorized Maytag dealer to determine if another warranty applies. 6/08
For additional product information, in the U.S.A., visit www.maytag.com
In Canada, visit www.maytag.ca
If you do not have access to the Internet and you need assistance using your product or you would like to schedule service, you may
contact Maytag at the number below.
Have your complete model number ready. You can find your model number and serial number on the label, located on the inside wall of
the refrigerator compartment.
For assistance or service in the U.S.A., call 1-800-688-9900. In Canada, call 1-800-807-6777.
If you need further assistance, you can write to Maytag with any questions or concerns at the address below:
In the U.S.A.:
Maytag Brand Home Appliances
Customer eXperience Center
553 Benson Road
Benton Harbor, MI 49022-2692
In Canada:
Maytag Brand Home Appliances
Customer eXperience Centre
1901 Minnesota Court
Mississauga, Ontario L5N 3A7
Please include a daytime phone number in your correspondence.
Please keep this User Instructions and model number information for future reference.

16
LE AGRADECEMOS la compra de este producto de alta calidad. Si usted experimenta un problema que no se haya cubierto en
SOLUCIÓN DE PROBLEMAS, visite nuestro sitio de internet en www.maytag.com para obtener información adicional. Si
considera que aún necesita ayuda, llámenos al 1-800-688-9900. En Canadá, visite nuestro sitio de internet en www.maytag.ca o
llámenos al 1-800-807-6777.
Necesitará tener a mano su número de modelo y de serie ubicados
en la pared interior del compartimiento del refrigerador.
SEGURIDAD DEL REFRIGERADOR
INSTRUCCIONES PARA EL
USUARIO DEL REFRIGERADOR
Si no sigue las instrucciones de inmediato, usted puede
morir o sufrir una lesión grave.
Si no sigue las instrucciones, usted puede morir o sufrir
una lesión grave.
Todos los mensajes de seguridad le dirán el peligro potencial, le dirán cómo reducir las posibilidades de sufrir una lesión y lo que
puede suceder si no se siguen las instrucciones.
Su seguridad y la seguridad de los demás es muy importante.
Hemos incluido muchos mensajes importantes de seguridad en este manual y en su electrodoméstico. Lea y obedezca siempre
todos los mensajes de seguridad.
ADVERTENCIA
PELIGRO
Este es el símbolo de advertencia de seguridad.
Este símbolo le llama la atención sobre peligros potenciales que pueden ocasionar la muerte o una lesión a
usted y a los demás.
Todos los mensajes de seguridad irán a continuación del símbolo de advertencia de seguridad y de la palabra
“PELIGRO” o “ADVERTENCIA”. Estas palabras significan:
Para reducir el riesgo de incendio, choque eléctrico, o lesiones personales al usar su refrigerador siga
estas precauciones básicas:
ADVERTENCIA:
INSTRUCCIONES IMPORTANTES DE SEGURIDAD
CONSERVAR ESTAS INSTRUCCIONES
■
Conecte a un contacto de pared de conexión a tierra de
3 terminales.
■
No use un adaptador.
■
No quite la terminal de conexión a tierra.
■
No use un cable eléctrico de extensión.
■
Desconecte el suministro de energía antes de darle servicio.
■
Vuelva a colocar todos los componentes y paneles antes de
hacerlo funcionar.
■
Remueva las puertas de su refrigerador viejo.
■
Use un limpiador no inflamable.
■
Mantenga los materiales y vapores inflamables, tales como
gasolina, alejados del refrigerador.
■
Use dos o más personas para mover e instalar el
refrigerador.
■
Desconecte el suministro de energía antes de instalar la
fábrica de hielo (en aquellos modelos que incluyen el juego
de instalación de la fábrica de hielo).
■
Use un vaso resistente para recibir hielo del despachador
(en algunos modelos).

17
USO DE SU REFRIGERADOR
Uso de los controles
Regulación del control de temperatura y
Encendido/Apagado del enfriamiento
Los botones del control del refrigerador y del congelador están
ubicados en el panel del despachador.
Para apagar el enfriamiento, presione y sostenga los botones de
LOCK (Bloqueo) y FAST ICE/COOL (Hielo/Frío rápido) al mismo
tiempo, por 3 segundos. Presione y sostenga LOCK (Bloqueo) y
FAST ICE/COOL (Hielo/Frío rápido) nuevamente para encender el
enfriamiento. Su refrigerador y congelador no se enfriarán
cuando el enfriamiento esté apagado.
IMPORTANTE: Para evitar bloquear accidentalmente el
despachador o cambiar otros ajustes, asegúrese de
presionar ambos botones exactamente al mismo tiempo.
Para su comodidad, los controles de su refrigerador y
congelador vienen prefijados de fábrica. Al instalar su
refrigerador por primera vez, cerciórese de que los controles aún
estén fijados en los “ajustes medios”.
Para ver los puntos fijos, presione el botón TEMPERATURE
(Temperatura) en el panel del despachador. Los puntos de ajuste
recomendados de fábrica son 0ºF (-18ºC) para el congelador y
37ºF (3ºC) para el refrigerador.
IMPORTANTE:
■ Espere 24 horas antes de colocar alimentos en el
refrigerador. Si agrega alimentos antes de que el refrigerador
se haya enfriado por completo, sus alimentos podrían
echarse a perder.
NOTA: El ajustar los puntos fijos a un ajuste más alto (más
frío) que el ajuste recomendado no hará que los
compartimientos se enfríen más rápido.
■ Si la temperatura está demasiado caliente o demasiado fría
en el refrigerador o en el congelador, antes de regular los
controles, revise primero los conductos de ventilación para
cerciorarse de que no estén obstruidos.
■ Los ajustes prefijados deben ser los correctos para un uso
doméstico normal. Los controles están ajustados
correctamente cuando la leche o los jugos están tan fríos
como Ud. desea y cuando el helado tiene consistencia firme.
■ Espere por lo menos 24 horas entre ajustes. Vuelva a verificar
las temperaturas antes de realizar otros ajustes.
■ La pantalla que está en el panel de control del despachador
tiene una luz de fondo que se apagará automáticamente
cuando los botones del control no se hayan usado durante
30 segundos o más. Cuando está apagada la luz de fondo, al
presionar por primera vez el botón de control se reactivará la
misma, sin cambiar ningún ajuste. En menos de 30 segundos
después de que se haya reactivado la luz de fondo, al
presionar más veces los botones del control, se cambiarán
los ajustes que sean aplicables.
Cómo deshacerse adecuadamente de su
refrigerador viejo
IMPORTANTE: El atrapamiento y asfixia de niños no es un
problema del pasado. Los refrigeradores tirados y abandonados
son un peligro, aún si van a quedar ahí “por unos pocos días”. Si
Ud. está por deshacerse de su refrigerador viejo, por favor siga
las instrucciones que se dan a continuación para prevenir
accidentes.
Antes de tirar su viejo refrigerador o congelador:
■ Saque las puertas.
■ Deje los estantes en su lugar para que los niños no puedan
meterse con facilidad.
ADVERTENCIA
Peligro de Asfixia
Remueva las puertas de su refrigerador viejo.
No seguir esta instrucción puede ocasionar la muerte
o daño al cerebro.

18
Cómo ajustar los controles
Para ajustar los puntos fijos, presione y sostenga el botón de
TEMPERATURE (Temperatura) por 3 segundos. Cuando el modo
de ajuste se activa, los puntos fijos y la información de ajuste
aparecerán en la pantalla.
NOTA: Para ver la temperatura en grados centígrados, oprima el
botón de FILTER (Filtro) cuando el modo de ajuste se activa. Para
volver a fijar el ajuste de la pantalla a grados Fahrenheit, presione
FILTER (Filtro) nuevamente.
Controles del refrigerador
Cuando el modo de ajuste se activa, los botones de LOCK
(Bloqueo) y FAST ICE/COOL (Hielo/Frío rápido) regulan la
temperatura del compartimiento del refrigerador. El rango de
punto de ajuste para el refrigerador es de 33°F a 45°F (0°C
a7°C).
■ Presione LOCK (Bloqueo) para bajar el punto fijo.
■ Presione FAST ICE/COOL (Hielo/Frío rápido) para subir el
punto fijo.
Controles del congelador
Cuando el modo de ajuste se activa, los botones de ICE (Hielo) y
LIGHT (Luz) regulan la temperatura del compartimiento del
congelador. El rango de punto de ajuste para el congelador es de
-5°F a 5°F (-21°C a -15°C).
■ Presione ICE (Hielo) para bajar el punto de ajuste.
■ Presione LIGHT (Luz) para subir el punto de ajuste.
Presione TEMPERATURE (Temperatura) para salir del modo de
ajuste, o deje pasar más o menos 15 segundos de inactividad y
el modo de ajuste se apagará automáticamente.
Características adicionales
NOTA: La pantalla que está en el panel de control del
despachador tiene una luz de fondo que se apagará
automáticamente cuando los botones del control no se hayan
usado durante 30 segundos o más. Cuando está apagada la luz
de fondo, al presionar por primera vez el botón de control se
reactivará la misma, sin cambiar ningún ajuste. En menos de
30 segundos después de que se haya reactivado la luz de fondo,
al presionar más veces los botones del control, se cambiarán los
ajustes que sean aplicables.
Fast Cool (Frío rápido) y Fast Ice (Hielo rápido)
La característica de Fast Cool (Frío rápido) ayuda en los períodos
de alto uso de hielo, cargas completas de comestibles o
temperaturas ambientales temporalmente calientes.
La característica Fast Ice (Hielo rápido) ayuda en los períodos
temporarios de alto consumo de hielo al aumentar la producción
de hielo.
■ Presione el botón de FAST ICE/COOL (Hielo/Frío rápido) para
activar la característica de Fast Cool (Frío rápido). Cuando la
característica se enciende, la animación de “Fast Cool”
aparecerá en la pantalla del despachador.
El ajuste Fast Cool (Frío rápido) permanecerá encendido
durante 24 horas a menos que se le apague manualmente.
■ Presione FAST ICE/COOL (Hielo/Frío rápido) nuevamente
para apagar Fast Cool (Frío rápido) y para encender la
característica de Fast Ice (Hielo rápido). Cuando la
característica se enciende, la animación de “Fast Ice”
aparecerá en la pantalla del despachador.
El ajuste Fast Ice (Hielo rápido) permanecerá encendido por
un mínimo de 90 minutos, a menos que se le apague
manualmente.
■ Presione FAST ICE/COOL (Hielo/Frío rápido) por tercera vez
para activar Fast Cool (Frío rápido) y Fast Ice (Hielo rápido) al
mismo tiempo. Cuando las características se encienden,
aparecerán las animaciones de “Fast Cool” y “Fast Ice” en la
pantalla del despachador.
■ Presione FAST ICE/COOL (Hielo/Frío rápido) por cuarta vez
para apagar Fast Cool (Frío rápido) y Fast Ice (Hielo rápido).
Cuando Fast Cool (Frío rápido) y/o Fast Ice (Hielo rápido) están
activados, la temperatura que se muestra en la pantalla no
cambiará. Después de 24 horas, el refrigerador vuelve a los
puntos de ajuste previos de la temperatura.
NOTA: Si se desea aumentar la producción de hielo todo el
tiempo, cambie el control del congelador a un ajuste más bajo. El
ajuste del congelador a una temperatura más fría puede
endurecer más algunos alimentos, como el helado.
Pantalla de temperatura siempre encendida
Esta característica mantiene la pantalla de temperatura siempre
encendida.
■ Presione y sostenga TEMPERATURE (Temperatura) y LOCK
(Bloqueo) a la vez durante 3 segundos, para encender esa
característica.
IMPORTANTE: Para evitar bloquear accidentalmente el
despachador o cambiar otros ajustes, asegúrese de
presionar ambos botones exactamente al mismo tiempo.
■ Presione y sostenga nuevamente TEMPERATURE
(Temperatura) y LOCK (Bloqueo) a la vez durante 3 segundos,
para apagar esa característica.
CONDICIÓN: REGULACIÓN DE LA
TEMPERATURA:
REFRIGERADOR
demasiado frío
Ajuste del REFRIGERADOR
1º más alto
REFRIGERADOR
demasiado caliente
Ajuste del REFRIGERADOR
1º más bajo
CONGELADOR
demasiado frío
Ajuste del CONGELADOR
1º más alto
CONGELADOR demasiado
caliente/muy poco hielo
Ajuste del CONGELADOR
1º más bajo

19
Alarma de puerta entreabierta
La característica de la alarma de puerta entreabierta hace sonar
una alarma cuando la puerta del refrigerador o del congelador
esté abierta durante 5 minutos y esté funcionando el enfriamiento
del producto. La alarma se repetirá cada 2 minutos. Cierre
ambas puertas para apagarla. La característica luego se vuelve a
fijar y se reactivará cuando se deje nuevamente cualquier puerta
abierta durante 5 minutos.
Desactivación de sonidos
■ Para desactivar todos los sonidos del despachador y del
control, incluyendo la alarma de puerta entreabierta, presione
y sostenga ICE (Hielo) y FAST ICE/COOL (Hielo/Frío rápido) a
la vez, durante 3 segundos.
■ Para volver a activar todos los sonidos, presione y sostenga
ICE (Hielo) y FAST ICE/COOL (Hielo/Frío rápido) a la vez,
durante 3 segundos nuevamente.
Control de temperatura del
cajón convertible
(en algunos modelos)
Puede ajustarse el control para que enfríe de manera apropiada
las carnes o los vegetales. El aire dentro de la charola se enfría
para evitar que partes de los alimentos se congelen y puede
ajustarse para mantener la carne a las temperaturas de
almacenaje recomendadas por el National Livestock and Meat
Board (Consejo Nacional de Ganado y Carnes) de 28° a 32°F
(-2° a 0°C). El control de temperatura para el cajón convertible
está prefijado en el ajuste de PRODUCE (Verduras).
Para guardar carne:
Fije el control en uno de los tres ajustes de MEAT (Carne), para
guardar la carne en su temperatura ideal de almacenaje.
Para guardar verduras:
Fije el control en PRODUCE para guardar las verduras en sus
temperaturas óptimas de almacenaje.
NOTA: Si los alimentos se empiezan a congelar, mueva el control
hacia la izquierda (menos frío). Recuerde que debe esperar
24 horas entre ajustes.
Control de humedad del cajón para verduras
(en algunos modelos)
Usted puede controlar el nivel de humedad en el cajón hermético
para verduras. Regule el control a cualquier ajuste entre LOW
(Bajo) y HIGH (Alto).
LOW (Bajo - posición abierta) para el mejor almacenamiento de
frutas y verduras con cáscaras.
HIGH (Alto - posición cerrada) para el mejor almacenamiento de
vegetales de hoja frescos.
Control del frío de la puerta
(en algunos modelos)
El control del frío de la puerta está situado del lado izquierdo del
compartimiento del refrigerador.
■ Gire el control en la dirección de las manecillas del reloj
(derecha) para reducir el flujo de aire frío hacia la puerta y
hacerla menos fría.
■ Gire el control en la dirección opuesta de las manecillas del
reloj (izquierda) para incrementar el flujo de aire frío hacia la
puerta y hacerla menos fría.
Despachadores de agua y hielo
(en algunos modelos)
Dependiendo de su modelo, usted puede tener una o más de las
opciones siguientes: la posibilidad de seleccionar hielo picado o
en cubos, una luz especial que se enciende cuando usted utiliza
el despachador o una opción de cierre para evitar que salga hielo
o agua involuntariamente.
NOTAS:
■ El sistema de distribución no funcionará cuando la puerta del
congelador esté abierta.
■ Después de haber conectado el refrigerador a un suministro
de agua, enjuague el sistema de agua. Use un recipiente
resistente para oprimir y sostener la barra del despachador
por 5 segundos, luego suéltela por 5 segundos. Repita hasta
que el agua comience a correr. Una vez que el agua comenzó
a correr, continúe presionando y soltando la barra del
despachador (5 segundos activado, 5 segundos
desactivado) por otros 5 minutos. Este proceso eliminará el
aire en el filtro y en el sistema de despacho de agua. En
algunas casas se podrá requerir enjuague adicional. A
medida que sale aire del sistema, es posible que salgan
chorros de agua repentinos del despachador.
■ Deje transcurrir 24 horas para que el refrigerador se enfríe y
pueda enfriar el agua.
■ Deje transcurrir 24 horas para la producción del primer lote
de hielo. Deshágase de los tres primeros lotes de hielo
producidos.
■ La pantalla que está en el panel de control del despachador
tiene una luz de fondo que se apagará automáticamente
cuando los botones del control no se hayan usado durante
30 segundos o más. Cuando está apagada la luz de fondo, al
presionar por primera vez el botón de control se reactivará la
misma, sin cambiar ningún ajuste. En menos de 30 segundos
después de que se haya reactivado la luz de fondo, al
presionar más veces los botones del control, se cambiarán
los ajustes que sean aplicables.
El despachador de agua
IMPORTANTE: Haga salir suficiente agua cada semana para
mantener un suministro fresco.
Para despachar agua:
1. Oprima un vaso resistente contra la barra del despachador
de agua.
2. Retire el vaso para detener la salida del agua.

20
El despachador de hielo
El hielo se distribuye del depósito de la fábrica de hielo en el
congelador cuando se presione la barra del despachador. El
sistema de distribución no funcionará cuando la puerta del
congelador esté abierta. Para apagar la fábrica de hielo, vea
“Fábrica de hielo y depósito”.
Su fábrica de hielo produce hielo picado y en cubos. Antes de
sacar hielo, seleccione el tipo de hielo que desea, presionando el
botón de ICE (Hielo).
La pantalla indica qué tipo de hielo se ha seleccionado.
Para obtener hielo picado, el hielo es triturado antes de ser
despachado. Esto puede retrasar un poco la distribución del
hielo picado. El ruido proveniente del triturador de hielo es
normal y los trozos de hielo pueden variar en tamaño. Cuando
cambie de la posición de hielo picado a cubos, caen unas onzas
de hielo picado junto con los primeros cubos.
Para despachar hielo:
1. Oprima el botón para seleccionar el tipo de hielo que desee.
2. Oprima con un vaso resistente la barra del despachador de
hielo. Sostenga el vaso junto al orificio del despachador para
que el hielo no caiga fuera del vaso.
IMPORTANTE: No necesita aplicar mucha presión a la barra
para activar el despachador de hielo. Oprimir fuerte no hará
que el despachador funcione con más rapidez o produzca
mayor cantidad de hielo.
3. Retire el vaso para detener la salida de hielo.
NOTA: El hielo puede continuar saliendo por hasta
10 segundos después de haber retirado el vaso de la barra.
El despachador puede continuar haciendo ruido por algunos
segundos después de haber despachado.
La luz del despachador (en algunos modelos)
Cuando usted utilice el despachador, la luz se encenderá
automáticamente. Si usted desea que la luz esté encendida
continuamente, puede elegir ON (Encendido) o DIM (Tenue). La
pantalla indica qué modo está seleccionado.
ON (Encendido): Presione LIGHT (Luz) para encender la luz del
despachador.
DIM (Tenue): Presione LIGHT por segunda vez para seleccionar
el modo DIM. La luz del despachador permanecerá encendida,
pero con una intensidad más baja.
OFF (Apagado): Presione LIGHT por tercera vez para apagar la
luz del despachador.
Las luces del despachador son del tipo LED y no se pueden
cambiar. Si le parece que las luces del despachador no
funcionan, vea “Solución de problemas” para obtener más
información.
El bloqueo del despachador (en algunos modelos)
El despachador puede apagarse para facilitar la limpieza o para
evitar que sea activado involuntariamente por niños pequeños o
animales domésticos.
NOTA: La función de cierre no interrumpe el flujo eléctrico al
refrigerador, a la fábrica de hielo o a la luz del despachador.
Únicamente desactiva los controles y las barras del
despachador. Para apagar la fábrica de hielo, vea “Fábrica de
hielo y depósito”.
■ Presione y sostenga LOCK (Bloqueo) por 3 segundos para
bloquear el despachador.
■ Presione y sostenga LOCK por segunda vez para
desbloquear el despachador.
La pantalla indica cuándo el despachador está bloqueado.
Fábrica de hielo y depósito
Para encender y apagar la fábrica de hielo
El interruptor de On/Off (Encendido/Apagado) se encuentra en el
lado derecho superior del compartimiento del congelador.
■ Para poner a funcionar la fábrica de hielo, deslice el control a
la posición de ON (Encendido - hacia la izquierda).
■ Para apagar la fábrica de hielo manualmente, deslice el
control a la posición de OFF (Apagado - hacia la derecha).
NOTA: La fábrica de hielo tiene un apagado automático. Los
sensores de la fábrica de hielo detendrán automáticamente la
producción de hielo, pero el control permanecerá en la posición
de ON (Encendido - hacia la izquierda).
RECUERDE:
■ Deje transcurrir 24 horas para la producción del primer lote
de hielo. Deshágase de los tres primeros lotes de hielo
producidos.
■ La calidad del hielo dependerá de la calidad del agua que
suministre a su fábrica de hielo. Evite la conexión de su
fábrica de hielo a un suministro de agua blanda. Los
químicos para ablandar el agua (como la sal) pueden dañar
ciertos componentes de la fábrica de hielo y producir un hielo
de muy baja calidad. Si no se puede evitar el uso de un
suministro de agua blanda, asegúrese de que el ablandador
de agua esté funcionando correctamente y que goce de un
buen mantenimiento.
CRUSHED
(Hielo picado)
CUBED
(Hielo en cubos)
ON
(Encendido)
DIM
(Tenue)
OFF
(Apagado)
Peligro de Cortaduras
Use un vaso resistente para recibir hielo del
despachador.
No seguir esta instrucción puede ocasionar
cortaduras.
ADVERTENCIA
LOCKED
(Bloqueado)
UNLOCKED
(Desbloqueado)
La page est en cours de chargement...
La page est en cours de chargement...
La page est en cours de chargement...
La page est en cours de chargement...
La page est en cours de chargement...
La page est en cours de chargement...
La page est en cours de chargement...
La page est en cours de chargement...
La page est en cours de chargement...
La page est en cours de chargement...
La page est en cours de chargement...
La page est en cours de chargement...
La page est en cours de chargement...
La page est en cours de chargement...
La page est en cours de chargement...
La page est en cours de chargement...
La page est en cours de chargement...
La page est en cours de chargement...
La page est en cours de chargement...
La page est en cours de chargement...
La page est en cours de chargement...
La page est en cours de chargement...
La page est en cours de chargement...
La page est en cours de chargement...
La page est en cours de chargement...
La page est en cours de chargement...
La page est en cours de chargement...
-
 1
1
-
 2
2
-
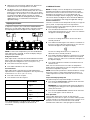 3
3
-
 4
4
-
 5
5
-
 6
6
-
 7
7
-
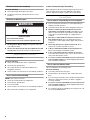 8
8
-
 9
9
-
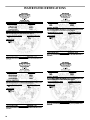 10
10
-
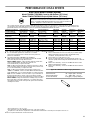 11
11
-
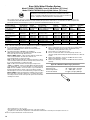 12
12
-
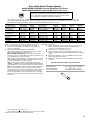 13
13
-
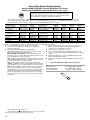 14
14
-
 15
15
-
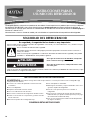 16
16
-
 17
17
-
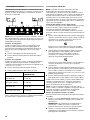 18
18
-
 19
19
-
 20
20
-
 21
21
-
 22
22
-
 23
23
-
 24
24
-
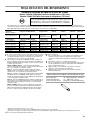 25
25
-
 26
26
-
 27
27
-
 28
28
-
 29
29
-
 30
30
-
 31
31
-
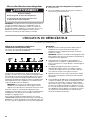 32
32
-
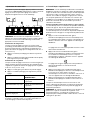 33
33
-
 34
34
-
 35
35
-
 36
36
-
 37
37
-
 38
38
-
 39
39
-
 40
40
-
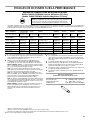 41
41
-
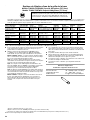 42
42
-
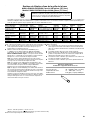 43
43
-
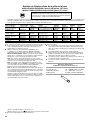 44
44
-
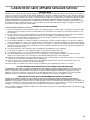 45
45
-
 46
46
-
 47
47


Maytag MCD2358WEW - 23.1 cu. Ft. Cabinet Depth User Instructions
- Catégorie
- Frigos
- Taper
- User Instructions
- Ce manuel convient également à