Panasonic CS-E24RKUAW Mode d'emploi
- Catégorie
- Climatiseurs split-system
- Taper
- Mode d'emploi
Ce manuel convient également à

Français English
F569988
Operating Instructions
Air Conditioner
Model No.
Indoor Unit
CS-E18RKUAW
CS-E24RKUAW
Outdoor Unit
Single Split Multi Split
CU-E18RKUA
CU-E24RKUA
CU-5E36QBU
Operating Instructions
Air Conditioner
2-12
Thank you for purchasing Panasonic Air Conditioner.
Installation instructions attached.
Before operating the unit, read these operating
instructions thoroughly and keep them for future
reference.
Instructions d’utilisation
Climatiseur
13-24
Merci d’avoir acheté un climatiseur Panasonic
Instructions d’installation en annexe.
Avant d’utiliser le climatiseur, lire ces instructions
d’utilisation et les conserver pour s’y référer dans le
futur.

2
Operation conditions
Use this air conditioner under the following temperature range.
DBT : Dry bulb temperature
WBT : Wet bulb temperature
Temperature (°F/°C)
CS-E18RKUAW
CS-E24RKUAW
CU-E18RKUA
CU-E24RKUA
CU-5E36QBU
DBT WBT DBT WBT DBT WBT
COOL
Max. 89.6/32 73.4/23 114.8/46 78.8/26 114.8/46 78.8/26
Min. 60.8/16 51.8/11 0/-17.8 -/- 14.0/-10 -/-
HEAT
Max. 86.0/30 -/- 75.2/24 64.4/18 75.2/24 64.4/18
Min. 60.8/16 -/- -4/-20 -5.8/-21 5.0/-15 3.2/-16
Power Supply
Models Number Time Delay Circuit Breaker Rated Volts
CS-E18RKUAW / CU-E18RKUAW 20 Amps
208/230VCS-E24RKUAW / CU-E24RKUAW 25 Amps
CS-E18RKUAW / CS-E24RKUAW / CU-5E36QBU 45 Amps
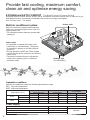
Provide fast cooling, maximum comfort,
clean air and optimise energy saving
ECONAVI and AUTO COMFORT The Right Choice for Energy Saving
Equipped with the human activity sensor, the air conditioner ensures to deliver cool or warm air to you,
and keeps the room consistently comfortable with minimum energy consumption.
See “To learn more...” for details.
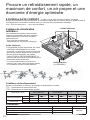
Multi air conditioner system
Multi air conditioner systems save space by
letting you connect multiple indoor units to a
single outdoor unit.
• For complete product features, please refer
catalogue.
Indoor units
Outdoor unit
( CU-5E36QBU)
Indoor units
• It is possible to operate the indoor units
individually or simultaneously. The priority
of operation is placed on the fi rst unit that
turned on.
• During operation, HEAT and COOL modes
cannot activate at the same time for different
indoor units.
• The power indicator blinks to indicate the
indoor unit is standing by for a different
operation mode.

3
English
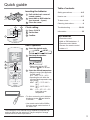
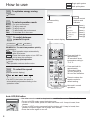
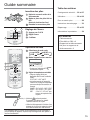
Quick guide
1
2
3
Inserting the batteries
1
Pull out the back cover of
remote control
2
Insert AAA or R03 batteries
(can be used ~ 1 year)
3
Close the cover
TIMER
SET
CANCEL
ON
OFF
1
2
3
SET CHECK CLOCK RESET
AC
RC
TIMER
C
AN
C
E
L
ON
O
FF
1
3
S
ET
C
HE
CK
R
E
S
ET
AC
RC
2 3
1
Clock setting
1
Press CLOCK
2
Set the time
3
Confi rm
AUTO
COMFORT
MODE
POWERFUL/
QUIET
TEMP
OFF/ON
TIMER
SET
CANCEL
ON
OFF
1
2
3
FAN SPEED
SET CHECK CLOCK RESET
AC
RC
ECONAVI
AUTO
HEAT
COOL
DRY
FAN
FAN
SPEED
AIR
SWING
AIR SWING
A
UT
O
C
O
MF
O
RT
P
O
WERFUL/
Q
UIET
TIMER
S
ET
C
AN
C
E
L
ON
O
FF
1
2
3
F
AN
S
PEE
D
S
ET
C
HE
CK
CL
O
C
K
R
E
S
ET
A
C
RC
E
C
O
NAV
I
AUT
O
HEAT
C
OOL
DRY
FAN
FAN
S
PEE
D
AIR
S
WIN
G
AIR
S
WIN
G
1
2
3
26ft/8m
Basic operation
1
Select the desired mode
DRY
AUTO HEAT
COOLFAN
2
Start/stop the operation
POWER
•
Please note that the OFF
indication is on to start.
3
Select the desired temperature
•
Selection range (Not applicable
for FAN mode):
60°F ~ 86°F / 16°C ~ 30°C.
•
Operating the unit within the
recommended temperature may
save energy.
HEAT : 68°F ~ 75°F / 20°C ~
24°C.
COOL : 78°F ~ 82°F / 26°C ~
28°C.
DRY : 2°F ~ 4°F / 1°C ~ 2°C
lower than room
temperature.
•
To dim or restore the unit’s indicator
brightness, press and hold for
5 seconds.
•
Use remote control within 26ft/8m
from the remote control receiver of
the indoor unit.
The illustrations in this manual are for explanation purposes only
and may differ from the actual unit. They are subject to change
without notice for future improvement.
Table of contents
Safety precautions ...................4-5
How to use...............................6-7
To learn more... .........................8
Cleaning instructions ..................9
Troubleshooting ..................10-11
Information................................12
Accessories
• Remote control
• AAA or R03 batteries × 2
• Remote control holder
• Screws for remote control
holder × 2

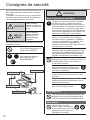
4
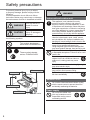
Safety precautions
To prevent personal injury, injury to others
or property damage, please comply with the
following:
Incorrect operation due to failure to follow
instructions below may cause harm or damage,
the seriousness of which is classifi ed as below:
WARNING
This sign warns of
death or serious
injury.
CAUTION
This sign warns of
injury or damage to
property.
The instructions to be followed are classifi ed by
the following symbols:
This symbol denotes an
action that is PROHIBITED.
These symbols denote
actions COMPULSORY.
WARNING
Indoor unit and outdoor unit
This appliance is not intended for use by
persons (including children) with reduced
physical, sensory or mental capabilities, or lack
of experience and knowledge, unless they have
been given supervision or instruction concerning
use of the appliance by a person responsible for
their safety. Children should be supervised to
ensure that they do not play with the appliance.
Please consult authorised dealer or specialist to
clean the internal parts, repair, install, remove
and reinstall the unit. Improper installation and
handling will cause leakage, electric shock or fi re.
Confi rm with authorised dealer or specialist on
usage of any specifi ed refrigerant type.
Using refrigerant type other than the specifi ed
may cause product damage, burst and injury etc.
Do not install the unit in a potentially explosive
or fl ammable atmosphere. Failure to do so could
result in fi re.
Do not insert your fi ngers or other
objects into the air conditioner indoor or
outdoor unit, rotating parts may cause
injury.
Do not touch the outdoor unit during lightning, it
may cause electric shock.
Do not expose yourself directly to cold air for a
long period to avoid excess cooling.
Do not sit or step on the unit, you may
fall down accidentally.
Remote control
Do not allow infants and small children to play
with the remote control to prevent them from
accidentally swallowing the batteries.
Power supply
Do not use a modifi ed cord,
joint cord, extension cord or
unspecifi ed cord to prevent
overheating and fi re.
Indoor unit
Outdoor unit
Power supply
Remote control
Air inlet
Air inlet
Air inlet
Air inlet
Air outlet
Air outlet
Air outlet
Air outlet

5
English
To prevent overheating, fi re or electric shock:
•
Do not share the same power outlet with
other equipment.
•
Do not operate with wet hands.
•
Do not over bend the power supply cord.
If the supply cord is damaged, it must be
replaced by the manufacturer, service agent
or similarly qualifi ed persons in order to avoid
a hazard.
It is strongly recommended to install this
unit using an Earth Leakage Circuit Breaker
(ELCB) or Ground Fault Interrupt (GFCI) or
Appliance Leakage Current Interrupt (ALCI) to
prevent electric shock or fi re.
Stop using the product if any abnormality/
failure occurs or turn off the power switch and
breaker. (Risk of smoke/fi re/electric shock)
Examples of abnormality/failure
•
The ELCB or GFCI or ALCI trip frequently.
•
Burning smell is observed.
•
Abnormal noise or vibration of the unit is
observed.
•
Water leaks from the indoor unit.
•
Power cord becomes abnormally hot.
•
Fan speed cannot be controlled.
•
The unit stops running immediately even if it
is switched on for operation.
•
The fan does not stop even if the operation
is stopped.
Contact your local dealer immediately for
maintenance or repair assistance.
This equipment must be earthed to prevent
electrical shock or fi re.
Prevent electric shock by switching off the
power supply:
- Before cleaning or servicing,
- When extended non-use, or
- During abnormally strong lightning activity.
CAUTION
Indoor unit and outdoor unit
Do not wash the indoor unit with water,
benzene, thinner or scouring powder to avoid
damage or corrosion at the unit.
Do not use for preservation of precise
equipment, food, animals, plants, artwork
or other objects. This may cause quality
deterioration, etc.
Do not use any combustible equipment
in front of the airfl ow outlet to avoid fi re
propagation.
Do not expose plants or pet directly to airfl ow
to avoid injury, etc.
Do not touch the sharp aluminium
fi n, sharp parts may cause injury.
Do not switch ON the indoor unit when waxing
the fl oor. After waxing, aerate the room
properly before operating the unit.
Do not install the unit in oily and smoky areas
to prevent damage to the unit.
Do not dismantle the unit for cleaning purpose
to avoid injury.
Do not step onto an unstable bench when
cleaning the unit to avoid injury.
Do not place a vase or water container on the
unit. Water may enter the unit and degrade
the insulation. This may cause an electric
shock.
Do not open window or door for long time
during COOL/DRY mode operation.
Prevent water leakage by ensuring drainage
pipe is:
- Connected properly,
- Kept clear of gutters and containers, or
- Not immersed in water
After a long period of use or use with any
combustible equipment, aerate the room
regularly.
After a long period of use, make sure the
installation rack does not deteriorate to
prevent the unit from falling down.
Remote control
Do not use rechargeable (Ni-Cd) batteries. It
may damage the remote control.
To prevent malfunction or damage of the
remote control:
•
Remove the batteries if the unit is not going
to be used for a long period of time.
•
New batteries of the same type must be
inserted following the polarity stated.
Safety precautions

6
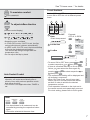
ECONAVI
To optimize energy saving
ECONAVI
MODE
To select operation mode
AUTO - For your convenience
HEAT - To enjoy warm air
COOL - To enjoy cool air
DRY - To dehumidify the environment
FAN - To circulate air in the room
POWERFUL/
QUIET
To switch between
powerful & quiet
QUIETPOWERFUL NORMAL
POWERFUL: To reach temperature quickly
POWERFUL
Single
• This operation stops automatically
after 20 minutes.
Multi
• Press the button again or turn OFF the
unit to stop this operation.
QUIET: To enjoy quiet operation
QUIET
• This operation reduces airfl ow noise.
FAN SPEED
To select fan speed
(Remote control display)
• For AUTO, the indoor fan speed is
automatically adjusted according to the
operation mode.
How to use
AUTO
COMFORT
MODE
POWERFUL/
QUIET
TEMP
OFF/ON
TIMER
SET
CANCEL
ON
OFF
1
2
3
FAN SPEED
SET CHECK CLOCK RESET
AC
RC
ECONAVI
AUTO
HEAT
COOL
DRY
FAN
FAN
SPEED
AIR
SWING
AIR SWING
/
TEMP
OFF/ON
TIMER
S
ET
C
AN
C
E
L
ON
O
FF
1
2
3
C
HE
CK
Remote control display
Human activity
sensor
Remote control
receiver and
Indicator
Auto OFF/ON button
Use when remote control is misplaced or a malfunction occurs. Raise the front panel:
• To use in AUTO mode, press the button once.
• To use in COOL mode, press and hold the button until 1 beep is heard, then
release.
• To use in HEAT mode, press and hold the button until 1 beep is heard, then
release. And press again until 2 beeps, then release.
• Press the button again to turn off.
Press and hold for
approximately
10 seconds to show
temperature setting in
°F or °C.
Press and hold for
approximately
5 seconds to show
12-hour (am/pm) or
24-hour time indication.
Press to restore the
remote control to
default setting.
Not used in normal
operations.
POWER
TIMER
ECONAVI
AUTO COMFORT
POWERFUL
QUIET
(Green)
(Orange)
(Green)
(Green)
(Orange)
(Orange)
Single
Single split system
Multi
Multi split system

7
English
Note
ECONAVI
,
POWERFUL/
QUIET
,
AUTO
COMFORT
• Can be activated in all modes and can be
cancelled by pressing the respective button
again.
• Cannot be selected at the same time.
To set the timer
2 sets of ON and OFF timers are available
to turn ON or OFF the unit at different preset
times.
TIMER
SET
CANCEL
ON
OFF
1
2
3
AC
C
C
AN
C
E
L
3
AC
C
21 3
1
Select ON or OFF
timer
Example:
OFF at 11:50PM
• Each time pressed:
OFF
AM
Cancel
2
Set the time
2
PM
3
Confi rm
SET
PM
TIMER
• To cancel ON or OFF timer, press
ON
or
OFF
to select respective or then press
CANCEL
.
• If timer is cancelled manually or due to power
failure, you can restore the timer again by
pressing
ON
or
OFF
to select respective or
then press
SET
.
• The nearest timer setting will be displayed and
will activate in sequence.
• When ON Timer is set, the unit may start
earlier (up to 35 minutes) before the actual
set time in order to achieve the desired
temperature on time.
• Timer operation is based on the clock set in
the remote control and repeats daily once set.
For clock setting, please refer to Quick guide.
See "To learn more..." for details.
AUTO
COMFORT
To maximize comfort
AUTO COMFORT
AIR SWING
To adjust airfl ow direction
(Remote control display)
• Keeps the room ventilated.
• In COOL/DRY mode, if AUTO is set, the fl ap
swings left/right and up/down automatically.
• In HEAT mode, if AUTO is set, the horizontal fl ap
is fi xed at the predetermined position.
The vertical fl ap swings left/right after the
temperature rises.
• Do not adjust the fl ap by hand.
How to use
Auto Restart Control
• If power is resumed after a power failure, the
operation will restart automatically after a
period of time with previous operation mode
and airfl ow direction.
• This control is not applicable when TIMER is
set.

8
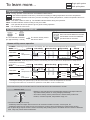
To learn more...
Operation mode
AUTO : During operation mode selection the POWER indicator blinks.
Single
• Unit selects operation mode every 10 minutes according to setting temperature and room temperature.
Multi
• Unit selects operation mode every 3 hours according to setting temperature, outdoor temperature and room
temperature.
HEAT
: Unit takes a while to warm up. The POWER indicator blinks during this operation.
COOL
: Provides effi cient comfort cooling to suit your needs.
DRY
: Unit operates at low fan speed to give a gentle cooling operation.
FAN
: To circulate air in the room.
ECONAVI and AUTO COMFORT
ECONAVI
AUTO
COMFORT
or
Note
AIR SWING
When manual AIR SWING is selected,
the ECONAVI and AUTO COMFORT
operations will be cancelled.
The unit will start to initialize
(for approximately 1 minute)
The human activity sensor
will start to detect.
Human activity sensor operation
Low activity Normal activity
Human
Mode
Set
temperature
High activity Absent
ECONAVI
; Detecting human presence and activity, the unit controls room temperature to save energy.
Low activity Normal activity
Human
Mode
Set
temperature
High activity Absent
Set
Fan Speed
AUTO COMFORT ; Detecting human presence and activity, the unit controls room temperature to keep human
comfortable consistently.
HEAT
COOL/DRY
HEAT
COOL/DRY
* During low activity, fan speed 1 tap up for first 15 minutes or until set temperature is reached.
** During human absence, maximum fan speed for COOL/DRY mode is medium fan.
+1 tap
0HGLXP)DQ
+1 tap*
+2°F / +1°C
+2°F / +1°C
+0.5°F / +0.3°C
-2°F / -1°C
-4°F / -2°C
+4°F /
+2°C
-4°F /
-2°C
-4°F / -2°C
+4°F /
+2°C
-4°F /
-2°C
The human activity sensor will also scan for area of heat source and movement in a room.
Detection area
• Based on area activeness horizontal airfl ow direction will adjust either fi x
at predetermined position or swing left/right periodically.
• The human activity sensor performance is infl uenced by indoor unit
location, movement speed, temperature range, etc.
90º
23ft/7m
• The human activity sensor may:
- mistakenly detect an object with heat source & movement similar to human, such as pets, etc.
- mistakenly detect as non-heat source & movement if a human stays motionless for certain period of time.
• Do not place large objects near the sensor and keep away heating units or humidifi er from the sensor’s detection
area. They may cause sensor malfunction.
Single
Single split system
Multi
Multi split system

9
English To learn more... / Cleaning instructions
Cleaning instructions
To ensure optimal performance of the unit,
cleaning has to be carried out at regular
intervals. Dirty unit may cause malfunction
and you may see error code “H99”. Please
consult authorised dealer.
• Switch off the power at the circuit breaker before
cleaning.
• Do not touch the aluminium fi n, sharp parts may
cause injury.
• Do not use benzene, thinner or scouring powder.
• Use only soap ( pH 7) or neutral household
detergent.
• Do not use water hotter than 104°F / 40°C.
Indoor unit
Wipe the unit gently with a soft,
dry cloth.
Human activity sensor
Do not hit or violently press or poke it with a sharp
object. This can lead to damage and malfunction.
Front panel
Wash gently and dry.
Remove the front panel
Raise
Pull out
1
2
POW
ER
TIM
ER
EC
O
NAVI
AUTO C
OMFORT
POWERFUL
QUIET
Close it securely
POW
ER
TIM
ER
EC
O
NAV
I
AUTO C
OMFO
RT
POWERFUL
QUIET
2
Close down
3
Press both ends of the front panel
4
Press at center of the front panel
Insert at both sides
1
Air fi lters
Every 2 weeks
• Wash/rinse the fi lters gently
with water to avoid damage to
the fi lter surface.
• Dry the fi lters thoroughly under shade, away
from fi re or direct sunlight.
• Replace any damaged fi lters.
Remove air fi lter Attach air fi lter
Insert into the unit
Air purifying fi lter
Vacuum the air purifying fi lter
• It is recommended to clean the fi lter every 6
months.
• Replace the fi lter every 3 years or replace any
damaged fi lter. Part no.: CZ-SA20P
For seasonal inspection after extended
non-use
•
Checking of remote control batteries.
•
No obstruction at air inlet and air outlet vents.
•
Use Auto OFF/ON button to select COOL/
HEAT operation. After 15 minutes of operation,
it is normal to have the following temperature
difference between air inlet and air outlet vents:
COOL: ≥ 14.4°F/8°C
HEAT: ≥ 25.2°F/14°C
For extended non-use
•
Activate HEAT mode for 2~3 hours to remove
moisture left in the internal parts thoroughly to
prevent mould growth.
•
Turn off the power supply.
•
Remove the remote control batteries.
Indoor unit
POW
ER
TIM
ER
EC
O
NAV
I
AUTO C
OMFO
RT
POWERFUL
QUIET
Aluminium fi nFront panel
Air fi lters
Human activity
sensor
Air purifying fi lter

10
The following symptoms do not indicate malfunction.
Symptom Cause
Mist emerges from indoor unit. • Condensation effect due to cooling process.
Water fl owing sound during operation. • Refrigerant fl ow inside the unit.
The room has a peculiar odour. • This may be due to damp smell emitted by the wall,
carpet, furniture or clothing.
Indoor fan stops occasionally during automatic
fan speed setting.
• This helps to remove the surrounding odour.
Airfl ow continues even after operation has
stopped.
• Extraction of remaining heat from the indoor unit
(maximum 30 seconds).
Operation is delayed a few minutes after
restarting.
• The delay is a protection to the unit’s compressor.
Outdoor unit emits water/steam. • Condensation or evaporation occurs on pipes.
TIMER indicator is always on. • The timer setting repeats daily once set.
POWER indicator blinks during HEAT mode
with no warm air supply (and fl ap is closed).
• The unit is in defrost mode (and AIR SWING is set to
AUTO).
Indoor fan stops occasionally during heating
operation.
• To avoid unintended cooling effect.
POWER indicator blinks before the unit is
switched on.
• This is a preliminary step in preparation for the
operation when the ON timer has been set.
Cracking sound during operation. • Changes of temperature caused the expansion/
contraction of the unit.
Discoloration of some plastic parts. • Discoloration is subject to material types used in plastic
parts, accelerated when exposed to heat, sun light, UV
light, or environmental factor.
Check the following before calling for servicing.
Symptom Check
Operation in HEAT/COOL mode is not working
effi ciently.
• Set the temperature correctly.
• Close all doors and windows.
• Clean or replace the fi lters.
•
Clear any obstruction at the air inlet and air outlet vents.
Noisy during operation. • Check if the unit has been installed at an incline.
• Close the front panel properly.
Remote control does not work.
(Display is dim or transmission signal is weak.)
• Insert the batteries correctly.
• Replace weak batteries.
The unit does not work. • Check if the circuit breaker is tripped.
• Check if timers have been set.
The unit does not receive the signal from the
remote control.
• Make sure the receiver is not obstructed.
• Certain fl uorescent lights may interfere with signal
transmitter. Please consult authorised dealer.
Troubleshooting
NON SERVICEABLE CRITERIAS
SWITCH OFF POWER AT THE CIRCUIT BREAKER then please consult an authorised dealer under
the following conditions:
• Abnormal noise during operation.
• Water/foreign particles have entered the remote
control.
• Water leaks from Indoor unit.
• Circuit breaker switches off frequently.
• Switches or buttons are not functioning properly.

11
English Troubleshooting
Diagnostic
display
Abnormality/Protection
control
H 00
No memory of failure
H 11
Indoor/outdoor abnormal
communication
H 12
Indoor unit capacity unmatched
H 14
Indoor intake air temperature
sensor abnormality
H 15
Compressor temperature sensor
abnormality
H 16
Outdoor current transformer (CT)
abnormality
H 19
Indoor fan motor mechanism lock
H 23
Indoor heat exchanger
temperature sensor 1 abnormality
H 24
Indoor heat exchanger
temperature sensor 2 abnormality
H 25
Indoor ion device abnormality
H 27
Outdoor air temperature sensor
abnormality
H 28
Outdoor heat exchanger
temperature sensor 1 abnormality
H 30
Outdoor discharge pipe
temperature sensor abnormality
H 32
Outdoor heat exchanger
temperature sensor 2 abnormality
H 33
Indoor/outdoor misconnection
abnormality
H 34
Outdoor heat sink temperature
sensor abnormality
H 36
Outdoor gas pipe temperature
sensor abnormality
H 37
Outdoor liquid pipe temperature
sensor abnormality
H 38
Indoor/outdoor mismatch
(brand code)
Diagnostic
display
Abnormality/Protection
control
H 39
Abnormal indoor operating unit or
standby units
H 41
Abnormal wiring or piping
connection
H 59
Eco sensor abnormality
H 64
Outdoor high pressure sensor
abnormality
H 70
Light sensor abnormality
H 97
Outdoor fan motor mechanism
lock
H 98
Indoor high pressure protection
H 99
Indoor operating unit freeze
protection
F 11
4-way valve switching
abnormality
F 17
Indoor standby units freezing
abnormality
F 90
Power factor correction (PFC)
circuit protection
F 91
Refrigeration cycle abnormality
F 93
Compressor abnormal revolution
F 94
Compressor discharge pressure
overshoot protection
F 95
Outdoor cooling high pressure
protection
F 96
Power transistor module
overheating protection
F 97
Compressor overheating
protection
F 98
Total running current protection
F 99
Outdoor direct current (DC) peak
detection
The unit stops and the TIMER indicator blinks.
Use remote control to retrieve error code.
TIMER
SET
CANCEL
ON
OFF
1
2
3
SET CHECK CLOCK RESET
AC
RC
TIMER
S
ET
C
AN
C
E
L
ON
O
FF
1
3
S
ET CL
O
C
K
R
E
S
ET
AC
RC
Press until you hear beep sound, then
write down the error code
21
3
Press for 5 seconds
to quit checking
Turn the unit off and reveal the error code
to authorised dealer
4
Press for 5 seconds
• For certain errors, you may restart the unit for limited operation with 4 beeps when operation starts.

12
Information
Federal Communications Commission Interference Statement
This device complies with part 15 of the FCC Rules. Operation is subject to the following two
conditions: (1) This device may not cause harmful interference, and (2) this device must accept any
interference received, including interference that may cause undesired operation.
This equipment has been tested and found to comply with the limits for a Class B digital device,
pursuant to part 15 of the FCC Rules. These limits are designed to provide reasonable protection
against harmful interference in a residential installation. This equipment generates, uses and can
radiate radio frequency energy and, if not installed and used in accordance with the instructions,
may cause harmful interference to radio communications. However, there is no guarantee
that interference will not occur in a particular installation. If this equipment does cause harmful
interference to radio or television reception, which can be determined by turning the equipment off
and on, the user is encouraged to try to correct the interference by one or more of the following
measures:
• Reorient or relocate the receiving antenna.
• Increase the separation between the equipment and the receiver.
• Connect the equipment to an outlet on a circuit different from that to which the receiver is
connected.
• Consult the dealer or an experienced radio/TV technician for help.
FCC Caution: To assure continued compliance, follow the attached installation instructions. Any
changes or modifi cations not expressly approved by the party responsible for compliance could void
the user’s authority to operate this equipment.
Industry Canada Notice
This Class B digital apparatus complies with Canadian ICES-003.
Models Number
CS-E18RKUAW / CS-E24RKUAW
The above listed models have been designed and manufactured to meet ENERGY
STAR
®
criteria for energy effi ciency when matched with appropriate coil components.
However, proper refrigerant charge and proper air fl ow are critical to achieve rated
capacity and effi ciency. Installation of this product should follow the manufacturer’s
refrigerant charging and airfl ow instructions. Failure to confi rm proper charge and
airfl ow may reduce energy effi ciency and shorten equipment life.
Information for Users on Collection and Disposal of Old Equipment and used Batteries
[Information on Disposal in other Countries outside the European Union]
These symbols are only valid in the European Union. If you wish to discard
these items, please contact your local authorities or dealer and ask for the
correct method of disposal.
Pb
Note for the battery symbol (bottom two symbol examples):
This symbol might be used in combination with a chemical symbol. In this case
it complies with the requirement set by the Directive for the chemical involved.
Contact your local hazardous waste disposal hotline.

Instructions d’utilisation
Climatiseur
Nos de modèle.
Unité intérieure
CS-E18RKUAW
CS-E24RKUAW
Unité extérieure
d’un système à
deux blocs
d’un système
multiblocs
CU-E18RKUA
CU-E24RKUA
CU-5E36QBU

14
Conditions de fonctionnement
Utiliser ce climatiseur à l’intérieur de la plage de température suivante.
TTS : Température du thermomètre sec
TTM : Température du thermomètre mouillé
Température (°C/°F)
CS-E18RKUAW
CS-E24RKUAW
CU-E18RKUA
CU-E24RKUA
CU-5E36QBU
TTS TTM TTS TTM TTS TTM
REFROIDISSEMENT
Max. 32/89,6 23/73,4 46/114,8 26/78,8 46/114,8 26/78,8
Min. 16/60,8 11/51,8 -17,8/0 -/- -10/14,0 -/-
CHAUFFAGE
Max. 30/86,0 -/- 24/75,2 18/64,4 24/75,2 18/64,4
Min. 16/60,8 -/- -20/-4 -21/-5,8 -15/5,0 -16/3,2
Alimentation
Numéros de modèles Fusible à retardement Tension nominale
CS-E18RKUAW / CU-E18RKUAW 20 ampères
208/230VCS-E24RKUAW / CU-E24RKUAW 25 ampères
CS-E18RKUAW / CS-E24RKUAW / CU-5E36QBU 45 ampères
Procure un refroidissement rapide, un
maximum de confort, un air propre et une
économie d’énergie optimisée
ECONAVI et AUTO COMFORT Le bon choix pour les économiser l’énergie
Équipé d’un détecteur d’activité humaine, le climatiseur assure de l’air frais ou chaud et garde la pièce à
une température confortable constante avec un minimum de consommation d’énergie.
Voir « Pour en savoir plus… » pour plus de détails.
Système de climatisation
multiblocs
Les climatiseurs multiblocs économisent
l’espace en permettant de relier plusieurs
unités intérieures à une seule et même
unité extérieure.
• Pour une liste complète des
caractéristiques, consulter le catalogue.
Unités intérieures
Unités intérieures
• Il est possible de faire fonctionner les unités
intérieures individuellement ou toutes
ensemble. La priorité de fonctionnement est
donnée au premier appareil mis en marche.
• Durant le fonctionnement, les modes
CHAUFFAGE et REFROIDISSEMENT ne
peuvent pas être activés simultanément pour
différentes unités extérieures.
• Le voyant d’alimentation clignote pour
indiquer que l’unité intérieure est en attente
d’un mode de fonctionnement différent.
Unité extérieure
( CU-5E36QBU)

15
Français
Guide sommaire
1
2
3
Insertion des piles
1
Retirer le couvercle arrière de la
télécommande
2
Mettre en place des piles AAA ou
R03
(durée de vie d’environ 1 an)
3
Remettre le couvercle en place
TIMER
SET
CANCEL
ON
OFF
1
2
3
SET CHECK CLOCK RESET
AC
RC
TIMER
C
AN
C
E
L
ON
O
FF
1
3
S
ET
C
HE
CK
R
E
S
ET
AC
RC
2 3
1
Réglage de l’heure
1
Appuyer sur CLOCK
2
Régler l’heure
3
Confi rmer
AUTO
COMFORT
MODE
POWERFUL/
QUIET
TEMP
OFF/ON
TIMER
SET
CANCEL
ON
OFF
1
2
3
FAN SPEED
SET CHECK CLOCK RESET
AC
RC
ECONAVI
AUTO
HEAT
COOL
DRY
FAN
FAN
SPEED
AIR
SWING
AIR SWING
A
UT
O
C
O
MF
O
RT
P
O
WERFUL/
Q
UIET
TIMER
S
ET
C
AN
C
E
L
ON
O
FF
1
2
3
F
AN
S
PEE
D
S
ET
C
HE
CK
CL
O
C
K
R
E
S
ET
AC
RC
EC
O
NAV
I
AUT
O
HEAT
C
OOL
DRY
FAN
FAN
S
PEE
D
AIR
S
WIN
G
AIR
S
WIN
G
1
2
3
8 m/26 pi
Opération de base
1
Sélectionner le mode voulu
DRY
AUTO HEAT
COOLFAN
2
Mettre l’appareil en/hors marche
POWER
•
À noter que l’indication OFF
est affi chée au départ.
3
Régler la température souhaitée
•
Plage de réglage (N’est pas
disponible dans le mode ventilation
(FAN)):
16°C à 30°C / 60°F à 86°F.
•
Le fonctionnement de l’appareil à
l’intérieur de la plage de température
recommandée peut économiser de
l’énergie.
CHAUD : 20°C à 24°C / 68°F à 75°F.
FROID : 26°C à 28°C / 78°F à 82°F.
SEC : 1°C à 2°C / 2°F à 4°F plus
bas que la température de
la pièce.
•
Maintenir enfoncée pendant
5 secondes pour atténuer ou rétablir
l’intensité lumineuse du voyant.
•
Utiliser la télécommande à l’intérieur d’une
distance de 8 m/26 pi du capteur du signal
de la télécommande de l’unité intérieur.
Les illustrations dans ce manuel ne sont présentées qu’à titre d’exemple et
peuvent différer de l’appareil, lequel est sujet à changements sans préavis à
des fi ns d’amélioration.
Table des matières
Consignes de sécurité .....16 et 17
Utilisation .........................18 et 19
Pour en savoir plus... ..............20
Instructions de nettoyage .........21
Dépannage .....................22 et 23
Informations importantes ..........24
Accessoires
• Télécommande
• Piles AAA ou R03 x 2
• Support de la télécommande
• Vis pour le support de la
télécommande x 2

16
Consignes de sécurité
Afi n de prévenir tout risque de blessures ou de
dommages matériels, observer les consignes
suivantes :
L’utilisation incorrecte due au non-respect des
consignes de sécurité entraîne des blessures
ou dommages classifi és comme suit:
ATTENTION
Cette indication
signale un risque de
mort ou de blessure
grave.
MISE EN
GARDE
Cette indication
signale un risque
de blessure ou
des dommages
matériels.
Les instructions à suivre sont classées selon les
symboles suivants:
Ce symbole indique qu’une
action est INTERDITE.
Ces symboles indiquent
des actions qui sont
OBLIGATOIRES.
ATTENTION
Unités intérieure et extérieure
Cet appareil n’est pas destiné à une utilisation
par des personnes (y compris des enfants)
ayant des capacités physiques, sensorielles ou
mentales réduites, ou manquant d’expérience ou
de connaissances, à moins d’être supervisées
ou d’avoir été renseignées sur son utilisation par
une personne responsable de leur sécurité. Ne
pas laisser un enfant jouer avec l’appareil.
Il est recommandé de faire appel à un détaillant
agréé ou à un spécialiste pour le nettoyage
des pièces internes, la réparation, l’installation,
le retrait ou la réinstallation de l’appareil. Une
mauvaise installation ou manipulation de
l’appareil entraînera des fuites et des risques de
choc électrique ou d’incendie.
Consulter un détaillant agréé ou un technicien
spécialisé quant au type de frigorigène à utiliser.
L’utilisation d’un frigorigène autre que celui de
type spécifi é pourrait causer des dommages à
l’appareil, un éclatement, des blessures, etc.
Ne pas installer l’appareil dans un milieu où
pourraient se trouver des substances explosives
ou infl ammables. Dans le cas contraire, il y
aurait risque d’incendie.
Ne pas introduire de doigts ou des objets
dans l’unité intérieure ou extérieure du
climatiseur; les pièces rotatives peuvent
provoquer des blessures.
Ne pas toucher l’unité extérieure durant un
orage électrique sous peine de subir un choc
électrique.
Ne pas s’exposer directement à l’air froid
pendant une période prolongée pour éviter un
refroidissement excessif.
Ne pas s’asseoir ni monter sur l’appareil
pour éviter tout risque de chute.
Télécommande
Ne pas permettre aux bébés et aux enfants en
bas âge de jouer avec la télécommande pour
éviter qu’ils avalent accidentellement les piles.
Alimentation
Ne pas utiliser un cordon
modifi é, rapiécé, prolongateur
ou aux spécifi cations inconnues
afi n de prévenir tout risque de
surchauffe et d’incendie.
Unité intérieure
Unité extérieure
Alimentation
Télécommande
Entrée d’air
Entrée d’air
Entrée d’air
Entrée d’air
Sortie d’air
Sortie d’air
Sortie d’air
Sortie d’air

17
Français
Afi n d’éviter une surchauffe de l’appareil, un
risque d’incendie ou de choc électrique:
•
Ne pas partager la prise de courant avec un
autre appareil.
•
Ne pas utiliser l’appareil avec les mains
mouillées.
•
Ne pas plier le cordon d’alimentation.
Dans le cas où le cordon d’alimentation serait
endommagé, le faire remplacer par le
fabricant, son agent de service après-vente
agréé ou un technicien qualifi é de manière à
prévenir les risques d’incendie.
Il est fortement recommandé de brancher
l’appareil sur un circuit muni d’un disjoncteur
de courant de fuite à la terre (ELCB), d’un
disjoncteur différentiel de fuite à la terre
(GFCI) ou d’un coupe-circuit de courant de
fuite d’appareil (ALCI) afi n de prévenir les
risques de choc électrique ou d’incendie.
Cesser d’utiliser ce produit en cas de situation
anormale ou de défaillance et mettre le
disjoncteur hors marche.
(Risque de fumée/d’incendie/de choc
électrique)
Exemples de situation anormale/défaillance
•
Le ELCB, GFCI ou ALCI saute souvent.
•
Une odeur de brûlé est perçue.
•
Un bruit anormal ou une vibration de
l’appareil survient.
•
L’eau fuit de l’unité intérieure.
•
Le cordon d’alimentation devient
anormalement chaud.
•
La vitesse du ventilateur n’est pas
contrôlable.
•
L’appareil cesse de fonctionner
immédiatement même s’il est mis en
marche.
•
Le ventilateur ne s’arrête pas même s’il est
mis hors marche.
Contacter immédiatement votre détaillant
local pour entretien/réparation.
Cet appareil doit être relié à la terre afi n de
prévenir les risques de choc électrique ou
d’incendie.
Pour prévenir les risques d’électrocution,
débrancher l’appareil dans les situations
suivantes :
- Avant de nettoyer ou de réparer l’appareil.
- En cas de non-utilisation prolongée.
- En cas d’orage électrique particulièrement
violent.
MISE EN GARDE
Unités intérieure et extérieure
Ne pas laver l’unité intérieure à l’eau, ni
utiliser de benzène, diluant ou poudre
à récurer afi n d’éviter tout dommage ou
corrosion.
Ne pas utiliser pour le maintien au frais de
dispositifs de précision, d’aliments, d’animaux,
de plantes, d’objets d’art ou pour d’autres
usages particuliers; cela pourrait en détériorer
la qualité, etc.
Ne pas utiliser d’équipement à combustible
devant l’orifi ce de sortie du fl ux d’air afi n
d’éviter la propagation du feu.
Ne pas exposer les plantes ou les animaux
domestiques directement au fl ux d’air.
Ne pas toucher l’ailette tranchante en
aluminium; les pièces tranchantes
peuvent causer des blessures.
Ne pas faire fonctionner l’unité intérieure
durant le cirage d’un plancher. Une fois le
cirage terminé, bien aérer la pièce avant
d’utiliser l’appareil.
Ne pas installer l’appareil dans un
endroit enfumé ou huileux afi n d’éviter de
l’endommager.
Ne pas désassembler l’appareil pour le
nettoyer afi n d’éviter les risques de blessures.
Ne pas monter sur un banc instable lors
du nettoyage de l’appareil afi n d’éviter les
risques de blessures.
Ne pas placer de vase ou autre récipient
contenant de l’eau sur l’appareil. De l’eau
pourrait pénétrer dans l’appareil et détériorer
l’isolation, ce qui risquerait de provoquer un
choc électrique.
Ne pas laisser la fenêtre ou la porte ouverte
longtemps pendant le fonctionnement en
mode REFROIDISSEMENT/SEC.
Prévenir toute fuite d’eau en s’assurant que le
conduit d’évacuation :
- est raccordé correctement
- est gardé loin de gouttières et de contenants ou
- n’est pas immergé dans l’eau
Après une longue période d’utilisation ou
l’utilisation avec un équipement à combustible,
aérer la pièce régulièrement.
Après une longue période d’utilisation, s’assurer
que le support de montage est en bon état afi n
de prévenir la chute de l’appareil.
Télécommande
Ne pas utiliser de piles rechargeables (Ni-Cd).
Ce type de piles peut endommager la
télécommande.
Afi n de prévenir le mauvais fonctionnement
ou les risques de dommages à la
télécommandel :
•
Retirer les piles de la télécommande si
l’appareil ne sera pas utilisé pendant une
longue période.
•
Mettre en place des piles neuves de même
type en prenant soin de respecter la polarité
indiquée.
Consignes de sécurité

18
AUTO
COMFORT
MODE
POWERFUL/
QUIET
TEMP
OFF/ON
TIMER
SET
CANCEL
ON
OFF
1
2
3
FAN SPEED
SET CHECK CLOCK RESET
AC
RC
ECONAVI
AUTO
HEAT
COOL
DRY
FAN
FAN
SPEED
AIR
SWING
AIR SWING
/
TEMP
OFF/ON
TIMER
S
ET
C
AN
C
E
L
ON
O
FF
1
2
3
C
HE
CK
ECONAVI
Optimisation de l’économie
d’énergie
ECONAVI
MODE
Sélection du mode de
fonctionnement
AUTO - Pour votre commodité
CHAUD - Pour obtenir de l’air chaud
FROID - Pour obtenir de l’air frais
SEC - Pour déshumidifi er l’air ambiant
VENTILATION - Pour aérer la pièce
POWERFUL/
QUIET
Pour commuter entre
puissant et silencieux
QUIETPOWERFUL NORMAL
POWERFUL : Atteinte rapide de la
température souhaitée
POWERFUL
Un seul
• Ce mode de fonctionnement est
automatiquement interrompu après
20 minutes.
Multiblocs
• Appuyer sur la touche à nouveau ou
mettre l’appareil hors marche pour
arrêter le fonctionnement.
QUIET : Fonctionnement silencieux
QUIET
• Ce mode réduit le bruit du fl ux d’air.
FAN SPEED
Réglage du ventilateur
(Affi chage de la télécommande)
• Dans le mode AUTO, la vitesse du ventilateur
est automatiquement réglée en fonction du
mode de fonctionnement.
Utilisation
Affi chage de la
télécommande
Détecteur d’activité
humaine
Capteur et
indicateur de la
télécommande
Touche ARRÊT/MARCHE auto
Utiliser cette touche dans le cas où la télécommande aurait été égarée ou ne
fonctionnerait pas. Soulever le panneau avant :
• Pour utiliser en mode AUTO, appuyer sur la touche une fois.
• Pour utiliser en mode REFROIDISSEMENT, appuyer et maintenir la touche
enfoncée jusqu’à l’émission d’un bip, puis relâcher.
• Pour utiliser en mode CHAUFFAGE, appuyer et maintenir la touche enfoncée
jusqu’à l’émission d’un bip, puis relâcher. Et appuyer à nouveau jusqu’à l’émission
de 2 bips, puis relâcher.
• Appuyer sur la touche à nouveau pour mettre hors marche.
Maintenir la touche
enfoncée pendant
environ 10 secondes
pour affi cher la
température en °C
ou °F.
Maintenez la touche
enfoncée pendant
environ 5 secondes
pour passer du mode
d’affi chage de 12 heures
(am/pm) ou au mode 24
heures et inversement.
Appuyer pour
réinitialiser la
télécommande aux
réglages par défaut.
Ne sont pas utilisées
dans les conditions
normales d’utilisation.
POWER
TIMER
ECONAVI
AUTO COMFORT
POWERFUL
QUIET
(Vert)
(Orange)
(Vert)
(Vert)
(Orange)
(Orange)
Un seul
Climatiseur à deux blocs
Multiblocs
Climatiseur multiblocs

19
Français
AUTO
COMFORT
Optimisation du confort
AUTO COMFORT
AIR SWING
Pour ajuster l’orientation du
fl ux d’air
(Affi chage de la télécommande)
• Assure une bonne aération de la pièce.
• Dans le mode REFROIDISSEMENT/SEC,
si AUTO a été sélectionné, le volet bascule
automatiquement vers la gauche et la droite et
vers le haut et le bas.
• En mode CHAUFFAGE, lors du réglage à
AUTO, le volet horizontal est fi xé à une position
prédéterminée.
Le volet vertical bascule de gauche à droite
après une hausse de température.
• Ne pas ajuster le volet manuellement.
Utilisation
Nota
ECONAVI
,
POWERFUL/
QUIET
,
AUTO
COMFORT
• Ces fonctions peuvent être activées dans tous
les modes et désactivées en appuyant de
nouveau sur la touche respective de la fonction.
• Ces fonctions ne peuvent être sélectionnées en
même temps.
Réglage de la minuterie
Deux réglages de la minuterie sont possibles pour
mettre l’appareil en/hors marche à des heures
préréglées.
TIMER
SET
CANCEL
ON
OFF
1
2
3
AC
C
C
AN
C
E
L
3
AC
C
21 3
1
Sélectionner la
minuterie de mise en
marche (ON) ou de mise
hors marche (OFF)
Exemple :
mise hors marche à
11:50PM heures
•
Sur chaque pression :
OFF
AM
Cancel
2
Régler l’heure
2
PM
3
Confi rmer le réglage
SET
PM
TIMER
•
Pour annuler le réglage de la minuterie, appuyer
sur
ON
ou
OFF
pour sélectionner ou , puis
appuyer sur
CANCEL
.
•
Si le réglage de la minuterie est annulé
manuellement ou à la suite d’une panne de
courant, il est possible de le rétablir en appuyant
sur
ON
ou
OFF
pour sélectionner ou et en
appuyant ensuite sur
SET
.
•
Le prochain réglage de la minuterie sera affi ché et
activé en séquence.
•
Lorsque la minuterie est réglée pour la mise en
marche (ON), il peut arriver que l’appareil démarre
avant (jusqu’à 35 minutes) l’heure préréglée de
manière à assurer que la température souhaitée
est atteinte à l’heure réglée.
•
Le fonctionnement de la minuterie est fondé sur
le réglage de l’heure sur la télécommande et
est répété quotidiennement. Pour le réglage de
l’heure, se reporter au guide sommaire.
Voir « Pour en savoir plus… » pour plus de détails.
Commande de redémarrage
automatique
• Si le courant revient après une interruption de
l’alimentation, le fonctionnement redémarrera
automatiquement après un certain temps,
avec le même mode de fonctionnement et le
même fl ux d’air qu’auparavant.
• Cette commande n’est pas applicable si le
TIMER est activé.

20
Pour en savoir plus...
Mode de fonctionnement
AUTO : Durant la sélection du mode de fonctionnement, le voyant d’alimentation (POWER) clignote.
Un seul
•
L’appareil change le mode de fonctionnement toutes les 10 minutes en fonction de la température de consigne et
de la température ambiante.
Multiblocs
•
L’appareil sélectionne le mode de fonctionnement toutes les 3 heures selon la température réglée, la température
extérieure et la température de la pièce.
CHAUD :
L’appareil prend un certain temps pour se réchauffer. Le voyant d’alimentation (POWER) clignote pendant cette
opération.
FROID : Procure un refroidissement effi cace et confortable adapté à vos besoins.
SEC : Le ventilateur tourne à basse vitesse pour donner un refroidissement en douceur.
VENTILATION : Pour aérer la pièce.
ECONAVI et AUTO COMFORT
ECONAVI
AUTO
COMFORT
ou
Nota
AIR SWING
Lorsque le réglage manuel du ventilateur
(AIR SWING) est sélectionné, le
fonctionnement de ECONAVI et AUTO
COMFORT est annulé.
L’appareil démarre sa mise
en marche
(pendant environ 1 minute)
Le détecteur d’activité humaine
et le détecteur de lumière du
soleil lance la détection.
Fonctionnement du détecteur d’activité humaine
Mode
Température
réglée
Mode
Température
réglée
Régler
le régime du
ventilateur
CHAUD
FROID/SEC
CHAUD
FROID/SEC
+1°C / +2°F
+1°C / +2°F
+0.3°C / +0.5°F
-1°C / -2°F
-2°C / -4°F
+2°C /
+4°F
-2°C /
-4°F
-2°C / -4°F
+2°C /
+4°F
-2°C /
-4°F
Activité faible Activité normaleHumain Activité élevée Absent
ECONAVI ; Lors de la détection de présence ou activité humaine, l’appareil contrôle la température de la pièce
pour économiser l’énergie.
CONFORT AUTO (AUTO COMFORT) ; En détectant l’activité et la présence humaines, l’appareil contrôle la
température de la pièce pour la maintenir à un niveau confortable.
Activité faible Activité normaleHumain Activité élevée Absent
+1 niveau* +1 niveau
YLWHVVHPR\HQQH
* Si l'activité humaine est de faible niveau, le ventilateur tourne à faible vitesse (1) pendant les premières
15 minutes ou jusqu'à ce que la température de consigne ait été atteinte.
** En l’absence de personnes, la vitesse maximale du ventilateur pour le mode REFROIDISSEMENT/SEC
HVWOHUpJODJHPR\HQ
Le capteur d’activité humaine balaie la pièce pour détecter les sources de chaleur et le mouvement.
Aire de balayage
• Selon l’activité de l’endroit, la direction horizontale du fl ux d’air sera fi xe
à une position prédéterminée ou basculera périodiquement de gauche à
droite.
• La performance du détecteur d’activité humaine est infl uencée par
l’endroit d’installation, la vitesse du mouvement, la plage de température,
etc.
90º
7 m/23 pi
• Le détecteur d’activité humaine peut:
- détecter par erreur un sujet produisant de la chaleur et un mouvement similaire à un mouvement humain, comme
un animal domestique, etc.
- détecte par erreur qu’il n’y a aucune source de chaleur et aucun mouvement si une personne demeure immobile
pendant un certain temps.
• Ne pas placer des objets de grande taille près du détecteur et éloigner tout appareil de chauffage ou humidifi cateur
de la zone de détection du détecteur.
Un seul
Climatiseur à deux blocs
Multiblocs
Climatiseur multiblocs
La page est en cours de chargement...
La page est en cours de chargement...
La page est en cours de chargement...
La page est en cours de chargement...
La page est en cours de chargement...
La page est en cours de chargement...
La page est en cours de chargement...
La page est en cours de chargement...
-
 1
1
-
 2
2
-
 3
3
-
 4
4
-
 5
5
-
 6
6
-
 7
7
-
 8
8
-
 9
9
-
 10
10
-
 11
11
-
 12
12
-
 13
13
-
 14
14
-
 15
15
-
 16
16
-
 17
17
-
 18
18
-
 19
19
-
 20
20
-
 21
21
-
 22
22
-
 23
23
-
 24
24
-
 25
25
-
 26
26
-
 27
27
-
 28
28


Panasonic CS-E24RKUAW Mode d'emploi
- Catégorie
- Climatiseurs split-system
- Taper
- Mode d'emploi
- Ce manuel convient également à
dans d''autres langues
- English: Panasonic CS-E24RKUAW User guide
Documents connexes
-
Panasonic E9RKUA Mode d'emploi
-
-
Panasonic CS-UE12JKE Klimagerät Le manuel du propriétaire
-
-
-
Panasonic CSMRE5SKE Le manuel du propriétaire
-
Panasonic CUE15HBEA Mode d'emploi
-
Panasonic CUE7QKE Le manuel du propriétaire
-
Panasonic CU2E15PBE Le manuel du propriétaire
-