Kichler Lighting 43688NI Manuel utilisateur
- Taper
- Manuel utilisateur

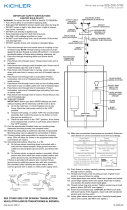
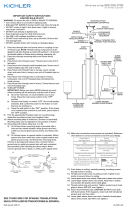
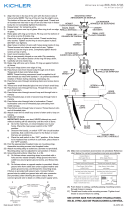
MOUNTING STRAP
ABRAZADERA DE MONTAJE
IMPORTANT SAFETY INSTRUCTIONS
LIGHTED BULB IS HOT!
WARNING: To reduce the risk of FIRE or INJURY TO PERSON:
• Turnoffandallowtocoolbeforereplacingbulb.
• BulbgetsHOTQUICKLY!Contactswitchonlywhenturningoff.
• DONOTremaininlightifskinfeelswarm.(Lightisintense,
maycause“sunburn”)
• DONOTlookdirectlyatlightedbulb.
• Keepmaterialsawayfrombulbthatmayburn.
• UseONLYwithwattagespeciedorlower.
• DONOTtouchbulbatanytime,useasoftcloth.Oilfromskin
maydamagebulb.
• DONOToperatexturewithmissingordamagedglass.
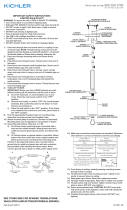
1) Passwirefromxturethroughstemandscrewstemto
couplingontopofxturebody.
NOTE: Threadlockingcompoundmustbeappliedtoall
stemthreadsasnotedwithsymbol(3)topreventaccidental
rotationofxtureduringcleaning,relamping,etc.
2) Passxturewirethroughremainingstemsandscrewstems
together.
3) If using swivel for sloped ceilings,passxturewirethrough
swivelandthreadswivelontotopoflaststem.
NOTE DIRECTION OF SWIVEL IN ACCORDANCE WITH
CEILING.
4) Passxturewirethroughsmallthreadedpipe.Threadsmall
threadedpipeintoendofswivel.
5) Passxturewirethroughholeincanopy.Passthreadedpipe
onendofswivelupthroughholeincanopy.
6) Passxturewirethroughholeinlockwasher.Threadlockwasher
overendofthreadedpipeprotrudingfrominsidecanopy.
7) Passxturewirethroughholeinhexnut.Screwhexnutonto
threadedpipe.
8) If not using swivel,passthreadedpipethroughsmall
threadedpipe.Threadsmallthreadedpipeintoendoflast
stem.
9) Passxturewirethroughholeincanopy.Passthreadedpipe
onendofstemupthroughholeincanopy.
10) Passxturewirethroughholeinlockwasher.Threadlockwasher
overendofthreadedpipeprotrudingfrominsidecanopy.
11) Passxturewirethroughholeinhexnut.Screwhexnutonto
threadedpipe.
12)TURN OFF POWER.
IMPORTANT:Beforeyoustart,NEVERattemptanywork
withoutshuttingofftheelectricityuntiltheworkisdone.
a) Gotothemainfuse,orcircuitbreaker,boxinyour
home.Placethemainpowerswitchinthe“OFF”
position.
b) Unscrewthefuse(s),orswitch“OFF”thecircuitbreaker
switch(s),thatcontrolthepowertothextureorroom
thatyouareworkingon.
c) Placethewallswitchinthe“OFF”position.Ifthexture
tobereplacedhasaswitchorpullchain,placethosein
the“OFF”position.
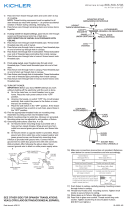
13)Findtheappropriatethreadedholesonmountingstrap.
Assemblemountingscrewsintothreadedholes.
14)Attachmountingstraptooutletbox.(Screwsnotprovided).
Mountingstrapcanbeadjustedtosuitpositionofxture.
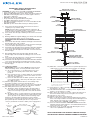
15) Groundinginstructions:(SeeIllus.AorB).
A)Onxtureswheremountingstrapisprovidedwitha
holeandtworaiseddimples.Wrapgroundwirefrom
outletboxaroundgreengroundscrew,andthreadinto
hole.
B) Onxtureswhereacuppedwasherisprovided.Attach
groundwirefromoutletboxundercuppedwasherand
greengroundscrew,andthreadintomountingstrap.
Ifxtureisprovidedwithgroundwire.Connectxture
groundwiretooutletboxgroundwirewithwireconnector.
(Notprovided.)Afterfollowingtheabovesteps.Never
connectgroundwiretoblackorwhitepowersupplywires.
GREEN GROUND
SCREW
CUPPED
WASHER
A
B
OUTLET BOX
GROUND
FIXTURE
GROUND
DIMPLES
WIRE CONNECTOR
(NOT PROVIDED)
OUTLET BOX
GROUND
GREEN GROUND
SCREW
FIXTURE
GROUND
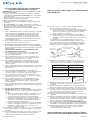
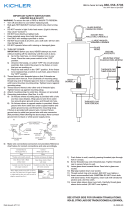
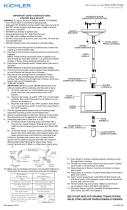
Connect Black or
Red Supply Wire to:
Connect
White Supply Wire to:
Black White
*Parallel cord (round & smooth) *Parallel cord (square & ridged)
Clear, Brown, Gold or Black
without tracer
Clear, Brown, Gold or Black
with tracer
Insulated wire (other than green)
with copper conductor
Insulated wire (other than green)
with silver conductor
*Note: When parallel wires (SPT I & SPT II)
are used. The neutral wire is square shaped
or ridged and the other wire will be round in
shape or smooth (see illus.)
Neutral Wire
DateIssued:9/19/14
IS-43688-US
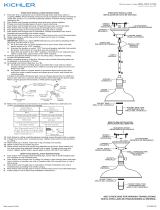
CANOPY
ESCUDETE
STEM
VÁSTAGO
KNURLKNOB
PERILLAESTRADA
SWIVEL
UNIÓN GIRATORIA
3
3
GLASS
VIDRIO
SEE OTHER SIDE FOR SPANISH TRANSLATIONS.
VEA EL OTRO LADO DE TRADUCCIONES AL ESPAÑOL.
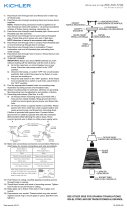
16) Makewireconnections(connectorsnotprovided.)Reference
chartbelowforcorrectconnectionsandwireaccordingly.
17) Pushxturetoceiling,carefullypassingmountingscrews
throughholesincanopy.
18) Threadknurlknobsontomountingscrews.Tightenknurl
knobstosecurexturetoceiling.
19) Raiseglassuptoxture.Passtopofglassthroughholein
bottomofxturebody.Passholeinglassoversocket.
20) Slipspaceroversocket.
21) Attachsocketringtosocketringtool.
22) Raisesocketringtoolwithsocketringattacheduptoxture.
Passsocketringtoolwithsocketringattachedthroughholein
glass.Threadsocketringontosocket.Tightensocketringto
secureglassinplace.(DONOTovertighten.)
23) Insertrecommendedbulb.CAUTION: DONOTtouchbulb
withbarehands.Ifthishappens,cleanbulbwithdenatured
alcoholandalintfreecloth.
24) Slipglasssleeveoverbulb.Carefullythreadglasssleeve
ontosocket.(DONOTovertighten.)
We’re here to help 866-558-5706
Hrs: M-F 9am to 5pm EST
SOCKETRING
ANILLODELCASQUILLO
FIXTURE BODY
CUERPODELARTEFACTO
GLASSSLEEVE
CAMISADEVIDRIO
BULB
BOMBILLA
SPACER
ESPACIADOR
SOCKETRINGTOOL
HERRAMIENTADEL
ANILLODELCASQUILLO
3

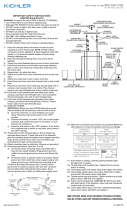
15) Instruccionesdeconexiónatierrasolamenteparalos
EstadosUnidos.(VealailustracionAoB).
A) Enlaslámparasquetieneneleje,demontajeconun
agujeroydoshoyuelosrealzados.Enrollarelalambrea
tierradelacajatomacorrientealrededordeltornillo
verdeypasarloporelaquiero.
B) Enlaslámparasconunaarandelaacopada.Fijarel
alambreatierradelacajatomacorrientedelajodela
arandelaacoadaytornilloverde,ypaserporelejede
montaje.
Silalámparavieneconalambreatierra.Conecterel
alambreatierradelalámparaalalambreatierradelacaja
tomacorrienteconunconectordealambres(noincluido)
espuésdeseguirlospasosanteriores.Nuncaconectarel
alambraatierraalosalambreseléctrosnegrooblanco.
16) Hagalesconexionesdelosalambres(noseproveenlos
connectores.)Latabladereferenciadeabajoindicalas
conexionescorrectasylosalambrescorrespondientes.
17) Empujeelartefactohaciaeltecho,pasandocuidadosamente
lostornillosdemontajeatravésdelosoriciosenel
escudete.
18) Atornillelasperillasestriadasenlostornillosdemontaje.
Aprietelasperillasestriadasparajarelartefactoaltecho.
19)Levanteelvidriohastaelartefacto.Passerlapartesuperior
delvidrioatravésdelagujeroenlaparteinferiordelcuerpo
delartefacto.Passerletroudansleverresurladouille.
20)Pongaelespaciadorencimadelcasquillo.
21)Acopleelanillodelcasquilloalaherramientadelanillodel
casquillo.
22)Bajelaherramientadelanillodelcasquilloconelanillodel
casquilloacopladoabajoatravésdelvidrio.Rosqueelanillo
delcasquilloalcasquillo.Aprieteelanillodelcasquillopara
sujetarelvidrioenellugar.(NOaprieteexcesivamente.)
23) Insertelabombillarecomendada.PRECAUCIÓN:NOtoque
labombillaconlasmanossinguantes.Siestosucede,limpie
labombillaconalcoholdesnaturalizadoyunatelasinpelusas.
24) Desciendalacamisadevidriosobreelfoco(bombilla).
Rosquecuidadosamentelacamisadevidriosobreel
casquillo.(NOaprietedemasiado).
INSTRUCCIONES IMPORTANTES DE SEGURIDAD
LA BOMBILLA ENCENDIDA ES CALIENTE
ADVERTENCIA: ParadisminuirelriesgodeINCENDIOoLESIO-
NESALASPERSONAS:
• Apagueydejequeseenfríeantesdecambiarlabombilla.
• LabombillaSECALIENTARÁPIDAMENTE.Useelinterruptor
sóloparaapagar.
• NOpermanezcaenlaluzsisientecalientelapiel.(Laluzes
intensaypuedecausar“quemaduras”).
• NOmiredirectamentealabombillaencendida.
• Mantengaalejadosdelabombillalosartículosquepuedan
quemarse.
• UseSOLAMENTEconelvatiajeespecicadoomasbajo.
• NOtoquelabombillaenningúnmomento,useunatelasuave.
Lagrasadelamanopuededañarlabombilla.
• NOhagafuncionarelartefactoconlabombilladañadao
faltante.
1) Paseelalambredelartefactoatravésdelvástagoyatornille
elvástagoparaelacoplamientoenlapartesuperiordel
cuerpodelartefacto.NOTA:Elcompuestopararosca
estancasedebeaplicaratodaslasroscasdelvástago
comosenotóconelsímbolo(3)paraimpedirlarotación
accidentaldelartefactodurantelalimpieza,instalaciónde
unabombillanueva,etc.
2) Paseelalambredelartefactoatravésdelosvástagos
restantesyatornillelosvástagosjuntos.
3) Si utiliza una unión giratoria para cielo rasos inclinados,
paseelalambredelartefactoatravésdelaunióngiratoriay
rosquelaunióngiratoriaporencimadelapartesuperiordel
últimovástago.
NOTE LA DIRECCIÓN DE LA UNIÓN GIRATORIA DE
ACUERDO CON EL CIELO RASO.
4) Paseelalambredelartefactoatravéselpequeñotubo
roscado.Atornilleelpequeñotuboroscadodentrodel
extremodelunióngiratoria.
5) Paseelalambredelartefactoatravésdelagujeroenel
escudete.Paseeltuboroscadoenelextremodelunión
giratoriaatravésdelagujeroenelescudete.
6) Paseelalambredelartefactoatravésdelagujeroenla
arandeladeseguridad.Rosquelaarandeladeseguridad
dentrodelextremodeltuboroscadoquesobresaledel
escudeteinterior.
7) Paseelalambredelartefactoatravésdelagujeroenlatuerca
hexagonal.Rosquelatuercahexagonalsobreelextremodel
tuboroscado.
8) Si no utiliza una unión giratoria,paseelalambredel
artefactoatravéselpequeñotuboroscado.Rosqueeltubo
roscadopequeñoenelextremodelvástagoúltima.
9) Paseelalambredelartefactoatravésdelagujeroenel
escudete.Paseeltuboroscadoenelextremodelvástagoa
travésdelagujeroenelescudete.
10) Paseelalambredelartefactoatravésdelagujeroenla
arandeladeseguridad.Rosquelaarandeladeseguridad
dentrodelextremodeltuboroscadoquesobresaledel
escudeteinterior.
11)Paseelalambredelartefactoatravésdelagujeroenlatuerca
hexagonal.Rosquelatuercahexagonalsobreelextremodel
tuboroscado.
12)APAGUELAALIMENTACIÓNELÉCTRICA.
IMPORTANTE: Antesdecomenzar,NUNCAtratedetrabajar
sinantesdesconectarlacorrientehastaqueeltrabajose
termine.
a) Vayaalacajaprincipaldefusibles,ointerruptorocaja
decircuitosdesucasa.Coloqueelinterruptordela
corrienteprincipalenposicióndeapagado“OFF”.
b) Desatornilleel(los)fusible(s),ocoloqueelinterruptoro
interruptoresdelbreakerenposicióndeapagado
“OFF”,quecontrola(n)lacorrientehaciaelartefactoo
habitacióndondeestátrabajando.
c) Coloqueelinterruptordeparedenposicióndeapagado
“OFF”.Sielartefactoquesevaareemplazartieneun
interruptorocadenaquesejala,colóquelosenla
posicióndeapagado“OFF”.
13)Encontrarlosagujerosroscadoscorrectosenlaabrazadera
demontaje.Instalarlostornillosdemontajeenlosagujeros
roscados.
14)Unirlaabrazaderademontajealacajadeconexiones.(No
seproveentornillos).Laabrazaderademontajepuede
ajustarseparaacomodarlaposicióndelartefacto.
DateIssued:9/19/14
IS-43688-US
ARANDELA
CONCAVA
A
B
TIERRA DE LA
CAJA DE SALIDA
TORNILLO DE TIERRA,
VERDE
DEPRESIONES
TIERRA
ARTEFACTO
CONECTOR DE ALAMBRE
(NO SE PROVEE)
TIERRA DE LA
CAJA DE SALIDA
TORNILLO DE TIERRA,
VERDE
TIERRA
ARTEFACTO
Conectar el alambre de
suministro negro o rojo al
Conectar el alambre de
suministro blanco al
Negro Blanco
*Cordon paralelo (redondo y liso)
*Cordon paralelo (cuadrado y estriado)
Claro, marrón, amarillio o negro
sin hebra identificadora
Claro, marrón, amarillio o negro
con hebra identificadora
Alambre aislado (diferente del verde)
con conductor de cobre
Alambre aislado (diferente del
verde) con conductor de plata
*Nota: Cuando se utiliza alambre paralelo
(SPT I y SPT II). El alambre neutro es de forma
cuadrada o estriada y el otro alambre será de
forma redonda o lisa. (Vea la ilustracíón).
Hilo Neutral
SEE OTHER SIDE FOR ENGLISH TRANSLATIONS.
VEA EL OTRO LADO DE TRADUCCIONES AL INGLÉS.
We’re here to help 866-558-5706
Hrs: M-F 9am to 5pm EST
VEA EL OTRO LADO PARA LA ILUSTRACIÓN
DEL APARATO.
-
 1
1
-
 2
2


Kichler Lighting 43688NI Manuel utilisateur
- Taper
- Manuel utilisateur
dans d''autres langues
Documents connexes
-
 Kichler Lighting 44008MIZ Manuel utilisateur
-
 Kichler Lighting 44010MIZ Manuel utilisateur
-
 Kichler Lighting 44011MIZ Manuel utilisateur
-
 Kichler Lighting 43201OZ Manuel utilisateur
-
 Kichler Lighting 43792NI Manuel utilisateur
-
 Kichler Lighting 45608MIZ Manuel utilisateur
-
 Kichler Lighting 43767OZ Manuel utilisateur
-
 Kichler Lighting 42580OZ Manuel utilisateur
-
 Kichler Lighting 44009MIZ Manuel utilisateur
-
 Kichler Lighting 43152AP Manuel utilisateur


