Simpli Home AXCHOL005 Mode d'emploi
- Catégorie
- Coffres de rangement
- Taper
- Mode d'emploi
Ce manuel convient également à

REQUIRES 2 PEOPLE
FOR EASE OF ASSEMBLY
REQUIERT 2 PERSONNES
POUR FACILITER
L'ASSEMBLAGE
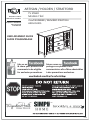
USER ASSEMBLY GUIDE
GUIDE D’ASSEMBLAGE
ARTISAN / HOLDEN / STRATFORD
TV STAND
MEUBLE-TÉLÉ
ITEM /NUMBER NUMÉRO D’ARTICLE
AXCHOL005
Like us on
& share your pictures and
comments to be eligible
for exclusive promotions.
Suivez-nous sur
partagez vos photos et vos
commentaires afin d’être admissibles
à des promotions exclusives.
TM
TM
TM
1/12

Allen Key Screw
VisAllen
Cam Lock
Verrou
Allen Key
ClefAllen
Cam Lock Pin
Goujons de Serrage
M6 x 30 mm
26 SPIECE
26 PIÈCES
25 SPIECE
25 PIÈCES
20 SETS
20 ENSEMBLES
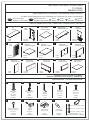
HARDWARE / QUINCAILLERIE
REQUIRES 2 PEOPLE FOR EASE OF ASSEMBLY
REQUIERT 2 PERSONNES POUR FACILITER L'ASSEMBLAGE
1 PIECE
1 PIÈCE
1 PIECE
1 PIÈCE
2/12
A
1 2 3
B
30 SPIECE
30 PIÈCES
6 7 8 10
TIPPING RESTRAINT - 1 SET
COURROIE DE RETENUE - 1 ENSEMBLE
M4 x 25 mm - 1 - 1 PIÈCEPIECE
M4 x 15 mm - 1 - 1 PIÈCEPIECE
M4 x 25 mm - 1 - 1 PIÈCEPIECE
a.
b.
c.
Top
Dessus
Shelf part
Support de tablette
ONE PAIR
UNE PAIRE
D
4
9
5
2 SETS
2 ENSEMBLES
8SPIECE
8 PIÈCES
12 SPIECE
12 PIÈCES
M3 x 12 mm
M3 x 15 mm
1 PIECE
1 PIÈCE
M4 x 15 mm
Sides
Côtés
C
Back panel
Panneau arrière
E
4SPIECE
4 PIÈCES
F G
Door
Porte
ONE PAIR
UNE PAIRE
I
1 PIECE
1 PIÈCE
H J
1 PIECE
1 PIÈCE
2 PIECE
2 PIÈCE
K L N
2SPIECE
2 PIÈCES
M
2 PAIRS
2 PAIRES
O
2SPIECE
2 PIÈCES
4 SETS
4 ENSEMBLES
M4 x 30 mm
Shelf Support
Support à tablette
Magnet and Plate
Aimant et Plaque
Handle
Poignée
Back panel
Panneau arrière
Back panel
Panneau arrière
Drawer front
Avant du tiroir
Drawer side
Côté du tiroir
Drawer back
Arrière du tiroir
Drawer bottom
Bas du tiroir
Centre Shelf
Tablette Centrale
Bottom Shelf
Tablette Inférieure
Divider
Séparateur
1 PIECE
1 PIÈCE
ONE PAIR
UNE PAIRE
1 PIECE
1 PIÈCE
2SPIECE
2 PIÈCES
Shelf part
Support de tablette
Phillips Screw
Vis cruciforme
Phillips Screw
Vis cruciforme
Phillips screw round head
Vis cruciforme à tête ronde
PARTS DESCRIPTION / DESCRIPTIONS DES PI
ÈCES
INFOGRAPHIC LEGEND / :LÉGENDE GRAPHIQUE
In relative spatial arrangement to the assembled unit / Disposition par rapport à l'assemblage
INNER
Panel: Inner side Back
OUTER
F
B
Panneau : côté intérieur
Panel: Outer side
Front
Top
Panneau: côté externe
Bottom
T
Arrière Avant Supérieur Inférieur
ARTISAN / HOLDEN / STRATFORD
TV STAND
MEUBLE-TÉLÉ

3/12
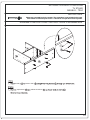
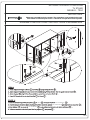
B
Avant du tiroir
verrous
avant du tiroir
verrous
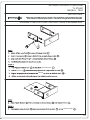
ASSEMBLY INSTRUCTIONS / INSTRUCTIONS D’ASSEMBLAGE
NOTICE / AVIS
Please use a screwdriver for the screws. The screwdriver is not included in the pack.
SVP utilisez un tournevis pour les vis. Le tournevis n’est pas fourni avec le produit.
Please use a screwdriver for the screws. The screwdriver is not included in the pack.
SVP utilisez un tournevis pour les vis. Le tournevis n’est pas fourni avec le produit.
ARTISAN / HOLDEN / STRATFORD
TV STAND
MEUBLE - TÉLÉ
La page est en cours de chargement...
La page est en cours de chargement...
La page est en cours de chargement...

7/12
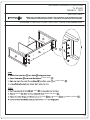
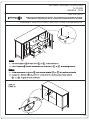
côtés
verrous
bottom shelf
bottom shelf
tablette inférieure
côtés
verrous
tablette inférieure
verrous
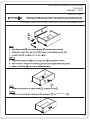
ASSEMBLY INSTRUCTIONS / INSTRUCTIONS D’ASSEMBLAGE
NOTICE / AVIS
Please use a screwdriver for the screws. The screwdriver is not included in the pack.
SVP utilisez un tournevis pour les vis. Le tournevis n’est pas fourni avec le produit.
Please use a screwdriver for the screws. The screwdriver is not included in the pack.
SVP utilisez un tournevis pour les vis. Le tournevis n’est pas fourni avec le produit.
ARTISAN / HOLDEN / STRATFORD
TV STAND
MEUBLE - TÉLÉ
La page est en cours de chargement...
La page est en cours de chargement...
La page est en cours de chargement...
La page est en cours de chargement...

12/12
A
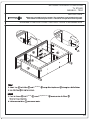
ASSEMBLY INSTRUCTIONS / INSTRUCTIONS D’ASSEMBLAGE
NOTICE / AVIS
Please use a screwdriver for the screws. The screwdriver is not included in the pack.
SVP utilisez un tournevis pour les vis. Le tournevis n’est pas fourni avec le produit.
Please use a screwdriver for the screws. The screwdriver is not included in the pack.
SVP utilisez un tournevis pour les vis. Le tournevis n’est pas fourni avec le produit.
ARTISAN / HOLDEN / STRATFORD
TV STAND
MEUBLE - TÉLÉ
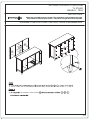
12 13
12
13
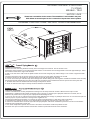
I
1.Attach one of the mounting brackets securely to the back edge of the furniture. Use the shorter screw.
2.Determine where furniture is to be placed and mark location on the wall for the mounting bracket screw hole approximately 2” below
the bracket mounted to the edge of the furniture.
3. Drill a 3/16” hole in the wall. Press the plastic anchor into the hole and gently tap until the flange on the anchor is against the wall
surface.
4.Position the bracket over the anchor and use the long screw to securely attach the bracket to the wall.
5. Place the furniture so the bracket on the back edge is in line with the bracket on the wall.
6. Lace an end of the nylon restrains strap down through each brecket. Bring both ends together and slide the beaded end of the strap
through the keyhole shaped slot in the other end until snug. Pull down on the beaded end until it snap locks into the keyhole slot.
7. To double lock return the beaded end back through the keyhole as shown.
8. Check to make sure the strap is securely laced and locked to the brackets.
nstallation Instructions:
I
1.Visser s’ecuritairement une des plaquettes de montage sure le champ arriére du meuble. Utiliser la visse la plus courte.
2.Déterminer I’ emplacement du meuble et marquer le mur á environ 2” plus bas que la plaquette vissée sur le meuble, afin de
determiner la position du trou á percer pour la plaquette d’assemblage au mur .
3. Percer un trou de 3/16” á I’ aide d’une perceuse.Incérez délicatement I’ancrage en plastique dans le trou en vous assurant qu’il soit
enfoncé jusqu’ á ce que le rebord de I’ encrage soit á I’égalité du mur .
4.Positioner la plaquette de montage sur I’encrage et vissez-la sécuritairement á I’ aide de la visse la plus longe .
5. Repositionner le meuble de facon á ce que la plaquette du meuble soit enlingnée avec celle sur le mur.
6. Insérer une extrémité de la couroie de nylon dans chaque plaquette. Réunir les extrémités et passer le bout de la courroie dans
I’oeillet de I’autre .
7. Pour barrer simplement repasser de nouveau le bout de la couroie dans I’oeillet tel qu’illustré ci-haut .
8.Assurez-vous que la courroie soit bien inséreé dans I’oellet et qu’elle soit barrée de facon sécuritaire .
nstruction d’Installation:
extrémités et serrer fort
10
10
-
 1
1
-
 2
2
-
 3
3
-
 4
4
-
 5
5
-
 6
6
-
 7
7
-
 8
8
-
 9
9
-
 10
10
-
 11
11
-
 12
12


Simpli Home AXCHOL005 Mode d'emploi
- Catégorie
- Coffres de rangement
- Taper
- Mode d'emploi
- Ce manuel convient également à
dans d''autres langues
Documents connexes
-
Simpli Home AXCHOL003 Guide d'installation
-
-
-
-
-
-
-
-
-