ROBLIN CLEANR Le manuel du propriétaire
- Catégorie
- Hottes
- Taper
- Le manuel du propriétaire

Notice
LIDO CLEAN-R
HOTTE MURALE
CONCEPTION
FABRICATION
FRANÇAISE


F SOMMAIRE
RACCORDEMENT ÉLECTRIQUE
CONSEILS D’INSTALLATIONS
POSE DE L’APPAREIL
FONCTIONNEMENT
CONSEILS D’UTILISATIONS
ENTRETIEN
GARANTIE ET SERVICE APRÈS-VENTE
REMARQUES
GB CONTENTS
ELECTRICAL WIRING
INSTALLATION ADVICE
FITTING THE APPLIANCE
OPERATION
USEFUL HINTS
MAINTENANCE
GUARANTEE AND AFTER-SALES-SERVICES
REMARKS


1
F
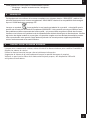
Nousvousremercionsdelaconancequevousnousavezaccordéeenchoisissantunappareil
de la gamme ROBLIN.
Celui-ciafaitl’objetdetoutenotreattentiondanssaconceptionetsaréalisation.
Anqu’ilvousdonneentièresatisfaction,nousvousrecommandonsdelireavecattentioncettenoticequi
vousexpliqueracommentl’installer,l’utiliseretl’entretenirdanslesmeilleuresconditions.
Laprésentenoticed’emploivautpourplusieursversionsdel’appareil.Ellepeutcontenirdesdescriptions
d’accessoiresnegurantpasdansvotreappareil.
1 RACCORDEMENT ÉLECTRIQUE.
• Lahotteestéquipéed’uncordond’alimentationdetypeHO5VVF3x0,75mm²comportantune
chenormalisée10/16Aavecsystèmedemiseàlaterre.
Modedeprotection:classeI.Tensiond’alimentation:220-240Vmono-50Hz/220V-60Hz.
Vérier que la tension du secteur est identique aux valeurs indiquées sur la plaque signalétique à
l’intérieurdelahotte
• Silahotteestraccordéedirectementsurleréseausanssache,uninterrupteuromnipolaireavec
uneouverturedecontactde3mmdoitêtreinstalléavantlahotte.Leldeterre(Jaune/vert)nedoit
pasêtreinterrompuparcetinterrupteur.
2 CONSEILS D’INSTALLATION.
• Respecterlediamètredesortiedel’appareil:la hotte ne doit en aucun cas être raccordée à un
conduitdeventilationmécaniquecontrôlée(V.M.C.).
• Lorsqu’onévacuel’airviciédansunconduitd’évacuation,veilleràcequecelui-cinesoitpasdéjà
exploitéàvéhiculerdesgazoufuméesprovenantd’appareilsalimentésparuneénergieautrequ’élec-
trique.
• Positionnerleplandecuissonauplusprèsdel’évacuationetéviterlaformationdecoudessurla
gaine,afinderéduireaumaximumlespertesdecharges.
• Danstouslescasd’installation,veilleraubonrenouvellement d’air delacuisine.Penseràef-
fectueruneoudes
entréesd’airparunegrilledesectionégale ou supérieure au diamètre du tuyau
d’évacuation, afindenepasmettrelacuisineendépression.
• Prévoiruneaérationsuffisantelorsqu’unappareildecuissonouautreutilisesimultanémentl’air
ambiantdelapièceoùestinstalléelahotte.
• Ladépressionmaximumcréedanslapiècedoitêtreinférieurà0.04mbar,cequiéviteunretourde
gazdecombustion.
• L’appareildoitêtrepositionnédetellefaçonquelafiched’alimentationsoitaccessible.
• Cetappareilnedoitpasêtreutilisépardespersonnes(ycomprislesenfants)ayantdescapacités
psychiques, sensorielles ou mentales réduites, ni par des personnes n’ayant pas l’expérience et la
connaissancedecetyped’appareils,àmoinsd’êtresouslecontrôleetlaformationdepersonnesres-
ponsablesdeleursécurité.Les enfants doivent être surveillés pour s’assurer qu’ils ne jouent pas avec
l’appareil.
•

2
F
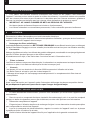
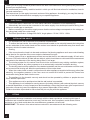
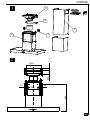
3 POSE DE L’APPAREIL.
Montageetraccordementdoiventêtreréalisésparuninstallateur* qualié.
(*) Le non-respect de cette condition entraîne la suppression de la garantie du constructeur et
tout recours en cas d’accident.
Attention: prendre bien soin d’employer les chevilles adaptées au support, se renseigner au près
des fabricants, effectuer un scellement si nécessaire. La société décline toute responsabilité en
cas d’accrochage défectueux dû au perçage et chevillage.
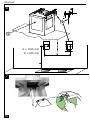
1) Tracersurlaparoiuneverticalejusqu’auplafondàl’emplacementdelahotteaucentredelazone
prévuepourlemontagedelahotte(Fig.3, rep. 1).Cettelignesertpouralignerverticalementlesdiffé-
rentesparties.
2) Positionnerlesupportdeconduit(Rep. 2),centrésurlaverticaleà40mmduplafondetmarquersur
laparoilesdeuxalésagesdusupport.EffectuersurlaparoideuxtrousavecunforetØ8mm.Fixerle
supportdeconduit(Rep. 2)etledéecteur(R)àl’aidedesvis4.5x50etdeschevillesfournies(Fig.
4).
3) Dénirlebasdelahotte(Rep 3)andexerlessupportsaumur(Fig 1 et 3, Rep 4).Effectuersurla
paroi4trousavecunforetØ8mm.Fixerlessupport(Rep. 4)àl’aidedesvis4.5x45etdeschevilles
fournies.
4) Montage du corps de la hotte :
Accrocherlecorps(Fig 6,Rep 5)surlessupportsmuraux(Rep. 4).
Parfaireleréglaged’alignementdel’ensemble,àl’aidedesvisTH5x25dessupports,ainsiquel’incli-
naisonàl’aidedes2vis5x25mmTC.
5) Raccordement:
Raccorderélectriquementlahotte(VoirparagrapheRaccordementElectrique)etvérierlebonfonc-
tionnementdel’éclairage,dumoteuretduchangementdesvitessesd’aspiration.
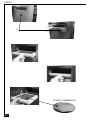
a- Fixerlehautdeconduit(Rep. 7)ausupport(Rep. 2)par2visM4fournies.L'emplacement
delagrilledoitêtresituédevantletiroir(G)dudéecteur(R)(Fig. 9).Puispositionnerlebasde
conduit.
b- Installeruntuyaudediamètreapproprié(Nonfourni)entrelasortiedel’appareiletàl’entréedu
déecteur.Fixerl’ensembleàl’aidedecolliersouderubanadhésifappropriés.
c- Placerlacartouchesàcharbonactifdanssonlogementenexerçantunepressionsurleslanguettes
A(Fig. 7).

3
F
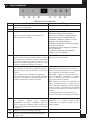
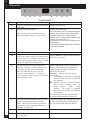
4 FONCTIONNEMENT
Tableau de commandes
Touche
A Allume et éteint le moteur d’aspiration à la der-
nière vitesse d’utilisation.
Indique la vitesse de réglage.
B Réduit la vitesse d’exercice.
C
Augmente la vitesse d’exercice.
Active la fonction alarme de saturation des
filtres charbon (recyclage)
D Active le régime intensif à partir de n’importe
quelle vitesse, même à moteur éteint ce régime
est temporisé à 10 minutes, terme au bout duquel
le système retourne à la vitesse spécifiée en pré-
cédence. Fonction indiquée pour faire face aux
pointes d’émission de fumées de cuisson.
Affiche HI et le point en bas à droite cli-
gnote une fois par seconde.
E
Active le moteur à une vitesse qui permet
une aspiration de 100m3/h pendant 10 minutes
toutes les heures. Au bout de 24h, cette fonction
s’arrête.
Pour remettre à zéro l’alarme de filtre une
fois déclenchée, appuyez sur la touche pendant
envi-ron 3 secondes. Ces signalisations ne sont
visibles que lorsque le moteur est éteint.
Affiche 24 et le point en bas à droite cli-
gnote tandis que le moteur est en service.
Une fois la procédure terminée, la signalisa-
tion visualisée en précédence s’éteint.
FF ou FG signale la nécessité de laver
les filtres anti-gras métalliques. L’alarme
entre en fonction au bout de 100 heures
de travail effectif de la hotte.
EF signale la nécessité de remplacer les
filtres au charbon actif et indique que les
filtres anti-gras métalliques doivent égale-
ment être lavés. L’alarme entre en fonction
au bout de 200 heures de travail effectif de
la hotte.
Ces manipulations ne sont possible que
lorsque le moteur et l’éclairage sont éteints
F Active l’extinction automatique avec un délai de
30 minutes. Indiqué pour compléter
l’élimination des odeurs résiduelles. Peut être
activé à partir de n’importe quelle position; dé-
sactivé en appuyant sur la touche ou en éteignant
le moteur.
Affiche alternativement la vitesse
d’exercice et le temps restant jusqu’à
l’extinction de la hotte. Le point en bas à
droite clignote.
G
H
A B C D
E F G H
Fonction
Affichage
Allume et éteint l’éclairage principal.
Diminue ou augmente l'intensité lumineuse par
un appui long.
Réduit la vitesse utilisée.
Hotte hors tension et hors fonction:
appuyez sur C tout en remettant la hotte
sous tension, alors 2 traits défilent sur
l’afficheur, relâchez le bouton : la confi-
guration est possible pendant 3s.
Configurez la fonction à l’aide d’un appui
court sur la touche C :
la fonction est active lorsque EF clignote 2
fois à l’afficheur
la fonction est désactivée lorsque EF
clignote 1 fois à l’afficheur

4
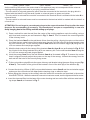
5 CONSEILS D’UTILISATION.
• Pour obtenir une efcacité maximum d’absorption des fumées ou des vapeurs, faire fonctionner
l’appareil5minutesenvironavantetaprèslacuissondesaliments;Lapremièrevitesseestconseillée
pourlescuissonsàfeudouxetpourlessauces.Ladeuxièmepourlescuissonssoutenues,grilladeset
friteuses.Latroisièmeestindiquéepourlescuissonsàforteémanationdegraissesetvapeur.
• IMPORTANT . NE JAMAIS FLAMBER DE METS AU DESSOUS DE L’APPAREIL
Nelaissezjamaisdeammeslibressouslahotteenfonctionnement.
• Lesfrituresnécessitentunesurveillancepermanente,l’huilesurchaufféepouvants’enammer.
6 ENTRETIEN.
Déconnecterlecâbled’alimentationpourtouteinterventionélectrique.
L’appareilaétéconçupourfaciliteraumaximumlesopérationsd’entretien,synonymedebonfonctionne-
mentetrendementdel’appareildansletemps.
• Nettoyage des ltres métalliques.
IlestindispensabledeprocéderàunNETTOYAGE PÉRIODIQUE decesltresàlamain(avecundétergent
liquideàl’eautièdeetrinçage)ouaulave-vaisselle(touslesdeuxmoisenvironpouruneutilisationnormale).
• Carrosserie.
Nettoyerrégulièrementcelle-cienutilisant desproduitsdétergents,nonabrasifsetuneépongelégèrement
humide.N’utilisezjamaisd’épongesoudechiffonstrempés
N’introduisezaucunobjet,nilesmainsdansl’ouvertureservantàl’évacuationdel’air
• Filtres a charbon
Lesltresacharbonsnepeuventêtrenéttoyés,Ilsnécessitentunremplacementachaquetrimestreau
minimumouplussilalahotteestutiliséeplusdetroisheuresparjours.
• Clean-air.
LeslampesUVontuneduréedevied'environ6000heuresselonl'utilisationdelahotte.
LesltresClean-airsuiventlecycledeviedeslampesUV.
L'échanged'unelampeUVs'accompagneautomatiquementd'unremplacementdultreclean-air
correspondant.
• Éclairage.
Avanttouteinterventionsurl’appareil,mettrel’interrupteurd’allumagedeslampesenpositionéteinte.
Ne pas dépasser la puissance prescrite et ne pas changer de type de lampe.
7 GARANTIE ET SERVICE APRÈS-VENTE.
• Encasd’anomaliedefonctionnement,prévenezvotreinstallateurquidevravérierl’appareiletson
raccordement.
• Danslecasoùuncomposantélectriqueviendraitàêtreendommagé,celui-cinepeutêtreremplacé
queparunatelierderéparationreconnuparlefabricant,cardesoutilsspéciauxsontnécessaires.
• Débranchercomplètementl’appareil.
• Exigeztoujoursl’utilisationdepiècesderechanged’origine.Lanonobservationdecetteprescription
peutcompromettrelasécuritédel’appareil.
• Lorsdelacommande de pièces détachées, rappeler lenumérodel’appareilinscritsurlaplaque
signalétiquesituéeàl’intérieurdelahotte.
• Seulelafactured’achatdel’appareilferafoipourl’applicationdelagarantiecontractuelle.
F

5
F
Cettegarantienecouvrepaslesconsommablescomme:
- L’éclairage:lampesincandescentes,halogènes...
- Lesltres.
8 REMARQUES
Cetéquipementestconformeàlanormeeuropéennesurlabassetension2006/95/CErelativeàla
sécuritéélectriqueetauxnormeseuropéennes:2004/108/CErelativeàlacompatibilitéélectromagné-
tiqueet93/68relativeaumarquageCE.
Lorsquecesymbole d’unepoubelleàrouebarréeestattachéàunproduit,celasigniequele
produitestcouvertparlaDirectiveEuropéenne2002/96/EC.Votreproduitestconçuetfabriquéavec
desmatériauxetdescomposantsdehautequalité,quipeuventêtrerecyclésetutilisésdenouveau.
Veuillezvousinformerdusystèmelocaldeséparationdesdéchetsélectriquesetélectroniques.Veuillez
agirselonlesrègleslocalesetnepasjetervosproduitsusagésaveclesdéchetsdomestiquesusuels.
Jetercorrectementvotreproduitusagéaideraàprévenirlesconséquencesnégativespotentielles
contrel’environnementetlasantéhumaine.
9 CONSEILS POUR L’ECONOMIE D’ENERGIE.
Lorsque vous commencez à cuisiner, activer la hotte à la vitesse minimum pour contrôler l’humidité et
éliminer les odeurs de cuisine.
Utilisez la vitesse intensive lorsque cela est strictement nécessaire.
Augmentez la vitesse de la hotte seulement lorsque la quantité de vapeur le requiert.
Veillez à ce que le ou les filtres de la hotte soient toujours propres, afin d’optimiser l’éfficacité
anti-graisse et anti-odeurs.

6
GB
ThankyouforbuyingaROBLINproductwhichhasbeenmanufacturedtothehighestqualitystandards
tomeetyourrequirements.
Werecommendyoucarefullyreadthisbookletinwhichyouwillndinstructionsforinstallation,hintsfor
useandmaintenance.
TheInstructionsforUseapplytoseveralversionsofthisappliance.Accordingly,youmaynddescrip-
tionsofindividualfeaturesthatdonotapplytoyourspecicappliance.
1 ELECTRICAL
• Thiscookerhoodisttedwitha3-coremainscablewithastandard10/16Aearthedplug.
• Alternativelythehoodcanbeconnectedtothemainssupplyviaadouble-poleswitchhaving3mm
minimumcontactgaponeachpole.
• Beforeconnectingtothemainssupplyensurethatthemainsvoltagecorrespondstothevoltageon
theratingplateinsidethecookerhood.
• TechnicalSpecication:Voltage220-240V,singlephase~50Hz/220V-60Hz.
2 INSTALLATION ADVICE
• Itisapossiblefireriskifthehoodisnotsitedasrecommended.
• Toensurethebestresults,thecookingfumesshouldbeabletorisenaturallytowardstheinletgrilles
ontheundersideofthecookerhoodandthecookerhoodshouldbepositionedawayfromdoorsand
windows,whichwillcreateturbulence.
• Ducting
• Iftheroomwherethehoodistobeusedcontainsafuel-burningappliancesuchasacentralheating
boilerthenitsfluemustbeoftheroomsealedorbalancedfluetype.
• Ifothertypesofflueorappliancesarefittedensurethatthereisanadequatesupplyoffreshairto
theroom.Ensurethekitchenisfittedwithanairbrick,whichshouldhaveacross-sectionalmeasurement
equivalenttothediameteroftheductingbeingfitted,ifnotlarger.
• Theductingsystemforthiscookerhoodmustnotbeconnectedtoanyexistingventilationsystem,
whichisbeingusedforanyotherpurposesortoamechanicallycontrolledventilationducting.
• Theductingusedmustbemadefromfireretardantmaterialsandthecorrectdiametermustbeused,
asincorrectsizedductingwillaffecttheperformanceofthiscookerhood.
• Whenthecookerhoodisusedinconjunctionwithotherappliancessuppliedwithenergyotherthan
electricity,the negativepressure in
theroom mustnot exceed0.04 mbar toprevent thefumes from
combustionbeingdrawnbackintotheroom.
• Theapplianceisfordomesticuseonlyandshouldnotbeoperatedbychildrenorpeoplewhoare
infirmwithoutsupervision.
• Thisappliancemustbepositionedsothatthewallsocketisaccessible.
• Thisapplianceisnotintendedforusebypersons(includingchildren)withreducedphysical,sensory
ormentalcapabilities,orlackofexperienceandknowledge,unlesstheyhavebeengivensupervisionor
instructionconcerninguseoftheappliancebyapersonresponsiblefortheirsafety.
Childrenshouldbesupervisedtoensurethattheydonotplaywiththeappliance.
3 FITTING
Anypermanentelectricalinstallationmustcomplywiththelatestregulationsconcerningthistypeof
installationandaqualifiedelectricianmustcarryoutthework.Non-compliancecouldcauseserious
accidentsorinjuryandwoulddeemthemanufacturersguaranteenullandvoid.
IMPORTANT - Thewiresinthismainsleadarecolouredinaccordancewiththefollowingcode:

7
GB
- green/yellow:earth - blue:neutral - brown:live
Asthecoloursofthewiresinthemainsleadofthisappliancemaynotcorrespondwiththecoloured
markingsidentifyingtheterminalsinyourplug,proceedasfollows.
- Thewirewhichiscolouredgreenandyellowmustbeconnectedtotheterminalintheplugwhichis
markedwiththeletterE orbytheearthsymbolorcolouredgreenorgreenandyellow.
- ThewirewhichiscolouredbluemustbeconnectedtotheterminalwhichismarkedwiththeletterN or
colouredblack.
- ThewirewhichiscolouredbrownmustbeconnectedtotheterminalwhichismarkedwiththeletterL or
coloured red.
ATTENTION: Do not forget to use adequate plugs to the support brackets. Enquire after the manu-
facturers. Do an embedding if necessary. The manufacturer accepts no responsibility in case of a
faulty hanging due to the drilling and the setting up of plugs.
GB
1) Drawaverticallineontothewallfromthecentreofthecookingapplianceuptotheceilling,usinga
spiritlevelandamarkerpenasillustratedinFig. 3 - item 1.Thisistoensurethecorrectalignment
ofthechimneyhood.
2) Placethebracketsitem 2onthewallabout40mmfromtheceiling;aligningitscentreonthevertical
line.Markthetwoeyeletholesofthebracketontothewall.Drilltheholesforthexingbracketusing
an8mmmasonrybit.Fixthechimneybracketitem 2 andtherecirculationspigot(R)usingthe4.5
x50mmscrewsandrawlplugssupplied.
3) Marktheholecentresforthecanopyxingbracketsitem 4atitem BmmasillustratedinFig. 6.Drill
the4holesforthexingbracketsusingan8mmmasonrybit.Fixthewallbracketsitem 4usingthe
4.5x45mmscrewsandrawlplugssupplied.
4) Hookthecanopyitem 5ontothewallbracketsitem 4asillustratedinFig. 6.Toensurethecooker
hoodisalignedcorrectlyadjustthescrewsonthetopofthecanopy.Unhookthecanopyfromthe
wallanddrilltheholeforthesecurityxingscrew.
5)
a. FittherecirculationspigotRontotheupperchimneywallbracketusingthesamexingscrews(Fig.
4 item 2).Thelocationofthegridmustbelocatedinfrontoftheslide(G)ofthedeector(R).
b. Connecttheducting150mm(6INS)notprovidedbetweenmotorsitem 6andtherecirculationspigot
andsecuretheconnectionswithappropriateclampingringsoradhesivetape.
c. Beforettingthechimneytothecanopymaketheelectricalconnectionasdescribedinthesection
titledELECTRICAL.Whentheelectricalconnectionhasbeenmade,testthelightsandthefanmotor.
d. Insertthecharcoallterintothebaseofthemotorhousingandsecurethelterwithtwometalsecur-
ingstrapsitem AasillustratedinFig. 7.

9
GB
4 OPERATION
Control panel
A B C D
E F G H
Button Function Display
A
Turns the suction motor on and off at the last
speed used.
Displays the speed set
B
Decrease the working speed.
Turns off the engine (and deactivates the
delayed shutdown function, if it is active).
C Increase the working speed.
D
Activates intensive speed from any other
speed even with the motor off. This speed is
timed to run for 10 minutes, after which the
system returns to the previous speed. Suitable
to deal with maximum cooking fumes.
Displays HI and the bottom right hand spot
flashes once a second.
E
Activates the motor at a speed that allows
extraction of 100m3 / h for 10 minutes every
hour. After 24 hours, this function stops.
When the filter alarm is on, press the
button for approximately 3 seconds to
reset the alarm. These signs are visible only
when the engine is off.
Displays 24 and the bottom right hand spot
flashes, while the motor is turned on.On
completing the procedure the previous
indicator is turned off:
FF ou FG indicates that the metal
grease filters
need washing. The alarm is triggered
after the Hood has been in operation
for 100 hours.
EF indicates that the activated charcoal
filter needs changing and the
metal grease filters need
washing. The alarm is triggered
after the Hood has been in operation
for 200 hours.
F
Activates automatic shutdown after 30’. Suit-
able to complete elimination of residual
odours. Can be activated from any position,
and is turned off by pressing the button or
switching the motor off.
Alternately displays the working speed and
the time remaining before the hood turns
off. The bottom right hand spot flashes.
G
H
Turns the main lighting system on and off.
Decreases or increases the brightness
by a long press.
These operations are only possible when
the motor and the lighting is turned off.
Reduces the speed used.
Hood off and on: press C while turning the
hood on, then 2 lines scroll on the display,
release the button: the configuration is
possible for 3s. Configure the function with
a short press on the key C :
the function is active when EF flashes twice
on the display
the function is deactivated when EF flashes
1 time on the display

10
5 USEFUL HINTS
• Toobtainthebestperformancewerecommendyoutoswitch‘ON’thecookerhoodafewminutes(in
theboostsetting)beforeyoustartcookingandyoushouldleaveitrunningforapproximately15minutes
afternishing.
• IMPORTANT: NEVER DO FLAMBÉ COOKING UNDER THIS COOKER HOOD
• Do not leave frying pans unattended during use as over-heated fat and oil might catch re.
• Do not leave naked ames under this cooker hood.
• Switch ‘OFF’ the electric and gas before removing pots and pans.
• Ensure heating areas on your hotplate are covered with pots and pans when using the hotplate
and cooker hood simultaneously.
6 MAINTENANCE
Beforecarryingoutanymaintenanceorcleaningisolatethecookerhoodfromthemainssupply.
Thecookerhoodmustbekeptclean;abuildupoffatorgreasemaycausearehazard.
Casing
• Wipethecookerhoodfrequentlywithacleancloth,whichhasbeenimmersedinwarmwatercontain-
ingamilddetergentandwrungout.
• Neveruseexcessiveamountsofwaterwhencleaningparticularlyaroundthecontrolpanel.
• Neverusescouringpadsorabrasivecleaners.
• Alwayswearprotectivegloveswhencleaningthecookerhood.
Metal Grease Filters :Themetalgreaseltersabsorbgreaseanddustduringcookinginordertokeep
cleanthecookerhoodinside.Thegreaseltersshouldbecleanedonceamonthormorefrequentlyif
thehoodisusedformorethan3hoursperday.
To remove and replace the metal grease lters
• Removethemetalgreaseltersoneatatimebyreleasingthecatchesonthelters;thelterscan
nowberemoved.
• Themetalgreaseltersshouldbewashed,byhand,inmildsoapywaterorinadishwasher.
• Allowtodrybeforereplacing.
Active Charcoal Filter : Thecharcoalltercannotbecleaned.Theltershouldbereplacedatleast
everythreemonthsormorefrequentlyifthehoodisusedformorethanthreehoursperday.
To remove and replace the lter
• Removethemetalgreaselters.
• Pressagainstthetworetainingclips,whichholdthecharcoallterinplaceandthiswillallowthelter
todropdownandberemoved.
• Cleanthesurroundingareaandmetalgreaseltersasdirectedabove.
• Insertthereplacementlterandensurethetworetainingclipsarecorrectlylocated.
• Replacethemetalgreaselters.
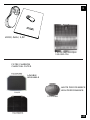
Clean air.
UVlampshavealifeofabout6000hoursdependingonusageofthehood.
Clean-airltersfollowingthelifecycleofUVlamps.
Changetheltersclean-airatthesametimeastheUVlamps.
Lighting :Ifthelampfailstofunctionchecktoensureitisttedcorrectlyintotheholder.Iflampfailure
hasoccurredthenitshouldbereplacedwithidenticalreplacement.
Do not replace with any other type of lamp and do not t a lamp with a higher rating.
GB

11
7 GUARANTEE AND AFTER SALES SERVICE
• In the event of any malfunction or anomaly, notify your tter who will have to check the ap-
pliance and its connection.
• Intheeventofdamagetothemainssupplycable,thiscanonlybereplacedbyatapprovedrepair
centreappointedbythemanufacturerwhowillhavetherequiredtoolsandequipmenttocarryoutany
repairsproperly.Repairscarriedoutbyotherpersonswillinvalidatetheguarantee.
• Useonlygenuinespareparts.Shouldthesewarningsfailtobeobserveditcouldaffectthesafetyof
yourcookerhood.
• Whenorderingsparepartsquotethemodelnumberandserialnumberwrittenontheratingplate,
whichisfoundonthecasingbehindthegreaseltersinsidethehood.
• Proof of purchase will be required when requesting service.Therefore, please have your receipt
availablewhenrequestingserviceasthisconstitutesthedatefromwhichyourguaranteecommenced.
ThisGuaranteedoesnotcover:
- Damageorcallsresultingfromtransportation,improperuseorneglect,thereplacementofanylight
bulbsorltersorremovablepartsofglassorplastic.
Theseitemsareconsideredtobeconsumableunderthetermsofthisguarantee.
8 REMARKS
ThisappliancecomplieswithEuropeanregulationsonlowvoltagesDirective2006/95/CEonelectrical
safety,andwiththefollowingEuropeanregulations:Directive2004/108/CEonelectromagneticcompat-
ibilityandDirective93/68onECmarking.
Whenthiscrossed-outwheeledbinsymbol isattachedtoaproductitmeanstheproductiscov-
eredbytheEuropeandirective2002/96/EC.Yourproductisdesignedandmanufacturedwithhighquality
materialsandcomponents,whichcanberecycledandreused.
Pleaseinformyourselfaboutthelocalseparatecollectionsystemforelectricalandelectronicproduct.
Pleaseactaccordingtoyourlocalrulesanddonotdisposeofyouroldproductswithyournormalhouse-
holdwaste.Thecorrectdisposalofyouroldproductwillhelppreventpotentialnegativeconsequences
fortheenvironmentandhumanhealth.
GB
9 ENERGY SAVING TIPS.
When you start cooking, switch on the range hood at minimum speed, to control moisture and remove
cooking odor.
Use boost speed only when is strictly necessary.
Increase the range speed only when the amount of vapor makes it necessary.
Keep range hood filter(s) clean to optimize grease and odor efficiency.

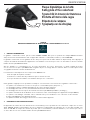
x2
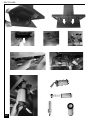
A1
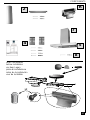
COMPOSANTS
2
R
7
4
5
8
avant l’installation
before installation
vor dem Legen
prima di installazione
antes de la instalación
voor de installatie

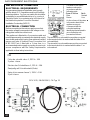
UK ELECTRICAL CONNECTION
ELECTRICAL REQUIREMENTS
Any permanent electrical installation must comply
with the latest I.E.E. Regulations and local Electricity
Board regulations. For your own safety this should be
undertaken by a qualified electrician e.g. your local
Electricity Board, or a contractor who is on the roll of
the National Inspection Council for Electrical
Installation Contracting (NICEIC).
ELECTRICAL CONNECTION
Before connecting to the mains supply ensure that
the mains voltage corresponds to the voltage on the
rating plate inside the cooker hood.
This appliance is fitted with a 2 core mains cable and
must be permanently connected to the electricity supply
via a double-pole switch having 3mm minimum contact
gap on each pole. A Switched Fuse Connection Unit
to BS.1363 Part 4, fitted with a 3 Amp fuse, is a
recommended mains s
upply connection accessory to
ensu
re compliance with the Safety Requirements
applicable to fixed wiring instructions.
The wires in this mains
lead are coloured in
accordance with the
following code:
Blue Neutral
Brown Live
As the colours of the wires
in the mains lead of this
appliance may not
correspond with the
coloured markings
identifying the terminals in
your connection unit,
proceed as follows:-
The wire which is coloured blue must be connected
to the terminal which is marked with the letter ‘N’ or
coloured black.
The wire which
is coloured brown must be con
nected
to the terminal which is marked with the letter ‘L’ or
coloured red.
CH
Fiche de sécurité class 1, 250 V~ 10A
2 poles + terre.
Stecker der Schutzklasse 1, 250 V~ 10A
Zweipolig mit Schutzkontakt (Erde).
Spira di sicurezza classe 1, 250 V~ 10A
2 poli + terra
SEV 1011, SN416534-2, CH-Typ 12
Green & Yellow Earth
RACCORDEMENT ELECTRIQUE
A2

A3
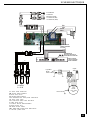
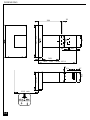
SCHEMA ELECTRIQUE
A - AZUR - AZUR - AZUR BLAU
BK - BLACK - NOIR- SCHWARZ
B - BLUE - BLEU - BLAU
Br
- BROWN - BRUN - BRAUN
G-Y - GREEN YELLOW - VERT JAUNE - GRÜN GELB
Gr - GREY - GRIS - GRAU
L B - LIGHT BLUE - BLEU CLAIR - HELL BLAU
P - PINK - ROSE - ROSA
V - PURPLE - MAUVE - MALVER FARBIG
R - RED - ROUGE - ROT
W
- WHITE - BLANC - WEISS
W-P
- WHITE PINK - BLANC ROSE - WEISS ROSA
Y - YELLOW - JAUNE - GELB
Black
Pink
Brown
Blue
MULTI-FLACHKABEL
LIMANDE COMMANDE
FLATCABLE
FERNBEDIENUNG
RECEPTEUR INFRAROUGE
REMOTE CONTROL
ELEKTRONISCHE STEUERUNG
BOITIER COMMANDE
PUSH BUTTON PANEL
7
6
5
4
3
2
1
8
9
ECLAIRAGE
LIGHTING
BELEUCHTUNG
2 X LEDS 5 W (900)
3 X LEDS 5 W (1200)
deR
elpruP
50Hz
Light-Blue
Brown
Green-Yellow
kcalB
yerG
kniP
etihW
eulB
M
250 W
220 - 240 V
6.3 µF
425 V
Green-Yellow
7
6
5
4
3
2
1
8
9
nworB
wolleY
J1
J6
J13
J3
J7
J2
J11
J4
UV lamps
3 x 20 W
elpruP
eulB
J-Y
J-Y
B
R
J-Y
B
R
J-Y
B
R
J-Y
B
R
J-Y
B
R
J-Y
B
R
J-Y

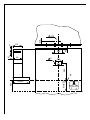
A4
DIMENSIONS
152
44
324
min.
830
- max.1174
383
85
898 / 1198
500/560
278
26
190
41
47
650 min
35
150
594

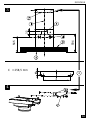
A5
MONTAGE
69.4
258.5
30
30
200
545
1
2
45
7
R
2

41
47
650
113
H = 650
545
40
170
278
293
26
190
6
260
200
3
500/560
La page est en cours de chargement...
La page est en cours de chargement...
La page est en cours de chargement...
La page est en cours de chargement...
La page est en cours de chargement...
La page est en cours de chargement...
La page est en cours de chargement...
La page est en cours de chargement...
-
 1
1
-
 2
2
-
 3
3
-
 4
4
-
 5
5
-
 6
6
-
 7
7
-
 8
8
-
 9
9
-
 10
10
-
 11
11
-
 12
12
-
 13
13
-
 14
14
-
 15
15
-
 16
16
-
 17
17
-
 18
18
-
 19
19
-
 20
20
-
 21
21
-
 22
22
-
 23
23
-
 24
24
-
 25
25
-
 26
26
-
 27
27
-
 28
28


ROBLIN CLEANR Le manuel du propriétaire
- Catégorie
- Hottes
- Taper
- Le manuel du propriétaire
dans d''autres langues
- English: ROBLIN CLEANR Owner's manual
Documents connexes
-
ROBLIN INSPIRATION SLIM Le manuel du propriétaire
-
ROBLIN LIDO Le manuel du propriétaire
-
-
-
-
-
-
-
-