HOTPOINT/ARISTON 7OFK 536J X RU/HA Mode d'emploi
- Catégorie
- Fours
- Taper
- Mode d'emploi
Ce manuel convient également à

IT
FORNO
7OFK 536J X RU/HA
7OFK 536J RU/HA
FK 536 X /HA
FK 536 /HA
Sommario
Installazione, 2-3
Posizionamento
Collegamento elettrico
Targhetta caratteristiche
Descrizione dell’apparecchio, 4
Vista d’insieme
Pannello di controllo
Avvio e utilizzo, 5
Avviare il forno
Programmi, 6-7
Programmi di cottura
Consigli pratici di cottura
Tabella cottura
Il programmmatore di cottura
elettronico, 8
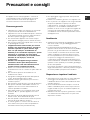
Precauzioni e consigli, 9
Sicurezza generale
Smaltimento
Risparmiare e rispettare l’ambiente
Manutenzione e cura, 10
Escludere la corrente elettrica
Pulire l’apparecchio
Pulire la porta
Sostituire la lampadina
Assistenza, 11
Assistenza attiva 7 giorni su 7
Estensione di garanzia Airbag
Istruzioni per l’uso
Italiano, 1 Français, 22
Espanol, 32 Portuges, 42
English,12
GBIT FR
ES PT

2
IT
Installazione
! È importante conservare questo libretto per poterlo
consultare in ogni momento. In caso di vendita, di
cessione o di trasloco, assicurarsi che resti insieme
all’apparecchio per informare il nuovo proprietario sul
funzionamento e sui relativi avvertimenti.
! Leggere attentamente le istruzioni: ci sono
importanti informazioni sull’installazione, sull’uso e
sulla sicurezza.
Posizionamento
! Gli imballaggi non sono giocattoli per bambini e
vanno eliminati secondo le norme per la raccolta
differenziata (
vedi Precauzioni e consigli
).
! L’installazione va effettuata secondo queste
istruzioni e da personale professionalmente
qualificato. Una errata installazione può causare
danni a persone, animali o cose.
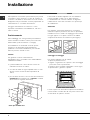
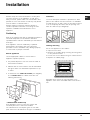
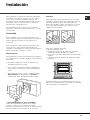
Incasso
Per garantire un buon funzionamento
dell’apparecchio è necessario che il mobile abbia le
caratteristiche adatte:
• i pannelli adiacenti il forno devono essere di
materiale resistente al calore;
• nel caso di mobili in legno impiallacciato, le colle
devono essere resistenti alla temperatura di
100°C;
• per l’incasso del forno, sia nel caso di inserimento
sottotavolo (
vedi figura
) che a colonna, il mobile
deve avere le seguenti dimensioni:
590 mm.
595 mm.
22,5 mm.*
20,5 mm.
550 mm.
570 mm.
20 mm.
575-585 mm.
45 mm.
560 mm.
550 mm.
min.
* Solo per modelli inox
! Una volta incassato l’apparecchio non debbono
essere possibili contatti con le parti elettriche.
Le dichiarazioni di consumo indicate in targhetta
caratteristiche sono state misurate con questo tipo
di installazione.
Aerazione
Per garantire una buona aerazione è necessario
eliminare la parete posteriore del vano. È preferibile
installare il forno in modo che appoggi su due listelli
in legno oppure su un piano continuo che abbia
un’apertura di almeno 45 x 560 mm (
vedi figure
).
Centraggio e fissaggio
Per fissare l’apparecchio al mobile:
• aprire la porta del forno;
• togliere i 4 gommini che coprono i fori di fissaggio
posti sulla cornice perimetrale;
• fissare il forno al mobile utilizzando 4 viti a legno;
• riposizionare i gommini coprifori.
! Tutte le parti che assicurano la protezione debbono
essere fissate in modo tale da non poter essere tolte
senza l’aiuto di qualche utensile.
560 mm.
45 mm.

IT
3
! Tutte le parti che assicurano la protezione debbono
essere fissate in modo tale da non poter essere tolte
senza l’aiuto di qualche utensile.
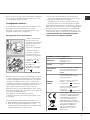
Collegamento elettrico
! I forni dotati di cavo di alimentazione tripolare sono
predisposti per il funzionamento con corrente
alternata, con tensione e frequenza indicate nella
targhetta caratteristiche (
vedi sotto
).
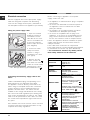
Montaggio del cavo di alimentazione
1. Aprire la morsettiera
facendo leva con un
cacciavite sulle linguette
laterali del coperchio:
tirare e aprire il
coperchio (
vedi figura
).
2. Svitare la vite del
serracavo e toglierlo
facendo leva con un
cacciavite (
vedi figura
).
3. Togliere le viti dei
contatti L-N-
e poi
fissare i cavetti sotto le
teste delle viti
rispettando i colori Blu
(N) Marrone (L) Giallo-
Verde (
).
Allacciamento del cavo di alimentazione alla rete
Montare sul cavo una spina normalizzata per il carico
indicato nella targhetta caratteristiche (
vedi a fianco
).
In caso di collegamento diretto alla rete è necessario
interporre tra l’apparecchio e la rete un interruttore
onnipolare con apertura minima fra i contatti di 3 mm
dimensionato al carico e rispondente alle norme in
vigore (il filo di terra non deve essere interrotto
dall’interruttore). Il cavo di alimentazione deve essere
posizionato in modo tale che in nessun punto superi di
50°C la temperatura ambiente.
! L’installatore è responsabile del corretto
collegamento elettrico e dell’osservanza delle norme
di sicurezza.
Prima di effettuare l’allacciamento accertarsi che:
• la presa abbia la messa a terra e sia a norma di legge;
• la presa sia in grado di sopportare il carico
massimo di potenza della macchina, indicato nella
targhetta caratteristiche (
vedi sotto
);
• la tensione di alimentazione sia compresa nei
valori nella targhetta caratteristiche (
vedi sotto
);
• la presa sia compatibile con la spina
dell’apparecchio. In caso contrario sostituire la
presa o la spina; non usare prolunghe e multiple.
! Ad apparecchio installato, il cavo elettrico e la presa
della corrente devono essere facilmente raggiungibili.
! Il cavo non deve subire piegature o compressioni.
! Il cavo deve essere controllato periodicamente e
sostituito solo da tecnici autorizzati (
vedi Assistenza
).
! L’azienda declina ogni responsabilità qualora
queste norme non vengano rispettate.
TARGHETTA CARATTERISTICHE
Dimensioni
larghezza cm 43,5
altezza cm 32
profondità cm 41,5
Volume
lt. 58
Collegamenti
elettrici
tensione a 220-240V ~ 50/60Hz
(vedi targhetta caratteristiche)
potenza massima assorbita
2800W
ENERGY
LABEL
Direttiva 2002/40/CE
sull’etichetta dei forni elettrici.
Norma EN 50304
Consumo energia convezione
Naturale – funzione di
riscaldamento: Tradizionale;
Consumo energia dichiarazione
Classe convezione Forzata -
funzione di
riscaldamento: Multicottura.
Questa apparecchiatura è
conforme alle seguenti Direttive
Comunitarie: 2006/95/CEE del
12/12/06 (Bassa Tensione) e
successive modificazioni -
2004/108/CEE del 15/12/04
(Compatibilità Elettromagnetica)
e successive modificazioni -
93/68/CEE del 22/07/93 e
successive modificazioni.
2002/96/CE e successive
modificazioni.

4
IT
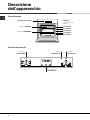
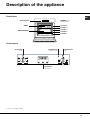
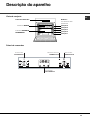
Descrizione
dell’apparecchio
Vista d’insieme
Pannello di controllo
Pannello di controllo
Ripiano GRIGLIA
Ripiano LECCARDA
GUIDE di
scorrimento dei
ripiani
posizione 5
posizione 4
posizione 3
posizione 2
posizione 1
Manopola
PROGRAMMI
Manopola
TERMOSTATO
Spia di
TERMOSTATO
Programmatore
ELETTRONICO*

IT
5
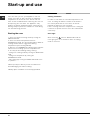
! Alla prima accensione fare funzionare il forno a
vuoto per almeno un’ora con il termostato al
massimo e a porta chiusa. Poi spegnere, aprire la
porta del forno
e aerare il locale. L’odore che si avverte è dovuto
all’evaporazione delle sostanze usate per proteggere
il forno.
Avviare il forno
1. Selezionare il programma di cottura desiderato
ruotando la manopola PROGRAMMI.
2. Scegliere la temperatura ruotando la manopola
TERMOSTATO. Una lista con le cotture e le relative
temperature consigliate è consultabile nella Tabella
cottura (
vedi Programmi
).
3. La spia TERMOSTATO accesa indica la fase di
riscaldamento fino alla temperatura impostata.
4. Durante la cottura è sempre possibile:
- modificare il programma di cottura agendo sulla
manopola PROGRAMMI;
- modificare la temperatura agendo sulla manopola
TERMOSTATO;
- interrompere la cottura riportando la manopola
PROGRAMMI in posizione “0”.
! Non appoggiare mai oggetti sul fondo del forno
perché si rischiano danni allo smalto.
! Porre sempre i recipienti di cottura sulla griglia
in dotazione.
Ventilazione di raffreddamento
Per ottenere una riduzione delle temperature esterne,
una ventola di raffreddamento genera un getto d’aria
che esce tra il pannello di controllo, porta del forno
ed anche nella parte inferiore della porta forno.
! A fine cottura la ventola rimane attiva finché il forno
non è sufficientemente freddo.
Luce del forno
Si accende selezionando
con la manopola
PROGRAMMI. Rimane accesa quando si seleziona
un programma di cottura.
Avvio e utilizzo

6
IT
Programmi di cottura
! Per tutti i programmi è impostabile una temperatura
tra 60°C e MAX, tranne:
• GRILL (si consiglia di impostare solo su MAX);
• GRATIN (si consiglia di non superare la temperatura
di 200°C).
Programma FORNO TRADIZIONALE
Si attivano i due elementi riscaldanti inferiore e
superiore. Con questa cottura tradizionale è meglio
utilizzare un solo ripiano: con più ripiani si ha una
cattiva distribuzione della temperatura.
Programma MULTICOTTURA
Si attivano tutti gli elementi riscaldanti (superiore e
inferiore) ed entra in funzione la ventola. Poiché il
calore è costante in tutto il forno, l’aria cuoce e rosola
il cibo in modo uniforme. È possibile utilizzare fino a
un massimo di due ripiani contemporaneamente.
Programma
FF
FF
F
ORNO SOPRAORNO SOPRA
ORNO SOPRAORNO SOPRA
ORNO SOPRA
Si accende l’elemento riscaldante superiore. Questa
funzione può essere utilizzata per ritocchi di cottura.
Programma
GRILLGRILL
GRILLGRILL
GRILL
Si accende l’elemento riscaldante superiore. La
temperatura assai elevata e diretta del grill consente
la immediata rosolatura superficiale dei cibi che,
ostacolando la fuoriuscita dei liquidi, li mantiene più
teneri internamente. La cottura al grill è
particolarmente consigliata per quei piatti che
necessitano di elevata temperatura superficiale:
bistecche di vitello e manzo, entrecôte, filetto,
hamburger etc...
Alcuni esempi di utilizzo sono riportati
al paragrafo “Consigli pratici per la cottura”. Effettuare le
cotture con la porta del forno chiusa.
Programma GRATIN
Si attiva l’elemento riscaldante superiore ed entra in
funzione la ventola. Unisce all’irradiazione termica
unidirezionale, la circolazione forzata dell’aria
all’interno del forno. Ciò impedisce la bruciatura
superficiale degli alimenti aumentando il potere di
penetrazione del calore. Effettuare le cotture con la
porta del forno chiusa.
Consigli pratici di cottura
! Nelle cotture ventilate non utilizzare le posizioni dei
ripiani 1 e 5: sono investite direttamente dall’aria
calda, che potrebbe provocare bruciature sui cibi
delicati.
! Nelle cotture GRILL e GRATIN, disporre
la leccarda in posizione 1 per raccogliere i residui
di cottura (sughi e/o grassi).
MULTICOTTURA
• Utilizzare le posizioni dei ripiani 2 e 4, mettendo alla
2 i cibi che richiedono maggior calore.
• Disporre la leccarda in basso e la griglia in alto.
GRILL
• Inserire la griglia in posizione 3 o 4, disponendo
gli alimenti al centro della griglia.
• Si consiglia di impostare il livello di energia al
massimo. Non allarmarsi se la resistenza superiore
non resta costantemente accesa: il suo
funzionamento è controllato da un termostato.
PIZZA
• Per una buona cottura della pizza ultilizzate il
programma MULTICOTTURA.
• Utilizzare una teglia in alluminio leggero,
appoggiandola sulla griglia in dotazione.
Con la leccarda si allungano i tempi di cottura
e difficilmente si ottiene una pizza croccante.
• Nel caso di pizze molto farcite è consigliabile
inserire la mozzarella a metà cottura.
Programmi

IT
7
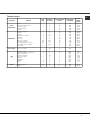
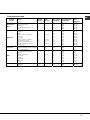
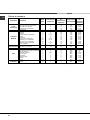
Programmi Alimenti
Peso
(Kg)
Posizione
dei ripiani
Preriscaldamento
(minuti)
Temperatura
consigliata
Durata
cottura
(minuti)
Forno
Tradizionale
Anatra
Arrosto di vitello o manzo
Arrosto di maiale
Biscotti (di frolla)
Crostate
1
1
1
-
1
3
3
3
3
3
15
15
15
15
15
200
200
200
180
180
65-75
70-75
70-80
15-20
30-35
Multicottura
Pizza (su 2 ripiani)
Lasagne
Agnello
Pollo arrosto + patate
Sgombro
Plum-cake
Bignè (su 2 ripiani)
Biscotti(su 2 ripiani)
Pan di spagna (su 1 ripiano)
Pan di spagna (su 2 ripiani)
Torte salate
1
1
1
1+1
1
1
0.5
0.5
0.5
1
1.5
2 e 4
3
2
2 e 4
2
2
2 e 4
2 e 4
2
2 e 4
3
15
10
10
15
10
10
10
10
10
10
15
230
180
180
200
180
170
190
180
170
170
200
15-20
30-35
40-45
60-70
30-35
40-50
20-25
10-15
15-20
20-25
25-30
Forno Sopra
Ritocchi di cottura - 3/4 15 220 -
Grill
l
Sogliole e seppie
Spiedini di calamari e gamberi
Filetto di merluzzo
Verdure alla griglia
Bistecca di vitello
Cotolette
Hamburger
Sgombri
Toast
1
1
1
1
1
1
1
1
n.° 4
4
4
4
3/4
4
4
4
4
4
5
5
5
5
5
5
5
5
5
Max
Max
Max
Max
Max
Max
Max
Max
Max
8-10
6-8
10
10-15
15-20
15-20
7-10
15-20
2-3
Gratin
Pollo alla griglia
Seppie
1.5
1.5
2
2
5
5
200
200
55-60
30-35
! I tempi di cottura sono indicativi e possono essere modificati in base ai proprio gusti personali.
Tabella cottura

8
IT
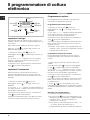
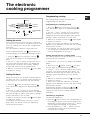
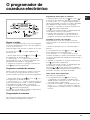
Il programmmatore di cottura
elettronico
DISPLAY
Tasto
IMPOSTAZIONE
TEMPI
Icona
FINE COTTURA
Icona
OROLOGIO
Icona
DURATA
Icona
CONTAMINUTI
Tasto
DIMINUZIONE
TEMPI
Tasto
AUMENTO
TEMPI
•• ••
Impostare l’orologio
! Si può impostare sia quando il forno è spento che
quando è acceso, ma non si è programmata la fine di
una cottura.
Dopo l’allacciamento alla rete elettrica o dopo un
black-out, l’icona
e i quattro digit numerici sul
DISPLAY lampeggiano.
1. Premere più volte il tasto
finchè non
lampeggiano l’icona
e i quattro digit numerici sul
DISPLAY;
2. con i tasti “+” e “-” regolare l’ora; se si tengono
premuti, i numeri scorrono più velocemente per
facilitare l’impostazione.
3. attendere 10 sec oppure premere nuovamente il
tasto
per fissare l’impostazione.
Impostare il contaminuti
! Questa funzione non interrompe la cottura e
prescinde dall’utilizzo del forno; permette solo di
azionare il segnale acustico allo scadere dei minuti
impostati.
1. Premere più volte il tasto
finchè non
lampeggiano l’icona
e i tre digit numerici sul
DISPLAY;
2. con i tasti “+” e “-” regolare il tempo desiderato; se
si tengono premuti, i numeri scorrono più velocemente
per facilitare l’impostazione.
3. attendere 10 sec oppure premere nuovamente il
tasto
per fissare l’impostazione.
Seguirà la visualizzazione del conto alla rovescia al
termine del quale si azionerà il segnale acustico.
Programmare la cottura
! La programmazione è possibile solo dopo aver
selezionato un programma di cottura.
Programmare la durata di cottura
1. Premere più volte il tasto
finchè non
lampeggiano l’icona
e i tre digit numerici sul
DISPLAY;
2. con i tasti “+” e “-” regolare la durata desiderata;
se si tengono premuti, i numeri scorrono più
velocemente per facilitare l’impostazione.
3. attendere 10 sec oppure premere nuovamente il
tasto
per fissare l’impostazione.
4. a tempo scaduto, sul DISPLAY compare la scritta
END, il forno termina la cottura e viene emesso un
segnale acustico.
• Esempio: sono le 9:00 e viene programmata una
durata di 1 ora e 15 minuti. Il programma si arresta
automaticamente alle 10:15.
Programmare la fine di una cottura
! La programmazione della fine di una cottura è
possibile solo dopo aver impostato una durata di
cottura.
1. Seguire la procedura da 1 a 3 descritta per la
durata;
2. poi premere il tasto
finchè non lampeggiano
l’icona
e i quattro digit numerici sul DISPLAY;
3. con i tasti “+” e “-” regolare l’ora di fine cottura
desiderata; se si tengono premuti i numeri, scorrono
più velocemente per facilitare l’impostazione.
4. attendere 10 sec oppure premere nuovamente il
tasto
per fissare l’impostazione.
5. a tempo scaduto, sul DISPLAY compare la scritta
END, il forno termina la cottura e viene emesso un
segnale acustico.
Le icone
e accese segnalano che è stata
effettuata una programmazione. Sul DISPLAY vengono
visualizzate alternativamente l’ora di fine cottura e la
durata.
Annulare una programmazione
Per annullare una programmazione:
• premere il tasto
finchè non lampeggia l’icona
dell’impostazione da annullare e i digit sul display.
Premere il tasto “-” finchè sul display non
compaiono le cifre 00:00.
• tenere premuti contemporaneamente i tasti “+” e ”-
”; in questo modo si annullano tutte le
programmazioni effettuate contaminuti compreso.

IT
9
! L’apparecchio è stato progettato e costruito in
conformità alle norme internazionali di sicurezza.
Queste avvertenze sono fornite per ragioni di
sicurezza e devono essere lette attentamente.
Sicurezza generale
• L’apparecchio è stato concepito per un uso di tipo
non professionale all’interno dell’abitazione.
• L’apparecchio non va installato all’aperto, nemmeno
se lo spazio è riparato, perché è molto pericoloso
lasciarlo esposto a pioggia e temporali.
• Per movimentare l’apparecchio servirsi sempre
delle apposite maniglie poste sui fianchi del forno.
• Non toccare la macchina a piedi nudi o con le mani
o i piedi bagnati o umidi.
• L’apparecchio deve essere usato per cuocere
alimenti, solo da persone adulte e secondo le
istruzioni riportate in questo libretto. Ogni
altro uso (ad esempio: riscaldamento di
ambienti) è da considerarsi improprio e quindi
pericoloso. Il costruttore non può essere
considerato responsabile per eventuali danni
derivanti da usi impropri, erronei ed
irragionevoli.
• Durante l'uso dell'apparecchio gli elementi
riscaldanti e alcune parti della porta forno
diventano molto calde. Fare attenzione a non
toccarle e tenere i bambimi a distanza.
• Evitare che il cavo di alimentazione di altri
elettrodomestici entri in contatto con parti calde del
forno.
• Non ostruire le aperture di ventilazione e di
smaltimento di calore.
• Impugnare la maniglia di apertura della porta al
centro: ai lati potrebbe essere calda.
• Utilizzare sempre guanti da forno per inserire o
estrarre recipienti.
• Non rivestire il fondo del forno con fogli di alluminio.
• Non riporre materiale infiammabile nel forno: se
l’apparecchio viene messo inavvertitamente in
funzione potrebbe incendiarsi.
• Assicurarsi sempre che le manopole siano nella
posizione “”/“
” quando l’apparecchio non è
utilizzato.
• Non staccare la spina dalla presa della corrente
tirando il cavo, bensì afferrando la spina.
• Non fare pulizia o manutenzione senza aver prima
staccato la spina dalla rete elettrica.
• In caso di guasto, in nessun caso accedere ai
meccanismi interni per tentare una riparazione.
Contattare l’Assistenza (
vedi Assistenza
).
• Non appoggiare oggetti pesanti sulla porta del
forno aperta.
• Evitare che i bambini giochino con l'apparecchio.
• Non è previsto che l'apparecchio venga utilizzato
da persone (bambini compresi) con ridotte
capacità fisiche, sensoriali o mentali, da persone
inesperte o che non abbiano familiarità con il
prodotto, a meno che non vengano sorvegliate da
una persona responsabile della loro sicurezza o
non abbiano ricevuto istruzioni preliminari sull'uso
dell'apparecchio.
Smaltimento
• Smaltimento del materiale di imballaggio: attenersi
alle norme locali, così gli imballaggi potranno
essere riutilizzati.
• La direttiva Europea 2002/96/CE sui rifiuti di
apparecchiature elettriche ed elettroniche (RAEE),
prevede che gli elettrodomestici non debbano
essere smaltiti nel normale flusso dei rifiuti solidi
urbani. Gli apparecchi dismessi devono essere
raccolti separatamente per ottimizzare il tasso di
recupero e riciclaggio dei materiali che li
compongono ed impedire potenziali danni per la
salute e l’ambiente. Il simbolo del cestino barrato è
riportato su tutti i prodotti per ricordare gli obblighi
di raccolta separata.
Per ulteriori informazioni, sulla corretta dismissione
degli elettrodomestici, i detentori potranno rivolgersi
al servizio pubblico preposto o ai rivenditori.
Risparmiare e rispettare l’ambiente
• Azionando il forno negli orari che vanno dal tardo
pomeriggio fino alle prime ore del mattino si
collabora a ridurre il carico di assorbimento delle
aziende elettriche.
• Si raccomanda di effettuare sempre le cotture al
GRILL e GRATIN a porta chiusa: sia per ottenere
migliori risultati che per un sensibile risparmio di
energia (10% circa).
• Mantenere efficienti e pulite le guarnizioni, in modo
che aderiscano bene alla porta e non procurino
dispersioni di calore.
Precauzioni e consigli

10
IT
Escludere la corrente elettrica
Prima di ogni operazione isolare l’apparecchio dalla
rete di alimentazione elettrica.
Pulire l’apparecchio
• Le parti esterne smaltate o inox e le guarnizioni in
gomma possono essere pulite con una spugnetta
imbevuta di acqua tiepida, e sapone neutro. Se le
macchie sono difficili da asportare usare prodotti
specifici. Si consiglia di sciacquare
abbondantemente e di asciugare dopo la pulizia.
Non usare polveri abrasive o sostanze corrosive.
• L’interno del forno va pulito preferibilmente ogni
volta dopo l’uso, quando è ancora tiepido. Usare
acqua calda e detersivo, risciaquare e asciugare
con un panno morbido. Evitare gli abrasivi.
• Gli accessori possono essere lavati come normali
stoviglie, anche in lavastoviglie.
! Non utilizzare mai pulitori a vapore o ad alta
pressione per la pulizia dell’apparecchio.
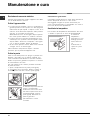
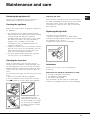
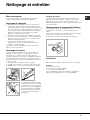
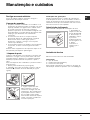
Pulire la porta
Pulire il vetro della porta con spugne e prodotti non
abrasivi e asciugare con un panno morbido; non
usare materiali ruvidi abrasivi o raschietti metallici
affilati che possono graffiare la superficie e causare
la frantumazione del vetro.
Per una pulizia più accurata è possibile smontare
la porta del forno:
1. aprire completamente la porta (
vedi figura
);
2. servendosi di un cacciavite, alzare e ruotare le
levette
F F
F F
F poste sulle due cerniere (
vedi figura
);
3. afferrare la porta ai due lati
esterni, richiudendola
lentamente ma non del tutto.
Poi tirare la porta verso di sé
estraendola dalle cerniere
(
vedi figura
). Rimontare la
porta seguendo il
procedimento in senso
contrario.
Controllare le guarnizioni
Controllare periodicamente lo stato della guarnizione
attorno alla porta del forno. In caso risulti
danneggiata rivolgersi al Centro Assistenza più
vicino (
vedi Assistenza
). È consigliabile non usare il
forno fino all’avvenuta riparazione.
Sostituire la lampadina
Per sostituire la lampadina di illuminazione del forno:
1. Svitare il coperchio in vetro del portalampada.
2. Svitare la
lampadina e
sostituirla con una
analoga: potenza
25 W, attacco E
14.
3. Rimontare il
coperchio (
vedi
figura
).
Manutenzione e cura
F

IT
11
Assistenza
! Non ricorrere mai a tecnici non autorizzati.
Comunicare:
• Il tipo di anomalia;
• il modello della macchina (Mod.)
• il numero di serie (S/N)
Queste ultime informazioni si trovano sulla targhetta caratteristiche posta sull’apparecchio e/o sull’imballo.
Assistenza Attiva 7 giorni su 7
Se nasce il bisogno di assistenza o manutenzione basta chiamare il Numero Unico Nazionale 199.199.199* per
essere messi subito in contatto con il Centro Assistenza Tecnica più vicino al luogo da cui si chiama.
È attivo 7 giorni su 7, sabato e domenica compresi, e non lascia mai inascoltata una richiesta.
Estensione di garanzia Airbag
Airbag è il servizio esclusivo creato da Ariston che integra e prolunga nel tempo i contenuti della garanzia
standard: con una modica cifra protegge il cliente da ogni imprevisto riguardante l’assistenza e la
manutenzione dell’elettrodomestico. Per i 5 anni successivi alla data di acquisto il cliente che aderisce al
programma Airbag avrà diritto gratuitamente a:
• l’intervento entro 48 ore dalla chiamata;
• il contributo per spese di trasferta del Tecnico (diritto di chiamata);
• la manodopera;
• le parti di ricambio originali;
• il trasporto dell’elettrodomestico non riparabile in loco.
Inoltre, qualora l’elettrodomestico non sia riparabile la garanzia prevede la sostituzione a prezzo agevolato in
funzione dell’anzianità del prodotto.
* Al costo di 14,25 centesimi di Euro al minuto (iva inclusa) dal Lun. al Ven. dalle 08:00 alle 18:30, il Sab. dalle 08:00 alle
13:00 e di 5,58 centesimi di Euro al minuto (iva inclusa) dal Lun. al Ven. dalle 18:30 alle 08:00, il Sab. dalle 13:00 alle
08:00 e i giorni festivi, per chi chiama dal telefono fisso.
Per chi chiama da radiomobile le tariffe sono legate al piano tariffario dell’operatore telefonico utilizzato.
Le suddette tariffe potrebbero essere soggette a variazione da parte dell’operatore telefonico; per maggiori informazioni
consultare il sito www.aristonchannel.com.

12
GB
Operating Instructions
Contents
Installation, 13-14
Positioning
Electrical connection
Data plate
Description of the appliance, 15
Overall view
Control panel
Start-up and use, 16
Starting the oven
The electronic cooking programmer, 17
Cooking modes, 18-19
Cooking modes
Practical cooking advice
Cooking advice table
Precautions and tips, 20
General safety
Disposal
Respecting and conserving the environment
Maintenance and care, 21
Switching the appliance off
Cleaning the appliance
Cleaning the oven door
Replacing the light bulb
Assistence
OVEN
7OFK 536J X RU/HA
7OFK 536J RU/HA
FK 536 X /HA
FK 536 /HA
Italiano, 1 Français, 22
Espanol, 32 Portuges, 42
English,12
IT GB FR
ES PT

13
GB
Installation
! Please keep this instruction booklet in a safe place
for future reference. If the appliance is sold, given
away or moved, please make sure the booklet is also
passed on to the new owners so that they may benefit
from the advice contained within it.
! Please read this instruction manual carefully: it
contains important information concerning the safe
operation, installation and maintenance of the
appliance.
Positioning
! Do not let children play with the packaging material; it
should be disposed of in accordance with local
separated waste collection standards (
see Precautions
and tips
).
! The appliance must be installed by a qualified
professional in accordance with the instructions
provided. Incorrect installation may damage property
or cause harm to people or animals.
Built-in appliances
Use an appropriate cabinet to ensure that the
appliance operates properly:
• The panels adjacent to the oven must be made of
heat-resistant material.
• Cabinets with a veneer exterior must be assembled
with glues which can withstand temperatures of up
to 100°C.
• To install the oven under the counter (
see diagram
)
or in a kitchen unit, the cabinet must have the
following dimensions:
590 mm.
595 mm.
22,5 mm.*
20,5 mm.
550 mm.
570 mm.
20 mm.
575-585 mm.
45 mm.
560 mm.
550 mm.
min.
* Stainless steel models only
! The appliance must not come into contact with
electrical parts once it has been installed.
The indications for consumption given on the data
plate have been calculated for this type of installation.
Ventilation
To ensure adequate ventilation is provided, the back
panel of the cabinet must be removed. It is advisable
to install the oven so that it rests on two strips of wood,
or on a completely flat surface with an opening of at
least 45 x 560 mm (
see diagrams
).
Centring and fixing
Secure the appliance to the cabinet:
• Open the oven door.
• Remove the 4 rubber plugs covering the fixing holes
on the perimeter frame.
• Fix the oven to the cabinet using the 4 wood screws.
• Replace the rubber plugs.
! All parts which ensure the safe operation of the
appliance must not be removable without the aid of a
tool.
560 mm.
45 mm.

14
GB
Electrical connection
! Ovens equipped with a three-pole power supply
cable are designed to operate with alternating
current at the voltage and frequency indicated on
the data plate located on the appliance (
see below
).
Fitting the power supply cable
1. Open the terminal
board by inserting a
screwdriver into the
side tabs of the cover.
Use the screwdriver as
a lever by pushing it
down to open the cover
(
see diagram
).
2. Loosen the cable
clamp screw and
remove it, using a
screwdriver as a lever
(
see figure
).
3. Remove the wire
contact screws L-N-
,
then fasten the wires
under the screw heads,
observing the colour
code: Blue (N), Brown (L) and Yellow-Green (
).
Connecting the electricity supply cable to the
mains
Install a standardised plug corresponding to the
load indicated on the data plate (
see table
).
The appliance must be directly connected to the
mains using an omnipolar switch with a minimum
contact opening of 3 mm installed between the
appliance and the mains. The switch must be
suitable for the charge indicated and must comply
with current electrical regulations (the earthing wire
must not be interrupted by the switch). The supply
cable must be positioned so that it does not come
into contact with temperatures higher than 50°C at
any point.
! The installer must ensure that the correct electrical
connection has been performed and that it is fully
compliant with safety regulations.
Before connecting the appliance to the power
supply, make sure that:
• the appliance is earthed and the plug is compliant
with the law;
• the socket can withstand the maximum power of
the appliance, which is indicated on the data
plate (
see below
);
• the voltage is in the range between the values
indicated on the data plate (
see below
);
• the socket is compatible with the plug of the
appliance. If the socket is incompatible with the
plug, ask an authorised technician to replace it.
Do not use extension cords or multiple sockets.
! Once the appliance has been installed, the power
supply cable and the electrical socket must be
easily accessible.
! The cable must not be bent or compressed.
! The cable must be checked regularly and replaced
by authorised technicians only (
see Assistance
).
! The manufacturer declines any liability should
these safety measures not be observed.
DATA PLATE
Dimensions
width cm 43.5
height cm 32
depth cm 41.5
Volume lt. 58
Electrical
connections
voltage: 220-240V ~ 50/60 Hz
(see data plate)
maximum power absorbed
2800W
ENERGY LABEL
Directive 2002/40/EC on the label
of electric ovens.
Standard EN 50304
Energy consumption for Natural
convection – heating mode:
Convection mode
Declared energy consumption for
Forced convection Class – heating
mode: Multi-cooking
This appliance conforms to the
following European Economic
Community directives:
- 2006/95/EEC of 12/12/06 (Low
Voltage) and subsequent
amendments;
-2004/108/EEC of 15/12/04
(Electromagnetic Compatibility) and
subsequent amendments;
- 93/68/EEC of 22/07/93 and
subsequent amendments.
- 2002/96/EC and subsequent
amendments.

15
GB
Description of the appliance
Overall view
Control panel
* Only on certain models.
Control panel
GRILL
DRIPPING PAN
GUIDES for the
sliding racks
position 5
position 4
position 3
position 2
position 1
SELECTOR
knob
THERMOSTAT
knob
THERMOSTAT
indicator light
ELECTRONIC
programmer*

16
GB
Start-up and use
! The first time you use your appliance, heat the
empty oven with its door closed at its maximum
temperature for at least an hour. Ensure that the
room is well ventilated before switching the oven off
and opening the oven door. The appliance may
produce a slightly unpleasant odour caused by the
burning away of protective substances used during
the manufacturing process.
Starting the oven
1. Select the desired cooking mode by turning the
SELECTOR knob.
2. Select the desired temperature with the
THERMOSTAT knob. See the Cooking advice table for
cooking modes and the suggested cooking
temperatures (
see Cooking Modes
).
3. When lit, the THERMOSTAT indicator light indicates
that the oven is heating up to the temperature set.
4. You may do the following during cooking:
- change the cooking mode by turning the SELECTOR
knob.
- change the temperature by turning the
THERMOSTAT knob.
- stop cooking by turning the SELECTOR knob to the
“0” position.
! Never put objects directly on the oven bottom to
avoid damaging the enamel coating.
! Always place cookware on the rack(s) provided.
Cooling ventilation
In order to cool down the external temperature of the
oven, a cooling fan blows a stream of air between
the control panel and the oven door, as well as
towards the bottom of the oven door.
! Once cooking has been completed, the cooling fan
continues to operate until the oven has cooled down
sufficiently.
Oven light
When selecting
with the SELECTOR knob the
oven light goes on. It remains lit when a cooking
mode is selected.

17
GB
The electronic
cooking programmer
DISPLAY
SET TIME
button
END OF
COOKING icon
CLOCK icon
DURATION
icon
TIMER icon
DECREASE TIME
button
INCREASE TIME
button
•• ••
Setting the clock
! The clock may be set when the oven is switched
off or when it is switched on, provided that a the end
time of a cooking cycle has not been programmed
previously.
After the appliance has been connected to the
mains, or after a blackout, the
icon and the four
numerical digits on the DISPLAY will begin to flash.
1. Press the
button several times until the
icon and the four digits on the display begin to
flash.
2. Use the “+” and “-” buttons to adjust the time; if
you press and hold either button, the display will
scroll through the values more quickly, making it
quicker and easier to set the desired value.
3. Wait for 10 seconds or press the
button again
to finalise the setting.
Setting the timer
! This function does not interrupt cooking and does
not affect the oven; it is simply used to activate the
buzzer when the set amount of time has elapsed.
1. Press the
button several times until the
icon and the three digits on the display begin to
flash.
2. Use the “+” and “-” buttons to set the desired
time; if you press and hold either button, the display
will scroll through the values more quickly, making it
quicker and easier to set the value.
3. Wait for 10 seconds or press the
button again
to finalise the setting.
The display will then show the time as it counts
down. When this period of time has elapsed the
buzzer will be activated.
Programming cooking
! A cooking mode must be selected before
programming can take place.
Programming the cooking duration
1. Press the
button several times until the
icon and the three digits on the DISPLAY begin to
flash.
2. Use the “+” and “-” buttons to set the desired
duration; if you press and hold either button, the
display will scroll through the values more quickly,
making it quicker and easier to set the value.
3. Wait for 10 seconds or press the
button again
to finalise the setting.
4. When the set time has elapsed, the text END
appears on the DISPLAY, the oven will stop cooking
and a buzzer sounds.
• For example: it is 9:00 a.m. and a time of 1 hour
and 15 minutes is programmed. The programme
will stop automatically at 10:15 a.m.
Setting the end time for a cooking mode
! A cooking duration must be set before the cooking
end time can be scheduled.
1. Follow steps 1 to 3 to set the duration as detailed
above.
2. Next, press the
button until the icon and
the four digits on the DISPLAY begin to flash.
3. use the “+” and “-” buttons to adjust the cooking
end time; if you press and hold either button, the
display will scroll through the values more quickly,
making it quicker and easier to set the desired
value.
4. Wait for 10 seconds or press the
button again
to finalise the setting.
5. When the set time has elapsed, the text END
appears on the DISPLAY, the oven will stop cooking
and a buzzer sounds.
Programming has been set when the
and
buttons are illuminated. The DISPLAY shows the
cooking end time and the cooking duration
alternately.
Cancelling a programme
To cancel a programme:
• press the
button until the icon corresponding to
the setting you wish to cancel and the digits on the
display are no longer flashing. Press the “-” button
until the digits 00:00 appear on the display.
• Press and hold the “+” and “-” buttons; this will
cancel all the settings selected previously,
including timer settings.

18
GB
Cooking modes
Cooking modes
! A temperature value can be set for all cooking
modes between 60°C and Max, except for
• GRILL (recommended: set only to MAX power
level);
• GRATIN (recommended: do not exceed 200°C).
TRADITIONAL OVEN mode
Both the top and bottom heating elements will come
on. With this traditional cooking mode, it is best to use
one cooking rack only; if more than one rack is used,
the heat will be distributed unevenly.
MULTILEVEL mode
All the heating elements (top and bottom), as well as
the fan, will come on. Since the heat remains constant
throughout the oven, the air cooks and browns food
uniformly. A maximum of two racks may be used at
the same time.
TOP OVEN mode
The top heating element comes on. This mode can be
used to brown food at the end of cooking.
GRILL mode
The top heating element comes on. The extremely
high and direct temperature of the grill makes it
possible to brown the surface of meats and roasts
while locking in the juices to keep them tender. The
grill is also highly recommended for dishes that
require a high temperature on the surface: such as
beef steaks, veal, rib steak, filets, hamburgers etc...
Some grilling examples are included in the “Practical
Cooking Advice” paragraph. Always cook in this mode
with the oven door closed.
GRATIN mode
The top heating element, as well as the fan, will come
on. This combination of features increases the
effectiveness of the unidirectional thermal radiation of
the heating elements through forced circulation of the
air throughout the oven. This helps prevent food from
burning on the surface, allowing the heat to penetrate
right into the food. Always cook in this mode with the
oven door closed.
Practical cooking advice
! Do not place racks in position 1 and 5 during fan-
assisted cooking. Excessive direct heat can burn
temperature sensitive foods.
! In the GRILL and GRATIN cooking modes, place the
dripping pan in position 1 to collect cooking residues
(fat and/or grease).
MULTILEVEL
• Use position 2 and 4, placing the food that requires
more heat on 2.
• Place the dripping pan on the bottom and the rack
on top.
GRILL
• Insert the rack in position 3 or 4. Place the food in
the centre of the rack.
• We recommend that you set the maximum power
level. The top heating element is regulated by a
thermostat and may not always be on.
PIZZA
• For best results when cooking pizza, use the
MULTILEVEL mode.
• Use a light aluminium pizza pan. Place it on the
rack provided.
For a crispy crust, do not use the dripping pan
(prevents crust from forming by extending cooking
time).
• If the pizza has a lot of toppings, we recommend
adding the mozzarella cheese on top of the pizza
halfway through the cooking process.

19
GB
Cooking advice table
Cooking
modes
Foods
Weight
(in kg)
Rack
position
Pre-heating
time (min)
Recommended
temperature
Cooking
time
(minutes)
Convection
Oven
Duck
Roast veal or beef
Pork roast
Biscuits (short pastry)
Tarts
1
1
1
-
1
3
3
3
3
3
15
15
15
15
15
200
200
200
180
180
65-75
70-75
70-80
15-20
30-35
Multilevel
Pizza (on 2 racks)
Lasagne
Lamb
Roast chicken + potatoes
Mackerel
Plum cake
Cream puffs (on 2 racks)
Biscuits (on 2 racks)
Sponge cake (on 1 rack)
Sponge cake (on 2 racks)
Savoury pies
1
1
1
1+1
1
1
0.5
0.5
0.5
1
1.5
2 and 4
3
2
2 and 4
2
2
2 and 4
2 and 4
2
2 and 4
3
15
10
10
15
10
10
10
10
10
10
15
230
180
180
200
180
170
190
180
170
170
200
15-20
30-35
40-45
60-70
30-35
40-50
20-25
10-15
15-20
20-25
25-30
Top oven
Browning food to perfect cooking - 3/4 15 220 -
Grill
Soles and cuttlefish
Squid and prawn kebabs
Cod filet
Grilled vegetables
Veal steak
Cutlets
Hamburgers
Mackerels
Toasts
1
1
1
1
1
1
1
1
4
4
4
4
3 or 4
4
4
4
4
4
5
5
5
5
5
5
5
5
5
Max
Max
Max
Max
Max
Max
Max
Max
Max
8-10
6-8
10
10-15
15-20
15-20
7-10
15-20
2-3
Gratin
Grilled chicken
Cuttlefish
1.5
1.5
2
2
5
5
200
200
55-60
30-35
! The cooking times listed above are intended as guidelines only and may be modified according to personal tastes.

20
GB
Precautions and tips
! The appliance was designed and manufactured in
compliance with international safety standards. The
following warnings are provided for safety reasons
and must be read carefully.
General safety
• The appliance was designed for domestic use
inside the home and is not intended for
commercial or industrial use.
• The appliance must not be installed outdoors,
even in covered areas. It is extremely dangerous
to leave the appliance exposed to rain and
storms.
• When handling the appliance, always use the
handles provided on the sides of the oven.
• Do not touch the appliance with bare feet or with
wet or moist hands and feet.
• The appliance must be used by adults only for
the preparation of food, in accordance with the
instructions outlined in this booklet. Any other
use of the appliance (e.g. for heating the room)
constitutes improper use and is dangerous.
The manufacturer may not be held liable for
any damage resulting from improper, incorrect
and unreasonable use of the appliance.
• When the appliance is in use, the heating
elements and some parts of the oven door
become extremely hot. Make sure you don't
touch them and keep children well away.
• Ensure that the power supply cable of other
electrical appliances does not come into contact
with the hot parts of the oven.
• The openings used for ventilation and dispersion
of heat must never be covered.
• Always grip the oven door handle in the centre:
the ends may be hot.
• Always use oven gloves to place cookware in the
oven or when removing it.
• Do not use aluminium foil to line the bottom of the
oven.
• Do not place flammable materials in the oven: if
the appliance is switched on by mistake, it could
catch fire.
• Always make sure the knobs are in the “”/“
”
position when the appliance is not in use.
• When unplugging the appliance always pull the
plug from the mains socket, do not pull on the
cable.
• Never carry out any cleaning or maintenance work
without having unplugged the plug from the
mains.
• In the case of a malfunction, under no
circumstances should you attempt to repair the
appliance yourself. Repairs carried out by
inexperienced persons may cause injury or further
malfunctioning of the appliance. Contact a Service
Centre (
see Assistance
).
• Do not rest heavy objects on the open oven door.
• The appliance should not be operated by people
(including children) with reduced physical,
sensory or mental capacities, by inexperienced
individuals or by anyone who is not familiar with
the product. These individuals should, at the very
least, be supervised by someone who assumes
responsibility for their safety or receive
preliminary instructions relating to the operation of
the appliance.
• Do not let children play with the appliance.
Disposal
• Observe local environmental standards when
disposing packaging material for recycling
purposes. Observe existing legislation when
disposing of the old appliance.
• The European Directive 2002/96/EC on Waste
Electrical and Electronic Equipment (WEEE),
requires that old household electrical appliances
must not be disposed of in the normal unsorted
municipal waste stream. Old appliances must be
collected separately in order to optimise the
recovery and recycling of the materials they
contain and reduce the impact on human health
and the environment. The crossed out “wheeled
bin” symbol on the product reminds you of your
obligation, that when you dispose of the
appliance it must be separately collected.
Consumers should contact their local authority or
retailer for information concerning the correct
disposal of their old appliance.
Respecting and conserving the
environment
• By using the appliance in the hours between late
afternoon and early morning, you can help reduce
the work load placed on electrical companies.
• Always keep the oven door closed when using the
GRILL and GRATIN modes: to attain best results
and to save energy (approximately 10%).
• Regularly check the door seals and wipe clean to
ensure they are free of debris so that they stick
properly to the door and do not allow heat to
disperse.
La page charge ...
La page charge ...
La page charge ...
La page charge ...
La page charge ...
La page charge ...
La page charge ...
La page charge ...
La page charge ...
La page charge ...
La page charge ...
La page charge ...
La page charge ...
La page charge ...
La page charge ...
La page charge ...
La page charge ...
La page charge ...
La page charge ...
La page charge ...
La page charge ...
La page charge ...
La page charge ...
La page charge ...
La page charge ...
La page charge ...
La page charge ...
La page charge ...
La page charge ...
La page charge ...
La page charge ...
La page charge ...
-
 1
1
-
 2
2
-
 3
3
-
 4
4
-
 5
5
-
 6
6
-
 7
7
-
 8
8
-
 9
9
-
 10
10
-
 11
11
-
 12
12
-
 13
13
-
 14
14
-
 15
15
-
 16
16
-
 17
17
-
 18
18
-
 19
19
-
 20
20
-
 21
21
-
 22
22
-
 23
23
-
 24
24
-
 25
25
-
 26
26
-
 27
27
-
 28
28
-
 29
29
-
 30
30
-
 31
31
-
 32
32
-
 33
33
-
 34
34
-
 35
35
-
 36
36
-
 37
37
-
 38
38
-
 39
39
-
 40
40
-
 41
41
-
 42
42
-
 43
43
-
 44
44
-
 45
45
-
 46
46
-
 47
47
-
 48
48
-
 49
49
-
 50
50
-
 51
51
-
 52
52


HOTPOINT/ARISTON 7OFK 536J X RU/HA Mode d'emploi
- Catégorie
- Fours
- Taper
- Mode d'emploi
- Ce manuel convient également à
dans d''autres langues
Documents connexes
-
HOTPOINT/ARISTON 7OFK 536J X RU/HA Mode d'emploi
-
Indesit 7OFK 838J X RU/HA Mode d'emploi
-
-
-
Whirlpool 7OFK 638J X RU/HA Mode d'emploi
-
-
HOTPOINT/ARISTON FK 83.1 X/HA Mode d'emploi
-