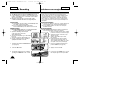
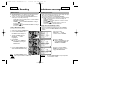
Samsung SC-L903 Manuel utilisateur
- Catégorie
- Caméscopes
- Taper
- Manuel utilisateur
Ce manuel convient également à

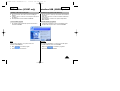
Video Camcorder
8mm
COLOR LCD
SCL901/L903/L906/L907
Owner’s Instruction Book
Before operating the unit, please read this instruction book
thoroughly, and retain it for future reference.
Hi
SCL901/L903/L906
/L907
Caméscope
8mm
ÉCRAN LCD COULEUR
SCL901/L903/L906/L907
Mode d’emploi
Avant d’utiliser l’appareil, lisez attentivement ce mode
d’emploi et le conservez-le à proximité pour vous y référer
ultérieurement.
ENGLISH FRANÇAIS
ELECTRONICS
AD68-00732B
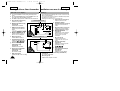
Hi
SCL901/L903/L906
/L907
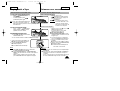
START/
STOP
SELF
TIMER
ZERO
RETURN
STILL
COUNTER
RESET
WIDE
TELE
DISPLAY
00732B SCL901 USA+FRA(1-19) 1/14/04 8:38 AM Page 101

FRANÇAISENGLISH
Contents
Sommaire
2
Notices and Safety Instructions
Features .................................................................................................8
Descriptions
■
Front View/Side View/Rear View........................................9, 10, 11
■
OSD (On Screen Display) ...........................................................12
Accessories Supplied with the Camcorder...........................................14
Remote Control (SCL906/L907 only) ...................................................15
■
Self Timer Recording....................................................................15
Getting to Know Your Camcorder
Adjusting the Hand Strap and Shoulder Strap .....................................16
Attaching the Lens Cover.....................................................................17
Lithium Battery Installation ...................................................................17
Connecting the Power Source..............................................................18
■
To use the AC Power Adapter......................................................18
■
To use the Battery Pack ...............................................................19
Using the Battery Pack.........................................................................20
■
Continuous Recording time table .................................................20
■
Battery Level Display....................................................................21
Inserting and Ejecting a Cassette .......................................................22
Preparing
Making your First Recording ................................................................23
Hints for Stable Image Recording .......................................................25
■
Recording with LCD Screen.........................................................25
■
Recording with Viewfinder............................................................25
Adjusting the LCD ................................................................................26
Adjusting Focus of the VIEWFINDER ..................................................27
Playing back a tape on the LCD ..........................................................28
■
Controlling the Sound from the Speaker......................................29
■
Viewing a Still Picture...................................................................29
■
Picture Search..............................................................................29
Zooming In and Out..............................................................................30
Digital Zoom .........................................................................................31
EASY mode (for Beginners).................................................................33
CUSTOM-Creating your own customized recording settings...............34
DIS (Digital Image Stabilizer, SCL903/L906/L907 only).......................35
MF/AF (Manual Focus/Auto Focus) .....................................................36
BLC.......................................................................................................37
Basic Recording
Advanced Recording
Remarques et consignes de sécurité
Familiarisez-vous avec le caméscope
Fonctionnalités .......................................................................................8
Descriptions
■
Vue avant/Vue latérale/Vue arrière.....................................9, 10, 11
■
Affichage ......................................................................................12
Accessoires fournis avec votre caméscope .........................................14
Télécommande (SCL906/L907) ...........................................................15
■
Enregistrement automatique avec la télécommande ...................15
Mise en place de la poignée de soutien et de la bandoulière..............16
Fixation du couvre-objectif ...................................................................17
Installation de la pile au lithium ............................................................17
Connexion d’une alimentation ..............................................................18
■
Utilisation de l’adaptateur secteur et du câble DC.......................18
■
Utilisation du bloc batterie ...........................................................19
Utilisation du bloc batterie ....................................................................20
■
Tableau des durées d'enregistrement ..........................................20
■
Affichage du niveau de la batterie................................................21
Insertion et éjection d’une cassette .....................................................22
Votre premier enregistrement...............................................................23
Astuces pour la stabilité de l’image .....................................................25
■
Utilisation de l’écran LCD .............................................................25
■
Utilisation du viseur électronique..................................................25
Réglage de l’écran LCD .......................................................................26
Réglage du viseur ................................................................................27
Lecture d’une cassette à l’écran LCD ..................................................28
■
Réglage du volume du haut-parleur.............................................29
■
Arrêt sur image .............................................................................29
■
Recherche d’une image................................................................29
Utilisation du zoom avant et arrière......................................................30
Utilisation du zoom numérique.............................................................31
Mode EASY (enregistrement simplifié) ................................................33
Mode CUSTOM - Personnalisation des réglages pour l'enregistrement ....34
Utilisation du stabilisateur d’images (SCL903/L906/L907)...................35
Mise au point manuelle/automatique (MF/AF) .....................................36
Fonctions BLC......................................................................................37
Réglage du caméscope
Effectuez un enregistrement simple
Perfectionnez vos enregistrements
00732B SCL901 USA+FRA(1-19) 1/14/04 8:38 AM Page 2

FRANÇAISENGLISH
3
Contents (continued)
Program AE (Automatic Exposure)...............................................38
DSE (Digital Special Effects) in CAMERA mode ..........................40
Setting and Recording DATE/TIME ..............................................42
Selecting and Recording a Title....................................................44
Fade In and Out............................................................................46
Snap Shot (SCL903/L906/L907 only)...........................................47
White Balance...............................................................................48
Selecting the OSD LANGUAGE ..........................................................49
Demonstration...............................................................................50
Setting the Date/Title Color...........................................................51
Lighting Techniques ......................................................................52
Visionnez une cassette
Cleaning and Taking care of the Camcorder ................................62
■ Cleaning the Viewfinder ......................................................62
■ Cleaning the LCD Panel.......................................................62
■ Cleaning the Video Heads ...................................................62
■ Storing the Camcorder .........................................................62
Maintenance
Self Diagnosis Display .................................................................64
Checking .......................................................................................65
Moisture Condensation.................................................................67
Troubleshooting
Specifications
............................................................68
Index
...........................................................................69
Using Your Camcorder Abroad
.......................................63
Sommaire (suite)
Sélection d’un mode d’exposition automatique ...........................38
Effet spéciaux numériques en mode Caméscope. ......................40
Réglage et enregistrement de la date et de l’heure ....................42
Sélection et enregistrement d’un titre ..........................................44
Fondu en ouverture ou en fermeture...........................................46
Mode photo (Snap Shot) (SCL903/L906/L907) ...........................47
Balance des blancs (White Balance) ...........................................48
Sélection de la LANGUE D’AFFICHAGE.....................................49
Mode DEMO ................................................................................50
Régler la date/la couleur du titre..................................................51
Sources de lumière ......................................................................52
Lecture à l’écran LCD .................................................................53
Lecture à l’écran de votre téléviseur............................................53
Fonctions du mode magnétoscope..............................................55
Réglage de l’écran LCD...............................................................56
Réglage du haut-parleur ..............................................................56
DSE en mode Magnétoscope......................................................56
Lecture multiple (avec le système PAL60)...................................57
Transfert d'images numériques avec l'interface USB ....................58
Installation du programme USB Media 2.0..................................59
Nettoyage et entretien du caméscope .........................................62
■ Nettoyage du viseur.............................................................62
■ Nettoyage de l’écran LCD ...................................................62
■ Nettoyage des têtes vidéo ...................................................62
■ Rangement du caméscope..................................................62
Diagnostic à l’écran......................................................................64
Vérification....................................................................................65
Condensation d'humidité..............................................................67
Warranty (Canada Users Only)
..............................71
Conseils d’utilisation
Dépannage
Spécifications techniques
.......................................68
Index
...........................................................................69
Utilisation du caméscope à l’étranger
.......................63
Interface USB (SCL907 uniquement)
Garantie pour le Canada
.........................................71
Playing back a Tape
To watch with LCD .......................................................................53
To watch with TV...........................................................................53
Various Functions in PLAYER mode ............................................55
Adjusting the LCD.........................................................................56
Setting the Speaker ON/OFF........................................................56
DSE in PLAYER mode..................................................................56
Multi Playback (Using a PAL60 System) ......................................57
Transferring a Digital Image through a USB Connection ...............58
Installing USB Media 2.0 program................................................59
USB interface (SCL907 only)
00732B SCL901 USA+FRA(1-19) 1/14/04 8:38 AM Page 3

Notices and Safety Instructions
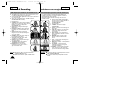
Notices regarding rotation of LCD screen
ENGLISH FRANÇAIS
4
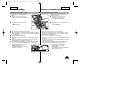
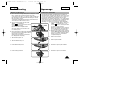
Please rotate the LCD screen carefully as illustrated.
Unintended rotation may cause damage to the inside of the
hinge that connects the LCD screen to the Camcorder.
1) LCD screen closed.
2) Standard recording by using
the LCD screen.
3) Making a recording by looking
at the LCD screen from the top.
4) Making a recording by looking
at the LCD screen from the front.
5) Making a recording with the
LCD screen closed.
✤ Do not let the LENS point toward the
sun.
Direct sunlight can damage the CCD
(Charge Coupled Device).
Notices regarding the LENS
Remarques et consignes de sécurité
Rotation de l’écran LCD
Manipulez l’écran doucement lorsque vous le faites tourner.
Une rotation intempestive peut endommager l’intérieur de la
charnière qui relie l’écran LCD au corps de l’appareil.
1) Écran LCD fermé.
2) Enregistrement standard lors de
l’utilisation de l’écran LCD.
3) Enregistrement en regardant l’écran
LCD d’en haut.
4) Enregistrement en regardant l’écran
LCD de devant.
5) Enregistrement avec l’écran LCD
fermé.
✤ Veillez à ne pas diriger l’objectif vers
le soleil. La lumière solaire directe
peut endommager le dispositif
électronique à transfert de charge
(CCD).
Objectif
90°
➔
➔
➔
➔
➔
➔
➔
➔
1)
2)
3)
4)
5)
90°
90°
90°
00732B SCL901 USA+FRA(1-19) 1/14/04 8:38 AM Page 4

Notices and Safety Instructions
Notices regarding electronic viewfinder
FRANÇAISENGLISH
5
1) Do not place the camcorder
so that the viewfinder is
pointing towards the sun.
Direct sunlight can
damage the inside of the
viewfinder. Be careful when
placing the camcorder
under sunlight or by a
window.
2) Do not pick up the
camcorder by the viewfinder.
3) Unintended rotation may cause damage to the viewfinder.
1) A sudden rise in atmospheric
temperature may cause condensation
to form inside the camcorder.
for example:
■ When you take the camcorder from
cold temperature outside to warm
temperature inside during the winter.
■ When you take the camcorder from
cool temperature inside to hot
temperature outside during the
summer.
2) If the “DEW( )” protection feature
is activated, leave the camcorder in a
dry, warm room with the cassette
compartment opened and the battery
removed.
3) If the “DEW( )” protection feature is
activated unexpectedly, and you want to
override it, detach, then reinstall the battery
pack and lithium battery.
Please make sure that the condensation has
disappeared completely. (see page 67)
Notices regarding moisture condensation
Remarques et consignes de sécurité
Viseur électronique
1) N’orientez pas le viseur
vers le soleil.
La lumière solaire directe
peut endommager
l'intérieur du viseur.
Soyez vigilant lorsque
vous placez le caméscope
au soleil ou près d’une
d'une fenêtre.
2) Ne saisissez pas votre
caméscope par le viseur.
3) Évitez les rotations intempestives du viseur qui risquent de
l’endommager.
1) Un accroissement soudain de
température peut entraîner la formation
de buée à l’intérieur de l’appareil.
Ce peut être le cas, lorsque vous passez:
■
d’un extérieur froid à un intérieur chaud
(en hiver, par exemple),
■
d’un intérieur frais à un extérieur chaud
(en été, par exemple).
2) Si la fonction de protection
“DEW( )” se déclenche, laissez
l’appareil dans un endroit sec et à
température ambiante, le compartiment à
cassette ouvert et sans le bloc batterie.
3) Si la fonction de protection
“DEW( )” se déclenche
intempestivement et que vous souhaitiez
néanmoins filmer, retirez le bloc batterie
et la pile au lithium, puis réinstallez-les.
Assurez-vous que la condensation a
complètement disparu. (voir page 67)
Formation de condensation
1
2
3
00732B SCL901 USA+FRA(1-19) 1/14/04 8:38 AM Page 5

Notices and Safety Instructions
Notices regarding the battery pack
ENGLISH FRANÇAIS
6
✤ Make sure that the battery pack is charged before
recording outdoors.
✤ To preserve battery power, keep your camcorder turned off
when you are not operating it.
✤ When your camcorder is in CAMERA mode, if it is left in
STANDBY for more than 5 minutes without operation, it
will automatically turn off to protect against unexpected
battery discharge.
✤ It is a good idea to use the viewfinder instead of the LCD
when recording for a long time because the LCD uses
more battery power.
✤ Make sure that the battery pack is fitted firmly into place.
Dropping the battery pack might damage it.
✤ When the battery reaches the end of its life, please
contact your local dealer. The batteries have to be dealt
with as chemical waste.
W
arning: Keep the LITHIUM BATTERY out of the reach of
children. Should the battery be swallowed,
consult a doctor immediately.
✤ The lithium battery maintains the CLOCK function, TITLE,
CUSTOM function and preset contents memory;
even if the battery pack or AC power adapter is removed.
✤ The lithium battery for the camcorder lasts about 8~10
months under normal operation from time of installation.
✤ When the lithium battery becomes weak or dead, the
date/time indicator flashes about 5 seconds when you set
the power switch to CAMERA. When this occurs, replace
the lithium battery with type CR2025. (see page 17)
Notices regarding the Lithium battery
* When the lithium battery
becomes weak or dead
please contact your local
dealer. The batteries have
to be dealt with as
chemical waste.
WARNING:
LITHIUM BATTERY MUST
BE RECYCLED OR
DISPOSED OF PROPERLY.
Remarques et consignes de sécurité
Bloc batterie
✤ Assurez-vous que le bloc batterie est chargé avant de filmer
sans connexion au secteur.
✤ Pour conserver la charge de la batterie, maintenez votre
caméscope éteint lorsque vous ne l’utilisez pas.
✤ En mode caméscope, si vous laissez votre appareil en mode
veille pendant plus de 5 minutes sans vous en servir, il s’éteint
automatiquement pour éviter un déchargement intempestif de la
batterie.
✤ Si vous filmez longtemps, nous vous conseillons d’utiliser le
viseur plutôt que l’écran LCD car celui-ci consomme plus
d’énergie.
✤ Assurez-vous que le bloc batterie est fermement maintenu en
place. Ne le faites pas tomber car vous risqueriez de
l’endommager.
✤ Lorsque la batterie ou la pile ne fonctionne plus, contactez votre
revendeur le plus proche. Les batteries doivent être traitées en
tant que déchets chimiques.
A
vertissement: Maintenez la PILE AU LITHIUM hors de portée
des enfants. Si la pile venait à être avalée,
consultez immédiatement un médecin.
✤ La pile au lithium permet au caméscope de garder en
mémoire les fonctions d'horloge, de titrage, les réglages des
modes CUSTOM ainsi que les réglages prédéfinis,
en l'absence du bloc batterie ou de l'adaptateur secteur.
✤ La longévité de la pile au lithium est de huit à dix mois à
partir de sa mise en place et dans des conditions normales
d’utilisation.
✤ Lorsque la pile au lithium s’affaiblit ou est déchargée,
l’affichage de la date et de l’heure clignote pendant cinq
secondes environ lorsque vous passez en mode Caméscope.
Dans ce cas, remplacez-la par une pile de type CR2025. (voir
page 17)
Pile au lithium
* Lorsque la pile s’affaiblit ou est
déchargée, contactez votre
revendeur le plus proche. Les
piles doivent être traitées en
tant que déchets chimiques.
AVERTISSEMENT :
LA PILE AU LITHIUM DOIT
ÊTRE RECYCLÉE OU DÉPOSÉE
DANS UN CENTRE DE
TRAITEMENT APPROPRIÉ.
00732B SCL901 USA+FRA(1-19) 1/14/04 8:38 AM Page 6

Notices and Safety Instructions
Notices with Recording or Playback by using LCD
FRANÇAISENGLISH
7
✤ To protect against tape and head-drum wear,
your camcorder will automatically turn off if it is left in
STANDBY mode without operation for more than
5 minutes.
5 minutes off timer in STANDBY mode
✤ It is very important to adjust the hand strap
for better recording.
(see page 16)
✤ Do not insert your hand in the hand strap
forcibly, the buckle may be damaged.
Notices regarding the hand strap
✤ To ensure normal recording and clear picture, clean the video
heads. When playing back the pictures, if they are noisy or
hardly visible, the video heads may be dirty. If this happens,
clean the video heads with a dry type cassette cleaner.
✤ Do not use a wet type cassette cleaner. It may damage the
video heads. (see page 62)
Notices regarding video head cleaning
Remarques et consignes de sécurité
Enregistrement ou lecture avec l’écran LCD
1) L’écran a été conçu à l’aide d’une
technologie de haute précision. Cependant,
de minuscules points noirs (rouges, bleus ou
verts) peuvent apparaître de façon
constante sur l’écran LCD. Ces points sont
normaux et n’affectent aucunement l’ima-ge
enregistrée.
2) Lorsque vous utilisez l’écran LCD
directement sous le soleil, la vision à l’écran
peut s’avérer difficile. Dans ce cas, nous
vous recommandons d’utiliser le viseur.
3) La fonction d’affichage d’informations sur
l’écran LCD est désactivée lorsque celui-ci
est tourné vers l’avant.
✤ Afin de protéger la bande et les têtes vidéo, votre
caméscope s’éteint automatiquement s’il est laissé en
mode veille pendant plus de 5 minutes.
Désactivation automatique en mode veille
✤ Pour une meilleure qualité de prise de
vue, il est important de bien ajuster la
poignée de soutien. (voir page 16)
✤ Ne forcez pas pour insérer votre main
dans la poignée car vous risqueriez de
l’endommager.
Poignée de soutien
✤ Pour garantir un enregistrement normal et obtenir des images
claires, nettoyez régulièrement les têtes vidéo. L’apparition de
parasites sur l’image ou l’affichage d’un écran vide peut signifier
que les têtes vidéo sont sales. Dans ce cas,
nettoyez-les avec une cassette de type sec prévue à cet effet.
✤ N'utilisez pas de cassette de type humide, car vous risqueriez
d’endommager les têtes vidéo. (voir page 62)
Nettoyage des têtes vidéo
1) The LCD Screen is manufactured by
using high precision technology.
However, there may be some tiny specks
(red, blue or green in color) that appear on
the LCD Screen. These specks are normal
and do not affect the recorded picture in
any way.
2) When using the LCD Screen outdoors in
direct sunlight, it may be difficult to view.
If this occurs, use the viewfinder.
3) The LCD Screen's OSD is turned off when
the LCD is placed in the forward direction.
00732B SCL901 USA+FRA(1-19) 1/14/04 8:38 AM Page 7

Getting to Know Your Camcorder
Familiarisez-vous avec le caméscope
Features
ENGLISH FRANÇAIS
Fonctionnalités
Votre caméscope dispose de nombreuses fonctionnalités d’enregistre-
ment et de lecture.
Langue de l’affichage écran
Vous pouvez sélectionner la langue d’affichage appropriée parmi les
langues suivantes : Anglais, Français et Espagnol.
Mode photo (SCL903/L906/L907)
Ce mode permet de filmer un objet immobile pendant un temps limité en
mode Caméscope. (voir page 47)
Fonction BLC
■ BLC (Backlight compensation)
Lorsque vous prenez un sujet devant une source lumineurse ou
devant un fond clair, utilisez la fonction BLC. (voir page 37)
DSE (Effets numériques spéciaux)
Cette fonction donne un côté spectaculaire à vos films, grâce aux
différents procédés originaux utilisés. (voir page 40)
Programme AE
Cette fonction permet d’adapter la vitesse d’obturateur et le diaphragme
au type de scène à filmer. (voir page 38)
DIS (SCL903/L906/L907)
Cette fonction compense le léger tremblement qui peut survenir en
filmant, surtout lors de l’utilisation du zoom. (voir page 35)
Zoom longue portée 22x
Le zoom est une technique d’enregistrement qui vous permet de changer
la taille du sujet filmé. Pour des enregistrements plus professionnels,
utilisez la fonction zoom. (voir page 30)
Zoom numérique (880x)
Une portée de zoom supérieure à 22x est obtenue numériquement.
(voir page 31)
Macro
Cette fonction permet de filmer le sujet de très près. Pour ce faire, vous
devez régler le zoom sur la position grand angle. (voir page 30)
EASY
Le mode EASY permet aux débutants de réaliser des prises de vues de
façon très simple. (voir page 33)
Lecture multiple
PAL60 est un format de signal de sortie spécial qui permet à un téléviseur
PAL d’être utilisé pour visionner une bande enregistrée avec un enregistreur
NTSC.
8
Your camcorder has many features for recording and playing back.
MULTI OSD LANGUAGE
You can select the appropriate OSD Language among English, French
and Spanish.
Snap Shot (SCL903/L906/L907 only)
The Snap Shot function lets you record an object at a standstill for a limited
time in Camera mode. (see page 47)
BLC
When you record a subject with the light source behind the subject or a
subject with a light background, use the BLC function. (see page 37)
DSE (Digital Special Effects)
The DSE enables you to give a creative look to your films by adding various
special effects.(see page 40)
Program AE (Auto Exposure)
The Program AE enables you to adapt the shutter speed and aperture to the
type of scene to be filmed.(see page 38)
DIS (SCL903/L906/L907 only)
The DIS compensates for unstable images caused by hand shake,
particularly at high magnification. (see page 35)
22x High ratio zoom lens
Zooming is a recording technique that lets you change the size of the subject
in the picture.
For more professional recordings, use the zoom function. (see page 30)
Digital Zoom (880x)
Zooms more than 22x are performed digitally. (see page 31)
Macro
The macro function allows you to record your subject at close range.
You have to adjust the zoom fully wide for macro recording. (see page 30)
EASY
This mode enables even the beginner to easily make a recording.
(see page 33)
Multi PLAYBACK (PAL60)
PAL60 is a special output signal format with which a PAL TV can be used to
view a tape recorded by an NTSC recorder.
00732B SCL901 USA+FRA(1-19) 1/14/04 8:39 AM Page 8

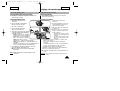
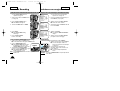
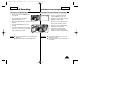
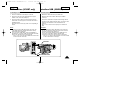
Getting to Know Your Camcorder
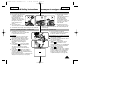
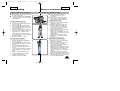
Front View
FRANÇAISENGLISH
1. Lens (see page 68)
2. REC SEARCH (REW)
REC SEARCH works in
STANDBY mode. (see page 24)
REW works in PLAYER mode.
(see page 55)
3. LIGHT (PLAY/STILL)
(see page 54)
PLAY/STILL works in
PLAYER mode.
LIGHT works in CAMERA
mode. (SCL906/L907 only)
The built-in video light turns on
when LIGHT is pressed.
It enables recording in low-light
conditions.
4. REC SEARCH (FF)
REC SEARCH works in
STANDBY mode. (see page 24)
FF works in PLAYER mode.
(see page 55)
5. DATE/TIME (STOP)
DATE/TIME works in CAMERA
mode. (see page 42)
STOP works in PLAYER mode.
(see page 54)
6. TAPE EJECT (see page 22)
Use when ejecting the tape.
7. EVF (Electronic Viewfinder)
8. MIC
MIC works in CAMERA mode.
9. Remote Sensor
(SCL906/L907 only)
10. LCD (see page 26)
11. CUSTOM
CUSTOM works in CAMERA
mode.
12. EASY
EASY works in CAMERA
mode.
13. VIDEO LIGHT
(SCL906/L907 only)
Familiarisez-vous avec le caméscope
Vue avant
1. Lentille (voir page 68)
2. REC SEARCH (REW)
REC SEARCH fonctionne
en mode veille. (voir page 24)
REW fonctionne en mode
Magnétoscope. (voir page 55)
3. LIGHT (PLAY/STILL)
(voir page 54)
Fonctionne en mode
Magnétoscope.
LIGHT fonctionne en mode
Caméscope. (SCL906/L907)
La torche vidéo intégrée
permet d’éclairer en appuyant
simplement sur une touche.
L’enregistrement en conditions
de faible éclairage ou sans
éclairage du tout n’a jamais
été plus facile.
4. REC SEARCH (FF)
REC SEARCH fonctionne
en mode veille. (voir page 24)
FF fonctionne en mode
Magnétoscope. (voir page 55)
5. DATE/TIME (STOP)
DATE/TIME fonctionne en mode
Caméscope. (voir page 42)
STOP fonctionne en mode
Magnétoscope. (voir page 54)
6. TAPE EJECT (voir page 22)
Permet d’éjecter la cassette.
7. Viseur électronique
8. MICRO
Fonctionne en mode
Caméscope.
9. Capteur de la
télécommande
(SCL906/L907)
10. Écran LCD (voir page 26)
11. CUSTOM
CUSTOM fonctionne en
mode Caméscope.
12. EASY
EASY fonctionne en mode
Caméscope.
13. Torche vidéo (SCL906/L907)
9
3. LIGHT
(PLAY/STILL)
4. REC SEARCH (FF)
5. DATE/TIME (STOP)
7. EVF
10. LCD
11. CUSTOM
12. EASY
2. REC SEARCH (REW)
6. TAPE EJECT
13. VIDEO LIGHT
1. LENS
9. Remote Sensor
8. MIC
00732B SCL901 USA+FRA(1-19) 1/14/04 8:39 AM Page 9

FRANÇAISENGLISH
Getting to Know Your Camcorder
Familiarisez-vous avec le caméscope
10
14. MENU ON/OFF (see page 26)
MENU ON/OFF works in
CAMERA and PLAYER mode.
15. ENTER (MF) (see page 26)
ENTER works in MENU mode.
MF works in CAMERA mode.
(see page 36)
16. UP/DOWN dial (VOLUME)
UP/DOWN dial works in MENU
mode. (see page 26)
VOLUME works in PLAYER
mode. (see page 56)
17. S-VIDEO out (see page 54)
18. PROGRAM AE (see page 38)
PROGRAM AE (Auto Exposure)
works in CAMERA mode.
19. DSE (see page 40)
DSE works in CAMERA and
PLAYER mode.
20. SPEAKER (see page 56)
Speaker works in PLAYER mode.
21. Lithium Battery (see page 17)
22. LCD open
23. FADE (see page 46)
FADE works in CAMERA mode.
24. BLC (see page 37)
BLC works in CAMERA mode.
14.
MENU ON/OFF (voir page 26)
Fonctionne en mode
Caméscope et Magnétoscope.
15. ENTER (MF) (voir page 26)
Fonctionne en mode MENU.
MF fonctionne en mode
Caméscope. (voir page 36)
16. Bouton UP/DOWN (VOLUME)
UP/DOWN fonctionne en mode
MENU. (voir page 26)
VOLUME fonctionne en mode
Magnétoscope. (voir page 56)
17. S-VIDEO out (voir page 54)
18.
PROGRAM AE (voir page 38)
Fonctionne en mode
Caméscope.
19. DSE (voir page 40)
Fonctionne en mode
Caméscope et Magnétoscope.
20. Haut-parleur (voir page 56)
Fonctionne en mode
Magnétoscope.
21. Pile au lithium (voir page 17)
22. Ouverture de l’écran LCD
23. FADE (voir page 46)
Fonctionne en mode
Caméscope.
24. BLC (voir page 37)
Fonctionne en mode
Caméscope.
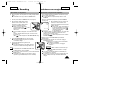
Side View
Vue latérale
21. Lithium Battery
24. BLC
23. FADE
20. SPEAKER
22. LCD Open
14. MENU ON/OFF
15. ENTER (MF)
16. UP/DOWN Dial (VOLUME)
18. P.AE
19. DSE
17. S-VIDEO out
00732B SCL901 USA+FRA(1-19) 1/14/04 8:39 AM Page 10

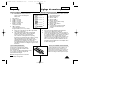
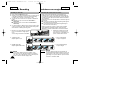
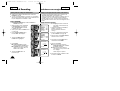
Getting to Know Your Camcorder
Familiarisez-vous avec le caméscope
Rear View
FRANÇAISENGLISH
11
25. ZOOM (see page 30)
26. Cassette Compartment
27. Hooks for Shoulder Strap
(see page 17)
28. AUDIO/VIDEO out
(see page 53)
29. LENS Cap
30. Hand Strap (see page 16)
31. POWER Switch
(see page 18)
- CAMERA : Select to record.
- OFF : Select to turn off the
camcorder.
- PLAYER : Select to
playback.
32. START/STOP (see page 23)
START/STOP works in
CAMERA mode.
33. External MIC (see page 68)
(SCL906/L907 only)
34. DC Jack (see page 18)
35. Battery Pack Compartment
(see page 19)
36. BATTERY EJECT
37. SNAP SHOT/D.ZOOM
SNAP SHOT works in
CAMERA mode.
(SCL903/L906/L907 only,
see page 47)
D.ZOOM works in CAMERA
mode. (SCL901 only,
see page 32)
38. Recharging Indicator
(see page 19)
39. USB Jack (SCL907 only)
(see page 61)
Vue arrière
25. ZOOM (voir page 30)
26. Compartiment à cassette
27. Anneau pour bandoulière
(voir page 17)
28. Sortie AUDIO/VIDEO
(voir page 53)
29. Cache objectif
30. Poignée de soutien
(voir page 16)
31.
Commutateur principal :
trois positions : (voir page 18)
- CAMERA: permet de filmer.
- OFF: l’appareil est éteint.
- PLAYER: mode
magnétoscope,
permet la lecture.
32. START/STOP (voir page 23)
Fonctionne en mode
Caméscope.
33. Micro externe (voir page 68)
(SCL906/L907)
34. Prise DC (voir page 18)
35. Compartiment du bloc
batterie (voir page 19)
36. Éjection du bloc batterie
37. SNAP SHOT/D.ZOOM
SNAP SHOT fonctionne en
mode Caméscope.
(SCL903/L906/L907, voir page
47) D.ZOOM fonctionne en
mode Caméscope.
(SCL901, voir page 32)
38. Voyant de recharge
(voir page 19)
39. Prise USB (voir page 61)
(SCL907)
30. Hand Strap
26. CASSETTE Compartment
25. ZOOM
29. LENS Cap
36. BATTERY EJECT
27. Hooks for shoulder strap
28. AUDIO/VIDEO Out
32. START/STOP
35. Battery Pack Compartment
38. Recharging Indicator
34. DC Jack
31. POWER Switch
39. USB JACK (SCL907 only)
33. External MIC
(SCL906/L907 only)
MIC
37. SNAP SHOT/D.ZOOM
00732B SCL901 USA+FRA(1-19) 1/14/04 8:39 AM Page 11

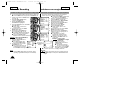
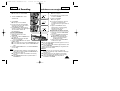
Getting to Know Your Camcorder
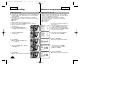
OSD (On Screen Display)
ENGLISH FRANÇAIS
12
✤ You can turn the OSD on/off by setting the Display menu
on/off.
✤ The TITLE, DATE/TIME, EASY and CUSTOM functions can
be operated even after the OSD is turned off.
✤ The OSD is displayed in the viewfinder and the LCD Screen.
a. Zoom position (see page 30)
Indicates zoom position.
b. DIS (SCL903/L906/L907 only)
(see page 35)
Indicates DIS is activated.
c. Battery level (see page 21)
Indicates the power left in the
battery.
( )
d. Manual Focus (see page 36)
Indicates manual focus is on.
Auto Focus is not displayed.
e. BLC (see page 37)
Indicates BLC is activated.
f. Program AE (see page 38)
Indicates Program AE mode is
activated. ( , , , , )
g. Self record waiting timer.
(SCL906/L907 only)
(see page 15)
Indicates 10 second timer.
h. Self record recording timer.
(SCL906/L907 only)
(see page 15)
(30 seconds or END).
i. Date (see page 42)
Indicates the date of the recording.
Familiarisez-vous avec le caméscope
Affichage
OSD in CAMERA mode
p
o
x
z
k
j
i
s q
r
b a t
Hi REC
880 0:00:00
CINEMA
TITLE
BLC
WAIT-10S 12:00 AM
SELF-30S JAN. 29, 2004
c
v
p
o
u
l
w
r q
Hi PLAY
0:00:25
SEPIA Z.RTN
TITLE
TAPE!
VOLUME
W
T
EASY
OFF
x
XX
c
m
f
n
e
d
y
g
h
OSD in PLAYER mode
8
✤ Pour activer/désactiver l'affichage dans le viseur et sur l'écran LCD,
utilisez le menu DISPLAY.
✤ Les fonctions titre, date/heure, EASY et CUSTOM sont disponibles,
que l'affichage soit activé ou non.
✤ L’affichage a lieu dans le viseur et sur l'écran LCD.
a. Position du zoom (voir page 30)
Indique la position du zoom.
b. Stabilisateur d’images
(SCL903/L906/L907) (voir page 35)
Indique que la fonction DIS est
activée.
c.
Niveau de la batterie (voir page 21)
Indique le niveau du bloc batterie.
( )
d. Mise au point manuelle
(voir page 36)
Indique la mise au point manuelle.
Aucune indication n’est affichée
lorsque la mise au point est
automatique.
e. BLC (voir page 37)
Indique que la fonction de
compensation du contre-jour est
activée.
f. Exposition automatique
(voir page 38)
Indique que le mode d’exposition
automatique est activé.
( , , , , )
g. Minuterie d'attente
d'enregistrement automatique
(
SCL906/L907)
(voir page 15)
Indique 10 secondes d'attente.
h. Minuterie d’enregistrement automatique (SCL906/L907)
(voir page 15)
30 secondes ou END (FIN).
i. Date (voir page 42)
Indique la date à laquelle vous filmez.
8
00732B SCL901 USA+FRA(1-19) 1/14/04 8:39 AM Page 12

Getting to Know Your Camcorder
OSD (On Screen Display)
FRANÇAISENGLISH
13
j. Time (see page 42)
Indicates the time you are recording.
k. Title (see page 44)
Indicates the recorded title you have set.
It is superimposed on the scene.
l. Self diagnosis (see page 64)
(TAPE!, TAPE END!, PROTECTION!) Checks the operation of the
Camcorder.
m. DSE (Digital Special Effect) (see page 40)
Indicates the DSE mode is activated.
The operation modes are STROBE, SEPIA, B&W, NEG.,
MIRROR, ART, MOSAIC, 16:9(WIDE) and CINEMA.
n. White Balance mode (see page 48)
Indicates the White Balance mode is activated.
The White Balance modes are AUTO, INDOOR
( ) and
OUTDOOR
( ).
o. Tape counter
Indicates amount of the tape used.
p. Operation mode
Indicates the operation mode is activated.
The operation modes are STBY, REC , STOP, PLAY
( ),
FF
( ), REW( ), EJECT.
q. Hi8 (see page 54)
Indicates you are using Hi8 tape when recording or playing back.
r. DEW ( ) condensation (see page 67)
Monitors the moisture condensation.
s. Digital zoom (see page 31)
Indicates digital zoom is activated.
t. Snap Shot (SCL903/L906/L907 only) (see page 47)
Indicates the time left during Snap Shot Recording.
u. Zero return (SCL906/L907 only) (see page 55)
Indicates that the zero return is activated.
v. PB DSE (see page 56)
Shows that the PB DSE mode is active.
w. VOLUME (see page 56)
x. EASY & CUSTOM
Shows when the easy or custom mode is active.
y. LIGHT (SCL906/L907 only)
Shows when the Light is switched on.
z. Remocon ( OFF) (SCL906/L907 only)
Indicates the remocon off mode is activated.
Familiarisez-vous avec le caméscope
Affichage
j. Heure (voir page 42)
Indique l'heure à laquelle vous filmez.
k. Titre (voir page 44)
Indique le titre prédéfini choisi pour l’enregistrement.
Il apparaît en surimpression sur scène filmée.
l. Auto-diagnostic (voir page 64)
(TAPE!, TAPE END!, PROTECTION!) Contrôle le fonctionnement du
caméscope.
m. Effets Numériques Spéciaux (voir page 40)
Indique que ce mode est activé.
Les différents modes sont les suivants : STROBE, SEPIA, B&W, NEG.,
MIRROR, ART, MOSAIC, 16:9(WIDE) et CINEMA.
n. Mode de sélection de l’équilibrage des blancs (voir page 48)
Indique que ce mode est activé.
Les différents modes disponibles sont les suivants: AUTO,
INDOOR ( ) et OUTDOOR ( ) .
o. Compteur de bande
Indique la quantité de bande utilisée.
p. Mode de fonctionnement
Indique quel mode de fonctionnement est activé. Les différents modes
sont les suivants: STBY, REC , STOP, PLAY( ), FF( ),
REW( ) et EJECT.
q. Hi8 (voir page 54)
Indique que vous utilisez une cassette Hi 8 en mode d’enregis-trement
ou de lecture.
r. DEW ( ) (voir page 67)
Contrôle de la condensation due à l'humidité.
s. Zoom numérique (voir page 31)
Indique que le zoom numérique est activé.
t. Mode Photo (SCL903/L906/L907) (voir page 47)
Indique le temps restant sur la bande pour une prise de vue en mode
photo.
u. Remise à zéro (SCL906/L907) (voir page 55)
Indique que la remise à zéro est activée.
v. PB DSE (voir page 56)
Indique que les effets numériques spéciaux sont activés en mode
Magnétoscope.
w. VOLUME (voir page 56)
x. EASY & CUSTOM
Indique que le mode EASY ou CUSTOM est activé.
y. Torche (SCL906/L907)
Indique que la torche vidéo est allumée.
z.
Télécommande
( OFF) (SCL906/L907)
Indique que la télécommande est en mode "désactivé".
00732B SCL901 USA+FRA(1-19) 1/14/04 8:39 AM Page 13

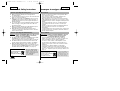
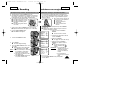
Make sure that the following basic accessories are supplied with
your camcorder.
Basic Accessories
1. AC Power Adapter. (AA-E8 TYPE)
(see page 18)
2. AC cord. (see page 18)
3. Battery Pack. (see page 19)
4. Audio/Video Cable.
(see page 53)
5. Shoulder strap. (see page 17)
6. Instruction Book.
7. Remote Control.
(SCL906/L907 only, see page 15)
8. Lithium Battery for Remote Control.
(SCL906/L907 only, see page 15)
Lithium Battery for Clock.
(TYPE: CR2025, see page 17)
9. Software CD (SCL907 only)
10. USB Cable (SCL907 only)
11. USB AUDIO Cable
(SCL907 only)
12. Lens Cover
Optional Accessory
13. S-VIDEO cable. (see page 54)
Note
: Optional accessories may be
included with the camcorder,
depending on the country in
which it is purchased.
Getting to Know Your Camcorder
Accessories Supplied with Camcorder
ENGLISH FRANÇAIS
14
Familiarisez-vous avec le caméscope
Accessoires fournis avec votre caméscope
Assurez-vous que les accessoires de base ci-après ont été livrés
avec votre caméscope.
Accessoires de base
1. Adaptateur secteur. (TYPE AA-E8)
(voir page 18)
2. Câble DC. (voir page 18)
3. Bloc batterie. (voir page 19)
4. Câble AUDIO/VIDEO.
(voir page 53)
5. Bandoulière. (voir page 17)
6. Mode d’emploi.
7. Télécommande.
(SCL906/L907, voir page 15)
8. Pile au lithium pour la
télécommande.
(SCL906/L907, voir page 15)
Pile au lithium pour l’horloge
interne.
(type: CR2025, voir page 17)
9. CD logiciel (SCL907)
10. Câble USB (SCL907)
11. Câble USB AUDIO (SCL907)
12. Couvre-objectif
Accessoires en option
13. Câble S-VIDEO. (voir page 54)
Remarque: dans certains pays, ces accessoires peuvent être
livrés avec le caméscope.
1. AC Power Adapter
(AA-E8 TYPE)
2. AC cord
3. Battery Pack
5. Shoulder Strap
4. AUDIO/VIDEO Cable
6. Instruction Book
7. Remote Control
Video Camcorder
8mm
COLOR
Caméscope
8mm
ÉCRAN LCD COULEUR
8. Lithium Batteries
S
T
A
R
T
/
S
T
O
P
S
E
L
F
T
I
M
E
R
Z
E
R
O
R
E
T
U
R
N
S
T
I
L
L
C
O
U
N
T
E
R
R
E
S
E
T
W
I
D
E
T
E
L
E
D
I
S
P
L
A
Y
9. Software CD
10. USB Cable
11. USB AUDIO Cable 12. Lens Cover
13. S-VIDEO cable
00732B SCL901 USA+FRA(1-19) 1/14/04 8:39 AM Page 14

Getting to Know Your Camcorder
Remote Control (SCL906/L907 only)
FRANÇAISENGLISH
15
Description of Buttons
1. Start/Stop (see page 23)
2. Self Timer
3. Still (see page 55)
4. WIDE (see page 30)
5. TELE (see page 30)
6. Display (see page 12)
7. (Play) (see page 54)
8. (FF) (see page 55)
9. (REW) (see page 55)
10. (Stop) (see page 54)
11. Counter Reset (see page 55)
12. Zero Return (see page 55)
Remote Control Battery Installation
✤ You must insert or replace this battery
when:
- You purchase the camcorder.
- The remote control doesn’t work.
✤ Insert Lithium Battery, following the
+ and - markings.
✤ Be careful not to reverse the polarity of
the battery.
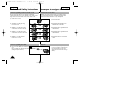
Self Timer Recording
✤ The Self Timer function on the remote control allows you
to start and stop recording automatically.
Example:
Recording yourself
✤ Two options are available
- WAIT-10S/SELF-30S: wait 10 seconds, followed by
30 seconds of recording.
- WAIT-10S/SELF-END: wait 10 seconds, followed by
recording until you press the START/STOP button
again.
Familiarisez-vous avec le caméscope
Télécommande (SCL906/L907)
Touches
1. Start/Stop (Marche/arrêt, voir page 23)
2. Self Timer (Minuterie automatique)
3. Still (Pause, voir page 55)
4. WIDE (Grand angle, voir page 30)
5. TELE (Téléobjectif, voir page 30)
6. Display (Affichage, voir page 12)
7. (Play) (Lecture, voir page 54)
8. (FF) (Avance rapide, voir page 55)
9. (REW) (Rembobinage, voir page 55)
10. (Stop) (Arrêt, voir page 54)
11 Mise à zéro du compteur (voir page 55)
12. Remise à zéro (voir page 55)
Insertion des piles dans la télécommande
✤ Vous devez insérer ou remplacer les piles:
- à l’achat du caméscope,
- lorsque la télécommande ne fonctionne
plus.
✤ Insérez la pile au lithium en respectant les
signes de polarité + et -.
✤
Veillez à ne pas inverser la polarité de la pile.
Enregistrement automatique avec la télécommande
✤ La fonction de minuterie automatique sur la télécommande
vous permet de démarrer et d’arrêter un enregistrement
automatiquement.
Exemple: scène regroupant tous les membres de votre famille
✤ Vous avez deux possibilités:
- WAIT-10S/SELF-30S: dix secondes d’attente, suivies
de trente secondes d’enregistrement.
- WAIT-10S/SELF-END: dix secondes d’attente, suivies
de l’enregistrement, jusqu’à ce que vous appuyiez de
nouveau sur la touche START/STOP.
START/
STOP
SELF
TIMER
ZERO
RETURN
STILL
COUNTER
RESET
WIDE
TELE
DISPLAY
6
1
2
8
9
7
11
4
5
12
10
3
00732B SCL901 USA+FRA(1-19) 1/14/04 8:39 AM Page 15

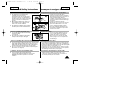
FRANÇAISENGLISH
Preparing
16
1. Set power switch to CAMERA mode.
2. Press Self Timer button until the appropriate
indicator is displayed on the LCD:
■ WAIT-10S/SELF-30S
■ WAIT-10S/SELF-END
3. Press START/STOP button to start the timer.
: After waiting for 10 seconds, recording starts.
: If you have selected SELF-30S, recording
stops automatically after 30 seconds.
: If you have selected SELF-END,
press START/STOP again when you wish to
stop recording.
Note
: When recording with the timer, you can
press START/STOP button again to cancel
the function.
Adjusting the Hand Strap and Shoulder Strap
1. Placez le caméscope en mode Caméscope.
2. Appuyez sur la touche Self Timer, jusqu’à ce
que l’indication souhaitée s’affiche à l’écran
LCD :
■ WAIT-10S/SELF-30S
■ WAIT-10S/SELF-END
3. Appuyez sur la touche START/STOP
pour démarrer la minuterie.
:
Après une attente de dix
secondes,l’enregistrement démarre.
:
Si vous avez sélectionné
SELF-30S, l’enregistrement s’arrête au
bout de trente secondes.
: Si, au contraire, vous avez sélectionné
SELF-END, appuyez
de nouveau sur START/STOP pour
arrêter l’enregistrement.
Remarque
: lorsque vous enregistrez avec la
minuterie, vous pouvez appuyer une
deuxième fois sur START/STOP
pour annuler la fonction.
Mise en place de la poignée de soutien et de la bandoulière
Poignée de soutien
✤ Il est très important d’ajuster la poignée de soutien afin de filmer
dans les meilleures conditions possibles.
✤ La poignée de soutien vous permet :
-
de maintenir le caméscope dans une position stable et confortable,
-
d’appuyer sur le bouton du zoom et sur le bouton rouge
d’enregistrement sans avoir à changer la position de votre main.
1. Détachez le ruban adhésif de la dragonne.
2. Réglez la dragonne à votre main et fixez à
nouveau le ruban adhésif pour la maintenir
en place.
Bandoulière
✤ La bandoulière vous permet de porter
le caméscope en toute sécurité.
1. Insérez chaque extrémité de la bandoulière
dans les anneaux de fixation sur le
caméscope.
2. Enfilez ensuite les extrémités dans la
boucle, ajustez la longueur désirée, puis
resserrez la boucle.
Réglage du caméscope
1
START/
STOP
SELF
TIMER
ZERO
RETURN
STILL
COUNTER
RESET
WIDE
TELE
DISPLAY
3
START/
STOP
SELF
TIMER
ZERO
RETURN
STILL
COUNTER
RESET
WIDE
TELE
DISPLAY
2
WAIT-10S
SELF-30S
CAMERA
Hand Strap
✤ It is very important to adjust the hand strap for better recording.
✤ The hand strap enables you to:
- Hold the camcorder in a stable, comfortable position.
- Press the Zoom and the red Record button without
having to change the position of your hand.
1. Detach adhesive tape from the Hand Strap.
2. Adjust the Hand Strap to your hand and
reattach the adhesive tape to secure it.
Shoulder Strap
✤ The Shoulder Strap allows you to carry
your camcorder with complete safety.
1. Insert each end of the strap into the hooks
on the camcorder.
2. Put the end of each strap through the
buckle, adjust the length of the strap, then
pull it tight in the buckle.
00732B SCL901 USA+FRA(1-19) 1/14/04 8:39 AM Page 16

FRANÇAISENGLISH
Preparing
17
✤ The lithium battery maintains the clock function, title and
preset contents of the memory; even if the battery pack or AC
power adapter is removed.
✤ The lithium battery for the camcorder lasts about 8~10 months
under normal operation from the time of installation.
✤ When the lithium battery becomes weak or dead, the
date/time indicator flashes for about 5 seconds when you set
the power switch to CAMERA.
When this occurs, replace the lithium battery with type
CR2025.
1. Take out the holder from the lithium
battery compartment.
2. Insert the side of the lithium battery
toward the bottom of the holder.
3. Reinsert the holder into the lithium
battery compartment.
Note: If the holder is inserted in the wrong direction, it will not fit
correctly.
W
arning: Keep the LITHIUM BATTERY out of the reach of the
children. Should the battery be swallowed,
consult a doctor immediately.
Lithium Battery Installation
✤ La pile au lithium mémorise les fonctions d’horloge et de
titrage ainsi que les réglages prédéfinis, en l’absence du bloc
batterie ou de l’adaptateur secteur.
✤ La longévité de la pile au lithium est de huit à dix mois à partir
de sa mise en place et dans des conditions normales
d’utilisation.
✤ Lorsqu’elle s’affaiblit ou est déchargée, l’affichage de la date et
de l’heure clignote pendant cinq secondes environ lorsque
vous passez en mode Caméscope.
Dans ce cas, remplacez-la par une pile de type CR2025.
1. Retirez le cache du compartiment de
la pile au lithium.
2. Placez le côté de la pile au lithium
vers le bas, sur le support.
3. Remettez le cache du compartiment
de la pile au lithium en place.
Remarque: si le cache est mal emboîté, il ne se mettra pas
correctement en place.
A
vertissement: maintenez la pile au lithium hors de portée
des enfants. Si une pile venait à être avalée,
consultez immédiatement un médecin.
Installation de la pile au lithium
Attaching the Lens Cover
Fixation du couvre-objectif
Réglage du caméscope
1 2 3 4
00732B SCL901 USA+FRA(1-19) 1/14/04 8:39 AM Page 17

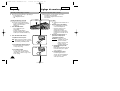
Preparing
Connecting the Power Source
ENGLISH FRANÇAIS
18
✤ There are two ways to connect power source.
- Using the AC Power Adapter : used for indoor recording.
- Using the Battery Pack: used for outdoor recording.
To use the AC Power Adapter
1. Connect the AC Power
Adapter to the AC cord.
2. Connect the AC cord to a wall
socket.
Note: The plug and wall
socket type may be
different depending on
regional conditions.
3. Connect the other end of the
DC cable to DC jack of the
camcorder.
4. To set the camcorder to the CAMERA mode.
a. Hold down the tab of the power switch and push the switch
to CAMERA mode.
b. Make sure that the Lens Cap is open.
c. Open the LCD Screen and make sure that the image
appears in the LCD Screen.
- The LCD Screen is turned on automatically when it’s
opened more than 30 degrees.
Note
: If the adapter is used next to a TV or the camcorder, it may
cause the TV or camcorder to emit noise. Move the adapter
away from the TV, camcorder or the antenna cable.
Réglage du caméscope
Connexion d’une alimentation
✤ Deux possibilités d’alimentation s’offrent à vous:
-l’adaptateur secteur et le câble DC: utilisation intérieure,
- le bloc batterie: utilisation extérieure.
Utilisation de l’adaptateur secteur et du câble DC
1. Branchez le câble DC sur
l’adaptateur secteur.
2. Connectez l’adaptateur à
une prise murale.
Remarque:
le type de fiche
et de prise
murale peut
différer selon le
pays.
3. Connectez l’autre extrémité
du câble DC au caméscope.
4. Placez l’appareil en mode caméscope en suivant les
instructions ci-après.
a. Tout en maintenant appuyé le petit bouton au milieu du
commutateur, placez ce dernier sur la position CAMERA.
b. Retirez le capuchon de la lentille.
c. Ouvrez l’écran LCD et assurez-vous que l’image apparaît.
-L’écran LCD s’allume automatiquement lorsqu’il est
ouvert de plus de 30°.
Remarque: Si vous utilisez l’adaptateur secteur à proximité d’un
téléviseur ou du caméscope, des parasites peuvent
apparaître sur l’écran. Eloignez l’adaptateur du
téléviseur,
du caméscope ou du câble de l’antenne.
2
1
3
CAMERA
00732B SCL901 USA+FRA(1-19) 1/14/04 8:39 AM Page 18

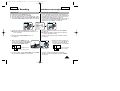
How long will the battery last for recording?
✤ Depends on how often you are likely to use the zoom
feature during recording.
Recharging the Battery Pack
1. Attach the battery pack to the
camcorder.
2. Connect the AC Power Adapter to
the AC cord and connect the
AC cord to a wall socket.
3. Connect the DC cable to the
DC jack of the camcorder.
4. Turn off the camcorder power, and the
recharging indicator will start blinking
and begin recharging.
- Blinking once a second : Indicates
less than 50% has been charged.
- Blinking twice a second : Indicates
50% ~ 75% has been recharged.
- Blinking three times a second :
Indicates 75% ~ 100% has been recharged.
- Blinking stops and stays on : Recharging has been
completed.
- On for a second and off for a second: Indicates there is
an error. Reset the battery pack and DC cable.
5. If recharging is completed, separate the camcorder,
AC power adapter, and battery pack.
■ Even if the power is turned off, battery will be
discharged.
Note:
Battery pack may be charged a little at the time
of purchase.
Preparing
To use the Battery Pack
FRANÇAISENGLISH
19
Utilisation du bloc batterie
Durée d’enregistrement
✤ De la fréquence d’utilisation du zoom. Par conséquent,
disposez de plusieurs blocs.
Recharge du bloc batterie
1. Installez le bloc batterie sur le
caméscope.
2. Connectez l’adaptateur secteur à un
câble d’alimentation et branchez ce
câble sur une prise murale.
3. Branchez le câble DC à la prise DC
du caméscope.
4. Éteignez le caméscope, le voyant de
charge se met alors à clignoter et la
charge commence :
-s’il clignote une fois par seconde,
moins de 50 % de la batterie a été
rechargé;
-s’il clignote deux fois par seconde,
50 % à 75 % de la batterie a été
rechargé;
-s’il clignote trois fois par seconde, 75 % à 100 % de la
batterie a été rechargé ;
- si le voyant reste allumé, la batterie est totalement
rechargée;
-s’il s’allume pendant une seconde et s’éteint pendant une
seconde, cela signifie qu’un incident s’est produit.
Réinitialisez le bloc batterie et le câble DC.
5. Si la batterie est entièrement chargée, retirez l’adaptateur
secteur et le bloc batterie du caméscope.
■ La batterie se décharge, même lorsque l’alimentation est
coupée.
Remarque
: le bloc batterie peut être déjà en partie chargé à
l’achat.
Réglage du caméscope
1
4
2 3
OFF
00732B SCL901 USA+FRA(1-19) 1/14/04 8:39 AM Page 19

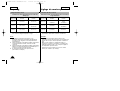
ENGLISH FRANÇAIS
20
Preparing
Réglage du caméscope
Using the Battery Pack Utilisation du bloc batterie
✤ The continuous recording times given in the table are approxi-
mate. Actual recording time depends on usage.
Notes:
✤ The battery pack should be recharged in a room
temperature that is between 0°C(32°F) and 40°C(104°F).
It should never be charged in a room temperature that is
below 0°C(32°F).
✤ The life and capacity of the battery pack will be reduced if it is
used in temperatures below 0°C, even when it is fully
recharged.
✤ The life and capacity of the battery pack will be reduced if the
battery pack is left in temperatures above 40°C(104°F) for a
long period, even when it is fully recharged.
✤ Do not put the battery pack near any heat source
(fire or flames, for example).
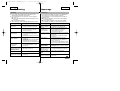
Continuous recording time table based on model and
battery type.
✤ Les durées d'enregistrement indiquées dans le tableau sont
approximatives. Elles varient en fonction de l'utilisation.
Remarques:
✤ Le chargement de la batterie doit être effectué à une
température comprise entre 0°C et 40°C. Il ne doit jamais être
effectué dans une pièce dont la température est inférieure à
0°C.
✤ Même si le bloc batterie est complètement chargé, sa
longévité et ses capacités sont réduites, s’il est utilisé à une
température inférieure à 0°C ou s’il est exposé longtemps à
une température supérieure à 40°C.
✤ N’exposez pas le bloc batterie à une source de chaleur
intense (feu ou flammes, par exemple).
Tableau des durées d'enregistrement selon le modèle et
le type de batterie
SB-L110A
environ
90
minutes
environ
120
minutes
SB-L160
environ
130
minutes
environ
180
minutes
SB-L320
environ
270
minutes
environ
360
minutes
LCD ON,
EVF OFF
LCD OFF,
EVF ON
Type de pile
Battery Type
SB-L110A
SB-L320
Approximately
90 minutes
Approximately
120 minutes
SB-L160
Approximately
130 minutes
Approximately
180 minutes
Approximately
270 minutes
Approximately
360 minutes
LCD ON,
EVF OFF
LCD OFF,
EVF ON
00732B SCL901 USA+FRA(20-45) 1/14/04 8:39 AM Page 20
La page charge ...
La page charge ...
La page charge ...
La page charge ...
La page charge ...
La page charge ...
La page charge ...
La page charge ...
La page charge ...
La page charge ...
La page charge ...
La page charge ...
La page charge ...
La page charge ...
La page charge ...
La page charge ...
La page charge ...
La page charge ...
La page charge ...
La page charge ...
La page charge ...
La page charge ...
La page charge ...
La page charge ...
La page charge ...
La page charge ...
La page charge ...
La page charge ...
La page charge ...
La page charge ...
La page charge ...
La page charge ...
La page charge ...
La page charge ...
La page charge ...
La page charge ...
La page charge ...
La page charge ...
La page charge ...
La page charge ...
La page charge ...
La page charge ...
La page charge ...
La page charge ...
La page charge ...
La page charge ...
La page charge ...
La page charge ...
La page charge ...
La page charge ...
La page charge ...
La page charge ...
-
 1
1
-
 2
2
-
 3
3
-
 4
4
-
 5
5
-
 6
6
-
 7
7
-
 8
8
-
 9
9
-
 10
10
-
 11
11
-
 12
12
-
 13
13
-
 14
14
-
 15
15
-
 16
16
-
 17
17
-
 18
18
-
 19
19
-
 20
20
-
 21
21
-
 22
22
-
 23
23
-
 24
24
-
 25
25
-
 26
26
-
 27
27
-
 28
28
-
 29
29
-
 30
30
-
 31
31
-
 32
32
-
 33
33
-
 34
34
-
 35
35
-
 36
36
-
 37
37
-
 38
38
-
 39
39
-
 40
40
-
 41
41
-
 42
42
-
 43
43
-
 44
44
-
 45
45
-
 46
46
-
 47
47
-
 48
48
-
 49
49
-
 50
50
-
 51
51
-
 52
52
-
 53
53
-
 54
54
-
 55
55
-
 56
56
-
 57
57
-
 58
58
-
 59
59
-
 60
60
-
 61
61
-
 62
62
-
 63
63
-
 64
64
-
 65
65
-
 66
66
-
 67
67
-
 68
68
-
 69
69
-
 70
70
-
 71
71
-
 72
72


Samsung SC-L903 Manuel utilisateur
- Catégorie
- Caméscopes
- Taper
- Manuel utilisateur
- Ce manuel convient également à
dans d''autres langues
- English: Samsung SC-L903 User manual