
150BT
EN Operator's manual 6-16
ES-MX Manual de usuario 17-28
FR-CA Manuel d’utilisation 29-40
BP152HV

2
14
24
29
25
23
19
21
20
22
17
6
18
15
16
5
4
11
3
10
7
12
12
8
28
26
9
6
27
13
1
30
1
2 3 4 5 6 7
8 9 10 11 12 13
14 15
16 17
18
B
D
A
C
19

E
20 21
22 23
24
A
B
25
26 27

28 29
0
30 31
32 33
34 35

36 37
38 39
B
C
A
40

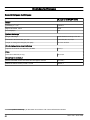
Contents
Introduction..................................................................... 6
Safety..............................................................................7
Assembly...................................................................... 10
Operation...................................................................... 10
Maintenance................................................................. 12
Troubleshooting............................................................ 14
Transportation and storage...........................................15
Technical data.............................................................. 16
Introduction
Product description
This product is a backpack blower with a fuel engine.
We have a policy of continuous product development
and therefore reserve the right to modify the design and
appearance of products without prior notice.
Intended use
Use the product to blow leaves and other unwanted
material from areas such as lawns, pathways and
asphalt roads.
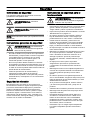
Product overview
(Fig. 1)
1. Throttle control lever
2. Frame
3. Harness
4. Engine cover
5. Fan cover
6. Air intake screen
7. Air filter
8. Starter rope handle
9. Fuel tank
10. Waist belt
11. Spark plug
12. Vibration damping system
13. Choke control
14. Control handle
15. Stop switch with throttle control
16. Throttle trigger
17. Pipe angle
18. Clamp
19. Flexible hose
20. Control pipe
21. Cable clamp
22. Intermediate pipe
23. Blower nozzle
24. Operator's manual
25. Combination wrench
26. Air purge bulb
27. High speed nozzle
28. Idle adjustment screw
29. Fan
30. Foot plate
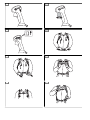
Symbols on the product
(Fig. 2) WARNING! This product can be
dangerous and cause serious injury or
death to the operator or others. Be careful
and use the product correctly.
(Fig. 3) Read the operator's manual carefully
and make sure that you understand the
instructions before use.
(Fig. 4) Use approved hearing protection and
approved eye protection. If the
environment contains dust, use a
breathing mask.
(Fig. 5) Use approved protective gloves during
operation and maintenance. Use
protective boots or shoes with non-slip
soles. Use clothing of strong fabric and of
full length.
(Fig. 6) Make sure that long hair is put above your
shoulders.
(Fig. 7) Do not wear jewelry or loose clothing
during operation.
(Fig. 8) Mixture of gasoline and two-stroke oil.
(Fig. 9) Air purge bulb.
(Fig. 10) Keep all body parts away from hot
surfaces.
(Fig. 11) Do not go near the impeller as it turns.
(Fig. 12) Choke, open position.
(Fig. 13) Choke, closed position.
(Fig. 14) Idle adjustment screw.
61456 - 006 - 28.07.2022

(Fig. 16)
Look out for thrown ob-
jects. Thrown objects can
cause serious injury. Use
personal protective equip-
ment.
(Fig. 17)
Keep a safety distance at
a minimum of 15 m to per-
sons or animals.
yyyywwxxxxx
The rating plate or the la-
ser printing shows the seri-
al number. yyyy is the pro-
duction year and ww is the
production week.
Note: Other symbols/decals on the product refer to
certification requirements for other commercial areas.
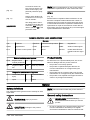
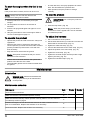
EPA III
(Fig. 15)
The Emissions Compliance Period referred to on the
Emission Compliance label indicates the number of
operating hours for which the engine has been shown
to meet Federal emissions requirement. Maintenance,
replacement or repair of the emission control devices
and system may be performed by any non-road engine
repair establishment or individual.
EMISSION CONTROL LABEL ABBREVIATIONS
General:
CAL California EXH/EVP Exhaust and Evaporative REGS Regulations
DISPL Displacement EVAP Evaporative SORE Small off road engines
ECS Emission control system HRS Hours US EPA United States Environ-
mental Protection Agen-
cy
Exhaust emission control system:
ECM Engine control
module (Autotune)
OC Oxidizing Catalyst
EM Engine modifica-
tion
TWC Three way catalyst
Evaporative emission control systems:
C Coextruded (Multi-
layer)
P Treated HDPE or
PE
N Nylon S Sealed
Product liability
As referred to in the product liability laws, we are not
liable for damages that our product causes if:
• the product is incorrectly repaired.
• the product is repaired with parts that are not
from the manufacturer or not approved by the
manufacturer.
• the product has an accessory that is not from the
manufacturer or not approved by the manufacturer.
• the product is not repaired at an approved service
center or by an approved authority.
Safety
Safety definitions
The definitions below give the level of severity for each
signal word.
WARNING: Injury to persons.
CAUTION: Damage to the product.
Note: This information makes the product easier to
use.
General safety instructions
WARNING: Read the warning
instructions that follow before you use the
product.
• Do not do changes to the product without approval
from the manufacturer and always use original
accessories. Modifications and/or accessories that
1456 - 006 - 28.07.2022 7

are not approved can result in serious injury or the
death of the operator or others.
• Do not use a damaged product. Do the safety
checks and maintenance given in this operator's
manual. All other maintenance must be done by
approved servicing personnel.
• All servicing and repair operations must be done by
approved servicing personnel. If a part of the product
is defective, speak to your servicing dealer.
Vibration safety
This product is for occasional operation only.
Continuous or regular operation of the product can
cause “white finger” or equivalent medical problems
from vibrations. Examine the condition of your hands
and fingers if you operate the product continuously or
regularly. If your hands or fingers have discoloration,
have pain, tingle, or are numb, stop work and speak to a
physician immediately.
Safety instructions for operation
WARNING: Read the warning
instructions that follow before you use the
product.
• This product can be dangerous and cause serious
injury or death to the operator or others. Be careful
and use the product correctly.
• Do an inspection of the product before use. Refer to
Maintenance on page 12
.
• Do not operate the product when you are tired, ill or
under the influence of alcohol or other drugs that can
decrease your vision, judgment or coordination.
• Install all covers and guards before use. To prevent
electrical shock, make sure that the spark plug cap
and ignition cable are not damaged.
• Do not touch the spark plug or ignition cable when
the engine is on.
• Keep a safety distance at a minimum of 15 m to
persons or animals. If persons, children or animals
come nearer than 15 m, stop the product. Point the
product away from persons, animals, open windows
and other objects.
• Do not let children operate the product. Make sure
that all operators read and understand the contents
of this operator's manual.
• Keep hands or other objects away from the blower
housing during operation. Rotating parts can cause
serious injury.
• Do not use the product if the air intake screen is
not installed. Always make sure that the air intake
screen is installed and not damaged before use.
• If an emergency occurs, release the waist belt and
chest belt of the harness and let the product fall.
• Obey national regulations and directives.
• Keep all body parts away from hot surfaces.
• Too much vibration can cause damage to the
circulation or the nervous system. Speak to your
physician if you have symptoms, for example
numbness, loss of feeling, tingling, pricking, pain,
loss of strength or changes in skin color in your
fingers, hands or wrists.
• Look out for thrown objects. Thrown objects can
cause serious injury.
• Do not use the product in bad weather, for example
fog, rain, strong winds and too cold environments.
To do work in bad weather can cause tiredness and
dangerous conditions.
• Make sure that you can move and keep a stable
position. Do a check of the work area for possible
obstacles, for example rocks. Be careful if you
operate the product on a slope.
• Do not put the product on the ground with the engine
on.
• Do not operate the product from high positions, for
example on a ladder.
• Make sure that you can always be heard if an
accident occurs.
• Make sure that the exhaust fume outlet is not
blocked. To prevent damage to the product, keep
obstacles at a minimum distance of 50 cm from the
exhaust fume outlet.
• Do not start the product indoors, in bad airflow or
near flammable material. The engine exhaust fumes
contain carbon monoxide, which can cause carbon
monoxide poisoning. The engine exhaust fumes are
hot and can contain sparks which can start a fire.
Personal protective equipment
WARNING: Read the warning
instructions that follow before you use the
product.
• Use approved personal protective equipment when
you use the product. Personal protective equipment
cannot fully prevent injury but it can decrease the
degree of injury. Speak to your dealer for more
information.
• Use approved hearing protection. Long-term
exposure to noise can result in permanent hearing
damage.
• Use approved eye protection. If you use a visor,
you must also use approved protective goggles.
Approved protective goggles must agree with the
ANSI Z87.1 standard in the USA or EN 166 in EU
countries.
• Use protective gloves during operation and
maintenance.
• Use protective boots or shoes with non-slip soles.
• Use clothing of strong fabric and of full length. Do
not use jewelry or open shoes. To decrease the
risk on injury, your clothing must be close-fitting but
not limit your movements. Put your hair above your
81456 - 006 - 28.07.2022

shoulders to prevent that your hair enters rotating
parts or catches on branches.
• Use breathing protection when there is a risk of dust.
• Keep first aid equipment near.
Safety devices on the product
WARNING: Read the warning
instructions that follow before you use the
product.
• Do not use a product with defective safety devices.
• Do a check of the safety devices regularly. Refer to
Maintenance on page 12
.
• If the safety devices are defective, speak to your
Husqvarna servicing dealer.
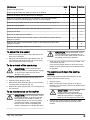
To do a check of the muffler
WARNING: Do not use a product with
a defective muffler.
WARNING: The muffler becomes very
hot during and after operation, also at idle
speed. Use protective gloves to prevent burn
injuries.
WARNING: The inner side of the
muffler contains chemicals that may be
carcinogenic. Do not touch the muffler if it
is damaged.
• Regularly do a visual check of the muffler. The
muffler keeps noise levels to a minimum and sends
exhaust fumes away from the operator. Refer to
To
examine and clean the cooling system on page 13
.
To do a check of the vibration damping system
1. Make sure that there are no cracks or deformation
on the vibration damping units.
2. Make sure that the vibration damping units are
correctly attached to the engine unit and handle unit.
Refer to
Product overview on page 6
for information
about where the vibration damping system is on your
product.
To do a check of the start/stop switch
1. Use the start/stop switch to stop the engine.
2. Make sure that the engine stops fully.
To see where the start/stop switch is on your product,
refer to
Product overview on page 6
.
Harness safety
Always use the harness when you operate the product.
If you do not use the harness, you cannot operate the
product safely. This can result in injury to you or other
persons. Make sure that the waist belt and chest strap
are attached and correctly adjusted. There is a risk that
an open belt can go into the fan of the product.
(Fig. 18)
Fuel safety
WARNING: Read the warning
instructions that follow before you use the
product.
• Do not mix or add the fuel indoors or near a heat
source.
• Do not start the product if there is fuel or oil on the
product or on your body.
• Do not start the product if the engine has a fuel leak.
Examine the engine for fuel leaks regularly.
• Always be careful with fuel. Fuel is flammable and
the fuel fumes are explosive and can cause serious
injury or death.
• Do not breathe in the fuel fumes, it can cause injury.
Make sure that there is a sufficient airflow.
• Do not smoke near the fuel or the engine.
• Do not put the product or a fuel container near warm
objects, an open flame, a spark or a pilot light.
• Always use approved containers for storage and
transportation of fuel.
Safety instructions for maintenance
WARNING: Read the warning
instructions that follow before you use the
product.
• Stop the engine, remove the spark plug and let
the engine become cool before maintenance and
assembly.
• A blocked spark arrestor screen causes the engine
to become too hot which causes damage to the
engine.
• If the spark arrestor screen is frequently blocked,
it can be a sign that performance of the catalytic
converter is decreased. Speak to your servicing
dealer to examine the muffler.
1456 - 006 - 28.07.2022 9

Assembly
Introduction
WARNING: Read and understand the
safety chapter before you assemble the
product.
To assemble the blower pipe and the
control handle on the product
Note: Lubricate the tubes and flexible hose to make
them easier to assemble.
1. Attach the flexible hose (A) to the pipe angle and the
control pipe (B) with the clamps (C) and (D). (Fig.
19)
2. Attach the handle holder (E) to the control pipe. Align
the handle holder with the flange on the control pipe.
(Fig. 20)
3. Adjust the position of the control handle to a safe
and correct work position. Tighten the knob.
4. Attach the cable to the flexible hose with the cable
clamp. (Fig. 21)
5. Attach the intermediate pipe to the control pipe. (Fig.
22)
6. Attach the blower nozzle to the intermediate pipe.
Note: The blower nozzle can only be installed on
the intermediate pipe.
7. For higher air speed, attach the high speed nozzle to
the blower nozzle.
Operation
Introduction
WARNING: Read and understand the
safety chapter before you use the product.
Fuel
This product has a two-stroke engine.
CAUTION: Incorrect type of fuel can
result in engine damage. Use a mixture of
gasoline and two-stroke oil.
Premixed fuel
• Use Husqvarna premixed alkylate fuel for best
performance and extension of the engine life. This
fuel contains less harmful chemicals compared
to regular fuel, which decreases harmful exhaust
fumes. The quantity of remains after combustion is
lower with this fuel, which keeps the components of
the engine more clean.
To mix fuel
Gasoline
• Use good quality unleaded gasoline with a maximum
of 10% ethanol contents.
CAUTION: Do not use gasoline with
an octane grade less than 90 RON/87
AKI. Use of a lower octane grade can
cause engine knocking, which causes
engine damages.
Two-stroke oil
• For best results and performance use Husqvarna
two-stroke oil.
• If Husqvarna two-stroke oil is not available, use a
two-stroke oil of good quality for air-cooled engines.
Speak to your servicing dealer to select the correct
oil.
CAUTION: Do not use two-stroke
oil for water-cooled outboard engines,
also referred to as outboard oil. Do not
use oil for four-stroke engines.
To mix gasoline and two-stroke oil
Gasoline, liter Two-stroke oil,
liter
2% (50:1)
5 0.10
10 0.20
15 0.30
20 0.40
US gallon US fl. oz.
1 2 ½
2 1/2 6 ½
5 12 ⅞
10 1456 - 006 - 28.07.2022

CAUTION: Small errors can influence
the ratio of the mixture drastically when you
mix small quantities of fuel. Measure the
quantity of oil carefully and make sure that
you get the correct mixture.
(Fig. 23)
1. Fill half the quantity of gasoline in a clean container
for fuel.
2. Add the full quantity of oil.
3. Shake the fuel mixture.
4. Add the remaining quantity of gasoline to the
container.
5. Carefully shake the fuel mixture.
CAUTION: Do not mix fuel for more
than 1 month at a time.
To fill the fuel tank
WARNING: Obey the procedure that
follows for your safety.
1. Stop the engine and let the engine become cool.
2. Clean the area around the fuel tank cap. (Fig. 24)
3. Shake the container and make sure that the fuel is
fully mixed.
4. Remove the fuel tank cap slowly to release the
pressure.
5. Fill the fuel tank.
CAUTION: Make sure that there is
not too much fuel in the fuel tank. The
fuel expands when it becomes hot.
6. Tighten the fuel tank cap carefully.
7. Clean fuel spillage on and around the product.
8. Move the product 3 m/10 ft or more away from the
refueling area and fuel source before you start the
engine.
Note: To see where the fuel tank is on your product,
refer to
Product overview on page 6
.
To start a cold engine
WARNING: Air is released as soon as
the engine is started, even when it idles. Do
not let anyone stand close to the blower or
the blower tube.
1. If the engine is cold, put the choke control (A) to
the closed choke position. Refer to
Symbols on the
product on page 6
. (Fig. 25)
2. Push the air purge bulb (B) again and again for a
minimum of 10 times and fuel starts to fill the air
purge bulb. It is not necessary to fill the air purge
bulb fully.
3. Put the throttle control in the fast idle position. Align
the guide marks on the throttle control lever and the
control handle. (Fig. 26)
4. Put the product on a flat surface on the ground.
5. Hold the product with the left hand and put your foot
on the foot plate. (Fig. 27)
6. Pull the starter rope handle slowly with the right hand
until resistance occurs.
Note: Do not pull the starter rope handle to full
extension and do not let go of the starter rope
handle.
7. Pull the starter rope handle quickly with the right
hand until the engine starts or attempts to start,
maximum 6 times. If the engine starts, move the
choke lever gradually to the open position and
continue to step 11. If the engine does not start,
continue to step 9.
8. When the engine attempts to start, move the choke
lever gradually to the open position.
9. Pull the starter rope handle quickly with the right
hand until the engine starts, maximum 6 times.
Note: If the engine does not start,
repeat the starting instructions from step
1.
10. Let the engine run for 30 seconds.
11. Put the throttle control at idle speed. (Fig. 28)
12. Push the throttle trigger to adjust the blower speed.
Refer to
To use the throttle trigger on page 11
.
To start a warm engine
• If the ambient temperature is below 32°C / 90°F,
use the same starting procedure as
To start a cold
engine on page 11
but do not put the choke control
in the closed choke position.
• If the ambient temperature is above 32°C / 90°F,
use the same starting procedure as
To start a cold
engine on page 11
.
To use the throttle trigger
• To increase the blower speed during operation, push
the throttle trigger until you get the correct speed.
(Fig. 29)
• To decrease the blower speed during operation,
release the throttle trigger until you get the correct
speed.
1456 - 006 - 28.07.2022 11

To start the engine when the fuel is too
hot
If the product does not start, the fuel can be too hot.
Note: Always use new fuel and decrease the
operation time during warm weather.
1. Put the product in a cool area away from open
sunlight.
2. Let the product cool down for 20 minutes at
minimum.
3. Press the air purge bulb again and again for 10-15
seconds.
4. Obey the procedure to start a cold engine. Refer to
To start a cold engine on page 11
.
To operate the product
• Operate the product at usual work hours. Obey local
regulations.
• Decrease the pieces of equipment and select the
correct speed for your task. Use the throttle at lowest
position possible to prevent more noise and dust
than necessary.
• Keep the blower nozzle near the ground.
Note: Husqvarna recommends that you use the
full blower nozzle extension.
• Make a note of the wind direction and operate the
product in the direction of the wind.
• Use applicable garden tools to release material from
the ground.
• In areas with dust, use spray equipment to wet the
area. This decreases the operation time.
• After operation, keep the product in storage
vertically.
To stop the product
CAUTION: Do not stop the product at
full speed.
1. Push the stop switch. (Fig. 30)
Note: When the product stops, you can hear a
knock sound. This is typical and is not an indication
of a defective product.
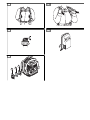
To adjust the harness
1. Put on the harness of the product.
2. Put the waist belt around your waist and connect the
belt buckle for the waist strap. (Fig. 31)
3. Tighten the waist belt strap. (Fig. 32)
4. Connect the belt buckle for the chest strap. (Fig. 33)
5. Adjust the position of the chest strap. (Fig. 34)
6. Tighten the chest strap. (Fig. 35)
7. Tighten the shoulder straps until the product is tight
against your body. (Fig. 36)
8. Tighten the load lifter straps. (Fig. 37)
Maintenance
Introduction
WARNING: Read and understand the
safety chapter before you do maintenance
on the product.
Maintenance schedule
Maintenance Daily Weekly Monthly
Clean the external surfaces. X
Make sure that the control handle operates correctly. X
Make sure that the start/stop switch operates correctly. Refer to
To do a check of
the start/stop switch on page 9
.X
Examine the engine, the fuel tank and the fuel lines for leaks. Examine the fuel
filter for contamination. Replace the fuel filter if it is necessary. X
Clean the air filter. Replace the air filter if it is necessary. X
12 1456 - 006 - 28.07.2022

Maintenance Daily Weekly Monthly
Tighten nuts and screws. X
Examine the air intake and make sure that it is not blocked. X
Examine the starter and the starter rope for damages. X
Examine the vibration damping units for damages, cracks and deformation.
Make sure that the vibration damping units are correctly installed. X
Examine the spark plug. Refer to
To do a check of the spark plug on page 13
. X
Clean the cooling system. X
Clean the external surface of the carburetor and the area around it. X
Clean the fuel tank. X
Examine all cables and connections. X
Examine and clean the spark arrestor screen on the muffler (for products without
catalytic converter). X
Examine and clean the spark arrestor screen on the muffler (for products with
catalytic converter). X
Examine the spark plug. Replace if it is necessary. X
To adjust the idle speed
1. Make sure that the air filter is clean and that the air
filter cover is attached.
2. Adjust the idle speed with the idle speed screw. To
see where the idle speed screw is on your product,
refer to
Product overview on page 6
.
To do a check of the spark plug
CAUTION: Use the recommended
spark plug. Refer to
Technical data on page
16
. An incorrect spark plug can cause
damage to the product.
1. Stop the engine and let the product become cool.
2. Clean the spark plug if it is dirty.
3. Make sure that the electrode gap is correct. Refer to
Technical data on page 16
. (Fig. 38)
4. Replace the spark plug monthly or more frequently if
it is necessary.
To do maintenance on the muffler
CAUTION: If the spark arrestor screen
is frequently blocked, it can be a sign that
performance of the catalytic converter is
decreased. Speak to you servicing dealer
to examine the muffler. A blocked spark
arrestor screen causes overheating and
results in damage to the cylinder and piston.
CAUTION: The spark arrestor screen
must be replaced if it is damaged. Do not
use a product if the spark arrestor screen on
the muffler is missing or defective.
• Clean the spark arrestor screen on the muffler. Use
a wire brush. (Fig. 39)
• Let a servicing dealer replace or do service on the
muffler and the spark arrestor screen after 50 hours
of operation.
To examine and clean the cooling
system
The cooling system includes the cooling fins on the
cylinder and the air intake screen.
1. Stop the engine.
2. Make sure that the cooling system is not dirty or
blocked. If it is necessary, clean the air intake screen
and cooling fins.
CAUTION: A dirty or blocked
cooling system can increase the
temperature of the engine and cause
damage to the product. A clogged air
intake screen decreases the blow force.
3. Examine the cooling system for damages. Make
sure that the parts are attached correctly to the
product.
1456 - 006 - 28.07.2022 13

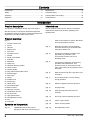
To clean the air filter
CAUTION: Do not use a product
without an air filter or with a damaged air
filter. Dust in the air can cause damage to
the engine.
1. Push the choke control to the closed position.
2. Remove the air filter cover (A).
3. Remove the pre-filter (B) from the air filter cover.
(Fig. 40)
4. Remove the air filter (C) from the filter frame.
5. Clean the pre-filter and the air filter with warm water
and soap.
Note: An air filter that has been used for a long
time cannot be fully cleaned. Replace the air filter
regularly and always replace a defective air filter.
6. Clean the inner surface of the air filter cover (A) with
a brush.
7. Put the air filter in the filter frame.
8. Attach the pre-filter to the air filter cover.
9. Attach the air filter cover to the product.
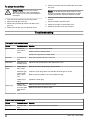
Troubleshooting
The engine is not possible to start
Check Possible cause Solution
Starter pawls. Blocked or
worn starter
pawls.
Adjust or replace the starter pawl/s.
Clean around the starter pawl/s.
Speak to an approved servicing dealer.
Fuel tank. Incorrect fuel
type.
Drain the fuel tank and use correct fuel.
Carburetor. Adjustment of
the idle speed.
Adjust the idle speed with the idle adjustment screw.
Spark (no
spark).
Spark plug is
dirty or wet.
Make sure that the spark plug is dry and clean.
Electrode gap
on the spark
plug is incor-
rect.
Clean the spark plug. Make sure that the electrode gap is correct.
Refer to technical data for the correct electrode gap.
Spark plug.
Spark plug is
loose.
Tighten the spark plug.
There is un-
wanted materi-
al on the spark
plug electro-
des.
Make sure that the fuel mixture is correct.
Make sure that the air filter is clean.
Engine starts but stops again
Check Possible cause Solution
Fuel tank. Incorrect fuel
type.
Drain the fuel tank and use the correct fuel.
14 1456 - 006 - 28.07.2022

Engine starts but stops again
Check Possible cause Solution
Carburetor. Engine will not
operate cor-
rectly at idle
speed.
Speak to your servicing dealer.
Air filter. Clogged air fil-
ter.
Clean the air filter.
Transportation and storage
Transportation and storage
WARNING: To prevent the risk of fire,
make sure that there are no leaks or fumes
during transportation or storage. Make sure
that there is no risk of sparks or fire.
• Empty the fuel tank before transportation or long-
term storage. Push the air purge bulb to make
sure that all fuel is removed. Discard the fuel at an
applicable disposal location.
• Make sure that the product is clean and that a full
servicing is done before long-term storage.
• Remove the spark plug and put approximately 15 ml
of two-stroke oil into the cylinder. Turn the product 3
times and install the spark plug again.
• Attach the product safely to the vehicle during
transportation.
• Keep the product in a dry, cool and clean space with
good airflow. Keep the product away from children.
1456 - 006 - 28.07.2022 15

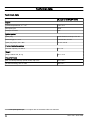
Technical data
Technical data
Husqvarna 150BT (BP152HV)
Engine
Cylinder displacement, in.3 / cm33.06 / 51.7
Idle speed, rpm 2800
Catalytic converter Yes
Ignition system 1
Spark plug NGK BPMR7A/Champion RCJ6Y
Electrode gap, in. / mm 0.023–0.027 / 0.6–0.7
Spark plug torque, ft-lb / Nm 18–22 / 25–30
Fuel and lubrication system
Fuel tank capacity, US Pint / l 2.1 / 1.0
Weight
Weight without fuel, lb / kg 22.0 / 10.0
Fan performance
Max. air velocity with high speed nozzle, mph / m/s 270 / 120.7
Air flow in housing, cfm / m3/min 765 / 21.7
1The spark ignition system complies with the Canadian ICES-002 standard.
16 1456 - 006 - 28.07.2022

Contenido
Introducción.................................................................. 17
Seguridad..................................................................... 19
Montaje......................................................................... 21
Funcionamiento............................................................ 22
Mantenimiento.............................................................. 24
Solución de problemas................................................. 26
Transporte y almacenamiento...................................... 27
Datos técnicos.............................................................. 28
Introducción
Descripción del producto
Este producto es una sopladora de mochila con motor
de combustible.
Husqvarna AB tiene una política de desarrollo continuo
de productos y, por lo tanto, se reserva el derecho de
modificar el diseño y el aspecto de los productos sin
previo aviso.
Uso específico
Utilice el producto para soplar hojas y otros materiales
no deseados de zonas como césped, senderos y
caminos de asfalto.
Descripción general del producto
(Fig. 1)
1. Palanca del acelerador
2. Bastidor
3. Arnés
4. Cubierta del motor
5. Cubierta del ventilador
6. Rejilla de aspiración de aire
7. Filtro de aire
8. Empuñadura de la cuerda de arranque
9. Depósito de combustible
10. Cinturón
11. Bujía
12. Sistema amortiguador de vibraciones
13. Estrangulador
14. Mango de control
15. Interruptor de parada con acelerador
16. Acelerador
17. Ángulo del tubo
18. Abrazadera
19. Manguera flexible
20. Tubo de control
21. Anclaje del cable
22. Tubo intermedio
23. Boquilla de la sopladora
24. Manual del usuario
25. Llave combinada
26. Bulbo de la purga de aire
27. Boquilla de régimen alto
28. Tornillo de ajuste de ralentí
29. Ventilador
30. Placa de pie
Símbolos en el producto
(Fig. 2) ADVERTENCIA: Este producto puede ser
peligroso y provocar daños graves o
fatales al operador o a otras personas.
Tenga cuidado y utilice el producto
correctamente.
(Fig. 3) Lea atentamente el manual de
instrucciones y asegúrese de que
entiende las instrucciones antes de usar
el producto.
(Fig. 4) Utilice protectores auriculares y oculares
aprobados. Si el ambiente contiene polvo,
utilice una máscara respiratoria.
(Fig. 5) Utilice guantes protectores aprobados
durante el funcionamiento y
mantenimiento. Utilice botas o zapatos
de protección con suelas antideslizantes.
Utilice ropa de tejido resistente y que lo
cubra por completo.
(Fig. 6) Si tiene el cabello largo, asegúrese de
amarrarlo sobre sus hombros.
(Fig. 7) No utilice joyas ni ropa holgada durante el
funcionamiento.
(Fig. 8) Utilice una mezcla de gasolina y de aceite
para motores de dos tiempos.
(Fig. 9) Bulbo de la purga de aire.
(Fig. 10) Mantenga todas las partes del cuerpo
lejos de las superficies calientes.
1456 - 006 - 28.07.2022 17

(Fig. 11) No se acerque al propulsor mientras gira.
(Fig. 12) Estrangulador, posición abierta.
(Fig. 13) Posición cerrada de estrangulamiento.
(Fig. 14) Tornillo de ajuste de ralentí.
(Fig. 16)
Esté atento a que no sal-
gan objetos despedidos.
Los objetos despedidos
pueden causar daños gra-
ves. Utilice el equipo de
protección personal.
(Fig. 17)
Mantenga una distancia de
seguridad de un mínimo de
15m para personas o ani-
males.
aaaassxxxxx
La placa de características
o la impresión láser mues-
tra el número de serie.
yyyy es el año de produc-
ción, y ww es la semana de
producción.
Nota: Otros símbolos o etiquetas del producto hacen
referencia a requisitos de certificación para otras zonas
comerciales.
EPA III
(Fig. 15)
El período de cumplimiento de emisiones al que se hace
referencia en la etiqueta de cumplimiento de emisiones
indica la cantidad de horas de funcionamiento para
la que se ha demostrado que el motor cumple el
requisito de emisiones federales. El mantenimiento,
reemplazo o reparación de los dispositivos y el sistema
de control de emisiones puede realizarlo cualquier
establecimiento o persona que repare motores no
destinados al transporte.
ABREVIATURAS DE LA ETIQUETA DE CONTROL DE EMISIONES
Información general:
CAL California EXH/EVP Escape y evaporación REGS Reglamentos
DISPL Desplazamiento EVAP Evaporación SORE Motores todoterreno pe-
queños
ECS Sistema de control de
emisiones
HRS Horas US EPA Agencia de Protección
Ambiental de Estados
Unidos
Sistema de control de emisiones de escape:
ECM Módulo de control
del motor (afina-
ción automática)
OC Catalizador oxi-
dante
EM Modificación del
motor
TWC Catalizador de tres
vías
Sistemas de control de emisiones por evaporación:
C Coextrusionado
(multicapa)
P HDPE o PE trata-
dos
N Nailon S Sellado
Responsabilidad del fabricante
Como se menciona en las leyes de responsabilidad del
fabricante, no nos hacemos responsables de los daños
que cause nuestro producto si:
• el producto se repara incorrectamente
• el producto se repara con piezas que no son del
fabricante o que este no autoriza
• el producto tiene un accesorio que no es del
fabricante o que este no autoriza
• el producto no se repara en un centro de servicio
autorizado o por una autoridad aprobada.
18 1456 - 006 - 28.07.2022

Seguridad
Definiciones de seguridad
Las siguientes definiciones proporcionan el nivel de
gravedad de cada palabra clave.
ADVERTENCIA: Lesiones a
personas.
PRECAUCIÓN: Daños en el
producto.
Nota: Esta información hace que el producto sea más
fácil de usar.
Instrucciones generales de seguridad
ADVERTENCIA: Lea atentamente
las instrucciones de advertencia siguientes
antes de usar el producto.
• No realice cambios en el producto sin la aprobación
del fabricante y siempre utilice accesorios originales.
Las modificaciones o accesorios que no estén
aprobados pueden provocar daños graves o la
muerte del operador u otras personas.
• No use un producto dañado. Realice los controles
de seguridad y las tareas de mantenimiento como se
describen en este manual de usuario. El personal de
un taller de servicio aprobado debe realizar todas las
demás tareas de mantenimiento.
• Todas las operaciones de mantenimiento y
reparación las debe realizar el personal de
mantenimiento aprobado. Si una pieza del producto
está defectuosa, comuníquese con el concesionario
de servicio.
Seguridad de vibración
Este producto solo sirve para su uso ocasional. El
funcionamiento continuo o regular del producto puede
provocar la enfermedad de Dupuytren o problemas
médicos equivalentes producto de las vibraciones.
Examine la condición de sus manos y dedos si opera
el producto regular o continuamente. Si sus manos o
dedos tienen una decoloración, dolor, cosquilleo o se
sienten entumecidos, detenga el trabajo y póngase en
contacto con un médico de inmediato.
Instrucciones de seguridad para el
funcionamiento
ADVERTENCIA: Lea atentamente
las instrucciones de advertencia siguientes
antes de usar el producto.
• Este producto puede ser peligroso y provocar daños
graves o fatales al operador o a otras personas.
Tenga cuidado y utilice el producto correctamente.
• Inspeccione el producto antes de utilizarlo. Consulte
Mantenimiento en la página 24
.
• No opere el producto si está cansado, enfermo o
bajo la influencia de alcohol u otras drogas que
puedan disminuir su vista, criterio o coordinación.
• Instale todas las cubiertas y protecciones del
producto antes de utilizarlo. Para evitar sacudidas
eléctricas, asegúrese de que el sombrerete de la
bujía y el cable de encendido no estén dañados.
• No toque la bujía ni el cable de encendido cuando el
motor esté encendido.
• Mantenga una distancia de seguridad de un mínimo
de 15m para personas o animales. Si personas,
niños o animales se acercan a menos de 15m,
detenga el producto. Apunte el producto lejos
de personas, animales, ventanas abiertas y otros
objetos.
• No deje que los niños operen el producto.
Asegúrese de que todos los operadores lean
y comprendan el contenido de este manual de
usuario.
• Mantenga las manos u otros objetos alejados de la
carcasa de la sopladora durante el funcionamiento.
Las piezas giratorias pueden provocar daños
graves.
• No utilice el producto si la rejilla de aspiración de
aire no está instalada. Asegúrese siempre de que la
rejilla de aspiración de aire está instalada y no esté
dañada antes de cada uso.
• Si se produce una emergencia, suelte el cinturón
y el cinturón del pecho del arnés, y deje caer el
producto.
• Obedezca las normativas y directivas nacionales.
• Mantenga todas las partes del cuerpo lejos de las
superficies calientes.
• Demasiada vibración puede causar daños a la
circulación o al sistema nervioso. Hable con su
médico si tiene síntomas como insensibilidad,
pérdida de sensación, hormigueo, picazón, dolor,
pérdida de fuerza o cambios en el color de la piel
de los dedos, manos o muñecas.
• Esté atento a que no salgan objetos despedidos.
Los objetos despedidos pueden causar daños
graves.
1456 - 006 - 28.07.2022 19

• No opere el producto en condiciones climáticas
desfavorables, como niebla, lluvia, vientos fuertes ni
frío intenso. Trabajar con mal tiempo puede causar
cansancio y condiciones peligrosas.
• Asegúrese de poder moverse libremente y
mantenerse en una posición estable. Revise el área
de trabajo para ver si hay posibles obstáculos, como
rocas. Tenga cuidado cuando opere el producto en
pendientes.
• No deje el producto en el piso con el motor en
marcha.
• No utilice el producto desde posiciones altas, por
ejemplo, en una escalera.
• Asegúrese de que siempre lo puedan escuchar en
caso de producirse un accidente.
• Asegúrese de que la salida de los gases de escape
no esté obstruida. Para evitar daños en el producto,
mantenga los obstáculos a una distancia mínima de
50cm de la salida de los gases de escape.
• No encienda el producto en interiores, lugares con
mala ventilación o cerca de materiales inflamables.
Los gases de escape del motor contienen monóxido
de carbono, que puede provocar intoxicación por
monóxido de carbono. Los gases de escape están
calientes y pueden contener chispas que podrían
provocar un incendio.
Equipo de protección personal
ADVERTENCIA: Lea atentamente
las instrucciones de advertencia siguientes
antes de usar el producto.
• Utilice siempre el equipo de protección personal
aprobado cuando use el producto. El equipo de
protección personal no puede impedir por completo
el riesgo de lesiones, pero puede disminuir su grado.
Comuníquese con su concesionario para obtener
más información.
• Use protección auricular aprobada. La exposición
prolongada al ruido puede provocar daños
permanentes en la audición.
• Use protección ocular homologada. Si utiliza
un visor, también debe usar gafas protectoras
homologadas. Las gafas protectoras homologadas
deben cumplir con la norma ANSI Z87.1 de EE.UU.
o con EN166 en los países de la UE.
• Utilice guantes protectores durante el
funcionamiento y mantenimiento.
• Utilice botas o zapatos de protección con suelas
antideslizantes.
• Utilice ropa de tejido resistente y que lo cubra
por completo. No utilice joyas ni calzado abierto.
Para reducir el riesgo de lesiones, la ropa debe
estar ajustada, pero no limitar los movimientos.
Manténgase el pelo sobre los hombros para evitar
que se enganche entre en las piezas giratorias o en
las ramas.
• Utilice una protección respiratoria cuando haya
riesgo de polvo.
• Mantenga cerca el equipo de primeros auxilios.
Dispositivos de seguridad en el producto
ADVERTENCIA: Lea atentamente
las instrucciones de advertencia siguientes
antes de usar el producto.
• No utilice un producto con dispositivos de seguridad
defectuosos.
• Revise los dispositivos de seguridad de forma
regular. Consulte
Mantenimiento en la página 24
.
• Si los dispositivos de seguridad están defectuosos,
comuníquese con su concesionario de servicio
Husqvarna.
Para comprobar el silenciador
ADVERTENCIA: No utilice un
producto con un silenciador defectuoso.
ADVERTENCIA: El silenciador se
calienta mucho durante el funcionamiento o
después de este, así como en el régimen
de ralentí. Utilice guantes protectores para
evitar quemaduras.
ADVERTENCIA: El interior del
silenciador contiene productos químicos que
pueden ser cancerígenos. No toque el
silenciador si está dañado.
• Realice una inspección visual del silenciador de
manera regular. El silenciador mantiene los niveles
de ruido al mínimo y dirige los gases de escape lejos
del operador. Consulte
Para examinar y limpiar el
sistema de refrigeración en la página 26
.
Para comprobar el sistema amortiguador de vibraciones
1. Asegúrese de que no haya grietas o deformación en
los amortiguadores de vibraciones.
2. Asegúrese de que los amortiguadores de
vibraciones estén firmemente acoplados a la unidad
del motor y a la unidad del mango.
Consulte la sección
Descripción general del producto
en la página 17
para obtener más información sobre la
ubicación del sistema amortiguador de vibraciones en
su producto.
Para comprobar el interruptor de arranque/detención
1. Utilice el interruptor de arranque/detención para
detener el motor.
2. Asegúrese de que el motor se detenga por
completo.
20 1456 - 006 - 28.07.2022
La page est en cours de chargement...
La page est en cours de chargement...
La page est en cours de chargement...
La page est en cours de chargement...
La page est en cours de chargement...
La page est en cours de chargement...
La page est en cours de chargement...
La page est en cours de chargement...
La page est en cours de chargement...
La page est en cours de chargement...
La page est en cours de chargement...
La page est en cours de chargement...
La page est en cours de chargement...
La page est en cours de chargement...
La page est en cours de chargement...
La page est en cours de chargement...
La page est en cours de chargement...
La page est en cours de chargement...
La page est en cours de chargement...
La page est en cours de chargement...
La page est en cours de chargement...
La page est en cours de chargement...
La page est en cours de chargement...
La page est en cours de chargement...
-
 1
1
-
 2
2
-
 3
3
-
 4
4
-
 5
5
-
 6
6
-
 7
7
-
 8
8
-
 9
9
-
 10
10
-
 11
11
-
 12
12
-
 13
13
-
 14
14
-
 15
15
-
 16
16
-
 17
17
-
 18
18
-
 19
19
-
 20
20
-
 21
21
-
 22
22
-
 23
23
-
 24
24
-
 25
25
-
 26
26
-
 27
27
-
 28
28
-
 29
29
-
 30
30
-
 31
31
-
 32
32
-
 33
33
-
 34
34
-
 35
35
-
 36
36
-
 37
37
-
 38
38
-
 39
39
-
 40
40
-
 41
41
-
 42
42
-
 43
43
-
 44
44


dans d''autres langues
- English: Husqvarna BP152HV User manual
- español: Husqvarna BP152HV Manual de usuario
Documents connexes
-
Husqvarna 522HS75S Manuel utilisateur
-
Husqvarna 522HD60S Manuel utilisateur
-
Husqvarna 967650801 Mode d'emploi
-
Husqvarna 150BTA Le manuel du propriétaire
-
-
Husqvarna 450 II Manuel utilisateur
-
-
-
-