La page est en cours de chargement...


To view manuals, videos, drivers, downloads, technical drawings, and more visit www.startech.com/support
Compliance Statements
FCC Compliance Statement
This equipment has been tested and found to comply with the limits for a Class
B digital device, pursuant to part 15 of the FCC Rules. These limits are designed
to provide reasonable protection against harmful interference in a residential
installation. This equipment generates, uses and can radiate radio frequency
energy and, if not installed and used in accordance with the instructions, may
cause harmful interference to radio communications. However, there is no
guarantee that interference will not occur in a particular installation. If this
equipment does cause harmful interference to radio or television reception,
which can be determined by turning the equipment o and on, the user is
encouraged to try to correct the interference by one or more of the following
measures:
• Reorient or relocate the receiving antenna
• Increase the separation between the equipment and receiver
• Connect the equipment into an outlet on a circuit dierent from that to
which the receiver is connected
• Consult the dealer or an experienced radio/TV technician for help
For the State of California
WARNING: Cancer and Reproductive Harm
www.P65Warnings.ca.gov
i

ii
To view manuals, videos, drivers, downloads, technical drawings, and more visit www.startech.com/support
Use of Trademarks, Registered Trademarks, and other Protected Names
and Symbols
This manual may make reference to trademarks, registered trademarks, and
other protected names and/or symbols of third-party companies not related in
any way to StarTech.com. Where they occur these references are for illustrative
purposes only and do not represent an endorsement of a product or service
by StarTech.com, or an endorsement of the product(s) to which this manual
applies by the third-party company in question. Regardless of any direct
acknowledgement elsewhere in the body of this document, StarTech.com
hereby acknowledges that all trademarks, registered trademarks, service marks,
and other protected names and/or symbols contained in this manual and
related documents are the property of their respective holders.
PHILLIPS® is a registered trademark of Phillips Screw Company in the United States or other
countries.
Linux® is a registered trademark of Linus Torvalds.
macOS® is a trademark of Apple Inc., registered in the U.S. and other countries.
Windows®is a registered trademark of Microsoft Corporation in the United States and/
or other countries.

To view manuals, videos, drivers, downloads, technical drawings, and more visit www.startech.com/support
Safety Statements
Safety Measures
• Wiring terminations should not be made with the product and/or electric
lines under power.
• Product installation and/or mounting should be completed by a certied
professional as per the local safety and building code guidelines.
• Cables (including power and charging cables) should be placed and routed
to avoid creating electric, tripping or safety hazards.
Mesures de sécurité
• Les terminaisons de câblâge ne doivent pas être eectuées lorsque le produit
et/ou les câbles électriques sont sous tension.
• L’installation et/ou le montage du produit doit être réalisé par un
professionnel certié et dans le respect des normes locales et du code de
construction local.
• Les câbles (y compris les câbles d’alimentation et de chargement) doivent
être placés et acheminés de façon à éviter tout risque électrique, de chute ou
de sécurité
安全対策
• 電源が入っている状態の製品または電線の終端処理を行わないでください。
• 製品の設置やマウントは、使用地域の安全ガイドラインおよび建築基準に従い、有資格の専門業者が行うようにしてください。
• ケーブル(電源ケーブルと充電ケーブルを含む)は、適切な配置と引き回しを行い、電気障害やつまづきの危険性など、安全上のリスクを回避するよう
にしてください。
Misure di sicurezza
• I terminiali dei li elettrici non devono essere realizzate con il prodotto e/o le
linee elettriche sotto tensione.
• L’installazione e/o il montaggio dei prodotti devono essere eseguiti da un
tecnico professionale certicato che conosca le linee guida locali sulle norme
edilizie e sulla sicurezza.
• I cavi (inclusi i cavi di alimentazione e di ricarica) devono essere posizionati
e stesi in modo da evitare pericoli di inciampo, rischi di scosse elettriche o
pericoli per la sicurezza.
Säkerhetsåtgärder
• Montering av kabelavslutningar får inte göras när produkten och/eller
elledningarna är strömförda.
• Installation och/eller montering får endast göras av behöriga yrkespersoner
och enligt gällande lokala förordningar för säkerhet och byggnormer.
• Kablar (inklusive elkablar och laddningskablar) ska dras och placeras på så
sätt att risk för snubblingsolyckor och andra olyckor kan undvikas.
iii

iv
To view manuals, videos, drivers, downloads, technical drawings, and more visit www.startech.com/support
Warnings
Warning Statements
• Make sure that you assemble this product according to the instructions.
• Read the entire manual and make sure that you understand the instructions
before you start to assemble and use this product.
• Assembling this product is a two-person task. Do not attempt to assemble
this product and install equipment without assistance.
• Suitable for installation in Information Technology Rooms in accordance with
Article 645 of the National Electrical Code and NFPA 75.
Avertissements
• Assemblez ce produit conformément aux instructions.
• Lisez tout le manuel et assurez-vous que vous comprenez les instructions
avant de commencer à assembler et utiliser ce produit.
• L’assemblage de ce produit nécessite deux personnes. Ne tentez pas
d’assembler le produit et d’installer les équipements sans aide.
• Peut être installé dans des salles de matériel de traitment de l'information
conformément à l'article 645 du National Electrical Code et à la NFPA 75.
Varningsmeddelanden
• Se till att du monterar produkten i enlighet med instruktionerna.
• Läs hela manualen och se till att du förstår instruktionerna innan du börjar
montera och använda produkten.
• Det krävs två personer för att montera produkten. Försök inte montera
produkten och installera utrustning utan hjälp.
Warnhinweise
• Beachten Sie bei der Montage dieses Produkts die Montageanweisungen.
• Bevor Sie dieses Produkt montieren und verwenden, lesen Sie das gesamte
Handbuch und vergewissern Sie sich, dass Sie die Anweisungen verstanden
haben.
• Die Montage dieses Produkts ist auf die Ausführung von zwei Personen
ausgelegt. Versuchen Sie nicht ohne Hilfe, dieses Produkt zu montieren und
Geräte zu installieren.
Dichiarazioni di avvertenza
• Assicurarsi di Assemblare il prodotto secondo le istruzioni.
• Leggere l’intero manuale e assicurarsi di aver compreso tutte le istruzioni

v
To view manuals, videos, drivers, downloads, technical drawings, and more visit www.startech.com/support
prima di iniziare ad assemblare e a utilizzare questo prodotto.
• L’assemblaggio di questo prodotto richiede la presenza di due persone.
Non tentare di assemblare il prodotto e installare le apparecchiature senza
assistenza.
Mensagens de aviso
• Certique-se de que monta este produto de acordo com as instruções.
• Leia todo o manual e certique-se de que entende as instruções antes de
começar a montar e a utilizar este produto.
• Montar este produto é uma tarefa para duas pessoas. Não tentar montar este
produto e instalar o equipamento sem assistência.
Advertencias de uso
• Asegúrese de ensamblar este producto según las instrucciones.
• Lea todo el manual y asegúrese de haber comprendido bien las instrucciones
antes de proceder con el ensamblaje y el uso de este producto.
• Se requieren dos personas para el ensamblaje de este producto. No intente
ensamblar este producto e instalar otros equipos sin la debida asistencia de
otra persona.
Waarschuwingen
• Zorg dat u dit product volgens de instructies in elkaar zet.
• Lees de gehele handleiding en zorg dat u de instructies begrijpt voordat u
dit product in elkaar zet en gebruikt.
• Dit product moet met twee personen in elkaar worden gezet. Probeer dit
product niet zonder hulp in elkaar te zetten en apparatuur te installeren.
注意
• 必ず取扱説明書に従って本製品の組み立てを行って下さい。
• 最初に取扱説明書を最後まで読み、本製品の組み立て方をすべて理解
してから組み立て作業を始めて下さい。
• 本製品は、二人がかりでの組み立てを想定しています。手助けなしに
単独で組み立てと設置を行わないで下さい。

To view manuals, videos, drivers, downloads, technical drawings, and more visit www.startech.com/support
Table of Contents
Compliance Statements ........................................................................i
Safety Statements ..................................................................................iii
Warnings ..................................................................................................iv
Product Diagram ....................................................................................1
Front View (Open) ..................................................................................................................................... 1
Front View (Closed) ................................................................................................................................... 2
Rear View ......................................................................................................................................................3
Product Information ..............................................................................4
Package Contents ..................................................................................................................................... 4
Requirements ............................................................................................................................................. 4
Hardware Installation ...........................................................................6
Standard Rack Mounting ........................................................................................................................ 6
KVM Connection .....................................................................................9
USB-B Port and KVM VGA Port .............................................................................................................. 9
KVM DVI-D Port .......................................................................................................................................... 9
KVM Audio Port .......................................................................................................................................... 9
Console Connection ...............................................................................9
Console USB Keyboard and Mouse Ports ......................................................................................... 9
Console VGA Port ...................................................................................................................................... 9
Console DVI-D Port ...................................................................................................................................10
Console Audio Port ................................................................................................................................... 10

To view manuals, videos, drivers, downloads, technical drawings, and more visit www.startech.com/support
Powering the Console ...........................................................................10
Hardware Operation .............................................................................11
Opening the Console ...............................................................................................................................11
Closing the Console .................................................................................................................................12
LCD Buttons.................................................................................................................................................14
Adjustment Settings ............................................................................15
Keyboard Emulation ..............................................................................17
Sun Keyboard Emulation ........................................................................................................................17
MAC Keyboard Emulation ...................................................................................................................... 18
Hotkeys ....................................................................................................20
Troubleshooting ..................................................................................... 22
Firmware Upgrade .................................................................................22
Accessing the Firmware Upgrade Mode ........................................................................................... 22
Firmware Upgrade Switch...................................................................................................................... 23
Performing the Firmware Upgrade Procedure ...............................................................................23
Firmware Upgrade Recovery.................................................................................................................23
Technical Support ..................................................................................24
Warranty Information ............................................................................ 24
Limitation of Liability ............................................................................24
UL Safety Statements ............................................................................24

1
To view manuals, videos, drivers, downloads, technical drawings, and more visit www.startech.com/support
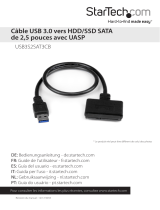
Product Diagram
Actual product may vary from photos
Front View (Open) LCD Screen
LCD Controls
LCD On /
O Button
Keyboard
Touchpad
Reset
Button
Firmware
Upgrade
Port
Keyboard
Release
Latches
Firmware
Upgrade
Switch


4
To view manuals, videos, drivers, downloads, technical drawings, and more visit www.startech.com/support
Product Information
Package Contents
• LCD Console x 1
• Rear Mounting Bracket x 2
• KVM Cables x 1
• Firmware Upgrade Cable x 1
• Audio Cable x 1
• M5 Cage Nuts x 8
• M5 Screws x 8
• Power Cords (NA, JP, UK, EU, ANZ) x 5
• Quick-Start Guide x 1
Requirements
For the latest requirements, please visit www.startech.com/RKCOND17HD.
Installation:
Note: Two people are required for hardware installation.
• 1U of Rack Space
• Phillips® Head Screwdriver x 1
• (Optional) Cage Nut Tool x 1
Power:
• AC Electrical Outlet
External Console:
• Computer x 1
• VGA Cable x 1
• DVI-D Cable x 1
Note: DVI displays connected to RKCOND17HD will display DVI-D
signals only.

5
To view manuals, videos, drivers, downloads, technical drawings, and more visit www.startech.com/support
• (Optional) HDMI Adapter x 1
Note: An HDMI Enabled Display Device can be connected to the LCD
Console using a DVI-D to HDMI cable.
• (Optional) HDMI Cable x 1
• USB Keyboard x 1
• USB Mouse x 1
• 3.5 mm Audio Cable x 1
Note: If you are installing an External Console, plug your USB Keyboard/
Mouse, Display, and Speakers into their respective ports in the Console
section.
KVM / Computer / Server:
• KVM Switch / Computer / Server (VGA or DVI) x 1
• USB Cable (Type-A to Type-B) x 1
• (Optional) VGA Cable x 1
• (Optional) DVI-D Cable x 1
Note: DVI Displays connected to RKCOND17HD will display DVI-D
signals only.
• (Optional) HDMI Adapter x 1
Note: An HDMI Enabled Display Device can be connected to the LCD
Console using a DVI-D to HDMI cable.
• (Optional) HDMI Cable x 1
• 3.5 mm Audio Cable x 1
Devices:
• USB Device x 1
Note: The USB ports support HID devices only.
Operating Systems:
• OS Independent (works with most Operating Systems)

6
To view manuals, videos, drivers, downloads, technical drawings, and more visit www.startech.com/support
Hardware Installation
Standard Rack Mounting
Note: Installation of this product requires at least two people. One person is
required to hold the unit in place. A second person is required to screw in all
of the required fasteners.
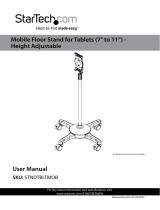
1. Select the 1U of Rack Space that you intend to use for installing the Console.
2. Install four M5 Cage Nuts into the front rails of your Rack. (gure 1)
gure 1

7
To view manuals, videos, drivers, downloads, technical drawings, and more visit www.startech.com/support
3. Repeat Step 2 for the rear side of your rack.
Note: Ensure that your M5 Cage Nuts are installed in the same 1U of
Rack Space in both the front and the rear of your rack.
4. While one person holds the RKCOND17HD unit in place, the second person
must loosely screw the front Rack Mounting Brackets into the front of your
Rack with four M5 Screws using a Phillips Head Screwdriver (not included).
Note: Do not completely tighten the M5 Screws.
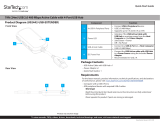
5. While the rst person holds the RKCOND17HD in place, the second person
must align the anges of the Rear Mounting Brackets with the rails on the
sides of RKCOND17HD.
6. Slide the Rear Mounting Brackets onto the rails located on either side of the
Console. Ensure that the screw holes on the Rear Mounting Brackets are
aligned with the Cage Nuts in the rear of the Rack. (gure 2)
7. Secure the Rear Mounting Brackets to your rack with four M5 Screws using a
Phillips Head Screwdriver.
8. Secure the front Rack Mounting Brackets into place by tightening the M5
Screws that were installed in Step 4.
gure 2

8
To view manuals, videos, drivers, downloads, technical drawings, and more visit www.startech.com/support
Specications
Display Size 17”
Panel Type Active Matrix TFT LED
Maximum Screen Resolution 1920x1080 @60Hz
Supported Platforms USB
Server / KVM Video Type DVI or VGA
Response Time 2 ms
Contrast Ratio 650:1
Brightness 250 cd/m²
Viewing Angle 140° (H), 120° (V)
Pixel Pitch 0.199 x 0.199 mm
Keyboard/Mouse 99-key USB keyboard with touchpad
Console Interface(s)
VGA (15-pin; High Density D-Sub) x 1
DVI (29-pin) x 1
USB-A (4-pin) x 3
3.5 mm Audio x 1
Chassis Material Heavy-duty steel
Minimum/Maximum
Mounting Depth 25.5 x 39 inches (647.7 – 990.6 mm)
Power Supply 100~240V AC Input
Power Consumption 10.2W
Operating Temperature 0°C to 40°C (32°F to 104°F)

9
To view manuals, videos, drivers, downloads, technical drawings, and more visit www.startech.com/support
KVM Connection
USB-B Port and KVM VGA Port
1. (Optional) If you are connecting the LCD Console to a VGA KVM Switch or
Computer/Server: Connect one Set of Console Cables (USB-A/VGA) to the
USB Type-A Port and VGA Female Port on your KVM Switch.
2. Connect the other end of the Set of Console Cables (USB-B/VGA) to the USB
Type-B Port and VGA Male Port on the RKCOND17HD Console.
KVM DVI-D Port
1. (Optional) If you are using a DVI KVM Switch or Computer/Server, connect
the DVI-D cable to the KVM Switch or Computer/Server.
2. Connect the other end of the DVI-D cable to the Female KVM DVI-D Port
on the RKCOND17HD Console.
KVM Audio Port
Note: RKCOND17HD supports speaker audio only.
1. Connect the Audio Cable to the 3.5 mm Audio Port on your KVM Switch or
Computer/Server.
2. Connect the other end of the Audio Cable to the 3.5 mm KVM Audio Port on
the RKCOND17HD Console.
Console Connection
Console USB Keyboard and Mouse Ports
1. Connect the USB Cable from your Keyboard to the Console USB Keyboard
Port.
2. Connect the USB Cable from your Mouse to the Console USB Mouse Port.
Console VGA Port
1. Connect the VGA Cable to the VGA Port on your Display.

10
To view manuals, videos, drivers, downloads, technical drawings, and more visit www.startech.com/support
2. Connect the other end of the VGA Cable to the Female Console VGA Port on
the RKCOND17HD Console.
Console DVI-D Port
1. Connect the DVI-D Cable to the DVI-D Port on your Display.
2. Connect the other end of the DVI-D Cable to the Female Console DVI-D Port
on the RKCOND17HD Console.
Console Audio Port
Note: RKCOND17HD supports speaker audio only.
1. Connect the Audio Cable to the 3.5 mm Port on your Speakers.
2. Connect the other end of the Audio Cable to the 3.5 mm Audio Port on your
RKCOND17HD Console.
USB HID Port
1. Connect the USB Cable to the USB Port on a USB HID Device (touchpad,
touchscreen, number pad, etc.).
2. Connect the other end of the USB Cable to the USB HID Port on the
RKCOND17HD Console.
Powering the Console
1. Connect the appropriate Power Cord from a wall plug to the Power Socket
Port on RKCOND17HD.
2. Power on your KVM, Computer, and any USB Peripheral Devices requiring
external power.
3. Press and release the LCD On/O Button on the LCD Console.
4. Toggle the Power Switch to the On position.

11
To view manuals, videos, drivers, downloads, technical drawings, and more visit www.startech.com/support
Hardware Operation
Warning: Do not place heavy objects on the Keyboard. The Keyboard Module
has a weight capacity of 66 lb. (30 kg). Failure to heed this warning can result in
damage to your equipment and personal injury.
Opening the Console
To access the LCD Screen, slide the RKCOND17HD Console out and raise the
cover. To slide the Keyboard and the LCD Screen unit out of the closed position
in your rack:
gure 3

12
To view manuals, videos, drivers, downloads, technical drawings, and more visit www.startech.com/support
1. Simultaneously slide both Console Release Latches toward the center of the
RKCOND17HD Console, and pull the unit out from the rack. (gure 3)
2. Lift the Upper Handle to reveal the LCD Screen.
3. Continue to pull the Keyboard Module towards you until you hear an
audible ‘click’.
Closing the Console
To independently slide the Keyboard Module back in:
1. Simultaneously slide both Console Release Latches on the Keyboard Module
toward the center of the RKCOND17HD Console.
2. Push the Keyboard Module into your rack.
To slide the Keyboard and LCD Screen back in:
1. Simultaneously slide both Console Release Latches on the Keyboard Module
toward the center of the RKCOND17HD.
2. Push the Keyboard Module into your rack.
gure 4
Console Release Tabs
/