Dometic AE Systems Camper Jack Bracket Accessory 3105638.005_3105638.013_3105639.003 Guide d'installation
- Taper
- Guide d'installation

1
USA
SERVICE OFFICE
Dometic Corporation
2320 Industrial Parkway
Elkhart, IN 46516
574-294-2511
CANADA
Dometic Corporation
46 Zatonski, Unit 3
Brantford, ON N3T 5L8
CANADA
519-720-9578
For Service Center
Assistance Call:
800-544-4881
INSTRUCTIONS
REVISION:
Form No. 3105646.024 8/06
(Replaces 3105646.016)
(French 3310919.000)
©2006 Dometic Corporation
LaGrange, IN 46761
This manual must be read and un-
derstood before installation, ad-
justment, service, or maintenance
is performed. This unit must be in-
stalled by a qualified service tech-
nician. Modification of this prod-
uct can be extremely hazardous
and could result in personal injury
or property damage.
Lire et comprendre ce manuel avant de
procéder à l'installation, à des réglages,
de l'entretien ou des réparations.
L'installation de cet appareil doit être
effectuée par un réparateur qualifié.
Toute modification de cet appareil peut
être extrêmement dangereuse et
entraîner des blessures ou dommages
matériels.
CAMPER JACK BRACKET
ACCESSORY
CAMPER
JACK
BRACKET
ACCESSORY
Straight Bracket Kit 3105638.005
Combination Kit 3105638.013
Angle Bracket Kit 3105639.003

2
These instructions must be read and under-
stood before installation of this kit. This kit
must be installed by a Dometic Service Cen-
ter or a qualified service technician. Modifi-
cation of this product can be extremely haz-
ardous and could result in personal injury or
property damage.
SAFETY INSTRUCTIONS
This manual has safety information and instruc-
tions to help users eliminate or reduce the risk
of accidents and injuries.
RECOGNIZE SAFETY INFORMATION
This is the safety-alert symbol. When you see
this symbol in this manual, be alert to the poten-
tial for personal injury.
Follow recommended precautions and safe op-
erating instructions.
UNDERSTAND SIGNAL WORDS
A signal word , WARNING OR CAUTION is used
with the safety-alert symbol. They give the level
of risk for potential injury.
Indicates a potentially hazard-
ous situation which, if not avoided, could result
in death or serious injury.
Indicates a potentially hazard-
ous situation which, if not avoided, may result in
minor or moderate injury.
When used without the safety
alert symbol indicates, a potentially hazardous
situation which, if not avoided, may result in prop-
erty damage.
Read and follow all safety information and in-
structions.
!
WARNING
!
CAUTION
CAUTION
!
GENERAL INSTRUCTIONS
A. GENERAL INSTRUCTIONS
These instructions should be used in conjunction with
those packed with the awning. Install awning per the
installation instructions packed with the product. When
it references locating and mounting the awning foot
use the following instructions:
Contents:
(2) Mounting Brackets (8) 5/16" Nuts
(2) Clamps (2) Gaskets
(8) 5/16" X 1-1/4" Bolts (2) 1-7/8" Dia. Shims
(12) 5/16" x 7/8" Washers (4) 7/8" Long Spacers
(8) 5/16 Lock Washers
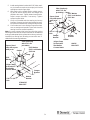
B. INSTALLATION PROCEDURE
1. Determine the position of brackets per awning
length. Multiple camper bracket locations are pos-
sible depending on awning length and jack posi-
tion on the truck camper.
Note: Use appropriate shims and spacers as noted below.
2. Place gasket on clamp as shown.
3. Place one (1) clamp around each jack and loosely
attach using two (2) 5/16" bolts, washers, lock
washer and nuts.
4. Install awning per installation instructions. Install
stop bolts in approximate location and place aw-
ning foot in bottom bracket.

3
5. Install awning bottom bracket with 5/16" bolts, wash-
ers, lock washers and nuts to camper jack bracket
and tighten nuts to finger-tight.
6. With awning in the stored position, adjust mount-
ing foot to ensure awning arms are straight and
parallel to the coach. Tighten bottom bracket bolts.
Adjust camper brackets if necessary. Tighten
camper bracket bolts.
7. Lift up on lift handle and raise awning to clear top
brackets. Remove stop bolts and reinstall to main-
tain clearance between top casting and top bracket.
8. Confirm that arm is not resting on upper brackets,
arm are straight and parallel. Open and close the
awning to ensure smooth operation.
Note: On some campers that have rear skirts the awning
mounting brackets and /or camper brackets can be attached
as long as adequate backing material has been previously
installed. Use awning foot mounting screws which are in-
cluded with the awning hardware.
Spacer (Used
only with square
tube Jacks
Shim (Used only
with 1-7/8" dia.
jack tubes)
Gasket
Clamp
5/16" Washer
5/16" Lock Washer
5/16" Nut
Camper
Bracket
Bottom
Bracket
5/16" x 1-1/4"
Bolt
* Align Clamp
To Bracket So
That Radius
Corners Match
5/16"
Washer
*
*
STRAIGHT
BRACKET
Shim (Used only
with 1-7/8" dia.
jack tubes) Clamp
5/16" Washer
5/16" Lock Washer
5/16" Nut
Gasket
Bottom
Bracket
Camper
Bracket
5/16" x 1-1/4"
Bolt
* Align Clamp
To Bracket So
That Radius
Corners Match
5/16"
Washer
Spacer (Used
only with square
tube Jacks
**
ANGLE
BRACKET
-
 1
1
-
 2
2
-
 3
3


Dometic AE Systems Camper Jack Bracket Accessory 3105638.005_3105638.013_3105639.003 Guide d'installation
- Taper
- Guide d'installation
dans d''autres langues
Documents connexes
-
Dometic PerfectWall PW3500 Guide d'installation
-
Dometic Revo Zip 200, 240, 270, 310, 350, 400, 450 (incl. Privacy Room) Mode d'emploi
-
-
-
-
PerfectRoof PR4500 Guide d'installation
-
Dometic Rally AIR, Rally AIR DA, Club AIR, Grande AIR, Ace AIR, Leggera AIR Manuel utilisateur
-
-
-