T-Fal Avante Deep-Fryer Instructions For Use Manual
- Catégorie
- Friteuses
- Taper
- Instructions For Use Manual


2
IMPORTANT
SAFEGUARDS
When using electrical appliances, basic safety
precautions should always be followed, inclu-
ding the following
1 Read all instructions.
2 Do not touch hot surfaces. Use the
handles or knobs.
3To protect against electric shock do not
immerse cord, plugs, or this appliance in
water or other liquid.
4 Close supervision is necessary when any
appliance is used by or near children.
5 Unplug from outlet when not in use and
before cleaning. Allow to cool before put-
ting on or taking off parts, and before
cleaning the appliance.
6 Do not operate any appliance with a
damaged cord or plug or after the
appliance malfunctions, or has been
damaged in any manner. Return applian-
ce to the nearest authorized service facili-
ty for examination, repair or adjustment.
7 The use of accessory attachments not
recommended by the appliance manu-
facturer may cause injuries.
8 Do not use outdoors.
9 Do not let cord hang over edge of table
or counter, or touch hot surfaces.
10 Do not place on or near a hot gas or elec-
tric burner, or in a heated oven.
11 Extreme caution must be used when
moving an appliance containing hot oil or
other hot liquids.
12 Always attach plug to appliance first, then
plug cord in the wall outlet. To discon-
nect, turn any control to “off,” then remo-
ve plug from wall outlet.
13 Do not use appliance for other than inten-
ded use.
14 Extreme caution must be used when
moving fryer containing hot oil.
15 Be sure handles are properly assembled
to basket and locked in place. See detai-
led assembly instructions.
16 SAVE THESE INS-
TRUCTIONS.
17 The oil level must always be between the
MINI and MAXI markings.
18 Do not overload the basket. For safety
reasons never exceed the maximum
quantity.
19 Never operate your fryer without any oil
or fat.
20 The cooking times are given as guide-
lines only.
21 The oil must be filtered regularly and
changed after 8 to 12 uses.
22 Do not mix different types of fat or oils.
23 If you use solid vegetable shortening, cut
it into pieces and melt it over slow heat in
a separate pot beforehand, then slowly
pour it into the deep fryer pot. Never
pour shortening directly into the deep
fryer pot or basket as this will lead to
deterioration of the appliance.
24 If the fryer has a removable pot, never
remove it while the deep fryer is on.
25 If you have any problems, contact the
authorized after-sales service or the inter-
net address www.t-fal.com.
Polarization instructions
If this appliance has a polarized plug (one
blade is wider than the other) it is to reduce
the risk of electric shock.
This plug is intended to fit into a polarized
outlet only one way. If the plug does not
fit fully into the outlet, reverse the plug. If
it still does not fit, contact a qualified elec-
trician. Do not attempt to modify the plug
in any way.
Short Cord instructions
Do not use with an extension cord ; a
short power supply cord is provided to
reduce the risks resulting from being
entangled in or tripping over a long cord.
Magnetic connector: for U.S.A. only
The cord is equipped with a detachable
magnetic connector. The magnetic
connector should be attached directly to
the fryer. THIS SHOULD BE DONE PRIOR
TO PLUGGING THE CORD INTO THE
WALL OUTLET.

3
ENG
Protection of the environment
•Your appliance has been designed to work for many years. However, when you
finally decide to replace it, remember to consider protecting the environment by
disposing the appliance at your local waste disposal center.
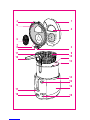
Description
1. Lid
2. Window
3. Lid clamps
4. Odor/splash guard hooks
5. Removable odor/splash
guard
6. Anti-odor filter
7. Lid seal
8. Odor/splash guard locking
clips
9. Basket
10. Removable bowl with non-
stick coating
11. Locking button on basket
lift/lower handle
12. Basket lift/lower handle
13. Mini and Maxi bowl-filling
markers
14. Removable bowl positioning
marker
15. Lid opening button
16. Metal casing
17. Timer (depending on model)
18. Adjustable thermostat
19. On-off switch with indicator
light

4
ENG
If you wish to put the lid in the
dishwasher or in water, remove
the anti-odor filter first.
Do not wet the anti-odor filter.
Never plug in the deep fryer
when it is empty.
Do not mix different types of
oils.
The oil level must always be
between the Mini and Maxi
markers. Check this each time
before cooking, and add some
of the same type of oil if neces-
sary.
Place the deep fryer:
- on a steady surface,
- out of the reach of children,
- away from water splashes or
heat sources.
Do not leave the deep fryer
unattended.
Do not let the power cord hang
down.
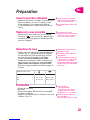
Oil quantity
Mini 2.3 l / 9 cups 2030 g / 4.3 lbs
Maxi 2.5 l / 10 cups 2160 g / 4.8 lbs
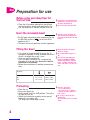
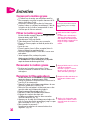
Preparation for use
Before using your deep fryer for
the first time
•
Clean the lid, window, odor/splash guard, bowl
and basket with a sponge and soapy water. Dry.
•
The anti-odor filter is already inserted in the lid.
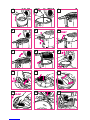
Filling the bowl
•
Use a food oil recommended for frying (fig. 2):
sunflower, vegetable. If using sunflower oil ensure
the oil is changed after every 5 uses.
•
If you use solid vegetable fat:
Cut it into pieces and melt it in a separate pan
then pour it inside the fryer (do not let it melt in
the basket or in the bowl).
•
Follow the manufacturer’s cooking recommenda-
tions.
Preheating
•
Close the lid.
•
Plug in the deep fryer.
•
Set the on-off switch to the Iposition. The indica-
tor light will turn on.
•
Adjust the thermostat according to the type of
food to fry (see tables, p.6).
The deep fryer should begin to heat.
1 l
500 g
!
!
!
!
!
!
!
!
A safety system prevents the
deep fryer from working if you
have not put the bowl correctly
in place.
Insert the removable bowl
•
Put the bowl into position with the pouring lip and
the Min./Max markers ()
to the rear of the
appliance (fig 1).
•
The bowl rim must fit perfectly into the equipment.

5
ENG
The steam coming from the lid,
the glass and metallic parts are
extremely hot.
Caution: Never place your
hands or your face over the fil-
ter. Do not touch the metal
casing or the window.
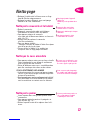
Monitor while cooking
•
During frying, it is normal for the temperature indi-
cator light to go on and off.
!
!
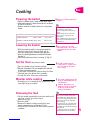
Cooking
!
!
The timer signals that the
cooking time is complete, but
does not stop the deep fryer
from cooking.
Lowering the basket
•
With the basket handle in the upright position
close the lid so that it locks in place (fig. 4).
•
After the temperature indicator light goes out,
press the locking button on the basket lift/lower
handle (1).
•
Fold the handle back into its housing (2) (fig. 5).
Set the timer (depending on model)
•
Press the button to set the desired time.
•
Release the button. The time displayed is selected
and the countdown begins.
•
If you make a mistake, or want to cancel the time
selected, press the button for 2 seconds.
•
To stop the timer alarm, press the button.
Do not push on the basket
lift/lower handle : press the loc-
king button first to unlock the
handle.
!
Never exceed the quantity safe-
ty limit.
Preparing the basket
•
Place the basket on the edge of the bowl (fig.3).
•
Add food to basket. Food should be dry and free
of excess moisture.
•
Reduce amount of food in basket if using frozen
foods.
Fresh French Fries Frozen French Fries
Quantity safety limit 1250 g / 2.7 lbs 900 g / 2 lbs
Maximum recommended quantity 670 g / 1.5 lbs 500 g / 1.1 lbs
Cut food into like-sized pieces
so that they cook evenly,
Avoid using pieces that are too
thick.
Shake frozen foods to detach
pieces of ice away from the
deep fryer.
Not all frozen foods are ready to
use. Check the manufacturer’s
instructions.
Add salt and pepper away from
the deep fryer to avoid getting in
the oil. For crispy fried food, open
the lid as soon as you have fini-
shed cooking.
To prepare for use a second time:
- wait for the temperature indica-
tor light to go out before lowering
food into oil.
- adjust the oil level according to
the quantity of food to be fried.
Removing the food
•
Lift the handle horizontally to raise the basket until
you hear a “click” as it locks (fig. 6).
•
Open the lid (fig. 7).
•
Drain the food.
•
Remove the basket, making sure that the rod
comes completely out of the bowl (fig. 8).
•
Close the fryer lid cover and then serve the prepa-
red food.

6
ENG
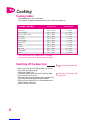
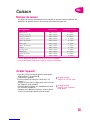
Cooking tables
The cooking times are a guide only.
They could vary depending on quantity, taste, electricity supply etc...
Cooking
Switching off the deep fryer
•
When you have finished frying foods, set the on-
off switch to the oposition.
•
Unplug the deep fryer.
•
Leave the deep fryer and the oil inside the deep
fryer to cool (2 to 3 hours).
•
Store cord by plugging into the plug storage chan-
nels in back of fryer (depending on model).
•
Wait until your deep fryer has cooled down com-
pletely before moving it.
•
Hold it securely and level.
Never move your deep fryer with
hot oil inside.
Never move the fryer with the lid
open.
!
!
Frozen foods *
* For fresh food reduce the cooking time by 1 or 2 minutes.
** For fresh fries increase the cooking time by 4 or 6 minutes.
Temperature Cooking time
French fries ** 190 °C / 374 °F 9 - 16 min.
Chicken nuggets 190 °C / 374 °F 10 - 13 min.
Quarter of fried chicken 180 °C / 356 °F 18 - 20 min.
Onions rings 190 °C / 374 °F 5 - 6 min.
Apple fritters 170 °C / 338 °F 6 - 7 min.
Fried vegetables 170 °C / 338 °F 6 - 8 min.
Shrimp fritters 180 °C / 356 °F 4 - 5 min.
Shrimp 190 °C / 374 °F 4 - 5 min.
Fish fillets 190 °C / 374 °F 5 - 6 min.
Mushrooms 150 °C / 302 °F 10 - 12 min.
Beef meatballs 180 °C / 356 °F 9 - 10 min.
Fritters 170 °C / 338 °F 5 - 6 min.

7
ENG
ENG
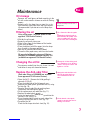
The oil must be filtered regular-
ly.
Remaining food debris tends to
burn and alters the quality of the
oil more rapidly. Over time, this
increases the risk of catching fire.
Oil storage
•
Remove any small pieces of food remaining in the
oil with a non-metallic skimmer or with oil filtering
papers.
•
Keep the oil in the deep fryer or store it in an air-
tight container away from heat and light sources.
(recommended if you do not use the deep fryer
often).
Filtering the oil
Using a filter paper (available online or from
approved T-Fal Service Centers):
•
Wait for the oil to cool.
•
Empty the oil gently into a pan.
•
Place a filter paper in the bottom of the basket.
•
Wash the fryer bowl.
•
Place the basket (with filter paper) into the deep
fryer (handle in the upper position).
•
Pour the oil carefully back into the bowl.
•
Throw the filter paper away and clean the basket.
Oil may also be filtered by using an oil filtering
container, ref. XA500003 maximum capacity: 2.5 l
(available from approved T-Fal Service Centers).
Change the oil after being used
for a maximum of 8 to 12 times.
“Clean” oil keeps the flavor and
lightness of foods.
Changing the oil/fat
•
Do not pour used oil into the sink. Leave it to cool
and throw it away with household waste.
Change the anti-odor filter each
time the deep fryer has been
used a maximum of 10 to 15
times.
Replace the Anti-odor filter
(Anti-odor filters
ref. XA500008
are available
from approved T-Fal Service Centers).
•
Open the lid (1). Remove the lid by pulling it
upwards (2) (fig. 9).
•
Place the underside of the lid towards you.
•
Separate the odor/splash guard from the lid, using
the clip (fig. 10).
•
Remove the anti-odor filter by pushing from
underneath the odor/splash guard.
•
Fit the replacement anti-odor filter (fig. 11).
•
Replace the odor/splash guard.
•
Insert the hooks of the odor/splash guard into the
notches in the lid (fig. 12).
•
Press the odor/splash guard on each side of the
locking clip until you hear a ‘click’ (fig. 13).
•
To replace the lid:
Place the lid clamps into their slots (fig. 14).
Maintenance
It is not necessary to store oil in a
refrigerator.
Check that the odor/splash
guard is locked in place before
turning over the lid.
!
!
!
!

8
ENG ENG
Cleaning
Remove the anti-odor filter
before washing.
Clean the window after each use.
Never replace the lid’s seal.
Never place the fryer in water.
Do not use abrasive products
when cleaning.
Cleaning the lid and the window
•
Remove the lid.
•
Separate the cover from the odor/splash guard
and remove the anti-odor filter.
•
The lid and odor/splash guard may be cleaned in
a dishwasher (fig. 15).
•
Dry before replacing the lid and the anti-odor fil-
ter.
•
To ensure good visibility :
- Clean the inside of the viewing window by
wiping it with a sponge and lemon juice.
•
Allow the window to dry at room temperature or
dry with a clean cotton cloth.
However, if your bowl does
become misshapen, have it
replaced by your nearest appro-
ved Service Center.
To preserve its non-stick pro-
perties longer, do not use any
metal tools.
Clean the removable bowl
•
You can clean your bowl in a dishwasher. Take
care not to damage its coating with the dishwa-
sher shelves.
•
Try not to damage the shape of your bowl
through bumps or being dropped.
Bowl with non-stick coating
•
Browning and scratches that may appear after
prolonged use do not cause any problems.
•
We guarantee that the non-stick coating COM-
PLIES WITH REGULATIONS regarding materials
coming into contact with food products.
If your basket is misplaced or
damaged, please call T-FAL.
Cleaning the basket
•
Wash the basket with an ample quantity of soapy
water.
•
You can put the basket with the handle in the dis-
hwasher. (fig. 15).
•
Dry before replacing in appliance.
!
!
!
!
!
!
!
•
Clean the outside of the deep fryer with a damp
cloth. Dry it carefully.
•
Clean the other parts using a damp sponge and
soapy water.

9
ENG
ENG
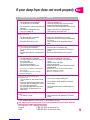
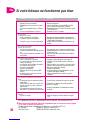
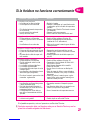
If your deep fryer does not work properly
Problem and possible causes
The deep fryer does not work.
•The equipment is not plugged in.
•The on-off switch is not set to I.
• The temperature indicator light does not
come on.
•The bowl is in the opposite way.
• There isn’t enough oil.
Unpleasant odors.
•The Anti-odor filter is saturated.
•The oil has deteriorated.
•Unsuitable oil has been used.
Steam escapes from around the lid.
• The lid is not closed properly.
•The seal is defective or incorrectly posi-
tioned.
• The odor/splash guard is assembled incor-
rectly.
The frying oil overflows.
• The Anti-odor filter is saturated.
• The Maxi marker for filling the bowl has
been exceeded.
•The basket is too full.
•The basket is misshapen.
•Mixture of different oils and fats.
• Food is wet or contains too much water
(frozen foods).
•Not changing the oil often enough.
Using the wrong oil.
The foods do not become golden,
and remain soft.
• They are too thick and contain a lot of
water.
•Too much food is being cooked at the
same time and the cooking oil is no lon-
ger at the right temperature.
•The frying oil temperature may not be
high enough; the thermostat is set
incorrectly.
The timer no longer works (depending on
model).
•The battery is spent.
Solutions
•Plug in the equipment.
•Set the on-off switch to Iand check that the
temperature indicator light lights up.
• Contact your nearest approved Service Center.
•Replace the bowl in the right position.
•Fill the bowl up to the Max. level.
•Replace the anti-odor filter (see page 7).
• Replace the oil (can be reused to a maximum 8
to 12 uses).
•Use a vegetable oil for top-quality frying of
food.
•Check that the lid is properly shut.
•Contact your nearest approved T-Fal Service
Center.
• Replace the odor/splash guard (see page 7)
•Change the anti-odor filter (see page 7).
•Check the oil level (Maxi), and remove the
excess.
•Remove some of the food.
•Change your basket.
•Empty and clean the bowl. Refill the bowl with
one type of oil.
• Remove the ice and dry the food thoroughly.
Lower the basket very slowly.
•Only use vegetable oil / fat.
•As a test, try a longer cooking time.
•Fry the foods in small quantities (particularly
frozen foods).
•Set the thermostat to the recommended tem-
perature.
•Have it replaced at an approved T-Fal Service
Center.
If the problem persists, check with T-Fal customer service
Any repairs must only be carried out by an approved Service Center with the
manufacturer’s own replacement parts.
First, contact T-FAL customer service at:
Canada : 1 800 418 3325 or www.t-fal.ca
USA : 1 800 395 8325 or www.t-fal.com
!

10
ENG
WARRANTY CANADA AND USA
One year limited warranty:
T-FAL warrants this product to be defect-free in material and
workmanship for a period of one year. Should any defect be discovered
within one year of date of purchase, the following should be used in
claiming the warranty :
In Canada
1) Return your appliance to the retailer from whom it was purchased along
with proof of purchase.
Or
2) Take your appliance to the nearest authorized T-FAL Service Center, along
with proof of purchase.
3) T-FAL Canada agrees to repair or replace the defective part or product at
no charge, provided that the product is returned with all shipping charges
prepaid to :
T-FAL Canada
a division of Groupe Seb Canada Inc.
455 Finchdene Square, Unit 1
Scarborough, Ontario M1X 1B7
accompanied by proof of purchase and a letter detailing the nature of the
defect. Be certain that the appliance is wrapped carefully when shipping.
The T-FAL Customer Service Department should be contacted by mail or
by telephone (1-800-418-3325), prior to any action, in the event that it is
possible to correct the defect without returning the unit.
In the USA
Do not return the product neither to the retailer from whom it was pur-
chased, nor to a service center. Instead, the following procedure should
be carefully followed:
1) Contact our consumer service department at (800) 395 8325 in order to
alert us on the problem and to ensure the fastest possible resolution of
the problem.
2) You will likely be asked to please send your product , with all shipping
charges prepaid, accompanied by proof or purchase and a letter detailing
the nature of the defect, to
T-FAL After Sales Service Department
2121 Eden Road
Millville, NJ 08332
Be certain that the product is carefully wrapped when shipped.
NOTE: Claims for lost packages will only be accepted if package was sent
insured or sent by traceable means.
3) After proper inspection , under this limited warranty, T-Fal Corporation
agrees to repair or replace the defective part or product at no charge.
The warranty does not apply to any unit that has been tampered with, nor
to damages incurred through negligence in use, faulty packing or
mishandling in transit by any common carrier.
Repairs not covered by this warranty will be performed at current costs
for parts and labor, plus return shipping charges.
This warranty gives you specific legal rights and you may also have other
rights, which may vary, from state to state.
THANK YOU FOR BEING A T-FAL CUSTOMER.
If problem persists, or for any other problem. Contact T-FAL Customer Service :
in the U.S. (1-800-395-8325) or www.t-fal.com
in Canada (1-800-418-3325) or www.t-fal.ca

PRÉCAUTIONS
IMPORTANTES
Lorsque vous utilisez des appareils
électriques, veillez à suivre quelques
précautions élémentaires
en matière de sécurité et en particu-
lier les suivantes :
1 Lisez entièrement ce mode d'emploi.
2 Ne touchez pas aux surfaces chaudes.
Utilisez les poignées ou les boutons.
3Pour vous protéger d'une possible
décharge électrique, n’immergez pas le
cordon d’alimentation, les prises de cou-
rant ou l’appareil, ni dans l’eau ni dans
aucun autre liquide.
4 Une surveillance étroite est nécessaire
lorsque tout l’appareil électrique est utilisé
par des enfants ou à leur portée.
5 Débranchez l’appareil après usage et
avant de le nettoyer. Laissez-le refroidir
avant d’installer, d’enlever les accessoires,
ou de le nettoyer.
6 N’utilisez aucun appareil électrique avec
un cordon d’alimentation ou une prise
endommagé, quand l’appareil fonctionne
mal, ou après qu’il ait été endommagé de
quelque manière que ce soit. Retournez
les appareils défectueux à un centre de
service. Voir la liste ci-jointe des centres
de service.
7 L’usage de certains accessoires non
recommandés par le fabricant pourrait
occasionner des blessures.
8 N’utilisez pas l’appareil à l’extérieur.
9 Ne laissez pas le cordon d’alimentation
pendre le long d’une table. Ceci pourrait
engendrer de graves accidents. Ne le lais-
sez pas au contact de surfaces chaudes.
10 Ne placez jamais l’appareil sur/ou près
d’un brûleur à gaz, d’une plaque élec-
trique ou dans un four chaud.
11 Ne déplacez jamais un appareil contenant
de l’huile chaude ou autres liquides
chauds.
12 Attachez toujours la prise à l’appareil en
premier, puis branchez. Pour éteindre,
débranchez.
13 N’utilisez cet appareil que pour un usage
exclusivement ménager.
14 Soyez très prudent quand vous déplacez
une friteuse contenant de l’huile chaude.
15 Assurez-vous que la poignée soit correc-
tement fixée au panier et solidement en
place. Voir les instructions détaillées de
montage.
16 GARDEZ
PRÉCIEUSEMENT
CES INSTRUC-
TIONS.
17 Respectez les quantités mini et maxi
d’huile.
18 Ne surchargez pas votre panier, respectez
les quantités limites de sécurité.
19 Ne branchez jamais votre friteuse vide
(sans matière grasse).
20 Les temps de cuisson sont donnés à titre
indicatif.
21 La matière grasse doit être filtrée réguliè-
rement et changée toutes les 8 à 12 utili-
sations.
22 Ne mélangez pas plusieurs sortes de
matières grasses ou d’huiles.
23 Si vous utilisez une matière grasse solide,
coupez-la en morceaux et faites-la fondre
à feux doux dans un récipient à part puis
versez-la lentement dans la cuve. Ne met-
tez jamais de matière grasse solide direc-
tement dans la cuve ou le panier sinon
l’appareil risque d’être détérioré.
24 Si vous avez une cuve amovible, ne
jamais la retirer lorsque votre friteuse est
en fonctionnement.
25 Conservez votre bon de garantie situé
sur l’emballage.
26 Pour toutes autres informations, contac-
tez un centre de service autorisé T-FAL.
Instructions pour la polarisation
Votre appareil est équipé d’une fiche
polarisée (une lame est plus large que
l’autre). Ceci a pour but de réduire les
risques de chocs électriques. Cette fiche
ne peut se brancher que dans un sens.
Si la fiche ne rentre pas correctement
dans la prise murale, retournez-la.
Si elle ne rentre toujours pas, contactez
un électricien. N’essayez pas de modifier
la prise d’aucune façon.
Instructions concernant le câble d’ali-
mentation
N’utilisez pas de rallonge ; le produit est
fourni avec un câble d’alimentation court
afin d’éviter que celui-ci s’emmêle et que
l’on trébuche dessus.
Cordon magnétique: pour les États-
Unis seulement
Le cordon est équipé d'un connecteur
magnétique détachable. Le cordon
magnétique doit être attaché directement
à la friteuse. CECI DOIT ÊTRE FAIT
AVANT DE BRANCHER LE CORDON
DANS LA PRISE DE COURANT MURALE.
FRA
11

12
FRA
Protection de l’environnement
•Cet appareil est conçu de façon à durer de nombreuses années. Cependant,
lorsque vous déciderez de changer d’appareil, pensez à l’environnement et appor-
tez votre vieil appareil à votre centre de collecte sélective.
Description
1. Couvercle
2. Hublot
3. Attaches du couvercle
4. Attaches du rabat anti-
éclaboussures/odeurs
5. Rabat anti-éclaboussures/
odeurs amovible
6. Filtre anti-odeurs
7. Joint d’étanchéité
8. Clip de verrouillage du
rabat anti-éclaboussures/
odeurs
9. Panier
10. Cuve amovible à revêtement
anti-adhésif
11. Bouton de déverrouillage
de la poignée servant à
monter et descendre le
panier
12. Poignée pour monter et
descendre le panier
13. Repères mini et maxi
du remplissage de cuve
14. Guide de positionnement de
la cuve amovible
15. Bouton d’ouverture
du couvercle
16. Revêtement en métal
17. Minuteur (sur certains modèles)
18. Thermostat réglable
19. Interrupteur Marche/Arrêt
lumineux

13
FRA
Avant de mettre le couvercle
dans l’eau ou au lave-vaisselle,
retirez le filtre anti-odeurs.
Ne mouillez jamais le filtre anti-
odeurs.
Ne branchez jamais la friteuse
quand elle est vide.
Ne mélangez jamais différents
types d’huile.
Le niveau d’huile doit toujours
se situer entre les repères mini
et maxi de la cuve. Vérifiez
avant chaque utilisation et ajou-
tez au besoin un peu d’huile du
même type.
Placez la friteuse
- sur un plan stable,
- hors de portée des enfants,
- éloignée de toutes sources
d’éclaboussures ou de chaleur.
Ne laissez jamais la friteuse
sans surveillance.
Ne laissez pas pendre le cordon.
Quantité de matière grasse
Mini 2,3 l / 9 cups 2030 g / 4,3 lbs
Maxi 2,5 l / 10 cups 2160 g / 4,8 lbs
Préparation
Avant la première utilisation
•
Nettoyez le couvercle, le hublot, le rabat anti-écla-
boussures/odeurs, la cuve et le panier à l’aide
d’une éponge et d’eau savonneuse. Séchez.
•
Le filtre anti-odeurs est déjà installé dans le cou-
vercle.
Remplissez la cuve
•
Utilisez une huile alimentaire recommandée pour
la friture (fig. 2) : huile de tournesol ou végétale.
Si vous utilisez de l’huile de tournesol, assurez-
vous de changer l’huile après 5 utilisations.
•
Si vous utilisez une matière grasse solide :
coupez-la en morceaux et faites-la fondre à part
pour ensuite la verser dans la cuve (ne la faites
jamais fondre dans le panier, ni dans la cuve).
•
Suivez les recommandations du fabricant pour la
cuisson.
Préchauffez
•
Fermez le couvercle.
•
Branchez.
•
Placez l’interrupteur Marche/arrêt à la position I.
Le voyant s’allumera.
•
Réglez le thermostat selon les aliments à frire (voir
tableaux à la p. 15).
1 l
500 g
!
!
!
!
!
!
!
!
Un système de sécurité
empêche la friteuse de fonction-
ner si vous n’avez pas remis la
cuve correctement en place.
Replacez la cuve amovible
•
Positionnez la cuve, bord verseur et marquage
mini/maxi ()
vers l’arrière de l’appareil (fig 1).
•
Les bords de la cuve doivent s’emboîter parfaite-
ment sur l’appareil.

- Coupez les aliments de la
même taille afin qu'ils cuisent
de façon homogène
- Evitez les morceaux trop épais
- Secouez bien les aliments sur-
gelés pour détacher les mor-
ceaux de glace avant de mettre
les aliments dans la friteuse.
- Certains aliments surgelés ne
peuvent être cuits immédiate-
ment. Vérifiez les indications du
fabricant.
14
FRA
La vapeur qui s’échappe du
couvercle, ainsi que les élé-
ments en verre et en métal,
sont brûlants.
Attention : ne placez jamais
votre main ou votre visage au-
dessus du filtre. Ne touchez
pas au revêtement métallique
ou au hublot.
Pour préserver la matière gras-
se, salez et poivrez toujours les
aliments hors de la friteuse. Pour
des fritures bien croustillantes,
ouvrez immédiatement le cou-
vercle à la fin de la cuisson.
Pour une 2e cuisson :
- attendez que le voyant soit
éteint avant de plonger de nou-
veaux aliments dans l’huile.
- rectifiez le niveau d’huile selon
la quantité d’aliments à frire.
Surveillez la cuisson
•
Durant la cuisson, il est normal que le voyant de
température s’allume et s’éteigne.
Retirez les aliments
•Pour remonter le panier, relevez la poignée à l’hori-
zontale jusqu’à ce que vous entendiez le « clic »
de verrouillage (fig. 6).
•Ouvrez le couvercle (fig. 7).
•Égouttez les aliments.
•Retirez le panier, en vous assurant que la tige est
complètement sortie de la cuve (fig. 8).
•Refermez le couvercle et servez.
!
!
Cuisson
!
!
Le minuteur signale la fin du
temps de cuisson mais n’arrête
pas l’appareil.
Plongez le panier dans l’huile
•
Laissez la poignée du panier en position haute et
fermez soigneusement le couvercle de la friteuse
(fig. 4).
•
Une fois le voyant de température éteint, appuyez
sur le bouton de déverrouillage de la poignée du
panier (1).
•
Rabattez lentement et complètement la poignée
dans son logement (2) (fig. 5).
Réglez le minuteur (selon modèle)
•
Appuyez sur le bouton et sélectionnez le nombre
de minutes désiré.
•
Relâchez le bouton. Le temps affiché est sélectionné
et le décompte commence.
•
En cas d’erreur ou pour modifier la sélection,
maintenez le bouton appuyé pendant
2 secondes.
•
Pour arrêter la sonnerie, appuyez sur le bouton.
Ne forcez jamais la poignée du
panier :
commencez par appuyer sur le
bouton de déverrouillage de la
poignée.
!
Ne dépassez jamais la quantité
limite de sécurité.
Préparez le panier
•
Mettez le panier en place sur le bord de la cuve
(fig. 3).
•
Placez les aliments dans le panier. Les aliments
doivent être secs, pas trop humides.
•
Réduisez les quantités pour les aliments surgelés.
Frites fraîches Frites surgelées
Quantité limite de sécurité 1250 g / 2,7 lbs 900 g / 2 lbs
Quantité maximale recommandée 670 g / 1,5 lbs 500 g / 1,1 lbs

15
FRA
Cuisson
Tableaux de cuisson
Les temps de cuisson sont donnés à titre indicatif. Ils peuvent varier en fonction des
quantités, du goût de chacun, de la tension du réseau électrique, etc.
Arrêtez l’appareil
•
Une fois la friture terminée, placez l’interrupteur
Marche/Arrêt à la position o.
•
Débranchez l’appareil.
•
Laissez refroidir la friteuse et l’huile (de 2 à 3
heures).
•
Rangez la fiche dans le range-prise situé à l'arrière
de l'appareil (selon modèle).
•
Attendez que la friteuse soit complètement refroi-
die avant de la déplacer.
•
Lorsque vous déplacez la friteuse, tenez-la ferme-
ment et assurez-vous qu’elle est bien droite.
Ne déplacez jamais
la friteuse si elle contient de
l’huile chaude.
Ne déplacez jamais
la friteuse le couvercle ouvert.
!
!
Surgelés*
* Pour les aliments frais diminuer les temps de cuisson de 1 à 2 minutes.
** Pour les frites fraîches augmenter les temps de cuisson de 4 à 6 minutes.
Température Temps de cuisson
Pommes frites** 190 °C / 374 °F 9 - 16 min
Croquettes de poulet 190 °C / 374 °F 10 - 13 min
Poulet frit en quartier 180 °C / 356 °F 18 - 20 min
Rondelles d’oignons 190 °C / 374 °F 5 - 6 min
Beignets de pommes 170 °C / 338 °F 6 - 7 min
Légumes frits 170 °C / 338 °F 6 - 8 min
Beignets de crevettes 180 °C / 356 °F 4 - 5 min
Crevettes 190 °C / 374 °F 4 - 5 min
Filets de poisson 190 °C / 374 °F 5 - 6 min
Champignons 150 °C / 302 °F 10 - 12 min
Boulettes de boeuf 180 °C / 356 °F 9 - 10 min
Beignets 170 °C / 338 °F 5 - 6 min
î

16
FRA
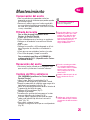
L’huile doit être filtrée régulière-
ment.
Les débris qui se détachent des
aliments ont tendance à brûler.
Cela entraîne une altération plus
rapide de l’huile et augmente à la
longue les risques d’inflam-
mation.
Conservez la matière grasse
•
À l’aide d’une écumoire non métallique ou d’un
filtre en papier, recueillez les petits morceaux d’ali-
ments restés dans l’huile.
•
Conservez la matière grasse dans la friteuse ou
stockez-la dans un récipient hermétique à l’abri de
la lumière et de la chaleur (recommandé si vous
n’utilisez pas la friteuse souvent).
Filtrez la matière grasse
À l’aide d’un filtre en papier (disponible en ligne ou à un
Centre de Service agréé T-Fal).
•
Attendez que l’huile soit froide.
•
Videz doucement l’huile dans une casserole.
•
Placez un filtre en papier au fond du panier de la
friteuse.
•
Lavez la cuve.
•
Placez le panier (avec le filtre en papier) dans la
friteuse (poignée en position haute).
•
Reversez soigneusement l’huile dans la cuve avec
précaution.
•
Jetez le papier filtre, nettoyez le panier.
L’huile peut aussi être filtrée à l’aide d’un pot à huile
réf. XA 500003 d’une capacité maximale de 2,5 l (disponible
auprès des Centres de Service agréés T-Fal).
Changez l’huile toutes les 8 à 12
utilisations maximum.
Une huile « propre » conserve
mieux le goût des aliments et
donne une friture plus légère.
Renouvelez la matière grasse
•
Ne jetez pas la matière grasse dans l’évier.
Laissez-la refroidir et mettez-la avec les ordures
ménagères.
Remplacez le filtre anti-odeurs au
bout de 10 à 15 fritures maxi-
mum.
Remplacez le filtre anti-odeurs
(le filtre anti-odeurs
réf.
XA500008
est disponible
auprès des Centres de Service agréés T-Fal).
•
Ouvrez le couvercle. Détachez-le en le tirant vers le
haut (fig. 9) et retournez-le.
•
Séparez le rabat anti-éclaboussures/odeurs du cou-
vercle en actionnant le clip (fig. 10).
•
Retirez le filtre anti-odeurs en poussant par en des-
sous du rabat anti-éclaboussures/odeurs.
•
Placez le nouveau filtre anti-odeurs (fig. 11).
•
Replacez le rabat anti-éclaboussures/odeurs.
•
Engagez les crochets du rabat anti-
éclaboussures/odeurs sous les deux encoches
avant du couvercle (fig. 12).
•
Appuyez sur le rabat anti-éclaboussures/odeurs de
part et d’autre du clip de verrouillage jusqu’à ce que
vous entendiez le « clic » (fig. 13).
•
Pour remettre le couvercle :
Introduisez les attaches du couvercle dans leur
logement (fig. 14).
Entretien
Il n’est pas nécessaire de conser-
ver la matière grasse au réfrigé-
rateur
Vérifiez si le clip du rabat anti-
éclaboussures/odeurs est bien
verrouillé avant de retourner le
couvercle.
!
!
!
!

17
FRA
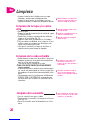
Nettoyage
Retirez le filtre anti-odeurs
avant de laver le couvercle.
Nettoyez le hublot après chaque
utilisation.
Ne changez jamais le joint
d’étanchéité du couvercle.
Ne plongez jamais l’appareil
dans l’eau.
N’utilisez pas de produits abra-
sifs.
Nettoyez le couvercle et le hublot
•
Retirez le couvercle.
•
Séparez le couvercle du rabat anti-éclabous-
sures/odeurs et retirez le filtre anti-odeurs.
•
Vous pouvez nettoyer le couvercle
et le rabat anti-éclaboussures/odeurs au lave vais-
selle (fig. 15).
•
Séchez avant de replacer le couvercle
et le filtre anti-odeurs.
•
Pour une bonne visibité :
- nettoyez l’intérieur du hublot à l’aide d’une épon-
ge et d’un peu de jus de citron
•
Laissez sécher le hublot à l’air ambiant ou
essuyez-le avec un linge propre en coton.
Pour conserver plus longtemps
les qualités anti-adhésives n’uti-
lisez aucun ustensile métallique.
Nettoyez la cuve amovible
•
Vous pouvez nettoyer votre cuve au lave-vaisselle.
Faites attention de ne pas abîmer le revêtement
avec les grilles du lave-vaisselle.
•
Evitez de déformer votre cuve – une déformation
peut être causée par des chocs ou des chutes.
CUVE A REVÊTEMENT ANTI-ADHESIF
•
Le brunissement et les rayures qui peuvent appa-
raître à la suite d’une longue utilisation ne présen-
tent pas d’inconvénient.
•
Nous garantissons que le revêtement anti-adhésif
est CONFORME A LA REGLEMENTATION concer-
nant les matériaux en contact avec les aliments.
Si vous perdez votre panier, ou
s’il est endommagé, veuillez
communiquer avec T-FAL.
Nettoyez le panier
•
Lavez le panier dans une grande quantité d’eau
savonneuse.
•
Vous pouvez mettre le panier et la poignée au
lave vaisselle (fig. 15).
•
Séchez le panier avant de le replacer dans la fri-
teuse.
!
!
!
!
!
!
!
•
Nettoyez l’extérieur de la friteuse avec un linge
humide. Séchez soigneusement.
•
Nettoyez les autres éléments avec une éponge
humide et de l’eau savonneuse..
Si votre cuve est déformée, rem-
placez-la auprès de votre Centre
de service agréé le plus proche.
La page charge ...
La page charge ...
La page charge ...
La page charge ...
La page charge ...
La page charge ...
La page charge ...
La page charge ...
La page charge ...
La page charge ...
La page charge ...
-
 1
1
-
 2
2
-
 3
3
-
 4
4
-
 5
5
-
 6
6
-
 7
7
-
 8
8
-
 9
9
-
 10
10
-
 11
11
-
 12
12
-
 13
13
-
 14
14
-
 15
15
-
 16
16
-
 17
17
-
 18
18
-
 19
19
-
 20
20
-
 21
21
-
 22
22
-
 23
23
-
 24
24
-
 25
25
-
 26
26
-
 27
27
-
 28
28
-
 29
29
-
 30
30
-
 31
31


T-Fal Avante Deep-Fryer Instructions For Use Manual
- Catégorie
- Friteuses
- Taper
- Instructions For Use Manual
dans d''autres langues
- English: T-Fal Avante Deep-Fryer
- español: T-Fal Avante Deep-Fryer