Sparky Group P 282 Manuel utilisateur
- Catégorie
- Outils électroportatifs
- Taper
- Manuel utilisateur

© 2006 SPARKY
720 W P282
1 – 8
DOUBLE BLADE PLANER
Instruction Manual
9 – 17
RABOT A DEUX LAMES
Instructions d’utilisation
18 – 26
ɊɍȻȺɇɈɄɋȾȼɍɆəɅȿɁȼɂəɆɂ
ɂɧɫɬɪɭɤɰɢɹɩɨɷɤɫɩɥɭɚɬɚɰɢɢ
27 – 36
ɊȿɇȾȿɋȾȼȺɇɈɀȺ
ɂɧɫɬɪɭɤɰɢɹɡɚɟɤɫɩɥɨɚɬɚɰɢɹ
13 14 15
16 17
SPARKY GmbH
Leipziger Str. 20
10117 Berlin, DEUTSCHLAND
Geschäftsführer Dipl.-Kfm., Dipl.-Ing. Stanislav Petkov
DECLARATION OF CONFORMITY
We declare under our sole responsibility that this product is in conformity with the provisions of the following directives
and the corresponding harmonized standards:
73/23/EEC, 98/37/EC, 89/336/EEC, EN 60745-1, EN 60745-2-14, EN 55014-1, EN 550214-2, EN 61000-2-3,
EN 61000-3-3.
DECLARATION DE CONFORMITE
Nous déclarons sous notre propre responsabilité que ce produit est conformé aux directives, respectivement les
standards harmonisés:
73/23/EEC, 98/37/EC, 89/336/EEC, EN 60745-1, EN 60745-2-14, EN 55014-1, EN 550214-2, EN 61000-2-3,
EN 61000-3-3.
ȾȿɄɅȺɊȺɐɂəɈɋɈɈɌȼȿɌɋɌȼɂɂ
Ɇɵ ɡɚɹɜɥɹɟɦ ɧɚɲɭ ɥɢɱɧɭɸ ɨɬɜɟɬɫɬɜɟɧɧɨɫɬɶ ɡɚ ɫɨɨɬɜɟɬɫɬɜɢɟ ɞɚɧɧɨɝɨ ɢɡɞɟɥɢɹ ɧɢɠɟɩɟɪɟɱɢɫɥɟɧɧɵɦ
ɞɢɪɟɤɬɢɜɚɦɢɫɨɨɬɜɟɬɫɬɜɭɸɳɢɦɭɧɢɮɢɰɢɪɨɜɚɧɧɵɦɫɬɚɧɞɚɪɬɚɦ
73/23/EEC, 98/37/EC, 89/336/EEC, EN 60745-1, EN 60745-2-14, EN 55014-1, EN 550214-2, EN 61000-2-3,
EN 61000-3-3.
ȾȿɄɅȺɊȺɐɂəɁȺɋɔɈɌȼȿɌɋɌȼɂȿ
ɇɢɟɞɟɤɥɚɪɢɪɚɦɟɧɚɲɚɬɚɥɢɱɧɚɨɬɝɨɜɨɪɧɨɫɬɱɟɬɨɜɚɢɡɞɟɥɢɟɟɜɫɴɨɬɜɟɬɫɬɜɢɟɫɪɚɡɩɨɪɟɞɛɢɬɟɧɚɫɥɟɞɧɢɬɟ
ɞɢɪɟɤɬɢɜɢɫɴɨɬɜɟɬɧɨɯɚɪɦɨɧɢɡɢɪɚɧɢɫɬɚɧɞɚɪɬɢ
73/23/EEC, 98/37/EC, 89/336/EEC, EN 60745-1, EN 60745-2-14, EN 55014-1, EN 550214-2, EN 61000-2-3,
EN 61000-3-3.
ȾȿɄɅȺɊȺɐɂəɁȺɋɔɈɌȼȿɌɋɌȼɂȿ
ɋɉȺɊɄɂȿɅɌɈɋȺȾɞɟɤɥɚɪɢɪɚɱɟ
ɊȿɇȾȿɋȾȼȺɇɈɀȺ
P 282
ɫɴɨɬɜɟɬɫɬɜɚɧɚɢɡɢɫɤɜɚɧɢɹɬɚɧɚɫɥɟɞɧɢɬɟɧɚɪɟɞɛɢ
ɇɚɪɟɞɛɚɡɚɧɢɫɤɨɜɨɥɬɨɜɢɬɟɟɥɟɤɬɪɢɱɟɫɤɢɫɴɨɪɴɠɟɧɢɹ±ɉɆɋ
ɇɚɪɟɞɛɚɡɚɦɚɲɢɧɢɬɟ±ɉɆɋ
ɇɚɪɟɞɛɚɡɚɟɥɟɤɬɪɨɦɚɝɧɢɬɧɚɫɴɜɦɟɫɬɢɦɨɫɬ±ɉɆɋ
ɤɚɤɬɨɢɧɚɫɥɟɞɧɢɬɟȻȾɋɜɴɜɟɥɢɟɜɪɨɩɟɣɫɤɢɬɟɯɚɪɦɨɧɢɡɢɪɚɧɢɫɬɚɧɞɚɪɬɢ
ȻȾɋ(1ȻȾɋ(1ȻȾɋ(1ȻȾɋ(1
ȻȾɋ(1ȻȾɋ(1
ɋɉȺɊɄɂȿɅɌɈɋȺȾ
ɭɥÄɄɭɛɪɚɬ´
Ʌɨɜɟɱ
Ȼɴɥɝɚɪɢɹ
ɇɢɤɨɥɚɣɄɴɥɛɨɜ
ɂɡɩɴɥɧɢɬɟɥɟɧȾɢɪɟɤɬɨɪ
06
www.sparkygroup.com
www.sparkygroup.com
BLACK PANTONE185
BLACK PANTONE185
0604R01

Ⱥ
B
1 2 3
9
4 5
7 8
12
A
B
10 11
6
3
5
12
1
7 14 6 13
2 4
8
18
15 16
9
11
10
17
BLACK PANTONE185
BLACK PANTONE185

1
EN
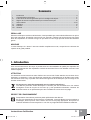
Contents
I - Introduction .................................................................................................................................... 1
,, 7HFKQLFDOVSHFL¿FDWLRQV................................................................................................................ 3
III - General safety instructions for electric power tools ................................................................... 3
IV - Additional safety rules for electric planers ................................................................................... 4
V - Know your product ....................................................................................................................A/5
VI - Operation ...................................................................................................................................... 5
VII - Maintenance .................................................................................................................................. 8
VIII - Warranty ......................................................................................................................................... 8
I - Introduction
Your new SPARKY power tool will more than satisfy your expectations. It has been manufactured under
VWULQJHQW63$5.<4XDOLW\6WDQGDUGVWRPHHWVXSHULRUSHUIRUPDQFHFULWHULD<RXZLOO¿QG\RXUQHZWRRO
easy and safe to operate, and, with proper care, it will give you many years of dependable service.
CAUTION!
Carefully read through this entire Instruction Manual before using your new SPARKY Power Tool. Take
special care to heed the Cautions and Warnings. Your SPARKY power tool has many features that will
make your job faster and easier. Safety, performance, and dependability have been given top priority in
the development of this tool, making it easy to maintain and operate.
Do not dispose of electrical products together with household waste!
Waste electrical products should not be disposed of with household waste. Please recycle where
facilities exist. Check with your local authority or retailer for recycling advice.
ENVIRONMENTAL PROTECTION
The machine, accessories and packaging should be sorted for environmental-friendly recycling.
The plastic components are labelled for categorised recycling.
UNPACKING
Due to modern mass production techniques, it is unlikely that your power tool is faulty or that a part is
PLVVLQJ,I\RX¿QGDQ\WKLQJZURQJGRQRWRSHUDWHWKHWRROXQWLOWKHSDUWVKDYHEHHQUHSODFHGRUWKHIDXOW
KDVEHHQUHFWL¿HG)DLOXUHWRGRVRFRXOGUHVXOWLQVHULRXVSHUVRQDOLQMXU\
ASSEMBLY
This SPARKY double blade planer P 282 is packed, fully assembled except for the shavings adaptor tube,
shavings collection bag and parallel fence guide.
P 282 • Instruction Manual
pages-P282.indd 1 ɝ

2
P 282EN
DESCRIPTION OF SYMBOLS
The rating plate on your tool may show symbols. These represent important information about the product
or instructions on its use.
Wear hearing protection.
Wear eye protection.
Wear respiratory protection.
Double insulated for
additional protection.
Connection to vacuum cleaner.
&RQIRUPVWRUHOHYDQW(XURSHDQ
safety standards.
Conforms to the requirements of
Russian standards.
Conforms to the requirements of the
*HUPDQ(TXLSPHQWDQG3URGXFW
Safety Act.
pages-P282.indd 2 ɝ

3
Instruction Manual EN
II - Technical
VSHFLÀFDWLRQV
Model: P 282
ƒ9ROWDJH 9a+]
ƒ3RZHULQSXW :
ƒ1RORDGVSHHG PLQ
-1
ƒ3ODQLQJGHSWK ±PP
ƒ5HEDWLQJGHSWK ±PP
ƒ3ODQLQJZLGWK PP
ƒ:HLJKW NJ
ƒ6RXQGSUHVVXUHOHYHO G%$
ƒ6RXQGSRZHUOHYHO G%$
ƒ:HLJKWHGDFFHOHUDWLRQ PV
2
ƒ6DIHW\FODVV(1 ,,
III - Safety instructions
WARNING: To reduce the risk of injury,
user must read instruction manual. Read all in-
VWUXFWLRQV)DLOXUHWRIROORZDOOLQVWUXFWLRQVOLVWHG
below may result in electric shock, fire and/or
serious injury. The term “power tool” in all of the
warnings listed below refers to your mains-op-
HUDWHGFRUGHGSRZHUWRRORUEDWWHU\RSHUDWHG
FRUGOHVVSRZHUWRRO
Observe these instructions!
WORK AREA
ƒ .HHSZRUNDUHDFOHDQDQGZHOOOLW&OXWWHUHGDQG
dark areas invite accidents.
ƒ 'RQRWRSHUDWHSRZHUWRROVLQH[SORVLYHDWPRV-
SKHUHV VXFK DV LQ WKH SUHVHQFH RI ÀDPPD-
ble liquids, gases or dust. Power tools create
sparks which may ignite the dust or fumes.
ƒ.HHSFKLOGUHQDQGE\VWDQGHUVDZD\ZKLOHRSHU-
ating a power tool. Distractions can cause you
to lose control.
ELECTRICAL SAFETY
ƒ 3RZHUWRROSOXJVPXVWPDWFKWKHRXWOHW1HYHU
modify the plug in any way. Do not use any
DGDSWHU SOXJV ZLWK HDUWKHG JURXQGHGSRZHU
tools. Unmodified plugs and matching outlets
will reduce risk of electric shock.
ƒ $YRLG ERG\ FRQWDFW ZLWK HDUWKHG RU JURXQGHG
surfaces such as pipes, radiators, ranges and
refrigerators. There is an increased risk of elec-
tric shock if your body is earthed or grounded.
ƒ 'RQRWH[SRVHSRZHUWRROVWRUDLQRUZHWFRQGL-
tions. Water entering a power tool will increase
the risk of electric shock.
ƒ'RQRWDEXVHWKHFRUG1HYHUXVHWKHFRUGIRU
carrying, pulling or unplugging the power tool.
Keep cord away from heat, oil, sharp edges or
moving parts. Damaged or entangled cords in-
crease the risk of electric shock.
ƒ :KHQRSHUDWLQJDSRZHUWRRORXWGRRUVXVHDQ
extension cord suitable for outdoor use. Use of
a cord suitable for outdoor use reduces the risk
of electric shock.
PERSONAL SAFETY
ƒ 6WD\DOHUWZDWFKZKDW\RXDUHGRLQJDQGXVH
common sense when operating a power tool.
Do not use a power tool while you are tired or
under the influence of drugs, alcohol or medi-
cation. A moment of inattention while operating
power tools may result in serious personal in-
jury.
ƒ 8VHVDIHW\HTXLSPHQW$OZD\VZHDUH\HSURWHF-
tion. Safety equipment such as dust mask, non-
skid safety shoes, hard hat, or hearing protec-
tion used for appropriate conditions will reduce
personal injuries.
ƒ $YRLGDFFLGHQWDOVWDUWLQJ(QVXUHWKHVZLWFKLV
in the off-position before plugging in. Carrying
power tools with your finger on the switch or
plugging in power tools that have the switch on
invites accidents.
ƒ 5HPRYH DQ\ DGMXVWLQJ NH\ RU ZUHQFK EHIRUH
turning the power tool on. A wrench or a key left
attached to a rotating part of the power tool may
result in personal injury.
ƒ 'RQRWRYHUUHDFK.HHSSURSHUIRRWLQJDQGEDO-
ance at all times. This enables better control of
the power tool in unexpected situations.
ƒ 'UHVVSURSHUO\'RQRWZHDUORRVHFORWKLQJRU
jewellery. Keep your hair, clothing and gloves
away from moving parts. Loose clothes, jewel-
lery or long hair can be caught in moving parts.
ƒ ,I GHYLFHV DUH SURYLGHG IRU WKH FRQQHFWLRQ RI
dust extraction and collection facilities, ensure
these are connected and properly used. Use
RIWKHVHGHYLFHVFDQUHGXFHGXVWUHODWHGKD]-
ards.
POWER TOOL USE AND CARE
ƒ 'R QRW IRUFH WKH SRZHU WRRO 8VH WKH FRUUHFW
power tool for your application. The correct
power tool will do the job better and safer at the
rate for which it was designed.
ƒ 'RQRWXVHWKHSRZHUWRROLIWKHVZLWFKGRHVQRW
turn it on and off. Any power tool that cannot
be controlled with the switch is dangerous and
must be repaired.
SDJHV3LQGG ɝ

4
P 282EN
ƒ 'LVFRQQHFWWKHSOXJIURPWKHSRZHUVRXUFHEH-
fore making any adjustments, changing acces-
sories, or storing power tools. Such preventive
safety measures reduce the risk of starting the
power tool accidentally.
ƒ 6WRUHLGOHSRZHUWRROVRXWRIWKHUHDFKRIFKLO-
dren and do not allow persons unfamiliar with
the power tool or these instructions to operate
the power tool. Power tools are dangerous in
the hands of untrained users.
ƒ 0DLQWDLQSRZHUWRROV&KHFNIRUPLVDOLJQPHQW
or binding of moving parts, breakage of parts
and any other condition that may affect the
power tools operation. If damaged, have the
power tool repaired before use. Many accidents
are caused by poorly maintained power tools.
ƒ .HHS FXWWLQJ WRROV VKDUS DQG FOHDQ 3URSHUO\
maintained cutting tools with sharp cutting
edges are less likely to bind and are easier to
control.
ƒ 8VHWKHSRZHUWRRODFFHVVRULHVDQGWRROELWV
etc., in accordance with these instructions and
in the manner intended for the particular type
of power tool, taking into account the working
conditions and the work to be performed. Use
of the power tool for operations, different from
WKRVH LQWHQGHG FRXOG UHVXOW LQ D KD]DUGRXV
situation.
SERVICE
ƒ +DYH \RXU SRZHU WRRO VHUYLFHG E\ D TXDOLILHG
repair person using only identical replacement
parts. This will ensure that the safety of the
power tool is maintained.
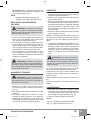
IV - Additional safety rules
for electric planers
ƒ $OZD\VZHDUH\HDQGHDUSURWHFWLRQDQGXVHD
dust mask.
ƒ )XOO\ XQZLQG FDEOH GUXP H[WHQVLRQV WR DYRLG
potential overheating.
ƒ:KHQDQH[WHQVLRQFDEOHLVUHTXLUHG\RXPXVW
ensure that it has the right ampere rating for your
power tool and is in safe electrical condition.
ƒ $IWHUORQJZRUNLQJSHULRGVH[WHUQDOPHWDOSDUWV
and accessories could be hot.
ƒ ,ISRVVLEOHDOZD\VXVHFODPSVRUDYLFHWRKROG
your work.
ƒ$OZD\VVZLWFKRIIEHIRUH\RXSXWWKHSODQHU
down.
ƒ 'RQRWIRUFHWKHSODQHUOHWWKHWRROGRWKHZRUN
at a reasonable speed. Overloading will occur
if too much pressure is applied and the motor
slows resulting in inefficient planing and possi-
ble damage to the planer motor.
ƒ$OZD\VXVHDGXVWH[WUDFWLRQV\VWHPZKHUH
possible.
ƒ 5DJV FORWKV FRUG VWULQJ DQG WKH OLNH VKRXOG
never be left around the work area.
ƒ 5HPRYHDOOQDLOVVFUHZVDQGRWKHUREMHFWVIURP
the workpiece. You can damage the blade and
the tool by cutting into a nail or other foreign ob-
MHFW,WFDQDOVRSUHVHQWDVDIHW\KD]DUG
ƒ +DQGOHWKHEODGHVYHU\FDUHIXOO\
ƒ%HVXUHWKDWWKHEODGHLQVWDOODWLRQEROWVDUHVH-
curely tightened before operation.
ƒ +ROGWKHWRROILUPO\ZLWKERWKKDQGV
ƒ .HHSKDQGVDZD\IURPURWDWLQJSDUWV
ƒ%HIRUHXVLQJWKHWRRORQDQDFWXDOZRUNSLHFH
switch on and let it run for a while. Watch for
vibration or wobbling that could indicate poor
installation or a poorly balanced blade.
ƒ 0DNHVXUHWKDWDEODGHLVQRWLQFRQWDFWZLWKWKH
workpiece when you switch the machine on.
ƒ:DLWXQWLOWKHEODGHVDWWDLQIXOOVSHHGEHIRUH
cutting.
ƒ2SHUDWHWKHWRRODWOHDVWPPDZD\IURP
your face and body.
ƒ $OZD\VVZLWFKRIIDQGZDLWXQWLOWKHEODGHVKDYH
come to a complete standstill before attempting
any adjustments
ƒ 1HYHU VWLFN \RXU ILQJHU LQWR WKH FKLS FKXWH
Shavings may jam in the chute when cutting
damp wood. Clean out the chips with a stick but
only when the tool has been turned off and un-
plugged from the power point.
ƒ'RQRWOHDYHWKHPDFKLQHUXQQLQJXQDWWHQGHG
Operate the tool only when controlled by both
hands.
ƒ Leave the planer down only after the blade
barrel has come to a standstill. A moving
blade barrel of an unattended planer may catch
on a surface and thus cause loss of control and
serious injury.
ƒ :KHQ OHDYLQJ WKHSODQHU VZLWFKRIIDQG VHW LW
with the front base up on a wooden block so
that the blades are not in contact with anything.
ƒ $OZD\VFKDQJHERWKEODGHVDWWKHVDPHWLPH
otherwise the resulting imbalance will cause
vibration and shorten the blade and tool life.
WARNING:%HIRUHFRQQHFWLQJDWRRO
WR D SRZHU VRXUFH PDLQV VRFNHW SRZHU SRLQW
UHFHSWDFOH RXWOHW HWF EH VXUH WKDW WKH YROW-
age supply is the same as that specified on the
nameplate of the tool. A power source with a
voltage greater than that specified for the tool
can result in serious injury to the user, as well
as damage to the tool.
pages-P282.indd 4 ɝ

5
Instruction Manual EN
r
r
ƒ ,ILQGRXEWGRQRWSOXJLQWKHWRRO8VLQJDSRZHU
source with a voltage less than the nameplate
rating is harmful to the motor.
ƒ7KHWRROPXVW EHXVHGRQO\IRU LWV SUHVFULEHG
purpose. Any use other than those mentioned
in this Manual will be considered a case of mis-
use. The user and not the manufacturer shall
be liable for any damage or injury resulting from
such cases of misuse.
ƒ7RXVHWKLVWRROSURSHUO\\RXPXVWREVHUYHWKH
safety regulations, the assembly instructions
and the operating instructions to be found in this
Manual. All persons who use and service the
machine have to be acquainted with this Manu-
DODQGPXVWEHLQIRUPHGDERXWLWVSRWHQWLDOKD]-
ards. Children and frail people must not use this
tool. Children should be supervised at all times
if they are in the area in which the tool is being
used. It is also imperative that you observe the
accident prevention regulations in force in your
area. The same applies for general rules of oc-
cupational health and safety.
ƒ7KHPDQXIDFWXUHUVKDOOQRWEHOLDEOHIRUDQ\
changes made to the tool nor for any damage
resulting from such changes.
(YHQZKHQWKHWRROLVXVHGDVSUHVFULEHGLWLVQRW
possible to eliminate all residual risk factors. The
IROORZLQJKD]DUGVPD\DULVHLQFRQQHFWLRQZLWKWKH
WRRO¶VFRQVWUXFWLRQDQGGHVLJQ
ƒ'DPDJHWRKHDULQJLIHIIHFWLYHKHDULQJSURWHF
-
tion is not worn.
ƒ$OZD\VUHPRYHWKHSOXJIURPWKHPDLQVVRFNHW
before making any adjustments or mainte-
nance, including changing the blades and ad-
justing the depth of cut.
ƒ &RQWDFWZLWKWKHEODGHV
ƒ 5HDFKLQJXQGHUWKHEDVHZKLOVWWKHWRROLVUXQ-
ning and making contact with the blade.
ƒ .LFNEDFNRIZRUNSLHFHDQGSDUWVRIZRUNSLHFH
ƒ %ODGHIUDFWXUH
ƒ &DWDSXOWLQJRIIDXOW\SLHFHVIURPWKHEODGH
ƒ 63$5.< SRZHU WRROV PXVW QRW EH XVHG RXW-
doors in rainy weather, or in moist environment
DIWHUUDLQRULQFORVHYLFLQLW\ZLWKHDVLO\IODP-
mable liquids and gases. The working place
should be well lit.
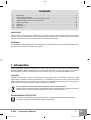
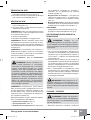
V - Know your product
%HIRUHXVLQJWKHSRZHUWRROIDPLOLDUL]H\RXUVHOI
with all the operating features and safety require-
ments. Use the tool and accessories only for the
applications intended. All other applications are
expressly ruled out.
1. On/Off trigger switch
2. Lock-off button
3. Depth adjustment knob
4. Main handle
5. Secondary handle
'XVWFKLSH[WUDFWLRQSRUW
3DUDOOHOIHQFHDWWDFKPHQWNQRE
8. Dust / chip extraction guide switch
5HYHUVLEOHEODGHV
%ODGHEDUUHO
11. Clamping screw
12. Moveable front base
)L[HGUHDUEDVH
14. Parallel fence guide
15. Shavings adaptor tube
6KDYLQJVFROOHFWLRQEDJ
6SDQQHU
18. Spanner storage sleeve
VI - Operation
This model SPARKY power tool is supplied from
single-phase alternating current mains.It is double
LQVXODWHGDFFRUGLQJWR(1,(&DQG
can be connected to grounded or not grounded
sockets. This power tool is radio suppressed
LQFRPSOLDQFHZLWK(1(1
(1 (1 IRU UDGLR LQWHUIHU-
ence.
PRIORTOINITIALOPERATION
ƒ 0DNHVXUHSRZHUVXSSO\YROWDJHFRUUHVSRQGV
to the value indicated on the name plate with
technical data of the tool.
ƒ0DNH VXUH WKHFRUGDQG WKHSOXJ DUHLQ RUGHU
If the replacement of the supply cord is neces-
sary, this has to be done by the manufacturer or
KLVDJHQWLQRUGHUWRDYRLGDVDIHW\KD]DUG
REMOVING AND INSTALLING
PLANER BLADES
CAUTION: Always ensure that the tool
is switched off and unplugged from the power
supply before installing or removing blades.
<RXU SODQHU LV ¿WWHG ZLWK UHYHUVLEOH EODGHV
%ODGHVFDQEHUHYHUVHGZKHQEOXQW$IWHUERWK
sides of the blades have been used they should
be discarded.
NOTE.
These blades cannot be re-sharpened.
pages-P282.indd 5 ɝ

6
P 282EN
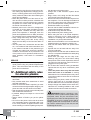
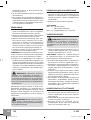
REMOVING A PLANER BLADE
8VLQJ WKH VXSSOLHG VSDQQHU ORRVHQ WKH
WKUHHFODPSLQJVFUHZV(Fig. 1)
6OLGHWKHSODQHUEODGHIURPWKHVORWLQWKH
EODGHEDUUHOLQZKLFKLWLVUHWDLQHG(Fig. 2)
INSTALLING A PLANER BLADE
(LWKHUWXUQRYHUWKHSODQHUEODGHRUUHSODFHLW
if required.
2. Slide the good blade face up into the blade sup-
SRUWEORFNRIWKHEODGHEDUUHO
NOTE.
The ridge along the blade should be on the
blade face on the opposite side to the clamping
VFUHZV
7LJKWHQWKHFODPSLQJVFUHZVHQVXULQJWKH\
are tightened evenly.
4. Repeat for the remaining blade.
NOTE.
Always change both blades at the same
time, otherwise the resulting imbalance can cause
vibration and shorten the blade and tool life.
NOTE.
%ODGH SRVLWLRQ KDV EHHQ DOLJQHG EHIRUH
going out from manufactory, so do not adjust the
two inner hex screws on blade supporter.
(Fig. 2)
±Correct (Fig. 3)±Incorrect
CAUTION::KHQLQVWDOOLQJEODGHV¿UVW
clean out all chips or foreign matter adhering
WR WKHEODGHEDUUHO DQG WKH EODGHV WKHP-
selves. Use blades of the same dimensions
and weight, or the barrel will oscillate and vi-
brate causing poor planing action and possibly
a machine breakdown. Tighten the clamping
VFUHZVFDUHIXOO\ZKHQDWWDFKLQJWKHEODGHV
to the planer. A loose clamping screw could be
extremely dangerous. Regularly check to see
they are tightened securely.
NOTE.
Your planing surface will end up rough and
uneven unless the blades are set properly and se-
curely. The blades must be mounted so that the
cutting edge is absolutely level, i.e. parallel to the
VXUIDFHRIWKHUHDUEDVH
The examples below show proper and improper
VHWWLQJV
ƒ
Correct setting(Fig. 2)
ƒ
Clean smooth cut(Fig. 4)
ƒ
Nicks in surface±DVFDXVHGE\WKHHGJHRI
one or both not being parallel to the rear base
line. (Fig. 5)
ƒ Gouging at start
±DVFDXVHGE\WKHHGJHRI
one or both not protruding enough in relation to
the rear base line. (Fig. 6)
ƒ Gouging at end
±DVFDXVHG E\WKH HGJHRI
one or both protruding too far in relation to the
rear base line. (Fig. 7)
NOTE. DIURQWEDVHPRYHDEOHVKRH
EUHDUEDVHVWDWLRQDU\VKRH
ADJUSTING THE THE PLANNING DEPTH
CAUTION! Always ensure that the tool is switched
off and unplugged from the power supply before
making adjustments or installing or removing
blades.
5RWDWHWKHGHSWKDGMXVWPHQWNQREFORFNZLVH
for a deeper cut and anti-clockwise for a shal-
lower cut. (Fig. 8)
2. The numbers on the ring under the depth ad-
MXVWPHQWNQRELQGLFDWHWKHGHSWKRIFXW)RU
example when “2” is next to the pointer on the
front of the planer, the depth of cut is approxi-
mately 2 mm.
3. If it is necessary to accurately determine the
depth of cut, plane a scrap piece of wood,
measure the difference in thickness and adjust
the setting if necessary.
CAUTION: Always ensure that the
QXPEHURQWKHULQJLVDWWKH³´SRVLWLRQZKHQ
the tool is not in use; at this position, the blade
can not cut the workpiece.
SWITCHING ON AND OFF
CAUTION: %HIRUH SOXJJLQJ WKH PD-
chine into the power point always check that the
WULJJHU VZLWFK DQG ORFNRII EXWWRQ ZRUN
properly.
1. Plug in the machine, push in the lock-off button
DQGSXOOWKHWULJJHUVZLWFK(Fig. 9)
2. To stop the tool, simply release the trigger
VZLWFK
3. In order to restart the machine, it is necessary
WRRSHUDWHERWKWKHORFNRIIEXWWRQDQGWKH
WULJJHU VZLWFK 7KLV LV DQ LPSRUWDQW VDIHW\
feature that helps prevent accidental operation
of the planer.
PLANING
5HVWWKH IURQW EDVH IODW RQ WKHZRUNSLHFH
surface without the blades making any contact
with the workpiece.
pages-P282.indd 6 ɝ

7
Instruction Manual EN
I
U
r
2. Switch on the tool and wait for the blades to
reach full speed.
3. Move the tool gently forward, applying pressure
on the front of the tool, using your hand on the
VHFRQGDU\KDQGOHDWWKHVWDUWRISODQLQJDQG
pressure at the rear of the tool, using your hand
RQWKHPDLQKDQGOHWRZDUGVWKHHQGRIWKH
planing stroke.
4. Push the planer beyond the edge of the work-
piece without tilting it downwards.
NOTE.
Planing is easier if you incline the work-
piece slightly away from you so that you plane
“downhill”.
5. The rate of planing and the depth of cut deter-
PLQHWKHTXDOLW\RIWKHILQLVK)RUURXJKFXWWLQJ
you can increase the depth of cut, however to
achieve a good finish you will need to reduce
the depth of cut and advance the tool more
slowly.
CAUTION: Moving the machine too fast
may cause a poor quality of cut and can dam-
age the blades or the motor. Moving the ma-
chine too slowly may burn or mar the cut.
The proper feed rate will depend on the type of
material being cut and the depth of the cut.
3UDFWLFH¿UVWRQDVFUDSSLHFHRIPDWHULDOWRJDXJH
the correct feed rate and the cut dimensions.
CAUTION: Always use two hands to
hold the planer. Where possible, clamp the
workpiece to the bench.
CHAMFERING AND REBATING
1. To make a chamfered or rebate cut as shown
in (Fig. 10). )LUVW DOLJQ WKH WKUHH ³9´ JURRYH
(Fig. 11)LQWKHIURQWEDVHRIWKHSODQHUZLWK
the corner edge of the workpiece.
2. Run the planer along the corner edge.
NOTE.
(Fig. 10)±$5HEDWHGHGJH
%&KDPIHUHGHGJH
(Fig. 11)±$OLJQLQJWKH³9´JURRYH
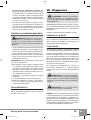
PARALLEL FENCE GUIDE
CAUTION: Always ensure that the tool
is switched off and unplugged from the power
supply before making adjustments or installing
or removing blades.
7RILWWKHSDUDOOHOIHQFHJXLGHUHPRYHWKH
SDUDOOHOIHQFHDWWDFKPHQWNQREDQGVOLGHWKH
fence guide on to the planer (Fig. 12, 13).
NOTE.
0DNHVXUHWKDWWKHWZRQRWFKHVLQWKH¿[-
ing plate of the fence locate over the two lugs on
the planer body.
5HSODFHWKHIHQFHDWWDFKPHQWNQREDQG
tighten it firmly (Fig. 14).
3. Loosen the wing nut securing the fence slide,
position the slide to the desired rebating width
and re-tighten the wing nut.
4. The numbers on the fence indicate the rebating
ZLGWK:KHQ³´LVQH[WWRWKHVOLGHWKHUHEDW-
LQJZLGWKLVDSSUR[LPDWHO\PP
5. If it is necessary to rebate to a precise width,
plane a scrap piece of wood, measure the re-
bate distance and adjust the setting if neces-
sary (Fig. 15).
SHAVINGS EXTRACTION
1. Depending on which side of the planer you wish
WKHFKLSVWRIORZFRQQHFWWKHGXVWEDJWR
WKHDSSURSULDWHGXVWFKLSH[WUDFWLRQSRUW
7KHGXVWEDJFDQEHLQVWDOOHGWRDOORZVKDY-
ings to flow either to the left or to the right of the
workpiece.
6HWWKHH[WUDFWLRQJXLGHVZLWFKWRSRLQWWR-
ZDUGVWKHH[WUDFWLRQSRUWWKDWLVWREHXVHG
(Fig. 16).
Cleaning the bag:(PSW\WKHGXVWEDJE\XQ-
]LSSLQJWKHOHYHUORFNORFDWHGRQWKHERWWRPRI
the bag and tap it gently to remove dust. On oc-
casion, slip the bag off of the frame and turn
EDJLQVLGHRXW%UXVKGXVWRIIRIWKHOLQLQJXVLQJ
a soft brush.
4. A workshop dust extraction system or a house
-
hold vacuum cleaner can be connected to the
DGDSWRU WXEH IRU WKH HIILFLHQW UHPRYDO RI
dust and shavings permitting a safer and clean-
er working environment.
DRIVE BELT REPLACEMENT
CAUTION: Always ensure that the tool
is switched off and unplugged from the power
supply before making adjustments or installing
or removing blades..
1. To replace the drive belt first take out the four
cross-head screws that secure the drive belt
cover on the left-hand side of the planer as
viewed from the rear (Fig. 17).
2. Remove the damaged belt and use a soft brush
to clean the pulleys and the surrounding area.
pages-P282.indd 7 ɝ

8
P 282EN
NOTE. Wear eye protection when cleaning out
the pulley area.
3. With the three continuous “V” profiles on the in
-
side, place the new belt over the bottom pulley.
+DOIILWWKHRWKHUHQGRIWKHEHOWRQWKHWRSSXOOH\
then roll the belt in place whilst turning the pul-
ley.
4. Check that the belt runs evenly by manually
turning the belt.
5. Replace the cover and the four fixing screws.
5HSODFHWKHHOHFWULFDOSOXJDQGUXQWKHSODQHU
for a minute or two to make sure that the motor
and belt are operating correctly.
ACCESSORIES
Parallel guide; spare driving belt; spare set of 2
blades; dust bag; spanner.
VII - Maintenance
CAUTION: Always ensure that the tool
is switched off and unplugged before attempt-
ing to perform inspection or maintenance.
5HJXODUO\FKHFNWKDWDOOWKH¿[LQJVFUHZVDUHWLJKW
They may vibrate loose over time.
Re-lubricate all moving parts at regular intervals.
BRUSH REPLACEMENT
When the carbon brushes are worn out, both
brushes must be replaced simultaneously with
genuine brushes at SPARKY service centre for
warranty and post-warranty service.
CLEANING
)RUVDIHRSHUDWLRQDOZD\VNHHSWKHPDFKLQHDQG
its ventilation slots clean.
Regularly check to see if any dust or foreign matter
has entered the grills near the motor and around
the switches. Use a soft brush to remove any ac-
cumulated dust. Wear safety glasses to protect
your eyes whilst cleaning.
If the body of the tool needs cleaning, wipe it with a
soft damp cloth. A mild detergent can be used.
CAUTION:1HYHUXVHDOFRKROSHWURORU
RWKHUFOHDQLQJDJHQW1HYHUXVHFDXVWLFDJHQWV
to clean plastic parts.
CAUTION: Water must never come into
contact with the tool.
IMPORTANT!
To assure product safety and reli-
DELOLW\UHSDLUVPDLQWHQDQFHDQGDGMXVWPHQWLQ-
FOXGLQJEUXVKLQVSHFWLRQDQGUHSODFHPHQWVKRXOG
EHSHUIRUPHGE\FHUWL¿HGVHUYLFHFHQWUHVRURWKHU
TXDOL¿HGVHUYLFHRUJDQLVDWLRQVDOZD\VXVLQJJHQ-
uine replacement parts.
VIII - Warranty
The guarantee period for SPARKY power tools is
determined in the guarantee card.
)DXOWVGXHWRQRUPDOZHDURYHUORDGLQJRULPSURS-
er handling will be excluded from the guarantee.
)DXOWVGXHWRGHIHFWLYHPDWHULDOVLPSOHPHQWHGDV
well as defects in workmanship will be corrected
free of charge through replacement or repair.
The complaints for defective SPARKY power
WRROV ZLOO EH UHFRJQL]HG LI WKH PDFKLQH LV VHQW
back to the dealer or is presented to the author-
ised warranty service centre undismantled, in its
initial condition.
Notes
Carefully read the entire Instruction Manual before
using this product.
With continuing product development changes
may have occurred which render the product
received slightly different to that shown in this in-
struction manual. The manufacturer reserves the
ULJKWWRFKDQJHVSHFL¿FDWLRQVZLWKRXWQRWLFH
6SHFL¿FDWLRQVPD\GLIIHUIURPFRXQWU\WRFRXQWU\
pages-P282.indd 8 ɝ

9
Instructions d’utilisation FR
Sommaire
I - Introduction .....................................................................................................................................
II - Caractéristiques techniques ........................................................................................................11
III - Instructions de sécurité générales pour les outillages électriques ........................................... 11
IV - Règles de sécurité complémentaires pour rabots électriques ..................................................12
9 1RPHQFODWXUH .......................................................................................................................... A/13
VI - Utilisation .......................................................................................................................................14
9,, (QWUHWLHQ........................................................................................................................................
VIII - Garantie .........................................................................................................................................
I - Introduction
Votre nouvel instrument a été conçu et produit selon tous les standards de qualité pour répondre aux
H[LJHQFHVOHVSOXVpOHYpHV6RQH[SORLWDWLRQHVWIDFLOHHWVpFXULVpH(WDYHFXQHXWLOLVDWLRQFRUUHFWHLOYRXV
servira longtemps.
ATTENTION!
Lire attentivement les instructions avant d’utiliser votre nouvel outil. Prêter attention aux sections «Aver-
tissement» et «Attention». Votre outil électrique possède des caractéristiques qui facilitent votre travail.
Cet instrument a été conçu et produit selon toutes les exigences de sécurité pour que son usage et son
entretien soient faciles.
Ne pas jeter les outils électroportatifs avec les ordures ménagères !
Les déchets provenant d’outils électriques ne doivent pas être ramassés avec les ordures
ménagères. Prière de recycler sur les lieux qui y sont spécialement destinés. Contacter les
autorités locales ou un représentant pour des consultations concernant le recyclage.
RESPECT DE L’ENVIRONNEMENT
Récupération des matières premières plutôt qu’élimination des déchets.
(QYXHjODSURWHFWLRQGHO¶HQYLURQQHPHQWOHVDSSDUHLOVFRPPHG¶DLOOHXUVOHXUVDFFHVVRLUHVHW
HPEDOODJHVGRLYHQWSRXYRLU VXLYUHFKDFXQXQHYRLHGHUHF\FODJHDSSURSULpH1RVSLqFHVHQ
PDWLqUHVDUWL¿FLHOOHVRQWpWpPDUTXpHVHQYXHG¶XQUHF\FODJHVpOHFWLIGHVGLIIpUHQWVPDWpULDX[
DEBALLAGE
Grâce aux techniques modernes de fabrication, il est improbable que votre outil soit défectueux ou qu’une
SLqFHVRLWPDQTXDQWH6LWRXWHIRLVYRXVWURXYH]XQHDQRPDOLHQ¶XWLOLVH]SDVO¶RXWLODYDQWTXHOHVSLqFHV
DLHQWpWpUHPSODFpHVRXOHGpIDXWFRUULJp1HSDVREVHUYHUFHWWHUqJOHSRXUUDLWFDXVHUGHVEOHVVXUHV
graves.
MONTAGE
/HUDERW pOHFWULTXHj ODPHV3 HVWHPEDOOpFRPSOqWHPHQWPRQWpH[FHSWpGXVDFFROOHFWHXUGH
copeaux et du guide parallèle.
U
r
SDJHV3LQGG ɝ

10
P 282FR
A
LÉGENDE
L’outil électrique porte une plaque décrivant les signes spéciaux. Ils apportent une information importante
quant au produit ou des instructions d’utilisation.
3 R U W H ] G H V p T X L S H P H Q W V G H S U R W H F W L R Q
DGDSWpV OXQHWWHV GH SURWHFWLRQ
casque anti-bruit et masque anti-
poussière.
Double isolation pour une
meilleure sécurité.
5DFFRUGHPHQWjXQDVSLUDWHXU
Conforme aux normes de sécurité
européennes.
(QFRQIRUPLWpDYHFOHVH[LJHQFHVGHV
standards Russes
(QFRQIRUPLWpDYHFOHVH[LJHQFHVGH
la Règle de sécurité des équipements
et produits allemande.
pages-P282.indd 10 ɝ

11
Instructions d’utilisation FR
II - Caractéristiques
techniques
Modèle: P 282
ƒ7HQVLRQQRPLQDOH 9a+]
ƒ3XLVVDQFHDEVRUEpH :
ƒ9LWHVVHjYLGHGHODODPH PLQ
-1
ƒ3URIRQGHXUGHUDERWDJH ±PP
ƒ3URIRQGHXUGHFKDQIUHLQDJH ±PP
ƒ/DUJHXUGHUDERWDJH PP
ƒ3RLGV NJ
ƒ1LYHDXGHSUHVVLRQDFRXVWLTXH G%$
ƒ1LYHDXGHSXLVVDQFHDFRXVWLTXH G%$
ƒ9DOHXUFRUULJpHG¶DFFpOpUDWLRQ PV
2
ƒ&ODVVHGHSURWHFWLRQ(1 ,,
III - Règles de sécurité
générales
ATTENTION: Pour éviter tout risque de
lésions il faut lire la notice d’utilisation. Toutes
les instructions doivent être suivies strictement.
La faute d’observer les instructions mention-
nées ci-dessous peut résulter en électrocution,
incendie ou blessures graves. Le mot «outil
électrique» utilisé dans les avertissements ci-
GHVVRXVVLJQLILHXQRXWLODOLPHQWpGXUpVHDXj
FkEOHDLQVLTX¶XQRXWLODOLPHQWpG¶XQDFFXPXOD-
WHXUVDQVFkEOH
Veuillez suivre les instructions!
AIRE DE TRAVAIL
ƒ*DUGHUO¶DLUHGHWUDYDLOSURSUHHWELHQpFODLUpH
Des aires encombrées et sombres favorisent
les accidents.
ƒ1HSDVIDLUHIRQFWLRQQHUOHVRXWLOVpOHFWULTXHV
en atmosphères explosives, comme en pré-
VHQFH GH OLTXLGHV JD] RX SRXVVLqUHV LQIODP-
mables. Les outils électriques créent des étin-
celles qui peuvent enflammer la poussière ou
les fumées.
ƒ1HSDVODLVVHUGHVSHUVRQQHVVSpFLDOHPHQWOHV
enfants, non concernées par le travail, toucher
l’outil, le câble d’alimentation ou la rallonge, et
les garder éloignées de l’aire de travail.
SECURITE ELECTRIQUE
ƒ /D ILFKH G¶DOLPHQWDWLRQ GHV RXWLOV pOHFWULTXHV
GRLWFRUUHVSRQGUHjODSULVHVHFWHXU1HMDPDLV
PRGLILHUHQDXFXQHIDoRQODILFKH1HSDVXWL-
liser de prises d’adaptation avec des outils
pOHFWULTXHVUHOLpVjODWHUUH/HVILFKHVG¶RULJLQH
dans des prises correspondantes réduisent les
risques d’électrocution.
ƒ eYLWHU OH FRQWDFW GX FRUSV DYHF GHV VXUIDFHV
UHOLpHV j OD WHUUH RX j OD PDVVH FRPPH OHV
tuyaux, radiateurs, cuisinières ou réfrigérateurs.
Il y a un risque accru de commotion électrique
VLOHFRUSVHVWjODWHUUHRXjODPDVVH
ƒ1HSDVH[SRVHUOHVRXWLOVpOHFWULTXHVjODSOXLH
ou en conditions humides. De l’eau pénétrant
dans un outil électrique augmente le risque
d’électrocution.
ƒ 1HSDVXWLOLVHUOHFkEOHG¶DOLPHQWDWLRQSRXUVRX-
OHYHUO¶RXWLO1HSDVWLUHUGHVVXVSRXUO¶HQOHYHU
de la prise de courant. Maintenir le câble éloi-
gné des sources de chaleur, des parties gras-
ses et des arrêtes tranchantes.
ƒ 4XDQG O¶RXWLO HVW XWLOLVp j O¶H[WpULHXU Q¶XWLOLVHU
qu’une rallonge conçue pour une utilisation en
extérieur.
SECURITE PERSONNELLE
ƒ 5HVWHUYLJLODQWVXUYHLOOHUFHTXHO¶RQIDLWHWIDLUH
preuve de bon sens en utilisant un outil électri-
TXH1HSDVXWLOLVHUG¶RXWLOpOHFWULTXHHQFDVGH
fatigue ou sous l’influence de drogues, d’alcool
ou de médicaments. Un moment d’inattention
dans l’utilisation d’outils électriques peut entraî-
ner des blessures corporelles graves.
ƒ 8WLOLVHU XQ pTXLSHPHQW GH VpFXULWp 3RUWHU
en permanence une protection oculaire. Les
équipements de sécurité, comme masque
anti-poussières, chaussures de sécurité anti-
dérapantes, casque, ou protections d’oreilles
utilisés dans de bonnes conditions réduisent
les risques de blessures corporelles.
ƒ eYLWHU OHV GpPDUUDJHV LQWHPSHVWLIV 6¶DVVXUHU
que l’interrupteur est bien en position d’arrêt
DYDQW GH EUDQFKHU O¶RXWLO 1H SDV WUDQVSRUWHU
un outil électrique en gardant le doigt sur
l’interrupteur.
ƒ 5HWLUHU WRXWH FOp RX RXWLO GH UpJODJH DYDQW GH
mettre l’outil en marche. Une clé ou un outil qui
reste fixé sur une pièce en rotation peut entraî-
ner des blessures.
ƒ 1HSDVVHSHQFKHUjO¶H[FqV*DUGHUHQSHUPD-
nence une position stable et un bon équilibre.
Cela permet de mieux contrôler l’outil dans les
situations inattendues.
ƒ 6¶KDELOOHUFRUUHFWHPHQW1HSDVSRUWHUGHVYr-
tements amples ou des bijoux, ils peuvent être
happés par des parties en mouvement. Des
gants de caoutchouc et des chaussures antidé-
rapantes sont recommandés pour des travaux
pages-P282.indd 11 ɝ

12
P 282FR
extérieurs. Porter une coiffe de protection pour
maintenir les cheveux longs.
ƒ 6LGHVGLVSRVLWLIVVRQWSUpYXVSRXUOHUDFFRUGH-
ment d’équipements d’extraction et de collecte
de poussière, s’assurer qu’ils sont bien bran-
chés et correctement utilisés. L’utilisation de
WHOVGLVSRVLWLIVSHXWUpGXLUHOHVULVTXHVUHODWLIVj
la poussière.
UTILISATION ET ENTRETIEN DE
L’OUTIL ELECTRIQUE
ƒ 1HSDVIRUFHUVXUO¶RXWLOpOHFWULTXH8WLOLVHUO¶RXWLO
de puissance appropriée pour l’application.
L’outil adéquat accomplira mieux la tâche et
avec plus de sûreté en fonctionnant au rythme
pour lequel il a été conçu.
ƒ 1HSDVXWLOLVHUO¶RXWLOpOHFWULTXHVLVRQLQWHUUXS-
teur ne permet pas la marche ou l’arrêt. Tout
outil qui ne peut pas être contrôlé par son inter-
rupteur est dangereux et doit être réparé.
ƒ 'pEUDQFKHUODILFKHGHODSULVHVHFWHXUDYDQWGH
faire tout réglage, de changer des accessoires
ou de stocker l’outil. De telles mesures préven-
tives réduisent le risque de faire démarrer acci-
dentellement l’outil électrique.
ƒ 5DQJHUO¶RXWLOHQpWDWGHUHSRV,OHVWUHFRPPDQ-
dé de ranger l’outil dans un local sec, de le pla-
cer hors de portée des enfants, soit en hauteur,
soit sous clef.
ƒ9pULILHU OHV SLqFHV HQGRPPDJpHV $YDQW GH
réutiliser l’outil, il est recommandé de vérifier
soigneusement un protecteur endommagé, ou
une autre partie, pour déterminer s’il peut fonc-
tionner correctement et remplir sa fonction. Vé-
rifier l’alignement des pièces, en mouvement,
leur mouvement libre, la rupture de pièces, le
montage et toutes les autres conditions qui
peuvent affecter le fonctionnement de l’outil.
Sauf indications contraires dans les instruc-
tions, il est recommandé de faire réparer cor-
rectement ou remplacer, par un service agréé,
un protecteur ou toute autre pièce endomma-
gée. Les interrupteurs défectueux doivent être
remplacés par un service agréé.
ƒ 0DLQWHQLU O¶RXWLO SURSUH SRXU XQH PHLOOHXUH HW
plus sûre performance. Suivre les instructions
pour la lubrification et le changement d’acces-
soires. Vérifier périodiquement les rallonges de
câble d’alimentation et les remplacer si elles
sont endommagées. Maintenir les poignées
sèches, propres et exemptes de graisse.
ƒ8WLOLVHUO¶RXWLOpOHFWULTXHVHVDFFHVVRLUHVHWRS-
tions, etc., en conformité avec ces instructions,
et de la façon prévue pour chaque outil spéci-
fiquement, en tenant compte des conditions de
WUDYDLOHWGHODWkFKHjDFFRPSOLU/¶XWLOLVDWLRQ
G¶RXWLOVpOHFWULTXHVjGHVILQVGLIIpUHQWHVGHFHO-
OHVSUpYXHVSHXWFRQGXLUHjXQHVLWXDWLRQGDQ-
gereuse.
DEPANNAGE
ƒ /HVLQWHUYHQWLRQVVXUYRWUHRXWLOpOHFWULTXHGRL-
vent être faites par un personnel de réparation
qualifié utilisant uniquement des pièces de re-
change identiques. Cela assure le maintien de
la sécurité pour l’outil électrique.
IV - Règles de sécurité
complémentaires
pour rabots
électriques
ƒ 3RUWH]WRXMRXUVGHVSURWHFWLRQVSRXUOHV\HX[HW
OHVRUHLOOHVHWXWLOLVH]XQPDVTXHjSRXVVLqUH
ƒ'pURXOH]FRPSOqWHPHQWODUDOORQJHSRXUpYLWHU
une surchauffe potentielle.
ƒ6L XQH UDOORQJH HVW QpFHVVDLUH DVVXUH]YRXV
qu’elle possède l’ampérage adéquat pour votre
outil et qu’elle soit en bon état.
ƒ $SUqVGHORQJXHVVpDQFHVG¶XWLOLVDWLRQOHVSDU-
ties métalliques externes et les accessoires
pourraient être chaudes.
ƒ6LSRVVLEOHXWLOLVH]WRXMRXUVGHVSLQFHVRXXQ
étau pour maintenir votre travail.
ƒ eWHLJQH] WRXMRXUVDYDQW GH SRVHUOHUDERW$W-
WHQGH]TXHODODPHV¶DUUrWH8QHODPHVDLOODQWH
peut entamer la surface, causant une perte de
contrôle possible et des blessures graves.
ƒ 1H IRUFH] SDV OH UDERW ODLVVH] O¶RXWLO IDLUH OH
WUDYDLO j XQH YLWHVVH UDLVRQQDEOH 6L YRXVDS-
SOLTXH] XQH WURS JUDQGH SUHVVLRQ OH PRWHXU
surchauffera et ralentira, causant un rabotage
insuffisant et des dommages possibles au mo-
teur.
ƒ 8WLOLVH] WRXMRXUV XQ V\VWqPH G¶H[WUDFWLRQ GH
poussière si possible.
ƒ 1H ODLVVH] MDPDLV WUDvQHU GHV FKLIIRQV WLVVXV
cordes, ficelles et articles similaires autour de
l’espace de travail.
ƒ (QOHYH]WRXVFORXVYLVHWDXWUHVREMHWVGHO¶HV-
SDFHGHWUDYDLO9RXVSRXYH]HQGRPPDJHUOD
lame et l’outil en coupant un clou ou autre corps
étranger. Cela peut également représenter un
risque de sécurité.
ƒ 0DQLSXOH]OHVODPHVDYHFSUpFDXWLRQ
ƒ $VVXUH]YRXVTXHOHVERXORQVG¶LQVWDOODWLRQGHV
lames sont bien serrés avant utilisation.
ƒ 7HQH]O¶RXWLOIHUPHPHQWDYHFOHVGHX[PDLQV
ƒ 1¶DSSURFKH] SDV YRV PDLQV GHV SDUWLHV WRXU-
nantes.
pages-P282.indd 12 ɝ

13
Instructions d’utilisation FR
ƒ$YDQWG¶XWLOLVHUO¶RXWLOVXUYRWUHSLqFHGHWUDYDLO
DOOXPH]OHHWIDLWHVOHWRXUQHUTXHOTXHVLQVWDQWV
9pULILH]G¶pYHQWXHOVYLEUDWLRQVRXWUHPEOHPHQWV
qui pourraient indiquer un mauvais montage ou
une lame mal équilibrée.
ƒ $VVXUH]YRXV TXH OD ODPH QH WRXFKH SDV OD
SLqFHGHWUDYDLOTXDQGYRXVPHWWH]ODPDFKLQH
en marche.
ƒ$WWHQGH]TXHOHVODPHVDWWHLJQHQWODSOHLQHYL-
tesse avant de couper.
ƒ 8WLOLVH] O¶RXWLOjDXPRLQV PPGHYRWUHIL-
gure et corps.
ƒ $YDQW G¶HVVD\HU XQ TXHOFRQTXH UpJODJH pWHL-
JQH] WRXMRXUVOD PDFKLQH HW DWWHQGH]TXHOHV
lames soient totalement arrêtées.
ƒ 1H PHWWH] MDPDLV OH GRLJW GDQV OD JRXORWWH
d’évacuation des copeaux. Des copeaux peu-
vent obstruer la goulotte en coupant du bois hu-
PLGHeWHLJQH]HWGpEUDQFKH]ODPDFKLQHGHOD
SULVHpOHFWULTXHSXLVHQOHYH]OHVFRSHDX[DYHF
un bâtonnet.
ƒ 1HODLVVH]SDVODPDFKLQHHQPDUFKHVDQVVXU-
YHLOODQFH1HYRXV VHUYH]GHO¶RXWLOTX¶HQXWLOL-
sant les deux mains.
ƒ Avant de poser l’outil il faut toujours atten-
dre l’arrêt complet de barillet des lames. Si
on pose le rabot avec un barillet encore tour-
nant, son contact avec une surface quelconque
peut provoquer la perte de contrôle et en con-
séquence des blessures graves
ƒ &KDQJH] WRXMRXUV OHV GHX[ ODPHV j OD IRLV
dans le cas contraire, un déséquilibre causera
des vibrations et réduira la durée de vie de la
lame et de l’outil.
ATTENTION: Avant de brancher l’outil
VXU OH UpVHDX pOHFWULTXH SULVH VHFWHXU SULVH
GHUDOORQJHERvWLHUGHUDFFRUGHPHQWHWFDV-
VXUH]YRXVTXHOHYROWDJHHVWLGHQWLTXHjFHOXL
spécifié sur la plaque d’identification de l’outil.
Un voltage supérieur que celui spécifié pour
l’outil peut gravement blesser l’utilisateur, et en-
dommager l’outil.
ƒ (Q FDV GH GRXWH QH EUDQFKH] SDV O¶RXWLO 8Q
voltage inférieur que celui spécifié sur l’outil est
dommageable pour le moteur.
ƒ /¶RXWLOQHGRLWrWUHXWLOLVpTXHSRXUO¶XVDJHSUpYX
Une utilisation autre que celle mentionnée dans
ce Manuel serait considérée comme un mau-
vais usage. L’utilisateur et non pas le fabricant
serait responsable de tout dommage ou bles-
sure résultant d’un tel cas de mauvais usage.
ƒ 3RXUXWLOLVHUFHWRXWLOGHIDoRQDSSURSULpHYRXV
GHYH]VXLYUHOHVFRQVLJQHVGHVpFXULWpOHVLQV-
tructions d’assemblage et les instructions d’uti-
OLVDWLRQ TXH YRXV WURXYHUH] GDQV FH 0DQXHO
Toute personne utilisant et entretenant cette
machine doit lire ce Manuel et doit être infor-
mée des risques potentiels s’y rapportant. Les
enfants et personnes fragiles ne doivent pas uti-
liser cet outil. Les enfants doivent être surveillés
jWRXWPRPHQWSHQGDQWTX¶LOVVRQWjSUR[LPLWp
de l’espace où l’outil est utilisé. Il est également
SULPRUGLDOTXHYRXVVXLYLH]OHVUqJOHPHQWVGH
prévention des accidents en vigueur dans votre
région. La même consigne s’applique en ce qui
concerne les règlements de santé et de sécu-
rité.
ƒ /HIDEULFDQWQHVHUDSDVUHVSRQVDEOHGHVPRGL-
ILFDWLRQVDSSRUWpHVjO¶RXWLOQLG¶pYHQWXHOVGRP-
mages résultant de telles modifications.
Même en utilisant l’outil tel que prescrit, il est im-
possible d’éliminer tous les facteurs de risque. Les
risques suivants, en connexion avec la construc-
WLRQHWODFRQFHSWLRQGHO¶RXWLOSHXYHQWVXUYHQLU
ƒ 'HV GRPPDJHV j O¶RXwH VL DXFXQH SURWHFWLRQ
auditive n’est portée.
ƒ (QOHYH]WRXMRXUVODSULVHGXUpVHDXpOHFWULTXH
avant de faire des réglages ou de l’entretien, y
compris le changement des lames et le réglage
de la profondeur de coupe.
ƒ &RQWDFWDYHFOHVODPHV
ƒ 7HQGUHODPDLQYHUVODEDVHSHQGDQWTXHO¶RXWLO
marche et toucher les lames.
ƒ5HERQGGHODSLqFHGHWUDYDLORXGHVSDUWLHVGH
la pièce de travail.
ƒ )UDFWXUHGHODODPH
ƒ&DWDSXOWDJH GH PRUFHDX[ GpIHFWXHX[ GH OD
lame.
ƒ /¶RXWLOpOHFWULTXHQHGRLWrWUHXWLOLVpHQSOHLQDLU
en temps pluvieux, ni dans un milieu humide
RXjSUR[LPLWpGHVOLTXLGHVRXJD]HVLQIODP-
PDEOHV3UHQH]VRLQTXHOHSRVWHGHWUDYDLOVRLW
bien éclairé.
V - Nomenclature
$YDQWG¶XWLOLVHUO¶RXWLOpWXGLH]WRXWHVOHVFDUDFWp-
ULVWLTXHVGHWUDYDLOHWUqJOHVGHVpFXULWp1¶XWLOLVH]
l’outil et les accessoires que pour les usages pré-
vus.
Toute utilisation autre que la prévue est expressé-
ment interdite.
1. Gâchette de marche/arrêt
%RXWRQGHEORFDJH
%RXWRQGHUpJODJHGHODSURIRQGHXU
SDJHV3LQGG ɝ

14
P 282FR
4. Poignée principale
5. Poignée secondaire
*RXORWWHGHVRUWLHGHSRXVVLqUHFRSHDX[
%RXWRQG¶DWWDFKHGXJXLGHSDUDOOqOH
%RXWRQGHUpJODJHGHO¶H[WUDFWLRQGHV
poussières/copeaux
/DPHVUpYHUVLEOHV
%DULOOHWGHODPH
11. Vis de serrage
%DVHDYDQWDPRYLEOH
%DVHDUULqUH¿[H
14. Guide parallèle
15. Tube adaptateur de copeaux
6DFFROOHFWHXUGHFRSHDX[
&Op
18. Rainure pour la clé
VI - Utilisation
L’outil électrique est alimenté en courant alternatif
PRQRSKDVp /¶LVRODWLRQ GRXEOH VHORQ (1
HW,ȿɋSHUPHWGHOHEUDQFKHUGDQVOHV
SULVHVVDQVERUQHGHSURWHFWLRQWHUUH/HVSD-
UDVLWHV pPLV VRQW FRQIRUPHV DX[ ȿ1
ȿ1ȿ1ȿ1
AVANT LE DÉBUT DE TRAVAIL
ƒ 9pUL¿HUVLODWHQVLRQGXUpVHDXpOHFWULTXHFRU-
UHVSRQGjODWHQVLRQLQGLTXpHVXUOHWDEOHDXGHV
caractéristiques de l’outil.
ƒ 9pUL¿HUOHERQpWDWGXFkEOHG¶DOLPHQWDWLRQHWVD
¿FKH8QFkEOHGpIHFWXHX[GHYUDrWUHUHPSODFp
par le producteur ou une station service auto-
ULVpHD¿QG¶pOLPLQHUWRXWULVTXHG¶XQUHPSODFH-
ment inapproprié.
ENLEVEROUINSTALLERLES
LAMES DE RABOT
ATTENTION: $VVXUH]YRXV WRXMRXUV
que l’outil est éteint et débranché du réseau
électrique avant de faire des réglages ou d’ins-
taller ou enlever les lames.
Votre rabot est muni de lames réversibles. Les
lames peuvent être inversées quand elles sont
émoussées. Après avoir utilisé les deux côtés des
lames, elles doivent être jetées.
NOTE.
Ces lames ne sont pas ré-affutables.
ENLEVER UNE LAME DE RABOT
(QXWLOLVDQWODFOpIRXUQLHGpYLVVH]OHVWURLV
YLVGHVHUUDJH(Fig. 1).
6RUWH]ODODPHGHUDERWGHODIHQWHGDQVOH
EDULOOHWGHODPHGDQVODTXHOOHHOOHHVWUHWH-
nue (Fig. 2).
INSTALLER UNE LAME DE RABOT
5HWRXUQH]ODODPHGHUDERWRXUHPSODFH]OD
si nécessaire.
*OLVVH]ODERQQHODPHIDFHYHUVOHKDXWGDQV
le bloc support de lame du barillet de lame
NOTE.
L’arête long de la lame devrait être sur la
IDFHGHODODPHRSSRVpDX[YLVGHVHUUDJH
6HUUH]OHVYLVGHVHUUDJHDVVXUH]YRXVGH
les serrer uniformément.
5pSpWH]O¶RSpUDWLRQSRXUO¶DXWUHODPH
NOTE.
&KDQJH]WRXMRXUVOHVGHX[ODPHVjODIRLV
dans le cas contraire, un déséquilibre peut causer
des vibrations ce qui réduira la durée de vie de la
lame et de l’outil.
(Fig. 2)
±Correct (Fig. 3)±Incorrect
NOTE.
La position des lames est réglée lors de
ODSURGXFWLRQ1¶HVVD\H]SDVGHODUpJOHUSDUOHV
deux vis hexagones.
ATTENTION:(QLQVWDOODQWGHVODPHV
HQOHYH]G¶DERUGWRXVOHVFRSHDX[HWWRXWHDXWUH
PDWLqUHDGKpUDQWDXEDULOOHWHWDX[ODPHV
HOOHVPrPHV8WLOLVH]GHVODPHVGHPrPHGL-
mension et poids, sinon le barillet oscillera et
vibrera, causant un mauvais rabotage et peut-
rWUHPrPHXQHSDQQHGHPDFKLQH6HUUH]OHV
YLVGHVHUUDJHDYHFSUpFDXWLRQTXDQGYRXV
DWWDFKH]OHVODPHVVXUUDERW8QHYLVGHVHU-
rage mal serrée pourrait être extrêmement dan-
JHUHXVH9pUL¿H]UpJXOLqUHPHQWTX¶HOOHVVRLHQW
bien serrées.
NOTE.
Votre surface de rabotage sera rugueuse
et inégale, sauf si les lames sont installées pro-
prement et fermement. Les lames doivent être
montées de telle façon que l’arête coupante soit
DEVROXPHQWGHQLYHDXF¶HVWjGLUHSDUDOOqOHjOD
surface de la base arrière.
Les exemples ci-dessous montrent un bon et un
PDXYDLVPRQWDJH
ƒ Montage correct
(Fig. 2)
ƒ Coupe propre et lisse(Fig. 4)
ƒ Entailles dans la surface±FDXVHO¶DUrWH
G¶XQHRXGHVGHX[ODPHVQ¶HVWSDVSDUDOOqOHjOD
ligne de base arrière (Fig. 5).
ƒ Gougeage au début±FDXVHO¶DUrWHG¶XQHRX
GHV GHX[ ODPHV Q¶HVWSDV DVVH] VDLOODQWH SDU
UDSSRUWjODOLJQHGHEDVHDUULqUH(Fig. 6).
A
pages-P282.indd 14 ɝ

15
Instructions d’utilisation FR
r
U
ƒ Gougeage à la fin±FDXVHO¶DUrWHG¶XQHRXGHV
GHX[ODPHVHVWWURSVDLOODQWH SDUUDSSRUWjOD
ligne de base arrière (Fig. 7).
NOTE.
D%DVHDYDQWVDERWDPRYLEOH
E%DVHDUULqUHVDERWLQDPRYLEOH
REGLAGE DE LA PROFONDEUR
DE COUPE
ATTENTION: $VVXUH]YRXV WRXMRXUV
que l’outil est éteint et débranché du réseau
électrique avant de faire des réglages ou d’ins-
taller ou enlever les lames.
7RXUQHUOHERXWRQGHUpJODJHGHSURIRQGHXU
dans le sens des aiguilles d’une montre pour
une coupe plus superficielle (Fig. 8).
2. Les numéros sur l’anneau en dessous du bou-
ton de réglage de profondeur indiquent la pro-
fondeur de la coupe. Par ex. quand le «2» s’af-
ILFKHjF{WpGXSRLQWHXUVXUOHGHYDQWGXUDERW
la profondeur de coupe est d’environ 2 mm.
3. S’il faut déterminer une profondeur de coupe
DYHFH[DFWLWXGHUDERWH]XQHFKXWHGHERLV
PHVXUH]ODGLIIpUHQFHG¶pSDLVVHXUHWDMXVWH]OHV
réglages si nécessaire.
ATTENTION: $VVXUH]YRXV WRXMRXUV
que le bouton de réglage de la profondeur est
HQSRVLWLRQ©ªORUVYRXVQ¶XWLOLVH]SDVOHUDERW
Dans cette position les lames ne peuvent pas
toucher la pièce de travail.
ALLUMER ET ETEINDRE
ATTENTION: Avant de brancher la
PDFKLQHDXUpVHDXpOHFWULTXHYpUL¿H]WRXMRXUV
TXHODJkFKHWWHHWOHERXWRQGHEORFDJH
fonctionnent correctement.
%UDQFKH] OD PDFKLQH SRXVVH] VXU OH ERXWRQ
GHEORFDJHSXLVHQIRQFH]ODJkFKHWWH
(Fig. 9).
3RXUDUUrWHUO¶RXWLOUHOkFKH]VLPSOHPHQWODJk-
FKHWWH
3. Pour pouvoir redémarrer la machine, il est né-
cessaire de faire fonctionner et le bouton de
EORFDJHHWODJkFKHWWH&HFLHVWXQHFD-
ractéristique de sécurité importante pour éviter
une mise en marche accidentelle du rabot.
RABOTAGE
3RVH]ODEDVHDYDQWjSODWVXUODVXUIDFHGH
la pièce de travail, sans que les lames soient en
contact avec la pièce de travail.
$OOXPH]O¶RXWLOHWDWWHQGH]TXHOHVODPHVDWWHL-
gnent la pleine vitesse.
$YDQFH]O¶RXWLOGRXFHPHQWHQIDLVDQWSUHVVLRQ
sur le devant de l’outil en utilisant votre main sur
ODSRLJQpHVHFRQGDLUHDXGpEXWGXUDERWDJH
puis une pression sur l’arrière de l’outil en utili-
VDQWYRWUHPDLQVXUODSRLJQpHSULQFLSDOHjOD
fin du rabotage.
3RXVVH]OHUDERWDXGHOjGHODSLqFHGHWUDYDLO
sans le basculer en avant.
NOTE.
Le rabotage sera plus facile si vous incli-
QH]OpJqUHPHQWODSLqFHGHWUDYDLOYHUVOHEDVHQ
partant du corps, pour raboter en pente descen-
dante.
5. La vitesse de rabotage et la profondeur de cou
-
pe déterminent la qualité de la finition. Pour un
UDERWDJHJURVVLHU YRXVSRXYH] DXJPHQWHUOD
profondeur de coupe, tandis que, pour obtenir
XQHERQQHILQLWLRQYRXVGHYUH]UpGXLUHODSUR-
fondeur de coupe et avancer l’outil plus lente-
ment.
ATTENTION: Une avance trop rapide
de la machine peut causer une qualité de cou-
pe médiocre et endommager les lames ou le
moteur. Une avance trop lente peut brûler ou
gâcher la coupe.
La vitesse d’avance dépendra du type de maté-
ULDXjFRXSHUHWGHODSURIRQGHXUGHODFRXSH
(QWUDvQH]YRXVVXUXQHFKXWHGHPDWpULDXSRXU
juger de la bonne vitesse d’avance et des dimen-
sions de coupe.
8WLOLVH]WRXMRXUVYRVGHX[PDLQVSRXUWHQLUOHUD-
bot.
$XWDQWTXHSRVVLEOH¿[H]ODSLqFHGHWUDYDLOVXU
l’établi.
CHANFREINAGE
1. Pour faire une coupe de chanfrein comme
montrée en (Fig. 10)DOLJQH]G¶DERUGUDLQXUHHQ
©9ª GDQVOD EDVHDYDQW GX UDERW DYHF OH
bord d’angle de la pièce de travail (Fig. 11).
3DVVH]OHUDERWOHORQJGXERUGG¶DQJOH
NOTE.
(Fig. 10)±$5DERWDJH%&KDQIUHLQDJH
(Fig. 11)±$OLJQHPHQWGHODUDLQXUH©9ª
pages-P282.indd 15 ɝ

16
P 282FR
GUIDE PARALLELE
ATTENTION: $VVXUH]YRXV WRXMRXUV
que l’outil est éteint et débranché du réseau
électrique avant de faire des réglages ou d’ins-
taller ou enlever les lames.
3RXU DMRXWHUOHJXLGH SDUDOOqOH HQOHYH] OH
ERXWRQG¶DWWDFKHGXJXLGHSDUDOOqOHHWJOLV-
VH]OHJXLGHVXUOHUDERW(Fig. 12, 13).
NOTE.
$VVXUH]YRXV TXH OHV GHX[ HQFRFKHV
GDQVODSODTXHGH¿[DWLRQGXJXLGHV¶DOLJQHQWDYHF
les deux repères situés sur le corps du rabot.
5HPHWWH]OHERXWRQG¶DWWDFKHGXJXLGHHW
VHUUH]OHIHUPHPHQW(Fig. 14).
'HVVHUUH]O¶pFURXjDLOHWWHVIL[DQWODFRXOLVVHGX
JXLGH SRVLWLRQQH] OD FRXOLVVH j OD ODUJHXU GH
IHXLOOXUHGpVLUpHSXLVUHVVHUUH]O¶pFURXjDLOHW-
tes.
4. Les nombres sur le guide indiquent la largeur
GHIHXLOOXUH3DUH[VL©ªILJXUHjFRWpGX
coulisseau, la largeur de feuillure est approxi-
PDWLYHPHQWPP
5. S’il faut déterminer une largeur de feuillure avec
H[DFWLWXGHUDERWH]XQHFKXWHGHERLVPHVXUH]
ODGLVWDQFHGHIHXLOOXUHHWDMXVWH]OHVUpJODJHVVL
nécessaire (Fig. 15)
EXTRACTION DES COPEAUX
6HORQOHF{WpRYRXVGpVLUH]YRLUWRPEHUOHV
FRSHDX[FRQQHFWH]OHVDFVXUOHSRUWG¶H[-
WUDFWLRQGHVFRSHDX[SRXVVLqUHVDSSURSULp
/HVDFSHXWrWUHLQVWDOOpSRXUSHUPHWWUHDX[
FRSHDX[GHWRPEHUVRLWjGURLWVRLWjJDXFKHGH
la pièce de travail.
7RXUQH]ODPDQHWWHGXJXLGHG¶H[WUDFWLRQ
SRXUSRLQWHUYHUVOHSRUWG¶H[WUDFWLRQjXWLOL-
ser (Fig. 16).
Nettoyage du sac de poussière: Pour vider le
VDFGpWDFKH]ODSLQFHDXIRQGGXVDFHWO¶pSRXV-
VHWH]5HQYHUVH]OHVDFUpJXOLqUHPHQWHWEURV-
VH]ODSRXVVLqUHHQXWLOLVDQWXQHEURVVHPROOH
4. Un système d’extraction de poussières profes
-
sionnel ou un aspirateur domestique peuvent
rWUHDGDSWpVDXWXEHDGDSWDWHXUSRXUXQH
évacuation efficace de la poussière et des co-
peaux, permettant de travailler dans un envi-
ronnement plus propre et plus sûr.
REMPLACEMENT DE LA
COURROIE D’ENTRAINEMENT
ATTENTION: $VVXUH]YRXV WRXMRXUV
que l’outil est éteint et débranché du réseau
électrique avant de faire des réglages ou d’ins-
taller ou enlever les lames.
1. Pour remplacer la courroie d’entraînement,
HQOHYH] G¶DERUG OHV YLV j WrWH FUXFLIRUPH TXL
maintiennent le couvercle de la courroie d’en-
traînement sur le côté gauche du rabot, vue de
l’arrière (Fig. 17).
(QOHYH] OD FRXUURLH HQGRPPDJpH HW XWLOLVH]
une brosse douce pour nettoyer les poulies et
OD]RQHHQYLURQQDQWH
NOTE.
8WLOLVH] XQH SURWHFWLRQ RFXODLUH HQ QHW-
WR\DQWOD]RQHGHVSRXOLHV
$YHF OHV WURLV SURILOpV ©9ª FRQWLQXV j O¶LQWp
-
ULHXUSODFH]ODQRXYHOOHFRXUURLHVXUODSRXOLH
LQIpULHXUH0HWWH]O¶DXWUHF{WpGHODFRXUURLHj
PRLWLp VXU OD SRXOLH VXSpULHXUH SXLV URXOH] OD
courroie en place en tournant la poulie.
9pULILH]TXHODFRXUURLHWRXUQHXQLIRUPpPHQWHQ
la tournant manuellement.
5HPHWWH]OHFRXYHUFOHHWOHVTXDWUHYLVGHIL[D-
tion.
5HEUDQFKH]ODSULVHpOHFWULTXHHWIDLWHVPDU-
cher le rabot pendant quelques minutes afin de
vous assurer que le moteur et la courroie fonc-
tionnent correctement.
ACCESSOIRES
Guide parallèle; courroie de transmission de re-
change; jeu complémentaire de lames de rechan-
JHVDFjSRXVVLqUHVFOp
pages-P282.indd 16 ɝ

17
Instructions d’utilisation FR
VII - Entretien
ATTENTION: Avant toute intervention
G¶LQVSHFWLRQ RX G¶HQWUHWLHQ YHXLOOH] DUUrWHU OD
machine et débrancher le câble d’alimentation
de la prise.
9pUL¿HUUpJXOLqUHPHQWOHVHUUDJHGHVYLVGXFRUSV
de la machine. Les vibrations pendant le travail
provoquent le desserrage des vis.
Le parties tournantes doivent être graissées régu-
lièrement.
CHANGER LES BALAIS
Quand les balais sont usés, tous les deux devront
être changés en même temps avec des balais d’ori-
gine dans un service après-vente agréé SPARKY.
NETTOYAGE
La machine et les trous de ventilation doivent être
PDLQWHQXV SURSUHV D¿Q G¶DVVXUHU OD VpFXULWp GH
travail.
,OIDXWYpUL¿HUUpJXOLqUHPHQWV¶LOQ¶\DSDVGHVFRUSV
étrangers ou poussière accumulée dans la grille
de ventilation près du moteur ou dans l’interrup-
WHXU(OLPLQHUODSRXVVLqUHDYHFXQHSLQFHGRX[
Pendant le nettoyage porter des lunettes de pro-
tection pour protéger vos yeux.
Le corps de la machine est nettoyé avec un chif-
fon doux humide. On peut utiliser un détergent
non-agressive au besoin.
ATTENTION:1HMDPDLVXWLOLVHUO¶DOFRRO
HVVHQFHRXDXWUHVVROYDQWVRUJDQLTXHV1HMD-
mais utiliser des produits corrosifs pour le net-
toyage des parties en plastique.
ATTENTION:1HMDPDLVODLVVHUO¶HDX
pénétrer dans la machine.
IMPORTANT!
$¿QGHJDUDQWLUODVpFXULWpHWOD
¿DELOLWpGHWUDYDLOGHODPDFKLQHWRXVOHVWUDYDX[
de réparation, entretien et réglage, y compris le
remplacement des balais moteur, ne devront être
faites que par les stations service autorisées de
SPARKY en utilisant uniquement des pièces de
rechange originales.
VIII - Garantie
La période de garantie des outils électroportatifs
63$5.<HVWGp¿QLHGDQVOHFRQWUDWGHJDUDQWLH
La garantie ne couvre pas les pannes apparues
VXLWH j O¶XVXUH QDWXUHOOH XQH VXUFKDUJH RX XQH
mauvaise exploitation.
Les pannes survenues pour cause de matériaux
défectifs et/ou d’erreurs de fabrication seront ré-
parées gratuitement ou le produit sera échangé.
Les réclamations pour un instrument SPARKY
défectueux seront honorées si la machine est
UHWRXUQpHDXOLYUHXURXHVWSUpVHQWpjXQVHUYLFH
après-vente agréé assemblé et dans son état ori-
JLQDODVVHPEOpH
Note
Merci de lire attentivement le manuel d’exploita-
tion avant de vous servir de ce produit.
Le fabricant ne se défait pas du droit d’introduire
des améliorations et des changements dans ses
SURGXLWVDLQVL TXHGHFKDQJHUOHV VSpFL¿FDWLRQV
sans avis préalable.
/HV VSpFL¿FDWLRQV SHXYHQW GLIIpUHU VHORQ OHV
pays.
pages-P282.indd 17 ɝ

18
P 282RU
ǿȜȒȓȞȔȎțȖȓ
, ȼɜɟɞɟɧɢɟ .....................................................................................................................................18
,, Ɍɟɯɧɢɱɟɫɤɢɟɞɚɧɧɵɟ..................................................................................................................
,,, ɂɧɫɬɪɭɤɰɢɢɩɨɛɟɡɨɩɚɫɧɨɫɬɢɩɪɢɪɚɛɨɬɟɫɷɥɟɤɬɪɨɢɧɫɬɪɭɦɟɧɬɨɦ.................................
,9 Ⱦɨɩɨɥɧɢɬɟɥɶɧɵɟɩɪɚɜɢɥɚɛɟɡɨɩɚɫɧɨɫɬɢɩɪɢɪɚɛɨɬɟɫɷɥɟɤɬɪɢɱɟɫɤɢɦɢɪɭɛɚɧɤɚɦɢ....21
9 ɍɡɧɚɣɛɨɥɶɲɟɨɫɜɨɟɦɢɧɫɬɪɭɦɟɧɬɟ ................................................................................ A/23
9, ɍɤɚɡɚɧɢɹɩɨɪɚɛɨɬɟ....................................................................................................................23
9,, Ɉɛɫɥɭɠɢɜɚɧɢɟ............................................................................................................................
9,,, Ƚɚɪɚɧɬɢɹ.......................................................................................................................................
,ǰȐȓȒȓțȖȓ
ɉɪɢɨɛɪɟɬɟɧɧɵɣȼɚɦɢɢɧɫɬɪɭɦɟɧɬ63$5.<ɫɩɨɫɨɛɟɧɩɪɟɜɡɨɣɬɢȼɚɲɢɨɠɢɞɚɧɢɹɈɧɢɡɝɨɬɨɜ-
ɥɟɧɜɫɨɨɬɜɟɬɫɬɜɢɢɫɜɵɫɨɤɢɦɢɫɬɚɧɞɚɪɬɚɦɢɤɚɱɟɫɬɜɚ63$5.<ɨɬɜɟɱɚɸɳɢɦɢɫɚɦɵɦɫɬɪɨɝɢɦ
ɬɪɟɛɨɜɚɧɢɹɦɩɨɬɪɟɛɢɬɟɥɹɉɪɨɫɬɨɣɜɨɛɫɥɭɠɢɜɚɧɢɢɢɭɞɨɛɧɵɣɜɷɤɫɩɥɭɚɬɚɰɢɢɨɧɧɚɞɟɠɧɨɩɪɨ-
ɫɥɭɠɢɬȼɚɦɞɨɥɝɨɟɜɪɟɦɹ
ȼɇɂɆȺɇɂȿ
ȼɧɢɦɚɬɟɥɶɧɨ ɩɪɨɱɢɬɚɣɬɟ ɢɧɫɬɪɭɤɰɢɸ ɩɨ ɷɤɫɩɥɭɚɬɚɰɢɢ ɨɬ ɧɚɱɚɥɚ ɞɨ ɤɨɧɰɚɈɛɪɚɬɢɬɟ ɨɫɨɛɨɟ
ɜɧɢɦɚɧɢɟɧɚɦɟɫɬɚɜɵɞɟɥɟɧɧɵɟɫɥɨɜɨɦ©ȼɧɢɦɚɧɢɟªɉɪɢɨɛɪɟɬɟɧɧɵɣȼɚɦɢɷɥɟɤɬɪɨɢɧɫɬɪɭɦɟɧɬ
ɨɛɥɚɞɚɟɬɦɧɨɝɢɦɢɤɚɱɟɫɬɜɚɦɢɫɩɨɫɨɛɧɵɦɢɨɛɥɟɝɱɢɬɶȼɚɦɪɚɛɨɬɭɉɪɢɟɝɨɩɪɨɢɡɜɨɞɫɬɜɟɦɵ
ɭɞɟɥɢɥɢɧɚɢɛɨɥɶɲɟɟɜɧɢɦɚɧɢɟɛɟɡɨɩɚɫɧɨɫɬɢɧɚɞɟɠɧɨɫɬɢɭɞɨɛɫɬɜɭɪɚɛɨɬɵ
ɇɟɜɵɛɪɚɫɵɜɚɣɬɟɷɥɟɤɬɪɨɢɧɫɬɪɭɦɟɧɬɵɜɦɟɫɬɟɫɛɵɬɨɜɵɦɢɨɬɯɨɞɚɦɢ
Ɉɬɪɚɛɨɬɚɧɧɵɟɷɥɟɤɬɪɢɱɟɫɤɢɟɢɡɞɟɥɢɹɧɟɞɨɥɠɧɵɜɵɛɪɚɫɵɜɚɬɶɫɹɫɨɜɦɟɫɬɧɨɫɛɵɬɨɜɵɦɢ
ɨɬɯɨɞɚɦɢ ɉɪɨɫɶɛɚ ɨɫɬɚɜɥɹɬɶ ɢɯ ɜ ɫɩɟɰɢɚɥɶɧɨ ɩɪɟɞɧɚɡɧɚɱɟɧɧɵɯ ɞɥɹɷɬɨɝɨɦɟɫɬɚɯ
ɉɪɨɤɨɧɫɭɥɶɬɢɪɭɣɬɟɫɶɩɨɷɬɨɦɭɩɨɜɨɞɭɫɦɟɫɬɧɵɦɢɜɥɚɫɬɹɦɢɢɥɢɢɯɩɪɟɞɫɬɚɜɢɬɟɥɟɦ
ɈɏɊȺɇȺɈɄɊɍɀȺɘɓȿɃɋɊȿȾɖȱ
ɋɭɱɟɬɨɦɨɯɪɚɧɵɨɤɪɭɠɚɸɳɟɣɫɪɟɞɵɷɥɟɤɬɪɨɢɧɫɬɪɭɦɟɧɬɩɪɢɧɚɞɥɟɠɧɨɫɬɢɢɭɩɚɤɨɜɤɚɞɨɥɠɧɵ
ɩɨɞɜɟɪɝɧɭɬɶɫɹ ɩɨɞɯɨɞɹɳɟɣ ɩɟɪɟɪɚɛɨɬɤɟ ɞɥɹ ɩɨɜɬɨɪɧɨɝɨ ɢɫɩɨɥɶɡɨɜɚɧɢɹ ɫɨɞɟɪɠɚɳɢɝɨɫɹ
ɜɧɢɯ ɫɵɪɶɹ Ⱦɥɹ ɨɛɥɟɝɱɟɧɢɹɪɟɰɢɤɥɢɪɨɜɚɧɢɹɞɟɬɚɥɟɣ ɩɪɨɢɡɜɟɞɟɧɧɵɯ ɢɡɢɫɤɭɫɫɬɜɟɧɧɵɯ
ɦɚɬɟɪɢɚɥɨɜɨɧɢɨɛɨɡɧɚɱɟɧɵɫɨɨɬɜɟɬɫɬɜɭɸɳɢɦɨɛɪɚɡɨɦ
ɊȺɋɉȺɄɈȼɄȺ
ɗɥɟɤɬɪɨɢɧɫɬɪɭɦɟɧɬɩɨɫɬɚɜɥɹɟɬɫɹɤɨɦɩɥɟɤɬɧɨɜɢɫɩɪɚɜɧɨɦɜɢɞɟȼɫɥɭɱɚɟɨɛɧɚɪɭɠɟɧɢɹɧɟɫɨɨɬ-
ɜɟɬɫɬɜɢɣɧɟɪɟɤɨɦɟɧɞɭɟɦɢɫɩɨɥɶɡɨɜɚɬɶɢɧɫɬɪɭɦɟɧɬɞɨɬɟɯɩɨɪɩɨɤɚɨɛɧɚɪɭɠɟɧɧɵɣɞɟɮɟɤɬɧɟ
ɛɭɞɟɬɭɫɬɪɚɧɟɧɇɟɜɵɩɨɥɧɟɧɢɟɷɬɨɣɪɟɤɨɦɟɧɞɚɰɢɢɦɨɠɟɬɫɬɚɬɶɩɪɢɱɢɧɨɣɬɪɚɜɦɵ
ɄɈɆɉɅȿɄɌȺɐɂə
ɊɭɛɚɧɨɤɊɩɨɫɬɚɜɥɹɟɬɫɹɜɭɩɚɤɨɜɤɟɜɩɨɥɧɨɫɬɶɸɫɨɛɪɚɧɧɨɦɜɢɞɟɡɚɢɫɤɥɸɱɟɧɢɟɦɦɟɲɤɚ
ɩɵɥɟɫɛɨɪɧɢɤɚɢɥɢɧɟɣɤɢ
pages-P282.indd 18 ɝ
La page est en cours de chargement...
La page est en cours de chargement...
La page est en cours de chargement...
La page est en cours de chargement...
La page est en cours de chargement...
La page est en cours de chargement...
La page est en cours de chargement...
La page est en cours de chargement...
La page est en cours de chargement...
La page est en cours de chargement...
La page est en cours de chargement...
La page est en cours de chargement...
La page est en cours de chargement...
La page est en cours de chargement...
La page est en cours de chargement...
La page est en cours de chargement...
La page est en cours de chargement...
La page est en cours de chargement...
La page est en cours de chargement...
La page est en cours de chargement...
La page est en cours de chargement...
La page est en cours de chargement...
-
 1
1
-
 2
2
-
 3
3
-
 4
4
-
 5
5
-
 6
6
-
 7
7
-
 8
8
-
 9
9
-
 10
10
-
 11
11
-
 12
12
-
 13
13
-
 14
14
-
 15
15
-
 16
16
-
 17
17
-
 18
18
-
 19
19
-
 20
20
-
 21
21
-
 22
22
-
 23
23
-
 24
24
-
 25
25
-
 26
26
-
 27
27
-
 28
28
-
 29
29
-
 30
30
-
 31
31
-
 32
32
-
 33
33
-
 34
34
-
 35
35
-
 36
36
-
 37
37
-
 38
38
-
 39
39
-
 40
40
-
 41
41
-
 42
42


Sparky Group P 282 Manuel utilisateur
- Catégorie
- Outils électroportatifs
- Taper
- Manuel utilisateur
Documents connexes
Autres documents
-
Triton Tools TPL 180 Mode d'emploi
-
Castorama Rabot 650W 82 mm Mode d'emploi
-
Beast BEAST7 Mode d'emploi
-
Milwaukee M18 FMS254-0 Manuel utilisateur
-
-
Ryobi RAG800-125G Mode d'emploi
-
Panasonic EY7206GQW Operating Instructions Manual
-
Toro 17in Curved-Shaft Gas Trimmer Manuel utilisateur
-
-
Fujitsu AOGG24LAT3 Guide d'installation