
1
1/06 ID# M8801041
© COPYRIGHT 2006 by SPALDING
Inground System
Owners Manual
Customer Service Center
• N53 W24700 South Corporate Circle • Sussex, WI 53089 • U.S.A.
Système de poteau carré
Manuel de l’utilisateur
Service clientèle
• N53 W24700 South Corporate Circle • Sussex, WI 53089 o É.-U.
Toll-Free Customer Service Number for U.S: 1-800-558-5234, For Canada: 1-800-284-8339,
For Europe: 00 800 555 85234 (Sweden: 009 555 85234), For Australia: 1800 632 792
Internet Address: www.huffysports.com www.spalding.com
Numéro vert du Service clientèle - États-Unis: 1-800-558-5234, Canada: 1-800-2284-8339,
Europe: 00 800 555 85234 (Suède: 009 555 85234), Australie: 1800 632 792
Adresse Internet: www.huffysports.com www.spalding.com
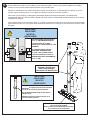
Adult Assembly Required.
Assemblage exclusivement réservé à un adulte.
This manual, accompanied by sales receipt, should be saved and kept on hand as a convenient reference, as it
contains important information about your model.
Ce manuel, accompagné du justificatif d'achat, devra être conservé pour référence ultérieure, dans la mesure où il
contient des informations importantes sur votre modèle.
READ AND UNDERSTAND OPERATOR'S
MANUAL BEFORE USING THIS UNIT.
FAILURE TO FOLLOW OPERATING
INSTRUCTIONS COULD RESULT IN
INJURY OR DAMAGE TO PROPERTY.
LISEZ LE MODE D'EMPLOI
AVANT D'UTILISER CE SYSTÈME
SOUS PEINE D'ENCOURIR DES
BLESSURES OU DES DÉGÂTS
MATÉRIELS..
WARNING!
AVERTISSEMENT!
Write Model Number
From Box Here:
Inscrivez ici le numéro de
modèle qui apparaît sur la
boîte:
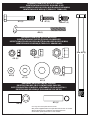
• Two (2) Capable Adults
• Deux (2) adultes capables
• Carpenter’s Level
• Niveau à bulle
• 15’ Tape Measure
• Mètre de 4,5 m
• Shovel & Post Hole Digger
• Pelle et bêchet arière
• Wood Board (scrap)
• Planche en bois (chute)
• Sawhorse or Support Table
• Chevalet de sciage ou table
• Wedge
•
Cale
•
• Container to Mix
• Récipient pour mélanger
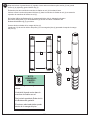
• (2 each) Wrenches and/or Socket Wrenches and
Sockets (Deep-Well Sockets are Recommended).
• (2) Clés, (2) Clés à douilles et douilles. Extension
de douille
1/2"
9/16" 3/4"
• Optional: Large & Small
Adjustable Wrenches
• Facultatif: petites et
grandes clés anglaises
1/2"
9/16" 3/4"
REQUIRED TOOLS AND MATERIALS:
OUTILS ET MATÉRIEL REQUIS:
• Hammer
• Marteau
• Stepladder 8 ft. (2.4 m)
• Escabeau de 2,4 m
• Safety Goggles
• Lunettes de sécurité
• Pliers
• Pinces
• Heavy Duty Tape
• Ruban extra-fort
CONCRETE
BÉTON
245 KG.
540 LBS.
La page est en cours de chargement...

3
1/06 ID# M8801041
BEFORE YOU START!
AVANT DE COMMENCER !
VORBEREITENDE MASSNAHMEN
¡ANTES DE COMENZAR!
(
HALT!HALT!
¡
¡ALTO!ALTO!
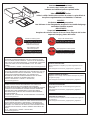
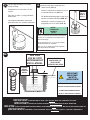
To ensure optimal playability of backboard system, a close tolerance fit between the elevator components and hardware is required. Test-fit
large bolts into large holes of elevator tubes, backboard brackets, and triangle plates. Carefully rock them in a circular motion to ream out any
excess paint from holes if necessary.
Not all items pictured are included with every model.
Pour garantir l'utilisation optimale du panneau, les composants du système élévateur et la visserie doivent être bien ajustés (serrés). À titre
d'essai, insérez les gros boulons dans les gros trous des tubes du système élévateur, des supports du panneau et des plaques triangulaires.
Basculez-les avec précaution en imprimant un mouvement circulaire pour éliminer l'excédent de peinture des trous, si nécessaire.
Les composants illustrés ici ne sont pas tous fournis avec chaque modèle.
Um sicherzustellen, dass das Korbwandsystem optimal für den Spielbetrieb geeignet ist, müssen die Komponenten der
Verlängerungsvorrichtung und die verschiedenen Befestigungsteile fest miteinander verschraubt werden. Große Schrauben zur Probe in die
großen Löcher der Verlängerungsrohre, Korbwandklammern und Dreiecksplatte stecken und diese vorsichtig in einer Kreisbewegung hin-
und herbewegen, um eventuelle Farbrückstände aus den Bohrungen zu entfernen.
Nicht jedem Modell sind alle abgebildeten Teile beigepackt.
Para asegurar el óptimo rendimiento del sistema del respaldo en el juego, se requiere un ajuste de tolerancia estrecha entre los
componentes del elevador y el herraje. Pruebe el ajuste de los pernos grandes en los orificios grandes de los tubos elevadores, soportes del
respaldo y placas triangulares. Cuidadosamente muévalos en círculos para eliminar cualquier exceso de pintura de los orificios, si es
necesario.
No todos los artículos ilustrados se incluyen con cada modelo.
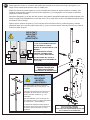
NOTICE TO ASSEMBLERS
Adult Assembly Required. Dispose of ALL packaging materials promptly. As with all products, periodically inspect for loose small parts.
ALL basketball systems, including those used for DISPLAYS, MUST be assembled and installed according to instructions. Failure to follow
instructions could result in SERIOUS INJURY. It is NOT acceptable to devise a makeshift support system.
AVIS AUX PERSONNES CHARGÉES DU MONTAGE
Assemblage exclusivement réservé à un adulte. Jetez TOUT le matériel d'emballage dans les plus brefs délais. Comme pour tous les produits pour
enfants, inspectez périodiquement le serrage des pièces de petite taille.
TOUS les systèmes de basket-ball, y compris ceux utilisés en EXPOSITION, DOIVENT être assemblés et installés conformément aux instructions.
Suivez ces instructions sous peine d’encourir des BLESSURES GRAVES. Il est INACCEPTABLE de composer un système de soutien de fortune.
HINWEIS FÜR DIE PERSONEN, DIE DEN ZUSAMMENBAU DURCHFÜHREN
Zusammenbau nur durch Erwachsene. ALLE Verpackungsmaterialien sofort wegwerfen. Wie alle Produkte muss auch dieses regelmäßig auf lose
Kleinteile inspiziert werden.
ALLE Basketballsysteme, einschließlich der zu AUSSTELLZWECKEN benutzten Systeme, MÜSSEN gemäß den Anleitungen zusammengebaut und
aufgestellt werden. Ein Missachten dieser Anleitungen kann SCHWERE VERLETZUNGEN zur Folge haben.Zum Beschweren darf NICHT zu
irgendwelchen Notbehelfsmaßnahmen gegriffen werden.
AVISO PARA LAS PERSONAS QUE REALIZAN EL MONTAJE
Es necesario que el montaje sea realizado por adultos. Deseche inmediatamente TODOS los materiales de embalaje. Al igual que con cualquier
producto, inspeccione periódicamente para verificar que todas las piezas pequeñas estén firmemente apretadas.
TODOS los sistemas de baloncesto, inclusive los de EXHIBICIÓN, DEBEN estar montados e instalados de acuerdo con las instrucciones. Si no se
siguen las instrucciones se podría ocasionar una LESIÓN SERIA. NO es aceptable improvisar un sistema de soporte temporal.

4
ID# M8801041 1/06
Owner must ensure that all players know and follow these rules
for safe operation of the system.
WARNING
•
DO NOT HANG on the rim or any part of the system including
backboard, support braces or net.
•
During play, especially when performing dunk type activities,
keep player's face away from the backboard, rim and net.
Serious injury could occur if teeth/face come in contact with
backboard, rim or net.
•
Do not slide, climb, shake or play on base and/or pole.
•
When adjusting height or moving system, keep hands and
fingers away from moving parts.
•
Do not allow children to move or adjust system.
•
During play, do not wear jewelry (rings, watches, necklaces,
etc.). Objects may entangle in net.
•
Keep organic material away from pole base. Grass, litter, etc.
could cause corrosion and/or deterioration.
•
Check pole system for signs of corrosion (rust, pitting,
chipping) and repaint with exterior enamel paint. If rust has
penetrated through the steel anywhere, replace pole
immediately.
•
Check system before each use for proper ballast, loose
hardware, excessive wear and signs corrosion and repair
before use.
•
Check system before each use for instability.
•
Never play on damaged equipment.
•
Keep pole top covered with cap at all times.
•
See instruction manual for proper installation and
maintenance.
R
ea
d
a
nd
und
e
r
s
t
a
nd
w
a
r
ning
s
li
s
t
e
d
b
e
low
b
e
f
o
r
e
u
s
ing
t
hi
s
p
r
odu
c
t
.
F
a
ilu
r
e
t
o
f
ollow
t
h
ese
w
a
r
ning
s
m
ay
r
es
ul
t
in
se
r
iou
s
inju
r
y
a
nd
/
o
r
p
r
op
e
r
t
y
d
a
m
a
g
e
.
ID#: 588000 05/05
In the U.S.: 1-888-713-5488
In the U.S.: 1-800-558-5234
In Canada: 1-800-284-8339
In the U.S.: 1-800-334-9111
In the U.S.: 1-800-558-5234
In Canada: 1-800-284-8339
ID#: GE588000 05/05
ACHTUNG
Vor Gebrauch dieses Produkts die
nachstehenden Warnhinweise lesen und
beachten.
Ein Missachten dieser Warnung kann zu
schweren Verletzungen und/oder Sachschäden
führe
In den USA: 1-888-713-5488
In den USA: 1-800-558-5234
Kanada: 1-800-284-8339
In den USA: 1-800-334-9111
In den USA: 1-800-772-5346
Kanada: 1-800-284-8339
Der Eigentümer muss sicherstellen, dass alle Spieler diese
Regeln für einen sicheren Betrieb des Systems kennen und
befolgen.
o NICHT am Korbrand oder irgendeinem anderen Teil des
Systems, einschl. Korbwand, Stützstreben oder Netz HÄNGEN.
o Während des Spielbetriebs, besonders bei Slam-Dunk-
Manövern, müssen die Spieler ihr Gesicht von Korbwand,
Korbrand und Netz fernhalten. Der Kontakt von Zähnen/Gesicht
mit der Korbwand, dem Korbrand oder dem Netz kann schwere
Verletzungen zur Folge haben.
o Nicht auf der Stange entlang rutschen, klettern, daran rütteln
oder damit spielen.
o Beim Einstellen der Höhe Hände und Finger von beweglichen
Teilen fernhalten.
o Kindern sollte das Verschieben oder Einstellen des Systems
nicht gestattet werden.
o Beim Spielen keinen Schmuck (Ringe, Armbanduhren,
Halsketten usw.) tragen. Gegenstände dieser Art können sich im
Netz verfangen.
o Organische Materialien vom Stangensockel fernhalten. Gras,
Abfälle usw. können Korrosion und/oder Abbauerscheinungen
verursachen.
o Das Stangensystem auf Anzeichen von Korrosion (Rost,
Narbenbildung, Abblättern) untersuchen und mit
Emailaußenfarbe neu lackieren. Wenn sich Rost an irgendeiner
Stelle durch den Stahl durchgefressen hat, ist die Stange sofort
auszutauschen.
o Das System vor jedem Gebrauch auf den richtigen Ballast, lose
Befestigungsteile, übermäßige Abnutzungserscheinungen und
Anzeichen von Korrosion untersuchen; vor jedem Einsatz
entsprechende Korrekturmaßnahmen bzw. Reparaturen
durchführen.
o Die Stabilität des Systems muss vor jedem Gebrauch überprüft
werden.
o Niemals an bzw. mit einer beschädigten Ausrüstung spielen.
o Das obere Stangenende muss jederzeit mit einer Kappe
abgedeckt sein.
o Hinweise zur ordnungsgemäßen Installation sind dem
Gebrauchshandbuch zu entnehmen.
El propietario debe asegurarse de que todos los jugadores conozcan y
obedezcan estas reglas para la operación segura del sistema.
•
NO SE CUELGUE del borde ni de ninguna parte del sistema, inclusive el
respaldo, las abrazaderas de apoyo y la red.
•
Durante el juego, especialmente cuando se realizan actividades de tipo clavada
(dunk), el jugador debe mantener la cara alejada del respaldo, el borde y la red.
Si los dientes o la cara entran en contacto con el respaldo, el borde o la red, se
puede sufrir una lesión grave.
•
Durante el juego, especialmente cuando se realizan actividades de tipo clavada
(dunk), el jugador debe mantener la cara alejada del respaldo, el borde y la red.
Si los dientes o la cara entran en contacto con el respaldo, el borde o la red, se
puede sufrir una lesión grave.
•
No se deslice, suba, sacuda ni juegue en el poste.
•
Al ajustar la altura mantenga las manos y los dedos alejados de las partes
movibles.
•
No permita que los niños muevan o ajusten el sistema.
•
Durante el juego, no use joyería (anillos, relojes, collares, etc.) Estos objetos se
podrían atorar en la red.
•
Mantenga los materiales orgánicos alejados de la base del poste. El césped, la
basura, etc. podrían causar corrosión y/o deterioro de la base del poste.
•
Revise que el sistema del poste no tenga señales de corrosión (oxidación,
picaduras, desconchaduras) y si las tiene vuelva a pintarlo con pintura de
esmalte para exteriores. Si la corrosión penetró a través del acero en cualquier
área, reemplace inmediatamente el poste.
•
Antes de cada uso revise el sistema para verificar que esté adecuadamente
equilibrado, que no tenga herraje suelto, desgaste excesivo ni signos de
corrosión, y repárelo si es necesario.
•
Verifique la estabilidad del sistema antes de cada uso.
•
Nunca juegue en equipo dañado.
•
Siempre mantenga la parte superior del poste cubierta con las tapas.
ADVERTENCIA
L
ea
y
e
n
t
i
e
nd
a
l
as
a
d
ve
r
t
e
n
c
i
as
qu
e
se
e
n
c
u
e
n
t
r
a
n
a
c
on
t
inu
ac
i
ó
n
a
n
t
es
d
e
u
sa
r
es
t
e
p
r
odu
c
t
o
.
S
i
no
se
ob
se
r
va
n
es
t
as
a
d
ve
r
t
e
n
c
i
as
se
pod
r
í
a
n
ca
u
sa
r
l
es
ion
es
g
r
aves
y
/
o
d
a
ñ
o
s
m
a
t
e
r
i
a
l
es
.
N/P: 588000 05/05
En EE.UU.: 1-888-713-5488
En EE.UU.: 1-800-558-5234
En Canadá: 1-800-284-8339
En EE.UU.: 1-800-334-9111
En EE.UU.: 1-800-772-5346
ID#: FR588000 05/05
AVERTISSEMENT
Lisez les avertissements indiqués ci-
dessous avant d'utiliser ce produit.
sous peine d'encourir des blessures
graves et/ou des dégâts matériels.
Aux États-Unis : 1-888-713-5488
Aux États-Unis : 1-800-334-9111
Aux États-Unis: 1-800-558-5234
Au Canada: 1-800-284-8339
Aux États-Unis: 1-800-558-5234
Au Canada: 1-800-284-8339
Le propriétaire du système doit s’assurer que tous les joueurs
connaissent et suivent ces
consignes d’utilisation sûre du système.
• NE VOUS SUSPENDEZ PAS sur le cerceau ou sur toute autre
partie du système, y compris le panneau, les supports ou le filet.
• Durant le jeu, en particulier lorsque vous faites des smash,
gardez le visage à l’écart du panneau, du cerceau et du filet.
Des blessures graves sont possibles si les dents ou le visage
venaient à entrer en contact avec le panneau, le cerceau ou le
filet.
• Ne glissez et ne montez pas sur le poteau, ne le secouez pas et
ne jouez pas dessus.
• Lorsque vous réglez la hauteur ou que vous déplacez le
système, gardez les mains et les doigts à l’écart des pièces en
mouvement.
• Ne laissez pas des enfants déplacer ou régler le système.
• Avant le jeu, retirez vos bijoux (bagues, montres, colliers, etc.).
Ces objets risquent de se prendre dans le filet.
• Maintenez les substances organiques à l’écart du socle du
poteau. L’herbe, les déchets, etc. risquent de causer la corrosion
et/ou la détérioration du système.
• Vérifiez l’état du système (signes de corrosion comme rouille,
piqûres, écaillage) et repeignez avec de la peinture émail pour
extérieur. Si la rouille a pénétré en tout point de l’acier,
remplacez immédiatement le poteau.
• Vérifiez le système avant chaque utilisation (lest, visserie mal
serrée, usure excessive et signes de corrosion) et réparez avant
utilisation.
• Vérifiez la stabilité du système avant chaque utilisation.
• Ne jouez jamais sur du matériel abîmé.
• Maintenez le poteau bouché à tout moment.
• Pour les instructions d’installation et d’entretien, reportez-vous
au guide fourni.

5
1/06 ID# M8801041
SAFETY INSTRUCTIONS
Most injuries are caused by misuse and/or not following instructions.
Use caution when using this system.
• If using a ladder during assembly, use extreme caution.
• Two (2) capable adults are recommended for this operation.
• Seat the pole sections properly. Failure to do so could allow the pole
sections to separate during play.
• Before digging, contact utility company to locate underground power
cables, gas, and water lines. Ensure there are no overhead power
lines within 20 ft. (7 m) radius of pole location.
• Climate, corrosion, excessive use, or misuse could result in system
failure.
• If technical assistance is required, contact Customer Service.
• Minimum operational height is 6'6" (1.98 m) to the bottom of
backboard.
• This equipment is intended for home recreational use only and NOT
excessive competitive play.
• Read and understand the warning label affixed to pole.
• The life of your basketball pole depends on many conditions. The
climate, placement of the pole, the location of the pole, exposure to
corrosives such as pesticides, herbicides, or salts are all important.
• Adult supervision is recommended when adjusting height.
• Serious injury could occur if teeth/face come in contact with
backboard, net, or rim.
FAILURE TO FOLLOW THESE SAFETY INSTRUCTIONS MAY RESULT IN SERIOUS
INJURY, PROPERTY DAMAGE AND WILL VOID WARRANTY.
Owner must ensure that all players know and follow these rules for safe operation
of the system.
To ensure safety, do not attempt to assemble this system without following the
instructions carefully. Proper and complete assembly, use and supervision is
essential for proper operation and to reduce the risk of accident or injury. A high
probability of serious injury exists if this system is not installed, maintained, and
operated properly. Check entire box and inside all packing material for parts and/or
additional instructional material. Before beginning assembly, read the instructions
and identify parts using the hardware identifier and parts list in this document.
CONSIGNES DE SÉCURITÉ
La plupart des blessures sont causées par une utilisation impropre et/ou le non-respect
des instructions.
Soyez prudent lorsque vous utilisez ce système.
• Si vous utilisez une échelle en cours de montage, soyez extrêmement prudent.
• Il est recommandé de s’y prendre à deux (2) (adultes) pour réaliser cette
opération.
• Emboîtez correctement les sections de poteau. Elles risquent sinon de se
déboîter en cours de jeu.
• Avant de creuser, contactez les fournisseurs d'électricité, gaz et eau pour
situer les câbles d'alimentation et les conduites de gaz et d'eau enfouis.
Assurez-vous qu'aucune ligne aérienne d'électricité ne se trouve dans un
rayon de 7 m de l'emplacement du poteau.
• Les conditions climatiques, la corrosion, une utilisation excessive ou une
mauvaise utilisation risquent de provoquer la panne du système.
• Pour toute assistance technique, contactez le service clientèle.
• La hauteur minimale d'utilisation est de 1,98 m (6'6") jusqu'à la base du
panneau.
• Ce matériel est réservé à un but récréatif à domicile et NON PAS à un jeu
extrêmement compétitif.
• Lisez et comprenez l'étiquette d'avertissement fixée au poteau.
• La durée de vie de votre poteau de basket-ball dépend de bien des facteurs. Le
climat, la position du poteau, son emplacement, son exposition à des agents
corrosifs tels que des pesticides, des herbicides ou des sels sont tous des
facteurs importants.
• La supervision d'un adulte est recommandée pour le réglage de la hauteur.
• Risque de blessures graves si les dents ou le visage viennent heurter le
panneau, le cerceau ou le filet.
SUIVEZ CES CONSIGNES DE SÉCURITÉ SOUS PEINE DE PROVOQUER DES
BLESSURES GRAVES, DES DÉGÂTS MATÉRIELS ET L'ANNULATION DE LA
GARANTIE..
Le propriétaire doit s'assurer que tous les joueurs connaissent et suivent ces
règles d'utilisation sûre du système.
Par mesure de sécurité, n'essayez pas de monter ce système sans suivre
scrupuleusement les instructions. Un montage, une utilisation et une supervision
corrects et complets sont indispensables à un bon fonctionnement et à la réduction
des risques d'accident ou de blessure. Il existe un haut risque de blessures graves
si ce système n'est pas correctement installé, entretenu et utilisé. Vérifiez bien le
carton et tout le matériel d'emballage pour y trouver toutes les pièces et/ou d'autres
instructions. Avant de commencer le montage, lisez les instructions et identifiez les
pièces à l'aide de la liste d'identification et de la liste des pièces de ce document.
La page est en cours de chargement...

7
1/06 ID# M8801041
IMPORTANT!
Remove all contents from boxes.
Be sure to check inside pole sections,
hardware and additional parts are packed inside.
IMPORTANT
!
Videz entièrement les boîtes.
Veillez à vérifier l'intérieur des sections de poteau. La quincaillerie et
des pièces supplémentaires sont emballées à l'intérieur.
WICHTIG
!
Die Kartons vollständig auspacken.
Den Hohlraum in den Stangenteilen inspizieren. Dort sind Befestigungs-
und andere Kleinteile verpackt.
¡IMPORTANTE
!
Saque todo el contenido de las cajas.
Asegúrese de revisar el interior de las secciones del poste. Ahí se han
empacado herraje y piezas adicionales.
Questions or Missing Parts?
Call TOLL-FREE Customer Service
number listed on the front page!
STOP!STOP!
DON'T go back to the store!
STOP!
Des questions ou des
pièces manquantes ?
Appelez le numéro du service clientèle
(NUMÉRO GRATUIT) qui figure en première page!
STOP!STOP!
STOP!
NE RETOURNEZ PAS au magasin !
Fragen oder fehlende Teile?
Rufen Sie die GEBÜHRENFREIE Telefonnummer
(in den USA und Kanada) auf der Vorderseite an!
HALT!HALT!
Gehen Sie NICHT zum Laden zurück!
HALT!
¿Tiene preguntas o le faltan piezas?
¡Llame al número telefónico GRATUITO de Servicio
al Cliente que se indica en la primera página!
¡ALTO!ALTO!
¡NO regrese a la tienda!
¡ALTO!
WARNING: IF YOUR SYSTEM IS EQUIPPED WITH AN ACRYLIC
BACKBOARD, EXAMINE BACKBOARD FOR ANY DAMAGE THAT MAY
HAVE OCCURRED DURING SHIPMENT. CRACKS IN THE BACKBOARD
COULD RESULT IN SUDDEN BREAKAGE. IF BACKBOARD IS DAMAGED
IN ANY WAY PRIOR TO OR AFTER ASSEMBLY, CALL TOLL-FREE
NUMBER:
U.S. 1-800-558-5234; CANADA: 1-800-284-8339; http://www.huffysports.com
AVERTISSEMENT: SI VOTRE SYSTÈME EST ÉQUIPÉ D'UN PANNEAU EN
ACRYLIQUE, EXAMINEZ-LE BIEN POUR VOUS ASSURER QU'IL N'A PAS
ÉTÉ ENDOMMAGÉ EN COURS DE TRANSPORT. S'IL EST FISSURÉ, IL
RISQUE DE SE CASSER SUBITEMENT. SI LE PANNEAU EST
ENDOMMAGÉ D'UNE QUELCONQUE MANIÈRE AVANT OU APRÈS
L'ASSEMBLAGE, APPELEZ LE NUMÉRO SANS FRAIS :
États-Unis 1-800-558-5234 ; CANADA : 1-800-284-8339 ;
http://www.huffysports.com
WARNUNG: BEI EINEM MIT EINER ACRYL-RÜCKWAND
AUSGESTATTETEN SYSTEM DIE KORBWAND AUF EVENTUELLE
SCHÄDEN UNTERSUCHEN, DIE WÄHREND DES VERSANDS
EINGETRETEN SEIN KÖNNEN. SPRÜNGE IN DER KORBWAND KÖNNEN
ZU DEREN PLÖTZLICHEM BRUCH FÜHREN. WENN DIE KORBWAND
VOR ODER NACH DEM ZUSAMMENBAU IN JEGLICHER WEISE
BESCHÄDIGT WIRD, RUFEN SIE DIE FOLGENDE GEBÜHRENFREIE
TELEFONNUMMER AN:
Innerhalb der USA: 1-800-558-5234; innerhalb KANADAS: 1-800-284-8339;
http://www.huffysports.com
ADVERTENCIA: SI SU SISTEMA ESTÁ EQUIPADO CON UN RESPALDO
DE ACRÍLICO, EXAMINE EL RESPALDO PARA VERIFICAR QUE NO HAYA
SUFRIDO DAÑOS DURANTE EL TRANSPORTE. LA PRESENCIA DE
GRIETAS EN EL RESPALDO PODRÍA OCASIONAR SU ROMPIMIENTO
REPENTINO. SI EL RESPALDO SE DAÑA DE ALGUNA MANERA ANTES
O DESPUÉS DE SU MONTAJE, LLAME AL NÚMERO TELEFÓNICO SIN
COSTO:
EE. UU. 1-800-558-5234; CANADÁ: 1-800-284-8339;
http://www.huffysports.com
ENREGISTREMENT DU PRODUIT :
Rappelez-vous de remplir votre formulaire d'inscription du produit
en ligne sur la page
www.huffysports.com/customer_support/product_registration.
PRODUCT REGISTRATION:
Please remember to complete your product registration form on-
line at:
www.huffysports.com/customer_support/product_registration.
PRODUKTREGISTRIERUNG:
Bitte vergessen Sie nicht, das Produktregistrierungsformular
online unter
www.huffysports.com/customer_support/product_registration
auszufüllen.
REGISTRO DEL PRODUCTO:
Por favor recuerde completar en línea el formulario de registro de
su producto en:
www.huffysports.com/customer_support/product_registration.

8
ID# M8801041 1/06
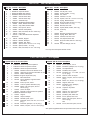
LISTE DES PIÈCES - Voir légende
Légende
Qté No de réf. Description
1 1 FR908143 Section de poteau supérieure
2 1 FR918125 Section de poteau centrale
3 1 FR928407 Section de poteau inférieure
4 2 202800 Moitié du manchon de fixation au sol
5 1 202801 Capuchon du manchon de fixation au sol
6 1 203279 Ruban antidérapant
7 2 90096401 Support de panneau (noir)
8 1 903601 Barre d'armature
9 2 204159 Pince, plastique, support de barre
d'armature
10 5* 203063 Ecrou, Ny-lock, 3/8-16
11 4 904807 Tube du système élévateur (noir)
12 1* 206360 Boulon, tête à six pans, 3/8-16 x
66 mm (long.)
13 1 108142 Levier de cliquet
14 1 204316 Étiquette, fonctionnement du système
FR204316 élévateur à cliquet
15 2 108144 Support
16 2 808152 Cliquet, estampé
17 2 202603 Rondelle, plate, nylon
18 2 204321 Entretoise, acier, D.E. de 1,9 cm x 3 cm
(long.)
19 2 201436 Entretoise, plastique, 1,9 cm (long.)
20 5 201640 Boulon, six pans, 1/2-13 x 18 cm (long.)
Légende
Qté No de réf. Description
21 5 206340 Ecrou, Ny-lock, 1/2-13
22 2 202587 Entretoise, plastique, 2,5 cm (long.)
23 1 206305 Axe d'épaulement
24 2 206303 Rondelle, 63 mm, plate
25 1* 201129 Entretoise, D.I. 1 cm x D.E. 1,27 cm x
4,5 cm (long)
26 1 201125 Ressort, retour de cliquet
27 4 205528 Boulon, six pans, 5/16-18 x 2,54 cm
(long.)
28 1 203796 Boulon à T, 3/8-16 x 12,7 cm (long.)
29 1 900033 Support, Slam Jam
30 2 201681 Entretoise, noire, plastique,
2,23 cm (long.)
31 1 207103 Capuchon de poteau
32 1 Cerceau
33 1 200318 Support, S/J, renforcement
34 1 203472 Ressort, noir, Slam Jam
35 1 203470 Rondelle, plate, Slam Jam
36 1 203795 Écrou, spécial, Slam Jam
37 4 204961 Boulon, tête à six pans, 3/8-16 x
16 mm (long.)
38 1 Filet
39 4* 203100 Ecrou, bride à six pans, 5/16-18
* Des pièces supplémentaires sont peut-être fournies avec ce modèle.
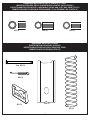
PARTS LIST - See Hardware Identifier
Item Qty. Part No. Description
1 1 FR908143 Top Pole Section
2 1 FR918125 Middle Pole Section
3 1 FR928407 Bottom Pole Section
4 2 202800 Ground Sleeve Half
5 1 202801 Ground Sleeve Cap
6 1 203279 Anti-Skid Tape
7 2 90096401 Backboard Bracket (Black)
8 1 903601 Rebar, Reinforcement Bar
9 2 204159 Clip, Plastic, Rebar Holder
10 5* 203063 Nut, Ny-lock, 3/8-16
11 4 904807 Elevator Tube (Black)
12 1* 206360 Bolt, Hex-Head, 3/8-16 x 2.625 Long
13 1 108142 Pawl Lever
14 1 204316 Label, Ratchet Elevator Operation
FR204316
15 2 108144 Bracket, Support
16 2 808152 Ratchet, Stamped
17 2 202603 Washer, Flat, Nylon
18 2 204321 Spacer, Steel .75 O.D. x 1.19" Long
19 2 201436 Spacer, Plastic, .75" Long
20 5 201640 Bolt, Hex-Head, 1/2-13 x 7.25" Long
Item
Qty. Part No. Description
21 5 206340 Nut, Ny-lock, 1/2-13
22 2 202587 Spacer, Plastic, 1" Long
23 1 206305 Pin, Clevis
24 2 206303 Washer, 1/4", Flat
25 1* 201129 Spacer, .402 I.D. x .5 O.D. x 1.8 Long
26 1 201125 Spring, Ratchet Return
27 4 205528 Bolt, Hex-Head, 5/16-18 x 1" Long
28 1 203796 T-Bolt, 3/8-16 x 5" Long
29 1 900033 Bracket, Slam Jam
30 2 201681 Spacer, Black, Plastic, .88" Long
31 1 207103 Pole Cap
32 1 Rim
33 1 200318 Bracket, S/J Reinforcement
34 1 203472 Spring, Black, Slam Jam
35 1 203470 Washer, Flat, Slam Jam
36 1 203795 Nut, Special, Slam Jam
37 4 204961 Bolt, Hex-Head, 3/8-16 x .625 Long
38 1 Net
39 4* 203100 Nut, Hex-Flange, 5/16-18
* You may have extra parts with this model.
La page est en cours de chargement...

10
ID# M8801041 1/06
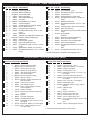
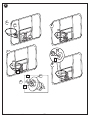
#39 (4)*
#17 (2)
HARDWARE IDENTIFIER (BOLTS & SCREWS)
IDENTIFICATION DES PIÈCES (BOULONS & VIS)
BEFESTIGUNGSTEILESCHLÜSSEL (BOLZEN UND SCHRAUBEN)
IDENTIFICADOR DE HERRAJE (PERNOS Y TORNILLOS)
HARDWARE IDENTIFIER (NUTS & WASHERS)
IDENTIFICATION DES PIÈCES (ÉCROUS & RONDELLES)
BEFESTIGUNGSTEILESCHLÜSSEL (MUTTERN UND UNTERLEGSCHEIBEN)
IDENTIFICADOR DE HERRAJE (TUERCAS Y ARANDELAS)
HARDWARE IDENTIFIER (METAL SPACERS)
IDENTIFICATION DES PIÈCES (ENTRETOISES EN ACIER)
BEFESTIGUNGSTEILESCHLÜSSEL (ABSTANDSSTÜCKE AUS METALL)
IDENTIFICADOR DE HERRAJE (SEPARADORES DE METAL)
#18 (2)
* You may have extra parts with this model.
* Des pièces supplémentaires sont peut-être fournies avec ce modèle.
* Diesem Modell können zusätzliche Teile beigepackt sein.
* Puede haber piezas adicionales en este modelo.
#10 (5)*
#27 (4)
Item #37 (4)
Item #20 (5)
#28 (1)
#36 (1)
#24 (2)
#25 (1)*
#12 (1)*
#35 (1)
#21 (5)
La page est en cours de chargement...
La page est en cours de chargement...

13
1/06 ID# M8801041
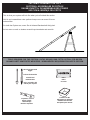
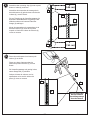
1.
2.
18" (42.7 cm)
6" (15.2 cm)
24" (61 cm)
PLAYING SURFACE
SURFACE DE JEU
SPIELFLÄCHE
SUPERFICIE DE JUEGO
GROUND SURFACE
SURFACE DU SOL
BODENFLÄCHE
SUPERFICIE DEL PISO
CONTACT UTILITIES BEFORE
DIGGING.
CONTACTEZ LES RÉSEAUX LOCAUX
(GAZ, ÉLECTRICITÉ...) AVANT DE
CREUSER.
VOR DEM GRABEN ENTSPRECHENDE
INFORMATIONEN VON DEN
ZUSTÄNDIGEN
VERSORGUNGSWERKEN EINHOLEN.
COMUNÍQUESE CON LAS COMPAÑÍAS
DE SERVICIO ANTES DE EXCAVAR.
WARNING!
AVERTISSEMENT!
ACHTUNG!
¡ADVERTENCIA!
Ensure ground is level with playing surface, then dig pole hole.
Assurez-vous que le sol est au niveau de la surface de jeu, puis
creusez le trou pour le poteau.
Sicherstellen, dass der Boden auf gleicher Höhe mit der
Spielfläche ist und ein Loch für die Stange graben.
Asegúrese de que el piso esté nivelado con la superficie de juego
y luego haga el orificio para el poste.
Correctly identify each pole section. Poles have an identification sticker that will be used as a
reference point in the next step.
Identifiez correctement chaque section de poteau. Les
poteaux ont une étiquette d'identification qui servira de
point de repère à l'étape suivante.
Jedes Stangenteil richtig identifizieren. Die Stangenteile
sind mit Aufklebern markiert, die als Orientierungshilfe
für den nächsten Schritt dienen.
Identifique correctamente cada sección del
poste. Los postes tienen una calcomanía de
identificación que se usará como punto de
referencia en el paso siguiente.
1
2
3
MIDDLE / CENTRALE / MITTE / MEDIA
BOTTOM / INFÉRIEURE / UNTEN / SECCIÓN INFERIOR
TOP / SUPÉRIEURE / OBEN / SUPERIOR
Identification Sticker / Étiquette d'identification
Markierungsaufkleber \ Calcomanías de identificación
Identification Sticker
Étiquette d'identification
Markierungsaufkleber
Calcomanías de identificación
IMPORTANT!
IMPORTANT!
WICHTIG!
¡IMPORTANTE!
Maximum distance from edge of hole to edge of
playing surface 6” (15.2 cm).
Distance maximum du bord du trou au bord de la
surface de jeu 15,2 cm.
Der maximale Abstand vom Rand des Lochs zum
Rand der Spielfläche beträgt 15,2 cm (6").
La distancia máxima desde el borde del orificio
hasta el borde de la superficie de juego debe ser
de 6" (15,2 cm).

14
ID# M8801041 1/06
3.
Snap two halves of ground sleeve (4) together. Insert and secure bottom pole section (3) into ground
sleeve (4) by tightening ground sleeve cap (5).
Enclenchez les deux moitiés du manchon de fixation au sol (4) l'une dans l'autre.
Insérez et fixez la section de poteau inférieure (3) dans le manchon de fixation au sol (4) en serrant le
capuchon du manchon de fixation au sol (5).
Die beiden Hälften der Bodenmuffe (4) zusammendrücken, bis sie ineinander einrasten.
Das untere Stangenteil (3) in die Bodenmuffe (4) stecken und durch Festdrehen der
Bodenmuffenabdeckung (5) gut sichern.
Conecte las dos mitades de la manga del piso (4).
Introduzca y fije la sección inferior del poste (3) en la manga del piso (4) apretando la tapa de la manga
del piso (5).
3
5
4
4
Flared end goes inside ground
sleeve.
L'extrémité évasée rentre dans le
manchon de fixation au sol.
Das konisch erweiterte Ende wird in
die Bodenmuffe gesteckt.
El extremo abocinado debe quedar
dentro de la manga del piso.
NOTE:
REMARQUE:
HINWEIS:
NOTA:

15
1/06 ID# M8801041
IMPORTANT!CONTINUE ON TO NEXT STEP. DO NOT WAIT FOR CONCRETE TO CURE.
IMPORTANT!PASSEZ À L'ÉTAPE SUIVANTE. N'ATTENDEZ PAS LA PRISE DU BÉTON.
WICHTIG!
GLEICH MIT DEM NÄCHSTEN SCHRITT FORTFAHREN. NICHT WARTEN, BIS DER BETON GETROCKNET IST.
¡IMPORTANTE!CONTINÚE CON EL SIGUIENTE PASO. NO ESPERE A QUE EL CONCRETO ENDUREZCA.
4.
Fill hole approximately 1/3 full with
mixed concrete.
Remplissez le trou de béton, au tiers
environ.
Das Loch zu etwa 1/3 mit gemischtem
Beton füllen.
Llene aproximadamente una tercera
parte del orificio con concreto mezclado.
FIG. A
FIG. A
ABB. A
FIG. A
Insert ground sleeve assembly and
center in hole (FIG. A).
Insérez le manchon de fixation au sol en
le centrant dans le trou (FIG. A).
Die Bodenmuffenbaugruppe in das Loch
stecken und darin zentrieren (ABB. A).
Introduzca y centre el conjunto de la
manga del piso en el orificio (FIG. A).
5A.
Leave 1" below flange exposed for drainage hill.
Laissez 2,5 cm exposés sous la bride pour la
butte de drainage.
Unter dem Flansch ca. 2,5 cm für ein Gefälle
zur Wasserableitung freilassen.
Deje 2,5 cm (1") debajo de la brida expuesta
para la pendiente de drenaje.
NOTE:
REMARQUE:
HINWEIS:
NOTA:
1" (2.54 cm)
SIDE VIEW
VUE DE CÔTÉ
SEITENANSICHT
VISTA LATERAL
FLANGE
BRIDE
FLANSCH
BRIDA
PLAYING SURFACE
SURFACE DE JEU
SPIELFLÄCHE
SUPERFICIE DE JUEGO
5B.
IMPORTANT!
IMPORTANT!
WICHTIG!
¡IMPORTANTE!
NOTE POSITION OF FLANGE
NOTEZ LA POSITION DE LA BRIDE
FLANSCHPOSITION BEACHTEN
NOTE LA POSICIÓN DE LA BRIDA

16
ID# M8801041 1/06
3
Fill hole completely with concrete.
Remplissez complètement le trou de béton.
Das Loch vollständig mit Beton füllen.
Llene el orificio completamente con
concreto.
6.
1" (2.54 cm)
5
1
" (2.54 cm)
7.
Tamp down concrete to release air pockets and build drainage hill. Level pole section in all directions several times
while concrete is curing.
Tassez le béton pour éliminer les poches d'air et formez une butte de drainage. Mettez le poteau à niveau plusieurs fois
dans toutes les directions pendant le séchage du béton.
Den Beton feststampfen, um Lufteinschlüsse zu beseitigen, und ein Gefälle zur Wasserableitung bilden. Das
Stangenteil während des Trocknens des Betons mehrmals in alle Richtungen begradigen.
Apisone el concreto para eliminar las bolsas de aire y construya una pendiente para el drenaje. Nivele varias veces
la
sección del poste en todas direcciones mientras el concreto se está endureciendo.
1" (2.54 cm)
SIDE VIEW
VUE DE CÔTÉ
SEITENANSICHT
VISTA LATERAL
DRAINAGE HILL
INCLINAISON DE
DRAINAGE
GEFÄLLE ZUR
WASSERABLEITUN
PENDIENTE DE
DRENAJE
IMPORTANT!CONTINUE ON TO NEXT STEP. DO NOT
WAIT FOR CONCRETE TO CURE.
IMPORTANT!PASSEZ À L'ÉTAPE SUIVANTE. N'ATTENDEZ PAS
LA PRISE DU BÉTON.
WICHTIG!GLEICH MIT DEM NÄCHSTEN SCHRITT FORTFAHREN. NICHT
WARTEN, BIS DER BETON GETROCKNET IST.
¡IMPORTANTE!CONTINÚE CON EL SIGUIENTE PASO. NO ESPERE A QUE EL CONCRETO ENDUREZCA.
PLAYING SURFACE
SURFACE DE JEU
SPIELFLÄCHE
SUPERFICIE DE JUEGO
Make a reference mark here for
anti-skid tape.
Marquez ce point en prévision de
l'application de ruban adhésif.
Hier eine Bezugsmarkierung für
das Fixierband anbringen.
Haga una marca de referencia
aquí para la cinta antiderrapante.
NOTE A:
REMARQUE A:
HINWEIS A:
NOTA A:
Keep flange pushed down to
concrete and leveled.
Maintenez la bride enfoncée
jusqu'au béton et à niveau.
Den Flansch am Beton
angedrückt lassen und nivellieren.
Mantenga la brida presionada
hacia el concreto y nivelada.
NOTE B:
REMARQUE B:
HINWEIS B:
NOTA B:
4

17
1/06 ID# M8801041
After concrete has cured
, remove bottom pole section from ground sleeve (4). Place anti-skid tape (6) around the
bottom area of bottom pole (see note A).
Une fois le béton sec
, retirez la section de poteau inférieure du manchon de fixation au sol (4). Placez du ruban
antidérapant (6) autour de la base du poteau (cf. remarque A).
Nachdem der Beton getrocknet ist
, das untere Stangenteil aus der Bodenmuffe (4) herausziehen. Fixierband (6) um
das untere Ende der unteren Stange wickeln (siehe Hinweis A).
Cuando se endurezca el concreto, separe la sección inferior del poste de la manga del piso (4). Coloque la cinta
antiderrapante (6) alrededor del área inferior de la sección inferior del poste (vea la nota A).
4
8.
5
IMPORTANT!WAIT A MINIMUM OF 24 HOURS BEFORE GOING ON TO NEXT STEP. CONCRETE MUST CURE.
IMPORTANT!ATTENDEZ AU MOINS 24 HEURES AVANT DE PASSER À L'ÉTAPE SUIVANTE. LE BÉTON DOIT FINIR
DE PRENDRE.
WICHTIG!VOR DEM NÄCHSTEN ARBEITSSCHRITT MINDESTENS
24 STUNDEN LANG WARTEN. DER BETON MUSS
TROCKNEN.
¡IMPORTANTE!ESPERE UN MÍNIMO DE 24 HORAS ANTES DE CONTINUAR CON EL PASO SIGUIENTE. EL
CONCRETO DEBE
ENDURECERSE.
Surface de jeu
Spielfläche
Superficie de juego
Keep ground sleeve cap on bottom pole.
Maintenez
le capuchon du manchon de fixation
au sol
sur la section de poteau inférieure
Die Bodenmuffenabdeckung auf der unteren
stange lassen.
Mantenga la
tapa de la manga del piso en la
sección inferior del poste.
IMPORTANT!
IMPORTANT!
WICHTIG!
¡IMPORTANTE!
6
Place top edge of anti-skid tape on
mark made in step 7, NOTE A.
Placez le bord supérieur du ruban
antidérapant sur le repère posé à
l'étape 7,
REMARQUE A
.
Die obere Kante des Fixierbands auf
der in Schritt 7 angebrachten
Markierung ankleben (
HINWEIS A)
.
Coloque el borde superior de la cinta
antiderrapante en la marca que hizo
en el paso 7,
NOTA A
.
NOTE A:
REMARQUE A:
HINWEIS A:
NOTA A:
Tape prevents the pole from rotating
during play.
Le ruban empêche la rotation du
poteau durant le jeu.
Das Fixierband verhindert, dass sich
die Stange während des
Spielbetriebs dreht.
La cinta evita que el poste gire
durante el juego.
NOTE B:
REMARQUE B:
HINWEIS B:
NOTA B:

18
ID# M8801041 1/06
9.
Stack and bounce bottom (3) and middle (2) pole sections together. Bounce pole sections together until middle
section no longer moves toward taped reference mark on bottom pole.
Empilez et entrechoquez les sections de poteau centrale (2) et inférieure (3). Entrechoquez-les jusqu'à ce que la
section centrale ne bouge plus vers la marque de référence (ruban) de la section inférieure.
Das untere (3) und mittlere (2) Stangenteil aufeinander stellen und zusammenstauchen. Die Stangenteile
zusammenstauchen, bis sich die mittlere Stange nicht mehr auf die mit Klebeband markierte Stelle auf dem unteren
Stangenteil zu bewegt.
Apile y golpee entre sí las secciones inferior (3) y media (2) del poste. Golpee entre sí las secciones del poste hasta
que la sección media ya no se mueva hacia la marca de referencia con cinta que se encuentra en la sección inferior
del poste.
2
3
Wood Scrap (NOT SUPPLIED)
Chute de bois (NON FOURNIE)
Holzstück (NICHT IM LIEFERUMFANG ENTHALTEN)
Trozo de madera (NO SE SUMINISTRA)
Identification Sticker
Étiquette d'identification
Markierungsaufkleber
Calcomanías de identificación
IMPORTANT!
IMPORTANT!
WICHTIG!
¡IMPORTANTE!
POLE SECTIONS SHOULD HAVE A
3-1/2" (9 CM) MINIMUM OVERLAP.
LES SECTIONS DE POTEAU
DOIVENT SE CHEVAUCHER DE 9 CM
MINIMUM.
DIE STANGENTEILE MÜSSEN
EINANDER UM MINDESTENS
9 CM (3 ½ ZOLL) ÜBERLAPPEN.
LAS SECCIONES DEL POSTE SE
DEBEN TRASLAPAR UN MÍNIMO DE
3-1/2" (9 CM).
1-1/2"
(3.81 cm)
5"
(12.7 cm)
Keep ground sleeve cap on bottom pole.
Maintenez
le capuchon du manchon de fixation
au sol
sur la section de poteau inférieure
Die Bodenmuffenabdeckung auf der unteren
stange lassen.
Mantenga la
tapa de la manga del piso en la
sección inferior del poste.
IMPORTANT!
IMPORTANT!
WICHTIG!
¡IMPORTANTE!
La page est en cours de chargement...

20
ID# M8801041 1/06
11
SECTION B: ASSEMBLE THE ELEVATOR TUBES TO BACKBOARD
SECTION B: MONTAGE DES TUBES DU SYSTÈME ÉLÉVATEUR SUR LE PANNEAU
BAUABSCHNITT B: MONTAGE DER VERLÄNGERUNGSROHRE AN DER KORBWAND
SECCIÓN B: MONTE LOS TUBOS ELEVADORES EN EL RESPALDO
9/16”
3/4”
1/2”
Identify elevator tubes (11).
Identifiez les tubes du système élévateur (11).
Die Verlängerungsrohre (11) zurecht legen.
Identifique los tubos elevadores (11).
Toward Pole
Vers le poteau
Zur Stange hin
Hacia el poste
Toward Board
Vers le panneau
Zur Korbwand hin
Hacia el tablero
This is what your system will look like
when you’ve finished this section.
Voici à quoi ressemblera votre système
lorsque vous en aurez fini avec cette
section.
So sieht das System aus, wenn Sie mit
diesem Bauabschnitt fertig sind.
Así es como se verá su sistema
cuando haya terminado esta sección.
TOOLS REQUIRED FOR THIS SECTION / OUTILS REQUIS POUR CETTE SECTION / FÜR DIESEN
BAUABSCHNITT BENÖTIGTES WERKZEUG / HERRAMIENTAS REQUERIDAS PARA ESTA SECCIÓN
• (2) 1/2” and (2) 9/16" and (2) 3/4" Wrenches
• (2) clés 1/2" et (2) clés 9/16" et (2) clés 3/4"
• (2) 1/2 und (2) 9/16-Zoll-Schraubenschlüsse
und (2) 3/4-Zoll-Schraubenschlüssell
• (2) Llaves de 1/2", y (2) de 9/16" de 3/4"
• (2) Socket Wrenches and Sockets
• (2) clés à douille et douilles
• (2) Steckschlüssel und Einsätze
• (2) Llaves de tuercas de boca tubular y
casquillos de
AND/OR
ET/OU
UND/ODER
Y/O
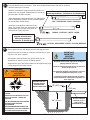
1.
• Pliers
• Pinces
• Zange
• Alicates

21
1/06 ID# M8801041
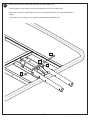
Assemble backboard brackets (7) using bolts (37), and nuts (10) as shown.
Assemblez les supports de panneau (7) à l’aide des boulons (37) et des écrous
(10), comme illustré.
Korbwandklammern (7) wie gezeigt mit Schrauben (37) und Muttern (10)
zusammenbauen.
Monte los soportes del respaldo (7) usando pernos (37) y tuercas (10)
como se muestra.
2.
7
3.
7
Fit spacer (25) into pawl lever (13). Continue to assemble using bolt (12), support brackets (15) and nut (10) as
shown.
Installez l'entretoise (25) dans le cliquet (13). Ensuite, continuez à assemblez avec le boulon (12), les supports (15) et
l'écrou (10), comme illustré.
Das Abstandsstück (25) in die Klinke (13) einpassen. Dann die Montage mit der Schraube (12), den Stützhalterungen (15)
und der Mutter (10) wie gezeigt fortsetzen.
Ajuste el separador (25) en el fiador (13). Luego continúe el montaje
usando un perno (12), soportes (15) y tuerca (10) como se muestra.
IMPORTANT! IMPORTANT!
WICHTIG! ¡IMPORTANTE!
DO NOT TIGHTEN HARDWARE COMPLETELY.
NE SERREZ PAS LA VISSERIE À FOND.
DIE BEFESTIGUNGSTEILE NICHT FEST ANZIEHEN.
NO APRIETE COMPLETAMENTE EL HERRAJE.
10
13
12
15
25
15
37
37
IMPORTANT! IMPORTANT!
WICHTIG! ¡IMPORTANTE!
DO NOT TIGHTEN HARDWARE COMPLETELY.
NE SERREZ PAS LA VISSERIE À FOND.
DIE BEFESTIGUNGSTEILE NICHT FEST ANZIEHEN.
NO APRIETE COMPLETAMENTE EL HERRAJE.
37
37
7
NOTE ORIENTATION
NOTEZ L'ORIENTATION.
DIE KORREKTE
AUSRICHTUNG
BEACHTEN.
NOTE LA ORIENTACIÓN.
10
10

22
ID# M8801041 1/06
4.
Attach lower elevator tubes (11) to backboard brackets (7) using spacers (18, 19 and 22), bolts (20), ratchet (16),
washers (17), and nuts (21) as shown.
Attachez les tubes inférieurs (11) du système élévateur aux supports de panneau (7) à l'aide des entretoises (18, 19 et
22), des boulons (20), du cliquet (16), des rondelles (17) et des écrous (21), comme illustré.
Die unteren Verlängerungsrohre (11) wie gezeigt mit Abstandsstücken (18, 19 u. 22), Schrauben (20), Ratsche (16),
Unterlegscheiben (17) und Muttern (21) an den Korbwandklammern
(7) befestigen.
Conecte los tubos elevadores inferiores (11) en los soportes del
respaldo (7) usando, pernos (20), espaciadores (18, 19, 22), trinquete
(16), arandelas (17), y tuercas (21) como se muestra.
A.
4.
B.
IMPORTANT! IMPORTANT!
WICHTIG! ¡IMPORTANTE!
TIGHTEN ALL HARDWARE FROM STEPS 2 THROUGH
4B COMPLETY. DO NOT OVER TIGHTEN BOLT (20)
AND NUT (21) FROM STEP 3. PAWL MUST MOVE
FREELY.
SERREZ À FOND TOUTE LA VISSERIE DES ÉTAPES 2
À 4B. NE SERREZ PAS TROP LE BOULON (20) ET
L'ÉCROU (21) DE L'ÉTAPE 3. LE CLIQUET DOIT
BOUGER LIBREMENT.
ALLE IN DEN SCHRITTEN 2 BIS 4B BENUTZTEN
BEFESTIGUNGSTEILE JETZT FEST ANZIEHEN. DIE IN
SCHRITT 3 BESCHRIEBENE SCHRAUBE (20) UND
MUTTER (21) NICHT ZU FEST ANZIEHEN. DIE KLINKE
MUSS SICH FREI BEWEGEN KÖNNEN.
APRIETE COMPLETAMENTE TODO EL HERRAJE DE
LOS PASOS 2 AL 4B. NO APRETAR DEMASIADO EL
TORNILLO (20) Y LA TUERCA (21) DE EL PASO
NUMERO 3. EL FIADOR TENT QUE MOVERSE CON
FACILIDAD.
11
17
17
13
21
7
18
11
16
20
19
19
20
21
18
22
IMPORTANT!
IMPORTANT!
WICHTIG!
¡IMPORTANTE!
IMPORTANT! IMPORTANT!
WICHTIG! ¡IMPORTANTE!
DO NOT TIGHTEN HARDWARE COMPLETELY.
NE SERREZ PAS LA VISSERIE À FOND.
DIE BEFESTIGUNGSTEILE NICHT FEST ANZIEHEN.
NO APRIETE COMPLETAMENTE EL HERRAJE.
22

23
1/06 ID# M8801041
5.
Secure pawl lever (13) in place with clevis pin (23) and washers (24).
Fixez le cliquet (13) en position avec l'axe à épaulement (23) et les rondelles (24).
Die Klinke (13) mit dem Lastösenbolzen (23) und den Unterlegscheiben (24) in der Einbauposition
sichern.
Fije el fiador (13) en su lugar con un pasador de horquilla (23) y arandelas (24).
23
24
13
24
La page est en cours de chargement...
La page est en cours de chargement...

26
ID# M8801041 1/06
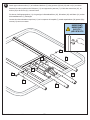
Attach upper elevator tubes (11) to backboard brackets (7) using spacers (30) bolt (20) and nut (21) as shown.
Attachez les tubes supérieurs de l'élévateur (11) aux supports du panneau (7) à l'aide des entretoises (30), du
boulon (20) et de l'écrou (21), comme illustré.
Die oberen Verlängerungsrohre (11) wie gezeigt mit Abstandsstücken (30), Schrauben (20) und Mutter (21) an den
Korbwandklammern (7) befestigen.
Conecte los tubos elevadores superiores (11) en los soportes del respaldo (7) usando espaciadores (30) pernos (20) y
tuercas (21) como se muestra.
8.
20
30
30
21
11
11
11
11
7
IMPORTANT!
IMPORTANT!
WICHTIG!
¡IMPORTANTE!

27
1/06 ID# M8801041
SECTION C: ATTACH THE BACKBOARD & ELEVATOR ASSEMBLY TO POLE SYSTEM
SECTION C: FIXATION DU PANNEAU ET DU SYSTÈME ÉLÉVATEUR AU POTEAU
BAUABSCHNITT C: BEFESTIGUNG DER KORBWAND- UND VERLÄNGERUNGSBAUGRUPPE AM
STANGENSYSTEM
SECCIÓN C: MONTE EL CONJUNTO DEL RESPALDO Y EL ELEVADOR AL SISTEMA DEL POSTE
• (2) 3/4" Wrenches
• (2) clés 3/4"
• (2) 3/4-Zoll-Schraubenschlüssel
• (2) Llaves de 3/4"
3/4”
TOOLS REQUIRED FOR THIS SECTION / OUTILS REQUIS POUR CETTE SECTION / FÜR DIESEN BAUABSCHNITT
BENÖTIGTES WERKZEUG / HERRAMIENTAS REQUERIDAS PARA ESTA SECCIÓN
• Container to Mix
• Récipient pour mélanger
• Behälter zum Mischen
• Recipiente para mezclar
This is what your system will look like when you’ve finished this section.
Voici à quoi ressemblera votre système lorsque vous en aurez fini avec
cette section.
So sieht das System aus, wenn Sie mit diesem Bauabschnitt fertig sind.
Así es como se verá su sistema cuando haya terminado esta sección.
• (2) Socket Wrenches and Sockets
• (2) clés à douille et douilles
• (2) Steckschlüssel und Einsätze
• (2) Llaves de tuercas de boca tubular y
casquillos de
• BÉTON
• BETON
• CONCRETO
AND/OR
ET/OU
UND/ODER
Y/O

28
ID# M8801041 1/06
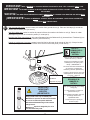
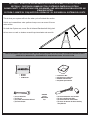
1.
21
11
20
20
21
1
Support pole on sawhorse. Attach backboard assembly to top pole section (1).
Appuyez le poteau sur le banc de sciage. Attachez le panneau à la section de poteau supérieure (1).
Die Stange auf einen Sägebock legen. Die Korbwandbaugruppe am oberen Stangenteil (1) befestigen.
Apoye el poste en un caballete de aserrar. Conecte el conjunto del respaldo en la sección superior del
poste (1).
WARNING!
AVERTISSEMENT!
WARNUNG!
¡ADVERTENCIA!
USE CAUTION; ELEVATOR ASSEMBLY IS HEAVY. TWO
CAPABLE ADULTS REQUIRED FOR THIS PROCEDURE.
FAILURE
TO FOLLOW THIS WARNING COULD RESULT IN SERIOUS
INJURY AND/OR PROPERTY DAMAGE.
SOYEZ PRUDENT, CAR LE SYSTÈME ÉLÉVATEUR EST LOURD.
DEUX ADULTES CAPABLES REQUIS POUR CETTE PROCÉDURE.
SUIVEZ CET AVERTISSEMENT SOUS PEINE D'ENCOURIR DES
BLESSURES GRAVES ET/OU DES DÉGÂTS MATÉRIELS.
BITTE VORSICHTIG ZU WERKE GEHEN; DIE
VERLÄNGERUNGSBAUGRUPPE IST SEHR SCHWER. DIESER
VERFAHRENSSCHRITT MUSS VON ZWEI DAZU IN DER LAGE
BEFINDLICHEN PERSONEN AUSGEFÜHRT WERDEN. EIN
MISSACHTEN DIESER WARNUNG KANN ZU SCHWEREN
VERLETZUNGEN UND/ODER SACHSCHÄDEN FÜHREN.
TENGA CUIDADO; EL CONJUNTO DEL ELEVADOR ES PESADO.
SE REQUIEREN DOS ADULTOS CAPACES PARA REALIZAR
ESTE PROCEDIMIENTO. SI NO SE OBSERVA ESTA
ADVERTENCIA SE PODRÍA OCASIONAR UNA LESIÓN GRAVE
Y/O DAÑOS A LA PROPIEDAD.
IMPORTANT!
IMPORTANT!
WICHTIG!
¡IMPORTANTE!
The Warning Label should be
facing towards the front. Note
orientation.
L'étiquette d'avertissement
doit être tournée vers l'avant.
Notez l'orientation.
Der Warnaufkleber sollte zur
Vorderseite hin zeigen. Die
korrekte Ausrichtung
beachten.
La etiqueta de advertencia
debe quedar orientada hacia el
frente. Note la orientación.
11
11
11
La page est en cours de chargement...
La page est en cours de chargement...
La page est en cours de chargement...
La page est en cours de chargement...
La page est en cours de chargement...
La page est en cours de chargement...
La page est en cours de chargement...
-
 1
1
-
 2
2
-
 3
3
-
 4
4
-
 5
5
-
 6
6
-
 7
7
-
 8
8
-
 9
9
-
 10
10
-
 11
11
-
 12
12
-
 13
13
-
 14
14
-
 15
15
-
 16
16
-
 17
17
-
 18
18
-
 19
19
-
 20
20
-
 21
21
-
 22
22
-
 23
23
-
 24
24
-
 25
25
-
 26
26
-
 27
27
-
 28
28
-
 29
29
-
 30
30
-
 31
31
-
 32
32
-
 33
33
-
 34
34
-
 35
35


dans d''autres langues
- English: Spalding M8801041 User manual
- español: Spalding M8801041 Manual de usuario
- Deutsch: Spalding M8801041 Benutzerhandbuch