Whirlpool EL8ATRRRQ05 Le manuel du propriétaire
- Catégorie
- Frigos
- Taper
- Le manuel du propriétaire
Ce manuel convient également à

REFRIGERATOR
.......... _;,_ :_/:_
For questions about features, operation/perlormance,
pa_s or service, call: 1-800-253-1301.
In Canada, call for assistance 1-800-807-6777,
or visit our website at...
www.whirlpool.com or w_.whirlpool.com/canada
REFRIGERATEUR
Au Canada, pour assistance, composez le 1-800-929-6631.
ou visitez notre site web &
www.whirlpool.com/canada
Table of Contents/Table des mati_res .................. 2
2-60697-001/8210433

TABLEOFCONTENTS
REFRIGERATOR SAFETY ............................................................. 3
Proper Disposal of Your Old Refrigerator .................................... 3
INSTALLATION INSTRUCTIONS .................................................. 4
Unpacking Your Refrigerator ....................................................... 4
Location Requirements ................................................................ 4
Electrical Requirements ............................................................... 5
Refrigerator Door .......................................................................... 5
Adjust the Door ............................................................................ 8
Normal Sounds ............................................................................ 8
REFRIGERATOR USE .................................................................... 8
Ensuring Proper Air Circulation .................................................... 8
Using the Control ......................................................................... 8
REFRIGERATOR FEATURES ........................................................ 9
Refrigerator Shelves ..................................................................... 9
Crispers and Meat Drawer ........................................................... 9
Crisper Humidity Control ............................................................. 9
Door Bin...................................................................................... 10
REFRIGERATOR CARE ............................................................... 10
Cleaning ...................................................................................... 10
Changing the Light Bulb ............................................................ 11
Power Interruptions .................................................................... 11
Vacation and Moving Care ......................................................... 11
TROUBLESHOOTING .................................................................. 11
ASSISTANCE OR SERVICE ......................................................... 13
WARRANTY .................................................................................. 14
TABLEDESMATIERES
Sg:CURITg: DU REFRIGERATEUR .............................................. 15
Mise au rebut de votre vieux refrigGrateur................................. 15
INSTRUCTIONS D'INSTALLATION ............................................ 16
Deballage .................................................................................... 16
Exigences d'emplacement ......................................................... 16
Specifications electriques .......................................................... 17
Porte du refrigerateur ................................................................. 17
Ajustement de porte ................................................................... 20
Sons normaux ............................................................................ 20
UTILISATION DU RI!:FRIGI_RATEUR .......................................... 20
Pour s'assurer d'une circulation d'air appropriee ...................... 20
Utilisation de la commande ........................................................ 21
CARACTI!:RISTIQUES DU RI_FRIGI!:RATEUR ........................... 21
Tablettes du refrigerateur ........................................................... 21
Bacs h legumes et tiroirs h viande ............................................. 21
Reglage de I'humidite dans le bach 16gumes ........................... 22
Balconnet de porte ..................................................................... 22
ENTRETIEN DU RleFRIGleRATEUR ............................................ 23
Nettoyage ................................................................................... 23
Remplacement de I'ampoule d'eclairage .................................. 23
Pannes de courant electrique .................................................... 24
Entretien avant les vacances ou Iors d'un demGnagement.......24
DlePANNAGE ................................................................................. 24
ASSISTANCE OU SERVICE ......................................................... 26
GARANTIE ..................................................................................... 27
2

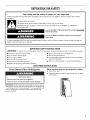
REFRIGERATORSAFETY
Your safety and the safety of others are very important.
We have provided many important safety messages in this manual and on your appliance. Always read and obey all safety
messages.
This is the safety alert symbol.
This symbol alerts you to potential hazards that can kill or hurt you and others.
All safety messages will follow the safety alert symbol and either the word 'DANGER" or WARNING."
These words mean:
You can be killed or seriously injured if you don't immediately/
follow instructions.
You can be killed or seriously injured if you don't follow
instructions.
All safety messages will tell you what the potential hazard is, tell you how to reduce the chance of injury, and tell you what can
happen if the instructions are not followed.
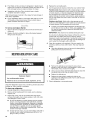
IMPORTANT SAFETY INSTRUCTIONS
WARN ING: To reduce the risk of fire, electric shock, or injury when using your refrigerator, follow these basic precautions:
• Plug into a grounded 3 prong outlet.
• Do not remove ground prong.
• Do not use an adapter.
• Do not use an extension cord.
• Disconnect power before servicing.
• Replace all parts and panels before operating.
• Remove doors from your old refrigerator.
• Use nonflammable cleaner.
• Keep flammable materials and vapors, such as gasoline,
away from refrigerator.
• Use two or more people to move and install refrigeratoi:
SAVE THESE INSTRUCTIONS
Proper Disposal of Your Old Refrigerator
Suffocation Hazard
Remove doors from your old refrigerator.
Failure to do so can result in death or brain damage.
IMPORTANT: Child entrapment and suffocation are not problems
of the past. Junked or abandoned refrigerators are still dangerous
- even if they will sit for "just a few days." If you are getting rid of
your old refrigerator, please follow these instructions to help
prevent accidents.
Before you threw away your old refrigerator or freezer:
• Takeoff the doors.
• Leave the shelves in place so that children may not easily
climb inside.

INSTALLATIONINSTRUCTIONS
Removing packaging materials
• Remove tape and glue residue from surfaces before turning
on the refrigerator. Rub a small amount of liquid dish soap
over the adhesive with your fingers. Wipe with warm water
and dry.
Do not use sharp instruments, rubbing alcohol, flammable
fluids, or abrasive cleaners to remove tape or glue. These
products can damage the surface of your refrigerator. For
more information, see the "Refrigerator Safety" section.
• To remove the protective (tranparent) film that is on the
nameplate, use your fingernail and peel oft the film, stating
from one side and peeling to the other.
• if your refrigerator has a stainless steel or Satina TM Stainless
Look finish, remove the protective film.
When Moving Your Refrigerator:
Your refrigerator is heavy. When moving the refrigerator
for cleaning or service, be sure to protect the floor.
Always pull the refrigerator straight out when moving it.
Do not wiggle or "walk" the refrigerator when trying to move
it, as floor damage could occur.
Cleaning before use
After you remove all of the package materials, clean the inside of
your refrigerator before using it. See the cleaning instructions in
the "Refrigerator Care" section.
important information to know about glass shelves
and covers:
Do not clean glass shelves or covers with warm water when
they are cold. Shelves and covers may break if exposed to
sudden temperature changes or impact, such as bumping.
For your protection, tempered glass is designed to shatter
into many small, pebble-size pieces. This is normal. Glass
shelves and covers are heavy. Use special care when
removing them to avoid impact from dropping.
Explosion Hazard
Keep flammable materiaJa and vapors, such as
gasoline, away from refrigerator.
Failure to do so can result in death, explosion, or fire.
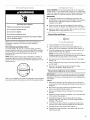
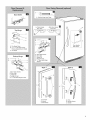
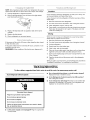
IMPORTANT: Do not install the refrigerator near an oven,
radiator, or other heat source, nor in a location where the
temperature will fall below 40°F (5°C).
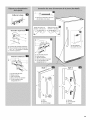
Allow at least 3" (7.5 cm) of air space at the top and on both sides
of the refrigerator and 1" (2.5 cm) between the back of the
refrigerator and the wall. If the refrigerator is to be against a wall,
leave extra space on the hinge side so the door can open wider.
NOTE: This refrigerator may be installed side by side with
another refrigerator or freezer. Allow for a3" (7.5 cm) clearance at
the top and sides and a 1/4"(0.64 cm) clearance between the
appliances.
I
jf
3"(7.5gin)
0
3" (7,5 cm) .25" (6,5 mm) 3" (7.5 cm)
I ntFqF-mlnI
U
4

Electrical Shock Hazard
Plug into a grounded 3 prong outlet.
Do not remove ground prong,
Do not use an adapter.
OO not use an extension cord,
Failure to follow these instructions can result in death,
tire, or electrical shock.
Before you move your refrigerator into its final location, it is
important to make sure you have the proper electrical
connection.
Recommended grounding method
A 115 Volt, 60 Hz., AC only 15- or 20-amp fused, grounded
electrical supply is required. It is recommended that a separate
circuit serving only your refrigerator be provided. Use an outlet
that cannot be turned off by a switch. Do not use an
extension cord.
NOTE: Before performing any type of installation, cleaning, or
removing a light bulb, turn the Temperature Control to the off
position as shown and then disconnect the refrigerator from the
electrical source.
<1
When you are finished, reconnect the refrigerator to the electrical
source and reset the Temperature Control to the desired setting.
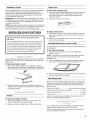
TOOLS NEEDED: s/_6"hex-head socket wrench, 5/8"hex-head
socket wrench, 1/4"hex-head socket wrench, 1/2"hex-head socket
wrench, 3/8"hex-head socket wrench, #2 Phillips screwdriver, flat-
blade screwdriver, s/_6"open-end wrench, flat 2" putty knife.
IMPORTANT:
• All graphics referenced in the following instructions are
included later in this section after "Final Steps." The graphics
shown are for a right-hand swing door (hinges factory
installed on the right).
• If you only want to remove and replace the door, see the
"Remove Door and Hinges" and "Replace Door and Hinges."
• Before you begin, turn the control OFF, and remove food and
adjustable door or utility bins from door.
Remove Door and Hinges
5/Ie" Hex-Head Hinge Screw
1,
2.
3,
Unplug refrigerator or disconnect power.
Open refrigerator door and remove base grille from the
bottom front of the refrigerator. See Base Grille Graphic 1A.
Close the refrigerator door and keep it closed until you are
ready to lift it free from the cabinet.
NOTE: Provide additional support for the door while the
hinges are being moved. Do not depend on the door magnets
to hold the door in place while you are working.
4. Remove the parts for the top hinge as shown in Top Hinge
Graphic lB.
5. Lift the refrigerator door free from the lower hinge and cabinet
and set aside.
6.
Remove 3 hex head hinge screws and bottom hinge
assembly. See Bottom Hinge Graphic 1C.
Reverse Door (optional on some models)
IMPORTANT: If you want to reverse your door so that it opens in
the opposite direction, continue with "Reverse Door (optional)"
instructions. If you are not reversing the door, see "Replace Door
and Hinges."
Cabinet
1. Remove the cabinet hinge hole plugs from the cabinet top
and move them to the opposite side hinge holes as shown in
Graphic 2.
2. Remove the door stop screws from the Bottom Hinge
bracket. See Bottom Hinge Graphic 1C
3. Remove the Hinge Pin Nut and Hinge Pin from the hinge
bracket.
4. Rotate the hinge bracket for installation on the opposite side
of the cabinet. See Graphic 3
5. Reinstall the Hinge Pin Nut and Hinge Pin to the hinge
bracket. Hinge Pin must point "up" when hinge bracket is
installed to the cabinet.
6. Invert the door stop so that the countersunk holes line up
with the screw holes in the hinge assembly. See Graphic 4
7. Reinstall the door stop screws. See Graphic 3.
8. Reinstall the hinge assembly to the cabinet with the 3 hex
head hinge screws.

Handle
Move the door handle from one side of the door to the other.
Style 1
1. Loosen set screws located on side of handle at each end.
See Graphic 1-1.
2. Remove handle from grommets.
3. Using a 1/4"hex-head socket wrench, remove the grommets
from the door.
4. Position the grommets on the opposite side of the door and
reinstall.
5. Position the handle over grommets on the opposite side of
the refrigerator door.
6. Ensure grommets are fitted into handle holes.
7. Tighten the upper and lower set screws with hex key
provided. Do not overtighten set screws.
Style 2
1. Slide the handle up and off the clips. See Graphic 1-2.
2. Using a flat-blade screwdriver, remove the screws from the
clips and remove the clips from the door.
3. Position the clips on the opposite side of the refrigerator door
and reinstall the screws.
4. Position handle overthe clips.
5. Apply even pressure and push down to lock in place.
Replace Door and Hinges
NOTE: Graphic may be reversed if door swing is reversed.
1. Replace the parts for the bottom hinge as shown and tighten
screws. See Bottom Hinge Graphic 1C. Replace the
refrigerator door.
NOTE: Provide additional support for the door while the
hinges are being moved. Do not depend on the door magnets
to hold the door in place while you are working.
2. Assemble the parts of the top hinge as shown in the Top
Hinge Graphic 1B. Do not tighten the screws completely.
3. Line up the door so that the bottom aligns evenly with the
cabinet. Tighten all screws.
Final Steps
1. Check all holes to make sure that hole plugs and screws are
in place. Reinstall top hinge cover. See Top Hinge
Graphic lB.
2. Replace the base grille. See Base Grille Graphic 1A.
Electrical Shock Hazard
Plug into a grounded 3 prong outlet,
Do not remove ground prong,
Do not use an adapter.
DO not use an extension cord,
Failure to follow these instructions can result in death,
fire, or electrical shock.
3. Plug into a grounded 3 prong outlet.
4. Reset the control. See "Using the Control."
5. Return all removable door parts to door and food to
refrigerator.
6

Base Grille
Top Hinge
A, Top Hinge Cover
B. 3/_,,or % " Hex-Head Hinge
Screws (depending on model)
D. Top Hinge
Bottom Hinge
A .................
.......... C
A. Door Stop Screws
B. Door Stop
C. Hinge Pin
D. Hinge Pin Nut
E. 5/_,,Hex-Head Hinge Screws
Left Hand Hinge Right Hand Hinge
__ _. . . _DoorStop Door Stop
D
E
A, Door Stop Screws
B. Door Stop
C, Hinge Pin
D. Hinge Pin Nut
E. 5h_"Hex-Head Hinge
Screws
Style 1
\
t
A Grommet
B. Handle
C. Set Screws
/
t
/
/
/
/
/
Door Handle
Seal Screw
Style 2
A. Clips
B. Handle Screws
C. Handle

1. Locate the two front leveling legs taped among the packing
materials.
2. Screw these legs into the front holes on the bottom of the
refrigerator. The back of the refrigerator rests on two fixed
supports.
3. Adjust the front legs just enough to lift the cabinet up off of
the floor.
NOTE: if your model is equipped with rollers, the front legs
should be lowered enough to lift the rollers off of the floor to
ensure the refrigerator does not roll forward when the door is
opened.
Place a leveling tool on top of the refrigerator first side to
side, then front to back. Turn leg counterclockwise to
raise a corner. Turn leg clockwise to lower a corner.
4. Repeat Step 4 until refrigerator is level.
5. After refrigerator is fully loaded with food, recheck with level
as in Step 4.
Your new refrigerator may make sounds that your old one didn't
make. Because the sounds are new to you, you might be
concerned about them. Most of the new sounds are normal. Hard
surfaces, like the floor, walls, and cabinets, can make the sounds
seem louder. The following describes the kinds of sounds and
what may be making them.
• Your refrigerator is designed to run more efficiently to keep
your food items at the desired temperatures and to minimize
energy usage. The high efficiency compressor and fans may
cause your refrigerator to run longer than your old one. You
may also hear a pulsating or high-pitched sound from the
compressor or fans adjusting to optimize performance.
• You may hear the evaporator fan motor circulating air through
the refrigerator compartment. The fan speed may increase as
you open the doors or add warm food.
• Rattling noises may come from the flow of refrigerant, the
water line, or items stored on top of the refrigerator.
• Water dripping on the defrost heater during a defrost cycle
may cause a sizzling sound.
• As each cycle ends, you may hear a gurgling sound due to
the refrigerant flowing in your refrigerator.
• Contraction and expansion of the inside walls may cause a
popping noise.
• You may hear air being forced over the condenser by the
condenser fan.
• You may hear water running into the drain pan during the
defrost cycle.
REFRIGERATORUSE
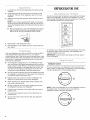
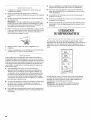
In order to ensure proper temperature, you need to permit proper
airflow in the refrigerator. As shown in the illustration, cool air
enters through the refrigerator wall and moves down. The air then
recirculates through the vent near the bottom.
Do not block any of these vents with food packages, if the vents
are blocked, airflow will be prevented, and temperature and
moisture problems may occur.
IMPORTANT: To prevent odors and drying out of food, wrap or
cover foods tightly.
Setting the Control
For your convenience, your refrigerator control is preset at the
factory. When you first install your refrigerator, make sure that the
control is still preset to the mid-setting as shown.
<1
NOTE: To turn your refrigerator off, turn the refrigerator control to
the setting shown. Your product will not cool when the
refrigerator control is set to the off position.
<1
8

Adjusting the Control Crisper Cover
Give the refrigerator time to cool down completely before adding
food. It is best to wait 24 hours before putting food into the
refrigerator. The control is set correctly when milk or juice is as
cold as you like. Move the dial one setting at a time and wait
24 hours between adjustments.
IMPORTANT: If you add food before the refrigerator has cooled
completely, your food may spoil. Turning the Temperature Control
to a colder (higher) than recommended setting will not cool the
compartment any faster.
NOTE: During high humidity, moisture may form on the outside of
the refrigerator. To prevent rust, dry the refrigerator's exterior and
reset the Temperature Control to a colder (higher) setting.
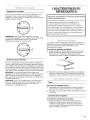
To remove the crisper(s) cover:
1. Remove crisper(s). Hold the glass insert firmly with one hand
and press up in the center of the glass insert until it rises
above the plastic frame. Carefully slide the glass insert
forward to remove.
2. Lift the cover frame and remove it.
REFRIGERATORFEATURES
Important information to know about glass shelves
and covers:
Do not clean glass shelves or covers with warm water when
they are cold. Shelves and covers may break if exposed to
sudden temperature changes or impact, such as bumping.
For your protection, tempered glass is designed to shatter
into many small, pebble-size pieces. This is normal. Glass
shelves and covers are heavy. Use special care when
removing them to avoid impact from dropping.
To replace crisper cover:
1. Fit the back of the cover frame into the supports on the side
walls of the refrigerator. Lower the front of the cover frame
into place.
2. Slide the rear of the glass insert into the cover flame and
lower the front into place.
Adjustable Meat Drawer (on some models)
The meat drawer can be placed on either the right or left side of
the refrigerator.
To move the meat drawer:
1. Remove the meat drawer and cover. See "Refrigerator
Shelves" section.
Store similar foods together and adjust the shelves to fit different
heights. This reduces the time the refrigerator door is open and
saves energy.
To remove and replace a shelf:
1. Remove the shelf by pulling it forward slightly to align the
shelf stops with the openings in the refrigerator compartment
liner. Lift straight up, and pull the shelf out the rest of the way.
NOTE: The meat drawer cover has one fixed support that runs
down the center of the shelf. The outside support is the
adjustable one.
2. Using a Phillips scrawdriver, remove the adjustable support
and move it to the other side of the meat drawer cover.
........s///
#
3. Place the meat drawer cover in the desired location and slide
the meat drawer back into position.
Meat Storage Guide
2. Replace the shelf by lowering the shelf stops through the
openings in the refrigerator compartment liner. Slide the shelf
in the rest of the way.
Dmwem
To remove and replace a drawer:
1. Slide drawer straight out to the stop. Lift the front of the
drawer and slide it out the rest of the way.
2. Replace a drawer by sliding it back in fully past the stop.
Store most meat in original wrapping as long as it is airtight and
moisture-proof. Rewrap if necessary. See the following chart for
storage times. When storing meat longer than the times given,
freeze the meat.
Fresh fish or shellfish ......................... use same day as purchased
Chicken, ground beef, variety meats (liver) ...................... 1-2 days
Cold cuts, steaks/roasts .................................................. 3-5 days
Cured meats ................................................................... 7-10 days
Leftovers - Cover leftovers with plastic wrap, aluminum foil, or
place in containers with tight fitting lids.
( !: *.* t} i_ ,t_i_}
You can adjust the amount of humidity in the moisture-sealed
crisper using the settings between HIGH and LOW.
LOW (open) lets moist air out of the crisper for best storage of
fruits and vegetables with skins.

• Fruit:Wash,letdryandstoreinrefrigeratorinplasticbagin 4.
crisper.Donotwashorhullberriesuntiltheyarereadytouse. 5.
Sortandkeepberriesinoriginalcontainerincrisper.
• Vegetableswithskins:Placeinplasticbagorplastic
containerandstoreincrisper.
HIGH(closed)keepsmoistairinthecrisperforbeststorageof
fresh,leafyvegetables.
• Leafyvegetables:Washincoldwater,drainandtrimortear
offbruisedanddiscoloredareas.Placeinplasticbagor
plasticcontainerandstoreincrisper.
Toremove and replace the bin:
1. Remove the bin by tipping the front of the bin forward and
sliding out.
2. Replace the bin by sliding it in above the desired support
tilting it back into place.
6.
REFRIGERATOR CARE
Replace the removable parts.
Use the appropriate cleaning method for your exterior finish.
Painted metal: Wash exteriors with a clean sponge or soft
cloth and a mild detergent inwarm water. Do not use abrasive
or harsh cleaners, or cleaners designed for stainless steel.
Dry thoroughly with a soft cloth. For additional protection
against damage to painted metal exteriors, apply appliance
wax (or auto paste wax) with a clean, soft cloth. Do not wax
plastic parts.
Stainless steel finish: Wash with a clean sponge or soft
cloth and a mild detergent inwarm water. Do not use abrasive
or harsh cleaners. Dry thoroughly with a soft cloth.
• To keep your stainless steel refrigerator looking like new
and to remove minor scuffs or marks, it is suggested that
you use the manufacturer's approved Stainless Steel
Cleaner & Polish.
IMPORTANT: This cleaner is for stainless steel parts only[
Do not allow the Stainless Steel Cleaner & Polish to come into
contact with any plastic parts such as the trim pieces,
dispenser covers or door gaskets. If accidental contact does
occur, clean plastic part with a sponge and mild detergent in
warm water. Dry thoroughly with a soft cloth.
Clean the condenser coils regularly. Coils may need to be
cleaned as often as every other month. This may help save
energy.
• Open the refrigerator door and remove the base grille by
pulling down and out from the top.
.t _ "
Explosion Hazard
Use nonflammable cleaner.
Failure to do so can result in death, explosion, or fire.
Clean the refrigerator about once a month to prevent odors from
building up. Wipe up spills immediately.
To clean your refrigerator:
1. Unplug refrigerator or disconnect power.
2. Remove all removable parts from inside, such as shelves,
crispers, etc.
3. Hand wash, rinse, and dry removable parts and interior
surfaces thoroughly. Use a clean sponge or soft cloth and a
mild detergent in warm water.
• Do not use abrasive or harsh cleaners such as window
sprays, scouring cleansers, flammable fluids, cleaning
waxes, concentrated detergents, bleaches or cleansers
containing petroleum products on plastic parts, interior
and door liners or gaskets. Do not use paper towels,
scouring pads, or other harsh cleaning tools. These can
scratch or damage materials.
• To help remove odors, you can wash interior walls with a
mixture of warm water and baking soda (2 tbs to 1 qt
[26 g to 0.95 L] of water).
• Remove the defrost pan and clean it using a clean
sponge or soft cloth and a mild detergent in warm water.
Hand wash, rinse, and dry it thoroughly.
• Use a vacuum with an extended attachment to clean the
condenser coils when they are dusty or dirty.
• Replacethe defrost pan.
• Replace the base grille by putting the clips in the
openings in the refrigerator panel. Push in until the base
grille snaps into place.
7. Plug in refrigerator or reconnect power.
10

NOTE: Not all appliance bulbs will fit your refrigerator. Be sure to
replace the bulb with one of the same size, shape, and wattage.
1. Unplug refrigerator or disconnect power.
2. Remove the light shield. From the front of the light shield,
push backward and down.
3. Replace the light bulb with an appliance bulb of the same
wattage.
4. Replace the light shield.
5. Plug in refrigerator or reconnect power.
If the power will be out for 24 hours or less, keep the door closed
to help food stay cold.
If the power will be out for more than 24 hours, consume or can
perishable food at once.
REMEMBER: If the condition of the food is poor, dispose of it.
Vacations
If you choose to leave the refrigerator on while you're away, use
up any perishables and freeze other items.
If you choose to turn the refrigerator off before you leave, follow
these steps.
1. Remove all food from the refrigerator.
2. Turn the control to the off position. See "Using the Control."
3. Clean refrigerator, wipe it, and dry well.
4. Tape rubber or wood blocks to the tops of both doors to prop
them open far enough for air to get in. This stops odor and
mold from building up.
Moving
When you are moving your refrigerator to a new home, follow
these steps to prepare it for the move.
1. Remove all food from the refrigerator.
2. Turn the Control to the off position. See "Using the Control."
3. Unplug refrigerator.
4. Empty water from the defrost pan.
5. Clean, wipe, and dry thoroughly.
6. Take out all removable parts, wrap them well, and tape them
together so they don't shift and rattle during the move.
7. Screw in the leveling legs so they don't scrape the floor. See
"Door Closing."
8. Tape the doors shut and the power cord to the refrigerator
cabinet.
When you get to your new home, put everything back and refer to
"installation Instructions" for preparation instructions.
TROUBLESHOOTING
Try the solutions suggested here first in order to avoid the cost of an unnecessary service call.
Your refrigerator will not operate
Electrical Shock Hazard
Plug into a grounded 3 prong outlet,
Do not remove ground prong.
DO riot use an adapter.
DO not use an e×tenaioR cord,
Failure to follow these instructions can result in death,
fire, or electrical shock.
• Has a household fuse blown or circuit breaker tripped?
Replace the fuse or reset the circuit.
• Is the Refrigerator Control turned to the OFF position?
See "Using the Control."
• Is the refrigerator defrosting? Recheck to see whether the
refrigerator is operating in 30 minutes. Your refrigerator will
regularly run an automatic defrost cycle.
• Is the power supply cord unplugged? Plug into a grounded
3 prong outlet.
11

The lights do not work The refrigerator seems to make too much noise
Electrical Shock Hazard
P_uginto a grounded 3 prong outlet.
Do not remove ground prong.
Do not use an adapter.
Do not use an extension cord.
Failure to follow these instructions can result in death,
fire, or electrical shock.
Is the power supply cord unplugged? Plug into a grounded
3 prong outlet.
Is a light bulb loose in the socket or burned out? See
"Changing the Light Bulb."
• The sounds may be normal for your refrigerator.
See "Normal Sounds."
Temperature is too warm
• Are the air vents blocked? Remove any objects from in front
of the air vents. See "Ensuring Proper Air Circulation" for the
location of air vents.
There is water in the defrost drain pan
• Is the refrigerator defrosting? The water will evaporate. It is
normal for water to drip into the defrost pan.
• Is it more humid than normal? Expect that the water in the
defrost pan will take longer to evaporate. This is normal when
it is hot or humid.
The motor seems to run too much •
Are the door(s) opened often? Be aware that the refrigerator
will warm when this occurs. In order to keep the refrigerator
cool, try to get everything you need out of the refrigerator at
once, keep food organized so it is easy to find, and close the
door as soon as the food is removed.
Is the room temperature hotter than normal? Expect the
motor to run longer under warm conditions. At normal room
temperatures, expect your motor to run about 40% to 80% of
the time. Under warmer conditions, expect it to run even
more of the time.
Has a large amount of food just been added to the
refrigerator? Adding a large amount of food warms the
refrigerator. It can take several hours for the refrigerator to
return to the normal temperature.
Has a large amount of food just been added to the
refrigerator? Adding a large amount of food warms the
refrigerator. It is normal for the motor to run longer in order to
cool the refrigerator back down. See "Refrigerator Features."
• Are the doors opened often? Expect the motor to run longer
when this occurs. In order to conserve energy, try to get
everything you need out of the refrigerator at once, keep food
organized so it is easy to find, and close the door as soon as
the food is removed.
Is the control set correctly for the surrounding
conditions? See "Using the Control."
There is interior moisture buildup
• Are the air vents blocked in the refrigerator? Remove any
objects from in front of the air vents. See "Ensuring Proper Air
Circulation" for the location of air vents.
Is the door opened often? To avoid humidity buildup, try to
get everything you need out of the refrigerator at once, keep
food organized so it is easy to find, and close the door as
soon as the food is removed. (When the door is opened,
humidity from the room air enters the refrigerator. The more
often the door is opened, the faster humidity builds up,
especially when the room itself is very humid.)
Is the room humid? It is normal for moisture to build up
inside the refrigerator when the room air is humid.
Is the food packaged correctly? Check that all food is
securely wrapped, if necessary, repackage food according to
the guidelines in "Refrigerator Features." Wipe off damp food
containers before placing in the refrigerator.
Is the control set correctly for the surrounding
conditions? See "Using the Control."
Was a self-defrost cycle completed? It is normal for
droplets to form on the back wall after the refrigerator self-
defrosts.
• Is the control set correctly for the surrounding
conditions? See to "Using the Control."
• Are the doors closed completely? Push the doors firmly
shut. If they will not shut all the way, see "The doors will not
close completely" later in this section.
• Are the condenser coils dirty? This prevents air transfer and
makes the motor work harder. Clean the condenser coils. See
"Refrigerator Care."
NOTE: Due to its high-efficiency motor, your new refrigerator will
run longer than your old one.
12

The door is difficult to open or will not close completely
_! ±; _
• Are food packages blocking the door open? Rearrange
containers so that they fit more tightly and take up less
space.
• Are the crisper cover, pans, shelves, bins, or baskets out
of position? Put the crisper cover and all pans, shelves, bins,
and baskets back into their correct positions. See
"Refrigerator Features" for more information.
• Does the refrigerator wobble or seem unstable? Level the
refrigerator. See "Door Closing."
Explosion Hazard
Use nonflammable cleaner.
Failure to do so can result in death, e×ploaioe, or tire.
• Are the gaskets dirty or sticky? Clean gaskets according to
the directions in "Refrigerator Care."
ASSISTANCEORSERVICE
Before calling for assistance or service, please check
"Troubleshooting." It may save you the cost of a service call. If
you still need help, follow the instructions below.
When calling, please know the purchase date and the complete
model and serial number of your appliance. This information will
help us to better respond to your request.
If You Need Replacement Parts
if you need to order replacement parts, we recommend that you
only use factory specified parts. Factory specified parts will fit
right and work right, because they are made with the same
precision used to build every new WHIRLPOOL ®appliance.
To locate factory specified parts in your area, call us or your
nearest designated service center.
Call customer service toll free in the U.S.A. toll free:
1-800-253-1301 Monday to Friday 8:00 a.m. -- 8:00 p.m. (EST).
Saturday 8:00 a.m. -- 4:30 p.m. (EST). In Canada call toll free:
1-800-807-6777 Monday to Friday 8:00 a.m. -- 6:00 p.m.
For Further Assistance
If you need further assistance, you can write to us with any
questions or concernt at:
Whirlpool Brand Customer Service
RO. Box 310
Ottawa, OH 45875-0310
13

SIDEKICEALLREFRIGERATORWARRANTY
Warranter: WC Wood Company Inc., 677 Woodland Drive, Ottawa, OH 45875
ONE YEAR LIMITED WARRANTY
For one year from the date of purchase, when this major appliance is operated and maintained according to instructions attached to or
furnished with the product, warrantor will pay for factory specified parts and repair labor to correct defects in materials or workmanship.
Service must be provided by a designated service company.
ITEMS WARRANTOR WILL NOT PAY FOR
1. Service calls to correct the installation of your major appliance, to instruct you how to use your major appliance, to replace or repair
house fuses or to correct house wiring or plumbing.
2. Service calls to repair or replace appliance light bulbs, air fikers or water filters. Those consumable parts are excluded from warranty
coverage.
3. Repairs when your major appliance is used for other than normal, single-family household use.
4. Damage resulting from accident, alteration, misuse, abuse, fire, flood, acts of God, improper installation, installation not in
accordance with electrical or plumbing codes, or use of products not approved by warrantor.
5. Any food loss due to refrigerator or freezer product failures.
6. Replacement parts or repair labor costs for units operated outside the United States or Canada.
7. Pickup and delivery. This major appliance is designed to be repaired in the home.
8. Repairs to parts or systems resulting from unauthorized modifications made to the appliance.
9. Expenses for travel and transportation for product service in remote locations.
10. The removal and reinstallation of your appliance if it is installed in an inaccessible location or is not installed in accordance with
published installation instructions.
DISCLAIMER OF IMPLIED WARRANTIES; LIMITATION OF REMEDIES
CUSTOMER'S SOLE AND EXCLUSIVE REMEDY UNDER THIS LIMITED WARRANTY SHALL BE PRODUCT REPAIR AS PROVIDED
HEREIN. IMPLIED WARRANTIES, INCLUDING WARRANTIES OF MERCHANTABILITY OR FITNESS FOR A PARTICULAR PURPOSE,
ARE LIMITED TO ONE YEAR OR THE SHORTEST PERIOD ALLOWED BY LAW. WARRANTOR SHALL NOT BE LIABLE FOR
INCIDENTAL OR CONSEQUENTIAL DAMAGES. SOME STATES AND PROVINCES DO NOT ALLOW THE EXCLUSION OR LIMITATION
OF INCIDENTAL OR CONSEQUENTIAL DAMAGES, OR LIMITATIONS ON THE DURATION OF IMPLIED WARRANTIES OF
MERCHANTABILITY OR FITNESS, SO THESE EXCLUSIONS OR LIMITATIONS MAY NOT APPLY TO YOU. THIS WARRANTY GIVES
YOU SPECIFIC LEGAL RIGHTS AND YOU MAY ALSO HAVE OTHER RIGHTS, WHICH VARY FROM STATE TO STATE OR PROVINCE
TO PROVINCE.
Outside the 50 United States and Canada, this warranty does not apply. Contact your authorized dealer to determine if another
warranty applies.
If you need service, first see the "Troubleshooting" section of the Use & Care Guide. After checking "Troubleshooting," additional help
can be found by checking the "Assistance or Service" section or by calling 1-800-253-1301 in the U.S.A. In Canada,
call 1-800-807-6777. 10/05
Keep this book and your sales slip together for future
reference. You must provide proof of purchase or installation
date for in-warranty service.
Write down the following information about your major appliance
to better help you obtain assistance or service if you ever need it.
You will need to know your complete model number and serial
number. You can find this information on the model and serial
number label located on the product.
Dealer name
Address
Phone number
Model number
Serial number
Purchase date
14

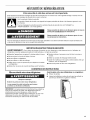
SECURIT] DUP FRIGERATEUR
Votre securite et celle des autres est trbs importante.
Nous donnons de nombreux messages de securit6 importants dans ce manuel et sur votre appareil menager. Assurez-vous de
toujours lire tousles messages de securite et de vous y conformer.
Voici le symbole d'alerte de securit&
Ce symbole d'alerte de securite vous signale les dangers potentiels de deces et de blessures graves h vous
eta d'autres.
Tous les messages de securite suivront le symbole d'alerte de securite et le mot DANGER" ou
"AVERTISSEMENT". Ces mots signifient :
Risque possible de d6cbs ou de blessure grave si vous ne
suivez pas imm6diatement lee instructions.
Risque possible de decOe ou de bleeeure grave ei voue
ne euivez pae les instructions.
Tous les messages de securite vous diront quel est le danger potentiel et vous disent comment reduire le risque de blessure et
ce qui peut se produire en cas de non-respect des instructions.
IMPORTANTES INSTRUCTIONS DE SECURITE
AVERTISSEMENT : Pour reduire les risques d'incendie, de choc 61ectrique ou des blessures Iors de I'utilisation du
refrigerateur, prendre quelques precautions fondamentales, y compris les suivantes :
• Brancher I'appareil sur une prise h 3 alveoles reliee h la terre.
• Ne pas enlever la broche de liaison h la terre.
• Ne pas utiliser un adaptateur.
• Ne pas utiliser un c&ble de rallonge.
• Utiliser deux ou plus de personnes pour deplacer et installer
le refrigerateur.
• Debrancher la source de courant electrique avant I'entretien.
• Replacer pieces et panneaux avant de faire la remise en
marche.
• Utiliser un produit de nettoyage ininflammable.
• Garder les materiaux et les vapeurs inflammables, telle que
I'essence, loin du refrigerateur.
• Enlever les portes de votre vieux refrigerateur.
CONSERVEZ CES INSTRUCTIONS
Mise au rebut de votre vieux r6frig6rateur
Avant de jeter votre vieux r6frig6rateur ou cong61ateur :
• Enlever les portes.
• Laisser les tablettes en place de sorte que les enfants ne
peuvent pas facilement se glisser h I'interieur.
IMPORTANT : L'emprisonnement et I'etouffement des enfants ne
sont pas un probl&,me du passe. Les re,frigerateurs jetes ou
abandonnes sont encore dangereux, m_me s'ils sont
abandonnes pendant "quelques jours seulement". Si vous vous
debarrassez de votre vieux refrigerateur, veuillez suivre les
instructions suivantes pour aider h 6viter les accidents.
15

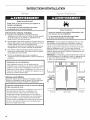
INSTRUCTIONSD' STALIATION
Risque du poids e×cessif
Utiiiser deu× uu plus de personnes pour d_placer et
installer le refrigerateur.
Le nun-respect de cette instruction peut causer
une blessure au dos ou d'autre blessure.
Enl_vernent des mat_riaux d'emballage
• Enlever le ruban adh_sif et la colle des surfaces du
r_frig6rateur avant de le brancher. Frotter une petite quantit_
de savon liquide pour la vaisselle sur I'adh6sif avec les
doigts. Rincer & I'eau tiede et essuyer.
Ne pas utiliser d'instruments coupants, d'alcool & friction, de
liquides inflammables ou de nettoyants abrasifs pour enlever
le ruban adh6sif ou la colle. Ces produits peuvent
endommager la surface de votre r6frig6rateur. Pour plus de
renseignements, voir la section "S_curit6 du r6frig6rateur".
Pour enlever la pellicule (transparente) de protection sur la
plaque de la marque, utiliser vos ongles et retirer la pellicule
en proc_dant d'un c6t6 & I'autre.
Si le fini du r6frig6rateur est en acier inoxydable ou
d'apparence acier inoxydable Satina TM, enlever la pellicule de
protection.
D_placement de votre r_frig_rateur :
Votre r6frig_rateur est Iourd. Lots du d_placement du
refrig6rateur pour le nettoyage ou le service, veiller & prot_ger
le plancher. Toujours tirer le refrigerateur tout droit Iors du
d6placement. Ne pas incliner ie refrig6rateur d'un cSte ou de
I'autre ni le "faire marcher" en essayant de le d_placer car le
plancher pourrait _tre endommag&
Nettoyage avant rutilisation
Apr_s avoir enlev_ tousles mat6riaux d'emballage, nettoyer
I'int6rieur du r6frig6rateur avant de I'utiliser. Voir les instructions
de nettoyage dans la section "Entretien du r6frig6rateur".
Importants renseignements a savoir au sujet des tabiettes
et des couvercles en verre :
Ne pas nettoyer les tablettes ou couvercies en verre avec de
I'eau tiede quand ils sont fluids. Les tablettes et les
couvercles peuvent se briser s'ils sont exposes a des
changements soudains de temperature ou a un impact tel
que coup brusque. Pour votre protection, is verre trempe est
concu pour eclater en d'innombrables pieces minuscules.
Ceci est normal. Les tablettes et les couvercles en verre sont
Iourds. Un soin special s'impose Iors de leur d_placement
pour eviter I'impact d'une chute.
Risque d'explosion
Garder les materiaux et les vapeurs inflammables, telle
que I'essence, loin du r_frig_rateur.
Le non-respect de cette instruction peut causer
un d_c_s, une explosion ou un incendie.
IMPORTANT : Ne pas installer le r_frig6rateur pres d'un four,
d'un radiateur ou d'une autre source de chaleur, ni dans un
endroit o_ la temp6rature baissera au-dessous de 40°F (5°C).
Laisser un espace d'au moins 3" (7,5 cm) en haut et des deux
c6tes du r6frig6rateur et de 1" (2,5 cm) entre I'arri_re du
r6frig6rateur et le tour. Si le r6frig6rateur dolt _tre contre un mur,
laisser un espace plus grand du cbt_ des charnieres pour que
la porte puisse s'ouvrir plus.
REMARQUE :Ce refrigemteur peut _tre installe c6te & cTte avec
un autre r6frigerateur ou cong61ateur. Laisser un d6gagement de
3" (7,5 cm) sur le dessus et les c6t6s etun d6gagement de
1¼,,(0,64 cm) entre les appareils.
I
311(7,5 crn)
"1
]
3" (7,5 cm)
C3LJ
j/
0,25" (5,5 ram)
E
I
3" (7,5 crn)
16

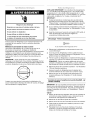
Risque de choc _lectrique
Brancher sur une prise _ 3 alv_oles reii_,e _ la terre,
Ne pas enlever la broche de liaison a la terre.
Ne pas utiliser un adaptateur.
Ne pas utiliser un c_ble de rallonge.
Le non-respect de ees instructions peut causer
ue d_c_s, ue incendie ou un choc _ectrique.
Avant de placer le r6frig6rateur _ son emplacement final, il est
important de vous assurer d'avoir la connexion 61ectrique
appropri6e.
Methode recommandee de raise _ la terre
Une source d'alimentation de 115 volts, 60 Hz, type 15 ou
20 amperes CA seulement, prot6g6e par fusibles et
ad6quatement mise & la terre est n6cessaire. II est recommand6
d'utiliser un circuit distinct pour alimenter uniquement votre
r6frig_rateur. Utiliser une prise murale qui ne peut pas 6tre mise
hors circuit & I'aide d'un commutateur. Ne pas employer de
rallonge.
REMARQUE : Avant d'ex6cuter tout type d'installation,
nettoyage ou remplacement d'une ampoule d'6clairage, tourner
la temperature a la position Off (arr6t) tel qu'illustr6 et d&brancher
ensuite le r6frig6rateur de la source d'alimentation _lectrique.
<1
Lorsque vous avez termin6, reconnecter le r6frig6rateur & la
source d'alimentation electrique et mettre de nouveau le r6glage
de la temperature au r_glage d6sir&
OUTILLAGE NleCESSAIRE : Cle &douille & t6te hexagonale de
%6", cl_ & douille & t_te hexagonale de %", el_ & douille &t6te
hexagonale de 1/4",cl6 & douille &t6te hexagonale de 1/2",cle &
douille #.t6te hexagenale de %", tournevis Phillips n° 2, tournevis
&lame plate, cl6 plate de 5_6" ceuteau &mastic plat de 2".
IMPORTANT :
• Toutes les illustrations mentionn6es dans les instructions
suivantes sont incluses plus loin dans cette section apr6s
"€:tapes finales". Les illustrations correspondent & une porte
s'ouvrant & droite (charni6res installees & droite & I'usine).
• Si vous d6sirez seulement enlever et r6installer la porte, voir
"D6montage - Porte et charni_res" et "R6installation - Porte
et charni_res".
• Avant de commencer, tourner la commande a OFF (arr6t), et
retirer les aliments et tout balconnet r6glable ou
compartiment utilitaire des portes.
D_rnontage - Porte et charnibres
Vis de charniere a t#te hexagonale de 5/_e"
1. D6brancher le refrig_rateur ou deconnecter la source de
courant electrique.
2. Ouvrir la porte du r6frig6rateur et 6ter la grille de la base
situ6e a I'avant de la partie inf6rieure du r6frig6rateur. Voir la
grille de la base sur I'illustration 1A.
3. Fermer la porte du r6frig6rateur; la maintenir ferm6e jusqu'au
moment o_ on est pr6t & la s6parer de la caisse de I'appareil.
REMARQUE : Pr_voir un support additionnel de la porte
pendant la r_installation des charni_res. La force d'attraction
des aimants de la porte ne suffit pas & la maintenir en place.
4. Retirer les pi_ces de la charni_re superieure - voir I'illustration
1B de la charni_re sup6rieure.
5. Soulever la porte du r6frig_rateur pour la s6parer de la
charni_re inferieure et de la caisse et la conserver &part.
6. Retirer les trois vis de charni_re & t6te hexagonale et la
charni6re inf_rieure. Voir I'illustration 1C de la charniere
inf_rieure.
Inversion du sens d'ouverture de la porte (facultatif - sur
certains modules)
IMPORTANT : Si vous souhaitez inverser le sens d'ouverture de
la porte, suivre les instructions de la section "Inversion du sens
d'ouverture de la porte (facultatif)". S'il n'est pas n_cessaire de
changer I'orientatien de la porte, voir "R6installatien - Porte et
charnieres".
Caisse
1. Enlever les bouchons d'ebturation des trous de charni_re au
sommet de la eaisse; transf_rer ceux-ci dans les treus de
charniere du c6t6 oppos6 (voir I'illustration 2).
2. Retirer les vis de but6e de porte de la charni6re.
3. Retirer I'_crou de I'axe de la eharni_re et I'axe de la eharniere.
4. Faire piveter la charni_re pour installer la porte sur le c6t_
oppes6 de la caisse.
5. Reinstaller I'_crou de I'axe de la charni6re et I'axe de la
eharniere. L'axe de la charni6re dolt pointer vers le haut
Iorsque la charni_re est install_e sur la caisse.
17

6. Inverser la butee de porte de facon & ce que les fraisures
soient alignees avec les trous des vis sur la charni6re. Voir
I'illustration 4.
7. R6installer les vis de butee de porte. Voir I'illustration 3.
8. R6installer la charniere sur la caisse _ I'aide des trois vis de
charniere & tete hexagonale.
Poignee
Retirer la poign6e et la transferer d'un c6te _ I'autre de la porte.
Style 1
1. Degager les vis de montage situees sur le cete de la poign6e
& chaque extremit& Voir Graphic 1-1.
2. Retirer la poignee des ceillets.
3. A I'aide d'une cle & douille & tete hexagonale de 1/4"retirer les
ceillets de la porte.
4. Place les ceillets sur le c6te oppose de la porte du
congelateur et r6installer.
5. Placer la poign6e sur les ceillets sur le c6t6 oppose de la
porte du refrigerateur.
6. Verifier que les ceillets sont face aux trous de la poignee.
7. Serrer les vis de montage superieures et inferieures & I'aide
de la cle &tete hexagonale fournie. Ne pas serrer
excessivement les vis de montage.
Style 2
1. Faire glisser la poignee vers le haut hors des brides des
attaches. Voir I'illustration 1-2.
2. A I'aide d'un tournevis & lame plate, eter les vis des attaches
et retirer les attaches de la porte.
3. Placer les attaches sur le cete oppos6 de la porte du
refrigerateur et reinstaller les vis.
4. Placer la poign6e sur les attaches.
5. Appliquer une pression uniforme et pousser vers le bas pour
bloquer la poignee en place.
R_installation - Porte et charni_res
REMARQUE : Si on inverse le sens d'ouverture de la porte,
considerer I'image symetrique.
1. Replacer les pieces de la eharniere inferieure tel qu'illustre et
serrer les vis. Voir I'illustration de la charni6re inf6rieure.
Reinstaller la porte du r6frigerateur.
REMARQUE : Prevoir un support additionnel de la porte
pendant la reinstallation des eharnieres. La force d'attraction
des aimants de la porte ne suffit pas & la maintenir en place.
2. Assembler les pieces de la charniere superieure (volt
I'illustration de la charniere sup6rieure). Ne pas
completement serrer les vis.
3. Aligner la porte de fa£on & ce que la ligne inferieure soit de
niveau avec la caisse. Serrer toutes les vis.
Etapes finales
1. Inspecter tousles trous. Verifier que tousles bouchons
d'obturation et vis sont en place. Reinetaller le couvercle de
la charni_re sup6rieure. Voir I'illustration 1B de la charniere
superieure.
2. Reinstaller la grille de la base. Voir la grille de la base sur
I'illustration 1A.
Risque de choc dlectrique
Brancher sur une prise _ 3 aiveoles reliee a la terre,
Ne pas enlever la broche de liaison a la terre.
Ne pas utiliser un adaptateur.
Ne pas utiliser un c_ble de ranonge.
Le non-respect de ces instructions peut causer
un decks, un incendie ou un choc electrique.
3. Brancher sur une prise & 3 alveoles reli6e & la terre.
4. Reinitialiser les commandes. Voir"Utilisation des
commandes".
5. Reinstaller I'ensemble des pieces amovibles de la porte et
remettre les aliments dans le refrigerateur.
18

A............ _V
A. Bouchons d'obturation des trous
de chamiere de la caisse
B
C ......................
°4
A, Vis de but#e de porte
B. But#e de porte
C. Axe de chami#re
D. Ecrou de I'axe de charni#re
E. Vis de chami#re # t#.te
hexagonale de 5/_,,
I
/
/
/
/D
Q
Vis de scellement
de poign#e de porte
Style 1
Style 2
;%
A EL=illet
B. Poign#e
C. Vis de montage
A. Attaches
B. Vis de po_nee
C. Poignee
19

1. Localiser les 2 pieds de nivellement h I'avant, joints aux
mat@iaux d'emballage.
2. Visser ces pieds dans les trous avant, h la base du
refrig@ateur. L'arri6re du refrig@ateur repose sur deux appuis
fixes.
3. Ajuster les pieds avant juste assez pour soulever le meuble
au-dessus du sol.
REMARQUE : Si votre mod61e est _quip6 de roulettes, les
pieds avant doivent 6tre suffisamment abaiss6s pour mettre
les roulettes hors service et s'assurer que le refrig@ateur ne
roule pas vers I'avant Iorsqu'on ouvre la porte.
4.
Placer un niveau au sommet du r6frig6rateur d'abord de c6t6
h c6te, puis de I'avant h I'arri_re. Tourner le pied dans le sens
antihoraire pour soulever un coin. Tourner le pied dans le
sens horaire pour abaisser un coin.
5. R6p6ter 1'6tape 4 jusqu'h ce que le r6frig@ateur soit
d'aplomb.
6. Lorsque le r6frig@ateur est compl_tement rempli d'aliments,
rev6rifier avec un niveau comme h 1'6tape 4.
L'eau qui d6goutte sur le dispositif de chauffage durant le
programme de d_givrage peut produire un gr6sillement.
A la fin de chaque programme, vous pouvez entendre un
gargouillement attribuable au refrigerant qui se trouve dans
votre r6frig6rateur.
La contraction et I'expansion des parois internes peuvent
produire un bruit sec.
Vous pouvez entendre de I'air forcer sur le condenseur par le
ventilateur du condenseur.
• Vous pouvez entendre I'_coulement de I'eau dans le plat de
r6cup6ration d'eau de d6givrage pendant le programme de
d6givrage.
UTILISATION
DUREFRIGERATEUR
Pour s'assurer d'avoir des temp@atures appropri6es, il faut
permettre h I'air de circuler dans le r6frig@ateur. Comme I'indique
I'illustration, I'air froid p6n6tre dans tout le refrig@ateur et se
d6place vers le bas. L'air recircule ensuite par 1'6vent pres de la
base.
II est possible que le r6frig@ateur neuf emette des bruits que
I'appareil pr6c6dent ne produisait pas. Comme ces bruits sont
nouveaux, ils peuvent vous inqui6ter. La plupart de ces nouveaux
bruits sont normaux. Des surfaces dures comme le plancher, les
murs et les armoires peuvent faire paraftre les bruits plus forts
qu'en r6alit& Les descriptions suivantes indiquent le genre de
bruits et leur origine.
• Votre refrig@ateur est con£u pour fonctionner plus
efficacement afin de garder les aliments h la temp@ature
d6sir6e et pour minimiser la consommation d'6nergie. Le
compresseur et les ventilateurs tr_s efficaces peuvent faire
fonctionner votre r6frig@ateur plus Iongtemps que I'ancien.
Vous pouvez aussi entendre des bruits saccad6s ou aigus
provenant du compresseur et des ventilateurs qui s'ajustent
pour optimiser la performance.
• Vous pouvez entendre le moteur du ventilateur d'evaporation
qui fait circuler I'air dans le r6frig6rateur. La vitesse du
ventiiateur peut augmenter si on ouvre lee portes ou si on
ajoute des aliments chauds.
• Les vibrations sonores peuvent provenir de I'_coulement du
r6frig@ant, de la canalisation d'eau ou d'articles places sur le
r_frig6rateur.
Ne pas obstruer I'une ou I'autre de ces ouvertures d'a@ation
avec des aliments emball6s. Si les ouvertures d'a@ation sont
bloqu6es, le courant d'air sera coupe et des probl_mes de
temperature et d'humidit6 peuvent survenir.
IMPORTANT : Pour emp6cher le transfert d'odeurs et
I'ass_chement dee aliments, envelopper ou recouvrir
herm_tiquement les aliments.
20
La page est en cours de chargement...
La page est en cours de chargement...
La page est en cours de chargement...
La page est en cours de chargement...
La page est en cours de chargement...
La page est en cours de chargement...
La page est en cours de chargement...
La page est en cours de chargement...
-
 1
1
-
 2
2
-
 3
3
-
 4
4
-
 5
5
-
 6
6
-
 7
7
-
 8
8
-
 9
9
-
 10
10
-
 11
11
-
 12
12
-
 13
13
-
 14
14
-
 15
15
-
 16
16
-
 17
17
-
 18
18
-
 19
19
-
 20
20
-
 21
21
-
 22
22
-
 23
23
-
 24
24
-
 25
25
-
 26
26
-
 27
27
-
 28
28


Whirlpool EL8ATRRRQ05 Le manuel du propriétaire
- Catégorie
- Frigos
- Taper
- Le manuel du propriétaire
- Ce manuel convient également à
dans d''autres langues
- English: Whirlpool EL8ATRRRQ05 Owner's manual
