Essential Style SYM008TSCCP Guide d'installation
- Catégorie
- Articles sanitaires
- Taper
- Guide d'installation
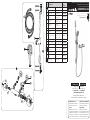
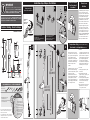
Vous trouverez ci-dessous de brèves informations pour Valve thermostatique essential style SYM008TSCCP-v02, Ensemble de barre glissière et douchette null null. Ce manuel fournit des informations sur l'installation, l'utilisation et l'entretien de la valve thermostatique avec ensemble de douche à main sur glissière. Il comprend des instructions de calibrage de la température, une liste des pièces de rechange et des consignes de sécurité importantes concernant l'utilisation de la barre coulissante. Le document indique qu'il ne faut pas utiliser la barre coulissante comme barre d'appui et donne des instructions sur l'entretien du produit afin de préserver son apparence.
Vous trouverez ci-dessous de brèves informations pour Valve thermostatique essential style SYM008TSCCP-v02, Ensemble de barre glissière et douchette null null. Ce manuel fournit des informations sur l'installation, l'utilisation et l'entretien de la valve thermostatique avec ensemble de douche à main sur glissière. Il comprend des instructions de calibrage de la température, une liste des pièces de rechange et des consignes de sécurité importantes concernant l'utilisation de la barre coulissante. Le document indique qu'il ne faut pas utiliser la barre coulissante comme barre d'appui et donne des instructions sur l'entretien du produit afin de préserver son apparence.


-
 1
1
-
 2
2


Essential Style SYM008TSCCP Guide d'installation
- Catégorie
- Articles sanitaires
- Taper
- Guide d'installation
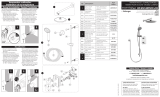
Vous trouverez ci-dessous de brèves informations pour Valve thermostatique essential style SYM008TSCCP-v02, Ensemble de barre glissière et douchette null null. Ce manuel fournit des informations sur l'installation, l'utilisation et l'entretien de la valve thermostatique avec ensemble de douche à main sur glissière. Il comprend des instructions de calibrage de la température, une liste des pièces de rechange et des consignes de sécurité importantes concernant l'utilisation de la barre coulissante. Le document indique qu'il ne faut pas utiliser la barre coulissante comme barre d'appui et donne des instructions sur l'entretien du produit afin de préserver son apparence.
dans d''autres langues
Documents connexes
Autres documents
-
H2flo FCKTS5016MB Guide d'installation
-
-
-
Keeney KITQUA140TSCP06 Guide d'installation
-
-
-
-
-
-
 Quik KIT-126STPVTCP Guide d'installation
