Kalia 104240 Mode d'emploi
- Catégorie
- Articles sanitaires
- Taper
- Mode d'emploi

MAX MIN
MAX MIN
Conserver ce guide après l’installation car il contient des informations utiles
pour le service et la garantie.
Keep these instructions after you have nished the installation, it contains useful
information regarding service and warranty.
Numéro de série/Serial number
104358_RevA 08/18
Instructions d’installation - Garantie
Installation Instructions - Warranty
www.KaliaStyle.com
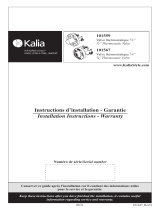
104240
Sélecteur 2 voies ½’’ / ½ ’’
2-way Diverter
104268
Sélecteur 2 voies ½’’
(Green)
½’’
2-way Diverter (Green)
104269
Sélecteur 3 voies ½’’ / ½’’
3-way Diverter
104270
Sélecteur 3 voies ½’’
(Green)
½’’
3-way Diverter (Green)

2
104358_RevA
Instruction Part list_Shower Faucets_RevN.xlsx
* Diverter Valve 104240-68-69-70 *
[ /Users/karine/Desktop/Instruction Part list_Shower Faucets_RevN.xlsx ]
104240
104268
Green
104269
104270
Green
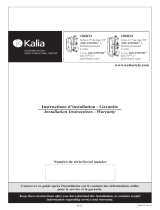
1103937
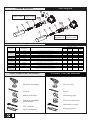
Couvercle de plastique / Plastic cover 1111
1111
2101755
Vis M4-7x11mm / Screw M4-7x11mm 1111
3103939
Pignon dentelé / Stem adaptor 1111
- 4 103940
Bonnet fileté / Threaded bonnet 1111
-5A 104241
Cartouche régulière 2 voies / 2-way regular cartridge 1
-5B 104242
Cartouche régulière 2 voies Green / Green 2-way regular cartridge 1
- 6 103941
Corps de la valve sélecteur 2-3voies ½''
2 / 3-ways divereter body Valve ½''
1111
-7A 104243
Cartouche régulière 3 voies / 3-way regular cartridge 1
-7B 104244
Cartouche régulière 3 voies Green / Green 3-way regular cartridge 1
- 8 101769 Bouchon de sortie / Outlet cap 1 1
- 9 104557
Rondelle en caoutchouc OD19mm x ID12mm x 3mm /
Rubber washer OD19mm x ID12mm x 3mm
1 1
103938
-Diverter Valve 1/2 104240 - 104268 (Green) - 104269 - 104270 (Green)
Assemblage
Assembly #Numéro de pièce
Part Number Description
Qté totale / Total qty
Schéma des pièces Parts Diagram
Liste des pièces Parts List
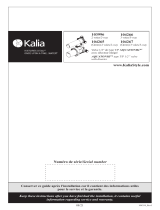
Outils et matériaux nécessaires Necessary Tools and Materials
Perceuse électrique
Crayon
Ruban à mesurer
Ruban d’étanchéité
pour letage
Clé à molette
Pince multiprise
Electric drill
Pencil
Measuring tape
Thread sealant tape
Adjustable wrench
Gripping pliers
104268 (Green)
2 voies / 2-way
104240
2 voies / 2-way
MAX MIN
1
2
3
4
5A 5B
6
8
9
104270 (Green)
3 voies / 3-way
104269
3 voies / 3-way
MAX MIN
1
2
3
4
7B
6
3 1
2
3 1
2
7A

3
104358_RevA
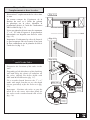
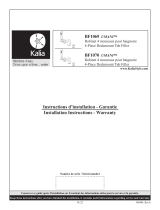
Étape 1 - Déterminer
l’emplacement et xer la valve
Déterminer l’emplacement de la valve dans
le mur.
En tenant compte de l’épaisseur de la
nition du mur et à l’aide du gabarit
de plastique sur la valve, identier la
profondeur désirée à l’aide de l’indication
MIN et MAX (g. 1.1).
Fixer une planche de bois entre les montants
2’’ x 4’’ à l’aide d’équerre à la profondeur
déterminée sur laquelle sera xée la valve
(g. 1.2).
Important : Positionner la valve de façon à
ce que la marque IN soit l’entrée d’eau puis
la xer solidement sur la planche de bois à
l’aide de vis (g. 1.4).
MAX
MIN
Fig. 1.1
MAX
MIN
Fig. 1.2
Fig. 1.3
31
2
31
2
MAX MIN
Fig. 1.4
104240
2 voies /
2-way
104269
3 voies /
3-way
Step 1 - Determine Location
and Fix the Valve
Determine the location of the valve in the
wall.
Depending of the thinckness of the nishing
wall and using the plastic x template on
the valve, identify the desire depth with
MIN and MAX indication (g. 1.1).
Fix a wooden board between the 2’’ x 4’’
studs with angle bracket as per the depth
chosen previously to x the valve on it (g.
1.2).
Important : Position the valve to put the
mark IN as the water inlet then rmly x
the valve on the wooden board with screws
(g. 1.4).

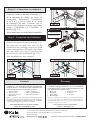
Étape 2 - Connection et validation
Connecter l’entrée et les sorties d’eau (g. 2.1).
Il est important de valider que toutes les
connections fonctionnent correctement
et qu’il n’y a pas de fuites d’eau avant
la fermeture du mur. S’assurer que le
couvercle de plastique demeure en position
jusqu’à l’installation de l’ensemble de
nition (g. 2.2).
Votre installation est maintenant complétée!
Step 2 - Connexion and Validation
Connect the water inlet and outlets (g. 2.1).
It’s important to make sure that all the
connections are working properly to avoid
water leaking before closing the wall. Make
sure the plastic cover stays in position until
the decorative trim installation (g. 2.2).
Your installation is now complete!
R
FERMÉ / OFF
etirer la cartouche
avant de souder
Remove the cartridge
before the welding
ATTENTION / WARNING
!
R
FERMÉ / OFF
etirer la cartouche
avant de souder
Remove the cartridge
before the welding
ATTENTION / WARNING
!
R
FERMÉ / OFF
etirer la cartouche
avant de souder
Remove the cartridge
before the welding
ATTENTION / WARNING
!
Imprimé en Chine/Printed in China 104358_RevA
GARANTIE À VIE LIMITÉE POUR LES SYSTÈMES DE
DOUCHE KALIA À L’EXCEPTION DES COMPOSANTES
SUIVANTES DONT LA GARANTIE EST POUR 1 AN :
• Jets de corps
• tête de pluie
• pomme de douche
• douchette
• Boyau flexiBle
• rail pour douchette
• Bec de Bain mural
Kalia inc. garantit à vie sa robinetterie de salle de bain contre
tout défaut de matériel ou de fabrication dans des conditions
normales d’utilisation et d’entretien tant et aussi longtemps
que l’acheteur/propriétaire possède sa résidence.
Pour information sur la garantie complète,
visitez le www.KaliaStyle.com
LIFETIME LIMITED WARRANTY ON KALIA SHOWER
SYSTEMS EXCEPT 1 YEAR LIMITED WARRANTY FOR
THE FOLLOWING COMPONENTS :
• Body jets
• Rainhead
• showeRhead
• handshoweR
• FlexiBle hose
• wallBaR
• tuB spout
Kalia Inc. guarantees all aspects of its bathroom faucets
to be free of defects in material and workmanship for
normal residential use for as long as the original consumer/
purchaser owns his or her home.
For complete warranty information,
visit www.KaliaStyle.com
Garantie Warranty
1355, 2e Rue, Parc Industriel, Sainte-Marie (Québec) G6e 1G9
T 418 387-9090 / 1 877 GO KALIA (1 877 465-2542)
F 418 387-9089
KaliaStyle.com
-
 1
1
-
 2
2
-
 3
3
-
 4
4


Kalia 104240 Mode d'emploi
- Catégorie
- Articles sanitaires
- Taper
- Mode d'emploi
dans d''autres langues
- English: Kalia 104240 User guide
Documents connexes
-
Kalia BF1179-120-200 Mode d'emploi
-
Kalia BF1434-110-201 Mode d'emploi
-
 Kalia BF1338-110-100 Mode d'emploi
-
 Kalia BF1651 Mode d'emploi
-
Kalia BF1493-110-001 Mode d'emploi
-
Kalia BF1648 Mode d'emploi
-
Kalia BF1708-110-101 Mode d'emploi
-
 Kalia BF2067-001 Mode d'emploi
-
Kalia BF1249-120 Mode d'emploi
-
 Kalia BF1069 Guide d'installation


