
INSTRUCTION
MANUAL
WWW.BNK-GLOBAL.COM
INFO@BNK-GLOBAL.COM

001/002
003
005
007
009
011
012
Thanks for choosing BNK .
For your SAFETY, please read this manual
before using the product. Thanks.
IMPORTANT
I.WALL-HUNG TOILET
II.INSTALLATION GUIDE
III.CHART OF TOILET INSTRUCTION
IV.ONE-PIECE DUAL FLUSH TOILET
V.SEAT INSTALL ATION
VI.CARE AND CLEANING

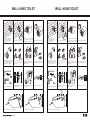
5. As per drawing, L1 is distance
between the two lines on straight
tube.L2 is distance between the
two lines on connecting pipe
003/004
WALL-HUNG TOILET WALL-HUNG TOILET
2. Draw the lines as above picture
1. Fully insert straight tube
into cistern flushing outlet
and connecting pipe into
discharging outlet.
3. Apply lubricant on rubber washers
of straight tube and connecting
pipe,then insert into ceramic holes.
4. Draw the lines as above picture
6. Cut the straight tube and
connecting pipe as per above
drawing.
7. Polishing the cutting surface to
get chamfer angle as per drawing
and deburring
8. Apply lubricant on joint surface of
straight and connecting pipe.
9. Five accessories: part A.B.C.D.E
10. Fix the part B into the screw as
the above picture
11. Put part C into the installing
hole on the pan
12. Insert the part C into Part B.
13. Fix part into the hole on part C by tool part A .
14.Cover part E on the hole of the pan
5. As per drawing, L1 is distance
between the two lines on straight
tube.L2 is distance between the
two lines on connecting pipe
2. Draw the lines as above picture
1. Fully insert straight tube
into cistern flushing outlet
and connecting pipe into
discharging outlet.
3. Apply lubricant on rubber washers
of straight tube and connecting
pipe,then insert into ceramic holes.
4. Draw the lines as above picture
6. Cut the straight tube and
connecting pipe as per above
drawing.
7. Polishing the cutting surface to
get chamfer angle as per drawing
and deburring
8. Apply lubricant on joint surface of
straight and connecting pipe.
9. Five accessories: part A.B.C.D.E
10. Fix the part B into the screw as
the above picture
11. Put part C into the installing
hole on the pan
12. Insert the part C into Part B.
13. Fix part into the hole on part C by tool part A .

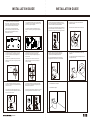
INSTALLATION GUIDE
WALL
cen ter of cl oset fl ange
305mm
(12")
3- Dessinez un guide en forme de croix qui se
trouve à 305 mm ( 12’’ ) de la parois du mur. Il
faut que le guide soit centré par rapport à la
parois du mur.
3- Draw a cross guideline at the point which is
305mm (12”) away from the roughing in center
to the wall.
Mak e sure th e posit ion of th e holes b y
fol lowin g the Ste p 1 and Ste p 2. Plac e
the s even- type br acket s follo wing St ep 3.
Step 3
Ste p 3:
pla ce seve n-typ e brack ets
in th e line fr ame
WAL L
Step 2 :
Dril l the bol es to
fix ex pansi on blot .
cent er of clo set fla nge
Ste p 1:
cen ter of cl oset fl ange,
cut a long th e dotte d line.
mounting bracket
Toilet
180 mm
(7" )
102 mm
(4" )
110m m
8mm
8mm
40m m
305 mm
(12 ")
135 mm
42m m
(5- 1/4")
(7- 1/2")
190 mm
4- Selon la feuille d’instruction, découpez la
sortie du drain qui se trouve sur la feuille
d’instruction. Puis placer le papier alignez sur
la bride du sol.
4- According to the instruction, cut the drain
outlet from the paper, and then put the paper
on the floor flange.
5- Selon l’emplacement indiqué sur la feuille
d’instruction, percez deux trous (Diamètre 8mm)
pour les vis du sol.
5- According to the instructed location in the
instruction, drill two holes (diameter of which is
8 mm) for the floor screws.
10- Serrez les vis de la toilette puis mettre les
chapeaux.
10. Tighten the toilet bowl mounting screws and
then put on the caps.
11- L’installation est complété.
11. Installation complete.
9- Mettre le bol de toilette par desssus par
bride de plancher et ajuster la toilette afin
qu’elle soit proche de la parois du mur.
9- Put the toilet bowl above the floor flange
and adjust the toilet bowl to be closed to wall.
8- Installer la cire à l' orifice d'évacuation de
cuvette de toilettes.
8- Stick the wax to the drain hole of toilet bowl.
wax
sil
i
c
o
n
e
7- Ajustez les équerres d’installation et serrez
les vis. Il faut s’assurer qu’il y a 206 mm ( 8 1/8’’ )
entre le bord des équerres d’installation.
7- Adjust the mounting brackets and then tighten
the screws. Make sure that it is 206mm (8 - 1 / 8”)
between the out edge of the seven-type brackets.
6- Insérez les manchons en plastique puis fixez
les des équerres d’installation de type sept puis
installez les vis à plancher.
6- Insert the plastic sleeves, attach the seven-type
mounting brackets and install the floor screws.
silicone
2- Voici la liste des outils qui seront nécessaire à
l’installation: perceuse,marteau, tournevis, colle
pour le verre, règle triangulaire ...
2- The tools required for installation are: Drill,
hammer ,screwdriver, glue for glass, Triangular
rule ...
1- La dimensions des équerres d’installation
de type sept , vis à plancher (70 mm φ 6mm),
manchons en plastique( 60mm φ 8mm) et la
vis de montage de toilette ( 90mm φ 4mm)
1- Size of seven-type mounting brackets,
floor screws (70mm, φ6mm), plastic sleeves
(60mm, φ 8mm) and toilet bowl mounting
screws (90mm, φ 4mm).
INSTALLATION GUIDE
005/006

007/008
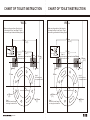
CHART OF TOILET INSTRUCTION
Make sure the position of the holes by
following the Step 1 and Step 2. Place
the seven-type brackets following Step 3.
Step 3
Step 3:
place seven-type brackets
in the line frame
WALL
Step 2:
Drill the boles to
fix expansion blot.
center of closet flange
Step 1:
center of closet flange,
cut along the dotted line.
mounting bracket
Toilet
180mm
(7")
102mm
(4")
110mm
8mm
8mm
40mm
305mm
(12")
135mm
42mm
(5-1/4")
(7-1/2")
190mm
8mm
40mm
305mm
(12")
Make sure the position of the holes by
following the Step 1 and Step 2. Place
the seven-type brackets following Step 3.
WALL
(8-1/8")
206mm
152mm
(6")
Step 3
mounting bracket
Toilet
Step 3:
place seven-type brackets
in the line frame
42mm
90mm
8mm
Step 2:
Drill the boles to
fix expansion blot.
180mm
(7")
Step 1:
center of closet flange,
cut along the dotted line.
102mm
(4")
center of closet flange
CHART OF TOILET INSTRUCTION

12”
009/010
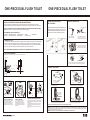
ONE-PIECE DUAL FLUSH TOILET
6 INSTALLING THE COVER OF
THE FLOOR BOLT
7.INSTALL TANK BUTTON
Nut
1.Remove nut from
push button assembly
Half flush push button
Full flush push button
left right
2. Place push button assembly
through cistern cover. Fit nut
and tighten (Do not over tighten)
3. Ensure full flush button is on the
right hand side so that is lines up
with ‘B’ as shown in the diagram.
Enlarge
Rod
Full flush push button
Half flush push button
A
B
The rods for full and half flush can be adjusted up and down by
turning the rods clockwise (UP) and anti-clockwise (DOWN)
01
Bolt
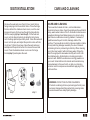
8. INSTALL TOILET SEAT
Picture 1
Small washer
Big washer
Rubber cork
1. Fit the big washer, small washer, rubber cork
with the bolt sequence.
Picture 2
Inner hinge
Toilet bowl
2
1
3
4
2. Align the inner hinge with toilet bowl’s hole
and insert screws to make the inner hinge fixed.
Picture 3
Toilet seat cover
Outer hinge
5
3. Get the seat cover and outer hinge ready, then,
assembled the outer and inner hinge in place.
Picture 4
Selftapping
screw
6
4. Lift the seat cover up, put the selftapping screws
into composite hole and tighten them up.
CAUTION: DO NOT OVERTIGHTEN THE LOCK-BOLT, AS IT MAY DAMAGE THE SEAT.
WARNING: DO NOT USE PLUMBER’S PUTTY, PIPE DOPE OR ANY OTHER SEALANT ON THE WATER SUPPLY CONNECTION TO THIS TANK.
IF THE CONNECTION LEAKS AFTER HAND TIGHTENING, REPLACE THE SUPPLY LINE. IF THE CONNECTION CONTINUES TO LEAK WITH
THE NEW SUPPLY LINE, REPLACE THE FILL VALVE.
WARRANTY IS VOID IF ANY TYPE OF SEALANT IS USED ON THE WATER SUPPLY CONNECTION.
Part (SS1) and (SS2) are already installed into the
opening when you get the toilet. Click the cover of
the flfloor bolt (SS3) into part (Ss2). Then repeat
the second cover for the other side of the toilet.
To ensure this product is installed properly, please read these instructions carefully before you begin.
(Certain installations may require professional help.) Also be sure your installation conforms to local codes.
CAUTION: HANDLE WITH CARE. VITREOUS CHINAWARE FRAGILE WITH SHARP EDGES IF BROKEN.
NOTE: Pictures may not exactly define contour of china and components.
RECOMMENDED TOOLS AND MATERIALS
Putty Knife Flathead Screwdriver Adjustable Wrench Sealant Tape Measure
Hacksaw Flexible Supply Hose Water Supply Kit Carpenters Level
1 REMOVE OLD TOILET
a. Turn off water supply valve and flush tank completely. Towel or sponge remaining water from tank and bowl.
b. Disconnect and remove old water supply line. NOTE: If replacing valve, first shut off main water supply!
c. Remove old mounting hardware, remove toilet and plug floor flange to block sewer gases from escaping.
d. Remove closet bolts from flange and clean away old wax, putty, etc from base area.
NOTE: MOUNTING SURFACE MUST BE CLEAN AND LEVEL BEFORE NEW TOILET IS INSTALLED.
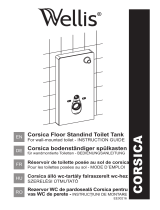
2 ROUGHING-IN DIMENSIONS:
NOTE: Distance from wall to closet flange center line must be as listed on chart:
3.INSTALL CLOSET BOLTS
Insert floor bolts into flange channel
with bolt head down (use plastic
retaining washers to hold the bolts in
full-length. Floor bolts should be
parallel to wall and 6” (152mm) apart.
TOILE T FLANG E
FLOOR BOLTS
RETAIN ING WASHER
4.INSTALL WAX RING
Turn toilet bowl down onto a towel
or cushioned surface. Place the
wax ring around the draining outlet
of the bowl and press firmly enough.
Apply a thin bead of sealant around
toilet base.
SEALANT
WAX R ING
5.POSITION TOILET BOWL ON FLANGE
a. Unplug floor waste opening, gently place the bowl in
position with the floor bolts protruding up through the
hole in the base.
b. Press down with slight twisting motion on the top
center of bowl to compress the wax ring creating a
water-tight seal.
c. Place plastic disc, metal washers and nuts o floor
bolts.
FLANGE
NUT
METAL WASHER
FLOOR BOLT
PLASTIC D ISC
(“THIS SI DE UP”)
SUPPLY AS REQ’D
FINISHED WA LL
FINISHED FLOOR
12"
INSTALLATION INSTRUCTIONS CARE AND MAINTENANCE
ONE-PIECE DUAL FLUSH TOILET
01

011/012
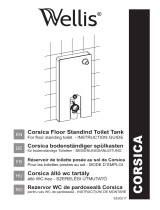
SEAT INSTALLATION
CARE AND CLEANING
CARE AND CLEANING
Your new toilet is made of stain-, acid- and abrasion-
resistant vitreous china. Clean the outside surface with mild
soap, warm water and a soft cloth. On stubborn stains use a
powdered detergent and damp sponge or nylon scouring
pad. Never use abrasive scouring powders, cleansers or
pads because they will scratch, damage and dull the
surface. The manufacturer shall not be responsible or liable
for any tank tting damage caused by the use of cleaners
containing chlorine (calcium hypochlorite). When cleaning
your toilet seat, wash it with mild soapy water. Rinse the
seat thoroughly with clean water and dry with a soft cloth.
Avoid detergents, disinfectants or cleaning products in
aerosol cans. NEVER use abrasive scouring powders on
your seat. Some bathroom chemicals and cosmetics may
cause damage to the seat’s nish, so test your cleaning
solution on an inconspicuous area before applying to the
entire surface.
Remove the seat and cover from it’s box. Insert the top
fixing rawl plugs into the seat bolt holes. Place the hinge
blocks, without the stainless steel covers, over the rawl
plugs and loosely fix the screw though the hinge blocks
into the rawl plugs(step 1 and step 2). Fit the seat and
cover onto the hinge blocks by locating the fixing holes
onto the hinge pins and push into place. Close the seat and
cover onto the pan, and adjust the position in line with the
rim of pan. Tighten the screws. Open the seat and cover
and depress the quick fix buttons to remove the seat and
cover. Place the stainless steel covers over the hinge
blocks(step 3) and replace the seat.
step 1
step 2
step 3
WARNING: DO NOT USE IN-TANK CLEANERS.
Products containing chlorine (calcium hypochlorite) can
seriously damage tank ttings potentially causing leaks,
excessive water use and property damage.
-
 1
1
-
 2
2
-
 3
3
-
 4
4
-
 5
5
-
 6
6
-
 7
7


Boyel Living JMJBL-128-OPT Mode d'emploi
- Taper
- Mode d'emploi
- Ce manuel convient également à
dans d''autres langues
Documents connexes
Autres documents
-
Toto 01 Mode d'emploi
-
American Standard 281AA104.020 Mode d'emploi
-
Toto MS654114MF#51 Guide d'installation
-
Toto MS626214CEFG#01 Mode d'emploi
-
American Standard 2961A104SC.020 Mode d'emploi
-
-
 Wellis Corsica floor standing toilet tank Manuel utilisateur
-
 Wellis Corsica toilet tank Manuel utilisateur
-
 Wellis CLARICE EE00274 Manuel utilisateur
-
Yamaha SS3 Snare stand Le manuel du propriétaire


