
Please Do Not Hesitate to
Contact Our Consumer Hotline
at
800-759-0977
with Any Questions That May
Arise During Assembly or
Use of This Product!
Ver. 0617 NG2515PB/NG2520PB
HUSTLER 7' & 8' POOL TABLE
ASSEMBLY INSTRUCTIONS
Please Do Not Hesitate to
Contact Our Consumer Hotline
at
800-759-0977
with Any Questions That May
Arise During Assembly or
Use of This Product!

2
THANK YOU!
Thank you for purchasing this product. We work around the clock and around the globe to ensure
that our products maintain the highest possible quality. However, in the rare case of issues during
assembly or use of this product, please contact our Consumer Hotline at 800-759-0977 for immediate
assistance before contacting your retailer. Please read the warranty information at the back of these
assembly instructions for further details.
CARE AND USE
1. This product is intended for INDOOR use only.
2. Do NOT drag the table when moving it, as this will damage the legs.
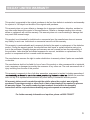
ASSEMBLY TIPS
1. Find a clean, level surface to begin the assembly of your game table. We recommend that two adults
work together to assemble this game. You may want to carefully cut or tear the four corners of the box
so that the bottom of the box can be used as your work surface.
2. Remove all of the contents from box and verify that you have all of the parts shown on the Parts
List before you begin assembly. Note: Some parts may be pre-installed or pre-assembled.
3. Some figures or drawings may not look exactly like product.
4. When installing parts that have more than one screw or bolt, hand tighten all screws or bolts
in place before final tightening with screwdriver or wrench.
5. Electric screwdrivers may be helpful during assembly; however, please set a low torque and use
extreme caution because screws may be stripped or overtightened, resulting in damaged parts, if the
electric screwdriver’s torque is set too high.
WARNINGS!
READ AND FOLLOW ALL ASSEMBLY, OPERATION AND SAFETY INSTRUCTIONS CAREFULLY.
CHOKE HAZARD - THIS ITEM MAY CONTAIN SMALL BALLS AND PARTS
NOT SUITABLE FOR CHILDREN UNDER 3 YEARS OF AGE.
IMPORTANT! PLEASE READ THESE ASSEMBLY INSTRUCTIONS
IN ENTIRETY BEFORE ASSEMBLING YOUR PRODUCT.

3
6/17
For replacement parts please call 800-759-0977.
Illustrations Not to Scale
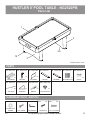
HUSTLER 7' POOL TABLE - NG2515PB
Parts List
#1 NGP5715 #2 NGP57163 #3 NGP57173 #4 NGP5722 #9 NGP5136 #10 NGP5077
LEG TOP
#11 NGP5191
TABLE BODY
LEG PANEL
BILLIARD BALLS
CUE STICK
CHALK
LEG SIDE
HARDWARE PACK - NGP5721
#6
#7 #8 #15
#16
2
1
3
14
#12 NGP5135 #13 NGP5073 #14 NGP5720
BRUSH
TRIANGLE
LEG LEVELER
I 61/5 NC TALF H
WASHER
LARGE BOLT
1-5/8” SCREW
HEX WRENCH
1-5/8” FLAT SCREW
PARTS
4,5
#
5 NGP57183
LEG BASE
X4 X4
X2
X1
X16
X1 X12 X24
X12
X2
X2
X1
X1 X1 X4
X2

4
6/17
For replacement parts please call 800-759-0977.
Illustrations Not to Scale
HUSTLER 8' POOL TABLE - NG2520PB
Parts List
#1 #2 3 4 #9 NGP5136 #10 NGP5077
LEG TOP
#11 NGP5191
TABLE BODY
LEG PANEL
BILLIARD BALLS
CUE STICK
CHALK
LEG SIDE
HARDWARE PACK - NGP5730
#6
#7 #8 #15
#16
2
1
3
14
#12 NGP5135 #13 NGP5073 #14 NGP5720
BRUSH
TRIANGLE
LEG LEVELER
I 61/5 NC TALF H
WASHER
LARGE BOLT
1-5/8” SCREW
HEX WRENCH
1-5/8” FLAT SCREW
PARTS
4,5
#
5
LEG BASE
X4 X4
X2
X1
X16
X1 X12 X24
X12
X2
X2
X1
X1 X1 X4
X2
NGP5726 NGP57273 # NGP57283 # NGP5731 NGP57293

5
ASSEMBLY INSTRUCTIONS
2. Attach each assembled LEG to the bottom of the TABLE BODY #1 with LARGE BOLT #15 and
5/16” FLAT WASHER #6.
3. Thread two LEG LEVELERS #14 on to the bottom of each LEG. Carefully turn table over.
#14
#15
#6
#1
#7
#7
#5
#4
#2
#2
#7
#7
#2
#
16
#3
#3
1. Begin LEG assembly by attaching the LEG TOP BOARD #4 and LEG BASE BOARD #5 to the cleats
on two LEG SIDES #2, using the pre-drilled holes with 1-5/8” SCREWS #7, as shown below.
Attach LEG PANEL #3 to the assembled leg frame, using pre-drilled holes, with FLAT HEAD SCREW #16.
Do NOT overtighten screws. Repeat assembly for remaining LEG.
Note: The Leg assembly may require two individuals, one to hold pieces, while the other inserts screws.
TIP: If you hand insert all screws, on a single piece, into pre-drilled holes before tightening, it will help
hold the pieces in alignment as you tighten the screws.

6
180-DAY LIMITED WARRANTY
This product is warranted to the original purchaser to be free from defects in material or workmanship
for a period of 180 days from the date of the original retail purchase.
This warranty does not cover defects or damage due to improper installation, alteration, accident or
any other event beyond the control of the manufacturer. Defects or damage resulting from misuse,
abuse or negligence will void this warranty. This warranty does not cover scratching or damage that
may result from normal usage.
This product is not intended for institutional or commercial use; the manufacturer does not assume
any liability for such use. Institutional or commercial use will void this warranty.
This warranty is nontransferable and is expressly limited to the repair or replacement of the defective
product. During the warranty period, the manufacturer shall repair or replace defective parts at no
cost to the purchaser. Shipping charges and insurance are not covered and are the responsibility of
the purchaser. Labor charges and related expenses for removal, installation or replacement of the
product or components are not covered under this warranty.
The manufacturer reserves the right to make substitutions to warranty claims if parts are unavailable
or obsolete.
The manufacturer shall not be liable for loss of use of the product or other consequential or incidental
costs, expenses or damages incurred by the consumer of any other use. The user assumes all risk of
injury resulting from the use of this product.
This warranty is expressly in lieu of all other warranties, expressed or implied, including warranties of
. Neither the manufac-
turer nor any of its representatives assumes any other liability in connection with this product.
All warranty claims must be made through the retailer where the product was originally
purchased. A purchase receipt or other proof of date of purchase will be required to process
all warranty claims. The model number and part numbers found within the assembly
instructions will be required when submitting any parts requests or warranty claims.
For further warranty information or inquiries, please call 800-759-0977

Ver. 0617 NG2515PB/NG2520PB
TABLE DE BILLARD
HUSTLER 2,13 m et 2,43 m
INSTRUCTIONS D’ASSEMBLAGE
Contactez
notre
service à la clientèle au
800-759-0977
avec des questions sur le montage
ou l'utilisation de ce produit.

2
MERCI!
Merci d’avoir acheté notre produit. Nous travaillons 24 heures sur 24, partout dans le monde, à garantir
que nos produits sont de la meilleure qualité possible. Toutefois, dans les rares cas de problèmes lors
du montage ou de l'utilisation de ce produit, se il vous plaît communiquer avec notre service à la clientèle
au 800-759-0977 pour une aide immédiate avant de contacter votre revendeur. Pour obtenir de plus amples
renseignements, veuillez lire l'information relative à la garantie au verso de ce guide d’instructions.
ENTRETIEN ET USAGE
1. Ce produit doit être utilisé À L’INTÉRIEUR seulement.
2. NE JAMAIS déplacer la table en la traînant, cela pourrait endommager les pieds.
INSTRUCTIONS D’ASSEMBLAGE
1. Trouver une surface propre et plane, pour commencer le montage de votre table de jeu. La table
s’assemble à l’envers pour être ensuite retournée sur ses pieds, une fois l’assemblage complété.
Cette table est lourde et nécessite au moins deux adultes forts pour la soulever et la retourner.
2. Retirez le contenu de la boîte, avant de commencer l’assemblage, assurez-vous d’avoir toutes
les pièces telles que listées et illustrées au tableau d’identification. Avis : certaines pièces sont
préassemblées ou préinstallées.
3. Certaines illustrations ou dessins peuvent ne pas ressembler au produit que vous avez acheté.
4. Quand vous fixez en place une pièce avec plus d’une vis ou écrou, veuillez, en premier, les
visser à la main et terminer la fixation avec un tournevis ou une clé.
5. Un tournevis électrique peut être utile lors de l’assemblage, mais veuillez le régler à basse torque
et l’utiliser avec prudence; si la torque est trop élevée, la vis peut se défaire ou être trop serrée.
AVERTISSEMENTS!
LIRE TOUTES LES INSTRUCTIONS D’ASSEMBLAGE ET LES CONSIGNES DE SÉCURITÉ ATTENTIVEMENT.
RISQUE D’ÉTOUFFEMENT – CERTAINS ÉLÉMENTS DU PRODUIT CONTIENNENT
DE PETITES PIÈCES - NE CONVIENT PAS À UN ENFANT DE MOINS DE TROIS ANS.
IMPORTANT! VEUILLEZ LIRE, EN ENTIER, TOUTES LES
INSTRUCTIONS AVANT D’ASSEMBLER VOTRE PRODUIT.

3
6/17
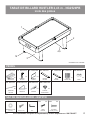
TABLE DE BILLARD HUSTLER 2,13 m - NG2515PB
Liste des pièces
#1 NGP5715 #2 NGP57163 #3 NGP57173 #4 NGP5722 #9 NGP5136 #10 NGP5077
#11 NGP5191
#6
#7 #8 #15
#16
2
1
3
14
#12 NGP5135 #13 NGP5073 #14 NGP5720
4,5
#
5 NGP57183
X4 X4
X2
X1
X16
X1 X12 X24
X12
X2
X2
X1
X1 X1 X4
X2
Pour commander une pièce de remplacement, veuillez téléphoner au 1 800 759-0977
PIÈCES
illustrations non à l'échelle
SAC DE QUINCAILLERIE – NGP5721
STRUCTURE
PRINCIPALE
PANNEAU
DE PIED
PANNEAU
LATÉRAL
DESSUS
DE PIED
QUEUE DE
BILLARD
TRIANGLE BROSSE
PATIN DE
NIVELLEMENT
BASE
DE PIED
RONDELLE PLATE
(0,79 cm)
VIS (4,18 cm) CLÉ
GROS
BOULON
VIS À TÊTE
PLATE (4,18 cm)
BOULES
DE BILLARD
CRAIE

4
6/17
#1 #2 3 4 #9 NGP5136 #10 NGP5077
#11 NGP5191
#6
#7 #8 #15
#16
2
1
3
14
#12 NGP5135 #13 NGP5073 #14 NGP5720
4,5
#
5
X4 X4
X2
X1
X16
X1 X12 X24
X12
X2
X2
X1
X1 X1 X4
X2
NGP5726 NGP57273 # NGP57283 # NGP5731 NGP57293
TABLE DE BILLARD HUSTLER 2,43 m - NG2520PB
Liste des pièces
Pour commander une pièce de remplacement, veuillez téléphoner au 1 800 759-0977
PIÈCES
illustrations non à l'échelle
SAC DE QUINCAILLERIE – NGP5730
STRUCTURE
PRINCIPALE
PANNEAU
DE PIED
PANNEAU
LATÉRAL
DESSUS
DE PIED
QUEUE DE
BILLARD
TRIANGLE BROSSE
PATIN DE
NIVELLEMENT
BASE
DE PIED
RONDELLE PLATE
(0,79 cm)
VIS (4,18 cm) CLÉ
GROS
BOULON
VIS À TÊTE
PLATE (4,18 cm)
BOULES
DE BILLARD
CRAIE

5
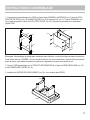
INSTRUCTIONS D’ASSEMBLAGE
#14
#15
#6
#1
#7
#7
#5
#4
#2
#2
#7
#7
#2
#
16
#3
#3
Remarque: L'assemblage de jambe peut nécessiter deux individus, un pour tenir des morceaux, tandis que
l'autre insère des vis. CONSEIL: Si vous insérez toutes les vis, d'une seule pièce, dans les trous pré-percés
avant de serrer, cela aidera à maintenir les pièces en alignement lorsque vous serrez les vis.
1. Commencez l’assemblage d’un PIED en fixant deux PANNEAU LATÉRAUX (no 2) sous le COU-
VERCLE DE PIED (no 4) et la BASE DE PIED (no 5) à l’aide de VIS (no 7). Fixez le PANNEAU (no
3) au pied assemblé à l’aide de VIS À TÊTE PLATE (no 16). Répétez le procédé pour assembler
l’autre PIED.
2. Fixez le PIED assemblé sous le STRUCTURE PRINCIPALE à l’aide de GROS BOULONS (no 15)
et de RONDELLES PLATES (no 6).
3. Installez les PATINS DE NIVELLEMENT (no 14) sous chacun des PIEDS.

6
GARANTIE LIMITÉE DE 180 JOURS
La garantie du produit est valide pour l'acheteur original en ce qui a trait aux pièces défectueuses ou
à la main-d’œuvre pour une période de 180 jours de la date d’achat.
Cette garantie n’est couvre pas les dommages causés par accident, par modification, par une
installation défectueuse ou tout autre événement hors du contrôle du fabricant. Tout défaut ou
dommage résultant de la négligence ou d’une mauvaise utilisation annule cette garantie. La présente
garantie ne couvre pas les égratignures ou les dommages attribuables à un usage normal.
Ce produit n'est pas destiné à un usage institutionnel ou commercial; le fabricant décline toute
responsabilité pour une telle utilisation. Un usage institutionnel ou commercial annule cette garantie.
Cette garantie est non transférable et est expressément limitée à la réparation ou au remplacement
du produit défectueux. Au cours de la période de garantie, le fabricant s’engage à remplacer et à
réparer les pièces défectueuses sans frais pour l’acheteur. Les frais d’assurance et d'expédition ne
sont pas couverts et sont à la charge de l'acheteur. Les frais de main-d'œuvre et les dépenses liées
au déplacement, à l’installation ou au remplacement du produit ou de ses composantes ne sont pas
couverts par cette garantie.
Le fabricant se réserve le droit de faire des substitutions de recours en garantie si la pièce n'est pas
disponible ou obsolète.
Le fabricant décline toute responsabilité liée à la perte d'utilisation ainsi que tous les autres coûts
directs ou indirects, frais ou dommages encourus par le consommateur qui aurait été causés par une
autre utilisation. L'utilisateur assume tous les risques de dommage résultant de l'utilisation de ce
produit.
Cette garantie tient lieu expressément de toute autre garantie, exprimée ou implicite, y compris les
garanties de qualité marchande ou d'adaptation à un emploi particulier dans la mesure permise par
les lois fédérales ou provinciales. Ni le fabricant, ni aucun de ses représentants n'assument aucune
autre responsabilité en rapport avec ce produit.
Toute réclamation doit être faite par le détaillant où le produit a été acheté. Une facture ou
autre preuve d'achat est nécessaire pour traiter toutes les réclamations de garantie. Le
numéro de modèle et les numéros de référence figurant dans les instructions d'assemblage
seront exigés lors de la soumission de demande de pièces ou de recours en garantie.
Pour plus d’information ou pour toute question, veuillez téléphoner au 1 800 759-0977.
-
 1
1
-
 2
2
-
 3
3
-
 4
4
-
 5
5
-
 6
6
-
 7
7
-
 8
8
-
 9
9
-
 10
10
-
 11
11
-
 12
12


dans d''autres langues
- English: Hathaway NG2520PB User manual
Documents connexes
-
Hathaway BG2567W Manuel utilisateur
-
-
Blue Wave BG2571M Manuel utilisateur
-
-
Maverick NG1023 Manuel utilisateur
-
-
-
-
Hathaway Madison Mode d'emploi
-

