Corsair CH-9311011-NA Manuel utilisateur
- Catégorie
- Souris
- Taper
- Manuel utilisateur
Ce manuel convient également à

corsair.com/downloads
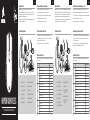
SLIPSTREAM WIRELESS GAMING MOUSE
HARPOON RGB WIRELESS
A — LEFT CLICK BUTTON
B — RIGHT CLICK BUTTON
C — MIDDLE CLICK BUTTON
D — DPI CYCLE BUTTON
E — FORWARD BUTTON
F — BACKWARD BUTTON
G — MULTI-PURPOSE LED INDICATOR
H — OPTICAL GAMING SENSOR
I — PTFE GLIDE PADS
J — POWER / WIRELESS MODE SWITCH
K — USB WIRELESS RECEIVER
L — USB CHARGING / DATA CABLE
IMPORTANT: The HARPOON RGB WIRELESS mouse must be fully charged before its first use.
Connect the HARPOON RGB WIRELESS mouse to an available USB 2.0 or 3.0 port on your PC with the USB
charging / data cable. The multi-purpose LED indicator on the mouse will begin pulsing green to denote battery
charging and will turn solid when charging is complete.
The battery has no “memory effect” and should not be completely discharged before recharging to ensure it will
last for hundreds of charge / discharge cycles.
CHARGING THE MOUSE
GETTING TO KNOW YOUR MOUSE
2.4G
OFF
A B
C
D
FE
K
G
J I
L
H
ENGLISH ENGLISH FRANÇAIS FRANÇAIS
> Turn on your Bluetooth 4.0 or higher enabled computer and initiate Bluetooth pairing mode on it.
> Hold DPI CYCLE button and toggle power / wireless mode switch to BT position to turn on your mouse.
The multi-purpose LED indicator will start blinking blue.
> The multi-purpose LED indicator on your mouse will turn solid blue when connected.
SETTING UP YOUR MOUSE USING BLUETOOTH
®
Various aspects of mouse operation are communicated through the multi-purpose LED indicator located behind
on top cover of the mouse.
MULTI-PURPOSE LED INDICATOR
> Turn on your computer and connect the USB wireless receiver to an available USB port.
> Toggle power / wireless mode switch to “2.4GHz” position to turn on your mouse.
> The multi-purpose LED indicator on your mouse will turn solid white when automatically connected.
> Download the iCUE software from www.corsair.com/downloads.
> Run the installer program and follow instructions for installation.
SETTING UP YOUR MOUSE USING 2.4GHz WIRELESS
MULTI-PURPOSE LED
INDICATOR
BAT TERY
STATUS
BATTERY CHARGING PULSING GREEN
BATTERY CRITICAL, RECHARGE REQUIRED PULSING RED
BATTERY LOW, RECHARGE SOON BLINKING RED
BATTERY MEDIUM BLINKING AMBER
BATTERY HIGH BLINKING GREEN
BATTERY CHARGED GREEN
WIRELESS
STATUS
2.4GHz WIRELESS MODE – PAIRING BLINKING WHITE
2.4GHz WIRELESS MODE – PAIRED WHITE
2.4GHz WIRELESS MODE – PAIRING FAILED PULSING WHITE
BT WIRELESS MODE – PAIRING BLINKING BLUE
BT WIRELESS MODE – PAIRED BLUE
BT WIRELESS MODE – PAIRING FAILED PULSING BLUE
DPI STAGE
STATUS
STAGE #1 – 500 DPI RED
STAGE #2 – 1000 DPI WHITE
STAGE #3 – 1500 DPI GREEN
STAGE #4 – 3000 DPI YELLOW
STAGE #5 – 5000 DPI CYAN
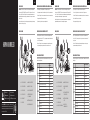
PRÉSENTATION DE LA SOURIS
A — BOUTON CLIC GAUCHE
B — BOUTON CLIC DROIT
C — BOUTON CLIC DU MILIEU
D — BOUTON DÉFILEMENT PPP
E — BOUTON SUIVANT
F — BOUTON PRÉCÉDENT
G — VOYANT À LED MULTIFONCTION
H — CAPTEUR GAMING OPTIQUE
I — PATINS EN PTFE
J — BOUTON D’ALIMENTATION /
DE MODE SANS FIL
K — RÉCEPTEUR SANS FIL USB
L — CÂBLE DE RECHARGE /
DONNÉES USB
2.4G
OFF
A B
C
D
FE
K
G
J I
L
H
IMPORTANT: La souris SANS FIL HARPOON RGB doit être complètement chargée avant sa première utilisation
Branchez la souris SANS FIL HARPOON RGB sur un port USB 2.0 ou 3.0 disponible de votre ordinateur avec le
câble USB de chargement/données. Le voyant à DEL multifonction de la souris clignote lentement en vert pour
indiquer que la recharge de batterie est en cours et reste allumé en vert quand la recharge est terminée.
La batterie ne dispose d'aucun «effet mémoire» et ne doit pas être complètement déchargée avant la recharge
afin d'assurer son autonomie pour des centaines de cycles de recharge / utilisation.
RECHARGE DE LA SOURIS
> Allumez votre ordinateur muni de la fonction Bluetooth 4.0 ou supérieure et lancez le mode de jumelage Bluetooth.
> Cliquez sur le bouton DÉFILEMENT PPP et faites basculer le bouton d'alimentation / de mode sans fil sur la
position BT pour allumer votre souris.
> Le voyant à DEL multifonction commence alors à clignoter en bleu pour signaler que la souris est prête pour
le jumelage, puis reste allumé en bleu continu une fois la connexion établie.
CONFIGURATION DE LA SOURIS VIA LE BLUETOOTH
®
Le voyant à DEL multifonction situé derrière la molette de défilement permet d'indiquer différents états de
fonctionnement de la souris.
VOYANT À LED MULTIFONCTION
> Allumez votre ordinateur et branchez le récepteur sans fil USB sur un port USB de votre ordinateur.
> Faites basculer le bouton d'alimentation / de mode sans fil sur la position «2,4GHz» pour allumer la souris.
> Le voyant à DEL multifonction de votre souris s'allume en blanc continu une fois la connexion automatique établie.
> Téléchargez le logiciel iCUE sur www.corsair.com/downloads.
> Exécutez le programme d'installation et suivez les instructions d'installation.
CONFIGURATION DE LA SOURIS EN MODE SANS FIL 2,4GHz
VOYANT À DEL MULTIFONCTION
ÉTAT DE LA
BAT TERIE
BATTERIE EN CHARGE VERT CLIGNOTANT LENT
BATTERIE CRITIQUE, RECHARGE NÉCESSAIRE ROUGE CLIGNOTANT LENT
BATTERIE FAIBLE, RECHARGER BIENTÔT ROUGE CLIGNOTANT RAPIDE
NIVEAU DE BATTERIE MOYEN ORANGE CLIGNOTANT RAPIDE
NIVEAU DE BATTERIE ÉLEVÉ VERT CLIGNOTANT RAPIDE
BATTERIE CHARGÉE VERT
STATUT
SANS FIL
MODE SANS FIL 2,4GHz – JUMELAGE EN COURS BLANC CLIGNOTANT RAPIDE
MODE SANS FIL 2,4GHz – JUMELÉ BLANC
MODE SANS FIL 2,4GHz – ÉCHEC DU JUMELAGE BLANC CLIGNOTANT LENT
MODE SANS FIL BT – JUMELAGE EN COURS BLEU CLIGNOTANT RAPIDE
MODE SANS FIL BT – JUMELÉ BLEU
MODE SANS FIL BT – ÉCHEC DU JUMELAGE BLEU CLIGNOTANT LENT
ÉTAT
NIVEAU PPI
NIVEAU #1 – 500 PPP ROUGE
NIVEAU #2 – 1000 PPP BLANC
NIVEAU #3 – 1500 PPP VERT
NIVEAU #4 – 3000 PPP JAUNE
NIVEAU #5 – 5000 PPP CYAN
La page est en cours de chargement...
-
 1
1
-
 2
2


Corsair CH-9311011-NA Manuel utilisateur
- Catégorie
- Souris
- Taper
- Manuel utilisateur
- Ce manuel convient également à
dans d''autres langues
- English: Corsair CH-9311011-NA User manual
- español: Corsair CH-9311011-NA Manual de usuario
- Deutsch: Corsair CH-9311011-NA Benutzerhandbuch
- português: Corsair CH-9311011-NA Manual do usuário
Documents connexes
-
Corsair Ironclaw RGB Mode d'emploi
-
Corsair CH-9317011-NA Mode d'emploi
-
-
Corsair Gaming Harpoon RGB (CH-9301011-EU) Manuel utilisateur
-
Corsair K55 + HARPOON Manuel utilisateur
-
Corsair RDA0036 Manuel utilisateur
-
-
-
Corsair M65 RGB Ultra Manuel utilisateur
-
Corsair M65 RGB Ultra Wireless Tunable FPS Gaming Mouse Manuel utilisateur
Autres documents
-
 SCIMITAR RGB Corsair Gaming Mouse Guide de démarrage rapide
-
Logitech Pro Wireless Manuel utilisateur
-
Logitech G 910-005622 Manuel utilisateur
-
Logitech G Lightspeed G502 Wireless Gaming Mouse Mode d'emploi
-
-
HP 635 Multi-Device Wireless Mouse Guide d'installation
-
-
-
Grandstream GMD1208 Guide d'installation
-
Logitech G703 Wired/Wireless Gaming Mouse Le manuel du propriétaire
