
DTX500 Module Setup Guide
1. Press the power switch while holding down the [SHIFT] button.
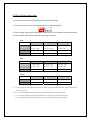
2. Check the number on the display that indicated in the picture below.
3. Set the trigger setup with the parameters listed below. The parameters should be different
for each number which you’ve checked at procedure 2 above.
XP70
Number = 1.00 Number = 1.10 Number = 1.20
TRG2=Type
For Snare : SN-1
For Tom : TM-1
For Snare : SN-4
For Tom : TM-4
For Snare : SN-7
For Tom : TM-7
TRG3=Gain,MVl
Gain
*1
Gain
*1
Gain
*1
TRG4=VelCurve
loud2 norm norm
XP80
Number = 1.00 Number = 1.10 Number = 1.20
TRG2=Type
For Snare : SN-1
For Tom : TM-1
For Snare : SN-4
For Tom : TM-4
For Snare : SN-6
For Tom : TM-6
TRG4=VelCurve
loud1 norm norm
PCY100
Number = 1.00 Number = 1.10 Number = 1.20
TGR2=Type
CY-1 / CY-2 / CY-3
*
2
CY-1 / CY-2 / CY-3
*
2
CY-1 / CY-2 / CY-3
*
2
TRG4=VelCurve
norm norm norm
*1 In case if you feel the XP70 wouldn’t sound when you hit it softly, please increase the value of the parameter “Gain”
in TGR3 = Gain, MVl.
*2 “CY-1” is the setting that the sensitivities of the three sections(Bow / Edge / Cup) are the same.
“CY-2” is the setting that the sensitivity of the Edge section is set fairly lower than the other section.
“CY-3” is the setting that the sensitivity of the Cup section is set fairly lower than the other section.

APPENDIX : How to setup the trigger setup settings?
1. Press the [SHIFT] + [DRUM KIT] buttons to call up the Trigger Setup Select page (TRG1). The currently
selected Trigger Setup is indicated in the display.
* If you want to edit a different trigger setup, use the jog dial and select the setup here.
2. Press the [<]/[>] buttons to change pages(TRG2 through TRG8) and move the flashing cursor to the
parameter you want to set.
*To select the Trigger Input (input jack) you want to edit, simply hit the pad you want to edit or use the
[SHIFT] + [<]/[>] buttons.
3. Rotate the jog dial to change the setting as listed in the tables above.
4. Press the [SAVE/ENTER] button.
5. Rotate the jog dial to select the destination trigger setup number (8–11).
*If you want to change the Trigger Setup name, press the [<]/[>] buttons to move the flashing cursor to the
character you want to edit, then rotate the jog dial to select a character.
6. Press the [SAVE/ENTER] button again. A prompt appears asking you to confirm the Store operation.
7. Press the [SAVE/ENTER] button once more to actually execute the Store operation.
*For more information, please refer to the DTX500 Owner’s Manual.
-
 1
1
-
 2
2


dans d''autres langues
- italiano: Yamaha DTX500 Guida d'installazione
- English: Yamaha DTX500 Installation guide
- español: Yamaha DTX500 Guía de instalación
- Deutsch: Yamaha DTX500 Installationsanleitung
- русский: Yamaha DTX500 Инструкция по установке
- Nederlands: Yamaha DTX500 Installatie gids
- português: Yamaha DTX500 Guia de instalação
- dansk: Yamaha DTX500 Installationsvejledning
- polski: Yamaha DTX500 Instrukcja instalacji
- čeština: Yamaha DTX500 instalační příručka
- svenska: Yamaha DTX500 Installationsguide
- Türkçe: Yamaha DTX500 Yükleme Rehberi
- română: Yamaha DTX500 Ghid de instalare
Documents connexes
-
Yamaha DTX530K Le manuel du propriétaire
-
-
Yamaha EAD10 Acoustic Drum Module Mic Trigger Le manuel du propriétaire
-
-
-
-
-
-
-
Yamaha DTX900M Le manuel du propriétaire