Philips FC6050/03 Manuel utilisateur
- Catégorie
- Aspirateurs portables
- Taper
- Manuel utilisateur
Ce manuel convient également à

FC6053, FC6051, FC6050
Cover+ Arab+Farsi 30604 02-03-2006 12:29 Pagina 1

2
Cover+ Arab+Farsi 30604 02-03-2006 12:29 Pagina 2

3
1
Cover+ Arab+Farsi 30604 02-03-2006 12:29 Pagina 3

4
Cover+ Arab+Farsi 30604 02-03-2006 12:29 Pagina 4

ENGLISH 6
FRANÇAIS 14
ESPAÑOL 22
PORTUGUÊS 30
BAHASA MELAYU 38
46
52
60
66
80
87
FC6053, FC6051, FC6050

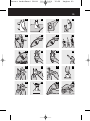
General description (fig. 1)
A Crevice tool
B Brush tool
C Bendable crevice tool (FC6053 only)
D Outer filter
E Inner filter
F Charging unit
G Adapter
H Dust compartment
I Dust compartment release button
J Exhaust air openings
K Charging light (LED)
L On/off slide
M Contact strips
Important
Read these instructions for use carefully before using the appliance and
save them for future reference.
◗ Check if the voltage indicated on the adapter corresponds to the
local mains voltage before you connect the appliance.
◗ Do not use the appliance if it is damaged in any way.Take it to an
authorised Philips service centre for repair.
◗ The adapter and the charging unit of this appliance cannot be
replaced. If the adapter or charging unit is damaged, the appliance
must be discarded.
◗ Never suck up water or any other liquid. Never suck up
flammable substances and do not suck up ashes until they are
cold.
◗ Never immerse the vacuum cleaner or the charging unit in water.
◗ Remove the adapter from the wall socket before cleaning the
charging unit.
◗ Only charge the vacuum cleaner with the adapter and charging
unit supplied. During charging, the adapter will feel warm to the
touch.This is normal.
◗ Always switch the vacuum cleaner off after use.
ENGLISH6

◗ Keep the appliance out of the reach of children.
◗ The voltage on the contact strips in the charging unit is low (max.
12 volts) and therefore not dangerous.
◗ Never block the exhaust air openings during vacuuming.
◗ Switch the appliance off when recharging it.
◗ Always use the vacuum cleaner with filter unit.
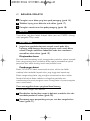
Preparing for use
Installing the charging unit
1 Attach the charging unit to the wall as indicated in the figure
(fig. 2).
If you attach the charging unit to the wall, the space between the screw
holes should be 70 mm.
2 You can also place the charging unit on a horizontal surface (e.g. a
table or desk) (fig. 3).
3 Excess mains cord can be wound round the charging unit (fig. 4).
Charging the appliance
Charge the appliance for at least 16 hours before you use it for the first
time.
1 Insert the adapter into the wall socket.
2 Place the vacuum cleaner on the charging unit (fig. 5).
◗ The charging light will go on to indicate that the appliance is
charging (fig. 6).
B
The charging light will stay on as long as the appliance is connected to
the charging unit and the adapter is in the wall socket.
B
The charging light does not give any information about the charge level
of the built-in batteries.
B
To optimise the lifetime of the rechargeable batteries, periodically
discharge them completely by letting the appliance run until it stops
and then recharge them fully again.
ENGLISH 7

Using the appliance
1 Push the on/off slide forwards to switch the appliance on (fig. 7).
2 Push the on/off slide backwards to switch the appliance off (fig. 8).
Accessories
The appliance comes with the following accessories:
1 a brush tool to clean delicate surfaces;
2 a crevice tool to clean corners or narrow gaps;
3 a bendable crevice tool, contractible and extendable to clean hard-
to-reach places (FC6053 only).
1 Take the accessory you want to use.
2 Attach the accessory to the nozzle of the appliance (fig. 9).
Cleaning
Always remove the adapter from the wall socket before cleaning the
charging unit.
1 Clean the appliance with a damp cloth.
Emptying the dust compartment
Make sure you empty the dust compartment and clean the filters
regularly.
1 Hold the appliance over a dustbin and press the dust
compartment release button (fig. 10).
2 Remove the filter unit from the dust compartment (fig. 11).
3 Empty the dust compartment with your free hand.
4 Clean the outer filter and the inner filter.
B
To clean the inner filter, you can remove the outer filter from the filter
holder by turning it anticlockwise.
ENGLISH8

B
You can clean the outer filter and the inner filter with a brush or with a
normal vacuum cleaner if they are very dirty.
B
If necessary, you can clean the outer filter and the inner filter in cold or
lukewarm water.
5 Place the outer filter back onto the filter holder and put the filter
holder back into the dust compartment. Make sure you insert the
filter holder in the correct way (fig. 12).
Never use the vacuum cleaner if the filter unit is still wet.
Storage
1 You can store the brush tool and the crevice tool by placing them
on the charging unit (fig. 13).
Replacement
◗ Replace the inner filter if it can no longer be cleaned properly
(usually after having been cleaned about 50 times).
1 Remove the filter unit from the dust compartment (fig. 11).
2 Remove the outer filter from the holder by turning it
anticlockwise (fig. 14).
3 Remove the inner filter from the holder by gently turning it
anticlockwise (fig. 15).
4 Attach a new inner filter to the holder (fig. 16).
5 Push the tip of the inner filter inwards (fig. 17).
6 Reattach the outer filter to the holder (fig. 18).
Accessories
New inner filters are available under type no. FC8035. Contact your
Philips dealer.
ENGLISH 9

Environment
◗ Do not throw the appliance away with the normal household
waste at the end of its life, but hand it in at an official collection
point for recycling. By doing this you will help to preserve the
environment (fig. 19).
Saving energy
If you are not going to use the appliance for a longer period of time, we
advise you to remove the adapter from the wall socket to save energy.
Disposal of batteries
NiCd/NiMH batteries can be harmful to the environment and may
explode if exposed to high temperatures or fire.
Batteries contain substances that may pollute the environment.Always
remove the batteries before discarding the appliance or handing it in at
an official collection point. Dispose of the batteries at an official
collection point for batteries.
Only remove the batteries if they are completely empty.
Remove the batteries in the following way.
1 Let the appliance run until it stops, undo the screws and open the
vacuum cleaner (fig. 20).
2 Cut the connecting wires one by one and remove the batteries
(fig. 21).
Guarantee & service
If you need information or if you have a problem, please visit the Philips
website at www.philips.com or contact the Philips Customer Care
Centre in your country (you will find its phone number in the
worldwide guarantee leaflet). If there is no Customer Care Centre in
your country, turn to your local Philips dealer or contact the Service
Department of Philips Domestic Appliances and Personal Care BV.
ENGLISH10

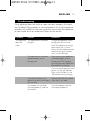
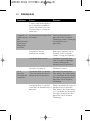
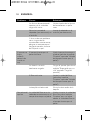
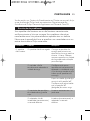
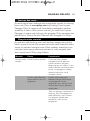
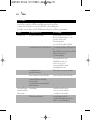
Solutions
Charge the appliance.When
charging for the first time,
leave the appliance to charge
continuously for 16 hours.
Always put the appliance back
onto the charging unit after
every use to recharge.
Make sure that the appliance
is placed properly on the
charging unit.The charging
light will go on to indicate that
the appliance is charging.
Push the on/off slide backward
to put it in the 'off' position.
Make sure the slide is in the
'off' position during charging.
Wipe the dirt off the contact
strips with a dry cloth.
Insert the adapter into the
wall socket (properly).
Causes
The appliance has not been
charged.
The appliance has not been
placed properly on the
charging unit.
The contact strips on the
appliance and on the charging
unit are dirty.
The adapter has not been
inserted (properly) into the
wall socket.
Problem
The appliance
does not
work.
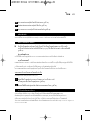
Troubleshooting
If the appliance does not work or does not work properly, first check
the list below. If the problem is not mentioned in this list, the appliance
probably has a defect. In that case we advise you to take the appliance
to your dealer or to an authorised Philips service centre.
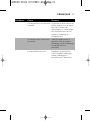
ENGLISH 11

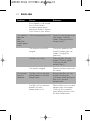
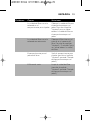
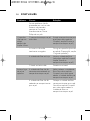
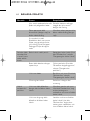
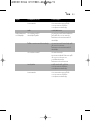
Solutions
Empty the dust compartment
(see chapter 'Cleaning',
section 'Emptying the dust
compartment')
Charge the appliance (see
chapter 'Preparing for use',
section 'Charging the
appliance').
Clean the filter unit (see
chapter 'Cleaning', section
'Emptying the dust
compartment').
Remove the obstruction from
the nozzle.
Reinsert the filter unit. See
chapter 'Cleaning' for
instructions about placing the
filter unit in the dust
compartment.
Place the filter unit in the dust
compartment. See chapter
'Cleaning' for instructions
about placing the filter unit in
the dust compartment.
Causes
If this problem is not caused
by any of the factors
mentioned above, please
contact the Philips Customer
Care Centre in your country.
The dust compartment is full.
The batteries are not fully
charged.
The filter unit is dirty.
The nozzle is clogged.
The filter unit has not been
placed properly in the dust
compartment.
The filter unit has not been
placed in the dust
compartment at all.
Problem
The appliance
does not
clean
floors/the
suction power
is low.
Dust escapes
from the
appliance.
ENGLISH12

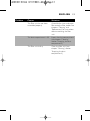
Solutions
Assemble the inner and outer
filter onto the filter holder. See
chapters 'Cleaning' and
'Replacement' for instructions
about assembling the filter
unit.
Empty the dust compartment
(see chapter 'Cleaning',
section 'Emptying the dust
compartment').
Clean the filter unit (see
chapter 'Cleaning', section
'Emptying the dust
compartment').
Causes
The filter unit has not been
assembled properly.
The dust compartment is full.
The filter unit is dirty.
Problem
ENGLISH 13

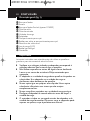
Description générale (fig. 1)
A Suceur
B Brosse
C Suceur flexible (FC6053 uniquement)
D Filtre extérieur
E Filtre intérieur
F Base de recharge
G Adaptateur
H Compartiment à poussière
I Bouton de déverrouillage du compartiment à poussière
J Orifices d'évacuation
K Voyant de charge
L Bouton coulissant marche/arrêt
M Zones de contact
Important
Avant d'utiliser l'appareil, lisez les instructions ci-dessous et conservez
ce mode d'emploi pour un usage ultérieur.
◗ Avant de brancher l'appareil, vérifiez que la tension indiquée sur
l'adaptateur correspond à la tension du secteur.
◗ N'utilisez jamais l'appareil s'il est endommagé, mais confiez-le à un
Centre Service Agréé Philips pour réparation.
◗ L'adaptateur et la base de recharge de l'appareil ne peuvent pas
être remplacés. En cas de dommage au niveau de l'adaptateur ou
de la base de recharge, l'appareil doit être mis au rebut.
◗ N'aspirez jamais d'eau, de liquides, de substances inflammables, ni
de cendres encore chaudes.
◗ Ne plongez jamais l'aspirateur ou la base de recharge dans l'eau.
◗ Débranchez l'adaptateur de la prise secteur avant de nettoyer la
base de recharge.
◗ Chargez toujours l'aspirateur à l'aide de l'adaptateur et de la base
de recharge fournis. En cours de charge, l'adaptateur chauffe. Ce
phénomène est normal.
◗ Arrêtez toujours l'aspirateur après utilisation.
◗ Tenez l'appareil hors de portée des enfants.
FRANÇAIS14

◗ La tension appliquée aux zones de contact de la base de recharge
est faible (12 V max.) et n'est donc pas dangereuse.
◗ Évitez d'obturer les orifices d'évacuation lorsque vous utilisez
l'aspirateur.
◗ Arrêtez l'appareil pour le charger.
◗ Veillez à toujours installer l'ensemble filtre dans l'aspirateur avant
de l'utiliser.
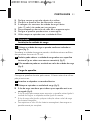
Avant utilisation
Installation de la base de recharge
1 Fixez la base de recharge au mur comme illustré sur la figure
(fig. 2).
Si vous fixez la base de recharge au mur, les trous des vis doivent être
espacés de 70 mm.
2 Vous pouvez également placer la base de recharge sur une
surface horizontale (par ex. sur une table ou un bureau) (fig. 3).
3 Si le cordon d'alimentation est trop long, enroulez-le sous la base
de recharge (fig. 4).
Charge de l'appareil
Chargez l'appareil pendant au moins 16 heures avant la première
utilisation.
1 Branchez l'adaptateur sur la prise secteur.
2 Placez l'aspirateur sur la base de recharge (fig. 5).
◗ Le voyant de charge s'allume pour indiquer que l'appareil est en
charge (fig. 6).
B
Le voyant de charge reste allumé tant que l'appareil se trouve sur la
base de recharge et que l'adaptateur est branché.
B
Le voyant de charge ne fournit aucune information sur le niveau de
charge de la batterie.
FRANÇAIS 15

B
Pour optimiser la durée de vie de la batterie, pensez à la décharger et
à la recharger complètement de temps en temps. Pour décharger la
batterie, laissez l'appareil fonctionner jusqu'à l'arrêt du moteur.
Utilisation de l'appareil
1 Faites glisser le bouton marche/arrêt vers l'avant pour mettre
l'appareil en marche (fig. 7).
2 Faites glisser le bouton marche/arrêt vers l'arrière pour arrêter
l'appareil (fig. 8).
Accessoires
L'appareil est livré avec les accessoires suivants :
1 une brosse pour nettoyer les surfaces délicates ;
2 un suceur pour nettoyer les coins et les zones étroites ;
3 un suceur flexible, extensible et rétractable pour nettoyer les zones
difficiles à atteindre (FC6053 uniquement).
1 Choisissez l'accessoire dont vous avez besoin.
2 Fixez l'accessoire sur l'aspirateur (fig. 9).
Nettoyage
Débranchez toujours l'adaptateur de la prise secteur avant de
nettoyer l'appareil.
1 Nettoyez l'appareil avec un chiffon humide.
Nettoyage du compartiment à poussière
Veillez à vider le compartiment à poussière et à nettoyer les filtres
régulièrement.
1 Tenez l'appareil au-dessus d'une poubelle et appuyez sur le
bouton de déverrouillage du compartiment à poussière (fig. 10).
2 Retirez l'ensemble filtre du compartiment à poussière (fig. 11).
FRANÇAIS16

3 Videz le compartiment à poussière avec votre main libre.
4 Nettoyez les filtres intérieur et extérieur.
B
Pour nettoyer le filtre intérieur, faites tourner le filtre extérieur dans le
sens inverse des aiguilles d'une montre de manière à le retirer du
porte-filtre.
B
Nettoyez les filtres intérieur et extérieur à l'aide d'une brosse ou d'un
aspirateur s'ils sont très sales.
B
Si nécessaire, vous pouvez nettoyer les filtres intérieur et extérieur à
l'eau froide ou tiède.
5 Replacez le filtre extérieur dans le porte-filtre, puis replacez
l'ensemble dans le compartiment à poussière.Veillez à insérer le
porte-filtre correctement (fig. 12).
Évitez d'utiliser l'aspirateur si les filtres sont encore humides.
Rangement
1 Rangez la brosse et le suceur dans la base de recharge (fig. 13).
Remplacement
◗ Si vous ne parvenez plus à le nettoyer correctement, remplacez le
filtre intérieur (en général, le remplacement s'avère nécessaire
après 50 nettoyages).
1 Retirez l'ensemble filtre du compartiment à poussière (fig. 11).
2 Faites tourner le filtre extérieur dans le sens inverse des aiguilles
d'une montre pour le retirer du porte-filtre (fig. 14).
3 Faites tourner le filtre intérieur avec précaution dans le sens
inverse des aiguilles d'une montre pour le retirer du porte-filtre
(fig. 15).
4 Insérez un nouveau filtre intérieur dans le porte-filtre (fig. 16).
5 Poussez le bout du filtre vers l'intérieur (fig. 17).
6 Fixez le filtre extérieur sur le porte-filtre (fig. 18).
FRANÇAIS 17

Accessoires
Les filtres intérieurs sont disponibles sous la référence FC8035.
Contactez votre revendeur Philips.
Environnement
◗ Lorsqu'il ne fonctionnera plus, ne jetez pas l'appareil avec les
ordures ménagères mais déposez-le à un endroit assigné à cet
effet, où il pourra être recyclé.Vous contribuerez ainsi à la
protection de l'environnement (fig. 19).
Économie d'énergie
Si vous n'utilisez pas l'appareil pendant une longue période, il est
recommandé de débrancher l'adaptateur de la prise secteur pour
économiser de l'énergie.
Mise au rebut de la batterie
La batterie NiCd/NiMH peut nuire à l'environnement et exploser en
cas d'exposition à des températures élevées ou aux flammes.
La batterie contient des substances susceptibles de nuire à
l'environnement. Retirez toujours la batterie avant de mettre l'appareil
au rebut ou de le déposer à un endroit assigné à cet effet. Mettez la
batterie usagée au rebut à un endroit assigné à cet effet.
Retirez la batterie lorsqu'elle est complètement déchargée.
Pour retirer la batterie, suivez la procédure ci-dessous :
1 Laissez l'appareil fonctionner jusqu'à l'arrêt complet du moteur,
puis ôtez les vis et ouvrez l'appareil (fig. 20).
2 Coupez les fils de connexion un par un, puis retirez la batterie
(fig. 21).
Garantie et service
Si vous souhaitez obtenir des informations supplémentaires ou si vous
rencontrez un problème, visitez le site Web de Philips à l'adresse
www.philips.com ou contactez le Service Consommateurs Philips de
votre pays (vous trouverez le numéro de téléphone correspondant sur
FRANÇAIS18

le dépliant de garantie internationale). S'il n'existe pas de Service
Consommateurs Philips dans votre pays, renseignez-vous auprès de
votre revendeur local ou contactez le Service Department of Philips
Domestic Appliances and Personal Care BV.
Dépannage
Si l'appareil ne fonctionne pas (correctement), consultez d'abord la liste
ci-dessous. Si le problème rencontré ne figure pas dans la liste, l'appareil
est probablement défectueux. Dans ce cas, contactez votre revendeur
ou un Centre Service Agréé Philips.
FRANÇAIS 19
Solution
Chargez l'appareil pendant au
moins 16 heures avant la
première utilisation.Veillez à
toujours replacer l'aspirateur
sur la base de recharge après
chaque emploi.
Assurez-vous que l'appareil
est correctement positionné.
Le voyant de charge s'allume
pour indiquer que l'appareil
est en charge.
Faites glisser le bouton
marche/arrêt vers l'arrière
pour arrêter l'appareil.
Assurez-vous que le bouton
est réglé sur la position d'arrêt
au cours de la charge.
Ôtez la poussière des zones
de contact à l'aide d'un chiffon
sec.
Branchez (correctement)
l'adaptateur.
Cause
L'appareil n'a pas été chargé.
L'appareil n'a pas été
correctement positionné sur la
base de recharge.
Les zones de contact de
l'appareil et de la base de
recharge sont sales.
L'adaptateur n'a pas été
(correctement) inséré dans la
prise secteur.
Problème
L'appareil ne
fonctionne
pas.

Solution
Videz le compartiment à
poussière (voir le chapitre
Nettoyage, section Nettoyage
du compartiment à
poussière).
Rechargez l'appareil (voir le
chapitre Avant utilisation,
section Charge de l'appareil).
Nettoyez l'ensemble filtre
(voir le chapitre Nettoyage,
section Nettoyage du
compartiment à poussière).
Nettoyez le suceur.
Réinsérez l'ensemble filtre.
Pour obtenir des informations
sur l'installation de l'ensemble
filtre dans le compartiment à
poussière, voir le chapitre
Nettoyage.
Placez l'ensemble filtre dans le
compartiment à poussière.
Pour obtenir des informations
sur l'installation de l'ensemble
filtre dans le compartiment à
poussière, voir le chapitre
Nettoyage.
Cause
Si vous ne parvenez toujours
pas à résoudre le problème,
veuillez contacter le Service
Consommateurs Philips de
votre pays.
Le compartiment à poussière
est rempli.
La batterie n'est pas
entièrement chargée.
L'ensemble filtre est sale.
Le suceur est obstrué.
L'ensemble filtre n'a pas été
inséré correctement dans le
compartiment à poussière.
L'ensemble filtre n'a pas été
inséré dans le compartiment à
poussière.
Problème
L'appareil ne
nettoie pas les
sols
correctement/
la puissance
d'aspiration
est faible.
De la
poussière
s'échappe de
l'aspirateur.
FRANÇAIS20
La page est en cours de chargement...
La page est en cours de chargement...
La page est en cours de chargement...
La page est en cours de chargement...
La page est en cours de chargement...
La page est en cours de chargement...
La page est en cours de chargement...
La page est en cours de chargement...
La page est en cours de chargement...
La page est en cours de chargement...
La page est en cours de chargement...
La page est en cours de chargement...
La page est en cours de chargement...
La page est en cours de chargement...
La page est en cours de chargement...
La page est en cours de chargement...
La page est en cours de chargement...
La page est en cours de chargement...
La page est en cours de chargement...
La page est en cours de chargement...
La page est en cours de chargement...
La page est en cours de chargement...
La page est en cours de chargement...
La page est en cours de chargement...
La page est en cours de chargement...
La page est en cours de chargement...
La page est en cours de chargement...
La page est en cours de chargement...
La page est en cours de chargement...
La page est en cours de chargement...
La page est en cours de chargement...
La page est en cours de chargement...
La page est en cours de chargement...
La page est en cours de chargement...
La page est en cours de chargement...
La page est en cours de chargement...
La page est en cours de chargement...
La page est en cours de chargement...
La page est en cours de chargement...
La page est en cours de chargement...
La page est en cours de chargement...
La page est en cours de chargement...
La page est en cours de chargement...
La page est en cours de chargement...
La page est en cours de chargement...
La page est en cours de chargement...
La page est en cours de chargement...
La page est en cours de chargement...
La page est en cours de chargement...
La page est en cours de chargement...
La page est en cours de chargement...
La page est en cours de chargement...
La page est en cours de chargement...
La page est en cours de chargement...
La page est en cours de chargement...
La page est en cours de chargement...
La page est en cours de chargement...
La page est en cours de chargement...
La page est en cours de chargement...
La page est en cours de chargement...
La page est en cours de chargement...
La page est en cours de chargement...
La page est en cours de chargement...
La page est en cours de chargement...
La page est en cours de chargement...
La page est en cours de chargement...
La page est en cours de chargement...
La page est en cours de chargement...
La page est en cours de chargement...
La page est en cours de chargement...
La page est en cours de chargement...
La page est en cours de chargement...
-
 1
1
-
 2
2
-
 3
3
-
 4
4
-
 5
5
-
 6
6
-
 7
7
-
 8
8
-
 9
9
-
 10
10
-
 11
11
-
 12
12
-
 13
13
-
 14
14
-
 15
15
-
 16
16
-
 17
17
-
 18
18
-
 19
19
-
 20
20
-
 21
21
-
 22
22
-
 23
23
-
 24
24
-
 25
25
-
 26
26
-
 27
27
-
 28
28
-
 29
29
-
 30
30
-
 31
31
-
 32
32
-
 33
33
-
 34
34
-
 35
35
-
 36
36
-
 37
37
-
 38
38
-
 39
39
-
 40
40
-
 41
41
-
 42
42
-
 43
43
-
 44
44
-
 45
45
-
 46
46
-
 47
47
-
 48
48
-
 49
49
-
 50
50
-
 51
51
-
 52
52
-
 53
53
-
 54
54
-
 55
55
-
 56
56
-
 57
57
-
 58
58
-
 59
59
-
 60
60
-
 61
61
-
 62
62
-
 63
63
-
 64
64
-
 65
65
-
 66
66
-
 67
67
-
 68
68
-
 69
69
-
 70
70
-
 71
71
-
 72
72
-
 73
73
-
 74
74
-
 75
75
-
 76
76
-
 77
77
-
 78
78
-
 79
79
-
 80
80
-
 81
81
-
 82
82
-
 83
83
-
 84
84
-
 85
85
-
 86
86
-
 87
87
-
 88
88
-
 89
89
-
 90
90
-
 91
91
-
 92
92


Philips FC6050/03 Manuel utilisateur
- Catégorie
- Aspirateurs portables
- Taper
- Manuel utilisateur
- Ce manuel convient également à
dans d''autres langues
- English: Philips FC6050/03 User manual
- español: Philips FC6050/03 Manual de usuario
- português: Philips FC6050/03 Manual do usuário
Documents connexes
-
Philips FC6051/01 Manuel utilisateur
-
Philips FC6050/99 Manuel utilisateur
-
Philips FC6823-01 Manuel utilisateur
-
Philips FC6171/01 Une information important
-
Philips TT2021/34 Manuel utilisateur
-
Philips FC6094/01 Manuel utilisateur
-
-
-
Philips FC6167/01 Une information important
-