La page est en cours de chargement...

1
2800 Etienne Lenoir, Laval
Quebec H7R 0A3 Canada
Purchase date: _________________________ Product Tracking Reference: ________________________
Questions, problems, missing parts?
Before returning to your retailer, call our customer service department at
1-866-839-2888, 8 a.m. - 8 p.m., EST, Monday - Friday
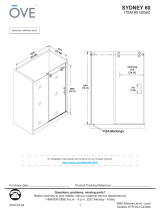
SYDNEY SIDE PANEL 32
1219 / 1524
[48] / [
60]
813
[32]
Opening
485 / 615
[19 3/32] / [24 7/32]
CSA Markings
2000
[78 3/4]
180
[7 3/32]
Measures: millimeter [inch]
ITEM #667449
2000
[78 3/4]
An installation video guide can be found on our Youtube channel.
http://youtu.be/lr43d5co_4M
2016-03-04

2
CAUTION
Please carefully read the following important safety information before handling or installing this shower. There
is a risk of serious injury while handling this product. To minimize these risks, please note:
• Always wear safety glasses and gloves while handling.
• Always read and follow all the steps in the installation instructions.
• Inspect all contents and glass for damage before installation.
• Extreme caution should be taken while handling the glass during installation as the tempered glass may
shatter if in contact with a hard surface.
• Handle the tempered glass with caution! Improperly handling the glass can cause it to break suddenly in
small pieces (never in pointed fragments).
• Always take all precautions not to touch the tempered glass with any tools during the installation, or after
installed.
• Do not cut or modify the tempered glass as it will shatter if cut.
• Carefully remove product from packaging and keep packaging until installation is complete.
• Inspect all parts for damage; if there is damage to the unit prior to installation, please contact customer
service at the number provided in this guide.
• Installtheshoweronaoorthatislevelandabletoaccommodatetheweightoftheunitandanoccupant.
• Consult local building codes and compliance standards prior to installation and ensure conformity.
• Afterinstallation,andfromtimetotime,checktheglassfortandnishtoensurethatnothinghascome
loose since installation.
• Keep this installation manual for future reference.
NOTICE
• Anymodicationoralterationfromwhatisspeciedinthisinstructionmanualwillvoidanyandallwarranty
on this product.
• The distributor is not responsible for any damage to the unit or personal property caused by improper
installation. If you disregard instructional warnings, you will void your warranty and possibly deal with water
damage.
• Consult www.ovedecors.com for any additional information or question on this product’s installation.
PREPARATION
You will need at least two people to install this unit properly.
Before beginning assembly of product, make sure all parts are present. Compare parts with package contents
list and hardware contents list. If any part is missing or damaged, do not attempt to assemble the product.
Estimated Assembly Time: Shower (60 min).
SAFETY INFORMATION

3
TABLE OF CONTENT
PACKAGE CONTENT.......................................................................................................................................... 5
HARDWARE CONTENT...................................................................................................................................... 6
TOOLS REQUIRED............................................................................................................................................. 6
SHOWER REVERSIBILITY.................................................................................................................................. 7
BASE INSTALLATION GUIDELINES (OPTIONAL)............................................................................................ 8
WALL TRACK INSTALLATION........................................................................................................................... 9
FIXED PANEL INSTALLATION......................................................................................................................... 10
SIDE PANEL INSTALLATION........................................................................................................................... 11
DOOR PANEL INSTALLATION......................................................................................................................... 13
HANDLE INSTALLATION & SEALING............................................................................................................. 14
LIMITED PRODUCT WARRANTY.....................................................................................................................15
CARE AND MAINTENANCE.............................................................................................................................15

4
PACKAGE CONTENT
O
Q
R
P

5
PACKAGE CONTENT
PART# DESCRIPTION QTY CODE
O Side panel 1
99SG10034-WM
P Sidepanelxture 2
99SGC1047-WM
Q Side panel’s bottom seal strip 1
99SRU0115
R Side panel’s clamp 1
99SGC1048-WM

6
HARDWARE CONTENT
Pencil Screwdriver
Drill with ceramic tile bits
3mm (1/8 in) & 8mm (5/16 in)
Level
Measuring Tape Silicone Rubber mallet
Box cutter
Ratchet
5 mm Bit socket
Safety glasses
PP
OO
QQ
RR SS TT UU
Screw
ST8x30mm
1x
Screw
ST5x25mm
2+1
Cap
4x
Cap
1x
Fitting
1x
Fitting
2x
Fitting
1x
TOOLS REQUIRED
DD
Screw
ST5x40mm
2+1
FF
Wall Anchor
ø8x30mm
2+1
Allen key
2.5mm & 4mm & 5mm

7
• This instruction is drawn up for an opening from right to left (see illustration A).
• For an installation from left to right (see illustration B), use the same instructions, but switch around the
panels: mirror effect.
SHOWER REVERSIBILITY
A
B

8
BASE INSTALLATION GUIDELINES (OPTIONAL)
1 2
4
Tile Wall
Studs
Drywall
Silicone
5
Shower Base
3
Shower Base
Cement
Floor
Wood shim
Flange
Stud
Drywall
Silicone
Flange

9
1. Ensure the base and walls are leveled. Place the metal track (B) approximately 20mm (3/4in) from the edge
of the base to the center of the metal track. Ensure the metal track (B) is leveled, then mark the holes clearly
on the wall using a pencil.
2.Removetrackanddrillpilotholesinthemarkedlocations.UsingΦ8mm(5/16in)ceramicdrillbit.
3.Insertthewallanchors(EE)usingarubbermalletuntilthewallanchorsareushwiththewall.
4. Replace and secure the metal track (B) with screws (CC). Do not overtighten.
WALL TRACK INSTALLATION
4
20mm
3/4in
20mm
3/4in
EE
CC
B
Note: Insert the door panel’s bottom seal strip (L) at the base of door
panel (C) and cut the surplus with a cutter. Place the door panel (C)
inside the shower enclosure to facilitate future steps.
Φ8mm
5/16in
2
3
Helpful Hint
Make sure there
is a support stud
located behind the
drywall, behind the
tracks!
1
B

10
2
1. Insertthexedpanel’sbottomsealstrip(I)atthebaseofthexedglasspanel(A),40mm(19/16in)fromthe
panel’s edge.
2. Place the sliding door guide (E) on the base. Ensure the distance that is shown in the image (2).
3. Mark the positions of holes of the sliding door guide (E) with a pencil, and drill pilot holes with a ø3mm (1/8in) drill
bit.
4. Fix the sliding door guide (E) with the screw (BB) and cap (KK). Ensure the plastic gasket in the guide is in place as
itprotectsthexedglasspanel
5-6. Placethexedglasspanel(A)intothewalltrack(B)andtheslidingdoorguide(E).
Note: The wall track (B) allows you to adjust the position of the xed glass panel (A). Adjusting the depth and/
or giving the xed glass panel a slight angle allows for precise alignment with the door.
7-8. Oncealladjustmentshavebeenmade,drillthexedpanel(A)withΦ3mm(1/8in)in3places,securethewall
track(B)usingscrews(AA),ttingsandcaps(FF).
FIXED PANEL INSTALLATION
1
A
I
E
Helpful Hint
Add a drop of
silicone in the
holes before
inserting the
screws
41.6mm
1 5/8in
565mm
22 1/4in
3
Φ3mm
1/8in
4
5
6
KK
BB
E
B
A
A
E
AA
A
A
7
Φ3mm
1/8in
FF
8

11
1. Place side panel’s vertical seal strip (Q) to the side panel (O).
2. Place the side panel onto the clamp (R).
3. Install the support bar’s anchors (N), support bar (D) and the stoppers (M) together.
4. Installthesupportbartothesidepanel(O),usingscrew(OO),tting(PP&QQ&RR)andcap(SS).
5. Installthexer(P)tothesidepanel(O),usingscrews(DD).
6-7. Markthepositionsofthexer(P)andtheclamp(R).
8-9. Removethexer(P)andtheclamp(R).
10. Place the clamp (R) back to it’s position without the plastic gasket, mark the holes.
SIDE PANEL INSTALLATION
5
9
6
7
4
10
8
1
2
OO
Q
O
R
O
D
M
N
3
SS
P
R
R
R
PP
QQ
RR
DD

12
1. Drill pilot holes with a ø3mm (1/8in) drill bit.
2. Secure the clamp (R) onto the base with screws (UU). Ensure the plastic gasket in the guide is in place as it
protects the side panel.
3-4. DrillpilotholesinthemarkedlocationsofthexerwithaΦ8mm(5/16in)drillbit.Insertthewallanthor(EE).
5-6. Install the side panel (O) and the support bar.
7-8. Scurethexer(P)tothewallanthor(EE)withscrew(DD)andthecap(TT).
SIDE PANEL INSTALLATION
EE
5
8
7
4
Φ8mm
5/16in
3
1
2
Φ3mm
1/8in
UU
R
EE
DD
TT
OO
SS
PP
QQ
RR
6

13
1. Install the 2 top rollers (K) on the door glass panel (C). Use a ratchet to strongly tighten the blots.
2. Insert the door bottom seal strip (L) onto the door panel (C).
3-4. Gently hang the door panel by its 2 top rollers on the support bar (D) and make sure to place the bottom of the
door inside the guide (E).
5. Install the 2 bottom rollers (K) on the door glass panel (C)
6-7. Install the 2 glass panels seal strips (F).
8. Using silicone, install the decorative metal track (J) in front of the door panel. Slide the decorative end caps (LL)
onto the track (J).
9. Install the door’s vertical seal strip (G) on the closing end.
DOOR INSTALLATION
3
8
4
9
6
K
C
JJ
E
C
C
A
J
C
G
5
7
2
1
K
L
C
C
A
C
F
LL
JJ
HH
HH
C

14
HANDLE INSTALLATION & SEALING
1. Install the door handle (H) using Allen keys (MM).
2. Ensure that the door closes tightly and opens smoothly, and that there is a tight connection between the side
glass panels and the frame as well as the support bar.
Applyaclearsiliconewatersealantaroundtheoutsideperimeterofanyxedshowercomponents(horizontally
betweenbottomofxedsideglasspanelandbase,aswellasverticallybetweenthewall,glassframes,and
any side glass panel).
Allow 24 hours for silicone to dry.
Improper application of silicone sealant may cause your shower to leak.
H
1
NN
MM
2

15
OVE Decors ULC
LIMITED Product Warranty
OVE is a distributor of the following Products:
• Shower Doors (warranty period 5 years).
• Acrylic Surfaces (warranty period 5 years against blistering, cracking or chipping in the acrylic surface).
• AcrylicShellStructure(warrantyperiod5yearsagainstlossofwaterthroughberglasslaminateoftheacrylicbody).
• Shower Hardware (handles, hinges, rubber support clips, metal support bars and wall tracks) (warranty period 1 year against defects in materials
or workmanship).
LimitedWarranty:OVEwarrantstotheoriginalretailpurchaserthatwithinareasonabletimeafternoticationfrompurchaser,OVEwillrepairor
replace the Product, or any part or component of the covered Product, distributed by OVE which is proven to the satisfaction of OVE to be defective in
workmanship or materials, and which has failed during normal use and within the warranty period. This Limited Warranty does not apply to Products
that have been damaged, or which fail, as a result of causes other than manufacturing defects (such as but not limited to improper installation; lack
of or improper care or maintenance; exposure to elements including corrosive products, environments or water; alteration; abuse or misuse). This
warrantydoesnotcoverdamagetonishes.ThewarrantycommencesontherstdateaProductispurchasedbythecustomer.Thiswarranty
applies exclusively to products purchased and used in non-commercial applications.
Warranty Claim Procedure: To make a claim please call 1-866-839-2888 to trouble-shoot the issue and start the claim process, or email info@
ovedecors.com. Products may be inspected or evaluated by OVE and any Product or component found to meet the above warranty criteria will be
repaired or replaced at OVE’s option. Replacement or repaired parts will be shipped at no cost to customer via ground freight only. Any expedited
methods of shipments are customer’s expense.
DISCLAIMER AND EXCLUSION OF WARRANTIES: This warranty is meant to be a complete and exclusive statement of
the terms of all limited warranties offered by OVE.
To the fullest extent permitted by law, other than the express warranty set forth in this instrument there are NO
WARRANTIES, EXPRESS OR IMPLIED, INCLUDING ANY IMPLIED WARRANTIES OF MERCHANTABILITY OR FITNESS FOR
A PARTICULAR PURPOSE EXTENDED BY OVE.
Thiswarrantygivesyouspeciclegalrights.Youmayalsohaverights,whichmayvaryunderapplicablestate,provinces,ornationallegislation,
whichcannotbedisclaimedormodiedbytheaboveDisclaimer.Exceptaspermitted,theDisclaimerisnotintendedtowaive,modify,releaseorlimit
the applicability of preemptive state, province, or national legislation inconsistent with the terms of this Limited Warranty and Disclaimer. However, to
theextentpermittedbylaw,noimpliedwarrantiesofmerchantabilityortnessareintendedorextendedhereunder.NotwithstandingtheDisclaimer
if any implied warranty is imposed by operation of law, to the extent permitted, the duration of such implied warranties is limited to the shorter of the
term of the express warranty or the applicable statute of limitations.
The Products listed above are intended to be installed and used for personal, consumer residential use. Use of Products for any other purpose such
as commercial purposes voids this warranty. The Limited Warranty is applicable only to the Products listed herein, and no warranty is extended to
productsnotdistributedbyOVE.Thewarrantyisapplicableonlytotherstretailpurchaser.
Transferability: This warranty is not transferrable.
LIMITATION AND EXCLUSION OF REMEDIES AND DAMAGES: OVE’s sole responsibility under this Limited Warranty shall
be to repair or replace, at its option, any defective Product or component. Purchaser agrees that this is the sole and
exclusive remedy under this Limited Warranty. OVE will not be responsible for any incidental, consequential, special or
indirect damages, including loss of use as a result of any manufacturing defect in a Product. OVE will not be responsible
for labor, or any other fees associated with removal or installation of warranted parts. Some states, provinces, or
national legislation do not allow the exclusion or limitation of incidental or consequential damages, so this limitation
may not apply to you.
Productmodication:OVEreservestherighttochange,modifyorimprovetheProductswithoutobligationtoincorporatesuchchangesinProducts
previously sold or installed.
AuthorityandModication:TheretailsellerisnottheagentofOVEandisnotauthorizedtovaryormodifythetermsoftheLimitedWarranty.In
addition, the retail seller cannot bind OVE or make any representations or promises about the Product that are binding on OVE.
CARE AND MAINTENANCE
For the daily maintenance, use a wet cloth and a soft liquid cleaner.
Never use abrasive cleaners containing some acetone, chlorine or strong bleach, scrapers, metallic brushes, nor other objects or the products which
can graze or tarnish surfaces.
Usearatchettostronglytightenanyboltsusedtosupportthexedglasspanelsordoorspanel(supportboltscanwithstandupto250lbf*inof
torque).
Check these bolts every 4 months and re-tighten them if necessary.

16
2800 Etienne Lenoir, Laval
Quebec H7R 0A3 Canada
Date de l’achat: _______________________ Numéro de référence du produit: ______________________
Questions, problèmes ou pièces manquantes?
Avant de retourner le produit à votre détaillant, contactez notre service à la clientèle au
1-866-839-2888, du lundi au vendredi de 9h00 à 17h00 HNE.
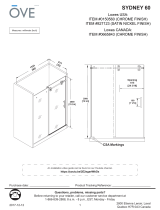
Mesures: millimètres [pouces]
ITEM #667449
SYDNEY PANNEAU LATÉRAL 32
1219 / 1524
[48] / [
60]
813
[32]
Ouverture
485 / 615
[19 3/32] / [24 7/32]
Marques CSA
2000
[78 3/4]
180
[7 3/32]
2000
[78 3/4]
Un guide d’installation video est disponible sur notre chaîne Youtube.
http://youtu.be/lr43d5co_4M
2016-03-04

17
AVERTISSEMENT
Veuillez lire attentivement les importantes consignes de sécurité suivantes avant la manutention et l’installation
de cette douche. La manipulation de ce produit présente un risque de blessure grave. Pour minimiser ces
risques, veuillez prendre note de ce qui suit:
• Toujours porter des lunettes et des gants de sécurité pendant la manutention.
• Toujours lire et suivre toutes les étapes indiquées dans les instructions d’installation.
• Avant l’installation, inspecter tout le contenu et le verre pour détecter toute forme de dommages.
• Pendant l’installation, faire très attention lorsque vous manipulez les pièces en verre, car le verre trempé peut
se fracasser s’il entre en contact avec une surface dure.
• Manipulez le verre trempé avec précaution sinon il pourrait se briser en petits morceaux (jamais en fragments
pointus).
• Prendre toujours toutes les précautions nécessaires pour que, pendant l’installation ou après, les outils que
vous utilisez n’entrent pas en contact avec le verre trempé.
• Nepascoupernimodierleverretrempé,carilpourraitsebriserenéclats’ilestcoupé.
• Sortir le produit de son emballage avec soin et le conserver jusqu’à ce que l’installation soit complétée.
• Inspectez toutes les pièces. S’il y a des dommages sur le produit avant l’installation, veuillez communiquer
avec le service à la clientèle au numéro indiqué dans ce guide.
• Installez la douche sur un plancher au niveau et capable de supporter le produit et son utilisateur.
• Veuillez consulter le code du batiment et les normes de conformité avant l’installation du produit.
• Après l’installation, et périodiquement, vérier l’assemblage et la nition des pièces en verre, pour vous
assurer qu’aucun élément ne s’est desserré depuis l’installation.
• Conserver le présent manuel d’instruction pour consultation future.
AVIS
• Toute modication ou altération apportée aux indications données dans le présent manuel d’instructions
annule toute garantie associée à ce produit.
• Le distributeur n’est pas responsable pour les dommages sur le produit ou sur la personne causés par une
installation inadéquate. Si vous ne tenez pas compte des indications du manuel d’instruction, vous annulerez
votre garantie et vous vous exposerez à des dommages causés par les fuites d’eau.
• Pour de plus amples renseignements sur l’installation du produit ou si vous avez des questions, veuillez
consulter le site www.ovedecors.com.
PRÉPARATION
2 personnes sont requises pour installer le produit correctement et sécuritairement.
Avant de commencer l’installation du produit, soyez assuré d’avoir toutes les pièces. Comparez les pièces
avec les listes fournies. S’il y a des pièces manquantes ou endommagées, ne tentez pas d’assembler le
produit.
Temps de montage estimé: douche (60 min).
INFORMATION SUR LA SÉCURITÉ

18
TABLE DES MATIÈRES
CONTENU DE L’EMBALLAGE..........................................................................................................................20
QUINCAILLERIE FOURNIE.............................................................................................................................. 21
OUTILS REQUIS............................................................................................................................................... 21
CETTE DOUCHE EST RÉVERSIBLE................................................................................................................ 22
GUIDE D’INSTALLATION DE LA BASE (OPTIONNEL)................................................................................... 23
INSTALLATION DU RAIL MURAL..................................................................................................................... 24
INSTALLATION DU PANNEAU FIXE................................................................................................................ 25
INSTALLATION DU PANNEAU LATÉRAL....................................................................................................... 26
INSTALLATION DE LA PORTE......................................................................................................................... 28
INSTALLATION DE LA POIGNÉE ET SCELLAGE.......................................................................................... 29
GARANTIE LIMITÉE DU PRODUIT..................................................................................................................30
TRAITEMENT ET ENTRETIEN......................................................................................................................... 30

19
CONTENU DE L’EMBALLAGE
O
Q
R
P

20
CONTENU DE L’EMBALLAGE
# DE PIÈCE
DESCRIPTION
QUANTITÉ
CODE
O Panneau latéral 1
99SG10034-WM
P Attache du panneau latéral 2
99SGC1047-WM
Q Joint d’étanchéité pour panneau latéral 1
99SRU0115
R Serre-joint pour panneau latéral 1
99SGC1048-WM
/