Hama ROC2309 Le manuel du propriétaire
- Catégorie
- Télécommandes
- Taper
- Le manuel du propriétaire

Hama GmbH & Co KG
86651 Monheim/Bayern GERMANY
Manufactured and commercialised
by HAMA under THOMSON
Trademark license
UNIVERSAL REMOTE CONTROL
Télécommande universelle
Universal Fernbedienung
Operating Instruction
Mode d'emploi
Bedienungsanleitung
ROC2309
00131872
UNIVERSAL
2
in
1
00131872bda.indd 1-300131872bda.indd 1-3 05.10.2009 9:33:19 Uhr05.10.2009 9:33:19 Uhr

ROC2309
00131872
Operating Instructions .......................................................... 01
Mode d‘emploi ....................................................................... 04
Bedienungsanleitung ............................................................. 07
Istruzioni per l‘uso ................................................................. 10
Instrucciones de uso ............................................................. 13
Gebruiksaanwijzing ............................................................... 16
Manual de instruções ............................................................ 19
Οδηγίες χρήσης..................................................................... 22
Руководство по эксплуатации ......................................... 25
Instrukcja obsługi ................................................................... 28
Návod k použití ...................................................................... 31
Használati útmutató .............................................................. 34
Bruksanvisning ....................................................................... 37
Brukerveiledning .................................................................... 40
Brugsanvisning ....................................................................... 43
Pistokelaturi ............................................................................ 46
1
GB
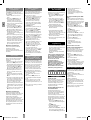
1
4
5
3
7
10
9
9
17
13
15
2
12
16
14
6
8
8
11
Characteristics - Caractéristiques - Eigenschaften - Caratteristiche
Características - Eigenschappen - Características - χαρακτηριστικά
Технические характеристики - Dane techniczne - Technické údaje
Karakterisztika - Data - Karakteristikker - Data - Ominaisuudet
Dimensions - Dimensions - Abmessungen - Dimensioni - Dimensiones
- Afmetingen - Dimensões -
Διαστάσεις - размеры -
Wymiary - Rozměry
- Méret
- Mått - Dimensjoner - Mål - Mitat
= 171 x 49 x 20 mm
Weight = 80 grammes
Poids = 80 grammes
Gewicht = 80 Gramm
Peso = 80 grammi
Peso = 80 gramos
Gewicht = 80 gram
Peso = 80 gramas
Βάρoς = 80 γραμμάρια
вес = 80 грамм
Ciężar = 80 g
Hmotnost = 80 g
Súly = 80 gramm
Vikt = 80 gram
Vekt = 80 gram
Vægt = 80 gram
Paino = 80 grammaa
AAA
This universal remote control (2 in 1) is compatible with the majority of television sets, DVD
players and video recorders, amplifi ers and Hi-Fi and Home Cinema systems, as well as
digital boxes such as satellite or cable receivers, DVBT receivers (Digital Video Broadcast
Terrestrial), ADSL decoders, and so on.
This remote control was programmed in the factory, so that you can use it to control most
of the sets of the THOMSON group’s make. For this reason, we recommend that prior to
attempting to programme the remote control, you try it out by means of one of the methods
described in this user manual. However, fi rst of all, you must install 2 batteries (AAA) in the
remote control.
Please keep this guide along with the code list (provided separately), so that you can
subsequently programme your remote control for use with other sets.
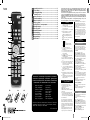
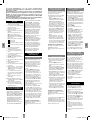
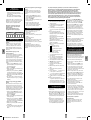
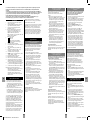
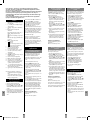
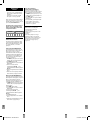
1 Indicator light: The red indicator light is lit
whenever a key is pressed.
2 G : On/Standby or Standby only, depending on
the equipment being used.
3 Mode keys: Select the device to control (TV, DVD,
…).
4. B (play): Play a DVD disc or a VCR tape*.
F (FF): Fast forward (DVD, VCR,...)*.
E (RW): Goes backward (DVD, VCR,...)*.
J (pause): Suspends play and stops on an
image*.
I (record): To record, press the RECORD key
twice.
K (stop): Stop the disc (DVD)*.
5. : Teletext On.
: Teletext Off.
: Teletext Hold (stop page scrolling).
: Displays information of the selected
appliance.
6 Guide: Electronic Program Guide.
7 Setup: Allows you to program your remote
before the fi rst use.
8 P+/P-: Channel Up and Channel Down buttons.
9. V+/V-: Increases (+) or decreases (-) the volume
of the selected device.
10. OK: Confi rms a selection.
11. C/D/A/B: Allow you to navigate the menus
verticaly and horizontaly.
12. Exit: Turn off the menu of the selected product.
13. H (Mute): Switches the selected appliance sound
off.
14. Menu: Turns on the menu of the selected product.
15. Numeric keys 0-9: These keys have the same
functions as those of your original remote and
are also used to enter the code.
16. :--/-: In connection with the numeric keys, this
button allows you, with some equipment, to select
directly channels with 2 digits.
17. AV: For selecting an external source (SCART,
HDMI, ...)..
Note: depending on the actual devices, manufacturers
and year of manufacture, the functions available
will vary.
* The coloured buttons can be used to select categories
when teletext is activated, and specifi c functions
depending on the make.
The keys
Testing the remote control before
you programme it
1. Switch on the set you want to control.
2. Press the key that corresponds to the type of
equipment you want to control:
TV: Television Set,
DVD: DVD Player, Video Recorder,
SAT: Satellite Receiver, Cable Receiver, ADSL Box,
DVBT Receiver, ...
3. Direct the remote control towards the TV set and
try to switch it off by simply pressing the key G. If
the device does not turn off, you must program the
remote control using one of the methods A, B, C or
D described hereafter.
Note 1: Except for the TV key, the DVD, SAT mode
keys can be programmed to control a device other
than that indicated on the key. It is therefore possible,
for example, to allocate SAT mode to the DVD key. You
must enter the code corresponding to the manufacturer
and the device by using one of the methods indicated
in this manual.
However, method D (automatic search for a code)
will greatly simplify the task for you. In this case it
is only necessary to enter a code from the list that
corresponds to the type of device, for example: 0603
for a Thomson satellite receiver) and then to run the
automatic search procedure. The remote control will
then test all the codes automatically until it fi nds those
that control the receiver.
Note 2: To control 2 devices of the same type and the
same brand (2 Thomson VCRs, 2 Thomson satellite
receivers, ...) ensure fi rst that these two devices are not
set to react to the same sub code, they will require one
sub code for one and a different sub code for the other
(i.e., codes A and B with Thomson devices). Once you
have checked this, successively program 2 separate
mode keys using method D.
Programming
the remote control
Method A – Fast programming
with 1-digit subcode
Before you start programming, you must fi nd the
subcode of the set to be controlled. Entering a subcode
lets the remote control test a predefi ned list of codes.
Refer to the list provided with these instructions, page I
of the subcodes.
1. Switch on the set you want to control.
2. Hold down the SETUP key until the red indicator
light blinks and then remains lit (the indicator light
remains on for a few seconds to give you the time to
proceed with the following steps. The indicator lamp
fl ashes to signal that this time is almost up, and then
goes off). Release the SETUP key.
3. Press the key that corresponds to the type of
equipment you want to control:
TV: television set, DVD: DVD player, Video
recorder, SAT: satellite receiver, cable, DVBT, ADSL
4. While the indicator is lit, type in the subcode
(example: 1 for THOMSON).
5. Direct the remote control towards the set and try to
switch it off by pressing the key G.
6. If the set you want to control switches off, press OK
to memorise the code.
7. Should the set not switch off, press key G repeatedly,
until the set switches off. Between pressing the keys,
be sure to leave enough time for the indicator light to
go out and then relight (about 1 second). Proceeding
this way will enable you to see whether the set
responds or not.
8. Immediately upon the switching-off of the set to be
controlled, press OK to store the code.
Check of the programming:
In principle, your set is ready for receiving the remote
control commands.
Check your remote control for proper functioning by
performing the test described on page 2.
Method B – 4-digit codes
programming
Before you start programming, you must fi nd the code
of the set to be controlled.
Refer to the list provided with these instructions, page
II of the codes.
1. Switch on the set you want to control.
2. Hold down the SETUP key until the red indicator
light blinks and then remains lit (the indicator light
remains on for a few seconds to give you the time to
proceed with the following steps. The indicator lamp
fl ashes to signal that this time is almost up, and then
goes off). Release the SETUP key.
3. Press the key that corresponds to the type of
equipment you want to control:
TV: television set, DVD: DVD player, Video
00131872bda.indd 4-Abs1:100131872bda.indd 4-Abs1:1 05.10.2009 9:33:23 Uhr05.10.2009 9:33:23 Uhr

2 3
GB
GB
A
recorder, SAT: satellite receiver, cable, DVBT, ADSL
and AMP: audio equipment.
4. While the indicator is lit, enter the fi rst digit of the
4-digit code proposed for the set to be controlled
(example: 0036 for Thomson).
5. Direct the remote control towards the set and try to
switch it off by pressing the key G.
6. Should the set not switch off, repeat step 2. Then
type in the next 4-digit code. Try to switch off the set
by pressing key G once. Repeat this procedure by
trying out each of the 4-digit codes.
Check of the programming:
In principle, your set is ready for receiving the remote
control commands.
Check your remote control for proper functioning by
performing the test described on page 2.
Method C – Programming by means
of code retrieval
Should none of the codes work, you still have the
possibility of retrieving the appropriate code without
having to perform any input.
1. Switch on the set you want to control.
2. Hold down the SETUP key until the red indicator
light blinks and then remains lit (the indicator light
remains on for a few seconds to give you the time
to proceed with the following steps. The indicator
lamp fl ashes to signal that this time is almost up,
and then goes off). Release the SETUP key.
3. Press the key that corresponds to the type of
equipment you want to control:
TV: television set, DVD: DVD player, Video
recorder, SAT: satellite receiver, cable, DVBT,
ADSL
4. Direct the remote control towards the set and try to
switch it off by pressing the key G.
5. If the set you want to control switches off, press
OK to memorise the code.
6. Should the set not switch off, press key G as many
times as required (up to 200 times), until the set
switches off. Between pressing the keys, be sure
to leave enough time for the indicator light to go
out and then relight (about 1 second). Proceeding
this way will enable you to see whether the set
responds or not.
7. Immediately upon the switching-off of the set to be
controlled, press OK to store the code.
Check of the programming:
In principle, your set is ready for receiving the remote
control commands.
Check your remote control for proper functioning by
performing the test described on page 2.
Try out other remote control keys to fi nd out the range
of functions you can control. If you think that not all
of the keys are active, repeat the procedure of this
programming method to fi nd out the code supporting a
wider range of features.
Method D – Automatic
code search
With this method, the remote control scrolls through
the full code list by sending an IR signal to the set to be
controlled remotely. Proceed as follows:
1. Switch on the set you want to control.
2. Hold down the SETUP key until the red indicator
light blinks and then remains lit (the indicator light
remains on for a few seconds to give you the time
to proceed with the following steps. The indicator
lamp fl ashes to signal that this time is almost up,
and then goes off).
3. Release the SETUP key.
4. Press the key that corresponds to the type of
equipment you want to control:
TV: television set, DVD: DVD player, Video
recorder, SAT: satellite receiver, cable, DVBT,
ADSL
5. Press the P+ or standby G or B (DVD/VCR only)
key. After a few seconds, the remote control begins
to scroll through the whole code list included in the
library (at a rate of roughly 1 code per second).
Press the P+ , G or B key once again to slow
down the test speed (1 code every 3 seconds). As
soon as the set changes channels (or turn off, or
start to play the disk), you must press OK to save
the code and stop the remote control scrolling
through the list. If you do not react quickly enough,
you can go back to the previous code by pressing
P- or E (DVD/VCR only) as many times as
necessary (you can go forward by pressing G ,
P+ or B (DVD/VCR only) if you have gone back
too far). As soon as the set responds again, press
OK to save the code.
Method E – Programming for control of a
COMBO (combined TV-VCR, TV/DVD, VCR/
DVD, … set)
Depending on the COMBO group (TV/VCR, VCR/
DVD, etc.) and the make, you will be required to
enter a single code for both devices in the COMBO,
or to enter two codes, one code per device. Consult
the separate list to discover this. Before you start
programming, you must fi nd the subcode or code
of the subset to be controlled (television or video
recorder...). Refer to the list supplied with this user
manual (see page subcodes or codes).
1. Switch on the COMBO you want to control.
2. Hold the SETUP key down until the red indicator
lamp blinks and then remains lit. Release the
SETUP key.
3. Press the key of the fi rst device to control, and then
follow one of the programming methods A, B, C or
D previously described.
4. If a second code programming is required, then
repeat steps 2 and 3 above.
How to retrieve
a programmed code
It may be useful to retrieve the code programmed in
the remote control.
1. Hold down the SETUP key until the red indicator
light blinks and then remains lit. Release the SETUP
key.
2. Press the key that corresponds to the type of
equipment you want to control:
TV: television set, DVD: DVD player, Video
recorder, SAT: satellite receiver, cable, DVBT,
ADSL.
3. Press the SETUP key again briefl y, the indicator
light blinks once.
4. Press the number keys (0 to 9) until you notice that
the indicator lamp blinks once.
5. The number which made the indicator lamp blink
is the fi rst of the four fi gures comprising your code,
write it down.
6. Repeat step 3 to fi nd out the 3 other numbers of
the code.
7. When the fourth fi gure is found, the indicator lamp
goes out.
Check of
the programming
- For a television or a satellite receiver: switch on
and, for example, press 2 to change channels,
etc...
- Video recorder: load a tape and then press B.
- DVD player: load a DVD and then press B.
Try other remote control keys to fi nd out the range of
functions you can control. If you think that not all of the
keys are active, try the programming Method B or C.
When you have retrieved the code of
your set, jot it down so that you can use it
whenever needed.
After battery replacement, you may have to
programme the remote control again.
Other functions
Placing all devices on standby
Press the G key twice in less than one second, keeping
it held down the second time. All the devices go on
standby one after the other (the devices which were
already on Standby may turn on).
Adjustment of ALL volume controls under a
specifi c mode
In its delivered state, the ROC6309 is programmed
such that all modes will use their own Volume and
Mute functions if present.
You can allocate the volume control to one of the
modes of the remote control on condition that the
volume control exists on the corresponding device
(e.g. control of TV sound in TV mode, DVD mode, VCR
Mode, etc.).
1. Hold the SETUP key down until the red indicator
lamp blinks and then remains lit.
2. Release the SETUP key
3. Press the
H key until the red indicator lamp blinks
once.
4. Press once on the mode key (TV, DVD, …)
corresponding to the device whose volume will
always be controlled by the VOL and H keys.
5. Press the H key once. The red indicator lamp goes
off.
6. All other mode will now punch-through to your
chosen mode for Volume and Mute control.
Adjustment of the volume controls for EACH
mode.
You can decide that the volume control is functional
for each mode selected on condition that the volume
control exists on the corresponding device (e.g. control
of the television set sound in TV mode, the control of
the sound of the SAT receiver in SAT mode, …).
1. Hold the SETUP key down until the red indicator
lamp blinks and then remains lit.
2. Release the SETUP key
3. Press the H key until the red indicator lamp blinks
once.
4. Press once on the mode key (TV, DVD, …)
corresponding to the device whose volume will
always be controlled by the VOL and H keys.
5. Press the VOL- key once.
6. Press the H key once. The red indicator lamp goes
off.
7. The chosen mode key will now use its own Volume
and Mute functions
Restoring the universal Volume/Mute
functions
If you have changed the universal volume and mute
functions, as described in the previous two sections,
you can reset the functions back to the factory settings:
1. Hold the SETUP key down until the red indicator
lamp blinks and then remains lit.
2. Release the SETUP key
3. Press the H key until the red indicator lamp blinks
once.
4. Press and release the H key. The red indicator
lamp will go off completely. The volume and mute
functions are now restored to their factory defaults.
TV CODE DVD/SAT CODE
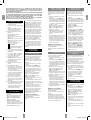
Replacing the batteries
Use 2 AAA 1.5 Volt batteries
1. Open the cover on the back of the remote control.
2. Check the +/– polarity on the batteries and inside
the compartment.
3. Insert the batteries.
4. Press the battery cover back into place.
When exchanging the batteries, it may be necessary to
reprogram the unit. Hence it is advisable to record the
codes needed for your devices.
00131872bda.indd Abs1:2-Abs1:300131872bda.indd Abs1:2-Abs1:3 05.10.2009 9:33:25 Uhr05.10.2009 9:33:25 Uhr

4 5
F
F
A
Cette télécommande universelle (2 en 1) est compatible avec la plupart des téléviseurs,
lecteurs DVD, magnétoscopes, les amplifi cateurs et les systèmes Hi-Fi et Home Cinéma
ainsi que la plupart des boîtiers numériques tels que les récepteurs satellite ou câble, les
récepteurs TNT, les décodeurs ADSL, etc…
La télécommande a été programmée en usine pour vous permettre de l’utiliser immédiatement
avec la plupart des appareils des marques du groupe Thomson. Nous vous conseillons donc
de l’essayer avant de la programmer en suivant une des méthodes de cette notice. Mais
avant tout, vous devez installer 2 piles (AAA) dans la télécommande.
Conservez cette notice et la liste des codes séparée afi n de pouvoir reprogrammer
ultérieurement la télécommande pour commander d’autres appareils.
1 Voyant lumineux: Le voyant rouge s'allume dés
qu’une touche est pressée.
2 G : Marche/Veille ou Veille uniquement selon les
appareils.
3 Touches colorées: Utilisables pour le choix
de rubriques lorsque le télétexte est activé, et
fonctions spécifi ques selon la marque.
4. B (lecture): Lecture d'un disque ou cassette
(DVD, VCR, ...)*.
F (avance rapide): Permet d'avancer
rapidement (DVD, VCR, ...)*.
E (retour rapide): Permet de revenir en arrière
(DVD, VCR, ...)*.
J (Pause): Arrête la lecture et arrêt sur image *.
I (enregistrement): Pour lancer l'enregistrement,
appuyez 2 fois sur la touche.
K (Stop): Arrête le disque (DVD, VCR, ...)*
5. : Mise en marche télétexte.
: Arrêt du télétexte.
: Arrêt de l’alternance des pages (télétexte).
: Affi che des informations de l'appareil
sélectionné.
6 Guide: Guide électronique des programmes.
7. Setup: Cette touche vous permet de programmer
la télécommande.
8 P+/P-: Touches Programme + ou Programme -.
9. V+/V-: Permet d'augmenter ou de diminuer le
volume sonore de l'appareil sélectionné.
10. OK: Confi rmation d'une selection.
11. C/D/A/B: Touches de direction. Elles vous
permettent de naviguer horizontalement et
verticalement dans les menus.
12. Exit: Sortie du menu de la TV.
13. H (Mute): Coupure du son de l'appareil
sélectionné.
14. Menu: Affi chage du menu de la TV.
15. Touches numériques 0-9: Elles ont les mêmes
fonctions que les touches numériques de votre
télécommande habituelle et servent en plus à
entrer les codes des appareils.
16. --/-: Permet, pour certains appareils, d'entrer
les chaînes à 2 chiffres. Appuyez d'abord sur
cette touche puis sur les touches numériques
correspondant au numéro de la chaîne.
17. AV: Sélection d’une source externe (SCART,
HDMI, ...).Note : selon les appareils, les
marques et les années de commercialisation des
appareils, les fonctions couvertes seront plus ou
moins étendues.
Note: selon les appareils, les marques et les années de
commercialisation des appareils, les fonctions
couvertes seront plus ou moins étendues.
* Touches colorées, utilisables pour le choix
de rubriques lorsque le télétexte est activé, et
fonctions spécifi ques selon la marque.
Description des touches
Essai de la télécommande sans
l’avoir programmée
1. Mettez en marche l’appareil que vous souhaitez
commander.
2. Appuyez sur la touche correspondant au type
d’appareil à commander : TV : Téléviseur,
DVD : Lecteur DVD, SAT : Satellite, Câble,
Adaptateur TNT, boîtier ADSL, …
3. Dirigez la télécommande vers l’appareil à
commander et essayez de l’éteindre avec la
touche G. Si l’appareil ne s’éteint pas, vous devrez
programmer la télécommande en suivant une des
méthodes A, B, C ou D décrites ci-après.
Note 1: Exceptée la touche TV, chaque touche de mode
(DVD, VCR, SAT) est programmable pour commander
un appareil autre que celui indiqué sur la touche. Il
est donc possible d'attribuer, par exemple, le mode
SAT à la touche DVD. Vous devrez entrer le code
correspondant à la marque et à l'appareil désiré en
suivant une des méthodes indiquées dans ce manuel.
Cependant, la méthode D (recherche automatique d'un
code) vous simplifi era la tâche. Il vous suffi ra d'entrer
n'importe quel code de la liste correspondant au
type d'appareil (ex : 0603 pour un récepteur satellite
Thomson) puis de lancer la procédure de recherche
automatique. La télécommande testera ainsi tous les
codes jusqu'à trouver celui qui fera réagir le récepteur.
Note 2: Pour commander 2 appareils de mêmes
types et de mêmes marques (2 magnétoscopes
Thomson, 2 récepteurs satellite Thomson, ...) assurez
vous au préalable, que ces deux appareils sont déjà
paramétrés pour ne réagir qu'à un sous code pour
l'un et à un autre sous code pour l'autre (code A et
B pour les appareils Thomson). Programmez ensuite
et successivement 2 touches de mode en utilisant la
méthode D.
Programmation
de la télécommande
Méthode A - Programmation rapide
avec un sous-code à 1 chiffre
Avant de commencer la programmation, recherchez
le sous-code de l’appareil que vous souhaitez
commander. L'entrée d'un sous-code permet à la
télécommande de tester une liste prédéfi nie de codes.
Reportez-vous à la liste jointe à cette notice, page I des
sous-codes.
1. Mettez en marche l’appareil que vous souhaitez
commander.
2. Maintenez appuyée la touche SETUP jusqu'à ce
que le voyant rouge clignote puis reste allumé (le
voyant restera allumé quelques secondes pour vous
laissez le temps de procéder aux étapes suivantes.
Le clignotement du voyant indique la fi n du temps
disponible, puis il s’éteint).
3. Appuyez sur la touche correspondant au type
d’appareil à commander : TV : Téléviseur,
DVD : Lecteur DVD, SAT : Satellite, Câble,
Adaptateur TNT, boîtier ADSL, …
4. Pendant que le voyant est allumé, tapez le sous-code
(ex : 1 pour Thomson).
5. Dirigez la télécommande vers l’appareil et essayez
de l’éteindre en appuyant une fois sur la touche G .
6. Si l’appareil à commander s’éteint, appuyez sur OK
pour mémoriser le code.
7. Si l’appareil ne s’éteint pas, appuyez de nouveau
sur la touche G, plusieurs fois jusqu’à ce que
l’appareil s’éteigne. Entre deux appuis, laissez le
temps au voyant de s’éteindre puis de se rallumer
(environ 1 seconde). Ceci vous permet de vous
rendre compte de la réaction de l’appareil.
8. Dès que l’appareil à commander s’éteint, appuyez
sur OK pour mémoriser le code.
Vérifi cation de la programmation :
Votre appareil est, en principe, prêt à recevoir les
ordres de la télécommande.
Vérifi ez le fonctionnement en procédant au test de
la page 6.
Méthode C – Programmation
par recherche de code
Si aucun code ne fonctionne, il est possible de
retrouver le code sans avoir à le taper.
1. Mettez en marche l’appareil que vous souhaitez
commander.
2. Maintenez appuyée la touche SETUP jusqu'à ce
que le voyant rouge clignote puis reste allumé (le
voyant restera allumé quelques secondes pour vous
laissez le temps de procéder aux étapes suivantes.
Le clignotement du voyant indique la fi n du temps
disponible, puis il s’éteint).
3. Appuyez sur la touche correspondant au type
d’appareil à commander : TV : Téléviseur,
DVD : Lecteur DVD, SAT : Satellite, Câble,
Adaptateur TNT, boîtier ADSL, …
4. Dirigez la télécommande vers l’appareil et essayez
de l’éteindre en appuyant une fois sur la touche G.
5. Si l’appareil à commander s’éteint, appuyez sur
OK pour mémoriser le code.
6. Si l’appareil ne s’éteint pas, appuyez de nouveau
sur la touche G, autant de fois que nécessaire
(jusqu’à 200 fois) jusqu’à ce que l’appareil
s’éteigne. Entre deux appuis, laissez le temps au
voyant de s’éteindre puis de se rallumer (environ 1
seconde). Ceci vous permet de vous rendre compte
de la réaction de l’appareil.
7. Dès que l’appareil à commander s’éteint, appuyez
sur OK pour mémoriser le code.
Vérifi cation de la programmation :
Votre appareil est, en principe, prêt à recevoir les
ordres de la télécommande.
Vérifi ez le fonctionnement en procédant au test de
la page 6.
Essayez d’autres touches de la télécommande
pour connaître l’étendue des fonctions que votre
télécommande peut commander. Si vous pensez que
toutes les touches ne sont pas actives, renouvelez la
procédure de cette méthode de programmation afi n de
trouver un code couvrant plus de fonctions.
Méthode D – Recherche
automatique d’un code
Dans le cadre de cette méthode, la télécommande
déroule la liste complète des codes en envoyant un
signal IR à l’appareil à télécommander. Procédez
ainsi :
1. Mettez en marche l’appareil que vous souhaitez
commander.
2. Maintenez appuyée la touche SETUP jusqu'à ce
que le voyant rouge clignote puis reste allumé (le
voyant restera allumé quelques secondes pour vous
laissez le temps de procéder aux étapes suivantes.
Le clignotement du voyant indique la fi n du temps
disponible, puis il s’éteint).
3. Relâchez la touche SETUP
4. Appuyez sur la touche de l’équipement souhaité
(par exemple TV).
5. Appuyez une seule fois sur la touche PROG+ ou
G ou B (DVD/VCR seulement). Après quelques
secondes la télécommande commence à dérouler
toute la liste de codes inclus dans la bibliothèque
(environ 1 code par seconde). Appuyer une
deuxième fois sur PROG+ pour réduire la vitesse
de test (1 code toutes les 3 secondes). Dès que
l’appareil change de chaîne, vous devez appuyer
immédiatement sur OK pour enregistrer le code et
stopper le déroulement de la liste. Si vous n’avez
pas réagi assez vite, vous avez la possibilité
de revenir au code précédent en appuyant sur
PROG- ou E ((DVD/VCR seulement) autant
de fois que nécessaire (vous pouvez réavancer
en appuyant sur G , P+ ou B (DVD/VCR
seulement) si vous êtes allés trop en arrière). Dès
que l’appareil répond à nouveau, appuyez sur
OK pour enregistrer le code.
Méthode E - Programmation pour com-
mander un COMBO (combiné TV/VCR,TV/
DVD,VCR/DVD, …)
Selon la famille de combo (TV/VCR,VCR/DVD,…) et
la marque, vous serez amené à entrer un seul code
pour les deux appareils réunis dans le combo ou à
entrer deux codes, un code par appareil. Reportez-
vous à la liste séparée pour le savoir.
Avant de commencer la programmation, recherchez le
sous-code ou le code de l’appareil que vous souhaitez
commander (ex. : téléviseur puis magnétoscope ou
COMBO TV/VCR). Reportez-vous à la liste jointe à
cette notice, page des sous-codes ou page des codes.
1. Mettez en marche le COMBO que vous souhaitez
commander.
2. Maintenez appuyée la touche SETUP jusqu'à ce
que le voyant rouge clignote puis reste allumé.
3. Appuyez sur la touche du premier appareil
à commander, puis suivez une des méthodes
de programmation A, B, C ou D décrites
précédemment.
4. Si un deuxième code est nécessaire, répétez les
étapes 2 et 3 ci-dessus.
Comment retrouver
un code programmé
Il peut être utile de retrouver le code programmé dans
la télécommande.
1. Maintenez appuyée la touche SETUP jusqu'à ce
que le voyant rouge clignote puis reste allumé.
2. Appuyez sur la touche correspondant au type
d’appareil à commander : TV : Téléviseur,
DVD : Lecteur DVD, SAT : Satellite, Câble,
Adaptateur TNT, boîtier ADSL, …
3. Appuyez à nouveau brièvement sur la touche
SETUP, le voyant clignote 1 fois.
4. Appuyez sur les touches numériques dans l'ordre
croissant (0 à 9) jusqu'à ce que le voyant rouge
clignote une fois.
5. Le chiffre qui a fait clignoter le voyant est le
premier des quatre chiffres composant votre code,
notez-le.
6. Répétez l'étape 4 pour retrouver les autres chiffres
du code.
7. Lorsque le quatrième chiffre est trouvé, le voyant
s’éteint.
Méthode B – Programmation
avec des codes à 4 chiffres
Avant de commencer la programmation, recherchez le
code de l’appareil que vous souhaitez commander.
Reportez-vous à la liste jointe à cette notice, page II
des codes.
1. Mettez en marche l’appareil que vous souhaitez
commander.
2. Maintenez appuyée la touche SETUP jusqu'à ce
que le voyant rouge clignote puis reste allumé (le
voyant restera allumé quelques secondes pour vous
laissez le temps de procéder aux étapes suivantes.
Le clignotement du voyant indique la fi n du temps
disponible, puis il s’éteint).
3. Appuyez sur la touche correspondant au type
d’appareil à commander : TV : Téléviseur,
DVD : Lecteur DVD, SAT : Satellite, Câble,
Adaptateur TNT, boîtier ADSL, …
4. Pendant que le voyant est allumé, tapez un des
codes à 4 chiffres proposés pour la marque
de l’appareil à commander (ex : 0166 pour
Thomson).
5. Dirigez la télécommande vers l’appareil et essayez
de l’éteindre en appuyant une fois sur la touche G.
6. Si l’appareil ne s’éteint pas, répétez l’étape 2.
Tapez ensuite, le code à 4 chiffres suivant. Essayez
d’éteindre l’appareil en appuyant une fois sur
la touche G. Renouveler l’opération en essayant
chacun des codes à 4 chiffres.
Vérifi cation de la programmation :
Votre appareil est, en principe, prêt à recevoir les
ordres de la télécommande.
Vérifi ez le fonctionnement en procédant au test de
la page 6.
00131872bda.indd Abs1:4-Abs1:500131872bda.indd Abs1:4-Abs1:5 05.10.2009 9:33:26 Uhr05.10.2009 9:33:26 Uhr

6 7
F
D
Vérifi cation
de la programmation
- Pour un téléviseur ou un récepteur satellite :
allumez l’appareil et appuyez, par exemple, sur 2
pour changer de chaîne.
- Pour un magnétoscope: insérez une cassette puis
appuyez sur B .
- Pour un lecteur DVD: insérez un disque puis
appuyez sur B .
Essayez d’autres touches de la télécommande
pour connaître l’étendue des fonctions que votre
télécommande peut commander. Si vous pensez que
toutes les touches ne sont pas actives, essayez une
autre méthode de programmation, Méthode B ou C.
Lorsque vous aurez trouvé le code de votre
appareil, notez-le afi n de vous y reporter
facilement en cas de besoin. Lorsque vous
changerez les piles, vous pourrez être
amené à reprogrammer la télécommande.
A
CODE TV CODE DVD/SAT
Autres fonctions
Mise en veille de tous les appareils
Appuyez 2 fois en moins d’une seconde, sur la touche
G en la maintenant appuyée la deuxième fois. Tous les
appareils s’éteignent les uns après les autres (Attention:
les appareils déjà en veille risquent de s'allumer).
Réglage de TOUTES les commandes de
volume sous un mode déterminé
En sortie d'usine, votre ROC6309 est programmée
de telle façon que chaque mode contrôle son propre
volume si celui-ci existe sur l'appareil sélectionné.
Vous pouvez affecter le contrôle du volume sonore à
un des modes de la télécommande à condition que
le contrôle du volume sonore existe sur l’appareil
correspondant (ex : contrôle du son TV en modes TV,
DVD, VDR, SAT/CAB et AUDIO/AUX).
1. Maintenez appuyée la touche SETUP jusqu'à ce
que le voyant rouge reste allumé.
2. Relâchez la touche SETUP.
3. Appuyez sur la touche H jusqu'à ce que la touche
de mode clignote une fois.
4. Appuyez une fois sur la touche de mode (TV, DVD,
…) correspondant à l’appareil dont le volume sera
toujours commandé par les touches VOL et H .
5. Appuyez une fois sur la touche H , la touche de
mode s'éteint.
6. Les touches Volume et contrôle désormais le
Volume de l'appareil choisi quel que soit le mode
sélectionné sur la télécommande.
Réglage des commandes de volume pour
CHAQUE mode.
Vous pouvez décider que le contrôle du volume soit
fonctionnel pour chaque mode choisi à condition
que le contrôle du volume existe sur l’appareil
correspondant (ex : commande du son du téléviseur en
mode TV, puis commande du son d’un récepteur SAT
en mode SAT, …).
1. Maintenez appuyée la touche SETUP jusqu'à ce
que le voyant rouge reste allumé.
2. Relâchez la touche SETUP.
3. Appuyez sur la touche H jusqu'à ce que la touche
de mode clignote une fois.
4. Appuyez une fois sur la touche de mode (TV,
DVD, …) correspondant à l’appareil dont le
volume sera toujours commandé par les touches
VOL et H .
5. Appuyez une fois sur la touche VOL-.
6. Appuyez une fois sur la touche H , le voyant
s'éteint.
7. Les touches Volume et du mode choisi
contrôleront désormais l'appareil sélectionné.
Réactivation de la fonction universelle de
volume et de désactivation du son
Si vous avez modifi é les fonctions de volume et de
désactivation du son comme décrit dans les deux
sections précédentes, il est possible de réactiver les
paramètres d'usine de ces fonctions.
1. Maintenez appuyée la touche SETUP jusqu'à ce
que le voyant rouge reste allumé.
2. Relâchez la touche SETUP.
3. Appuyez sur la touche H jusqu'à ce que la touche
de mode clignote une fois.
4. Appuyez encore une fois sur la touche H . Le
voyant s'éteint défi nitivement. Les réglages d'origine
des fonctions de volume et de désactivation du son
sont maintenant rétablis.
Remplacement des piles
Utilisez 2 piles AAA 1.5Volt.
1. Ouvrez le compartiment piles à l'arrière de la
télécommande.
2. Enlevez les piles usagées.
3. Vérifi ez la polarité +/- sur les piles et à l'intérieur
du compartiment piles de la télécommande.
4. Insérez les piles.
5. Refermez le compartiment.
Lorsque vous changez les piles, il peut être nécessaire
de reprogrammer la télécommande. C'est pourquoi
nous vous conseillons de noter les codes utilises pour
chacun de vos appareils.
Les piles usagées ne sont pas des déchets domestiques
! Elles doivent être déposées dans un lieu de collecte
de piles usagées.
Diese Universalfernbedienung (2 in 1) ist mit den meisten infrarotgesteuerten Fernsehgeräten,
Videorecordern, DVDPlayern und Satellitenempfängern sowie mit den Digital Video Broadcast
Terrestrial-Empfängern (DVBT) kompatibel.
Die Fernbedienung wurde im Werk programmiert, damit Sie sie sofort zum Steuern des größten
Teils der Geräte der
Marken des THOMSON-Konzerns benutzen können. Deshalb empfehlen wir Ihnen, die Fernbe-
dienung anhand einer der in dieser Bedienungsanleitung beschriebenen Methoden auszuprobie-
ren, bevor Sie versuchen, sie zu programmieren. Zuerst müssen die zwei AAA Batterien in die
Fernbedienung eingelegt werden.
Bitte bewahren Sie diese Bedienungsanleitung und die separate Codeliste unbedingt auf, um
die Fernbedienung zu einem späteren Zeitpunkt zum Steuern anderer Geräte programmieren
zu können.
1 Leuchtanzeige: Die rote Leuchtanzeige leuchtet
auf, wenn eine Taste gedrückt wird.
2 G: Ein/Standby oder nur Standby, abhängig von
den verwendeten Geräten.
3 MODUS-TASTEN: Zum Auswählen des zu
bedienenden Geräts (TV, DVD...)
4. B (Wiedergabe): Wiedergabe einer DVD oder
einer Videokassette*.
F (Schneller Vorlauf): Schneller Vorlauf (DVD,
VCR,...)*.
E (Rücklauf): Rücklauf (DVD, VCR,...)*.
J (Pause): Hält die Wiedergabe an und stoppt
auf einem Bild*
I (Aufnahme): Drücken Sie die Aufnahmetaste
zweimal, um die Aufnahme zu starten.
K (Stopp): Stoppt die Disk (DVD)*
5. : Teletext ein
: Teletext aus
: Teletext anhalten (Bildlauf stoppen)
: Zeigt Informationen des ausgewählten
Geräts an
6 Guide: Elektronischer Programmführer
7 Setup: Ermöglicht die Programmierung vor der
ersten Nutzung.
8 P+/P-: Tasten zum Umschalten auf den nächsten
bzw. vorherigen Kanal
9. V+/V-: Erhöht (+) bzw. vermindert (-) die
Lautstärke des ausgewählten Geräts
10. OK: Bestätigung der Auswahl
11. C/D/A/B: Ermöglicht die vertikale und
horizontale Navigation durch die Menüs
12. Exit: Schaltet das Menü des ausgewählten
Produkts aus
13. H (Stumm): Schaltet den Ton des ausgewählten
Geräts aus
14. Menu: Schaltet das Menü des ausgewählten
Produkts ein
15. Nummerntasten 0-9: Diese Tasten haben
dieselben Funktionen wie die auf Ihrer
Original-Fernbedienung und werden außerdem
verwendet, um den Code einzugeben.
16. :--/-: In Verbindung mit den Nummertasten
ermöglicht Ihnen diese Taste bei einigen
Geräten eine direkte zweistellige Anwahl von
Programmen.
17. AV: Zur Auswahl einer externen Quelle (SCART,
HDMI usw.)
Hinweis: Je nach Geräten, deren Herstellern und
Herstellungsjahren können sich die verfügbaren
Funktionen unterscheiden.
* Die farbigen Tasten können bei aktiviertem
Teletext zur Auswahl von Kategorien und
speziellen Funktionen (je nach Aufbau der
Menüs) verwendet werden.
Die Tasten
Testen der noch nicht
programmierten Fernbedienung
1. Schalten Sie das Gerät ein, das Sie steuern
möchten.
2. Die Taste drücken, welche der zu steuernden
Geräteart entspricht:TV: Fernseher, DVD: DVD-
Player, Videorekorder, SAT: Satelliten-Receiver,
Kabel-Receiver, ADSL-Box, DVBT-Receiver usw.
3. Richten Sie die Fernbedienung auf das zu steuernde
Gerät und versuchen Sie, es mit der Taste G
auszuschalten. Wenn sich das Gerät nicht
ausschaltet, müssen Sie die Fernbedienung nach
einer der nachstehend beschriebenen Methoden A,
B, C oder D programmieren.
Hinweis 1: Mit Ausnahme der TV-Taste sind alle
Modustasten (DVD, ...) programmierbar, um
ein anderes Gerät als das auf der Taste angegebene
zu steuern. So können Sie zum Beispiel den STB Modus
der Taste STB zuordnen. Sie müssen den der
Marke und dem gewünschten Gerät entsprechenden
Code eingeben, indem Sie eine der in dieser
Bedienungsanleitung beschriebenen Methoden
befolgen. Methode D (automatische Codesuche)
erleichtert Ihnen diesen Vorgang. Sie brauchen nur
irgendeinen Code der Liste einzugeben, welche dem
Gerätetyp entspricht (z.B. 0603 für einen Thomson-
Satellitenempfänger), und dann den automatischen
Suchvorgang zu starten. Die Fernbedienung testet
dann alle Codes, bis sie den Code gefunden hat, auf
den der Empfänger anspricht.
Hinweis 2: Um zwei Geräte des gleichen Typs und
der gleichen Marke zu steuern (2 Thomson-
Videorecorder, 2 Thomson-Satellitenempfänger), sich
zunächst vergewissern, dass diese beiden Geräte
bereits so parametriert sind, dass das eine Gerät nur
auf einen Untercode und das andere Gerät auf einen
anderen Untercode reagiert (Codes A und B für die
Thomson-Geräte). Dann nacheinander zwei
Modustasten nach Methode D programmieren.
Programmieren der
Fernbedienung
Methode A – Schnelles Programmieren
mit 1-stelligem Untercode
Bevor Sie mit dem Programmieren beginnen, müssen
Sie den Untercode des zu bedienenden Geräts fi nden.
Nach der Eingabe des Untercodes überprüft die
Fernbedienung ein vorgegebenes Codeverzeichnis.
Lesen Sie hierzu Seite I der dieser Bedienungsanleitung
beigelegten Liste mit den Untercodes.
1. Schalten Sie das Gerät ein, das Sie steuern
möchten.
2. Halten Sie die Taste SETUP gedrückt, bis die
rote Anzeigelampe blinkt und anschließend
ununterbrochen leuchtet. (Sie leuchtet einige
Sekunden lang, um Ihnen Zeit für die folgenden
Schritte zu geben. Kurz vor Ablauf der Zeit blinkt
sie wieder und erlischt dann.)
3. Die Taste drücken, welche der zu steuernden
Geräteart entspricht:TV: Fernseher, DVD: DVD-
Player, Videorekorder, SAT: Satelliten-Receiver,
Kabel-Receiver, ADSL-Box, DVBT-Receiver usw.
4. Wenn die Anzeige leuchtet, den Untercode
eintippen (z. B. 1 für THOMSON).
5. Richten Sie die Fernbedienung auf das Gerät, und
versuchen Sie, es mit der Taste G auszuschalten.
6. Sobald sich das zu bedienende Gerät abschaltet,
drücken Sie zur Abspeicherung des Codes auf die
OK Taste.
7. Sollte sich das Gerät nicht ausschalten, erneut
mehrmals die Taste G drücken, bis sich das Gerät
ausschaltet. Zwischen zwei aufeinanderfolgenden
Tastenbetätigungen, müssen Sie ca. 1 Sekunde
warten, um der Betriebsartenleuchte genügend Zeit
zum Verlöschen und Wiederaufl euchten zu geben.
Auf diese Weise können Sie feststellen, ob das
Gerät reagiert oder nicht.
8. Sowie sich das zu steuernde Gerät ausschaltet, auf
OK drücken, um den Code zu speichern.
Überprüfen der Programmierung:
Ihr Gerät ist im Prinzip bereit, die Befehle der
Fernbedienung zu empfangen.
Prüfen Sie das korrekte Funktionieren Ihrer
Fernbedienung, indem Sie den Funktionstest auf
Seite 9 durchrühren.
00131872bda.indd Abs1:6-Abs1:700131872bda.indd Abs1:6-Abs1:7 05.10.2009 9:33:26 Uhr05.10.2009 9:33:26 Uhr
La page est en cours de chargement...
La page est en cours de chargement...
La page est en cours de chargement...
La page est en cours de chargement...
La page est en cours de chargement...
La page est en cours de chargement...
La page est en cours de chargement...
La page est en cours de chargement...
La page est en cours de chargement...
La page est en cours de chargement...
La page est en cours de chargement...
La page est en cours de chargement...
La page est en cours de chargement...
La page est en cours de chargement...
La page est en cours de chargement...
La page est en cours de chargement...
La page est en cours de chargement...
La page est en cours de chargement...

44 45
DK
DK
Metode C – Programmering
ved søgning efter kode
Såfremt ingen af koderne er gyldige, er det muligt at
fi nde den rigtige kode uden at indtaste den direkte.
1. Tænd for det apparat, som De ønsker at betjene.
2. Hold SETUP-tasten inde, indtil den røde
indikatorlampe blinker og derefter lyser permanent.
3. TV: Tv-apparat, DVD: Dvd-afspiller,
videobåndoptager, SAT: Satellitmodtager,
kabelmodtager, ADSL-boks, DVBT-modtager, ...
4. Hold fjernbetjeningen hen mod apparatet og prøv
at slukke for det ved at trykke en gang på tasten G.
5. Så snart apparatet slukker, tryk på OK for at lagre
koden.
6. Hvis apparatet ikke slukker, tryk da igen på tasten
G så mange gange, som det er nødvendigt (indtil
200 gange), indtil apparatet slukker. Giv tasten
som svarer til det sidst valgte mode tid til at slukke
og tænde efter hvert tryk (ca. 1 sekund). Dette gør
det muligt for Dem at observere apparatets
reaktion.
7. Så snart det apparatet, der skal betjenes, slukker,
tryk da på OK for at lagre koden.
Kontrol af programmeringen:
Nu er Deres apparat i princippet klar til at modtage
ordrer fra fjernbetjeningen.
Kontroller programmeringen ved at udføre testen på
side 45.
Afprøv de andre taster på fjernbetjeningen for
at kende de funktioner, som Deres fjernbetjening
kan styre. Såfremt De mener, at visse taster ikke er
aktiveret, gentag denne programmeringsmetode for at
fi nde frem til en kode, der dækker alle funktionerne.
Metode D - Automatisk
søgning af en kode
Inden for rammerne af denne metode, viser
fjernbetjeningen den fuldstændige liste over koder ved
at sende et IR signal til apparatet som skal
fjernbetjenes. Gå således frem:
1. Kontroller at apparatet er tændt. Hvis ikke, tændes
det manuelt.
2. Hold SETUP-tasten inde, indtil den røde
indikatorlampe blinker og derefter lyser konstant. (Den
lyser i nogle sekunder, så du har tid til at udføre de
følgende trin. Kort før tiden er gået, blinker den igen,
hvorefter den slukkes.)
3. Slip tasten SETUP.
4. Tryk på tasten til det ønskede apparat (for eksempel
TV).
5. Tryk én gang på tasten PROG+ eller standby
G
eller
B
(DVD kun). Efter enkelte sekunder
begynder fjernbetjeningen at vise hele listen af
koder som er lagrede (ca. 1 pr. sekund). Tryk endnu
en gang på PROG+ for at mindske testens
hastighed (1 kode hvert 3 sekund). Når apparatet
skifter kanal, skal De straks trykke på OK for at
lagre koden og standse fremvisningen af listen.
Hvis De ikke har reageret hurtigt nok, er der
mulighed for at vende tilbage til den forrige kode
ved at trykke på PROG- eller
E
(DVD kun) så
mange gange som nødvendigt (De kan gå
fremad ved at trykke på
G
eller PROG+ eller
B
(DVD kun) hvis De er kommet for langt
tilbage). Når apparatet svarer påny, trykkes på
OK for at lagre koden.
Metode E – Programmering for at
betjene en COMBO (kombineret
TV/VCR,TV/DVD,VCR/DVD, osv.)
Afhængigt af kombinationsapparatets (TV/VCR,
VCR/DVD osv.) serie og fabrikat skal du enten indtaste
en enkelt kode til begge apparater eller to koder, dvs.
én kode for hvert apparat. Den separate liste
indeholder koderne.
Søg efter den underkode eller kode, der passer til det
apparat, som De ønsker at betjene (Eksempel: Fjernsyn
derefter videobåndoptager eller kombinationen
TV/VCR.), inden De begynder programmeringen. Find
den liste over underkoder eller koder, der følger med
denne brugsanvisning, frem.
1. Tænd for den COMBO, som De ønsker at betjene.
2. Hold SETUP-tasten inde, indtil den røde indikatorlampe
blinker og derefter lyser permanent.
3. Tryk på tasten til det første apparat, du vil betjene,
og følg derefter en af programmeringsmetoderne
A, B, C eller D som er beskrevet herover.
4. Gentag trin 2 og 3, hvis der skal bruges endnu en kode.
Søgning efter en allerede
programmeret kode
Du bliver muligvis nødt til at fi nde koden, der er
programmeret i fjernbetjeningen, igen.
1. Hold SETUP-tasten inde, indtil den røde
indikatorlampe blinker og derefter lyser permanent.
2. TV: Tv-apparat, DVD: Dvd-afspiller,
videobåndoptager, SAT: Satellitmodtager,
kabelmodtager, ADSL-boks, DVBT-modtager, ...
3. Tryk påny kort på tasten SETUP, det sidst valgte
mode blinker 1 gang.
4. Tryk på de numeriske taster i opadgående
rækkefølge (0 til 9) indtil det valgte mode blinker
en gang.
5. Cifret som har fået det valgte mode til at blinke, er
det første af fi re cifre som udgør Deres kode, det
noteres.
6. Gentag trin 4 for at fi nde de andre cifre i koden.
7. Når du har fundet det fjerde ciffer, slukkes den røde
indikatorlampe.
Kontrol af
programmeringen
- For et TV-apparat eller en satellitmodtager : tænd
for apparatet og tryk, for eksempel, på 2 for at
skifte kanal.
- For en videobåndoptager: Sæt et videobånd i og
tryk på B.
- For en DVD-afspiller: Sæt en DVD i og tryk på B.
Afprøv de andre taster på fjernbetjeningen for
at kende de funktioner, som Deres fjernbetjening
kan styre. Såfremt De mener, at visse taster ikke er
aktiveret, prøv da en anden programmeringsmetode,
metode B eller C.
Skriv koden til dit apparat ned, når du har
fundet den, så du straks kan fi nde den frem
ved behov.
Efter udskiftning af batterierne skal
fjernbetjeningen programmeres igen.
Metode B – Programmering
med 4-cifrede koder
Søg efter den kode, der passer til det apparat, som De
ønsker at betjene.
Se vedlagte liste, side II i listen over koder.
1. Tænd for det apparat, som De ønsker at betjene.
2. Hold SETUP-tasten inde, indtil den røde
indikatorlampe blinker og derefter lyser konstant.
(Den lyser i nogle sekunder, så du har tid til at
udføre de følgende trin. Kort før tiden er gået,
blinker den igen, hvorefter den slukkes.)
3. TV: Tv-apparat, DVD: Dvd-afspiller,
videobåndoptager, SAT: Satellitmodtager,
kabelmodtager, ADSL-boks, DVBT-modtager, ...
4. Indtast det første ciffer af den 4-cifrede kode, der
foreslås til det mærke apparat, som. De ønsker at
betjene (f. eks. 0036 for Thomson), mens
kontrollampen er tændt).
5. Ret fjernbetjeningen mod apparatet, og prøv at
slukke det med tasten G.
6. Gentag etape 3 hvis apparatet ikke slukker. Indtast
derefter den følgende 4-cifrede kode. Prøv at slukke
for apparatet ved at trykke en gang på tasten G.
Gentag proceduren med hver af de 4-cifrede
koder.
Kontrol af programmeringen:
Nu er Deres apparat i princippet klar til at modtage
ordrer fra fjernbetjeningen.
Kontroller programmeringen ved at udføre testen på
side 45.
TV-KODE DVD/SAT-KODE
Byta ut batterierna
Anvend to 1,5 volt-batterier af typen AAA.
1. Öppna luckan bak på fjärrkontrollen.
2. Ta ut de gamla batterierna.
2. Kontrollera +/– polerna på batterierna och var
+/– fi nns inuti facket.
3. Lägg i batterierna.
4. Stäng luckan.
Det kan bli nödvändigt att programmera om
fjärrkontrollen när batterierna byts. Det är därför
bra att spara koderna som man behöver för sina
apparater.
Förbrukade batterier ska inte kastas i hushållssoporna.
De ska istället lämnas till ett insamlingsställe för
batterier.
Andre funktioner
Indstilling af alle apparater på standby
Tryk to gange på tasten G inden for mindre end et
sekund, og bliv ved med at holde tasten inde anden
gang. Alle apparater går i standby, ét efter ét. (Det
betyder muligvis, at apparater, som allerede var sat på
standby, tændes igen.)
Indstilling af ALLE betjeningsknapper til
lydstyrken i en bestemt funktion
När ROC6309 levereras är den inställd så att
alla funktionslägen använder sina egna volym-
och ljudlösfunktioner, om aktuellt. Du kan tildele
reguleringen af lydstyrken til en af
fjernbetjeningens funktioner,hvis lydstyrkereguleringen
fi ndes på det pågældende apparat, f.eks. regulering af
lyden på tv-apparatet, når fjernbetjeningens TVfunktion
er aktiv osv.
1. Hold SETUP-tasten inde, indtil den røde
indikatorlampe blinker og derefter lyser permanent.
2. Slip tasten SETUP.
3. Tryk på tasten H , indtil den røde indikatorlampe
blinker én gang.
4. Tryk en gang på den funktionstast (TV, DVD, osv.),
der svarer til det apparat, som du vil regulere
lydstyrken for med tasterne VOL og H .
5. Tryk én gang på tasten H . Den røde
indikatorlampe slukkes.
6. Alla andra funktionslägen kommer nu att välja det
läge du valt för volym- och ljudlösinställningen.
Indstilling af betjening af lydstyrken for
HVER funktion.
Du kan bestemme, at reguleringen af lydstyrken virker
for hver af de valgte funktioner, hvis
lydstyrkereguleringen fi ndes på det pågældende
apparat, f.eks. regulering af lyden på fjernsynet, når
fjernbetjeningens TV-funktion er aktiv, regulering af
lyden på en STB-modtager, når SAT-funktionen er aktiv
osv.
1. Hold SETUP-tasten inde, indtil den røde
indikatorlampe blinker og derefter lyser permanent.
2. Slip tasten SETUP.
3. Tryk på tasten H , indtil den røde indikatorlampe
blinker én gang.
4. Tryk en gang på den funktionstast (TV, DVD, osv.),
der svarer til det apparat, som du vil regulere
lydstyrken for med tasterne VOL og H .
5. Tryk en gang på tasten VOL-.
6. Tryk én gang på tasten H . Den røde
indikatorlampe slukkes.
7. Den valda funktionslägesknappen kommer nu att
använda sina egna volym- och ljudlösfunktioner.
Återställa de universella volym/
ljudlösfunktionerna
Om du har ändrat de universella volym- och
ljudlösfunktionerna, som beskrevs i de föregående två
avsnitten, har du möjlighet att återställa funktionerna
till fabriksinställningarna:
1. Hold SETUP-tasten inde, indtil den røde
indikatorlampe blinker og derefter lyser permanent.
2. Släpp SETUP knappen
3. Tryk på tasten H , indtil den røde indikatorlampe
blinker én gang.
4. Tryk på tasten H , og slip den igen. Den
røde indikatorlampe slukkes helt. Lydstyrke-
og mute-funktionen er nu stillet tilbage til
fabriksindstillingerne.
00131872bda.indd Abs1:44-Abs1:4500131872bda.indd Abs1:44-Abs1:45 05.10.2009 9:33:30 Uhr05.10.2009 9:33:30 Uhr
La page est en cours de chargement...

48 49
SF
SF
Ohjelmoinnin
varmistus
- Kun kyseessä on televisio tai satelliittivastaanotin:
kytke laite päälle ja vaihda kanavaa esimerkiksi
painamalla 2.
- Kuvanauhurilla: vie sisään kasetti ja paina B.
- DVD-lukijalla: vie sisään levy ja paina B.
Kokeile toisia kauko-ohjaimen painikkeita saadaksesi
selville, mitä eri toimintoja sillä voi ohjata. Jos luulet,
että kaikki painikkeet eivät ole toiminnassa, yritä toista
ohjelmointitapaa, Menetelmällä B tai C .
Kun laitteen koodi on löytynyt, merkitse se
muistiin, jotta se löytyy tarvittaessa heti.
Paristojen vaihdon jälkeen kaukosäädin
on ohjelmoitava uudelleen.
TV-KOODI DVD/SAT-KOODI
Paristojen vaihtaminen
Vaihda molemmat 1,5 voltin AAA-paristot
1. Avaa kaukosäätimen takaosan kansi.
2. Poista vanhat paristot.
2. Tarkista +/--navat paristoista ja lokeron sisältä.
3. Isæt batterierne.
4. Sulje kansi.
Paristojen vaihdon yhteydessä voi olla syytä
ohjelmoida laite uudelleen. Siksi suosittelemme
laitteiden vaatimien koodien merkitsemistä muistiin.
Käytetyt paristot eivät ole talousjätettä. Paristot
tulee viedä erityiseen käytettyjen paristojen
keräyspisteeseen.
Muita toimintoja
Kaikkien laitteiden sammutus
Paina alle sekunnin kuluessa näppäintä G kahdesti,
ja pidä toisella kerralla näppäintä pohjassa. Kaikki
laitteet siirtyvät peräkkäin valmiustilaan. (Jos laitteet
ovat valmiiksi valmiustilassa, ne luonnollisesti
käynnistyvät.)
Yhteinen äänensäätö KAIKILLE laitteille
Toimitushetkellä ROC6309 on ohjelmoitu siten, että
kaikissa tiloissa käytetään omia äänenvoimakkuus- ja
mykistystoimintoja, jos sellaiset on olemassa.
Voit määritellä äänenvoimakkuuden säädön yhdelle
kaukosäätimen käyttötavalle sillä edellytyksellä, että
kyseisessä laitteessa on äänenvoimakkuuden säätö
(esim. TVvastaanottimen äänensäätö TV-käytössä,
kuvanauhurin äänensäätö jne.).
1. Pidä SETUP-näppäintä pohjassa, kunnes punainen
merkkivalo vilkkuu ja lopulta palaa yhtäjaksoisesti.
2. Päästä SETUP näppäin vapaaksi.
3. Paina näppäintä H , kunnes punainen merkkivalo
vilkahtaa kerran.
4. Paina kerran sitä laitetta vastaavaa
toimintatilanäppäintä (TV, DVD, …) jonka
voimakkuutta tällä hetkellä säädetään näppäimillä
VOL ja H .
5. Paina kerran näppäintä H . Punainen merkkivalo
sammuu.
6. Kaikissa muissa tiloissa siirrytään nyt valitsemaasi
äänenvoimakkuuden ja mykistyksen säätötilaan.
Erillinen äänensäätö KULLEKIN laitteelle
Voit määritellä, että äänenvoimakkuuden säätö toimii
kaikilla käyttötavoilla sillä edellytyksellä, että kyseisessä
laitteessa on äänenvoimakkuuden säätö (esim.
TVvastaanottimen äänensäätö TVkäytössä, sitten STB-
vastaanottimen äänensäätö satelliittikäytössä jne.).
1. Pidä SETUP-näppäintä pohjassa, kunnes punainen
merkkivalo vilkkuu ja lopulta palaa yhtäjaksoisesti.
palamaan jatkuvasti.
2. Päästä SETUP näppäin vapaaksi.
3. Paina näppäintä H , kunnes punainen merkkivalo
vilkahtaa kerran.
4. Paina kerran sitä laitetta vastaavaa
toimintatilanäppäintä (TV, DVD, …) jonka
voimakkuutta tällä hetkellä säädetään näppäimillä
VOL ja H .
5. Paina VOL- näppäintä kerran.
6. Paina kerran näppäintä H . Punainen merkkivalo
sammuu.
7. Valitulla mode-näppäimellä käytetään nyt sen omia
äänenvoimakkuus- ja mykistystoimintoja.
Yleisten äänenvoimakkuus-/
mykistystoimintojen palauttaminen
Jos olet muuttanut yleisiä äänenvoimakkuus- ja
mykistystoimintoja, jotka kuvattiin kahdessa edellisessä
jaksossa, voit palauttaa toimintojen tehdasasetukset:
1. Pidä SETUP-näppäintä pohjassa, kunnes punainen
merkkivalo vilkkuu ja lopulta palaa yhtäjaksoisesti.
2. Päästä SETUP-näppäin.
3. Paina näppäintä H , kunnes punainen merkkivalo
vilkahtaa kerran.
4. Paina näppäintä H , ja päästä näppäin vapaaksi.
Punainen merkkivalo sammuu kokonaan.
Äänenvoimakkuus- ja vaimennustoimintojen
tehdasasetukset on nyt palautettu.
00131872bda.indd Abs1:48-Abs1:4900131872bda.indd Abs1:48-Abs1:49 05.10.2009 9:33:30 Uhr05.10.2009 9:33:30 Uhr
-
 1
1
-
 2
2
-
 3
3
-
 4
4
-
 5
5
-
 6
6
-
 7
7
-
 8
8
-
 9
9
-
 10
10
-
 11
11
-
 12
12
-
 13
13
-
 14
14
-
 15
15
-
 16
16
-
 17
17
-
 18
18
-
 19
19
-
 20
20
-
 21
21
-
 22
22
-
 23
23
-
 24
24
-
 25
25
-
 26
26


Hama ROC2309 Le manuel du propriétaire
- Catégorie
- Télécommandes
- Taper
- Le manuel du propriétaire
dans d''autres langues
- italiano: Hama ROC2309 Manuale del proprietario
- English: Hama ROC2309 Owner's manual
- español: Hama ROC2309 El manual del propietario
- Deutsch: Hama ROC2309 Bedienungsanleitung
- русский: Hama ROC2309 Инструкция по применению
- Nederlands: Hama ROC2309 de handleiding
- português: Hama ROC2309 Manual do proprietário
- dansk: Hama ROC2309 Brugervejledning
- polski: Hama ROC2309 Instrukcja obsługi
- čeština: Hama ROC2309 Návod k obsluze
- svenska: Hama ROC2309 Bruksanvisning
- suomi: Hama ROC2309 Omistajan opas
Documents connexes
Autres documents
-
Thomson ROC6306 Le manuel du propriétaire
-
-
-
-
-
-
 Simplify QR-Code Guide de démarrage rapide
