HP LaserJet Enterprise 500 color MFP M575 Guide d'installation
- Taper
- Guide d'installation
La page charge ...

1
10% - 80%
15° - 27°C
(59° - 80.6°F)
EN
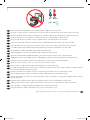
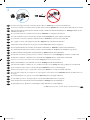
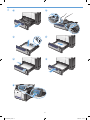
Select a sturdy, well-ventilated, dust-free area, away from direct sunlight to position the product.
FR
Choisissez un support solide et un endroit propre, bien aéré et à l'abri du rayonnement direct du soleil pour placer votre produit.
DE
Stellen Sie das Gerät an einem stabilen, gut durchlüfteten und staubfreien Ort auf, der nicht direktem Sonnenlicht ausgesetzt ist.
IT
Posizionare il prodotto in un'area piana, ben ventilata, priva di polvere e lontana dalla luce diretta del sole.
ES
Busque un lugar sólido, bien ventilado, sin polvo y alejado de la luz solar directa para colocar el producto.
CA
Seleccioneu una superfície sòlida, ben ventilada, sense pols i allunyada de la llum directa del sol per situar el producte.
CS
Pro umístění produktu vyberte stabilní, dobře větraný a bezprašný prostor mimo dosah přímého slunečního světla.
DA
Placer produktet i et stabilt, godt udluftet, støvfrit område uden direkte sollys.
NL
Plaats het apparaat op een stevige, goed geventileerde, stofvrije plek uit direct zonlicht.
FI
Sijoita laite tukevalle alustalle pölyttömään paikkaan, johon aurinko ei paista suoraan ja jossa on hyvä ilmanvaihto.
EL
Τοποθετήστε τη συσκευή σε ένα σταθερό σημείο, σε καλά αεριζόμενο χώρο χωρίς σκόνη και μακριά από το άμεσο ηλιακό φως.
Proizvod postavite na čvrstu površinu do koje ne dopire izravno sunčevo svjetlo u dobro prozračenom prostoru bez prašine.
HR
HU
A készüléket masszív, jól szellőző, pormentes helyen állítsa fel, és ne tegye ki közvetlen napfény hatásának.
KK
німді берік, жасы желдетілетін, шасыз, кн сулесі тікелей тспейтін жерге орнатыыз.
NO
Plasser produktet i et stabilt, støvfritt område med god ventilasjon og utenfor direkte sollys.
PL
Do umieszczenia produktu wybierz solidne, dobrze wentylowane i pozbawione kurzu miejsce, gdzie urządzenie nie będzie wystawione
na bezpośrednie działanie promieni słonecznych.
PT
Escolha um local firme, bem ventilado, sem poeira e longe da exposição direta à luz do sol para instalar o produto.
RO
Pentru a amplasa produsul, alegeţi un loc stabil, bine ventilat şi fără praf, ferit de lumina directă a soarelui.
RU
Выберите для установки устройства хорошо проветриваемое непыльное помещение и не допускайте попадания прямых солнечных
лучей на устройство.
SK
Produkt umiestnite na stabilnom, dobre vetranom a bezprašnom mieste, na ktoré nedopadá priame slnečné svetlo.
SL
Izdelek postavite na trdno površino v dobro prezračevanem in čistem prostoru, ki ni izpostavljen neposredni sončni svetlobi.
SV
Placera produkten i ett stadigt, välventilerat, dammfritt utrymme och fritt från direkt solljus.
Ürünü yerleştirmek için, sağlam, iyi havalanan, tozsuz ve güneş görmeyen bir yer seçin.
TR
AR
CD646-90966_N.indd 1 04/08/2012 14:31:07
2
La page charge ...
La page charge ...

4
EN
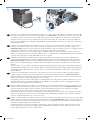
If you are connecting to a network, connect the network cable now. Caution! Do not connect the USB cable now.
FR
Si vous vous connectez à un réseau, branchez le câble réseau maintenant. Attention! Ne connectez pas le câble USB pour le moment.
DE
Wenn Sie das Gerät mit einem Netzwerk verbinden möchten, schließen Sie das Netzwerkkabel jetzt an. Achtung! Schließen Sie das
USB-Kabel nicht sofort an.
IT
Se ci si connette a una rete, connettere ora il cavo di rete. Attenzione: non collegare il cavo USB ora.
ES
Si se está conectando a una red, conecte ahora el cable de red. Precaución: No conecte todavía el cable USB.
CA
Si us connecteu a una xarxa, connecteu el cable de xarxa ara. Precaució: No connecteu ara el cable USB.
CS
Pokud budete produkt chtít připojit k síti, připojte síťový kabel. Pozor! Kabel USB nyní nepřipojujte.
DA
Hvis du opretter forbindelse til et netværk, skal du tilslutte netværkskablet nu. Advarsel! Du må ikke tilslutte USB-kablet nu.
NL
Als u verbinding wilt maken met een netwerk, sluit dan nu de netwerkkabel aan. Letop! Sluit de USB-kabel nu nog niet aan.
FI
Jos haluat muodostaa verkkoyhteyden, liitä verkkokaapeli nyt. Varoitus! Älä liitä vielä USB-kaapelia.
EL
Εάν πρόκειται να συνδέσετε τη συσκευή σε δίκτυο, συνδέστε το καλώδιο δικτύου τώρα. Προσοχή! Μην συνδέσετε το καλώδιο USB.
Ako se spajate na mrežu, sada priključite mrežni kabel. Oprez! Nemojte sad priključivati USB kabel.
HR
HU
Ha hálózathoz csatlakozik, csatlakoztassa most a hálózati kábelt. Figyelem! Még ne csatlakoztassa az USB-kábelt!
KK
Егер желіге осылсаыз, желілік кабельді азір жалаыз. Ескерту! USB кабелін азір жаламаыз.
NO
Koble til nettverkskabelen hvis du skal koble til et nettverk. Forsiktig! Ikke koble til USB-kabelen nå.
PL
Jeśli zamierzasz podłączyć urządzenie do sieci, podłącz teraz kabel sieciowy. Uwaga: Nie należy podłączać jeszcze kabla USB.
PT
Se for conectá-lo em rede, conecte o cabo de rede agora. Cuidado! Não conecte o cabo USB agora.
RO
Dacă sunteţi conectat la o reţea, conectaţi cablul de reţea acum. Atenţie! Nu conectaţi deocamdată cablul USB.
RU
Если устройство подключается к локальной сети, подсоедините сетевой кабель сейчас. Внимание! Подключать USB-кабель пока
не следует.
SK
Ak produkt zapájate do siete, pripojte sieťový kábel. Upozornenie! Teraz nepripájajte kábel USB.
SL
Če vzpostavljate povezavo z omrežjem, priključite omrežni kabel. Pozor! Kabla USB še ne priključite.
SV
Om du ansluter till ett nätverk ska du ansluta nätverkskabeln nu. Varning! Anslut inte USB-kabeln nu.
Bir ağa bağlanıyorsanız, ağ kablosunu şimdi bağlayın. Dikkat! USB kablosunu şimdi bağlamayın.
TR
AR
CD646-90966_N.indd 4 04/08/2012 14:31:10
5

5
1
2
3
4
EN
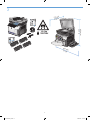
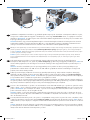
Connect the power cable between the product and a grounded ac outlet. Turn on the product. On the control panel, set the language,
the location, and the date/time. When the Home screen appears, touch Initial Setup, and enable basic product functions. NOTE: After
you install the software, more advanced setup is available by entering the product IP address in the address bar of a Web browser.
CAUTION: Make sure your power source is adequate for the product voltage rating. The voltage rating is on the product label. The
product uses either 100-127 Vac or 220-240 Vac and 50/60 Hz. To prevent damage to the product, use only the power cable that is
provided with the product.
FR
Connectez le cordon d'alimentation entre le produit et une prise secteur avec mise à la terre. Mettez le produit sous tension. Réglez
la langue, l'emplacement, la date et l'heure depuis le panneau de commande. Lorsque l'écran d'accueil s'affiche, appuyez sur
Configuration initiale et activez les fonctions de base du produit. REMARQUE : Après avoir installé le logiciel, une configuration avancée
supplémentaire est disponible en entrant l'adresse IP du produit dans la barre d'adresse du navigateur.
ATTENTION : Assurez-vous que votre source d'alimentation est adaptée à la tension nominale du produit. La tension nominale est
indiquée sur l'étiquette du produit. Le produit utilise 100-127 volts c.a. ou 220-240 volts c.a. et 50/60 Hz. Afin d'éviter d'endommager
le produit, utilisez uniquement le cordon d'alimentation fourni avec le produit.
DE
Verbinden Sie das Netzkabel mit dem Gerät und einer geerdeten Steckdose mit Wechselspannung. Schalten Sie das Gerät ein.
Legen Sie auf dem Bedienfeld Sprache, Standort und Datum/Uhrzeit fest. Wenn der Home-Bildschirm geöffnet wird, berühren Sie
Initialisierungseinrichtung, und aktivieren Sie die grundlegenden Gerätefunktionen. HINWEIS: Nachdem Sie die Software installiert
haben, können Sie weitere Einstellungen vornehmen, indem Sie die IP-Adresse des Produkts in die Adressleiste eines Webbrowsers
eingeben.
VORSICHT: Stellen Sie sicher, dass Ihre Stromquelle für die Betriebsspannung des Geräts geeignet ist. Die Betriebsspannung finden Sie
auf dem Geräteetikett. Das Gerät verwendet entweder 100 bis 127 Volt Wechselspannung oder 220 bis 240 Volt Wechselspannung
und 50/60 Hz. Um Schaden am Gerät zu vermeiden, sollten Sie ausschließlich das Netzkabel verwenden, das im Lieferumfang des
Geräts enthalten ist.
IT
Collegare il cavo di alimentazione del prodotto a una presa CA con messa a terra. Accendere il prodotto. Impostare la lingua, la
località, la data/l'ora nel pannello di controllo. Quando viene visualizzata la schermata iniziale, toccare
Impostazione iniziale e
abilitare le funzioni di base del prodotto. NOTA: dopo aver installato il software, è possibile impostare opzioni avanzate immettendo
l’indirizzo IP del prodotto nella barra degli indirizzi di un browser Web.
ATTENZIONE: accertarsi che la fonte di alimentazione sia adeguata alla tensione del prodotto. L'indicazione della tensione si trova
sull'etichetta del prodotto. Il prodotto utilizza 100-127 V CA o 220-240 V CA e 50/60 Hz. Per evitare di danneggiare il prodotto,
utilizzare solo il cavo di alimentazione fornito in dotazione.
ES
Conecte el cable de alimentación al producto y a un enchufe de CA con toma de tierra. Encienda el producto. En el panel de control,
establezca el idioma, la ubicación, y la fecha y la hora. Cuando aparezca la pantalla de inicio, toque Configuración inicial y active
las funciones básicas del producto. NOTA: Tras instalar el software hay disponibles más opciones de configuración avanzadas
introduciendo la dirección IP del producto en la barra de direcciones del navegador Web.
PRECAUCIÓN: Asegúrese de que la fuente de alimentación es adecuada para el voltaje del producto. La especificación del voltaje se
encuentra en la etiqueta del producto. El producto utiliza 100-127 VCA o 220-240 VCA y 50/60 Hz. Para evitar daños al producto,
utilice sólo el cable de alimentación que se proporciona con él.
CA
Endolleu el cable d’alimentació al producte i a una presa de CA connectada a terra. Engegueu el producte. Al tauler de control, definiu
l’idioma, la ubicació i la data i hora. Quan aparegui la pantalla d’inici, toqueu Configuració inicial i activeu les funcions bàsiques del
producte. NOTA: Un cop instal·lat el programari, hi haurà més opcions de configuració avançada disponibles si introduïu l’adreça IP
del producte a la barra d’adreces d’un navegador web.
PRECAUCIÓ: Assegureu-vos que la font d’energia és adequada per a la tensió nominal del producte. Trobareu la tensió nominal a
l’etiqueta del producte. El producte fa servir 100-127 VCA o 220-240 VCA i 50/60 Hz. Per evitar fer malbé el producte, feu servir
només el cable d’alimentació que s’inclou amb el producte.
CD646-90966_N.indd 5 04/08/2012 14:31:11
6
La page charge ...
La page charge ...
La page charge ...
La page charge ...

7
EN
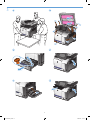
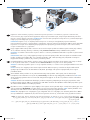
Mac: Connect the USB cable now.
Windows: Do not connect the USB cable until prompted during the software installation in the next step.
FR
Mac: Connectez le câble USB maintenant.
Windows: Ne branchez pas le câble USB tant que vous n'y êtes pas invité durant l'installation du logiciel à l'étape suivante.
DE
Mac: Schließen Sie das USB-Kabel jetzt an.
Windows: Schließen Sie das USB-Kabel erst an, wenn Sie während der Softwareinstallation im nächsten Schritt dazu aufgefordert
werden.
IT
Mac: collegare il cavo USB ora.
Windows: non collegare il cavo USB nché non viene richiesto durante l'installazione del software nel prossimo passaggio.
ES
Mac: Conecte ahora el cable USB.
Windows: No conecte el cable USB hasta que se le indique durante la instalación del software en el siguiente paso.
CA
Mac: Connecteu el cable USB ara.
Windows: No connecteu el cable USB ns que se us demani durant la instal·lació del programari al pas següent.
CS
Mac: Připojte kabel USB.
Windows: Nezapojujte kabel USB, dokud k tomu nebudete vyzváni v dalším kroku při instalaci softwaru.
DA
Mac: Tilslut USB-kablet nu.
Windows: Tilslut ikke USB-kablet, før du bliver bedt om det under softwareinstallationen i næste trin.
NL
Mac: Sluit de USB-kabel aan.
Windows: Sluit de USB-kabel pas aan wanneer hier tijdens de software-installatie in de volgende stap om wordt gevraagd.
FI
Mac: Liitä USB-kaapeli nyt.
Windows: Älä liitä USB-kaapelia, ennen kuin sinua pyydetään seuraavassa vaiheessa ohjelmiston asennuksen aikana tekemään niin.
EL
Mac: Συνδέστε το καλώδιο USB.
Windows: Μην συνδέσετε το καλώδιο USB μέχρι να εμφανιστεί η σχετική προτροπή κατά την εγκατάσταση του λογισμικού στο επόμενο
βήμα.
Mac: Sada priključite USB kabel.
Windows: Nemojte priključivati USB kabel dok vas se tijekom instalacije softvera ne uputi na idući korak.
HR
HU
Mac: Csatlakoztassa az USB-kábelt.
Windows: Ne csatlakoztassa az USB-kábelt addig, amíg a rendszer nem kéri erre a szoftvertelepítés következő lépésében.
CD646-90966_N.indd 10 04/08/2012 14:31:13
11
La page charge ...

8
EN
Install the product software from the CD. Follow the on-screen
instructions. For more product and problem-solving information
go to www.hp.com/support/ljcolorflowMFPM575
FR
Installez le logiciel produit depuis le CD. Suivez les instructions
affichées à l'écran. Pour obtenir davantage d'informations
sur le produit et la résolution des problèmes, rendez-vous sur
www.hp.com/support/ljcolorflowMFPM575
DE
Installieren Sie die Produktsoftware, die auf der CD enthalten
ist. Befolgen Sie dann die Anweisungen auf dem Bildschirm.
Wenn Sie weitere Informationen zum Produkt und zur
Problembehandlung wünschen, besuchen Sie folgende Seite:
www.hp.com/support/ljcolorflowMFPM575
IT
Installare il software del prodotto dal CD e seguire le
istruzioni visualizzate. Per ulteriori informazioni sui prodotti e
sulla risoluzione dei problemi, visitare il sito
Web www.hp.com/support/ljcolorflowMFPM575
ES
Instale el software del producto desde el CD. Siga las
instrucciones que aparecen en pantalla. Para obtener más
información sobre el producto y la solución de problemas,
visite www.hp.com/support/ljcolorflowMFPM575
CA
Instal·leu el programari del producte des del CD. Seguiu les
instruccions de la pantalla. Per obtenir més informació sobre
el producte i la solució de problemes
visiteu www.hp.com/support/ljcolorflowMFPM575
CS
Nainstalujte software produktu z disku CD. Postupujte
podle pokynů na obrazovce. Další informace o produktu a
informace o řešení problémů naleznete na webové adrese
www.hp.com/support/ljcolorflowMFPM575
.
DA
Installer produktsoftwaren fra cd’en. Følg vejledningen på
skærmen. Du kan få flere oplysninger om produktet
på www.hp.com/support/ljcolorflowMFPM575
NL
Installeer de productsoftware vanaf de cd. Volg de instructies
op het scherm op. Voor meer informatie over het apparaat of
het oplossen van problemen gaat u
naar www.hp.com/support/ljcolorflowMFPM575
FI
Asenna laitteen ohjelmisto CD-levyltä. Noudata näyttöön
tulevia ohjeita. Lisätietoja laitteesta ja vianmäärityksestä on
käyttöoppaassa ja
osoitteessa www.hp.com/support/ljcolorflowMFPM575
.
EL
Εγκαταστήστε το λογισμικό της συσκευής από το CD.
Ακολουθήστε τις οδηγίες που εμφανίζονται στην οθόνη. Για
περισσότερες πληροφορίες σχετικά με τη συσκευή και την
αντιμετώπιση προβλημάτων, επισκεφτείτε τη
διεύθυνση www.hp.com/support/ljcolorflowMFPM575
.
Instalirajte softver uređaja s CD-a. Slijedite upute na zaslonu.
Više informacija o proizvodu i rješavanju problema potražite
na www.hp.com/support/ljcolorflowMFPM575
HR
Telepítse a termékszoftvert a CD-ről. Kövesse a képernyőn
megjelenő utasításokat. A termékkel és a hibaelhárítással
kapcsolatos további információkért látogasson
el a www.hp.com/support/ljcolorflowMFPM575
címre.
HU
Бадарламалы ралды німні ышам дискісінен орнатыыз.
Экрандаы нсауларды орындаыз. нім мен мселелерді шешу
туралы осымша апарат алу шін,
www.hp.com/support/ljcolorflowMFPM575
торабына тііз.
KK
Installer produktprogramvaren fra CD-en. Følg instruksjonene
på skjermen. Hvis du vil ha mer informasjon om produkter og
problemløsing, kan du gå
til www.hp.com/support/ljcolorflowMFPM575
NO
Instalowanie oprogramowania urządzenia z dysku CD
administratora. Postępuj zgodnie z instrukcjami wyświetlanymi
na ekranie. Więcej informacji dotyczących produktu lub
rozwiązywania problemów znajduje się w Podręczniku
użytkownika lub pod adresem
www.hp.com/support/ljcolorflowMFPM575
PL
Instale o software do produto a partir do CD. Siga as
instruções na tela. Para mais informações sobre o produto e
como resolver problemas,
acesse www.hp.com/support/ljcolorflowMFPM575
PT
Instalaţi software-ul produsului de pe CD. Urmaţi instrucţiunile
de pe ecran. Pentru mai multe informaţii despre produs şi
despre rezolvarea problemelor,
accesaţi www.hp.com/support/ljcolorflowMFPM575
RO
Установите ПО устройства с компакт-диска. Следуйте
инструкциям на экране. Подробнее об устройстве и
способах устранения неполадок см. на
веб-сайте www.hp.com/support/ljcolorflowMFPM575
.
RU
Nainštalujte softvér produktu z disku CD. Postupujte podľa
pokynov na obrazovke. Ďalšie informácie o produkte a riešení
problémov nájdete na
lokalite www.hp.com/support/ljcolorflowMFPM575
SK
Namestite programsko opremo izdelka s CD-ja. Sledite
navodilom na zaslonu. Za več informacij o izdelku in
odpravljanju težav obiščite
www.hp.com/support/ljcolorflowMFPM575
SL
Installera programvaran från cd-skivan. Följ instruktionerna på
skärmen. Mer information om produkten och problemlösning
hittar du på
www.hp.com/support/ljcolorflowMFPM575
SV
CD'den ürün yazılımını yükleyin. Ekrandaki yönergeleri izleyin.
Ürünle veya sorun giderme ile ilgili daha fazla bilgi edinmek
için
www.hp.com/support/ljcolorflowMFPM575 adresini
ziyaret edin.
TR
www.hp.com/support/ljcolorflowMFPM575
AR
CD646-90966_N.indd 12 04/08/2012 14:31:14
13
La page charge ...
La page charge ...

Copyright and License
© 2012 Copyright Hewlett-Packard Development Company, L.P.
Reproduction, adaptation or translation without prior written
permission is prohibited, except as allowed under the copyright laws.
The information contained herein is subject to change without notice.
The only warranties for HP products and services are set forth in the
express warranty statements accompanying such products and
services. Nothing herein should be construed as constituting an
additional warranty. HP shall not be liable for technical or editorial
errors or omissions contained herein.
Part number: CD646-90966
Edition 1, 11/2012
FCC Regulations
This equipment has been tested and found to comply with the limits
for a Class A digital device, pursuant to Part 15 of the FCC rules.
These limits are designed to provide reasonable protection against
harmful interference in a residential installation. This equipment
generates, uses, and can radiate radio frequency energy, and if
not installed and used in accordance with the instruction manual,
may cause harmful interference to radio communications. Operation
of this equipment in a residential area is likely to cause harmful
interference in which case the user will be required to correct the
interference at his own expense.
NOTE: Any changes or modifications to the printer that are not
expressly approved by HP could void the user’s authority to operate
this equipment. Use of a shielded interface cable is required to
comply with the Class A limits of Part 15 of FCC rules.
Trademark Credits
Windows® is a U.S. registered trademark of Microsoft Corporation.
*CD646-90966*
*CD646-90966*
CD646-90966
www.hp.com
Copyright et licence
© 2012 Copyright Hewlett-Packard Development Company, L.P.
La reproduction, l'adaptation ou la traduction de ce document sans
l'autorisation écrite préalable de Hewlett-Packard est interdite, sauf
dans des conditions conformes aux lois relatives au copyright.
Les informations contenues dans ce document peuvent être modifiées
sans préavis.
Les seules garanties pour les produits et services HP sont décrites
dans les déclarations de garantie expresse qui accompagnent ces
produits et services. Les informations contenues dans ce document
ne constituent en aucun cas une garantie supplémentaire. HP n'est
pas responsable des erreurs d'ordre technique ou éditorial ou des
omissions contenues dans ce document.
Numéro de référence : CD646-90966
Edition 1, 11/2012
Réglementations de la FCC
Ce matériel a été testé et respecte les limitations concernant les
équipements numériques de classe A, conformément à l'article 15
de la réglementation FCC. Ces limites sont destinées à assurer une
protection suffisante contre les interférences produites dans une
installation résidentielle. Cet équipement génère, utilise et peut
émettre des fréquences radioélectriques. S'il n'est pas installé et
utilisé conformément au manuel d'instructions, il peut provoquer des
interférences préjudiciables aux communications radio. L'utilisation
de cet équipement dans une zone résidentielle peut provoquer des
interférences préjudiciables. Dans un tel cas, il incombe à l'utilisateur
de corriger ces interférences à ses propres frais.
REMARQUE : Toute modification apportée au produit sans le
consentement de HP peut se traduire par la révocation du droit
d'exploitation de l'équipement dont jouit l'utilisateur. Un câble
d'interface blindé est requis afin de satisfaire aux stipulations de
l'article 15 des réglementations de la FCC sur les appareils de
classe A.
Crédits concernant les marques
Windows® est une marque déposée aux Etats-Unis, appartenant à
Microsoft Corporation.
CD646-90966_N.indd 15 04/08/2012 14:31:14
-
 1
1
-
 2
2
-
 3
3
-
 4
4
-
 5
5
-
 6
6
-
 7
7
-
 8
8
-
 9
9
-
 10
10
-
 11
11
-
 12
12
-
 13
13
-
 14
14
-
 15
15
-
 16
16


HP LaserJet Enterprise 500 color MFP M575 Guide d'installation
- Taper
- Guide d'installation
dans d''autres langues
- italiano: HP LaserJet Enterprise 500 color MFP M575 Guida d'installazione
- English: HP LaserJet Enterprise 500 color MFP M575 Installation guide
- español: HP LaserJet Enterprise 500 color MFP M575 Guía de instalación
- Deutsch: HP LaserJet Enterprise 500 color MFP M575 Installationsanleitung
- русский: HP LaserJet Enterprise 500 color MFP M575 Инструкция по установке
- português: HP LaserJet Enterprise 500 color MFP M575 Guia de instalação
- slovenčina: HP LaserJet Enterprise 500 color MFP M575 Návod na inštaláciu
- polski: HP LaserJet Enterprise 500 color MFP M575 Instrukcja instalacji
- svenska: HP LaserJet Enterprise 500 color MFP M575 Installationsguide
- Türkçe: HP LaserJet Enterprise 500 color MFP M575 Yükleme Rehberi
- suomi: HP LaserJet Enterprise 500 color MFP M575 Asennusohje
- română: HP LaserJet Enterprise 500 color MFP M575 Ghid de instalare
Documents connexes
-
HP LaserJet Enterprise 500 color MFP M575 Guide d'installation
-
-
-
HP LaserJet Pro CP1525 Color Printer series Guide d'installation
-
-
-
-
-
HP COLOR LASERJET ENTERPRISE CM4540 Guide d'installation
-